Ford Torino Small Block Rack Kit Instructions
|
|
|
- Brianna Johns
- 6 years ago
- Views:
Transcription

1 Ford Torino Small Block Rack Kit Instructions Unisteer offers a limited warranty against all manufacturer defects of their kits and supplied parts. Unisteer will not honor any warranty on any parts that have been modified or improperly installed. Full refund will NOT be granted to any kits that are damaged, scratched, or altered in any fashion. Unisteer will not reimburse any labor money to the customer to change out the part even under a warranty repair. *USE ONLY POWER STEERING FLUID IN SYSTEM. DO NOT USE ATF. *ALTHOUGH THIS KIT IS FAIRLY SIMPLE TO INSTALL, SOME MODIFICATIONS MAYBE NECESSARY. *BEFORE STARTING INSTALLATION, PLEASE BE AWARE OF THE MODIFICATIONS THAT ARE NEEDED TO INSTALL. *DUE TO VARIABLES OUTSIDE OUR CONTROL THESE KITS MAY NOT FIT ALL APPLICATIONS. ALSO, PLEASE VERIFY KIT WILL FIT YOUR APPLICATION BEFORE ALTERING VEHICLE. Page

2 KIT CONTENTS: # Part Number Description Qty Inspected By Rack & Pinion Outer Ends Inner Ends Rack Install Kit /16-14 Lock Nut /8-16 Lock Nut /16 Flat Washer /16 Flat Washer /16-14 x 3 ½ Hex Bolt /8-16 x 3 ½ Hex Bolt /8-16 x 3 ¼ Hex Bolt Pump Kit C-5 Pump w/ Reservoir V-Belt Pulley Pump Mounting Bracket Pump Stabilizer Bracket Pump Install Kit /16 Flat Washer /16 Lock Washer /8 Stand Off Stand Off /16-18 x 5 ½ Hex Bolt #6 Hose #8 Hose Shaft Kit U-Joint 1 -Smooth x 9/16-30 (Column) U-Joint 17mm -DD x ¾ -DD (Pinion) Column Bushing DD Shaft Column Insert Shaft Install Kit ¼ -1 ½ Roll Pin /32 x 1 ½ Roll Pin ¼ Drill Bit Header / Exhaust Kit Hose Clamp Exhaust Wrap 10ft Header / Exhaust Kit Hose Clamp Exhaust Wrap 8ft Page


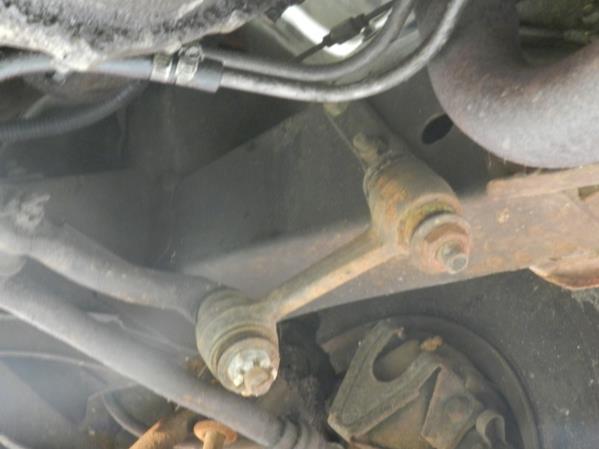
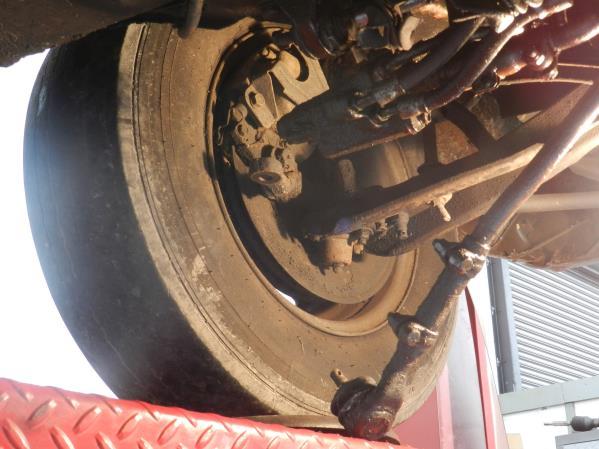
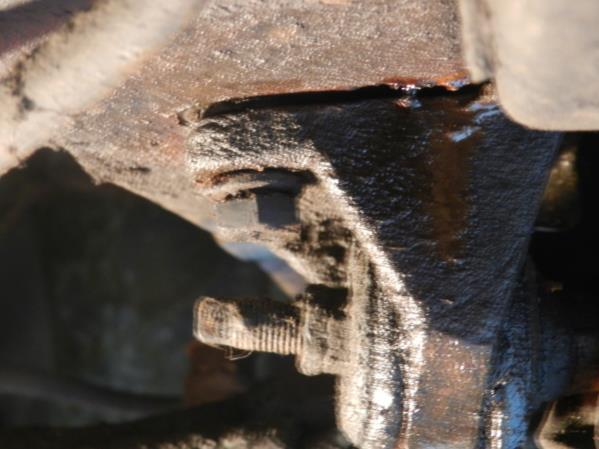
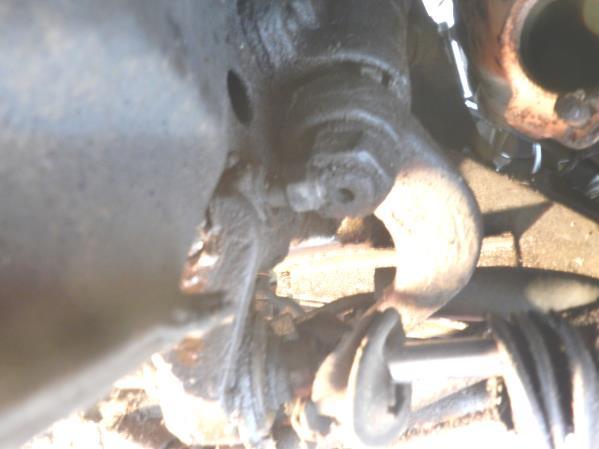
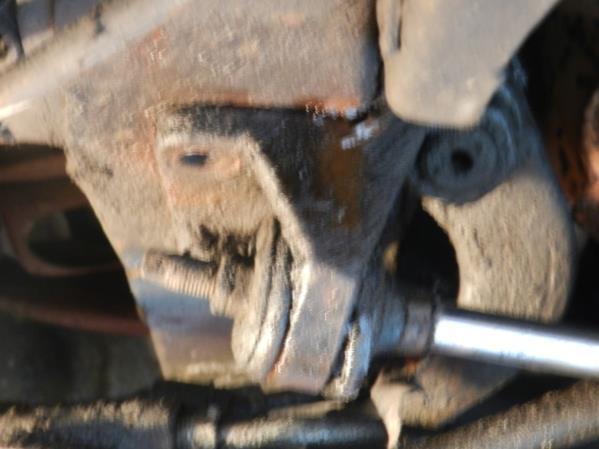
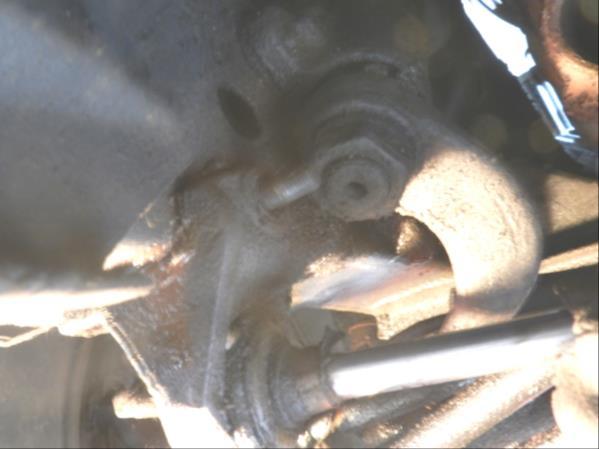
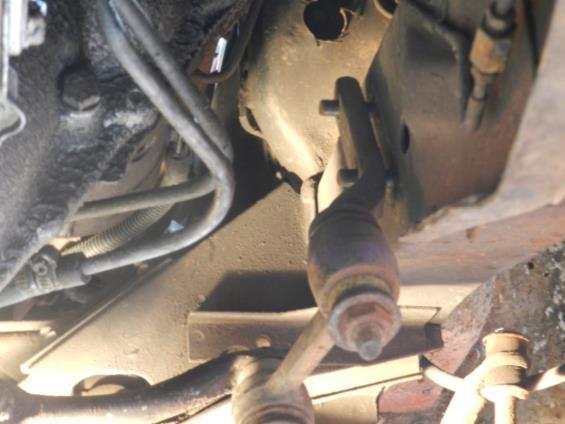
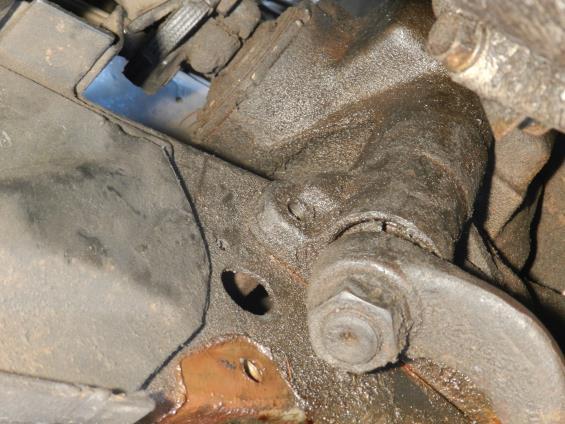
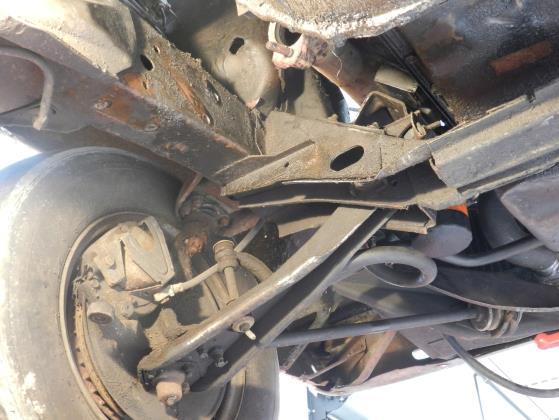
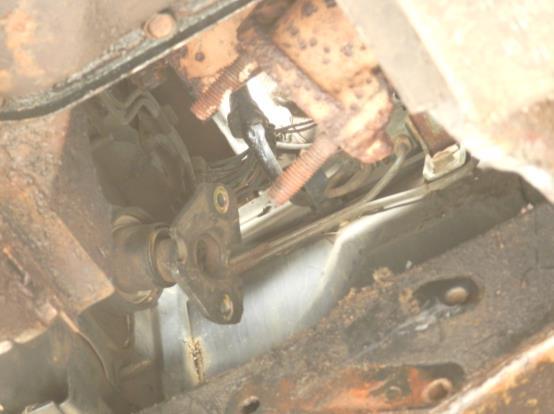
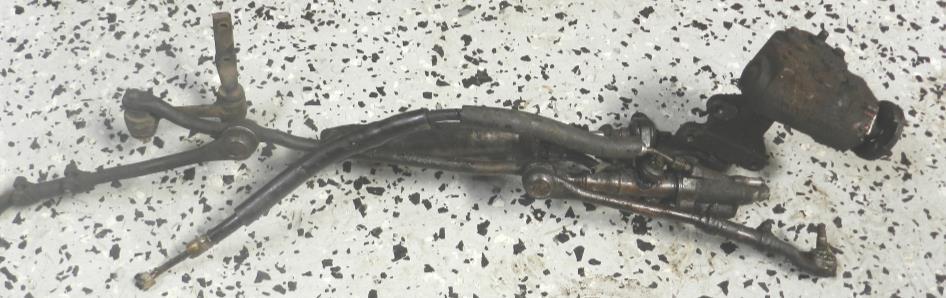
3 Disassembly The first step is to disassemble and remove the stock steering linkage, steering box and column. 1. Disconnect steering shaft from steering box at rag joint. Raise vehicle and support it on stands. 2. Remove the cotter pins and nuts from outer tie rod ends and remove tie rods from spindles. Disconnect the center link, power cylinder, idler arm, hoses, and steering box assembly from the frame and remove the entire old steering linkage system. Page


4 Page


5 Page


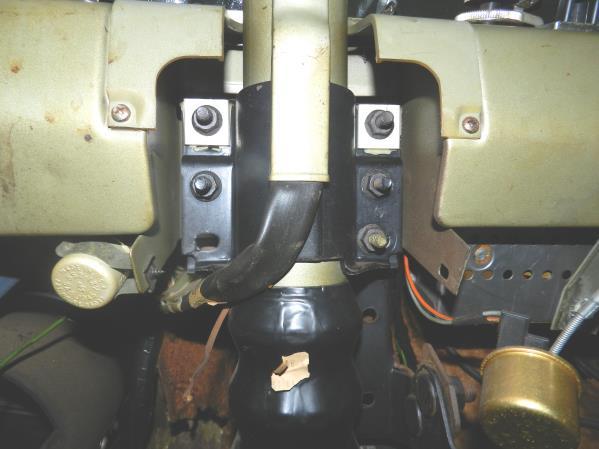
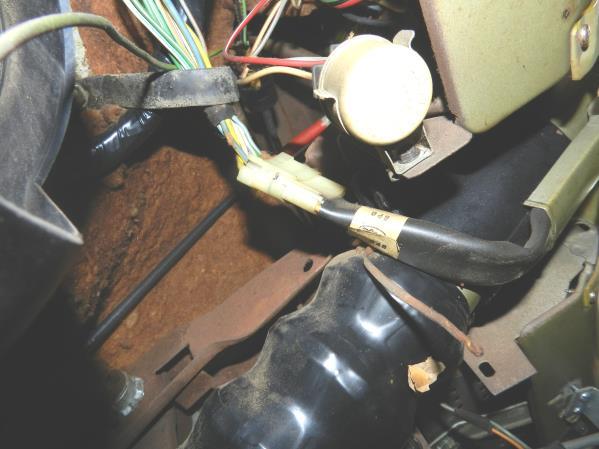
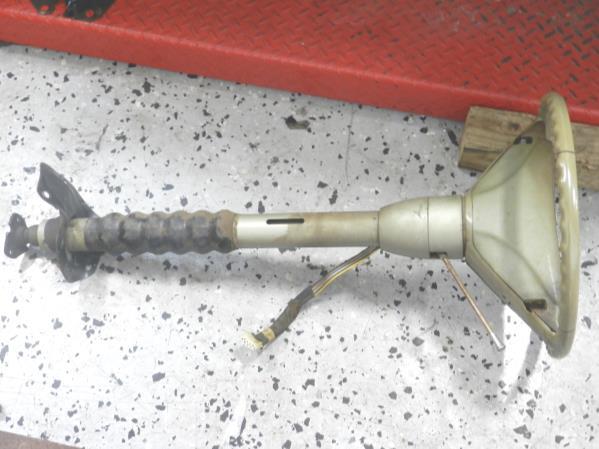
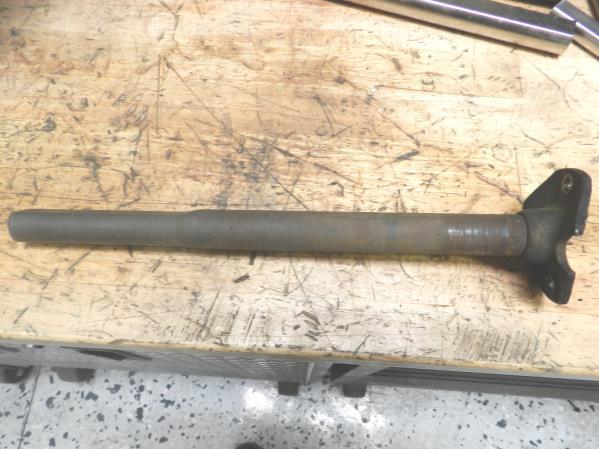
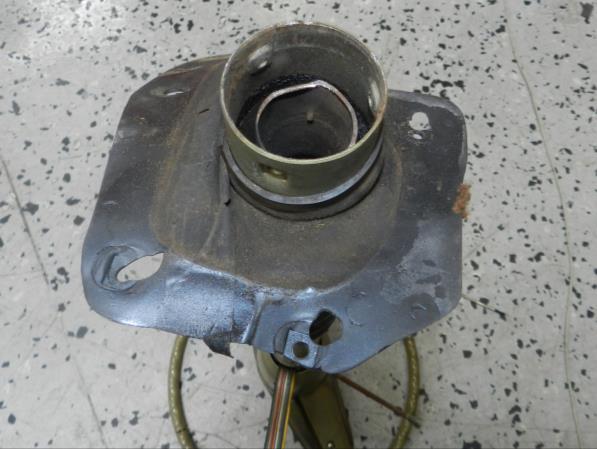
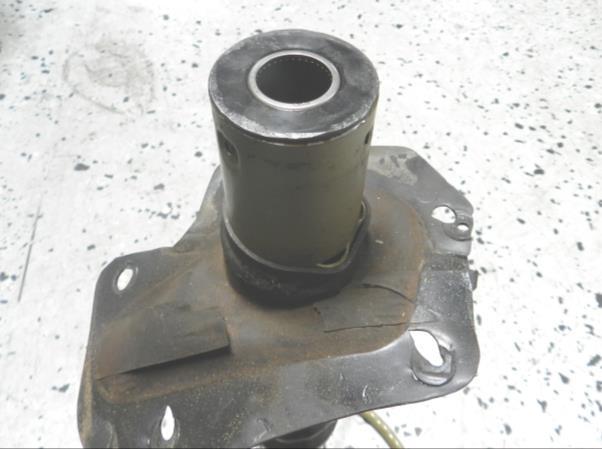
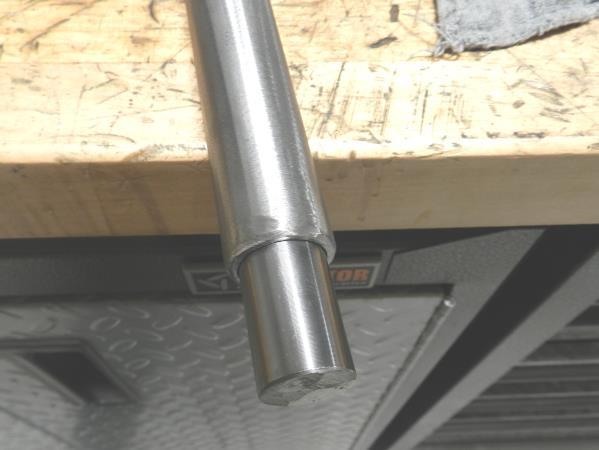
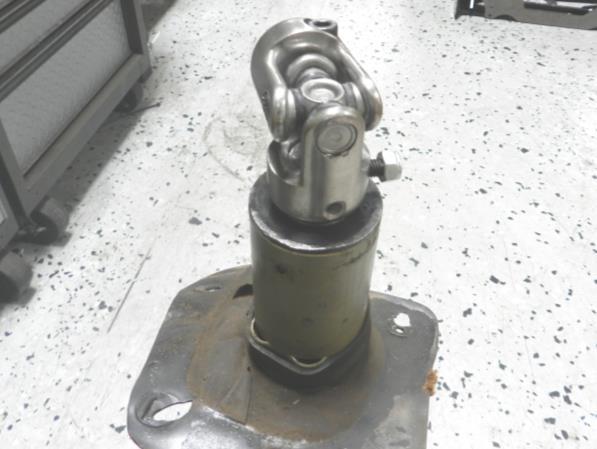
6 3. If equipped remove the power steering pump, brackets and lines. All the pieces removed will not be used. 4. You need to modify your stock column slightly. Remove the steering column by taking off the floor & dash mount and disconnecting the wiring harness. Do not remove the steering wheel. Pull out the end of the column shaft with the rag joint. Cut off the rag joint assembly at the end closest to the joint itself. Tap the inside column tube into the outer column tube far enough to tap the bearing in. Next install the supplied column tube bearing by tapping it in with a hammer. Then tap the column insert into the hallow shaft you just cut so you can line the u-joint yoke up flush with the end of the column shaft and insert to drill and pin in place. Next slide the brass washer up on the column shaft and u-joint. That is all that is needed for modification to the column. Page


7 Page


8 Page


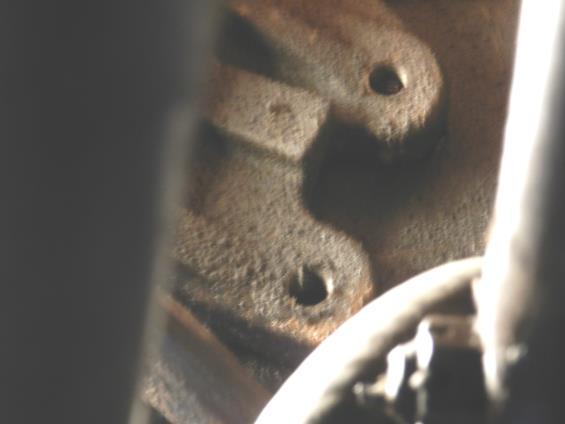
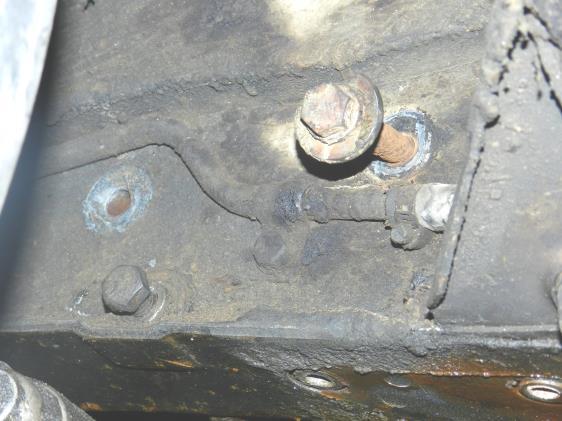
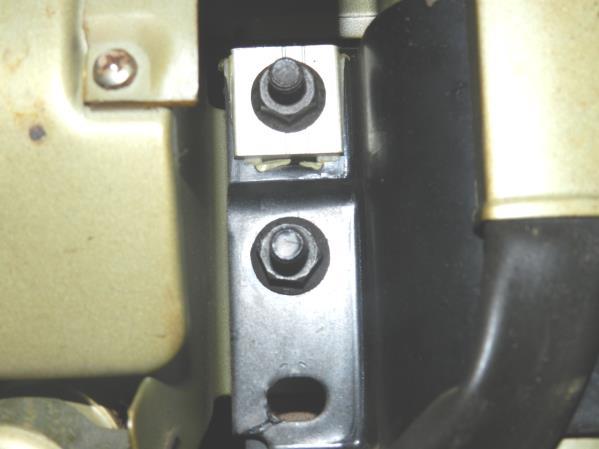
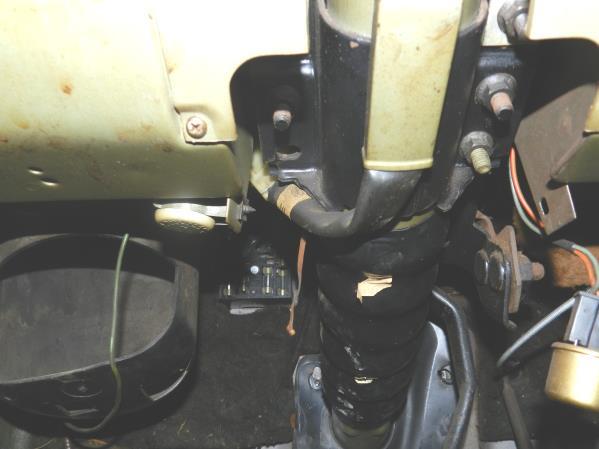
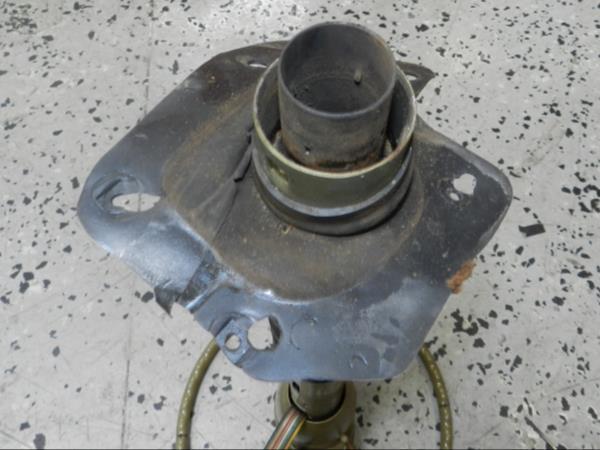
9 5. Once you have this done install the appropriate floor plate provided in your kit using the hardware provided. Slide the floor plate over the column tube with the clamp and install the column through the firewall and bolt back in place. Attach the new floor plate with supplied hardware and complete the installation using the factory dash mount. 6. Before installing the rack you must first install the headers if not done already. Whether your headers are installed or not at this time you must also wrap the area the rack boot will be near with heat insulation on the driver s side. There are two lengths of wrap provided. Use the longer length for the bottom set of tubes. 7. Your rack and pinion is centered before shipping and is marked. Make sure not to move it off center or loosen the mounting blocks on the gear itself. You will need to slide the entire rack assembly in the car from the passenger side to the driver s side. This allows you to go in-between the driver s side header. Line the mounting holes up on each side of the rack with the original steering box and idler arm holes on the frame. Then install hardware loosely to hold the rack in place. The lower driver s side mounting bolt will need the washer cut straight on one side. Copy the factory washer for this cut. Page


10 8. Once the rack is in place leave the bolts loose and install the shaft and u-joint from the rack and pinion to the steering column with the u-joint already on it. Slide the shaft onto the u-joint on the column and snug the pinch bolt. Run the shaft down to the rack, with the rack u-joint on the shaft, raise the rack into place to spline the lower joint to the pinion. NOTE: It is important that you phase the u-joint 90 degrees out or opposite of each other before you install and tighten. Also make sure that you center your steering wheel before sliding the u-joints together, but do not turn the rack out of center. Note: MAKE SURE YOUR RACK AND PINION IS CENTERED AND YOUR STEERING WHEEL IS RESONABLY STRAIGHT. Page


11 9. You can now torque the mounting bolts for your rack to 65 ft. lbs. Then torque the u-joint bolts to 40ft lbs. 10. Install the outer tie rod ends and tighten lock nut on steering arm to 45 ft. lbs. Adjust the toe by eye so you can drive to an alignment shop. This is done by turning the inner end. You do not have to take off outer end to adjust. Tighten jam nut once toe is set. Screw in Zerk fitting and grease. Page


12 11. The power steering pump is an easy install and comes with the pump brackets attached to it. If your car was equipped with power steering you will need to remove the stock pump and brackets that held it on the motor. Bolt on the pump using the provided hardware with the longer spacer on the lower bolt and the shorter spacer up top in-between the two mounting brackets. Measure the belt length and install belt. Tighten the hardware. 12. Now install the power steering hoses. Route hoses from the pump looped over and down to the front of the rack. Connect the hoses to the pump. They can only attach to the pump one way. Make sure the hoses are away from the headers. The smaller diameter hose is the pressure line and mounts to the lower larger port of the rack. The large diameter hose is the return line and mounts to the upper smaller port of the rack. Use the provided hydraulic stop leak on each side of all crush washers and tighten each banjo fitting. Once tight with the stop leak do not break loose. A leak free seal may not be created a second time with the crush washers on the banjo fittings. Page


13 13. When your lines are connected and all hardware is tight you may top off the fluid in the reservoir and start the car. Use only power steering fluid. DO NOT USE ATF. 14. Let the car idle and turn the wheels back and fourth slowly to remove air from the system. Start with small turns and gradually make your way out to full lock to lock turns. 15. Shut the car off and make sure you have no leaks and the level is full. 16. When your install is complete it will be necessary to have an alignment done. Page
67-70 Cougar Rack Kit Instructions # &
 67-70 Cougar Rack Kit Instructions # 8011950-01 & 8011940-01 Unisteer offers a limited warranty against all manufacturer defects of their kits and supplied parts. Unisteer will not honor any warranty on
Ford Full-Size Rack & Pinion Kit Instructions #
 1949-1951 Ford Full-Size Rack & Pinion Kit Instructions # 8011660 Unisteer offers a limited warranty against all manufacturer defects of their kits and supplied parts. Unisteer will not honor any warranty
Ford Fairlane Rack & Pinion Kit Instructions #
 1963-1965 Ford Fairlane Rack & Pinion Kit Instructions # 8011570 Unisteer offers a limited warranty against all manufacturer defects of their kits and supplied parts. Unisteer will not honor any warranty
60-72 Chevrolet C10 Power Rack & Pinion Kit Instructions # , , &
 60-72 Chevrolet C10 Power Rack & Pinion Kit Instructions # 8011740-01, 8011900-01, & 8011920-01 Unisteer offers a limited warranty against all manufacturer defects of their kits and supplied parts. Unisteer
G-Body Rack & Pinion Kit Instructions
 1977-82 G-Body Rack & Pinion Kit Instructions 8012400-01 Unisteer offers a limited warranty against all manufacturer defects of their kits and supplied parts. Unisteer will not honor any warranty on any
Part # Description Qty Inspected By Rack & Pinion Pump Kit Remote Reservoir Line Kit Shaft Kit
 58-62 Corvette Power Rack & Pinion Kit Instructions # 8011530 Unisteer offers a limited warranty against all manufacturer defects of their kits and supplied parts. Unisteer will not honor any warranty
TRANS-AM POWER RACK AND PINION INSTALLATION INSTRUCTION MANUAL
 1970-81 TRANS-AM POWER RACK AND PINION INSTALLATION INSTRUCTION MANUAL 8011160-01 & 8011110-01 Unisteer offers a limited warranty against all manufacturer defects of their kits and supplied parts. Unisteer
WHEEL DRIVE GM S-SERIES TRUCKS & SUV S ( 82-95) & ( 96-04) &
 & ( 96-04) &") 1982-2004 2-WHEEL DRIVE GM S-SERIES TRUCKS & SUV S ( 82-95) 8000990-01 & 8000990-02 ( 96-04) 8001020-01 & 8001020-02 Unisteer offers a limited warranty against all manufacturer defects of their kits and
1982-2004 2-WHEEL DRIVE GM S-SERIES TRUCKS & SUV S ( 82-95) 8000990-01 & 8000990-02 ( 96-04) 8001020-01 & 8001020-02 Unisteer offers a limited warranty against all manufacturer defects of their kits and
58-62 Corvette Manual Rack & Pinion Kit Instructions #
 58-62 Corvette Manual Rack & Pinion Kit Instructions # 8001550 Unisteer offers a limited warranty against all manufacturer defects of their kits and supplied parts. Unisteer will not honor any warranty
*USE ONLY POWER STEERING FLUID IN SYSTEM. DO NOT USE ATF. YOU MUST USE THE SUPPLIED HEADERS, MODIFY EXHAUST PIPES, AND WELD FLANGES.
 1949-1951 Ford Full-Size Rack & Pinion Kit Instructions # 8011660 Full refund will NOT be granted to any kits that are damaged, scratched, or altered in any fashion. *USE ONLY POWER STEERING FLUID IN SYSTEM.
67-69 Camaro / Nova Power Rack & Pinion # ,
 67-69 Camaro / 68-74 Nova Power Rack & Pinion # 8010540-01, 8010540-02 Unisteer offers a limited warranty against all manufacturer defects of their kits and supplied parts. Unisteer will not honor any
UNISTEER Performance Products
 UNISTEER Performance Products 1965-Early 1967 Manual Mustang Install Manual 8001110-01 & 8001120-01 *ALTHOUGH THIS KIT IS FAIRLY SIMPLE TO INSTALL, SOME MODIFICATIONS MAYBE NECESSARY. *BEFORE STARTING
&
 UNISTEER Performance Products 1968-72 CHEVROLET CHEVELLE POWER RACK AND PINION KIT INSTALLATION INSTRUCTION MANUAL 8010700-01 & 8010700-02 Thank you for purchasing Unisteer Performance Products for your
UNISTEER Performance Products
 UNISTEER Performance Products 1960-65 FALCON MANUAL RACK AND PINION INSTALLATION INSTRUCTION MANUAL 8001050-01 & 8001050-02 Thank you for purchasing Unisteer Performance Products for your 1960-65 Falcon/Comet.
58-62 Impala. Rack & Pinion Cradle Kit
 58-62 Impala Rack & Pinion Cradle Kit 58-62 Impala Note: For safety disconnect battery cables and ensure that the vehicle is properly supported by jack stands. Before painting or powder coating of the
73-87 Chevy C-10 Rack and Pinion Conversion Kit
 73-87 Chevy C-10 Rack and Pinion Conversion Kit For safety, disconnect battery cables and ensure that vehicle is properly supported by jack stands. NOTE: Power Steering Line Kit (FR1610) is sold separately
64-67 Chevelle. Power Rack & Pinion Cradle Kit
 64-67 Chevelle Power Rack & Pinion Cradle Kit 64-67 Chevelle Note: For safety disconnect battery cables and ensure that the vehicle is properly supported by jack stands. Before painting or powder coating
,
 UNISTEER Performance Products 67-69 Camaro/ 68-74Nova Power Rack & Pinion 8010540-01, 8010540-02 (OPTIONAL -02 CHROME KIT SHOWN ABOVE) ALTHOUGH THIS KIT IS FAIRLY SIMPLE TO INSTALL SOME MODIFICATIONS ARE
Polaris General 60 Rackzilla Instructions
 Polaris General 60 Rackzilla Instructions Kit Numbers: 8002200 Wicked Bilt offers a limited warranty against all manufacturer defects of their kits and supplied parts. Wicked Bilt will not honor any warranty
Flaming River Ind. 800 Poertner Dr Berea, OH Impala Rack and Pinion Conversion Kit
 Flaming River Ind. 800 Poertner Dr Berea, OH 44017 800-648-8022 58-64 Impala Rack and Pinion Conversion Kit For safety, disconnect battery cables and ensure that vehicle is properly supported by jack stands.
Flaming River Ind. 800 Poertner Dr Berea, OH Chevy C-10 Rack and Pinion Conversion Kit
 Flaming River Ind. 800 Poertner Dr Berea, OH 44017 800-648-8022 67-72 Chevy C-10 Rack and Pinion Conversion Kit For safety, disconnect battery cables and ensure that vehicle is properly supported by jack
Flaming River Ind. 800 Poertner Dr Berea, OH Camaro Rack and Pinion Conversion Kit
 Flaming River Ind. 800 Poertner Dr Berea, OH 44017 800-648-8022 67-69 Camaro Rack and Pinion Conversion Kit For safety, disconnect battery cables and ensure that vehicle is properly supported by jack stands.
65-70 Mustang. Rack and Pinion Conversion Kit
 65-70 Mustang Rack and Pinion Conversion Kit Mustang Rack & Pinion System Note: For safety, disconnect battery cables and ensure that the vehicle is properly supported by jack stands. Before painting or
Flaming River Ind. 800 Poertner Dr Berea, OH Mustang Rack and Pinion Conversion Kit
 Flaming River Ind. 800 Poertner Dr Berea, OH 44017 800-648-8022 65-70 Mustang Rack and Pinion Conversion Kit Mustang Rack & Pinion System Note: For safety, disconnect battery cables and ensure that the
Flaming River Ind. 800 Poertner Dr Berea, OH Chevelle/ El Camino Rack and Pinion Conversion Kit
 Flaming River Ind. 800 Poertner Dr Berea, OH 44017 800-648-8022 64-67 Chevelle/ El Camino Rack and Pinion Conversion Kit For safety, disconnect battery cables and ensure that vehicle is properly supported
68-72 Chevelle/El Camino. Rack and Pinion Conversion Kit
 68-72 Chevelle/El Camino Rack and Pinion Conversion Kit For safety, disconnect battery cables and ensure that vehicle is properly supported by jack stands. NOTE: Hoses (FR16) Pump Mounting Brackets (FR1612
Flaming River Ind. 800 Poertner Dr Berea, OH Chevelle/El Camino Rack and Pinion Conversion Kit
 Flaming River Ind. 800 Poertner Dr Berea, OH 44017 800-648-8022 68-72 Chevelle/El Camino Rack and Pinion Conversion Kit For safety, disconnect battery cables and ensure that vehicle is properly supported
Flaming River Ind. 800 Poertner Dr Berea, OH Impala/Caprice Rack and Pinion Conversion Kit
 Flaming River Ind. 800 Poertner Dr Berea, OH 44017 800-648-8022 65-66 Impala/Caprice Rack and Pinion Conversion Kit For safety, disconnect battery cables and ensure that vehicle is properly supported by
RHINO SUSPENSION SYSTEM INSTALLATION INSTRUCTIONS
 PARTS INCLUDED: 2 FRONT UPPER A-ARMS 2 FRONT LOWER A-ARMS 2 UNI-BALL JOINTS 2 UNI-BALL JOINT STUDS 2 UNI-BALL JOINT CAPS 2 RETAINING RINGS 1 FRONT SHOCK ASSEM. 2 DELRON STEERING STOPS 2 SHOCK MOUNT SPACERS
Flaming River Ind. 800 Poertner Dr Berea, OH Comet/Falcon Rack and Pinion Conversion Kit
 Flaming River Ind. 800 Poertner Dr Berea, OH 44017 800-648-8022 60-65 Comet/Falcon Rack and Pinion Conversion Kit For safety, disconnect battery cables and ensure that vehicle is properly supported by
Alignment Spec. Power Rack & Pinion: 5 degrees positive Camber 0 degrees Toe-In 1/32
 333-TCIE237 1967-1969 Chevy Camaro Front Suspension 1968-1972 Chevy Nova Front Suspension 1967-1969 Pontiac Firebird Front Suspension 1-800-984-6259 www.totalcostinvolved.com 1967-1969 Chevy Camaro Front
Retrofit Steering Column
 Retrofit Steering Column INSTALLATION INSTRUCTIONS for 1965 Ford Falcon FOR PART NUMBER S: 1170906010, 1170906020, 1170906051, 1130906010, 1130906020, 1130906051 S INCE 1986 www.ididitinc.com 610 S. Maumee
INDEX. NOTE: Part number ES381RL Camaro Outer Tie Rod Ends must be used with this rack and pinion kit.
 INDEX NOTE: Before beginning you must first measure the width of your front end from LEFT outer tie rod end zirc to the RIGHT outer tie rod end zirc to determine the overall width of your front end. Write
Installation Notes: #86000-R Race Series +3.5 L/T Kit
 159 North Maple St. Unit J, CORONA CA 92880 P. 951-737-9682 F. 951-737-9006 WWW.CHAOSFAB.COM Installation Notes: #86000-R Race Series +3.5 L/T Kit Factory manual is recommended for removal and re-installation
POWER RACK AND PINION STEERING INSTALLATION
 by Randy Irwin 1955-57 POWER RACK AND PINION STEERING INSTALLATION Randy Irwin - Technical Writer Randy has been involved in the Chevy parts business for over 25 years. He is a wizard at creating, making
Complete Front End Suspension Rebuild, Ñ Part 1, Tear Down
 Complete Front End Suspension Rebuild, 1955-57Ñ Part 1, Tear Down by Randy Irwin There is much more to performance than pure horsepower. Great performance comes from control and Classic Chevy InternationalÕs
60-65 Falcon, Comet & Ranchero Coil Spring IFS
 60-65 Falcon, 62-65 Comet & 62-65 Ranchero Coil Spring IFS All engine installations with this front end will require a rear sump oil pan. 289-302 Small Block Ford Motors Milodon rear sump pan holds 7 quarts
Flaming River Ind. 800 Poertner Dr Berea, OH Thunderbird Rack and Pinion Conversion Kit
 Flaming River Ind. 800 Poertner Dr Berea, OH 44017 800-648-8022 55-57 Thunderbird Rack and Pinion Conversion Kit Thunderbird Rack & Pinion System Note: For safety, disconnect battery cables and ensure
Steering Column to Steering Box. Installation Instructions. for Tri-Five Chevrolets. Right Hand Drive Steering Column. Instruction #
 Steering Column to Steering Box Installation Instructions for Tri-Five Chevrolets Right Hand Drive Steering Column Instruction # 8000000001 Thank you for purchasing the Tri-Five Chevy column from ididit.
INSTRUCTION S G-Comp Front Suspension: Chevy Nova Speedway Motors, Inc. 2017
 INSTRUCTION S 350-100 G-Comp Front Suspension: 62-67 Chevy Nova Speedway Motors, Inc. 2017 Kit Contents: 91035700 G-Comp Bare Subframe 350101 G-Comp Support Tubes 91035702 G-Comp Front Subframe Hardware
Installation Instructions
 Retrofit Steering Column Installation Instructions Second Series 1955-59 Chevy Trucks For # s 1120652010, 1120652020, 1120652051, 1140652010, 1140652020, 1140652051 www.ididitinc.com 610 S. Maumee St.,
'99-03 CHEVROLET/GMC IFS 4WD 6" SUSPENSION SYSTEM P/N INSTALLATION INSTRUCTIONS
 1/16/04 '99-03 CHEVROLET/GMC IFS 4WD 6" SUSPENSION SYSTEM P/N. 10-41099 INSTALLATION INSTRUCTIONS NOTE: Each Lift Kit and options to Lift Kits are packaged separately. Therefore, installation procedures
Steeroids Installa on Instruc ons Part Number(s): Mustang
: Mustang") Parts and finishes may vary from those shown. 1 PRESSURE HOSE 1 PASSENGER S BRACKET 1 RETURN HOSE FASTENERS Part Number(s): 84510-84569 1965-1970 Mustang 1 RACK AND PINION WITH 2 CLAMPS 1 TIE ROD BRACKET
Parts and finishes may vary from those shown. 1 PRESSURE HOSE 1 PASSENGER S BRACKET 1 RETURN HOSE FASTENERS Part Number(s): 84510-84569 1965-1970 Mustang 1 RACK AND PINION WITH 2 CLAMPS 1 TIE ROD BRACKET
Steeroids Installa on Instruc ons Part Number(s): Corve e
: Corve e") Steeroids Installa on Instruc ons Part Number(s): 83800-84095 1953-1962 Corve e SpeedDirect 1901 S FM 129 Santo, TX 76472 www.speeddirect.com sales@speeddirect.com (888) 425-2776 STEERING COLUMN FASTENERS
Steeroids Installa on Instruc ons Part Number(s): 83800-84095 1953-1962 Corve e SpeedDirect 1901 S FM 129 Santo, TX 76472 www.speeddirect.com sales@speeddirect.com (888) 425-2776 STEERING COLUMN FASTENERS
CALIFORNIA TRIMMER MOWER MAINTENANCE MANUAL
 CALIFORNIA TRIMMER MOWER MAINTENANCE MANUAL 2 Table of Contents Section 1: General Information Page Handle Assembly Instructions 4 Maintenance All Models 6 Oil Change Procedures All Models 9 Height Adjustment
Cable Shift Linkage Kit
 Cable Shift Linkage Kit INSTALLATION INSTRUCTIONS ididit column to GM Trans FOR PART NUMBER S: 2801000010, 2802000010 ididit Column to 350 Trans...Pg 1-4 ididit Column to 400 Trans...Pg 5-8 ididit Column
Chevy Nova Pro-Touring Front Suspension Installation Instructions
 1962-1967 Chevy Nova Pro-Touring Front Suspension Installation Instructions 1-800-984-6259 www.totalcostinvolved.com 1 Pro-Touring Clip A-Arm Assembly Sway Bar Assembly Fender Panel Kit 8 7/16-20 * 1 ¼
Steeroids INSTALLATION INSTRUCTIONS
 Verify Kit Contents: 1 RACK AND PINION WITH 2 RUBBER RACK BUSHINGS 2 RACK MOUNTING CLAMPS 2 TIE ROD ENDS W/ TAPERED STUDS 3 ROD ENDS (INCL. SUPPORT BEARING) 2 ALUMINUM TIE ROD SLEEVES 1 U-JOINT, 3/4 36
INSTALLATION INSTRUCTIONS MKIV Toyota Supra Manual Rack Conversion
 INSTALLATION INSTRUCTIONS MKIV Toyota Supra Manual Rack Conversion 1 Removal of Stock Rack 1.1 With your steering wheel centered, remove the pinch bolt from the factory intermediate shaft. This is located
CHECK ALL PARTS INCLUDED IN THIS KIT TO THE PARTS LIST BEFORE INSTALLATION. IF ANY PIECES ARE MISSING, PLEASE CONTACT: TOTAL COST INVOLVED
 333-TCIE237 1967-1969 Chevy Camaro Front End, 1968-1972 Chevy Nova Front End 1967-1969 Pontiac Firebird Front End Suspension Installation Instructions 1-855-693-1259 www.totalcostinvolved.com CHECK ALL
GENESIS COUPE(BK) > 2010 > G 3.8 DOHC > Steering System
 > 2010 > G 3.8 DOHC > Steering System") GENESIS COUPE(BK) > 2010 > G 3.8 DOHC > Steering System Steering System > General Information > Specifications Specifications Steering gear Oil pump Steering angle Power steering oil Item Specification
GENESIS COUPE(BK) > 2010 > G 3.8 DOHC > Steering System Steering System > General Information > Specifications Specifications Steering gear Oil pump Steering angle Power steering oil Item Specification
Next, chase the threads in the lower A-arm mounts with the 5/8-18 tap and blowout any remaining particles.
 Next, chase the threads in the lower A-arm mounts with the 5/8-18 tap and blowout any remaining particles. Now, apply some anti-seize to the threads of the pivot stud. Also put anti-seize inside the bore
ALL AMERICAN BILLET. Front Drive System - Small Block Ford Installation Instructions
 ALL AMERICAN BILLET Front Drive System - Small Block Ford Installation Instructions Small Block Ford with AC & PS All American Billet Store (800) 764-0926 www.allamericanbilletstore.com Items needed for
'88-'00 CHEVROLET/GMC IFS 4WD(8LUG) OLD BODY STYLE 6" SUSPENSION SYSTEM P/N
 OLD BODY STYLE 6 SUSPENSION SYSTEM P/N") 4/10/13 '88-'00 CHEVROLET/GMC IFS 4WD(8LUG) OLD BODY STYLE 6" SUSPENSION SYSTEM P/N. 10-41888 INSTALLATION INSTRUCTIONS APPLICATION WARNING: Applicable for hub mounted ABS sensor models only. Not for 1992-94
4/10/13 '88-'00 CHEVROLET/GMC IFS 4WD(8LUG) OLD BODY STYLE 6" SUSPENSION SYSTEM P/N. 10-41888 INSTALLATION INSTRUCTIONS APPLICATION WARNING: Applicable for hub mounted ABS sensor models only. Not for 1992-94
INSTRUCTION S G-Comp Front Suspension: Chevy Camaro Speedway Motors, Inc Kit Contents:
 INSTRUCTION S 350-500 G-Comp Front Suspension: 70-81 Chevy Camaro Speedway Motors, Inc. 2017 Kit Contents: 350500.1 G-Comp Subframe, Camaro 350500.2 G-Comp Sway Bar Kit, Camaro 350500.3 Hardware Kit, G-Comp
INSTALLATION GUIDE TCP RCKM-01
 READ ALL INSTRUCTIONS COMPLETELY AND THOROUGHLY UNDERSTAND THEM BEFORE DOING ANYTHING. CALL TOTAL CONTROL PRODUCTS TECH SUPPORT (916) 388-0288 IF YOU NEED ASSISTANCE. INSTALLATION GUIDE TCP RCKM-01 Manual
Cable Shift Linkage Kit
 Cable Shift Linkage Kit INSTALLATION INSTRUCTIONS Ford column to Ford 4R70W/AODE Trans FOR PART NUMBER S: 2802650010 S INCE 1986 www.ididitinc.com 610 S. Maumee St., Tecumseh, MI 49286 PH: (517) 424-0577
USE THE PARTS LIST BELOW TO MAKE SURE YOUR KIT IS COMPLETE BEFORE INSTALLATION. IF ANY PIECES ARE MISSING, PLEASE CONTACT:
 1962-1967 Chevy Nova Pro-Touring Front Suspension Installation Instructions Tech line: 1-855-693-1259 www.totalcostinvolved.com Read and understand these instructions before starting any work! USE THE
Part # Chevy Level 2 CoilOver Suspension Package Two Piece Frame
 350 S. St. Charles St. Jasper, In. 47546 Ph. 812.482.2932 Fax 812.634.6632 www.ridetech.com Part # 11030210 55-57 Chevy Level 2 CoilOver Suspension Package Two Piece Frame Front Components: 1 11013510
Installation Instructions for Mustangs
 Retrofit Steering Column Installation Instructions for 1968-69 Mustangs For # s 1300644010, 1300644020, 1300644051, 1300645010, 1300645020, 1300645051, 1300646010, 1300646020, 1300646051 1300647010, 1300647020,
2. Remove front wheels.
 1 PARTS DIAGRAM 2 Installation Instructions: (PASSENGER SIDE) 1. Place jack under center of RUV front end and lift until front wheels clear the ground. Be careful to support the RUV properly so that it
SECTION 6C POWER STEERING GEAR TABLE OF CONTENTS
 SECTION 6C POWER STEERING GEAR TABLE OF CONTENTS Description and Operation... 6C2 Power Rack and Pinion... 6C2 Component Locator... 6C3 Diagnostic Information and Procedures... 6C4 Power Steering Rack
INSTALLATION INSTRUCTIONS. FD3S RX7 Manual Rack Conversion
 INSTALLATION INSTRUCTIONS FD3S RX7 Manual Rack Conversion 1 Removal of Stock Rack 1.1 With your steering wheel centered, remove the pinch bolt from the factory intermediate shaft lower knuckle. If you
Steeroids INSTALLATION INSTRUCTIONS Camaro, Nova
 Doc #780-65547 Rev 11.2012 Steeroids INSTALLATION INSTRUCTIONS 1967-1969 Camaro, 1968-1974 va 1 PRESSURE HOSE 1 RETURN HOSE 2 ROD ENDS W/ STUDS 1 RACK AND PINION 1 ADAPTER BRACKET FASTENERS U-JOINT ASSEMBLY
PRE-INSTALLATION. INSTALLATION INSTRUCTIONS Front Ford F150 4WD 4" Suspension Lift Kit
 2015 Ford F150 4WD 4" Suspension Lift Kit PRE-INSTALLATION 2 - Knuckle (Driv/Pass) 2 - Crossmember (Front/Rear) 2 - Differential Bracket (Driv/Pass) 1 - Diff. Brace Bracket (Pass) 2 - Front Brake Line
INSTALLATION INSTRUCTIONS 64 ½ - 70 SUPERRIDE II INDEPENDENT FRONT SUSPENSION BX-350 FOR COYOTE AND MOD ENGINES
 INSTALLATION INSTRUCTIONS 64 ½ - 70 SUPERRIDE II INDEPENDENT FRONT SUSPENSION BX-350 FOR COYOTE AND MOD ENGINES Please read these instructions completely before starting your installation. Assemble suspension
DISC BRAKE/DUAL MASTER CYLINDER CONVERSION. Tools, Equipment and Supplies Needed:
 Please take the time to read the enclosed instructions carefully. If you have any questions, call our Product Assistance personnel for clarification. It is important to note that these instructions contain
PARTS LIST: VIEWPOINT RUNNING BOARD NISSAN MURANO EXCLUDES 2dr CROSSCABRIOLET CONVERTIBLE
 PARTS LIST: VIEWPOINT RUNNING BOARD Qty Description Qty Description 1 Driver/Left Running Board 14 10-1.5mm x 35mm Bolt Plates 1 Passenger/Right Running Board 6 10-1.50mm x 30mm Hex Bolt 1 Driver/Left
55-64 Full Size Chevy
 55-64 Full Size Chevy Installation Instructions Power Disc Conversion 9 slimline booster pictured Your new disc brake conversion kit can be bolted up with standard hand tools. The only tools you may not
Note: The transmission mount just happened to be upside down in this picture. (c) 2015 Total Cost Involved Engineering, Inc. All Rights Reserved.
 2015 Total Cost Involved Engineering, Inc. All Rights Reserved.") 1970-1981 Chevy Camaro & Pontiac Firebird Custom IFS Installation Instructions 1-855-693-1259 www.totalcostinvolved.com CHECK ALL PARTS INCLUDED IN THIS KIT TO THE PARTS LIST BEFORE INSTALLATION. IF ANY
1970-1981 Chevy Camaro & Pontiac Firebird Custom IFS Installation Instructions 1-855-693-1259 www.totalcostinvolved.com CHECK ALL PARTS INCLUDED IN THIS KIT TO THE PARTS LIST BEFORE INSTALLATION. IF ANY
SECTION steering mechanism
 07-302.01/ 1 2011MR17 SECTION 07-302.01 GENERAL Description See Figure 1. The includes the steering wheel (1), the steering column, the miter box (3), the steering shafts (2 and 4), and the drag link (7).
04-08 FORD F150 4 KIT
 9257700 04-08 FORD F50 4 KIT THANK YOU FOR CHOOSING ROUGH COUNTRY FOR YOUR SUSPENSION NEEDS. Rough Country recommends a certified technician install this system. In addition to these instructions, professional
Perfect Park 7000 Installation & Unloading Instructions Operating Manual
 Perfect Park 7000 Installation & Unloading Instructions Operating Manual 1) Always file a claim with the truck line if the lift has been damaged! (If you don t originally notice the damage, but find some
7929 Lincoln Ave, Riverside, CA Ph ICON Fx
 7929 Lincoln Ave, Riverside, CA 92504 Ph 951.689.ICON Fx 951.689.1016 Instruction Sheet: Part No. 6-7000 7 Suspension System 2005-2007 Ford F250/F350 4WD (2) Coil Springs (1) Pan Rod Drop Bracket (2) Radius
PRODUCT USE INFORMATION
 9RC61000 Jeep YJ Body Lift Thank you for choosing Rough Country for all your suspension needs. This body lift fits both manual and Automatic equipped vehicles!!! Refer to last page of this Instruction
Installation Instructions Z-Gate Shifter
 Installation Instructions Z-Gate Shifter Part Number 80681 1998, 2001 by B&M Racing and Performance Products The B&M Z-Gate shifter can be used in vehicles equipped with most popular three speed automatic
(6) Universal Mounting Brackets (NOTE: same bracket used for left or right side installation) Driver/left Running Board (example only)
 Universal Mounting Brackets (NOTE: same bracket used for left or right side installation) Driver/left Running Board (example only)") PARTS LIST: Qty Description Qty Description 6 Universal Left/Right Mounting Brackets 12 6-1.0mm x 20mm T-Bolts 12 8-1.25mm Clip-On Nuts 12 6mm x 22mm OD x 2mm Flat Washers 12 8-1.25mm x 25mm Hex Bolt 12
PARTS LIST: Qty Description Qty Description 6 Universal Left/Right Mounting Brackets 12 6-1.0mm x 20mm T-Bolts 12 8-1.25mm Clip-On Nuts 12 6mm x 22mm OD x 2mm Flat Washers 12 8-1.25mm x 25mm Hex Bolt 12
Part # GM G Body Air Suspension System
 350 S. St. Charles St. Jasper, In. 47546 Ph. 812.482.2932 Fax 812.634.6632 www.ridetech.com Part # 11320298 78-88 GM G Body Air Suspension System Front Components: 1 11323001 HQ Series Front Shockwaves
INSTALLATION INSTRUCTIONS Chevrolet Nova Superide II Independent Front Suspension
 INSTALLATION INSTRUCTIONS 1962 1967 Chevrolet Nova Superide II Independent Front Suspension Please read these instructions completely before starting your installation. Assemble suspension on vehicle before
Team Z Motorsports. K-Member installation instructions
 Team Z Motorsports K-Member installation instructions Parts Included: 1-Tubular K-Member Needed Items-Solid Steering Shaft Offset Steering Rack Bushings Optional-Heavy Duty Bolt Kit Tubular Front Lower
Part # GM A Body CoilOver System
 350 S. St. Charles St. Jasper, In. 47546 Ph. 812.482.2932 Fax 812.634.6632 www.ridetech.com Part # 11240210 68-72 GM A Body CoilOver System Front Components: 1 11243510 Front Single-adjustable CoilOvers
INSTALLATION GUIDE Bolt-On Drag-Race Strut Clip Chevy II
 INSTALLATION GUIDE 7702 Bolt-On Drag-Race Strut Clip 1962-67 Chevy II Description: STRUT CLIP 4130 BOLT ON 62-67 CHEVY II, INCLUDES 4130 ROUND TUBE FRAME CLIP, DOUBLE-ADJUSTABLE STRUTS, ADJUSTABLE-HEIGHT
Installation Procedure GR40 S197 SLA Front Suspension System (Does not include Aluminum Spindle and Hub Instructions)
") Installation Procedure GR40 S197 SLA Front Suspension System (Does not include Aluminum Spindle and Hub Instructions) Please take the time and read these instructions first! The GR40 S197 system is designed
Installation Procedure GR40 S197 SLA Front Suspension System (Does not include Aluminum Spindle and Hub Instructions) Please take the time and read these instructions first! The GR40 S197 system is designed
Next, set the bar level and tighten it down. Do this on both the driver and passenger sides.
 Next, set the bar level and tighten it down. Do this on both the driver and passenger sides. Using two tape measures, measure the outside width at the front and the rear of the tubes. The front dimension
INSTALLATION GUIDE STAINLESS DRAG-RACE STEERING COLUMN
 INSTALLATION GUIDE STAINLESS DRAG-RACE STEERING COLUMN Description: STEERING COLUMN STAINLESS TUBE x 4 LONG, DUAL /4- SPLINE /4 x 48 TUBULAR COLUMN SHAFTS, BILLET MOUNTS, DUAL ALUMINUM U-JOINTS & QUICK
LONGTRAVEL SUSPENSION FOR CLUB CAR Model
 INSTALLATION INSTRUCTIONS LONGTRAVEL SUSPENSION FOR CLUB CAR 1980 2003 Model C-7-06 TABLE OF CONTENTS Progressive Suspension Kit... 2 Kit Contents...3-6 Disassembly...7-17 Assembly...18-29 Rack & Pinion
INSTALLATION INSTRUCTIONS
 INSTALLATION INSTRUCTIONS --1075 North Ave. Sanger, CA 93657-3539 local: 559-875-0222 fax: 559-876-2259 toll free: 800-445-3767-- 2505 Lowering Spindle Assembly Installation Instructions ½ TON SILVERADO
Installation Instructions
 Retrofit Steering Column Installation Instructions for 1968-69 Mustangs For # s 1300644010, 1300644020, 1300644051, 1300645010, 1300645020, 1300645051 www.ididitinc.com 610 S. Maumee St., Tecumseh, MI
Yamaha Viking Rackzilla Install/Removal
 2014-15 Yamaha Viking Rackzilla Install/Removal Kit Numbers: 8001850, 8001790 Full refund will NOT be granted to any kits that are damaged, scratched, or altered in any fashion. Kit Contents: Part Number
TEL:1-866-XANATOS INSTALLATION INSTRUCTIONS PART#: SR-FOR SPARTAN RUNNING BOARD FORD ECONOLINE 99-14
 TEL:1-866-XANATOS INSTALLATION INSTRUCTIONS PART#: SR-FOR203796 SPARTAN RUNNING BOARD FORD ECONOLINE 99-14 PARTS LIST: 1 Driver/Left Side Spartan Running Board 2 10mm Lock Washers 1 Passenger/Right Side
UNIVERSAL ELECTRA-STEER FOR 2 COLUMN 220w Plain w Polished w Plain w Polished
 UNIVERSAL ELECTRA-STEER FOR 2 COLUMN 220w Plain 8052810 220w Polished 8052610 360w Plain 8052780 360w Polished 8052760 Full refund will NOT be granted to any kits that are damaged, scratched, or altered
»Product» Safety Warning
 J1455, J1456 Installation Instructions 1984-2001 Jeep Cherokee XJ 4.5 Suspension Lift Read and understand all instructions and warnings prior to installation of product and operation of vehicle. Zone Offroad
Parts Manual Rev. B RZT48 /
 115 91 36-2 Rev. B Parts Manual RZT48 / 96 62001-00 Please read the operator manual carefully and make sure you understand the instructions before using the machine. Gasoline containing a maximum of 10%
Installation Instructions. 6 Basic System FTS21060BK / FTS21061BK / FTS21042BK GM 2WD C1500 P/U ONLY
 Installation Instructions 6 Basic System FTS21060BK / FTS21061BK / FTS21042BK 2007-13 GM 2WD C1500 P/U ONLY 2007-13 GM 1500 Truck Basic System FTS21060BK / FTS21061BK / FTS21042BK 2007-13 GM 2WD C1500
Tools, Equipment and Supplies Needed:
 153-162 DISC BRAKE/DUAL MASTER CYLINDER CONVERSION Please take the time to read the enclosed instructions carefully. If you have any questions, call our Product Assistance personnel for clarifi cation.
STOP---READ THIS FIRST!
 STOP---READ THIS FIRST! **Read These Entire Instructions Before Starting Anything** 2011-13 FORD F-250 & F350 6 & 8 LIFT KITS 5680 W. Barstow, Fresno, CA 93722 PH: (559) 226-8196 (559) 277-0457 FAX www.mcgaughys.com
RUBICRAWLER - JEEP TJ & JK ( ) W/ UNIVERSAL SHIFTER KIT CONSISTS OF: No. Qty Part No. Description
 W/ UNIVERSAL SHIFTER KIT CONSISTS OF: No. Qty Part No. Description") KIT CONSISTS OF: No. Qty Part No. Description 1. 1 RUBICRAWLER - GEAR BOX 2. 1 42R-UNIV - UNIVERSAL SHIFTER KIT PAGE 1 OF 8 Page Rev. Date: 11-06-18 Optional Items: Part No. Description 15-1000 - UNI-RAISE,
KIT CONSISTS OF: No. Qty Part No. Description 1. 1 RUBICRAWLER - GEAR BOX 2. 1 42R-UNIV - UNIVERSAL SHIFTER KIT PAGE 1 OF 8 Page Rev. Date: 11-06-18 Optional Items: Part No. Description 15-1000 - UNI-RAISE,
Installation Instructions
 Preparing your vehicle to install your brake system upgrade 1. Rack the vehicle. 2. If you don t have a rack, then you must take extra safety precautions. 3. Choose a firmly packed and level ground to
First, check and record the camber and caster readings, they will be adjusted later.
 First, check and record the camber and caster readings, they will be adjusted later. The caliper-mounting bosses are machined perpendicular to the spindle so they are an excellent place for the level.
EVO EVO Enforcer PRO Stage 1
 EVO-201-1 EVO Enforcer PRO Stage 1 QTY PART # DESCRIPTION 1 EVO-11022B EVO Front Lower Control Arm, Driver 1 EVO-11023B EVO Front Lower Control Arm, Pass 1 EVO-11042B REARWARD BRACKET JK FRONT TRACKBAR