INSTALLATION OF THE STAR MACHINE EVP AND BATTERY
|
|
|
- Wendy Garrett
- 6 years ago
- Views:
Transcription
1 INSTALLATION OF THE STAR MACHINE EVP AND BATTERY PAGE 1: VACUUM PUMP DESCRIPTION AND OPERATION PAGE 2 : OVERALL DIMENSIONS OF VACUUM PUMP PAGES 3 THRU 8: INSTALLATION PAGES 9: REGULAR MAINTENANCE PAGES 10 THRU 13: DYNAMIC SEAL REPLACEMENT PAGE 14: INTAKE AND EXHAUST TUBE REPOSITIONING CONTACT INFORMATION: PHONE: WEB: STARVACUUMPUMPS.COM
2 The Star Machine Electric Vacuum Pump (EVP) is representative of our continued efforts to provide racers with the latest vacuum pump technology. The EVP is a DC electric, reciprocating piston vacuum pump. It incorporates two dynamic seal pistons, coupled to a common yoke that is eccentrically driven in a common bore. The EVP offers the distinct advantage of ALL the HP gains, thru increased crank case vacuum, with ZERO HP lost to driving a mechanical vacuum pump. Originally designed for Pro Stock Motorcycle to comply with the one pump rule it is also currently used in Pro Stock Car as a vacuum assist pump. In PSB applications it is equal to 5 times the capacity of the most commonly used pump to produce crank case vacuum. In PSB it is producing vacuum levels of 25 Hg.(wire to wire). In PS Car applications it has shown a 15-20% increase over existing crank case vacuum readings. At Star Machine we realize that you don t get something for nothing. The electric motor driven EVP adds the requirement of between round battery maintenance (recharging). This will be considered, by some racers as a burden (one more between round headache). Other racers, looking for that last.01 second advantage, will view the additional maintenance as part of the game. The EVP is sold (complete) with two 24 VDC (DEWALT Power Tool) rechargeable batteries, DEWALT Charger, quick change (battery) holder, wiring harness and vacuum hose. The EVP operates (completely) separate from your existing (12/16 VDC) electrical system. To complete the EVP installation one 12V-20A normally open switch (and 12ga. wire) are required to operate the pump. Activating the pump is presently (and recommended) done when the vehicle is pre-staged. In most cases at the same time the data recorder is switched on. This will guarantee the pump motor will receive the maximum available battery power. The vacuum line connection to the engine is critical to the operation of the EVP. Drawing oil into the EVP may result in damage to the reeds. Care must be taken to baffle and/or separate the engine oil from the air drawn by the pump. More important to the performance of the pump is the sealing of the engine, the better the seal the higher the potential vacuum. We also recommend that a check valve be installed in the vacuum line, at the pump inlet. 1
3 2
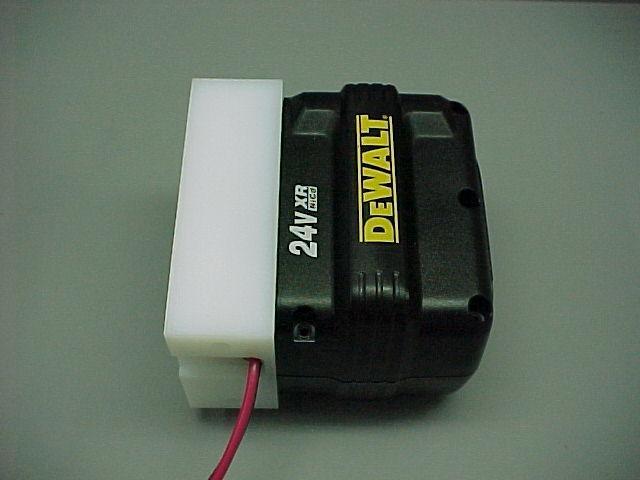
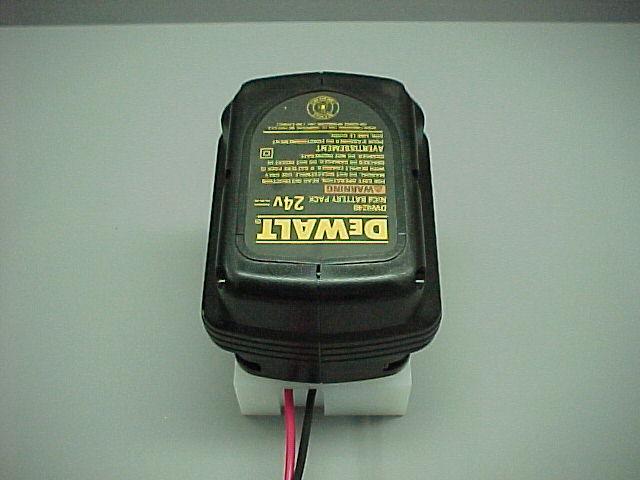
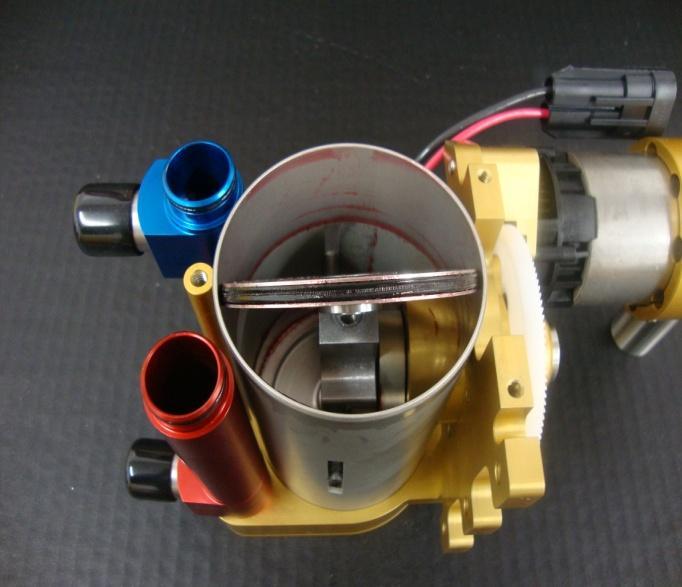
4 MOUNTING THE VACUUM PUMP AND BATTERY HOLDER PHOTO 1 SHOWS THE OPTIMUM POSITIONING FOR THE PUMP AND THE BATTERY HOLDER. THE MOTOR SHAFT IS PARALLEL TO THE DRIVE AXLE(S), THE EXHAUST TUBE (RED) IS ON THE BOTTOM AND THE INTAKE (BLUE) TUBE IS ON TOP. THE BATTERY HOLDER BASE FACES TO THE REAR OF THE VEHICLE. PHOTO 2 SHOWS THE THREE MOUNTING HOLES OF THE PUMP. PHOTOS 3 THRU 6 (Pg. 4) SHOW ADDITIONAL (ACCEPTABLE) MOUNTING POSITIONS FOR THE BATTERY HOLDER. BATTERY MOUNTING CONTAINS (2) 5/16-18 TAPPED HOLES ON CENTERS 1 2 EVP MOUNTING PLATE CONTAINS (3) ¼ -20 TAPPED HOLES ON 1.75 CENTERS 3

5 FRONT OF VEHICLE

6 WIRING THE VACUUM PUMP PHOTO 8: IDENTIFIES THE CONNECTION TO THE BATTERY HOLDER BLOCK PHOTO 7: USE A NORMALLY OPEN SWITCH RATED FOR AMPS (MINIMUM CONTINUOUS) TO ACTIVATE THE PUMP, WE RECOMMEND SWITCHING THE POSITIVE LEAD. NOTE: THE PUMP MOTOR IS NOT POLARITY SENSITIVE. IT WILL RUN IN EITHER DIRECTION. MOTOR HAS PREWIRED LOCKING AND MOISTURE RESISTANT CONNECTOR EVP IS SOLD WITH (MATING) PREWIRED CONNECTOR WITH 14 LEADS _


7 WIRING THE VACUUM PUMP PHOTOS 9 AND 10 DETAIL THE BATTERY CONNECTION, USE 12 ga. WIRE SECURE LEADS WITH SHCS (7/64 ALLEN) INSERT STRIPPED LEAD FULLY INTO CONNECTOR _ + + STRIP LEADS BACK

8 PLUMBING THE VACUUM PUMP THE PUMP IS DESIGNED FOR ¾ ID VACUUM HOSE SUPPLIED WITH THE PUMP. ALTHOUGH THERE ARE PRETTIER BRAIDED LINES AVAILABLE, THEY ARE OFTEN PRONE TO SUCKING FLAT DECREASING FLOW IN TURN REDUCING VACUUM POTENTIAL. CONNECT THE HOSE FROM THE ENGINE TO THE BLUE TUBE CONNECT A HOSE FROM THE RED TUBE TO A CATCH CAN. THE CATCH MUST BE CAPABLE OF FLOWING A MINIMUM OF 16 SCFM. THE POSITION OF THE INTAKE AND EXHAUST TUBES OF THE PUMP CAN BE CHANGED. IN THE PHOTO THE BLUE TUBE IS ON THE RIGHT, THE RED ON THE LEFT. THEY CAN BE PLACED: BOTH TO THE RIGHT (OR LEFT) OR BLUE-LEFT, RED- RIGHT (SEE PAGE 14, REPOSITIONING INT/EXH TUBES). 7
. SEE: REGULAR MAINTENANCE (PG.")
9 LOADING BATTERY INTO HOLDER RETRACT BATTERY RETAINING PIN (PHOTO 1) SLIDE BATTERY OUT OF HOLDER BATTERY RETAINING PIN + SLIDE FULLY CHARGED BATTERY INTO HOLDER DO NOT FORCE BATTERY! CHECK FOR GAP IN CONTACT(S). SEE: REGULAR MAINTENANCE (PG. 9 ) PULL BACK ON BATTERY TO INSURE THAT RETAINING PIN IS ENGAGED CONTACTS 1 8
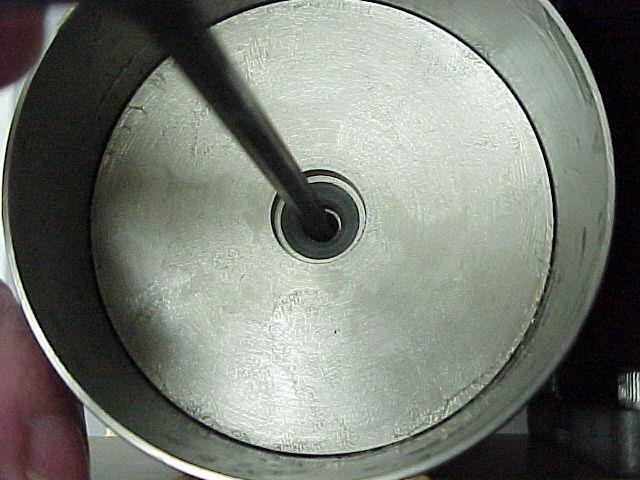
10 REGULAR MAINTENANCE BATTERY CHARGING IS THE MOST IMPORTANT PART OF EVP PERFORMANCE AND MAINTENANCE. FOLLOW THE MANUFACTURERS INSTRUCTIONS FOR CHARGING THE BATTERY. A FULLY CHARGED BATTERY WILL RUN THE PUMP FOR 4 MINUTES THE BATTERY MOUNTING BLOCK CONTACTS WILL NEED TO BE CHECKED FOR GAP (.017 ). THE O-RING WILL MAINTAIN THE GAP, HOWEVER IF A BATTERY TERMINAL IS BENT, IT WILL SPRING THE CONTACT OPEN OR MAY FOLD IT OVER. IF THE BATTERY DOSE NOT SLIDE INTO PLACE THE GAP IS TOO SMALL OR THE BATTERY TERMINAL(S) MAY BE BENT. THE GAP IS EASILY OPENED WITH A SCREW DRIVER OR CLOSED WITH PLIERS. + 9
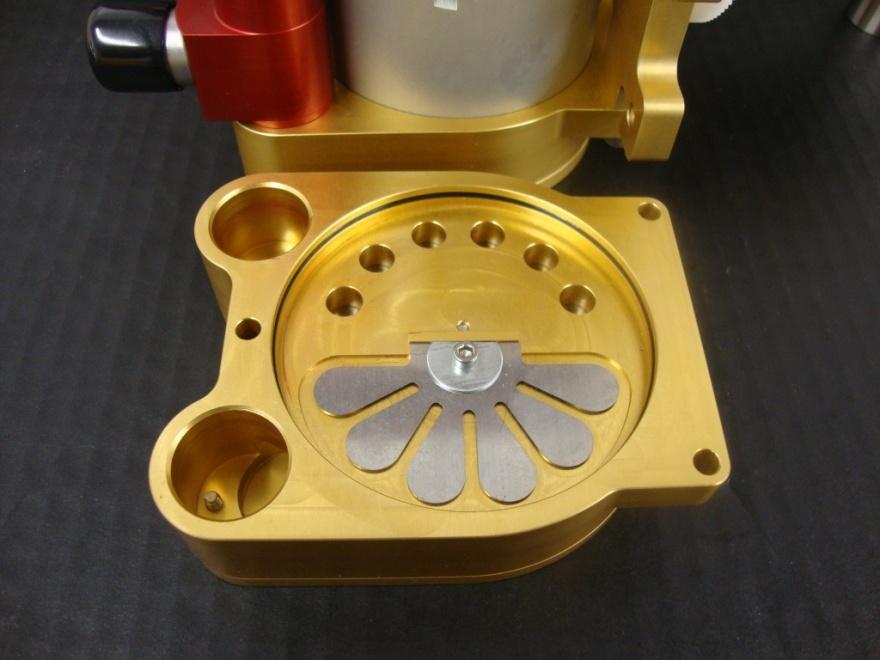
11 DYNAMIC SEAL REPLACEMENT REPLACE ONE SEAL AT A TIME (REMOVE ONE HEAD ONLY) REMOVE THE THREE #10-24 SHCS (5/32 ALLEN) MOUNTING THE HEAD (PG. 11, PHOTO 1) ROTATE THE PUMP GEAR TO POSITION THE YOKE (PIN) IN THE CENTER OF STROKE (PG. 11, PHOTO 2) REMOVE THE PISTON ¼-20 SHFH (5/32 ALLEN), PUSH ON ONE SIDE OF THE PISTON, ROTATING IT 90 DEGS. PULL THE PISTON OUT (PG. 11, PHOTO 4) REMOVE THE SEAL AND CLEAN THE PISTON GROOVE. LUBRICATE THE GROOVE AND NEW SEAL (LIBERALLY) WITH A LIGHT LOW TEMPERATURE GREASE (NEVER USE MOLYBDENUM BASED LUBES) PLACE NEW SEAL ON PISTON.(PG. 12, PHOTOS 7 & 8) APPLY GREASE TO CYLINDER WALL AS WELL. PLACE PISTON INTO BORE (PG. 12, PHOTO 9) PUSH ON EDGE TO ROTATE PISTON SQUARE IN BORE (PG. 12, PHOTO 10) USE 5/32 ALLEN WRENCH TO ALIGN BOLT HOLE IN PISTON TO TAPPED HOLE IN YOKE (PG. 12, PHOTO 11) INSTALL SCREW (DO NOT TIGHTEN) ROTATE GEAR TO PUT THE PISTON (PIN) TO END OF STOKE (PG. 11, PHOTO 2) BEFORE TIGHTENING THE SCREW, BE SURE THAT THE PISTON HUB (PG. 11 PHOTO 6) IS SEATED INTO THE YOKE COUNTER BORE (PG. 11 PHOTO 5) THIS IS EVIDENT (PG. 11 PHOTO 3) WHEN THE PISTON IS AT END OF IT S STROKE, SQUARE TO THE CYLINDER AND.030 DOWN FROM THE CYLINDER LIP. LUBRICATE THE HEAD O-RING AND THE TUBE BORES WITH ENGINE OIL. (PG. 13 PHOTO 13) REPLACE THE HEAD (PG. 13. PHOTOS 14 & 15) REPEAT ABOVE TO REPLACE THE OTHER SEAL 10


12 DYNAMIC SEAL REPLACEMENT REMOVE REMOVE END OF STROKE PISTON SCREW REMOVE 1 REMOVE 2 CENTER OF STROKE 3 YOKE COUNTER BORE PISTON HUB

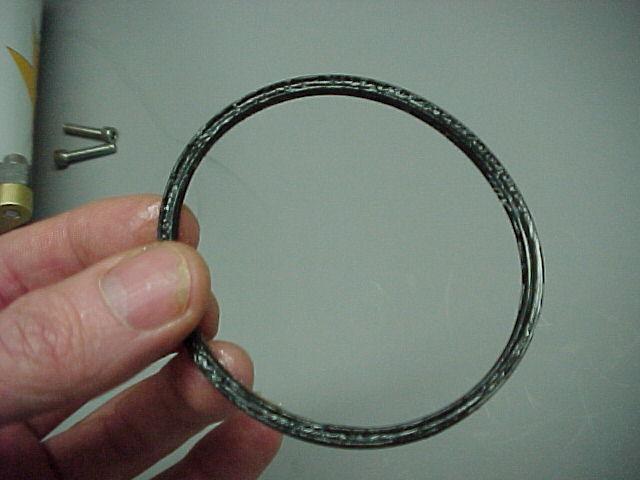

13 DYNAMIC SEAL REPLACEMENT SEAL GROOVE


14 DYNAMIC SEAL REPLACEMENT TUBE BORE CYLINDER O-RING
15 INTAKE/EXHAUST TUBE REPOSITIONING FOLLOW THE INSTRUCTIONS ON PG. 11, PHOTO 1 MOVE THE TUBES, ALWAYS KEEP THE BLUE TUBE HIGH AS THE MOTOR. LUBE THE O-RINGS. REINSTALL THE HEAD. 14
EGR Performance Brakes Assembly Instructions DODGE DANA 70 '87 - '93 (Will not fit stock sized dual rear wheels)
") EGR Performance Brakes Assembly Instructions DODGE DANA 70 '87 - '93 (Will not fit stock sized dual rear wheels) Got Brakes? Parts List (2) Vented Rotors (2) Multi hole Cable Mount & L Brkt (2) Axle Tube
EGR Performance Brakes Assembly Instructions DODGE DANA 70 '87 - '93 (Will not fit stock sized dual rear wheels) Got Brakes? Parts List (2) Vented Rotors (2) Multi hole Cable Mount & L Brkt (2) Axle Tube
RC4WD Diablo Instruction Manual
 Version 1.1 RC4WD Diablo Instruction Manual Thank you for your purchase. Welcome to the RC4WD family. This kit is a combination of many specially engineered and manufactured parts. Enjoy your build. This
Mopar 8 3/4 & 9 3/4 (Dana) Installation Instructions Rear Disc Conversion
 Installation Instructions Rear Disc Conversion") Mopar 8 3/4 & 9 3/4 (Dana) Installation Instructions Rear Disc Conversion This kit is for either Mopar 8 ¾ or Mopar 9 ¾ (Dana). This kit is designed to work with axles with either GM 5 x 4.75 Bolt Pattern
Mopar 8 3/4 & 9 3/4 (Dana) Installation Instructions Rear Disc Conversion This kit is for either Mopar 8 ¾ or Mopar 9 ¾ (Dana). This kit is designed to work with axles with either GM 5 x 4.75 Bolt Pattern
INSTALLATION INSTRUCTIONS
 INSTALLATION INSTRUCTIONS BIG ROTOR / CALIPER RELOCATION FRONT KITS SUM-BK1422, BK1423, BK1424 1999-2006 GM 1/2 Ton Trucks & SUVs Thank you for choosing SUMMIT RACING for your braking needs. Pleases take
HYDRAULICS. TX420 & & lower. Hydraulic Tandem Pump Removal. 4. Remove the LH side panel (Fig. 0388).
.") TX420 & 425 240000299 & lower 4. Remove the LH side panel (Fig. 0388). Hydraulic Tandem Pump Removal Note: Cleanliness is a key factor in a successful repair of any hydraulic system. Thoroughly clean all
TX420 & 425 240000299 & lower 4. Remove the LH side panel (Fig. 0388). Hydraulic Tandem Pump Removal Note: Cleanliness is a key factor in a successful repair of any hydraulic system. Thoroughly clean all
Installation Instructions
 Installation Instructions Rear Disc Brake Conversion Kit Item # RC1001, RC1001X Applications: 64-72 A-body, 67 F-Body, 63-67 X-body with Non Staggered Shocks Thank you for choosing GPS Auto for your automotive
INSTALLATION INSTRUCTIONS
 INSTALLATION INSTRUCTIONS BIG ROTOR / CALIPER RELOCATION REAR KIT SUM-BK1423 1999-2009 GM 1/2 Ton Trucks & SUVs Thank you for choosing SUMMIT RACING for your braking needs. Pleases take the time to read
Single-end Porting Head 1 ITEM A/R 2 A/R A/R A/R
 MXP50N Internal Bearing 50mm ( inch) Bore Models: MXP50NTP MXP50NGP MXP50NNP MXP50NST MXP50NSG MXP50NSN Both Metric and Inch models Parts Sheet 000_0_MXP5 0 5 7 5 9 0 5 7 9 0 Singleend Porting Head Return
Installation Instructions
 Installation Instructions Rear Disc Brake Conversion Kit Item # RC4001, RC4001X Applications: Mopar 7.25, 8.25, 9.25 Axles Thank you for choosing Leed Brakes for your automotive product needs. Before you
MP and MP Diaphragm and Seal Kits for MP8000 Series Actuators
 MP8000-6325 and MP8000-6350 Diaphragm and Seal Kits for MP8000 Series Actuators Contents of the MP8000-6325 Diaphragm and Seal Kit for MP82 and MP83 Actuators One seal, 5/8 in. Internal Diameter (I.D.)
Performance Inlet Manifold
 Performance Inlet Manifold Tools needed (some tools not required on some models): 13mm Combination Wrench Flat Blade Screwdriver T30 Torx Driver T25 Torx Driver 10mm Combination Wrench and/or Socket with
Vacuum and air hose replacement -- replacing all the old, crusty air and vacuum hoses under and around
 Vacuum and air hose replacement -- replacing all the old, crusty air and vacuum hoses under and around the intake manifold. Requires removing the intake manifold. While you've got the intake manifold off,
PARTS LIST. Alternator Bracket A Main Alternator Bracket 1-P763-A... Idler Pulley. Pulleys. 5/16 x 7/8 SHCS (P/S Option)
") LS Custom Series Serpentine Kit LS Alternator & Air Conditioning Only Serpentine Kit Kit # 20090-08 LS Alternator, Air Conditioning & Power Steering Serpentine Kit Kit # 20095-08 11/10/16 PARTS LIST Alternator
LS Custom Series Serpentine Kit LS Alternator & Air Conditioning Only Serpentine Kit Kit # 20090-08 LS Alternator, Air Conditioning & Power Steering Serpentine Kit Kit # 20095-08 11/10/16 PARTS LIST Alternator
MGM Brakes Service Manual
 MGM Brakes Service Manual MAGNUM Performance Plus Spring Brake Actuators (MJ-Series 3.00 / 76mm Long Stroke ) For: S-Cam Tamper-Resistant MAGNUM Performance Plus Spring Brake Actuators Figure 1 A B C Your
INSTALLATION INSTRUCTIONS
 INSTALLATION INSTRUCTIONS This Sheppard Power Steering Gear has been manufactured and tested for proper operation prior to shipment. Every effort has been made to ensure that it will provide you with many
Installation Instructions
 Installation Instructions Rear Disc Brake Conversion Kit Item # RC2001, RC2001X Applications: Mopar 8-3/4 & 9-3/4 Rear Axles Thank you for choosing Leed Brakes for your automotive product needs. Before
Wolverine Turn Signal / Horn Kit 2102
 All years Yamaha Wolverine STOP - THIS KIT IS DESIGNED SPECIFICALLY FOR ALL YEAR AND MODELS YAMAHA WOLVERINE. IF YOUR MACHINE IS NOT ONE OF THESE MODELS DO NOT PROCEED. Contact Ryco Motorsports or your
GH-BETTIS OPERATING & MAINTENANCE INSTRUCTIONS DISASSEMBLY & ASSEMBLY FOR THE T80X-M4-S DOUBLE ACTING SERIES HYDRAULIC ACTUATORS
 GH-BETTIS OPERATING & MAINTENANCE INSTRUCTIONS DISASSEMBLY & ASSEMBLY FOR THE T80X-M4-S DOUBLE ACTING SERIES HYDRAULIC ACTUATORS -S INDICATES CYLINDERS ARE IN TANDEM PART NUMBER: 100121 REVISION "A" ECN
BRAKE E
 8-1 GENERAL...8-2 SPECIFICATIONS...8-6 COMPONENTS...8-7 FRONT BRAKE...8-12 DISASSEMBLY INSPECTION REASSEMBLY (Pn1, Cu2 3 TON SERIES)...8-12 DISASSEMBLY INSPECTION REASSEMBLY (Pn2 3 TON SERIES)...8-17 BRAKE
Shotgun Double Barrel HPFP install guide
 Shotgun Double Barrel HPFP install guide Thank you for your purchase of the VTT Shotgun Double Barrel HPFP upgrade! First thing to do when you open your box is to make sure all parts are in their respective
Product Features. Easy installation. Pump adds only 3.3 to the overall assembly height. 60 GPH (227 LPH) flow rate while in priming mode.
 flow rate while in priming mode.") Primer Pump Kits RKP1912 (12 vdc) and RKP1924 (24 vdc) Instruction Part Number 14356 Rev C Primer pump kits are an innovative and proprietary system consisting of a prescreen filter, a flow by-pass circuit,
Primer Pump Kits RKP1912 (12 vdc) and RKP1924 (24 vdc) Instruction Part Number 14356 Rev C Primer pump kits are an innovative and proprietary system consisting of a prescreen filter, a flow by-pass circuit,
Wobbler Design Guide Western Kentucky University Mechanical Engineering Program Fall 2006
 Wobbler Design Guide Western Kentucky University Mechanical Engineering Program Fall 2006 What is a Wobbler Steam engine? A Wobbler is a valveless oscillating steam engine. The engine has no connecting
Z8004. KDT916 S197 Performance Watts Linkage
 Z8004 KDT916 S197 Performance Watts Linkage Kit Includes: Differential Cover o Magnetic Plug o Standard Plug o Main Brace o Center Pivot o Swivel Foot Bolts 2 o Swivel Foot Retaining nuts 2 o M12x30 Bolt
BAER Your Complete Performance Brake Supplier!
 Installation Instructions Product: T4, Pro+, Ext+ Instruction Part Number: 6000344 Vehicle Revision Date: 07 August 2013 Make: GM Model: C10-1/2Ton 2WD trucks Year(s): 60-87 ATTENTION: Read this before
Tooling List 10mm Socket 3 Extension Ratchet Large Jaw Pliers Needle Nose Pliers
 Thank you for purchasing! The CorkSport Binary VTA BPV provides features and performance to suit stock cars and on up to big turbo high power setups. The CorkSport Binary VTA BPV holds 50psi, responds
Rekluse Motor Sports. The z-start Clutch LTR 450. Installation Guide Copyright 2002 Rekluse Motor Sports z-start Revision 3.
 Rekluse Motor Sports The z-start Clutch LTR 450 Installation Guide Copyright 2002 Rekluse Motor Sports z-start Revision 3.000 RMS166 LTR 450 191-266 Manual Revision: 032306 Rekluse Motor Sports, inc. 110
Model Ton Hand Carry Axle Jack P/N: CJ67D0250-1
 Model 1504-50 15 Ton Hand Carry Axle Jack P/N: CJ67D0250-1 Operation and Maintenance Manual with Illustrated Parts List 2222 South Third Street Columbus, Ohio 43207-2402 Phone (614) 443-7492 FAX (614)
MGM Brakes Service Manual
 MGM Brakes Service Manual For: S-Cam Piston Type Service and Spring Brake Chambers Form No. 5009 Issued 6/91 - Revised 4/2010 MODEL MB-T SERIES MODEL MG-T SERIES Superseded by the MJS SERIES Form #5044
Ford 8, 9 Small Bearing Installation Instructions Rear Disc Conversion
 Ford 8, 9 Small Bearing Installation Instructions Rear Disc Conversion This kit is for Ford 9 rear axles with the small (2.835 ) style bearing and Ford 8 rear ends. This kit is designed to work with axles
2016 HONDA 1000 Pioneer PN 3102 Turn signal / horn kit rev nc
 2016 Honda 1000 Pioneer STOP - THIS KIT IS DESIGNED SPECIFICALLY FOR 2016 HONDA 1000 PIONEER IF YOUR MACHINE IS NOT THIS MODEL DO NOT PROCEED. THIS KIT DOES NOT WORK ON THE PIONEER 500 nor 700 S. Contact
Rekluse Motor Sports. The z-start Clutch GAS GAS. 200, 250, and strokes. 400 and strokes
 Rekluse Motor Sports The z-start Clutch GAS GAS 200, 250, and 300 2-strokes 400 and 450 4-strokes Installation Guide Copyright 2002-2004 Rekluse Motor Sports z-start Revision 3.000 RMS100 Gas Gas z-start
PN K K050012: Rebuild Kit for Delco Non-Delay Height Control Valve
 APPLICATION: 1959 1989 Cadillac, Oldsmobile, Buick, GMC Truck, Ford, Fruehauf Trailer INTRODUCTION This kit provides the necessary parts and instructions to rebuild Delco/King of the Road non-delay valves.
TOYOTA VENZA 2009 TRAILER WIRE HARNESS Procedure
 Part Number: PT791-0T099 Kit Contents Item # Quantity Reqd. Description 1 1 Trailer Wire Harness Module 2 1 4-Flat Harness 3 1 Battery Power Wire Harness 4 1 Mounting Bracket, 4-Flat 5 2 Screw #10-24 6
Repair Manual 11/99 PS-34. Page 1
 Repair Manual /99 PS-4 Page Table of contents Index Technical Data page Special tools 4 Repair instructions, general 0 Chain brake 6 0 Centrifugal clutch 8 0 Oil pump 9-04 Ignition system - 0 Starting
INSTALLATION & USER S GUIDE
 REKLUSE MOTOR SPORTS The Rekluse Core EXP Kit with Adjustable Slave Cylinder INSTALLATION & USER S GUIDE Doc ID: 191-7704A Doc Rev: 102915 OVERVIEW This kit replaces the OEM core clutch components including
MGM Brakes Service Manual
 MGM Brakes Service Manual MODEL LTR-T - 2.50 Pre 6/1/98 MODEL LTR-T - 2.50 Post 5/31/98 MODEL LTR-L3-3.00 For: Long Life Integral Release Bolt Double Diaphragm Spring Brakes Several design improvements
HP10098 BASIC INDEPENDENT AIR SPRING ACTIVATION KIT
 HP10098 BASIC INDEPENDENT AIR SPRING ACTIVATION KIT Thank you and congratulations on the purchase of a Pacbrake basic independent air spring activation kit. Please read the entire installation manual prior
Rekluse Motor Sports. The z-start Clutch. Cannondale
 Rekluse Motor Sports The z-start Clutch Cannondale Installation Guide Copyright 2002-2004 Rekluse Motor Sports z-start Revision 3.000 RMS105 Cannondale 191-205 Manual Revision: 091304 Rekluse Motor Sports,
13. CRANKCASE/CRANKSHAFT/BALANCER/PISTON/CYLINDER
 13. CRANKCASE/CRANKSHAFT/BALANCER/PISTON/CYLINDER COMPONENT LOCATION 13-2 SERVICE INFORMATION 13-3 TROUBLESHOOTING 13-4 CRANKCASE SEPARATION 13-5 CRANKSHAFT 13-7 MAIN JOURNAL BEARING 13-9 CRANKPIN BEARING
Table of Contents. D. Air Modules...D-2 PV Series...D-2 1. Product Overview...D-2 2. Installation...D-5
 Table of Contents D. Air Modules...D-2 PV Series...D-2 1. Product Overview...D-2 2. Installation...D-5 2.1 Master Module Installation... D-5 2.1.1 Installing the PV1, PV2, and PV3 Master Modules... D-5
Highly Styled, Low Cost Serpentine Drive. Chrysler 383, 440 and 426 HEMI
 Highly Styled, Low Cost Serpentine Drive Installation Instructions Chrysler 8, 440 and 426 HEMI Kit #40720 (without Power Steering) Use 71.5" Serpentine Belt Kit #40725 (with Power Steering) Use 81.5"
SMA Aluminum Cylinders
 SMA Aluminum Cylinders PNEUMATIC TO 200 PSI HYDRAULIC 250 TO 400 PSI Non shock /8,, 2, 3 BORE SPACE SAVING AND CONVENTIONAL DESIGNS REPAIRABLE Very high quality Pancake type cylinders with all of the engineering
Parkit360 Transformer
 Parkit360 Transformer 1 Owner s Manual Introduction We know you re busy, and need to get that fifth wheel moved. Now. So with that in mind, we ve kept these instructions as brief as possible, but they
INTRODUCTION. Reference No S-01 REVISED:
 10-21S-01 GT-225, SRM-225 1 1 INTRODUCTION We are constantly working on technical improvement of our products. For this reason, technical data, equipment and design are subject to change without notice.
Steer Axles. Spicer. Service Manual. AXSM-0070 November Front Drive Steer Axle Model 60
 Spicer Steer Axles Service Manual AXSM-0070 November 2017 Front Drive Steer Axle Model 60 General Information The description and specifications contained in this service publication are current at the
MotorScrubber MS2000S/M/L Instruction Manual
 MotorScrubber MS2000S/M/L Instruction Manual PLEASE READ ALL INSTRUCTIONS When using electric products, basic safety precautions should always be followed to reduce the risk of electric shock and personal
APR, LLC 1027-B Opelika Road Auburn Alabama 36830
 B6 A4 INJECTOR INSTALLATION L A T I N Tool Needed: - Flathead Screwdriver (large) - Flathead Screwdriver (small) - Ratchet - 5mm Allen Socket If you are using the APR Injectors, you will also need the
The spacers can be made out of.750 round aluminum bar with a.3125 to.318 hole drilled in center.
 SECTION I : FRONT COVER INSTALLATION With Crankshaft, Camshaft and oil Galley plugs installed in engine, you need to verify that the front cover clears the oil galley plugs and fits on engine block. The
INFORMATION SHEET: SERIES GRT 3 JAW PARALLEL GRIPPERS
 INFORMATION SHEET: SERIES GRT 3 JAW PARALLEL GRIPPERS IMPORTANT INFORMATION DO NOT DISCARD! Use this information sheet to assist with gripper installation and setup. File with maintenance or machine documentation.
INSTALLATION INSTRUCTIONS LOKAR COLUMN SHIFT LINKAGE
 INSTALLATION INSTRUCTIONS LOKAR COLUMN SHIFT LINKAGE Part No. ACA-1807 (Ford AOD) STOP! PLEASE READ ALL INSTALLATION INSTRUCTIONS BEFORE BEGINNING INSTALLATION. CALL LOKAR FOR ANY QUESTIONS OR UNCERTAINTIES
QUICK INDEX. Series SMA Aluminum. Pancake and conventional lengths 1 1/8 thru 3 bore. Series SMS Solid Stainless
 QUICK INDEX A U R O R A A I R P R O D U C T S Series SMA Aluminum Pancake and conventional lengths /8 thru 3 bore Series SMS Solid Stainless Pancake and conventional lengths for hostile environments Series
BAER Your Complete Performance Brake Supplier!
 Installation Instructions Product: Pro Plus Front Instruction Part Number: 6000338 Vehicle Make: Ford Model: Mustang Year(s): 65-67 All 68-73 with Original drum brakes. Notices Read and Follow BEFORE ATTEMPTING
SERVICE INSTRUCTIONS ASSEMBLY & DISASSEMBLY T50X DOUBLE ACTING HYDRAULIC SERIES ACTUATORS
 Page 1 of 7 SERVICE INSTRUCTIONS ASSEMBLY & DISASSEMBLY T50X DOUBLE ACTING HYDRAULIC SERIES ACTUATORS INTRODUCTION This service procedure is offered as a guide to enable general maintenance to be performed
DESIGN ENGINEERS O-RING SIZE GUIDE
 DESIGN ENGINEERS O-RING SIZE GUIDE INTRODUCTION: Substantially all O-ring manufacturers present their catalog data in the rotation of groupings or families of cross-sectional thickness first, then followed
SMA Aluminum Cylinders
 SMA Aluminum Cylinders PNEUMATIC TO 200 PSI HYDRAULIC 250 TO 400 PSI Non shock /8,, 2, 3 BORE SPACE SAVING AND CONVENTIONAL DESIGNS REPAIRABLE Very high quality Pancake type cylinders with all of the engineering
Brake System H TX, H2.0TXS [B475]; H TX [B466] Safety Precautions Maintenance and Repair
![Brake System H TX, H2.0TXS [B475]; H TX [B466] Safety Precautions Maintenance and Repair](/thumbs/86/93834005.jpg "Brake System H TX, H2.0TXS [B475]; H TX [B466] Safety Precautions Maintenance and Repair") HMM180001 Brake System H1.5-1.8TX, H2.0TXS [B475]; H2.5-3.5TX [B466] Safety Precautions Maintenance and Repair When lifting parts or assemblies, make sure all slings, chains, or cables are correctly fastened,
HMM180001 Brake System H1.5-1.8TX, H2.0TXS [B475]; H2.5-3.5TX [B466] Safety Precautions Maintenance and Repair When lifting parts or assemblies, make sure all slings, chains, or cables are correctly fastened,
Part # Chevy Level 2 Air Suspension Package One Piece Frame
 350 S. St. Charles St. Jasper, In. 47546 Ph. 812.482.2932 Fax 812.634.6632 www.ridetech.com Part # 11020299 55-57 Chevy Level 2 Air Suspension Package One Piece Frame Front Components: 1 11013001 Master
How to install the Barnett clutch and the stronger Oil Pump Drive Gear
 How to install the Barnett clutch and the stronger Oil Pump Drive Gear Written by WildFred I m from Germany so please excuse my English and the spelling. The following procedure is a combination of the
TOYOTA VENZA 2009 TRAILER WIRE HARNESS Procedure
 Part Number: PT791-0T099 Kit Contents Item # Quantity Reqd. Description 1 1 Trailer Wire Harness Module 2 1 4-Flat Harness 3 1 Battery Power Wire Harness 4 1 Mounting Bracket, 4-Flat 5 2 Screw #10-24 6
SD Bendix E-10PR Retarder Control Brake Valve DESCRIPTION. OPERATION - Refer to Figure 2
 SD-03-832 Bendix E-10PR Retarder Control Brake Valve MOUNTING PLATE SUPPLY 4 PORTS ELECTRICAL AUXILIARY DESCRIPTION TREADLE RETARDER CONTROL SECTION EXHAUST DELIVERY 4 PORTS FIGURE 1 - E-10PR RETARDER
SMALL BLOCK CHEVY STANDARD CAM INSTALLATION INSTRUCTIONS
 SMALL BLOCK CHEVY STANDARD CAM INSTALLATION INSTRUCTIONS P/N s 251000-0002 SBC Gear Drive 1/2 Cam Hub 251000-0003 SBC Gear Drive 5/8 Cam Hub ****DUE TO MANUFACTURING TOLERANCES OF THE CAM, CRANK AND GEAR
STRAIGHT FITTING ORIFICE DISK MUFFLER MANIFOLD MOUNTING PLATE MULTI-FUNCTION IMPACT SEAL CYLINDER TUBE 1/4 BSPP ELBOW FITTING HEAD ASSEMBLY
 Disassembly OF THE CYLINDER 1) WARNING: All air pressure in the unit must be exhausted prior to disassembly of stretch rod cylinder. 2) Remove valve from manifold (valve not shown). 3) Remove mufflers,
Installation Manual TWM Performance 2010 Mazda 3 short shifter 5 and 6 speed non-mazdaspeed
 Installation Manual TWM Performance 2010 Mazda 3 short shifter 5 and 6 speed non-mazdaspeed Begin the installation by parking on a flat surface, as you will have to engage and disengage the hand brake
Shotgun Single Barrel HPFP install guide
 Shotgun Single Barrel HPFP install guide Thank you for your purchase of the VTT Shotgun Single Barrel HPFP upgrade! First thing to do when you open your box is to make sure all parts are in their respective
Installation and Service Manual
 RAVE Star Lift Installation and Service Manual WARNING! STRICT ADHERENCE TO THESE INSTALLATION INSTRUCTIONS is required and will promote the safety of those installing this product, as well as those who
DO NOT INSTALL, OPERATE, OR MAINTAIN AN ATI PRODUCT UNLESS TRAINED AND QUALIFIED IN PRODUCT AND ACCESSORY INSTALLATION, OPERATION AND MAINTENANCE.
 IOM Supplement IOMS006 ATI SPLIT COUPLING VALVE STEM CONNECTION Scope of Supplement This supplement is intended to assist those who are involved with the installation, operation and maintenance of ATI
Highly Styled, Low Cost Serpentine Drive
 Highly Styled, Low Cost Serpentine Drive Installation Instructions Chrysler 18, 40 and 60 Kit #4040 (without Power Steering) 66.5" Belt Kit #40440 (with Remote Power Steering) 81.5" Belt Kit #40445 (with
INSTALLATION INSTRUCTIONS
 INSTALLATION INSTRUCTIONS Disc Brake Spindle Kit SUM-BKA2447 1964-72 A-BODY 1967-69 F-BODY 1968-74 X-BODY Thank you for choosing SUMMIT RACING for your braking needs. Please take the time to read and carefully
w w w. h d o n l i n e s h o p. d e CHROME FAN KIT GENERAL INSTALLATION -J04347 REV Kit Number Models Kit Contents
 -J0447 REV. 008-08-05 CHROME FAN KIT GENERAL Kit Number 996-08 Models For model fitment information, see the P&A Retail Catalog or the Parts and Accessories section of www.harley-davidson.com (English
REMOVAL & INSTALLATION
 REMOVAL & INSTALLATION NOTE: For reassembly reference, label all electrical connectors, vacuum hoses and fuel lines before removal. Also place mating marks on engine hood and other major assemblies before
DART. Small Block - Technical Notes. Deck Height Bore Main Bearing Size (2.45) 400 (2.65) Weight...
 400 (2.65) Weight...") DART Small Block - Technical Notes Deck Height... 9.025 9.325 Bore... 4.000 4.125 Main Bearing Size... 350 (2.45) 400 (2.65) Weight... 210 lbs Largest Recommended Bore..... 4.185 Largest Recommended Crank
DART Small Block - Technical Notes Deck Height... 9.025 9.325 Bore... 4.000 4.125 Main Bearing Size... 350 (2.45) 400 (2.65) Weight... 210 lbs Largest Recommended Bore..... 4.185 Largest Recommended Crank
SUPER TUBE-TUGGER Continuous Tube Extractor For 1-1/2 2 Tube OD ( )
") www.elliott-tool.com TM-42 Rev. 9/20/04 Elliott offers a complete line of precision tube tools, including: tube expanders Boiler Expanders Heat Exchanger Expanders Condenser Expanders Refinery Expanders
www.elliott-tool.com TM-42 Rev. 9/20/04 Elliott offers a complete line of precision tube tools, including: tube expanders Boiler Expanders Heat Exchanger Expanders Condenser Expanders Refinery Expanders
The Multi-Fuel Timing Conversion Kit Installation & Setup Instructions
 The Multi-Fuel Timing Conversion Kit Installation & Setup Instructions 1. Remove the flywheel shroud from engine, uninstall the recoil pull start unit from the shroud. 2. Remove the valve cover and the
INSTALLATION INSTRUCTIONS PORT INJECTION KIT (PIK)
") INSTALLATION INSTRUCTIONS PORT INJECTION KIT (PIK) 2017+ HONDA CIVIC TYPE-R, K20C1 Document: 19-0194 Support: info@radiumauto.com IMPORTANT NOTES: Installa on must be performed by an experienced technician.
INSTALLATION INSTRUCTIONS PORT INJECTION KIT (PIK) 2017+ HONDA CIVIC TYPE-R, K20C1 Document: 19-0194 Support: info@radiumauto.com IMPORTANT NOTES: Installa on must be performed by an experienced technician.
Torque Specs - Main Caps w/thread lube 1-5 7/16" bolts 65 ft lbs 1 & 5 3/8" bolts 35 ft lbs
 DART Iron Small Block - Technical Notes Deck Height... 9.025" Bore... 4.00" or 4.125" unfinished Main Bearing Size... 350 (2.45") 400 (2.65") Weight... 205 lbs Largest Recommended Bore...... 4.185" Camshaft
CRANKSHAFT REAR RADIAL SEAL
 1B-38 CRANKSHAFT REAR RADIAL SEAL Preceding Work: Removal of flywheel or drive plate 1. Special tool 2. Special tool 3. Crankshaft rear seal Tools Required W9911 0020B (601 589 03 43 00) Crankshaft Rear
Maintenance Information
 45528270 Edition 1 June 2007 Barring Motor T480 Series Maintenance Information Save These Instructions WARNING Always wear eye protection when operating or performing maintenance on this Barring Motor.
Genesis Double Adjustable Shock Assembly and Repair
 Genesis Double Adjustable Shock Assembly and Repair General Operating Description The Genesis Adjustable Shock is adjusted by moving one or both of two bypassing sliding valves. These valves slide longitudinally
advanced FLOW engineering Instruction Manual P/N: / / Make: Toyota Model: Tacoma Year: Engine: V6-4.
 advanced FLOW engineering Instruction Manual P/N: 51-76012 / 54-76012 / 75-76012 Make: Toyota Model: Tacoma Year: 2012-2015 Engine: V6-4.0L Please read the entire instruction manual before proceeding.
Installation Instructions
 Part # 12150299-2005 Up Mustang Level 2 Shockwave System Front Components: 12152401 Front ShockWave Strut Recommended Tools Rear Components: 12155401 Rear ShockWave Miscellaneous Components: 30334000 3
Parallel Grippers- DPDS DIRECTCONNECT Modular Series
 Courtesy of CMA/Flodyne/Hydradyne Motion Control Hydraulic Pneumatic Electrical Mechanical (8) 426-548 www.cmafh.com 1.134 Parallel Grippers- DPDS DIRECTCONNECT Modular Series Mounting Information: Grippers
 Special Tools Needed: DrVanos.com Stage I Installation Instructions Camshaft locking tool TDC Crank pin Sprocket turning tool Tool rental is available with the purchase of a vanos kit *See website for
Turn Signal / Horn Kit PN 7101 by All years Polaris RZR 1000 and RZR 900, 900-4, 900 trail, 900S and 900XC STOP - THIS KIT IS DESIGNED
 All years Polaris RZR 1000 and 1000-4 2015 RZR 900, 900-4, 900 trail, 900S and 900XC STOP - THIS KIT IS DESIGNED SPECIFICALLY FOR ALL YEAR AND MODEL POLARIS RZR 1000 AND 1000-4. ALSO THE 2015 POLARIS RZR
Copper Sleeve, Unit Injector, Replacement
 Volvo Trucks North America Greensboro, NC USA This service bulletin replaces SB 237-46, Copper Sleeve, Unit Injector, Replacement dated 6.2007, publication no. PV776-20177417. DService Bulletin Trucks
Chemical Injection Pump. Quick Start Guide. Pump Models P-075-M1/ ALU P-075-M1/ SS CLASS 1 DIV 1
 Chemical Injection Pump Quick Start Guide Pump Models P-075-M1/8-1750-12 ALU P-075-M1/8-1750-12-SS CLASS 1 DIV 1 Overview SPEC Chemical Injection Pump - Quick Start Guide SPEC Chemical Injection Pumps
PRODUCT SERVICE MANUAL
 PRODUCT SERVICE MANUAL FOR AM322ICX-325AE, 350AN and 400A PUMPS WARNING This Special Instruction Manual and General Instructions Manual, SRM00046, should be read thoroughly prior to pump installation,
Please try our way first.
 1958-1962 Corvette Raingear installation instructions Designer s Note: The 1958-1962 Corvette RainGear wiper system that you have purchased is complex and will require patient fitting. Complete Instructions
MAXI-BORE TM CARBURETTORS
 MAXI-BORE TM CARBURETTORS 26mm/28mm Mik bored to 30.5mm 33mm Smoothbores bored to 38.5mm Don t just rebuild your carbs MAXI-BORE TM them! MAXI-BORE TM carbs are more than just cleaned, rebuilt, or bored,
INDEX INTRODUCTION. Reference No L-01 REVISED:
 12-21L-01 1 1 INTRODUCTION We are constantly working on technical improvement of our products. For this reason, technical data, equipment and design are subject to change without notice. All specifications
FLEXIBLE SHAFT COUPLINGS
 FLEXIBLE JAW - SPIDER PERFORMANCE DATA Four types of elastomer designs and materials are offered to allow for flexibility in addressing specific application requirements. Standard Materials: SOX (NBR)
CHASSIS CONTENTS FRONT WHEEL 6-1 FRONT BRAKE 6-6 FRONT FORK 6-14 STEERING STEM 6-20 REAR WHEEL AND REAR BRAKE 6-25 SUSPENSION 6-31 REAR SWING ARM 6-36
 CHASSIS CONTENTS FRONT WHEEL 6-1 FRONT BRAKE 6-6 FRONT FORK 6-14 STEERING STEM 6-20 REAR WHEEL AND REAR BRAKE 6-25 SUSPENSION 6-31 REAR SWING ARM 6-36 6 6-1 CHASSIS FRONT WHEEL REMOVAL Support the machine
Bthird, or power stroke by the expanding gases. As the
 third, or power stroke by the expanding gases. As the piston reaches DC it enters the fourth cycle. The exhaust valve opens and the piston rises forcing burned gases from the combustion chamber in what
Rekluse Motor Sports. The z-start Clutch KTM LC4 ( )
") Rekluse Motor Sports The z-start Clutch KTM LC4 (1999 2005) Installation Guide Copyright 2002-2004 Rekluse Motor Sports z-start Revision 3.000 RMS630 KTM LC4 191-280 Manual Revision: 103105 Rekluse Motor
Rekluse Motor Sports The z-start Clutch KTM LC4 (1999 2005) Installation Guide Copyright 2002-2004 Rekluse Motor Sports z-start Revision 3.000 RMS630 KTM LC4 191-280 Manual Revision: 103105 Rekluse Motor
55-64 Full Size GM (Impala, Bel Air, etc.) This kit is for axles with a 3 3/8 spread center to center on the top two bolt holes (pictured left).
 This kit is for axles with a 3 3/8 spread center to center on the top two bolt holes (pictured left).") SUM-BK1624A Full Size GM Installation Instructions Rear Disc Conversion 55-64 Full Size GM (Impala, Bel Air, etc.) This kit is for axles with a 3 3/8 spread center to center on the top two bolt holes (pictured
SUM-BK1624A Full Size GM Installation Instructions Rear Disc Conversion 55-64 Full Size GM (Impala, Bel Air, etc.) This kit is for axles with a 3 3/8 spread center to center on the top two bolt holes (pictured
A /F/X Body Instruction Packet Rear Disc Conversion
 A /F/X Body Instruction Packet Rear Disc Conversion 64-72 A Body / 67-81 F Body / 62-74 X Body This kit is for axles with a 3 1/8 spread center to center on the top two bolt holes (pictured left). Rotor
DUAL REMOTE OIL FILTER MODIFICATION 4 TH GENERATION FIREBIRDS
 Written by Dave Dorey (lonetechie) Copyright FirebirdNation.com The following article details how I installed a dual remote oil filter system on my 2001 Formula Firebird. If you decide to tackle this project,
Clutch Installation Guide
 Clutch Installation Guide 0 STOP! READ CAREFULLY BEFORE INSTALLING CLUTCH This clutch must be installed by a qualified installer. Improper installation or failure to replace or resurface the flywheel,
DAH Left Hand Hose Inlet Kit Instruction Sheet For Use with 700 SERIES DAH Dilution at Hand Blend Centers
 DAH Left Hand Hose Inlet Kit 98-54-1 Instruction Sheet For Use with 700 SERIES DAH Dilution at Hand Blend Centers BASIC KIT FUNCTION: The left hand hose inlet kit has two main functions. The kit can be
Installation and Service Manual
 Solar Production Equipment Corp Chemical Injection Pump Installation and Service Manual Pump Models P-075-M1/8-1750-12 ALU P-075-M1/8-1750-12-SS CLASS 1 DIV 1 Table of Contents Overview... 4 Pump Specifications
California State University, Bakersfield. Signals and Systems. Kristin Koehler. California State University, Bakersfield Lecture 4 July 18 th, 2013
 Kristin Koehler California State University, Bakersfield Lecture 4 July 18 th, 2013 1 Outline Internal combustion engines 2 stroke combustion engines 4 stroke combustion engines Diesel engines 2 Consists