Replacing the Foam on the A/C Diverter Flaps Without Removing the Entire Dash
|
|
|
- Britton Adams
- 6 years ago
- Views:
Transcription
1 Replacing the Foam on the A/C Diverter Flaps Without Removing the Entire Dash If you are experiencing bits of grayish black foam blowing out of your dash area when you have your dash A/C or heater going, this is usually a sign that the foam which covers the heater/ac diverter flags has begun to disintegrate. Once this foam is gone, you will not get full A/C or full heat blowing out of your dash vents, just a mix of both. Some owners have chosen to remove the entire dash to replace the missing foam. This is a compilation of the instructions for replacing the deteriorating foam that covers the diverter flaps that DOES NOT require the removal of the entire dash. I have used previous posts by Russell Henderson as well as information sent to me by Joan Williams, who had her flap repairs made by Earl Hungness. I cannot verify if this same technique will work on earlier models. Under the right side of your dash against the firewall is a plastic molding. That is your heater box. With your flashlight, while you have your head under there, have someone operate the heater control and the vent control. You can hear and maybe see where the flappers are located in the heater box. Take your flashlight and look into the blocked right side upper dash vent. You'll probably see foam. Now, on to the repair method that Earl Hungness did on Joan William s Rialta. 1. Unbolt and remove the passenger seat to give yourself room to work. You will need to unplug the electrical connection under the seat that buzzes whenever the passenger seat is not facing forward in driving mode. Hint: Some of us never plug this connection back in. 2. Remove the plastic junk tray that rests on the floor in front of the gear selector and the panel under the radio (Picture 1). 3. You will need to cut through the plastic to access the diverter flaps. When you lie on your back and look up under the dash, you will see where to cut. A headlight strapped to your head works well for this task. A sharp utility knife will work, but a better tool might be the oscillating multi tool (available at Harbor Freight for about $20) The hole will need to be large enough to get your hand inside to tape/glue the new cover over the flaps. (Picture 2) 4. Remove the buttons that change from heat to A/C to see the diverter flaps and what needs to be repaired. Once the piece is out you can look up and turn your dash dials and see the metal pieces move from air to heat. (Pictures 3 & 4) 5. If needed, remove the rest of the old foam with tweezers or whatever tool will fit in the space. You can also blow out the foam debris. The first flap has holes in it and the second flap is solid and farther up into the interior. 6. Remove the old adhesive with nail polish remover, turpentine or Goo Gone. 7. Multiple suggestions for replacement material are a thin sheet of craft foam or heat/cold resistant foil. Make sure it can be easily handled for the reinstall in those narrow confines. Adhesives used were PVC pipe cement and Dollar Store s Fix All adhesive followed up with HVAC Shurtape AF A P/181B FX aluminum tape for good measure. 8. Reinstall the lower panel, the junk tray and the passenger seat.


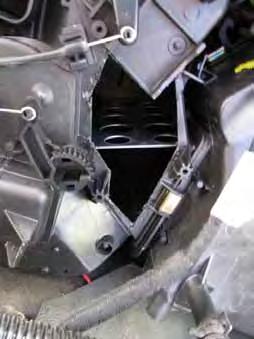
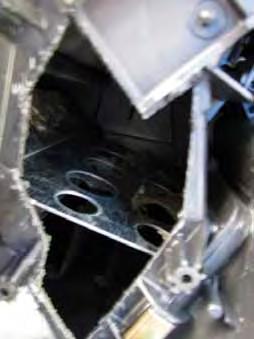
2 Picture 1 Picture 2 Pictures 3 & 4
3 Summary file of repairing the dash flap various sources and ideas Repairing Dash Heater/AC Vent Problem: First, the dash air conditioner and heater fan starts blowing pieces of foam out the ducts. Second, the dash air conditioning is no longer very cold. The foam has disintegrated to the point that the flaps which direct the airflow are no longer covered making the dash controls useless. Solution: Repair the flaps. There appear to be two methods of restoring the flap function. The Robert Crouse method of taking the whole dash out to refoam the flaps ( and the other is Gerry in KC method of cutting a hole in the heater box (RialtaTech@yahoo.com message 54219). Robert replaced his missing foam with a sticky-backed foam from a craft store; Gerry replaced his missing foam with tape, not with duct tape, but with professional HVAC ("alum tape that is used on home heating ducts")...since Robert had his dash out, he was able to replace the foam with foam on the flap controlling the cold/hot (blue dot/red dot), the foam on the ventilation direction (windshield/footwell/footwellface/face) and the power-operated recirculation (u-turn symbol). Gerry was able to replace the foam with tape on the cold/hot flap and the direction flap. Both placed their solution on both sides of the flap. Procedure: I used the Gerry tape method. As advised, I removed the passenger seat for better access. I wore my head mounted light so I could see under the dash. I removed the lower parts of the dash containing the footwell duct, the cupholder and the storage recess. From Harbor Freight, I got a Chicago Electric Oscillating Multifunction Power tool with a one inch wood/plastic saw blade. From a crafts store I got a Sharpie Paint pen in white. Using a three inch spackling blade as a straightedge, I outlined the cutlines from Gerry's pictures. I used the photos from ev_update@yahoo.com 93 EV GL AC/Heater as guide. Orienting the photo so that the writing is on the bottom margin and the colored wire bundle is at the top makes it easier to see the layout. Once I made the cut I determined that the opening could have safely been made larger. (See my modification of the ev update photo.) I made a second cut which made it relatively easy to get my hand in to place the tape on both sides of the flap. I creased the tape lengthwise to give it some rigidity, pulled away the backing to reveal the sticky on one end, placed the sticky end on the flap. With the tape then held in place, I removed the rest of the backing, pressing down on the tape. (Replacing two cut out pieces made closing the opening more difficult.) I suggest cutting the larger opening. I used seven inch pieces of HVAC Shurtape AF A P/181B FX on both sides of the cold/hot flap exposed by the cut and on both sides of the ventilation direction flap easily accessible with the lower dash removed. After testing the operation of the repaired flaps, I glued the removed pieces back into the heater box with PVC pipe cement and sealed with a bead of the Burt recommended Dollar Store Fix All Adhesive The Original Super Glue. (I also put a piece of the aluminum tape over the repair.) Russell Henderson russellhenderson@aol.com 98 RC (FD Double) March 31, 2012


4 Ev_update photo Showing tool in position


5 View with hole cut Tape ready to install
If you study the Mercedes Documents (pictured below) for several minutes before you start, you will understand them as you proceed.
 for several minutes before you start, you will understand them as you proceed.") Removing the C32 center dash panel and radio These are not my instructions, they were garnered from the web, I merely pasted them onto a doc file. There is Air Bag wiring nearby. If you feel uncomfortable
Removing the C32 center dash panel and radio These are not my instructions, they were garnered from the web, I merely pasted them onto a doc file. There is Air Bag wiring nearby. If you feel uncomfortable
1464. Interior Installation. Cover Rear Seat Support Cut the vinyl to approximately the size of the rear seat support.
 Chapter 37 (Video Clip 37) - Interior Installation 1464. Interior Installation Cover Rear Seat Support 1465. Cut the vinyl to approximately the size of the rear seat support. 1466. Make a dry fit of the
Thermostats, Radiator, Coolant Hose, Hydraulic Fan/Steering R&R PT38 8V92
 REMOVING AND REPLACING THE THERMOSTATS, COOLANT HOSES, RADIATOR AND CHANGING THE HYDRAULIC FAN/STEERING FILTER/OIL/SHAFT SEALS ON A 1987 PT38 8V92 BY CURT SPRENGER March 2007 Thermostats, Radiator, Coolant
Model 377, 379, 386, 388, Sleeper no window
 Installation Manual Model 377, 379, 386, 388, 389 63 Sleeper no window 2390 Blackhawk Road P.O. Box 6007 Rockford, IL 61125 www.nitesystem.com 1-866-204-8570 NITE Plus Installation Procedures 1-2 Table
Assembly Instructions
 Assembly Instructions Thank you for downloading the "YZR-M1"paper craft model. By simply following this manual while referring to the names and numbers shown on the parts sheets, you can assemble an authentic-looking
Jeep Wrangler TJ 4.0 LITER Installation instructions
 www.jeepair.com 2000-2001 Jeep Wrangler TJ 4.0 LITER Installation instructions Important information about your system, and warranty DO NOT ADD ANY OIL TO ANY PART OF THE SYSTEM. DO NOT USE THE SIGHT GLASS
RoR Step-by-Step Review * 1967 Dodge Coronet R/T Foose Design Revell Review
 RoR Step-by-Step Review 20130112* 1967 Dodge Coronet R/T Foose Design Revell 85-4906 Review Having been a long time fan of Chip Foose I could hardly wait to get this kit and with it being a MoPar with
TABLE OF CONTENTS INTRODUCTION 3. INSTALLATION PROCEDURES Air Conditioner Location 4. A/C Ducting Installation 5
 585474 1 TABLE OF CONTENTS SECTION PAGE INTRODUCTION 3 INSTALLATION PROCEDURES Air Conditioner Location 4 Air Conditioner Mounting 4 A/C Ducting Installation 5 Power Kit Installation (Batteries). 5 Separator...
Assembly instructions: Fourteen A4-sized sheets. Paper craft: Eighteen A4-sized sheets with 109 parts in all
 Thank you for downloading the "YZR-M1 50th Anniversary US edition" paper craft model. By simply following this manual while referring to the names and numbers shown on the parts sheets, you can assemble
1963 GEN IV SUREFIT VINTAGE AIR CONDITIONING INSTALLATION
 by Randy Irwin 1963 GEN IV SUREFIT VINTAGE AIR CONDITIONING INSTALLATION Randy Irwin - Technical Writer Randy has been involved in the Chevy parts business for over 30 years. He is a wizard at creating,
Climate control components in passenger compartment, servicing
 Page 1 of 34 87-120 Climate control components in passenger compartment, servicing Component electrical testing page 01-115. A/C control head -E87-, removing and installing Notes: Always check DTC memory
UrS6 Brake Servo Replacement Douglas Fifield July 2006
 UrS6 Brake Servo Replacement Douglas Fifield (douglas.fifield@gmail.com) July 2006 This write-up covers the replacement of the brake servo on a 95.5 S6. The master cylinder remained intact and connected,
The Wonderful World of Type II HVAC Systems
 Definitions The Wonderful World of Type II HVAC Systems Mark Wall The following is a short list of definitions that I use throughout this article that comprise many of the major components of the Type
PAPER CRAFT. Assembly Instructions
 PAPER CRAFT Assembly Instructions Thank you for downloading the "TMAX"paper craft model. By simply following this manual while referring to the names and numbers shown on the parts sheets, you can assemble
Subaru SVX 1/43 Scale Model Assembly Instructions
 Subaru SVX 1/43 Scale Model Assembly Instructions Congratulations on your purchase of an unassembled 1/43 scale Subaru SVX! You now own a model that is even more rare than the car it represents. Currently
Table of Contents. Tail Wheel Assembly Installation.. page 01. Stabilizer Installation.. page 02. Fin Installation.. page 03
 Table of Contents Tail Wheel Assembly Installation.. page 01 Stabilizer Installation.. page 02 Fin Installation.. page 03 Elevator and Rudder Hinge Installation.. page 04 Rudder Controls.. page 05 Elevator
This is what we are trying to create in the steps below
 You will need: (1) Some 3/4 aluminium or steel flat bar (+/- 1 foot) (2) About 12 of 3 Aluminium or steel tubing. (2) Piece of 3X3 silicone hose and 2 hose clamps (3) 1 K&N (or similar) high flow filter
OPR Replacement Foxbody Floor Pans Pair (79-93 All)
") OPR Replacement Foxbody Floor Pans Pair (79-93 All) Time Necessary: Approximately 40-hours Tools Required: Spot Weld Cutter Tool Corded Drill Center Punch MIG Welder (minimum recommended: 110VAC/135A)
OPR Replacement Foxbody Floor Pans Pair (79-93 All) Time Necessary: Approximately 40-hours Tools Required: Spot Weld Cutter Tool Corded Drill Center Punch MIG Welder (minimum recommended: 110VAC/135A)
Please try our way first.
 1958-1962 Corvette Raingear installation instructions Designer s Note: The 1958-1962 Corvette RainGear wiper system that you have purchased is complex and will require patient fitting. Complete Instructions
Genuine Corvette Accessories Carbon Fiber Radio Surround Installation Instructions for Corvettes.
 Genuine Corvette Accessories Carbon Fiber Radio Surround Installation Instructions for 2005-2007 Corvettes. Difficulty: 3 out of 5. Time: Plan on about 1 hour. The tools used are: A small flashlight A
Program IV: ProStar TM. Performance A/C International. Series. Study Guide Performance A/C Program IV: International ProStar Series TMT
 Performance A/C International A N AV I S TA R C O M PA N Y Program IV: ProStar TM Study Guide TMT-160701 Series Study Guide Performance A/C Program IV: International ProStar Series TMT-160701 2007 International
TABLE OF CONTENTS INTRODUCTION.. 3. A/C Ducting Installation. Power Kit Installation (Batteries)...5 OPERATION MANUAL 7-8 TOOLS LIST..
...5 OPERATION MANUAL 7-8 TOOLS LIST..") 585457 1 TABLE OF CONTENTS SECTION PAGE INTRODUCTION.. 3 INSTALLATION PROCEDURES Air Conditioner Location...4 Air Conditioner Mounting 4 A/C Ducting Installation...5 Power Kit Installation (Batteries)...5
585457 1 TABLE OF CONTENTS SECTION PAGE INTRODUCTION.. 3 INSTALLATION PROCEDURES Air Conditioner Location...4 Air Conditioner Mounting 4 A/C Ducting Installation...5 Power Kit Installation (Batteries)...5
Instant Chat off the main page of Or simply call our tech team at
 FRONT MOUNT INTERCOOLER 2008-13 STI 2014-04- 08 Thank you for purchasing this PERRIN product for your car! Installation of this product should only be performed by persons experienced with installation
WPS-104 Heater Installation Instructions For 500EFI, 700 XP, & Crew Applications
 WPS-104 Heater Installation Instructions For 500EFI, 700 XP, & Crew Applications ORDER OF INSTALLATION FOR A COMPLETE ENCLOSURE OF A RANGERWARE WPS (Weather Protection System) IS AS FOLLOWS: 1. Heater
Jeep Wrangler TJ. Complete Air Conditioning System. Slide Control Head. Installation instructions
 WWW.JEEPAIR.COM 1996-1998 Jeep Wrangler TJ Complete Air Conditioning System Slide Control Head Installation instructions Kit Information After 1994 every vehicle was designed for R134a refrigerant. The
MEMO. No.4341 Specification: Wing Span: 29.1 (740mm) Length: 36.6 (930mm) 2. Warranty
 Length: 36.6 (930mm) 2. Warranty") MEMO No.4341 Specification: Wing Span: 29.1 (740mm) Length: 36.6 (930mm) 2 Wing Area: 299 sq.in. (19.29 dm ) Weight: 18.9oz. (536.5g) 2 Wing loading: 0.58 oz./sq.ft (27.8g/dm ) Motor: OBL 29/27-07A Warranty
MEMO No.4341 Specification: Wing Span: 29.1 (740mm) Length: 36.6 (930mm) 2 Wing Area: 299 sq.in. (19.29 dm ) Weight: 18.9oz. (536.5g) 2 Wing loading: 0.58 oz./sq.ft (27.8g/dm ) Motor: OBL 29/27-07A Warranty
PAPER CRAFT. Assembly Instructions
 PAPER CRAFT Assembly Instructions Thank you for downloading the "SR400"paper craft model. By simply following this manual while referring to the names and numbers shown on the parts sheets, you can assemble
INSTALLATION INSTRUCTIONS
 INSTALLATION INSTRUCTIONS Part# 22-7810 Add On Kit for Your ADS System Contents: Complete Install Kit for Your ARB CKMTA12V Compressor For the most up-to-date instructions please visit www.updownair.com
Optima K Badge Removal & Installation Tutorial
 P.1 2014-2015 BADGE INSTALLATION & REMOVAL HOOD, TRUNK, AND STEERING WHEEL ***Modification to the rear K Badge emblem of 2011-2013 Optima models as directed in this tutorial is not necessary*** Tools and
Elite Skimmer Installation Manual. Manufacturers of Quality Pond Equipment & Supplies Item #PBESIM
 Elite Skimmer Installation Manual Manufacturers of Quality Pond Equipment & Supplies Item #PBESIM A C G B F E D H I A B C D Biological Waterfall Box Filters harmful waste and toxins from water, keeping
Installation Instructions for the F2B Pedal Bracket Kit
 Installation Instructions for the F2B Pedal Bracket Kit A. General Information 1. Before you begin, familiarize yourself with this installation procedure. It is assumed that the installer is an experienced
Repair of warped dial scale - Sony CRF-5090.
 Repair of warped dial scale - Sony CRF-5090. Apparently this is quite a common problem with this series of receivers. This one was bought on a local auction site where it was clearly advertised as having
INSTALLATION INSTRUCTIONS
 INSTALLATION INSTRUCTIONS Accessory Application Publications No. AII 26031 2004 ODYSSEY Issue Date AUG 2003 NOTE: You cannot install the subwoofer in a vehicle equipped with both an under seat Navigation
RAINGEAR 1955/ 1956 Chevrolet
 RAINGEAR 1955/ 1956 Chevrolet GETTING STARTED: SOME RECOMMENDATIONS PLEASE TRY OUR WAY FIRST! Note: This system is designed with built in adjustments to fit in your car. If, as you are installing it, you
Installation: Heater Core
 INTERIOR Changing the heater core in your 94-02 Dodge Ram has usually meant removing the entire dash and instrument panel, and then removing the heating-ventilating-air conditioning (HVAC) from the firewall.
Required Parts and Tools
 Welcome to the installation guide for the 2004 to 2009 CLK Class Mercedes Benz. Please thoroughly review this manual before installation as there are details that are essential to operation of the vehicle.
INSTALLATION GUIDE RAISED AIR INTAKE ½+ ram heavy duty diesel. AEV30240AA Last Updated: 12/11/14
 RAISED AIR INTAKE 2013 ½+ ram heavy duty diesel AEV30240AA Last Updated: 12/11/14 INSTALLATION GUIDE PLEASE READ BEFORE YOU START TO GUARANTEE A QUALITY INSTALLATION, WE RECOMMEND READING THESE INSTRUCTIONS
Raxiom Factory GPS Rear Back-up Camera Kit (07-17 Wrangler)
") Raxiom Factory GPS Rear Back-up Camera Kit (07-17 Wrangler) Installation Time: 2.5-3Hrs Tools Required: 7mm Socket & Driver 10mm Socket 10mm Open end wrench Knife / Razor blade Zip-ties Wire Cutters Needle
Raxiom Factory GPS Rear Back-up Camera Kit (07-17 Wrangler) Installation Time: 2.5-3Hrs Tools Required: 7mm Socket & Driver 10mm Socket 10mm Open end wrench Knife / Razor blade Zip-ties Wire Cutters Needle
OEM Cruise Control Installation in GMC/Chevy NBS trucks
 OEM Cruise Control Installation in 99-02 GMC/Chevy NBS trucks May 2008 ~ Rampage_Rick Having just installed factory cruise control in my 00 Sierra, I thought I d share the fun. I followed the steps outlined
Jeep Wrangler 4.0 Liter TJ Jeep Wrangler 2.5 Liter TJ Installation instructions
 TM www.jeepair.com 1999 Jeep Wrangler 4.0 Liter TJ 1999-2001 Jeep Wrangler 2.5 Liter TJ Installation instructions Kit Information After 1994 every vehicle was designed for R134a refrigerant. The Jeep kit
Replacing the Vacuum Servo on 700/900 with ACC/ECC Double-Acting Servos. [Procedure from Dick Riess, to whom thanks are given; some notes from Dan]
![Replacing the Vacuum Servo on 700/900 with ACC/ECC Double-Acting Servos. [Procedure from Dick Riess, to whom thanks are given; some notes from Dan]](/thumbs/89/98811956.jpg "Replacing the Vacuum Servo on 700/900 with ACC/ECC Double-Acting Servos. [Procedure from Dick Riess, to whom thanks are given; some notes from Dan]") Replacing Vacuum Servos in ACC/ECC-Equipped 700/900 Cars FAQ Home Volvo Maintenance FAQ for 7xx/9xx/90 Cars HVAC Home OEM Manual Procedure for Replacing Vacuum Servos. See the FAQ file for a large.pdf
Replacing Vacuum Servos in ACC/ECC-Equipped 700/900 Cars FAQ Home Volvo Maintenance FAQ for 7xx/9xx/90 Cars HVAC Home OEM Manual Procedure for Replacing Vacuum Servos. See the FAQ file for a large.pdf
MGB V8 Roadster restoration project Report 138
 24th May 2017. FITTING THE CARPETS - continued I have included quite a lot of detail and photographs on the carpet and trim fitting, as it may help those who decide to do this job on their own car. The
Revised 10/23/2015 Page 2 of 10
 1.Remove the gauge, side panels, hood and headlight. Remove the air box from the throttle bodies then remove the seat and gas tank. 2.Carefully remove temp sensor from air box using a small pick or screw
Front Bucket Seat Upholstery
 Specter Off-Road, Inc. 21600 Nordhoff St. Chatsworth, CA 91311 USA www.sor.com, (818)882-1238, Fax: (818) 882-7144 sor@sor.com Luxury Seat Upholstery Installation Instructions Front Bucket Seat Upholstery
& 76 CHEVROLET NOVA HEATER ONLY
 specializing in AIR CONDITIONING, PARTS AND SYSTEMS for your classic hi l PERFECT FIT IN-DASH HEAT/ COOL/ DEFROST 1969-74 & 76 CHEVROLET NOVA HEATER ONLY CONTROL & OPERATING INSTRUCTIONS The controls on
INSTALLATION INSTRUCTIONS
 INSTALLATION INSTRUCTIONS Accessory Application Publications No. AII 31716 HONDA (For ipod ) FIT Issue Date MAR 2006 PARTS LIST Attachment Kit P/N 08A28-1H1-800 4 Cushion tapes Honda Music Link Kit P/N
2015+ SUBARU STI FRONT-MOUNT INTERCOOLER PARTS LIST AND INSTALLATION GUIDE INSTALL DIFFICULTY DISCLAIMER CAUTION INSTALL PROCEDURE TOOLS NEEDED
 PARTS LIST AND PARTS INCLUDED 1PC ALUMINUM INTAKE PIPE 1PC BAR-AND-PLATE INTERCOOLER 1PC STEEL CRASH BAR W/ MOUNTING HARDWARE 2PC HOT-SIDE INTERCOOLER PIPES 2PC COLD-SIDE INTERCOOLER PIPES 1PC BPV FLANGE
Fog Light setup for a 2003 XL F250 Super Duty using the OEM kit.
 Fog Light setup for a 2003 XL F250 Super Duty using the 2005-2007 OEM kit. Since the kit (1C3Z15200BB) for the 2001-2004 series truck was not available anymore, I explored options to put a set of OEM fog
The M7 Direct Flow Intercooler (DFIC) Installation Guide
 Installation Guide") The M7 Direct Flow Intercooler (DFIC) Installation Guide This information is meant only as a guide. The author of this information,, or any M7 Tuning employees assumes no liabilities for any outcomes resulting
The M7 Direct Flow Intercooler (DFIC) Installation Guide This information is meant only as a guide. The author of this information,, or any M7 Tuning employees assumes no liabilities for any outcomes resulting
Installation Instructions for TJ Jeep s Fiberglass Replacement Bodies and Parts
 Installation Instructions for 1997-2006 TJ Jeep s Fiberglass Replacement Bodies and Parts Getting started: We recommend that you take pictures as you dismantle your Jeep. These pictures will help you when
5102 JK Hood Louver Panel
 SYNERGY MFG. 870 INDUSTRIAL WAY, SAN LUIS OBISPO, CA (805) 242-0397 5102 JK Hood Louver Panel GENERAL NOTES: These instructions are also available on our website; www.synergymfg.com. Check the website
CENTRAL VACUUM SYSTEMS
 CENTRAL VACUUM SYSTEMS INSTALLATION INSTRUCTIONS Review this manual before installing the central vacuum system Dynovac Industries 1 800 226 1221 1 403 346 4877 #1, 6841 52 Avenue Red Deer, Alberta T4N
A $10 Upgrade to my Harbor Freight 90 Amp Flux Wire Welder, version 2
 A $10 Upgrade to my Harbor Freight 90 Amp Flux Wire Welder, version 2 By R. G. Sparber Copyleft protects this document. 1 My Harbor Freight 90 amp flux wire welder is surprisingly good. But as with most
STEPS FOR REMOVING REAR ASHTRAY & CUP HOLDER, CENTER ARMREST, E- BRAKE CONSOLE, FRONT ASHTRAY, LOWER CENTER CONSOLE AND GLOVE BOX
 Please give credit where credit is due! This DIY was completed ENTIRELY by the hardest working VW Vortex moderator on the site!! Gary Thompson, Ph.D. - vortex ID VGRT6, email address vgrt6@yahoo.com. Please
Jeep Wrangler TJ 4.0 LITER Installation instructions
 www.jeepair.com 2002-2004 Jeep Wrangler TJ 4.0 LITER Installation instructions Kit Information These directions are for 2002-2006 model Jeep Wranglers. After 1994 every vehicle was designed for R134a refrigerant.
1967 (Late) CORVETTE STANDARD (NON-ADJUSTABLE) STEERING COLUMN DISASSEMBLY & REPAIR INSTRUCTIONS PAPER #2
 CORVETTE STANDARD (NON-ADJUSTABLE) STEERING COLUMN DISASSEMBLY & REPAIR INSTRUCTIONS PAPER #2") Last Revision: 03SE2012 1967 (Late) - 1968 CORVETTE STANDARD (NON-ADJUSTABLE) STEERING COLUMN DISASSEMBLY & REPAIR INSTRUCTIONS PAPER #2 Disassembly and Repair Instructions Addressed in this Paper Degree
Last Revision: 03SE2012 1967 (Late) - 1968 CORVETTE STANDARD (NON-ADJUSTABLE) STEERING COLUMN DISASSEMBLY & REPAIR INSTRUCTIONS PAPER #2 Disassembly and Repair Instructions Addressed in this Paper Degree
Installation Instructions and Suggestions For Jeep YJ Fiberglass Replacement Bodies
 Installation Instructions and Suggestions For Jeep YJ Fiberglass Replacement Bodies Getting started with the removal of your existing Jeep body. Trust nothing to memory; take photos of everything at different
Repairing a Loose Headlight Reflector Volvo V70XC ? Mark Pilant
 Repairing a Loose Headlight Reflector Volvo V70XC 2001 200? Mark Pilant If you find yourself in a position where the headlight adjusters do not change the aiming of your headlight, it is possible one of
How to Make Realistic Roads & Parking Lots
 How to Make Realistic Roads & Parking Lots Presented by Jeffrey Jarr Using Lightweight Spackling! Tools & Materials: Roads & Highways Red Devil Onetime Lightweight Spackling 3M All Purpose Sanding Sponge
INSTALLATION INSTRUCTIONS C-VS-2000-DUR-1 20 VEHICLE SPECIFIC CONSOLE for 2018 Dodge Durango with Standard Shifter
 INSTALLATION INSTRUCTIONS C-VS-2000-DUR-1 20 VEHICLE SPECIFIC CONSOLE for 2018 Dodge Durango with Standard Shifter TOOLS REQUIRED: Phillips Screw Driver T-20 Torx bit Standard Socket set 9/64 Allen wrench
Hood stripes Tools needed from AutoZone or any auto parts store: bottle spray, squeegee, a towel that you re using to clean you car up after washing,
 WARNING These following pages are instruction for C5 CE stripes; however, it is the same method applying vinyl. Please spend time to read thru these pages. At the end, it is your C5 GS1 stripes instruction.
TFI 70GAL XB ADJUSTABLE OVER THE BED RAIL TOOL BOX REFUELING SYSTEM
 TFI 70GAL XB ADJUSTABLE OVER THE BED RAIL TOOL BOX REFUELING SYSTEM Installation Instructions 889 IS-889 Page 2 of 12 FOREWORD Thank you for a purchasing a Transfer Flow Inc. 70gal XB adjustable over the
INSTALLATION INSTRUCTIONS
 2007-Current Jeep Wrangler 360º System for Aftermarket display (Kit # AVMS-3700v2) Please read thoroughly before starting installation and check that kit contents are complete. Items Included in the Kit:
INSTALLATION INSTRUCTIONS
 2007-Current Jeep Wrangler 360º System for Factory Display Radios (Kit # AVMS-3701) Please read thoroughly before starting installation and check that kit contents are complete. Items Included in the Kit:
INSTALLATION INSTRUCTIONS
 2007-Current Jeep Wrangler 360º System for Factory Display Radios (Kit # AVMS-3701v2) Please read thoroughly before starting installation and check that kit contents are complete. Items Included in the
991 ROLL BAR INSTALLATION:
 991 ROLL BAR INSTALLATION: We highly recommend CMS roll bars be fitted by shops with experience in installing roll bars. 1. Move power seats to a location where the four bolts can be removed and remove
2007 Crown Victoria Police Interceptor (P71) Blend Door Actuator Replacement (If I did it, you can too.)
 Blend Door Actuator Replacement (If I did it, you can too.)") 2007 Crown Victoria Police Interceptor (P71) Blend Door Actuator Replacement (If I did it, you can too.) I'm not saying this is the only way, or even the right way, but it worked for me. First time I've
2007 Crown Victoria Police Interceptor (P71) Blend Door Actuator Replacement (If I did it, you can too.) I'm not saying this is the only way, or even the right way, but it worked for me. First time I've
Tip: 2856 LED Lighting for the Airport Express Set Date:
 Hi All, The 2856 Airport Express set was manufactured in 1983. On 09-11-1989 the locomotive was given a digital upgrade using a 6080 decoder. It has since had a digital upgrade to a high performance motor
SAFETY SENSORS FIELD OF VIEW WILL BE ALTERED WITH USE OF THE REPLACEMENT BUMPER. Injury hazard
 SAFETY Your safety and the safety of others is very important. In order to help you make informed decisions about safety, we have provided installation instructions and other information. These instructions
Dash removal for 1968 Chevelles
 Dash removal for 1968 Chevelles This is the procedure I used when I removed the dash from my car. It s a column shift, automatic trans, A/C car with tach and gauges. 1. Disconnect the battery. 2. Remove
TECHNICAL INFORMATION RECALL ACE System Pipe Leak
 RECALL ACE System Pipe Leak AFFECTED VEHICLE RANGE: Ref: Issue: 1 Date: 01/12/01 Discovery Series II (LT) YA261114 to YA263118 SITUATION: ACE HIGH-PRESSURE PIPE MISBUILD Some ACE high pressure supply pipes
INSTALLATION INSTRUCTIONS
 INSTALLATION INSTRUCTIONS Part# 22-7810 Jeep JK/JKU ARB Mounting Kit 2007-2018.5 For the most up to date instructions please visit www.updownair.com www.updownair.com 833 226 4863 IMPORTANT INFORMATION
Installation Instructions
 Installation Instructions Jeep JK Unlimited (2007 Present) Mounting Bracket and Air Line System Kit for ARB On-Board Twin Air Compressor (CKMTA12) Made in the USA Kit Contents: 1 Bracket for ARB Compressor
Re-Stuffing the Multi-Capacitor Can in 600 Series Zenith Trans-Oceanics
 Re-Stuffing the Multi-Capacitor Can in 600 Series Zenith Trans-Oceanics 2014 by Ed Morris 600 Series Zenith Trans-Oceanic radios have a four section multi-capacitor can located behind the dial face. When
Ford Super Duty F-250, F and up
 Ford Super Duty F-250, F-350 2005 and up Installing Upfitter Switches by Richard L. Ray If you want to add a few aftermarket options to your new Ford Super Duty, Ford Motor Company makes things easy for
DIY: Shiver Valve Check, Illustrated
 DIY: Shiver Valve Check, Illustrated By Petemoss, AF1 Forum Tools needed: 4mm allen wrench to remove all the fairing pieces 2.5mm allen wrench to remove battery holder 5mm allen wrench for valve cover
Electric or I/C. Velocity
 Electric or I/C Velocity This, the latest in the Weston UK range of hyper performance ARTF kits, has been developed over a period of years to provide the ultimate flight performance. PLEASE NOTE: THIS
SAM-1 Fan Kit Installation Into HENG S Range Hood Model #R C David Jeffs June 2015
 SAM-1 Fan Kit Installation Into HENG S Range Hood Model #R0623500C David Jeffs June 2015 If you own an RV you probably have come to the same conclusion that I have. Everything related to an RV is plagued
How I installed new brake pads on my i with Sport Package (should be fine for other E39 s) By Robert B.
 By Robert B.") How I installed new brake pads on my 1999 528i with Sport Package (should be fine for other E39 s) How I installed new brake pads on my 1999 528i with Sport Package (should be fine for other E39 s) By
How I installed new brake pads on my 1999 528i with Sport Package (should be fine for other E39 s) How I installed new brake pads on my 1999 528i with Sport Package (should be fine for other E39 s) By
RoadComfort TM. Installation Manual Vibration Massage & Heat
 RoadComfort TM Vibration Massage & Heat Installation Manual 1-562-447-1780 WWW.RELAXOR.COM Table of Contents I Required tools II System Configuration III Motor Placement Bottom IV Motor Placement Back
INSTALLATION INSTRUCTIONS
 INSTALLATION INSTRUCTIONS Document# 19-0038 2004+ Lotus Elise (Series 2) Rear Clamshell Removal Kit Safely support the vehicle. This is a two-person job. Allow 1 to 2 hours for initial disassembly. Have
Volvo 850 Radiator Replacement Jason Reed 29 March 2013
 This write up covers removing and replacing the radiator on a 97 855 GLT wagon with light pressure turbo and automatic transmission. This car has 162K miles. The radiator, which was original, developed
WARNING These following pages are instruction for C5 CE stripes; however, it is the same method applying vinyl. Please spend time to read thru these
 WARNING These following pages are instruction for C5 CE stripes; however, it is the same method applying vinyl. Please spend time to read thru these pages. At the end, it is your C5/C6 ME stripes' instruction.
2001 V70 T5 ETM Removal and Cleaning Directions
 2001 V70 T5 ETM Removal and Cleaning Directions Howard Cheng howardc64@gmail.com 10/24/05 Version 1.4 Read this before you start I performed this ETM cleaning because I had gotten 2 reduced performance
Cold Air Intake Installation Instructions
 BAVARIAN AUTOSPORT Cold Air Intake Installation Instructions Page 1/5 3.06 INS264 NOTE: The vehicle shown for this installation is equipped with ASC+T. If your vehicle dos not have this feature, installation
Rear Speaker replacement.
 Rear Speaker replacement. First off you need the right rear speakers. The easy bit is 6x9 and better than a 15W paper cone, the difficult bit is getting a mounting depth under 74mm. Or to be more precise,
Lanier R/C F-4 Phantom
 Lanier R/C.40-.46 F-4 Phantom Almost Ready to Fly WARNING! THIS IS NOT A TOY! THIS IS NOT A BEGINNERS AIRPLANE This R/C kit and the model you will build from it is not a toy! It is capable of serious bodily
INSTALLATION INSTRUCTIONS
 COLD AIR INTAKE INSTALLATION INSTRUCTIONS PART NUMBER D760-0620 & D760-0621 PARTS LIST APPLICATION: 9/98-2003 E39 540i 4.4L 4" Intake Tube Air Filter w/ clamp Silicone Hose 80-100mm Hose Clamp 90-110mm
DrVanos.com Stage II Installation Instructions. Tool rental is available with the purchase of a vanos kit *See website for more info*
 DrVanos.com Stage II Installation Instructions Special Tools Needed: Camshaft locking tool TDC Crank pin Sprocket turning tool Tool rental is available with the purchase of a vanos kit *See website for
Building a Mick Reeves 1/4.5 scale Hurricane. Instalment 1
 Building a Mick Reeves 1/4.5 scale Hurricane. Instalment 1 Research, Planning and Purchasing A couple of years ago I made a 1/5 scale Vailly Hurricane but I have never been that happy with it due to the
Module 4: Climate Control
 ÂÂ ÂÂ Air-Conditioning Electronic Control Unit (ECU) Â Controlling Cabin Air Temperature Servo Motors Electric Servo Motors ÂÂ Air-Conditioning Electronic Control Unit (ECU) Automatic Climate Control Sensors
for Audi B7/A4 ( ) Part Number ES8017 Installation Instructions - ECS Tuning Vent Pod Vacuum/Boost Gauge Kit
 Part Number ES8017 Installation Instructions - ECS Tuning Vent Pod Vacuum/Boost Gauge Kit") Installation Instructions - ECS Tuning Vent Pod Vacuum/Boost Gauge Kit This tutorial is provided as a courtesy by ECS Tuning. Part Number for (2005-2008) Proper service and repair procedures are vital
Installation Instructions - ECS Tuning Vent Pod Vacuum/Boost Gauge Kit This tutorial is provided as a courtesy by ECS Tuning. Part Number for (2005-2008) Proper service and repair procedures are vital
Installing AMP-wiring in a New Beetle
 Installing AMP-wiring in a New Beetle Vehicle used: New Beetle 2.0i Type 9C (1999) Used set of cables: Dietz 35mm² power cable, double shielded Dietz chinch cable ( 35mm² Professional Line ) First of all:
WPS-104 Heater. Installation Instructions
 WPS-104 Heater Installation Instructions For 2007 vehicles see page 15 WPS 104 HEATER SYSTEM INSTALLATION INSTRUCTIONS If this is a complete installation of top, windshield and heater system, for ease
Ford Super Duty Dash Lighting LED Upgrade F250 4x4 XLT Sport Crew Cab
 Page 1 of 32 Ford Super Duty Dash Lighting LED Upgrade 2004 F250 4x4 XLT Sport Crew Cab Back to 2004 F250 Main Page Click Here for a PDF version of this article ** Updated 12/15/09 ** New version of the
INSTALLATION INSTRUCTIONS
 INSTALLATION INSTRUCTIONS Part# 69-0717 AIR IT UP 4 Tire On Board Installed Air Delivery System with Rear Mounted Controller (Requires External Air Source) For the most up-to-date instructions please visit
ITEM PART NO. DESCRIPTION QTY BODY - SNORKEL (SS1410HP) " AIR RAM ASSEMBLY BRACKET - UPPER MOUNTING 1
 AIR RAM ASSEMBLY BRACKET - UPPER MOUNTING 1") L; SS1410HP SAFARI ARMAX SNORKEL VOLKSWAGEN AMAROK V6 TDI550 3.0L TDI V6 Engine Parts List 10/04/2018 ITEM PART NO. DESCRIPTION QTY 1 910-133-600 BODY - SNORKEL (SS1410HP) 1 2 000-135-960 4" AIR RAM ASSEMBLY
L; SS1410HP SAFARI ARMAX SNORKEL VOLKSWAGEN AMAROK V6 TDI550 3.0L TDI V6 Engine Parts List 10/04/2018 ITEM PART NO. DESCRIPTION QTY 1 910-133-600 BODY - SNORKEL (SS1410HP) 1 2 000-135-960 4" AIR RAM ASSEMBLY
Lincoln Mark VII T5 Swap Version submitted by 5.0 bird
 Lincoln Mark VII 1984-1989 T5 Swap Version 20070611 submitted by 5.0 bird I've decided to make an article to assist with the T5 swap for the 84-89 Mark VIIs, since I was just in there because my DOA didn't
Kodak 750H Carousel Projector Repair
 Kodak 750H Carousel Projector Repair An AT YOUR OWN RISK PROJECT by Klaus Wolter, Rev B, 3-26-2016 Here I documen the repair of my 750H carousel. A common problem with this projector, and all of the projectors
Installation instructions for Camaro/Firebird and Nova* Windshield Wiper Systems
 Installation instructions for 1967-69 Camaro/Firebird and 1968-74 Nova* Windshield Wiper Systems The Raingear 1967-69 Camaro/Firebird and 1964-74 Nova wiper system is designed for ease of installation