TONER CARTRIDGE REMANUFACTURING INSTRUCTIONS OKIDATA B710/720/730 SERIES TONER CARTRIDGE
|
|
|
- Whitney Lee
- 6 years ago
- Views:
Transcription

1 OKIDATA B710/720/730 SERIES TONER CARTRIDGE REMANUFACTURING INSTRUCTIONS OKIDATA B710/720/730 SERIES TONER CARTRIDGE
, 1200dpi laser printer engine. The first page out is stated to be under 8 seconds. The processor is 600 MHz, and all come standard with 128Mb RAM, maximum 640Mb.")
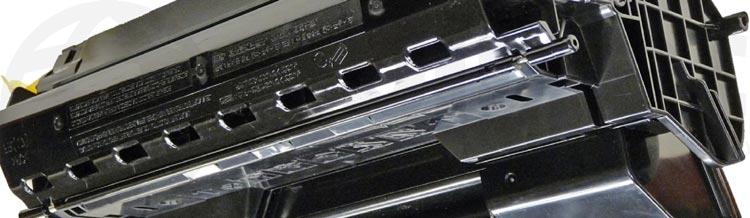
2 REMANUFACTURING THE OKIDATA B710/720/730 SERIES TONER CARTRIDGE By Mike Josiah and the Technical Staff at UniNet First introduced in December 2010, the Okidata B710/720/730 series are based on a 52ppm(depending on the model), 1200dpi laser printer engine. The first page out is stated to be under 8 seconds. The processor is 600 MHz, and all come standard with 128Mb RAM, maximum 640Mb. These machines were designed for use as workgroup printers, so if you have a customer that has one, the cartridge volume will be on the high side. With the list prices of these cartridges at $ USD for the low yield, and $ USD for the high yield, they are nice profitable cartridges, though a bit unique in their construction, they are fairly easy to remanufacture. These cartridges use white plastic pins located on each side that lock the two halves of the cartridge in place. The heads of these pins have a one-way screw head on them. We have contacted multiple specialty screw manufacturers to see if a special tool is available, but were not able to find one. They can be removed by inserting a 1 long #6 or #8 wood screw into the center of the pin. You can then twist the pin to release the two small tabs and pull it out. The following instructions will go more into detail on this. MACHINES BASED ON THE OKIDATA B710/720/730 SERIES ENGINE B710n / B710dn / B720n / B720dn / B730n / B730dn TONER CARTRIDGES USED FOR THESE MACHINES ,000 pages (all models) $ USD ,000 pages (B720n/dn only) $ USD ,000 Pages (B730n/dn only) $ USD With standard costs like these, the profit margins for remanufacturing these cartridges are nice! The 15K cores can be made into the higher yield cartridges. Check with your supplier for chip and toner load availability.
 5. New drum (optional) 6. New wiper blade (optional) 7. New doctor blade (optional) 8. Cotton swabs 9. Isopropyl alcohol 10. Drum padding powder 11.")


3 SUPPLIES REQUIRED 1. Replacement toner (700g) for use in the Okidata B700 series toner cartridge (15,000 pages) 2. New replacement chip 3. Sealing strip 4. New replacement locking pins (optional) 5. New drum (optional) 6. New wiper blade (optional) 7. New doctor blade (optional) 8. Cotton swabs 9. Isopropyl alcohol 10. Drum padding powder 11. Conductive grease 12. Dedicated magnetic roller cleaner TOOLS REQUIRED 1. Phillips head screwdriver 2. Small common screwdriver 3. A 1 long #6 or #8 wood screw 4. Needle nose pliers 5. Spring hook 6. Vacuum approved for toner 1. On either side of the cartridge is a white plastic pin with one-way screw heads. These pins are what hold and lock both halves together. Specialty drivers to remove them are not available, so the only way as of now to remove them is to insert a 1 long #6 or #8 wood screw into the center of the pin. Once the screw has been inserted, turn the pin/screw so that the two small tabs in the pin are free. Remove the pin. The head of the pin breaks easily so do not force the screw in too far, just enough to get a grip. New pins are available if they break on you.
 side of the cartridge.")


4 2. Remove the spring from the right (fill plug) side of the cartridge. Separate the two halves by lifting the waste chamber straight up off the supply chamber. 3. Remove the two screws and metal drum axle pin from left side of the cartridge. 4. Remove the two screws and plastic drum bushing from the right side of the cartridge.

5 5. Remove the drum. 6. Remove the PCR from its holders. 7. Remove the two screws and wiper blade. This blade has a very tight fit. Be careful not to break the alignment pins!


6 8. Clean out the waste chamber. Be very careful not to lose or damage the foam wiper blade seal. 9. Coat the wiper blade with your preferred lubricant, and install in the cartridge. As stated previously, this blade has a very tight fit. Be careful not to break the alignment pins! Install the two long screws the four short screws are for the drum axle pins only.


7 10. Clean the PCR contacts with a cotton swab and alcohol. Place a small amount of conductive grease on the black PCR holder. 11. Clean the PCR with your preferred PCR cleaner, and install in the holders. 12. Install the drum, axle pins, and screws. Make sure that there is clean conductive grease on the drum axle pin shaft.


8 13. While the cartridge is apart this is the best time to remove the old chip. Press in on the two tabs from the inside wall of the cartridge, and remove the chip. 14. With a small jeweler s screwdriver, pry out the upper fill plug. Dump out any remaining toner from the upper hopper. 15. With the same jeweler s screwdriver, pry out the lower fill plug, and dump out any remaining toner from the lower section.


9 16. On the side opposite the fill plug, remove the two screws and end cap and gears as shown. Leave the top large white gear in place. 17. Lift up the locking arm on the right side of the magnetic roller. With the keyed shaft of the magnetic roller free, lift up on the keyed end by the locking arm. Pull the entire magnetic roller assembly free.


10 18. Remove the two screws and doctor blade. Watch out for the alignment pins! Clean out any remaining toner. 19. Remove the four screws that hold the upper supply section to the lower. Remove the upper section.


11 20. Remove the two agitators from the lower hopper and clean them off. 21. Thoroughly clean out both the lower and upper chambers. Be careful not to lose or damage the square foam seals on the lower chamber!


12 22. Install the two agitators. Make sure the rectangle hole is towards the top of the cartridge. 23. Place the upper chamber onto the lower, and install the four screws.


13 24. If you are installing a seal, on the lower section, remove the seal plug by pressing in on the side tab. 25. Install the seal. Make sure the seal tab is slid into the seal tab slot. 26. Install the seal plug. 27. Install the cleaned doctor blade and two screws. Be careful not to damage the alignment pins.


14 28. Clean the magnetic roller assembly with a dedicated magnetic roller cleaner. Install the assembly left side (round shaft) first. Make sure the locking arm is firmly locked in place. 29. Install the gears in the order shown. Install the end cap and two screws.


15 30. Install the lower fill plug. 31. Fill with 700g toner for use in the Okidata B700 series toner cartridge in the upper chamber. 32. Install the upper fill plug, and check for leaks. 33. Install the toner supply section onto the waste chamber. Make sure the spring on the supply hopper fits into the plastic ring on the waste hopper.


16 34. Install the two white plastic locking pins. 35. Install the spring onto the outside of the cartridge. 36. Replace the chip. Use a thin screwdriver to separate the two halves as shown. Replace the chip and re-install.
17 CARTRIDGE DEFECT LISTING We have found no strange defects related to these cartridges. The following is a list of repetitive defects for the more common failures: 94.4 mm: OPC drum 94.2 mm: Fuser assembly 52 mm: Magnetic roller 51 mm: Transfer roller 38 mm: PCR RUNNING TEST PAGES 1. Press <Enter> to go into the menu mode. 2. Press the Down Arrow button until Information Menu is highlighted. 3. Press <Enter>. 4. Press the Down Arrow button until Print Menu Map is highlighted. 5. Press <Enter> twice. 6. The Menu Map prints. To run other pages, go to the configuration menu and follow the same basic steps as above. Pages available are the Page Count, Supplies Life, Network, and System Info. MACHINE ERROR CODES The error codes in these machines follow the trend of using all English messages (no numeric codes). There is no need to list them here.
THE ML-3471 TONER CARTRIDGE
 SAMSUNG ML-3471 TONER CARTRIDGE REMANUFACTURING INSTRUCTIONS THE ML-3471 TONER CARTRIDGE DOC# 0438 By Mike Josiah and the technical staff at Summit Technologies a distributor of Summit and Uninet Products.
XEROX PHASER 3635 MFP
 XEROX PHASER 3635 MFP TONER CARTRIDGE REMANUFACTURING INSTRUCTIONS XEROX PHASER 3635 TONER CARTRIDGE REMANUFACTURING THE XEROX PHASER 3635 MFP TONER CARTRIDGE By Mike Josiah and the Technical Staff at
TONER CARTRIDGE REMANUFACTURING INSTRUCTIONS XEROX PHASER 3320 TONER CARTRIDGE
 XEROX PHASER 3320 TONER CARTRIDGE REMANUFACTURING INSTRUCTIONS XEROX PHASER 3320 TONER CARTRIDGE REMANUFACTURING THE XEROX PHASER 3320 TONER CARTRIDGE By Mike Josiah and the Technical Staff at UniNet First
HP ENTERPRISE 600 M651/M680 SERIES TONER CARTRIDGE REMANUFACTURING INSTRUCTIONS
 HP ENTERPRISE 600 M651/M680 SERIES TONER CARTRIDGE REMANUFACTURING INSTRUCTIONS HP 652A TONER CARTRIDGE RREMANUFACTURING THE HP COLOR ENTERPRISE 600 M651/M680 SERIES TONER CARTRIDGES By Mike Josiah and
ML-3712 MLT-D205 TONER CARTRIDGE REMANUFACTURING INSTRUCTIONS
 SAMSUNG ML-3712 MLT-D205 TONER CARTRIDGE REMANUFACTURING INSTRUCTIONS SAMSUNG MLT-D205 TONER CARTRIDGE CHANGES TO THE SAMSUNG MLT-D205 DRUM & CARTRIDGE By Mike Josiah and the Technical Staff at UniNet
TONER CARTRIDGE REMANUFACTURING INSTRUCTIONS LASERJET P1505 SERIES TONER CARTRIDGE
 HP LASERJET P1505 TONER CARTRIDGE REMANUFACTURING INSTRUCTIONS HP LASERJET P1505 SERIES TONER CARTRIDGE 2010 UniNet Imaging Inc. All trademark names and artwork are property of their respective owners.
LEXMARK C780 CARTRIDGE REMANUFACTURING INSTRUCTIONS LEXMARK C780 TONER CARTRIDGE
 LEXMARK C780 CARTRIDGE REMANUFACTURING INSTRUCTIONS LEXMARK C780 TONER CARTRIDGE REMANUFACTURING THE LEXMARK C780 BLACK & COLOR TONER CARTRIDGES First released in April 2008, the Lexmark C780 is based
IMAGECLASS MF7200 SERIES (EP105) TONER CARTRIDGE REMANUFACTURING INSTRUCTIONS
 TONER CARTRIDGE REMANUFACTURING INSTRUCTIONS") CANON IMAGECLASS MF7200 SERIES (EP105) TONER CARTRIDGE REMANUFACTURING INSTRUCTIONS CANON EP105 TONER CARTRIDGE REMANUFACTURING THE CANON IMAGECLASS MF7200 SERIES EP105 TONER CARTRIDGE By Mike Josiah and
CANON IMAGECLASS MF7200 SERIES (EP105) TONER CARTRIDGE REMANUFACTURING INSTRUCTIONS CANON EP105 TONER CARTRIDGE REMANUFACTURING THE CANON IMAGECLASS MF7200 SERIES EP105 TONER CARTRIDGE By Mike Josiah and
XEROX WORKCENTRE 4150
 XEROX WORKCENTRE 4150 TONER CARTRIDGE REMANUFACTURING INSTRUCTIONS 013R00623 DRUM UNIT REMANUFACTURING THE XEROX WORKCENTRE 4150 DRUM UNIT By Enrique E. Estura, Daniel Reyes, and the Technical Staff at
Technical Document. Panafax UF-890 (actually revisiting the Panafax UF-550)
") Technical Document Disassembly Instructions SUMMIT Laser Products 95 Orville Drive Bohemia, New York 11716 Tel: 631-218-8376 Fax: 631-218-3275 Panafax UF-890 (actually revisiting the Panafax UF-550) Toner
Technical Document Disassembly Instructions SUMMIT Laser Products 95 Orville Drive Bohemia, New York 11716 Tel: 631-218-8376 Fax: 631-218-3275 Panafax UF-890 (actually revisiting the Panafax UF-550) Toner
1320 TO P2015 TONER CARTRIDGE CONVERSION INSTRUCTIONS
 HP 1320 TO P2015 TONER CARTRIDGE CONVERSION INSTRUCTIONS HP 1320 TO P2015 CONVERSION KIT (UNINET PART #1114) HP 1320 TO P2015 TONER CARTRIDGE CONVERSION INSTRUCTIONS By Javier Gonzalez and the Technical
HP LASERJET
 HP LASERJET 4200 4300 TONER CARTRIDGE REMANUFACTURING INSTRUCTIONS HP LASERJET 4200 TONER CARTRIDGE (Q1338A) HP LASERJET 4300 TONER CARTRIDGE (Q1339A) REMANUFACTURING HP LASERJET 4200/4300 TONER CARTRIDGES
MINOLTA MAGICOLOR 5430/5440/5450 CARTRIDGE REMANUFACTURING INSTRUCTIONS
 MINOLTA MAGICOLOR 5430/5440/5450 CARTRIDGE REMANUFACTURING INSTRUCTIONS MINOLTA MAGICOLOR 5430 Color Laser Printer with Toner Cartridge MINOLTA MAGICOLOR 5430 TONER CARTRIDGE SIDE VIEW WITH END CAP SHOWN
KONICA MINOLTA MAGICOLOR
 KONICA MINOLTA MAGICOLOR 5430 5440 5450 TONER CARTRIDGE REMANUFACTURING INSTRUCTIONS KONICA MINOLTA MAGICOLOR 5430 TONER CARTRIDGE REMANUFACTURING THE KONICA MINOLTA MAGICOLOR 5430/5440/5450 TONER CARTRIDGES
DRUM UNIT REMANUFACTURING INSTRUCTIONS
 Absolute COLOR Absolute BLACK Unidrums Unirollers Uniparts Unicoatings EPSON ACULASER C2600 DRUM UNIT REMANUFACTURING INSTRUCTIONS EPSON ACULASER C2600 COLOUR LASER PRINTER EPSON ACULASER C2600 DRUM UNIT
HP 5500 COLOR LASER PRINTER W/TONER CARTRIDGES
 AbsoluteCOLOR AbsoluteBLACK UniDrums UniRollers UniParts UniCoatings AbsoluteCOLOR AbsoluteBLACK UniDrums UniRollers UniParts UniCoatings HP 5500 CARTRIDGE REMANUFACTURING INSTRUCTIONS HP 5500 COLOR LASER
Sharp AR-160 OPC Cartridges DOC-0270
 Home New Arrivals! Company Info Publications Special Features Contact Us Overview Tools Required Supplies Needed Disassembly Recommended Supplies Sharp AR-160 OPC Cartridges DOC-0270 OVERVIEW The Sharp
DELL C 5100 TONER CARTRIDGE REMANUFACTURING INSTRUCTIONS
 DELL C 5100 REMANUFACTURING INSTRUCTIONS DELL C 5100 LASER PRINTER DELL C 5100 REMOVING THE GEARLESS END CAP 1. Remove the gearless end cap (shown) to access the toner fill cap. Using a small flathead
Conversion Kit for HP1200 Cartridge
 OEM HP1200 (C7115A) Cartridge Conversion Using T.P.E. CC1197 Canon EP26/EP27/X25/U Type Conversion Kit for HP1200 Cartridge OEM HP1200 (C7115A) T.P.E. CC1197 Canon EP26/EP27/X25/U Type Conversion Kit for
TPE CC1997CRS HP M252/MFP M277 X TONER HOPPER 60GRMS FILL(WITH SEAL) OEM HP M252/MFP M277 (CF400A-CF403A
 OEM HP M252/MFP M277 (CF400A-CF403A") Installation Instructions for TPE CC1997CRS HP M252/MFP M277 X TONER HOPPER 60GRMS FILL(WITH SEAL) OEM HP M252/MFP M277 (CF400A-CF403A or CF400X-CF403X) Cartridge T.P.E. CC1997CRS HP M252/MFP M277 X TONER
Installation Instructions for TPE CC1997CRS HP M252/MFP M277 X TONER HOPPER 60GRMS FILL(WITH SEAL) OEM HP M252/MFP M277 (CF400A-CF403A or CF400X-CF403X) Cartridge T.P.E. CC1997CRS HP M252/MFP M277 X TONER
2003 CR-V - A/T Shift Cable Replacement-Print Preview
 Page 1 of 7 2003 CR-V - A/T Shift Cable Replacement 1. Raise the front of the vehicle, or lift the vehicle up, and make sure it is securely supported. 2. Remove the driver's dashboard lower cover, and
5 Removal and replacement
 5 Removal and replacement This chapter describes the removal and replacement of field-replaceable units (FRUs) only. Removal and replacement strategy User-replaceable parts Covers Internal assemblies ENWW
Weekly T-Jet2 TM Maintenance Procedures January 2007 Ver1.3
 Weekly T-Jet2 TM - Maintenance Procedures Weekly T-Jet2 TM Maintenance Procedures January 2007 Ver1.3 As a T-Jet2 owner there is weekly maintenance that will need to be performed to ensure proper operation
Replace the pickup roller and separation pad (Tray 1)
") HP LaserJet P2015 series Maintenance Kit Instructions Replace the pickup roller and separation pad (Tray 1) 1. Press the print-cartridge-door button to open the print-cartridge door. 2. 3. Remove the print
HP LaserJet P2015 series Maintenance Kit Instructions Replace the pickup roller and separation pad (Tray 1) 1. Press the print-cartridge-door button to open the print-cartridge door. 2. 3. Remove the print
Main Cover and Paper Input Assembly removal
 Main Cover and Paper Input Assembly Remove the toner cartridge. Remove memory door (HP LaserJet 5L and 6L). CAUTION Remove the memory door first (HP LaserJet 5L and 6L). The door will break if you remove
Maintenance Information
 Form 16575334 Edition 1 April 2005 Electric Screwdrivers EL, EP and ET 34V DC Series Maintenance Information Save These Instructions WARNING Maintenance procedures have the potential for severe shock hazard
AQUOS LE810/820 QUATTRON LED REPLACEMENT LC-60LE810/820
 AQUOS LE810/820 QUATTRON LED REPLACEMENT LC-60LE810/820 Ver. FF Kit LEDKIT60LE8x Part number: LEDKIT60LE8x AQUOS LE810/820 QUATTRON LED REPLACEMENT LEDKIT60LE8X (1) Wiring Harness (1) Side LED Strip (2)Top
Replacing the Gear Drive Motor Assembly and GFCI Module for Operation with the Chain Drive Motor Assembly
 Replacing the Gear Drive Motor Assembly and GFCI Module for Operation with the Chain Drive Motor Assembly Kit Contents B00009035-3 Motor Drive Assembly (Return original to CMI) B00007698-8 GFCI Module
Illuminated Cup Holders Hyundai Elantra (GLS, Limited, Coupe)
") Illuminated Cup Holders 2011-2015 Hyundai Elantra (GLS, Limited, Coupe) Thanks for purchasing this Cup Holder Illumination Install Kit! If you have any questions or feedback please email me direct at info@accentglowled.com
Illuminated Cup Holders 2011-2015 Hyundai Elantra (GLS, Limited, Coupe) Thanks for purchasing this Cup Holder Illumination Install Kit! If you have any questions or feedback please email me direct at info@accentglowled.com
Daily T-Jet2 TM Maintenance Procedures January 2007 Ver1.1
 Daily T-Jet2 TM Maintenance Procedures January 2007 Ver1.1 As a T-Jet2 owner there is daily maintenance that will need to be performed to ensure proper operation of your printer. By not following the required
Motorcycle Electronic Cruise Control Instruction Manual
 Motorcycle Electronic Cruise Control Instruction Manual Cleaning of solenoids for MCS020 and MCS574 vacuum actuators MotorCycle Cruise Controls MotorCycle Setup Pty. Ltd. A.B.N. 94 798 167 654 6 Kingston
Maintenance Adjustments
 4 Maintenance and Adjustments Chapter Contents Cleaning the Printer and Paper Handling Accessories..... 158 Cleaning the HP Digital Copier....................... 161 Cleaning ADF and Glass............................
Maintenance Information
 45530136 Edition 1 July 2008 Electric Screwdrivers EL 24V DC Series Maintenance Information Save These Instructions WARNING Always wear eye protection when operating or performing maintenance on this tool.
1. Get fork mounted in stand. You can leave it in the bike, but you must remove the wheel and front brake.
 Tools Needed: Bike stand Lint free shop Towels 1.5mm Allen Key Pick Set Grease (We recommend Slick Honey) Oil Measuring Cup (with cc Scale) Small Metal Drift Shop Vise Oil Bucket 13mm Deep Socket (6 point)
Oreck Magnesium Series Service Manual. The Oreck Manufacturing Company
 Oreck Magnesium Series Service Manual The Oreck Manufacturing Company 08/2012 10/2011 The Oreck Manufacturing Company Contents Covering all Magnesium Upright Models Including: LW100, LW125, LW1000, AND
FIBER CONNECTOR SAFETY WARNINGS
 FIBER CONNECTOR SAFETY WARNINGS SAFETY INFORMATION 1. Always wear safety glasses. 2. Isopropyl alcohol is flammable and may cause eye irritation. In case of contact with eyes, flush with water for at least
GENUINE MUD FLAP (FRONT)
") GENUINE MUD FLAP (FRONT) INSTALLATION AND USER S INSTRUCTIONS Thank you for purchasing a Genuine Mazda Accessory. Before removal and installation, be sure to thoroughly read these instructions. Please
GENUINE MUD FLAP (FRONT) INSTALLATION AND USER S INSTRUCTIONS Thank you for purchasing a Genuine Mazda Accessory. Before removal and installation, be sure to thoroughly read these instructions. Please
Assembly and disassembly instructions for WP-Dynamic
 Assembly and disassembly instructions for WP-Dynamic 40... 125 Tools required: Size 19 open-ended or ring spanner (WPD DN40 125) Size 7 open-ended spanner Size 4 Allen key Flat screw-driver with 4mm blade
CorkSport Mazdaspeed 3 ECU Relocation Box Mazdaspeed 3
 CorkSport Mazdaspeed 3 ECU Relocation Box 2007-2013 Mazdaspeed 3 Thank you for purchasing the CorkSport ECU Relocation Battery Box for the Mazdaspeed 3. With the install of this battery box, you now have
TOYOTA VENZA 2009 TRAILER WIRE HARNESS Procedure
 Part Number: PT791-0T099 Kit Contents Item # Quantity Reqd. Description 1 1 Trailer Wire Harness Module 2 1 4-Flat Harness 3 1 Battery Power Wire Harness 4 1 Mounting Bracket, 4-Flat 5 2 Screw #10-24 6
Continuous Cord Loop Designer Series Roller Shades
 Shade Maintenance Leveling a Crooked Shade 1. Pull down shade until roller is exposed. Do not pull further to avoid pulling cloth off roller. 2. Stick a 5" strip of masking tape into the roller at opposite
TOYOTA SOLARA EC REARVIEW MIRROR Section I - Installation Preparation
 Section I - Installation Preparation Part Number: PT374-33020 Section I - Installation Preparation Kit Contents Item # Quantity Reqd. Description 1 1 AD Mirror Assembly w/compass 2 1 Hardware Bag 3 1 Installation
CAUTION. 2. Remove the wheel cover or nut covers, as required. Remove the wheel and tire assembly.
 Стр. 1 из 16 REAR DRUM BRAKES CAUTION Brake shoes may contain asbestos, which has been determined to be a cancer causing agent. Never clean the brake surfaces with compressed air! Avoid inhaling any dust
Used on 564 SS Gas Fireplaces Only. #8 x 3/8 Sheet Metal Screws. Upper and. Lower Grills. Heat Shield
 Compatibility: 564 SS GS 564 DF GS 564 HO GS 564 Electric Fireplace Packing List: Used on Both Fireplaces Doors Used on 564 SS Gas Fireplaces Only Mounting Brackets #8 x 3/8 Sheet Metal Screws Used on
INSTALLATION INSTRUCTIONS
 INSTALLATION INSTRUCTIONS Accessory Application Publications No. AII 24642 BODY SIDE CLADDING 2003 CR-V P/N 08P21-S9A-100 Issue Date OCT 2002 PARTS LIST Right rear bumper piece Right front fender piece
Section 5: Parts Replacement
 Section 5: Parts Replacement Should the STAR TRAC 4500 Treadmill experience a problem requiring replacement of a specific part, the following procedures will help and instruct in the replacement of major
Mounts on the right side of the 1,500 sheet paper feeder assembly. Mounts on the right side of the 1,500 sheet paper feeder assembly
 1500 Sheet Feeder Arm 1 RC1-0714-000CN Front door stop arm - Thin plastic arm between the front door and the lower frame - Provides a positive stop when the front door is opened Cable 2 RG1-4239-000CN
Dispenser Parts Part Description Replacement SKU
 Tork Elevation H1 Matic Towel Dispenser: H1 Matic System 5510202 White; 5510282 Black Dispenser Dimensions HxWxD Inches (cm): 14.65 x 13.26 x 7.99 (37.2 x 33.7 x 20.3) H1 Roll Towel Product Options: Roll
1 COPPERHEAD 3D PRINTER ASSEMBLY GUIDE WELCOME
 1 COPPERHEAD 3D PRINTER ASSEMBLY GUIDE WELCOME Thank you for choosing the Copperhead 3D printer from Acadian Robotics. Please read through this manual first before setting up your machine. If you have
Tach-Drive Distributor Reconditioning Joe Fisher PDF prepared by Dave Zuberer Link to Thread on the Corvette Forum (C1-C2)
") Tach-Drive Distributor Reconditioning Joe Fisher PDF prepared by Dave Zuberer Link to Thread on the Corvette Forum (C1-C2) I just finished two Corvette tach-drive distributors. One was a 71 small block
Tach-Drive Distributor Reconditioning Joe Fisher PDF prepared by Dave Zuberer Link to Thread on the Corvette Forum (C1-C2) I just finished two Corvette tach-drive distributors. One was a 71 small block
Carousel Unit User Manual Replacing the Check Stand Motor
 Carousel Unit User Manual Replacing the Check Stand Motor 02/01/2017 1 Table of Contents Tools:... 3 Turn Off Power to the Unit:... 4 Remove Power Switch... 5 Remove Electric Eyes:... 6 Remove POS (Point-Of-Sale)
Replacing the pick rollers P.N X
 Instruction Sheet Replacing the pick rollers P.N. 118-9717-0X For assistance while replacing the pick rollers, contact you local Tektronix representative. In the U.S. and Canada, call 1-800-835-6100. 1.
How to remove and replace the Foonf/Fllo fabric
 How to remove and replace the Foonf/Fllo fabric Remove Headrest Locate the Troubleshooting Tool behind the manual on the back of the car seat, as shown in Figure 1. Raise Headrest to highest position by
INSTALLATION INSTRUCTIONS REPAIR SEAL KIT Survivor 35
 INSTALLATION INSTRUCTIONS REPAIR SEAL KIT Survivor 35 PURPOSES OF THE KIT Over time, the dynamic seals and O-rings in the PowerSurvivor-35 and Survivor-35 will wear. The Repair Seal Kit contains the major
Toner Cartridge Evaluation Report # Cartridge Type: EY3-OCC5745
 Toner Cartridge Evaluation Report # 03-236 Cartridge Type: EY3-OCC5745 July 31, 2003 Cartridges submitted for evaluation by ELT 708 W.Kenosha Broken Arrow, OK Evaluation and Report By: National Center
HP Support document. HP LaserJet 4000 and 4050 Family Printers - Printer Maintenance Kit Installation Instructions. Step 1: Fuser assembly
 Page 1 of 7 summary of JavaScript functions on this page» Sign-in with HP Passport»Register United States-English» Contact HP Search: More options nmlkji Business Support Center nmlkj All of HP United
MX150L ASSEMBLY INSTRUCTIONS
 CONNECTOR PLUG ASSEMLY TERMINAL INSERTION MX150L ASSEMLY INSTRUCTIONS 1. egin assembly of the crimped male terminals into the plug housing by making sure the Terminal Position Assurance feature () is in
SAFETY THIS PRODUCT IS FOR OFFROAD USE ONLY. ALL LIABILITY FOR INSTALLATION AND USE RESTS WITH THE OWNER.
 SAFETY Your safety and the safety of others is very important. In order to help you make informed decisions about safety, we have provided installation instructions and other information. These instructions
Front seats. Special tools and equipment. VAS 5094 airbag adapter. Connecting page 72-9.
 Page 1 of 23 72-1 Front seats Special tools and equipment VAS 5094 airbag adapter Connecting page 72-9. Page 2 of 23 72-2 Front seats, removing and installing WARNING! Before starting work on seats, connect
Preparation for an Extended Idle Period of the GT-381/361
 Preparation for an Extended Idle Period of the GT-381/361 If the printer is not to be used for an extended period of time, the white print heads and ink tubes will still need to be maintained. The tube
Brake Shoe: Service and Repair Removal Procedure
 2000 Buick Century V6-3.1L VIN J Copyright 2013, ALLDATA 10.52 Page 1 Brake Shoe: Service and Repair Removal Procedure ^ Tools Required - J38400 Brake Shoe Spanner and Spring Remover Caution: Keep fingers
Top Down Rollstar Shade Installation Instructions
 Top Down Rollstar Shade Installation Instructions Thank you for purchasing your new Rollstar shade. It has been custom-made from the highest quality materials to the dimensions you specified. With proper
Short-throw Shifter Installation Guide
 Short-throw Shifter Installation Guide Removal Procedure 1) Remove the shift control knob. A. Lift up on the rear portion of the shift control closeout boot retaining ring and detach the retaining ring
Blue Jay Rodless Cylinder BC MS. Track Repair Manual 1996 & 2012 THE EASTMAN EASTMAN. All End Caps Black for Models
 EASTMAN 1996 & 2012 THE EASTMAN Blue Jay Rodless Cylinder BC-40224-MS Track Repair Manual All End Caps Black for 1996-2012 Models IMPORTANT Disconnect this equipment from pneumatic pressure lines before
SCION xa AUTO-DIMMING MIRROR Preparation
 Preparation Part Number: PT374-52040 (Compass) PT374-21050 (Homelink) Kit Contents Item # Quantity Reqd. Description 1a 1 AD Mirror Assembly w/compass & Map Lights (P/N PT374-52040) 1b 1 AD Mirror Assembly
Repair Manual 11/99 PS-34. Page 1
 Repair Manual /99 PS-4 Page Table of contents Index Technical Data page Special tools 4 Repair instructions, general 0 Chain brake 6 0 Centrifugal clutch 8 0 Oil pump 9-04 Ignition system - 0 Starting
DRIVE AXLE Volvo 960 DESCRIPTION & OPERATION AXLE IDENTIFICATION DRIVE AXLES Volvo Differentials & Axle Shafts
 DRIVE AXLE 1994 Volvo 960 1994 DRIVE AXLES Volvo Differentials & Axle Shafts 960 DESCRIPTION & OPERATION All 960 station wagon models use type 1041 rear axle assembly. All 960 4-door models use type 1045
Mityvac MV8000 O-ring Replacement
 A vacuum pump must be air tight in order to operate. A leak in your vacuum pump will potentially complicate the diagnosis of vacuum systems or make bleeding automotive fluids more difficult. Learn to replace
Master Sets with Foam Tray Organizers
 Master Sets with Foam Tray Organizers D096005-FT1T 1/2" Drive SAE Impact Sockets 6 Point Standard Sockets: 3/8" - 1-1/2" - 6 Point Deep Sockets: 3/8" - 1-1/2" Foam Tray Organizer: 21-3/4" (w) x 15" (d)
Fuser Replacement LJ 1160/1320/P2015
 Service Edge Page 6 COMPANY A L-side: Two tabs C R-side: Tabs E Back cover: tab, pin G Back cover B R-side: Tab D R-side: Tabs F Duplexer: tab Fuser Replacement LJ 1160/1320/P2015 As a regular maintenance
* * Inside Toyota Avalon. Tools Required IMPORTANT
 Revision 08/02/16 2013- Toyota Avalon IMPORTANT Before starting, compare items on your invoice with items received. Carefully check through packaging material. If any item is missing, please call Crutchfield
HP LaserJet 1160 or 1320 Fuser Replacement
 HP LaserJet 1160 or 1320 Fuser Replacement Written By: jrw01 ifixit CC BY-NC-SA www.ifixit.com Page 1 of 12 TOOLS: Metal Spudger Set (1) Phillips #0 Screwdriver (1) 8" Needle Nose Plier (1) PARTS: HP LaserJet
CorkSport ort Mazda 3 Adjustable Shifter Mazdaspeed 3, Mazda 3 6-speed and Mazda3 SkyActiv 6-speed
 Part # Axl-6-963 CorkSport ort Mazda 3 Adjustable Shifter 2010-2013 Mazdaspeed 3, 2010-2013 Mazda 3 6-speed and 2012-2013 Mazda3 SkyActiv 6-speed Pre-Installation Notes: The CorkSport Adjustable Short
Changing the Printer Paper Monthly
 DCA Vantage HbA1C: Appendix E - Instrument Maintenance Maintenance Schedule Daily As Needed Clean the exterior Changing the Printer Paper Monthly Calibrating the Touchscreen Clean the Barcode Window Quarterly
LIPPERTCOMPONENTS, INC.
 LIPPERTCOMPONENTS, INC. SCHWINTEK INWALL SLIDEOUT SYSTEM OPERATION AND SERVICE MANUAL Contents I. Controls 1-1 System components 1 1-1A versions C1 & C2 2 1-2 Motor wiring harness connections 3 1-3 Extend
Installation Manual TWM Performance Short Shifter Cobalt SS/SC, SS/TC, HHR SS, Ion Redline and Saab 9-3
 Page 1 Installation Manual TWM Performance Short Shifter Cobalt SS/SC, SS/TC, HHR SS, Ion Redline and Saab 9-3 Please Note: It is preferable to park on a flat surface, as you will have to engage and disengage
INSTALLATION INSTRUCTIONS
 INSTALLATION INSTRUCTIONS Accessory REMOTE ENGINE STARTER SYSTEM Application 2010 CIVIC 4-DOOR Publications No. AII 42460 Issue Date AUG 2009 PARTS LIST Remote Engine Starter Unit Kit P/N 08E91-E22-100B
Wiper Motor Windshield Frame Mount Marinco-500. Installation Instructions
 Wiper Motor Windshield Frame Mount Marinco-500 Installation Instructions Wiper Motor Windshield Frame Mount Marinco-500 Tools (Not Included): Phillips head screwdriver 17 mm or small adjustable wrench
ADF pickup roller assembly
 ADF pickup roller assembly 1. Open the ADF cover. 2. Disconnect one spring (callout 1). Figure 6-15 Remove the ADF pickup roller assembly (1 of 2) 1 3. Lift up on the end of the assembly, and then slide
Thank you for purchasing the Blackstone Models K-27!
 Operations Manual Thank you for purchasing the Blackstone Models K-27! Before your Mudhen whistles off, we want to tell you about a few things that will enhance your operating experience and ensure that
RWPV and DTF Read/Write/Print/Vault and Dual Ticket Feed Mechanisms SERVICE MANUAL
 RWPV and DTF Read/Write/Print/Vault and Dual Ticket Feed Mechanisms SERVICE MANUAL Amano Cincinnati, Inc. reserves the right to make equipment changes and improvements which may not be reflected in this
PRELIMINARY INSTALLATION INSTRUCTIONS. Remote Engine Starter Attachment Kit P/N 08E92-SNA-100B
 INSTALLATION INSTRUCTIONS Accessory Application Publications No. REMOTE ENGINE STARTER SYSTEM 2008 CIVIC 2-DOOR AII 38215 Issue Date OCT 2007 PARTS LIST Remote Engine Starter Unit Kit P/N 08E91-E22-100B
INSTALLATION INSTRUCTIONS
 INSTALLATION INSTRUCTIONS Accessory REMOTE CONTROL Application 2008 ACCORD 4-DOOR Publications No. AII 35365 Issue Date AUG 2007 PARTS LIST U Accessory User s Information Manual Remote Engine Starter Unit
Lexus ES Fine Mesh and Adaptive Cruise Control Fine Mesh Grilles Upper and Lower Replacements
 IMPORTANT: PLEASE KEEP THIS INSTRUCTION MANUAL FOR FUTURE REFERENCE! 2013-15 Lexus ES Fine Mesh and Adaptive Cruise Control Fine Mesh Grilles Upper and Lower Replacements Part #1372-0102-13 / Black Ice
Installation Instructions for the EVO3 Height-Adjustable Ultimate Short Shifter. for F80 M3 and F82 M4
 Installation Instructions for the EVO3 Height-Adjustable Ultimate Short Shifter for 2013+ F80 M3 and F82 M4 part number USSF80 Thank you for purchasing the Ultimate Shift Kit. Please read these directions
 INSTALLATION INSTRUCTIONS www.collegehillshonda.com Accessory P/N 08P21-SZA-100 Application 2009 PILOT Publications No. AII 39455 Issue Date MAY 2008 NOTE: The fender trim cannot be installed on vehicles
ELECTRICAL CONNECTORS B.1
 ELECTRICAL CONNECTORS B. GENERAL The following table provides a brief description of the connectors found on your motorcycle. Connector numbers are listed in [brackets] in this manual. Table B-. Electrical
Preventive Maintenance...
 Preventive Maintenance........................................ 2 Introduction This chapter contains recommended preventive maintenance (PM) procedures for the AccuFlex printer. Itemized logs for the PM
EDGE The Laser Printer Tech Quarterly from Liberty Parts Team Summer 2014
 SERVICE EDGE The Laser Printer Tech Quarterly from Liberty Parts Team Summer 2014 THIS ISSUE: P4015 Transfer Block Replacement Replacing the M600 Fuser Drive P3005 Formatter and Ribbon Cables Three new
Installation Manual TWM Performance Short Shifter 2008 Mitsubishi Lancer
 Page 1 Installation Manual TWM Performance Short Shifter 2008 Mitsubishi Lancer Please Note: It is preferable to park on a flat surface, as you will have to engage and disengage the hand brake and shift
BRAKES. Section III REAR AXLE DATA AND SPECIFICATIONS HAND BRAKE CHRYSLER SERVICE MANUAL BRAKES 17
 BRAKES 17 There is no basic design change in the rear axle and sure grip differential except the larger diameter pinion shaft is now used on all models for 1959. The Service Procedures will remain the
A maintenance guide for all GT-3 Series users
 A l l u s e f u l i n f o r m a t i o n t o s u c c e e d i n y o u r p r i n t i n g b u s i n e s s T H E G T 3 S E R I E S A maintenance guide for all GT3 Series users v 1.0 ENVIRONMENTAL CONDITIONS
Industrial Injections Compound Turbo Installation For 6.7L Scorpion
 Industrial Injections Compound Turbo Installation For 6.7L Scorpion Step 1: Whenever you are doing an installation the first thing you should do is unhook the batteries to avoid arcing. You will need an
Installation of Barricade Flat Style Fender Flare Kit (97-06 Wrangler TJ)
") Installation of Barricade Flat Style Fender Flare Kit (97-06 Wrangler TJ) Installation Time: 3-4 Hours Tools Required: 8mm wrench 8mm socket drive #1 Phillips screw driver Pliers Pry bar Electric drill
Installation of Barricade Flat Style Fender Flare Kit (97-06 Wrangler TJ) Installation Time: 3-4 Hours Tools Required: 8mm wrench 8mm socket drive #1 Phillips screw driver Pliers Pry bar Electric drill
GENUINE PARTS INSTALLATION INSTRUCTIONS
 GENUINE PARTS INSTALLATION INSTRUCTIONS 1. 2. 3. 4. DESCRIPTION: Accent light Kit APPLICATION: Versa (2012) PART NUMBER: 999F3 AW008 - Universal Accent Lighting Kit. KIT CONTENTS: Item QTY Description
Tools Needed for Mounting Cleá Filling Station
 ALWAYS OBSERVE PRODUCT SAFETY AND HANDLING INSTRUCTIONS. ALWAYS DIRECT DISCHARGE AWAY FROM YOU or other persons. ALWAYS DISPENSE CLEANERS AND CHEMICALS AS DIRECTED ON THE LABEL. ALWAYS DISPENSE INTO APPROVED
Robotic Cleaner Troubleshooting Guide. Copyright 2010 Hayward Industries Inc.
 Robotic Cleaner Troubleshooting Guide Copyright 2010 Hayward Industries Inc. Table of Contents TigerShark & TigerShark QC Important safety instructions Page 1 Service Tools Page 2 Filter Removal/Cleaning
INSTALLATION INSTRUCTIONS
 INSTALLATION INSTRUCTIONS REAR DISC BRAKE CONVERSION KIT A158 1994-97 Dodge Ram 1500 (2WD & 4WD) and REAR DISC BRAKE CONVERSION KIT A158-1 1998-01 Dodge Ram 1500 (2WD & 4WD) Thank you for choosing STAINLESS
3.1 DISPENSER BLACK SHADOW SERIES. Tools Needed for Mounting SCS Dispenser Hammer
 SCS 2 BLACK SHADOW SERIES 3.1 DISPENSER ALWAYS OBSERVE PRODUCT SAFETY AND HANDLING INSTRUCTIONS. ALWAYS DIRECT DISCHARGE AWAY FROM YOU or other persons. ALWAYS DISPENSE CLEANERS AND CHEMICALS AS DIRECTED