Exhaust System Installation Turbo Downpipe Audi MKII TT-RS 2.5T CD100028
|
|
|
- Bethanie Horton
- 6 years ago
- Views:
Transcription
1 Please take the time to read and understand installation instructions. APR recommends that installation of this system be performed by a qualified service center or professional muffler installer who has the necessary equipment, tools and experienced personnel. However, if you decide to perform this install, the use of a hoist and an additional person will be required. CAUTION: Never work on a hot exhaust system. Allow time for the vehicle to cool. Always wear eye protection when working under a vehicle. Please confirm that all parts are present before beginning the factory exhaust system removal and APR exhaust system installation. Bill of Materials: 1. Upper Downpipe Assembly 2. Lower Downpipe Assembly 3. Downpipe Adapter Pipe 4. Turbo-Back Connector Pipe 5. Hardware Kit 6. Latex Gloves 7. Anti-Seize Lubricant Packet Recommended Tools: Safety Glasses Soapy water solution 12 point 10mm socket Torque wrench T-25 torx bit 22mm oxygen sensor wrench 8mm socket and ¼ drive Locking style pliers rachet Long extension 15mm socket Grommet pullers 13mm socket and 3/8 12 point 8mm bit drive ratchet 13mm wrench 1 wrench
2 IMPORTANT NOTE: To remove the factory upper downpipe section, the driveshaft must be first be removed. The use of a car lift is required to create the necessary ground clearance to be able to remove the driveshaft from the vehicle. A helper is also recommended to assist with supporting and maneuvering the drive shaft as it is removed and then later reinstalled into the vehicle. Removal of Stock System: CAT-BACK Section: NOTE: If a factory cat-back system is on the vehicle, follow steps 1-4, and then skip to the downpipe removal section. If an aftermarket 3 cat-back is on the vehicle, skip to step Using a 13mm wrench, loosen both nuts on each of the factory cat-back to downpipe sleeve clamps. (See Fig. A) 2. Using grommet pullers or a similar device, remove the two front hangers from the grommets on each side of the factory tunnel muffler. (See Fig. B & C) NOTE: The use of a soapy water solution may aid in the removal and later installation of the hangers in the rubber isolators. 3. Locate the vacuum line attached to the right side outlet of the rear muffler, behind the right side integrated exhaust tip. Detach the line from the muffler. No tools are required. (See Fig. D) 4. Unbolt both of the rear muffler hanger mounts near each of the integrated exhaust tips using a 13mm socket, ratchet, and a long extension. (See Fig. E & F) and then carefully slide the factory cat-back section down and then away from the sleeve clamp location to free it from the vehicle. 5. Unbolt and remove the clamp(s) securing the system to the stock downpipe, and then follow steps 2-4 above to free it from the vehicle. NOTE: Any larger than stock diameter cat-back system that necks down to the stock downpipe size, and does not have a removable adapter, will likely have to be modified (i.e. Trim off the transition section, and then have pipe welded on) to allow it to properly fit up to your APR downpipe. The APR cat-back system for the Audi TT RS has been designed with a removable cat-back to stock downpipe adapter, which makes the APR downpipe a direct bolt on with no cutting or welding needed. 2


 3.")
 Using a T-25 Torx bit, remove both inlet pipe mounting screws, and then remove the inlet pipe from the")
 Tuck the oxygen sensor away someplace secure and clear of the factory upper downpipe section for the")
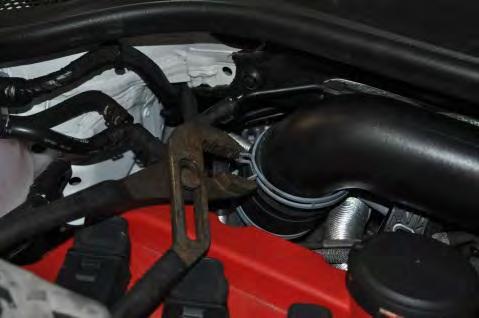
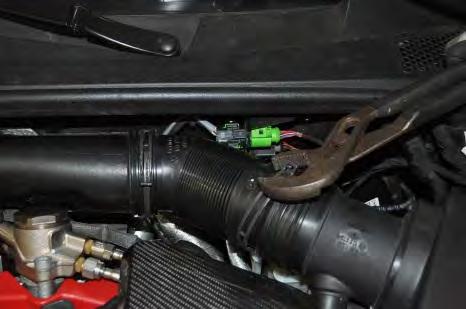
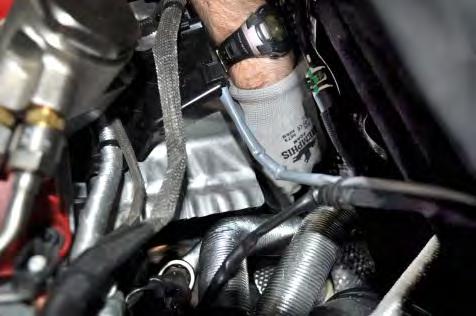
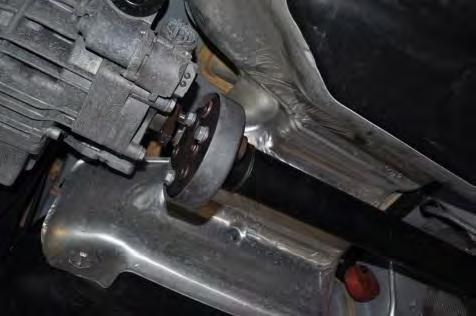
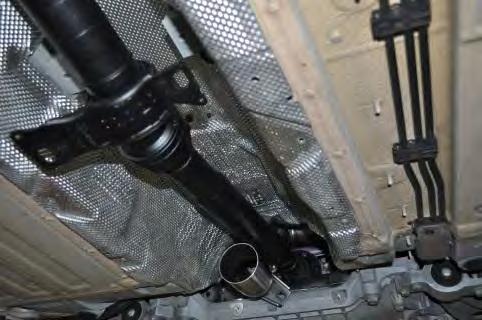
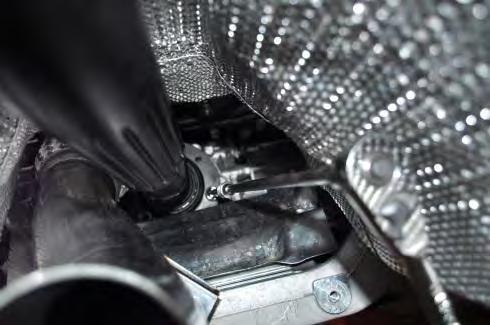
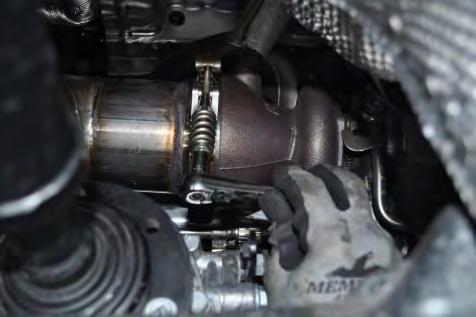
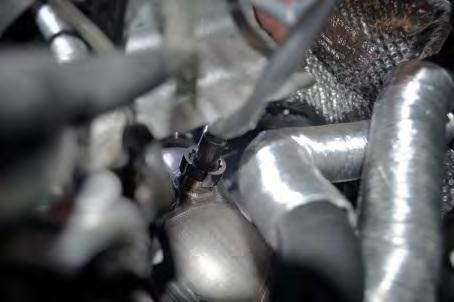
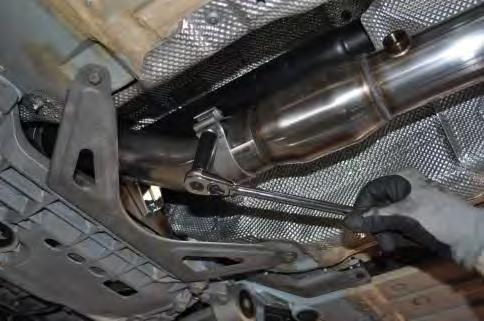
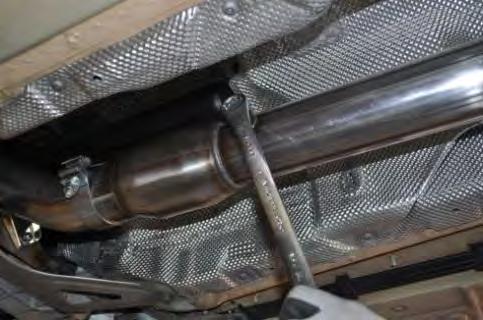
3 FIG. A FIG. B FIG. C FIG. D FIG. E FIG. F DOWNPIPE Section: 1. Using a 13mm wrench, remove the six nuts at each of the upper to lower downpipe flange connections. (See Fig. G) Carefully slide each of the lower downpipe sections down and away from the flange locations to free them from the vehicle. 2. Using a 13mm socket and ratchet, remove the two center bolts securing each pipe to the downpipe hanger bracket. (See Fig. H) Next, unbolt the front chassis brace and downpipe grommet bracket, and then slide these sections down and away from the mounting location to free them from the vehicle. (See Fig. I, J, & K) 3. Open the hood, and disconnect the negative terminal from the battery. 4. Using a pair of locking pliers (i.e. Channel Lock) or a similar device, unclip each end of the turbo inlet pipe. (See Fig. L & M) Using a T-25 Torx bit, remove both inlet pipe mounting screws, and then remove the inlet pipe from the vehicle. (See Fig. N) 5. Using a 22mm oxygen sensor wrench, remove the downpipe oxygen sensor from the factory downpipe. (See Fig. O) Tuck the oxygen sensor away someplace secure and clear of the factory upper downpipe section for the remainder of the removal process. WARNING: Be careful to not contaminate the sensor end of the oxygen sensor with dirt, grease, etc as it may prevent it from functioning properly. 3
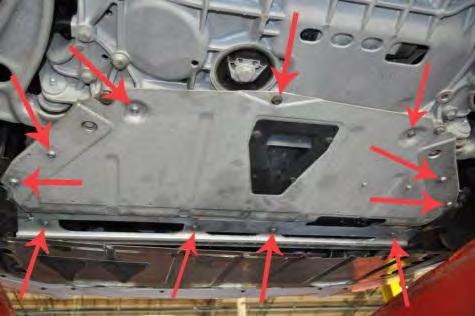
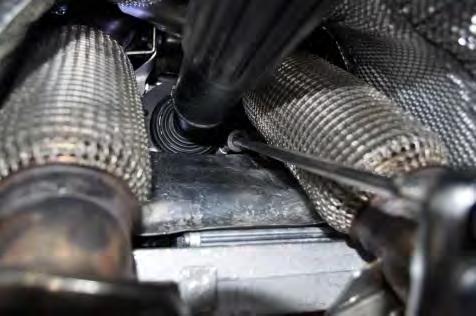
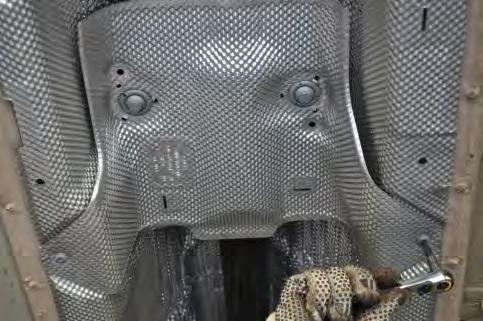
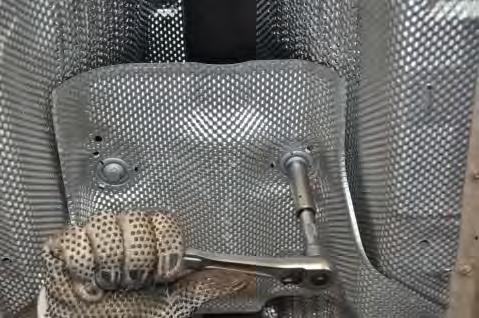
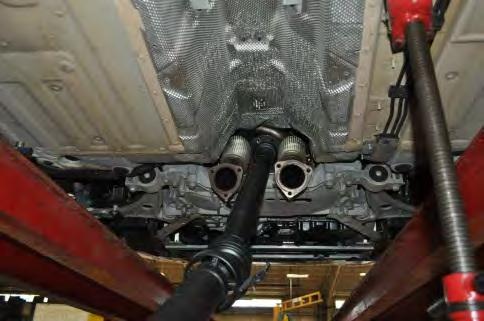
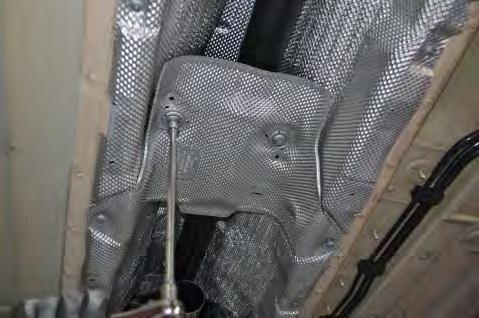
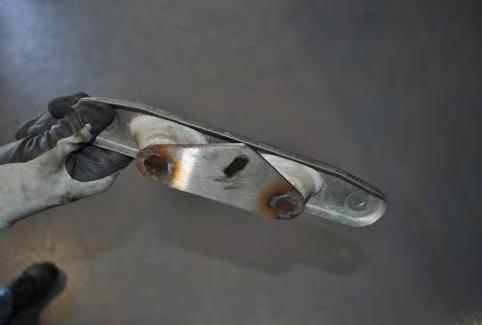
4 6. The front under tray is held on by thirteen T-25 Torx screws; the eight mounting screws located on the rear and the sides of this under tray need to be removed first to enable access to the rear under tray mounting screws. (See Fig. P) The rear under tray is held on by 10 T-25 Torx screws and one 12 point 8mm female screw. Remove the rear under tray to enable access to the factory V-band turbo outlet flange & clamp. (See Fig. Q) 7. Using a 12 point 10mm socket and ratchet, remove the three drive shaft mounting bolts on each end of the drive shaft. (See Fig. R & S) Before removing the driveshaft, the upper downpipe section has to be loosened and rotated downward. This allows for the end of the driveshaft to be able to fit between the downpipe and the upper heat shielding. 8. Using a 13mm socket and ratchet, unbolt the downpipe anchor bracket from the transfer case. (See Fig. T) 9. Using an 8mm socket and a ¼ inch drive ratchet, loosen the clamp on the factory V-band turbo outlet flange until the upper downpipe assembly can be rotated downward. (See Fig. U) Rotate the upper downpipe assembly as far downwards as possible. NOTE: The driveshaft must be supported prior to beginning the next step. The center driveshaft carrier will be unbolted along with the center heat shield, which will allow the middle of the driveshaft to drop. 10. Using a T-25 Torx bit, remove both outer heat shield mounting screws first. (See Fig. V) Using a 13mm socket and ratchet, remove the two center heat shield mounting bolts. (See Fig. W) Lower the center of the driveshaft and slide the rear of the driveshaft off of the rear differential. (See Fig. X) Pull the front of the driveshaft off of the transfer case, and walk the front driveshaft mounting flange over and between the two flexible downpipe sections. Drop the rear of the driveshaft as close to the ground as possible to maneuver the driveshaft out of the vehicle. (See Fig. Y) 11. The upper heat shielding must be removed before the upper downpipe section. Using a 10mm socket and ratchet, unbolt the two front heat shield mounting nuts. (See Fig. Z) Next, remove the 6 remaining heat shield mounting screws using a T-25 Torx bit. (See Fig. AA) Slide the upper heat shield down and back to remove it from the vehicle. 12. Finish loosening the V-band clamp until it can be unhooked and removed from the flange connection. Unseat the upper downpipe from the turbo and remove it from the vehicle. (See Fig. BB) 13. Using grommet pullers or a similar device, remove the downpipe hanger bracket from the downpipe grommet bracket. (See Fig. CC) This completes the removal of the downpipe section. 4


5 FIG. G FIG. H FIG. I FIG. J FIG. K FIG. L FIG. M FIG.N FIG. O FIG. P FIG. Q FIG. R 5


6 FIG. S FIG. T FIG. U FIG. V FIG. W FIG. X FIG. Y FIG. Z FIG. AA FIG. BB FIG. CC 6

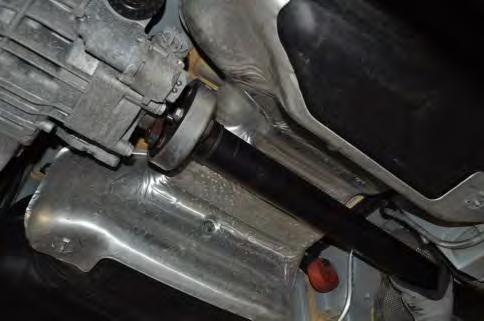
7 Installation of APR Exhaust System: NOTE: Apply the anti-seize lubricant (supplied) to the threads ONLY of all the clamps and flange bolts. Failure to follow this procedure can cause nuts to seize on clamps and potentially destroy threads. After applying anti-seize lubricant, be sure to thoroughly clean hands as lubricant will tarnish stainless steel. Align all clamps so that the center of the clamp bolt is 90 degrees from the notch on the pipe (See Fig. A) FIG.A NOTE: All clamps should be tightened using a properly calibrated Torque Wrench. Using an air impact gun will damage the clamp and reduce its ability to effectively seal the joint. It may also cause the joint to separate thereby causing damage to your exhaust system and your vehicle. 1. Remove all exhaust system components from the shipping carton, including the two 3.0 clamps, the M10 flange nut, the M10 flange bolt, and the M18 oxygen sensor port block off bolt. 2. Position the factory V-band turbo outlet clamp as shown on the outlet flange. (See Fig. B) Locate the APR upper downpipe assembly. Move the upper downpipe assembly up through the chassis, (See Fig. C) and seat the downpipe V-band flange against the turbo outlet. Make sure the step on the seating face of the downpipe flange is inside the mating step on the turbo outlet flange, and that the two flanges are fully seated against each other. While holding the upper downpipe assembly in place, reconnect the V-band clamp. 3. Using an 8mm socket and a ¼ inch drive ratchet, snugly tighten the V-band clamp bolt, leaving it just loose enough that the downpipe can still be rotated at the flange connection. (See Fig. D) 4. Rotate the upper downpipe assembly downward until it contacts the lower heat shielding. Reinstall the upper heat shielding into the chassis. Secure with six T-25 Torx Screws and the two front mounting nuts (10mm socket). (See Fig. E & F) Inspect the top corner of the upper heat shielding near the 4 inch downpipe elbow on the left side; if it got bent downward during the removal process, bend it back upwards at this time to ensure proper clearances are maintained. 5. Maneuver the front of the driveshaft onto the transfer case, and then reinstall the rear of the driveshaft onto the rear differential. (See Fig. G & H) While supporting the middle section of the driveshaft to keep it from dropping downward (See Fig. I), reinstall the center heat shield under the center driveshaft carrier, and secure with a 13mm socket and ratchet. (See Fig. J) Next, reinstall the last two T-25 Torx screws to secure the outer edges of the center heat shield to the chassis. 6. Using a 12 point 10mm socket and ratchet, reinstall the three drive shaft mounting bolts on each end of the drive shaft. (See Fig. K & L) 7
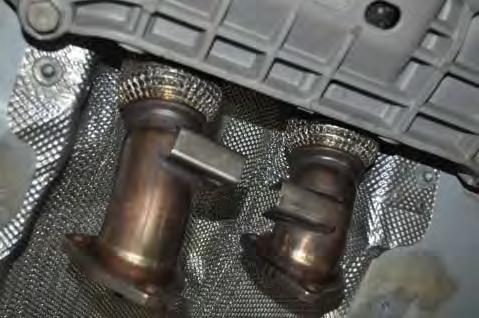
8 7. Locate the APR downpipe hanger assembly, the M10 flange nut, and the M10 flange bolt. Push the hanger assembly studs into the grommet bracket as shown. (See Fig. M) Rotate the upper downpipe assembly upward, then position the downpipe hanger and grommet bracket in place. Align the slotted hole on the upper downpipe with the mating hole on the downpipe hanger. Install the M10 flange bolt through these holes from the engine side, and secure with the M10 flange nut. (See Fig. N) 8. Reinstall the front chassis brace, which fits between the downpipe grommet bracket and the chassis. Secure the chassis brace and the grommet bracket with a 13mm socket and ratchet. (See Fig. O & P) 9. Snugly tighten the M10 flange bolt and nut installed in step 7 with a 15mm socket and ratchet. (See Fig. Q) Next, finish tightening the V-band clamp bolt to fix the upper downpipe assembly in place. (See Fig. R) Torque the V-band clamp bolt, and all OEM fasteners reinstalled in steps 4 through 8, to factory specifications. 10. Install the downpipe oxygen sensor and tighten with the 22mm oxygen sensor wrench. (See Fig. S) NOTE: An additional oxygen sensor port is provided just after the catalytic converter to enable sensor relocation as needed. If the alternate downstream sensor location will be used along with a wiring harness extension, then the block off bolt can be used instead at this upstream location (1 wrench). 11. Reinstall the turbo inlet pipe. Secure with the two T-25 Torx Screws. Reinstall the clamps on each end of the turbo inlet pipe. (Refer back to Fig. L, M, & N from the DOWNPIPE REMOVAL section) 12. Reinstall the front and rear under trays. Install is the reverse of removal. (Refer back to Fig. P & Q and step 6 from the DOWNPIPE REMOVAL section) 13. Locate the APR lower downpipe assembly, and one of the 3 clamps. Properly align the clamp (see clamping note in Bold before step 1) on the catalytic converter side of the lower downpipe, and slide the lower downpipe inlet over the end of the upper downpipe assembly. (See Fig. T) Check the orientation of the lower downpipe; the oxygen sensor bung should be oriented toward the left side of the vehicle. Snugly tighten the 3 clamp to retain the lower downpipe section. (See Fig. U) 14. Install the M18 oxygen sensor port block off bolt at this location using a 1 inch wrench. (See Fig. V) NOTE: If connecting to the factory cat-back system, follow steps 15-18, and then skip to step 21. If connecting to a previously installed aftermarket 3 cat-back system, skip to step 19. If you are doing the initial install of the APR catback system on the Audi TT-RS, refer to the instructions included with the cat-back section at this time. The additional steps needed are provided in detail on this other document. 15. Locate the APR 3 downpipe adapter, and the last 3 clamp. Properly align the clamp on the adapter inlet, and slide it over the end of the lower downpipe assembly. (See Fig. W) Snugly tighten the 3 clamp to retain the downpipe adapter. 8
9 16. Slide both of the factory cat-back to downpipe sleeve clamps onto the double 2.35 diameter end of the downpipe adapter. (See Fig. X) 17. Reinstall the factory cat-back section: Insert both cat-back inlet pipes into the sleeve clamps, and then reinstall both rear hanger mounts with a 13mm socket and ratchet. Reinstall both front hangers into the grommets on each side of the factory tunnel muffler. Reconnect the vacuum line at the right side outlet of the rear muffler. (Refer back to Fig. B, C, D, E & F from the CAT-BACK REMOVAL section) 18. Using a 13mm socket and ratchet, tighten both nuts on each of the factory cat-back to downpipe sleeve clamps. (See Fig. Y) 19. Locate the APR turbo-back connector pipe, and the last 3 clamp. Properly align the clamp on the connector pipe inlet, and slide it over the end of the lower downpipe assembly. Snugly tighten the 3 clamp to retain the connector pipe. (See Fig. Z) 20. Attach the inlet of the previously installed aftermarket cat-back system to the end of the turbo-back connector pipe, and then snugly tighten the 3 clamp to retain the CAT-BACK section. (See Fig. AA) NOTE: Your APR downpipe will mount directly to any cat-back that has a 3 expanded inlet section. This expansion allows the connecting pipe to fit over the outlet of the 3 diameter APR turbo-back connector pipe. However, additional fabrication may be necessary to adjust the length, size, or inlet position of any non-apr catback system in order to properly mount to this APR downpipe. The APR CAT-BACK system for the Audi TT RS will bolt on with no cutting or welding needed. 21. Visually inspect the exhaust system position, pipe alignment, clamp orientation, and chassis clearances. Make any necessary adjustments at the V-band flange location, at the two slip joints, and at the front downpipe hanger assembly. 22. When the exhaust system is in the desired location, tighten the nuts on the clamps. Torque the clamp nuts to 45 ft-lbs (61 N-m). Tighten the M10 nut and bolt at the front downpipe hanger assembly to 22 ft-lbs (30 N-m). 23. Reconnect the negative battery terminal. Let the car sit for at least three minutes with the ignition key on and the engine off. Close the hood. Installation complete. 24. It is STRONGLY SUGGESTED that all clamps be checked and re-tightened (if necessary) to the recommended torque after initial road testing of the vehicle, as thermal cycling has occurred on the system. Please wait until the system has fully cooled to perform this step. 9


10 FIG. B FIG. C FIG. D FIG. E FIG. F FIG. G FIG. H FIG. I FIG. J FIG. K FIG. L FIG. M 10


11 FIG. N FIG. O FIG. P FIG. Q FIG. R FIG. S FIG. T FIG. U FIG. V 11


12 FIG. W FIG. X FIG. Y FIG. Z FIG. AA NOTE: During cold weather start-ups, you may experience an exhaust sound that is deeper and louder in tone than usual. This is temporary and will diminish to normal levels once your engine has reached its normal operating temperature. NOTE: Immediately following the installation of your exhaust system, you may experience a trace of smoke after initial start-up. DO NOT be alarmed. The smoke is caused by the burning of a small amount of forming oil residue used in the manufacturing process. 12
3 Turbo Downpipe Installation Audi A3 / Volkswagen GTI / Volkswagen Jetta 2.0L FSI/TSI Turbo CD100013
 Please take time to read and understand these installation instructions. APR recommends that installation of this system be performed by a qualified service center or professional muffler installer who
IMPORTANT WARRANTY & INSTALLATION INSTRUCTIONS ATTACHED
 IMPORTANT WARRANTY & INSTALLATION INSTRUCTIONS ATTACHED Please Forward All Attached Information to Consumer Warranty Not Valid Unless Returned to CORSA Performance We ask that you take a few moments to
IMPORTANT WARRANTY & INSTALLATION INSTRUCTIONS ATTACHED
 IMPORTANT WARRANTY & INSTALLATION INSTRUCTIONS ATTACHED Please Forward All Attached Information to Consumer Warranty Not Valid Unless Returned to CORSA Exhaust STOP Please take time to read and understand
Bill of Materials: Please take time to read and understand these installation instructions.
 Please take time to read and understand these installation instructions. CORSA recommends that installation of this system be performed by a qualified service center or professional muffler installer who
IMPORTANT WARRANTY & INSTALLATION INSTRUCTIONS ATTACHED
 IMPORTANT WARRANTY & INSTALLATION INSTRUCTIONS ATTACHED Please Forward All Attached Information to Consumer Warranty Not Valid Unless Returned to CORSA Exhaust Please be sure to review the enclosed instructions
IMPORTANT WARRANTY & INSTALLATION INSTRUCTIONS ATTACHED
 IMPORTANT WARRANTY & INSTALLATION INSTRUCTIONS ATTACHED Please Forward All Attached Information to Consumer Warranty Not Valid Unless Returned to CORSA Exhaust We ask that you take a few moments to compete
IMPORTANT WARRANTY & INSTALLATION INSTRUCTIONS ATTACHED
 IMPORTANT WARRANTY & INSTALLATION INSTRUCTIONS ATTACHED Please Forward All Attached Information to Consumer Warranty Not Valid Unless Returned to CORSA Exhaust We ask that you take a few moments to complete
Please take time to read and understand these installation instructions.
 2014- Current C7 Corvette Please take time to read and understand these installation instructions. CORSA recommends that the installation of this system be performed by a qualified service center or professional
STOP IMPORTANT WARRANTY & INSTALLATION INSTRUCTIONS ATTACHED TO ACTIVATE YOUR LIMITED LIFETIME WARRANTY GO TO: CORSAPERFORMANCE.
 IMPORTANT WARRANTY & INSTALLATION INSTRUCTIONS ATTACHED Please Forward All Attached Information to Consumer Warranty Not Valid Unless Returned to CORSA Exhaust We ask that you take a few moments to complete
IMPORTANT WARRANTY & INSTALLATION INSTRUCTIONS ATTACHED
 IMPORTANT WARRANTY & INSTALLATION INSTRUCTIONS ATTACHED Please Forward All Attached Information to Consumer Warranty Not Valid Unless Returned to CORSA Performance STOP Please take time to read and understand
IMPORTANT WARRANTY & INSTALLATION INSTRUCTIONS ATTACHED
 IMPORTANT WARRANTY & INSTALLATION INSTRUCTIONS ATTACHED Please Forward All Attached Information to Consumer Warranty Not Valid Unless Returned to CORSA Exhaust STOP Please take time to read and understand
STOP IMPORTANT WARRANTY & INSTALLATION INSTRUCTIONS ATTACHED TO ACTIVATE YOUR LIMITED LIFETIME WARRANTY GO TO: CORSAPERFORMANCE.
 IMPORTANT WARRANTY & INSTALLATION INSTRUCTIONS ATTACHED Please Forward All Attached Information to Consumer Warranty Not Valid Unless Returned to CORSA Exhaust We ask that you take a few moments to complete
Please take time to read and understand these installation instructions.
 Cat Back Exhaust System 2013+ SRT/ GTS Viper Please take time to read and understand these installation instructions. CORSA recommends that the installation of this system be performed by a qualified service
Please confirm that all parts are present before beginning the factory exhaust system removal and CORSA exhaust system installation.
 Please take time to read and understand these installation instructions. CORSA recommends that installation of this system be performed by a qualified service center or professional muffler installer who
IMPORTANT WARRANTY & INSTALLATION INSTRUCTIONS ATTACHED
 IMPORTANT WARRANTY & INSTALLATION INSTRUCTIONS ATTACHED Please Forward All Attached Information to Consumer Warranty Not Valid Unless Returned to CORSA Exhaust We ask that you take a few moments to complete
Recommended Tools: 1/4 drive ratchet 1/4 drive 7mm socket 3/8 drive ratchet 3/8 drive 15mm deep socket File or rasp
 Please take time to read and understand these installation instructions. CORSA recommends that the installation of this system be performed by a qualified service center or professional muffler installer
Recommended Tools: 3/8 drive ratchet 3/8 drive 13mm deep socket 3/8 drive 15mm deep socket 3/8 drive 15mm shallow socket 13mm wrench
 Please take time to read and understand these installation instructions. CORSA recommends that the installation of this system be performed by a qualified service center or professional muffler installer
STOP IMPORTANT WARRANTY & INSTALLATION INSTRUCTIONS ATTACHED TO ACTIVATE YOUR LIMITED LIFETIME WARRANTY GO TO: CORSAPERFORMANCE.
 IMPORTANT WARRANTY & INSTALLATION INSTRUCTIONS ATTACHED Please Forward All Attached Information to Consumer Warranty Not Valid Unless Returned to CORSA Exhaust We ask that you take a few moments to complete
IMPORTANT WARRANTY & INSTALLATION INSTRUCTIONS ATTACHED
 IMPORTANT WARRANTY & INSTALLATION INSTRUCTIONS ATTACHED Please Forward All Attached Information to Consumer Warranty Not Valid Unless Returned to CORSA Exhaust STOP Please take time to read and understand
STOP IMPORTANT WARRANTY & INSTALLATION INSTRUCTIONS ATTACHED TO ACTIVATE YOUR LIMITED LIFETIME WARRANTY GO TO: CORSAPERFORMANCE.
 IMPORTANT WARRANTY & INSTALLATION INSTRUCTIONS ATTACHED Please Forward All Attached Information to Consumer Warranty Not Valid Unless Returned to CORSA Exhaust We ask that you take a few moments to complete
IMPORTANT WARRANTY & INSTALLATION INSTRUCTIONS ATTACHED
 IMPORTANT WARRANTY & INSTALLATION INSTRUCTIONS ATTACHED Please Forward All Attached Information to Consumer Warranty Not Valid Unless Returned to CORSA Performance We ask that you take a few moments to
Exhaust System Installation Corvette C6
 CORVETTE C6 Exhaust System Installation 2009+ Corvette C6 Recommended Tools: 13 mm Socket 15 mm Socket 18 mm Socket 15 mm Open End Wrench Torque Wrench (20-100 ft.-lb.) Drive extensions for Ratchet (MINIMUM
STOP IMPORTANT WARRANTY & INSTALLATION INSTRUCTIONS ATTACHED TO ACTIVATE YOUR LIMITED LIFETIME WARRANTY GO TO: CORSAPERFORMANCE.
 IMPORTANT WARRANTY & INSTALLATION INSTRUCTIONS ATTACHED Please Forward All Attached Information to Consumer Warranty Not Valid Unless Returned to CORSA Exhaust We ask that you take a few moments to complete
IMPORTANT WARRANTY & INSTALLATION INSTRUCTIONS ATTACHED
 IMPORTANT WARRANTY & INSTALLATION INSTRUCTIONS ATTACHED Please Forward All Attached Information to Consumer Warranty Not Valid Unless Returned to CORSA Performance We ask that you take a few moments to
Recommended Tools: 3/8 drive ratchet 3/8 drive 13mm socket 3/8 drive 15mm deep socket 10 3/8 ratchet extension Grommet pullers
 Please take time to read and understand these installation instructions. CORSA recommends that the installation of this system be performed by a qualified service center or professional muffler installer
Please take time to read and understand these installation instructions.
 Please take time to read and understand these installation instructions. CORSA recommends that installation of this system be performed by a qualified service center or professional muffler installer who
IMPORTANT WARRANTY & INSTALLATION INSTRUCTIONS ATTACHED
 IMPORTANT WARRANTY & INSTALLATION INSTRUCTIONS ATTACHED Please Forward All Attached Information to Consumer Warranty Not Valid Unless Returned to CORSA Performance We ask that you take a few moments to
IMPORTANT WARRANTY & INSTALLATION INSTRUCTIONS ATTACHED
 IMPORTANT WARRANTY & INSTALLATION INSTRUCTIONS ATTACHED Please Forward All Attached Information to Consumer Warranty Not Valid Unless Returned to CORSA Exhaust We ask that you take a few moments to complete
15-17 FORD MUSTANG GT
 15-17 FORD MUSTANG GT IMPORTANT! WARRANTY AND Please Forward All Information to Consumer Be sure to review the enclosed instructions prior to beginning the installation process. If you have any questions
IMPORTANT WARRANTY & INSTALLATION INSTRUCTIONS ATTACHED TO ACTIVATE YOUR WARRANTY GO TO: CORSAPERFORMANCE.COM/WARRANTY STOP
 IMPORTANT WARRANTY & INSTALLATION INSTRUCTIONS ATTACHED Please Forward All Attached Information to Consumer Warranty Not Valid Unless Returned to CORSA Performance We ask that you take a few moments to
CAUTION: Never work on a hot exhaust system. Allow time for the vehicle to cool. Always wear eye protection when working under a vehicle.
 Please take time to read and understand these installation instructions. CORSA Exhaust System Installation We recommend that the installation of this system be performed by a qualified service center or
15-18 FORD MUSTANG GT
 15-18 FORD MUSTANG GT IMPORTANT! WARRANTY AND Please Forward All Information to Consumer Be sure to review the enclosed instructions prior to beginning the installation process. If you have any questions
IMPORTANT WARRANTY & INSTALLATION INSTRUCTIONS ATTACHED
 IMPORTANT WARRANTY & INSTALLATION INSTRUCTIONS ATTACHED Please Forward All Attached Information to Consumer Warranty Not Valid Unless Returned to CORSA Exhaust We ask that you take a few moments to compete
STOP IMPORTANT WARRANTY & INSTALLATION INSTRUCTIONS ATTACHED TO ACTIVATE YOUR LIMITED LIFETIME WARRANTY GO TO: CORSAPERFORMANCE.
 IMPORTANT WARRANTY & INSTALLATION INSTRUCTIONS ATTACHED Please Forward All Attached Information to Consumer Warranty Not Valid Unless Returned to CORSA Exhaust We ask that you take a few moments to complete
15-17 FORD MUSTANG GT
 15-17 FORD MUSTANG GT IMPORTANT! WARRANTY AND Please Forward All Information to Consumer Be sure to review the enclosed instructions prior to beginning the installation process. If you have any questions
IMPORTANT WARRANTY & INSTALLATION INSTRUCTIONS ATTACHED
 IMPORTANT WARRANTY & INSTALLATION INSTRUCTIONS ATTACHED Please Forward All Attached Information to Consumer Warranty Not Valid Unless Returned to CORSA Exhaust We ask that you take a few moments to complete
STOP IMPORTANT WARRANTY & INSTALLATION INSTRUCTIONS ATTACHED TO ACTIVATE YOUR LIMITED LIFETIME WARRANTY GO TO: CORSAPERFORMANCE.
 IMPORTANT WARRANTY & INSTALLATION INSTRUCTIONS ATTACHED Please Forward All Attached Information to Consumer Warranty Not Valid Unless Returned to CORSA Exhaust We ask that you take a few moments to complete
Please confirm that all parts are present before beginning the factory exhaust system removal and db Performance Exhaust system installation.
 Please take time to read and understand these installation instructions. We recommend that the installation of this system be performed by a qualified service center or professional muffler installer who
Grommet pullers Soapy water Safety glasses Torque Wrench
 Please take time to read and understand these installation instructions. We recommend that the installation of this system be performed by a qualified service center or professional muffler installer who
IMPORTANT WARRANTY & INSTALLATION INSTRUCTIONS ATTACHED
 IMPORTANT WARRANTY & INSTALLATION INSTRUCTIONS ATTACHED Please Forward All Attached Information to Consumer Warranty Not Valid Unless Returned to CORSA Exhaust We ask that you take a few moments to complete
GM Duramax Diesel
 Please confirm that all parts are present before beginning the factory exhaust system removal and CORSA exhaust system installation. 2001-05 BILL OF MATERIALS: PN 15201, 15203, 15204 & 15210: (1) Muffler,
15-17 FORD MUSTANG GT
 15-17 FORD MUSTANG GT IMPORTANT! WARRANTY AND Please Forward All Information to Consumer Be sure to review the enclosed instructions prior to beginning the installation process. If you have any questions
Suggested Installation Instructions for: , , Corvette C6 - Corsa Performance Exhaust System
 Page 1 Suggested Installation Instructions for: 648-176, 648-178, 648-180 2009 Corvette C6 - Corsa Performance Exhaust System Count on Mid America Motorworks for all your Corvette Parts and Corvette Accessories
STOP IMPORTANT WARRANTY & INSTALLATION INSTRUCTIONS ATTACHED TO ACTIVATE YOUR LIMITED LIFETIME WARRANTY GO TO: CORSAPERFORMANCE.
 IMPORTANT WARRANTY & INSTALLATION INSTRUCTIONS ATTACHED Please Forward All Attached Information to Consumer Warranty Not Valid Unless Returned to CORSA Exhaust We ask that you take a few moments to complete
TENF8046MCD F8X M3/M4 TEST PIPES (REMOVES SECONDARY CATS) **NOT FOR USE ON ROAD VEHICLES / FOR OFF-ROAD AND RACING USE ONLY**
 **NOT FOR USE ON ROAD VEHICLES / FOR OFF-ROAD AND RACING USE ONLY**") Turner Motorsport LLC / 1-800-280-6966 / www.turnermotorsport.com DI/DBM 3/21/16 TENF8046MCD F8X M3/M4 TEST PIPES (REMOVES SECONDARY CATS) **NOT FOR USE ON ROAD VEHICLES / FOR OFF-ROAD AND RACING USE ONLY**
Turner Motorsport LLC / 1-800-280-6966 / www.turnermotorsport.com DI/DBM 3/21/16 TENF8046MCD F8X M3/M4 TEST PIPES (REMOVES SECONDARY CATS) **NOT FOR USE ON ROAD VEHICLES / FOR OFF-ROAD AND RACING USE ONLY**
Please take time to read and understand these installation instructions.
 Please take time to read and understand these installation instructions. We recommend that the installation of this system be performed by a qualified service center or professional muffler installer who
15-17 FORD MUSTANG GT
 15-17 FORD MUSTANG GT IMPORTANT! WARRANTY AND Please Forward All Information to Consumer Be sure to review the enclosed instructions prior to beginning the installation process. If you have any questions
IMPORTANT WARRANTY & INSTALLATION INSTRUCTIONS ATTACHED
 IMPORTANT WARRANTY & INSTALLATION INSTRUCTIONS ATTACHED Please Forward All Attached Information to Consumer Warranty Not Valid Unless Returned to CORSA Exhaust We ask that you take a few moments to complete
Chevy Monte Carlo / Chevy Impala / Pontiac Grand Prix 2000 & newer - All models Dual Rear Exit Exhaust System Installation Instructions
 Chevy Monte Carlo / Chevy Impala / Pontiac Grand Prix 2000 & newer - All models Dual Rear Exit Exhaust System Installation Instructions TOOLS/SUPPLIES NEEDED: Safety glasses, 15mm deep socket, 15mm wrench,
Please take time to read and understand these installation instructions.
 Please take time to read and understand these installation instructions. We recommend that the installation of this system be performed by a qualified service center or professional muffler installer who
IMPORTANT WARRANTY & INSTALLATION INSTRUCTIONS ATTACHED
 IMPORTANT WARRANTY & INSTALLATION INSTRUCTIONS ATTACHED Please Forward All Attached Information to Consumer. Warranty Not Valid Unless Returned to CORSA Exhaust We ask that you take a few moments to Complete
STOP IMPORTANT WARRANTY & INSTALLATION INSTRUCTIONS ATTACHED TO ACTIVATE YOUR LIMITED LIFETIME WARRANTY GO TO: CORSAPERFORMANCE.
 IMPORTANT WARRANTY & INSTALLATION INSTRUCTIONS ATTACHED Please Forward All Attached Information to Consumer Warranty Not Valid Unless Returned to CORSA Exhaust We ask that you take a few moments to complete
IMPORTANT WARRANTY & INSTALLATION INSTRUCTIONS ATTACHED
 IMPORTANT WARRANTY & INSTALLATION INSTRUCTIONS ATTACHED Please Forward All Attached Information to Consumer. Warranty Not Valid Unless Returned to db Performance Exhaust We ask that you take a few moments
05-18 DODGE CHRYSLER CHALLENGER CHARGER 300 MAGNUM
 05-18 DODGE CHRYSLER CHALLENGER CHARGER 300 MAGNUM IMPORTANT! WARRANTY AND INSTALLATION INSTRUCTIONS Please Forward All Information to Consumer Be sure to review the enclosed instructions prior to beginning
IMPORTANT WARRANTY & INSTALLATION INSTRUCTIONS ATTACHED TO ACTIVATE YOUR WARRANTY GO TO: CORSAPERFORMANCE.COM/WARRANTY STOP
 IMPORTANT WARRANTY & INSTALLATION INSTRUCTIONS ATTACHED Please Forward All Attached Information to Consumer Warranty Not Valid Unless Returned to CORSA Performance We ask that you take a few moments to
STOP IMPORTANT WARRANTY & INSTALLATION INSTRUCTIONS ATTACHED TO ACTIVATE YOUR LIMITED LIFETIME WARRANTY GO TO: CORSAPERFORMANCE.
 IMPORTANT WARRANTY & INSTALLATION INSTRUCTIONS ATTACHED Please Forward All Attached Information to Consumer Warranty Not Valid Unless Returned to CORSA Exhaust We ask that you take a few moments to complete
15-18 FORD MUSTANG GT
 15-18 FORD MUSTANG GT IMPORTANT! WARRANTY AND INSTALLATION INSTRUCTIONS Please Forward All Information to Consumer Be sure to review the enclosed instructions prior to beginning the installation process.
INSTALLATION INSTRUCTIONS Unitronic 3 Turbo-Back Exhaust System for MK5 Jetta /GLI UH020-EXA
 Unitronic recommends that you read through the entire installation instructions prior to beginning the installation to familiarize yourself with the included components, tools required, and procedures
INSTALLATION INSTRUCTIONS Unitronic 3 Turbo-Back Exhaust System for Golf R UH021-EXA
 Unitronic recommends that you read through the entire installation instructions prior to beginning the installation to familiarize yourself with the included components, tools required, and procedures
Exhaust System Installation for Audi S4, S5 & S5 Sportback PNs ,
 Exhaust System Installation for Audi S4, S5 & S5 Sportback PNs 140740, 140749 ***** Please compare the parts in the box with the bill of materials provided ***** to assure that you have all the parts necessary
97-04 CHEVROLET CORVETTE C5
 97-04 CHEVROLET CORVETTE C5 IMPORTANT! WARRANTY AND INSTALLATION INSTRUCTIONS Please Forward All Information to Consumer Be sure to review the enclosed instructions prior to beginning the installation
Exhaust System Installation for the Ford F-150 PNs , , , , , ,
 Exhaust System Installation for the Ford F-150 PNs 140693, 140694, 140695, 140696 140697, 140698, 140699, 140700 BORLA PERFORMANCE INDUSTRIES ***** Please compare the parts in the box with the bill of
VW & Audi TDI CR140 ECO KIT Installation Guide
 VW & Audi TDI CR140 ECO KIT Installation Guide This guide is to help you install your new Rawtek DPF, EGR & Adblue Delete Exhaust ECO Kit on your (2009-2014) VW / Audi with 2.0l CR140 Diesel Engine. Note:
Exhaust System Installation for Corvette, C6 or Z06 PN s , 11811, 11812, 11814, 11815, 11816, 11917
 Exhaust System Installation for Corvette, C6 or Z06 PN s - 11810, 11811, 11812, 11814, 11815, 11816, 11917 ***** Please compare the parts in the box with the bill of materials provided ***** to assure
Installation for Chevrolet Malibu 2.0L Turbo PN-11936
 Installation for Chevrolet Malibu 2.0L Turbo PN-11936 BORLA PERFORMANCE INDUSTRIES ***** Please compare the parts in the box with the bill of materials provided ***** to assure that you have all the parts
IMPORTANT WARRANTY & INSTALLATION INSTRUCTIONS ATTACHED
 IMPORTANT WARRANTY & INSTALLATION INSTRUCTIONS ATTACHED Please Forward All Attached Information to Consumer. Warranty Not Valid Unless Returned to CORSA Exhaust We ask that you take a few moments to Complete
Installation for Chevrolet Silverado/GMC Sierra PN s ,
 Installation for Chevrolet Silverado/GMC Sierra PN s-140550, 140551 ***** Please compare the parts in the box with the bill of materials provided ***** to assure that you have all the parts necessary for
Thank you for purchasing the AWE SwitchPath Exhaust System for the Audi B9 S5 Sportback.
 Thank you for purchasing the AWE SwitchPath Exhaust System for the 2017+ Audi B9 S5 Sportback. Let s go! Switchpath Exhaust Parts: 1 Driver downpipe upper section (part A10) 1 Driver downpipe lower section
INSTALLATION INSTRUCTIONS Unitronic Downpipe for AWD 2.0 TSI Gen3 MQB UH027-EXA
 Unitronic recommends that you read through the entire installation instructions prior to beginning the installation to familiarize yourself with the included components, tools required, and procedures
Installation for Chevrolet Silverado & GMC Sierra PN s , , ,
 Installation for Chevrolet Silverado & GMC Sierra PN s-140717, 140718, 140719, 140720 BORLA PERFORMANCE INDUSTRIES ***** Please compare the parts in the box with the bill of materials provided ***** to
Exhaust Component Installation for Ford Focus RS PN-60631, 60646
 Exhaust Component Installation for Ford Focus RS PN-60631, 60646 ***** Please compare the parts in the box with the bill of materials provided ***** to assure that you have all the parts necessary for
2010 Camaro Long Tube Headers, Coated w/high Flow Cats Use w/#30220
 PART #30212 2010 Camaro Long Tube Headers, Coated w/high Flow Cats Use w/#30220 PACKING LIST Before installation, use this checklist to make sure all necessary parts have been included. ITEM CHECK PART
Long Tube Header Installation For Ford Mustang GT
 Long Tube Header Installation For 2005-2008 Ford Mustang GT Precision manufactured using aircraft quality T-304 stainless steel; this system is designed to endure years of heavy use. Installing a Borla
Exhaust System Installation for Chevrolet Silverado and GMC Sierra PN , , , , ,
 Exhaust System Installation for Chevrolet Silverado and GMC Sierra PN-140535, 140536, 140537, 140538, 140539, 140540 ***** Please compare the parts in the box with the bill of materials provided *****
INSTALLATION INSTRUCTIONS Unitronic Turbo-Back Exhaust System for MK7 GTI UH026-EXA
 Unitronic Turbo-Back Exhaust System for MK7 GTI Unitronic recommends that you read through the entire installation instructions prior to beginning the installation to familiarize yourself with the included
Exhaust System Installation PN s , , , , ,
 Exhaust System Installation PN s - 140557, 140558, 140559, 140560, 140652, 140653 ***** Please compare the parts in the box with the bill of materials provided ***** to assure that you have all the parts
Install Guide MQB 1.8T/2.0T Cast Downpipe
 Cast Stainless Steel Performance Downpipe, 8V Audi A3/S3 & MkVII Volkswagen Golf/GTI/R Installation Spiciness Rating (Spicy) Installation of your 034Motorsport Cast Downpipe is a complex process. We recommend
Chevrolet Camaro (Gen6) Installation Guide PN 11920, 11921, 11924, 11925, 11926, 11927, 11930, 11931
 Installation Guide PN 11920, 11921, 11924, 11925, 11926, 11927, 11930, 11931") Installation Guide PN 11920, 11921, 11924, 11925, 11926, 11927, 11930, 11931 ***** Please compare the parts in the box with the bill of materials provided ***** (view the following pages) to assure that
Installation Guide PN 11920, 11921, 11924, 11925, 11926, 11927, 11930, 11931 ***** Please compare the parts in the box with the bill of materials provided ***** (view the following pages) to assure that
2007 Shelby GT500 Long Tube Headers Installation
 2007 Shelby GT500 Long Tube Headers Installation Precision manufactured using aircraft quality T-304 stainless steel; this system is designed to endure years of heavy use. Installing a Borla Performance
Installation for Ford F-150 Raptor (V6 Ecoboost) PN s , 60638, 60650*
 PN s , 60638, 60650*") Installation for (V6 Ecoboost) PN s- 60637, 60638, 60650* ***** Please compare the parts in the box with the bill of materials provided ***** to assure that you have all the parts necessary for this installation.
Installation for (V6 Ecoboost) PN s- 60637, 60638, 60650* ***** Please compare the parts in the box with the bill of materials provided ***** to assure that you have all the parts necessary for this installation.
IE MK5 & MK6 Downpipe Install Guide IEEXCC5
 IE MK5 & MK6 Downpipe Install Guide IEEXCC5 Thank you for purchasing another high quality Integrated Engineering product! This instruction guide is used for installation of IE s 3 Downpipe System for VW
Exhaust System Installation for Chevrolet Corvette C6 PN and
 Exhaust System Installation for Chevrolet Corvette C6 PN-140128 and 140131 These instructions have been written to help you with the installation of your Borla Performance Exhaust System. Please read this
Saab 9-3 Krona Downpipe Installation Instructions. What's Included:
 www.kronaperformance.com 2003-2010 Saab 9-3 Krona Downpipe Installation Instructions What's Included: (1) 3 stainless downpipe (with or without catalyst) (1) 3-2.5 stainless downpipe adapter pipe (1) Turbo
Installation for Honda Accord PN s 11840, 11853, 11949
 Installation for Honda Accord PN s 11840, 11853, 11949 BORLA PERFORMANCE INDUSTRIES ***** Please compare the parts in the box with the bill of materials provided ***** to assure that you have all the parts
2010 Camaro Long Tube Headers, Coated w/high Flow Cats/ Powerflo-X Crossover Assembly
 PART #30213/30214 2010 Camaro Long Tube Headers, Coated w/high Flow Cats/ Powerflo-X Crossover Assembly PACKING LIST Before installation, use this checklist to make sure all necessary parts have been included.
Exhaust System Installation for Audi S5, S4, and S6 PNs , ,
 Exhaust System Installation for Audi S5, S4, and S6 PNs-140391, 140403, 140704 ***** Please compare the parts in the box with the bill of materials provided ***** to assure that you have all the parts
Installation for Honda Civic Type R PN
 Installation for PN-140738 BORLA PERFORMANCE INDUSTRIES ***** Please compare the parts in the box with the bill of materials provided ***** to assure that you have all the parts necessary for this installation.
Header Installation for Ford Mustang GT, PN-17290* Adaptor Pipe PN-60566**
 Header Installation for Ford Mustang GT, PN-17290* Adaptor Pipe PN-60566** These instructions have been written to help you with the installation of your Borla Performance Exhaust System. Please read this
Installation for Dodge Challenger & Charger HellCat PN s , , , , , , ,
 Installation for PN s-140642, 140646, 140647, 140648, 140666, 140667, 140668, 140669 ***** Please compare the parts in the box with the bill of materials provided ***** to assure that you have all the
Chevrolet Camaro Exhaust System Installation PN s , , , , , , , , , , ,
 Chevrolet Camaro Exhaust System Installation PN s -140280, 140281, 140282, 140348, 140356, 140493, 140494, 140495, 140526, 140530, 140528, 140532 Thank you for purchasing a Borla Performance Cat-Back Exhaust
Exhaust System Installation for Dodge Challenger PN s , , , &
 Exhaust System Installation for Dodge Challenger PN s 140297, 140306, 140384, & 140482 ***** Please compare the parts in the box with the bill of materials provided ***** to assure that you have all the
Header Installation for Ford Mustang GT, PN-17290* Adaptor Pipe PN-60566*
 Header Installation for Ford Mustang GT, PN-17290* Adaptor Pipe PN-60566* These instructions have been written to help you with the installation of your Borla Performance Exhaust System. Please read this
2016 Camaro Header Installation
 TEXAS-SPEED.COM 2016 Camaro Header Installation Tools 8mm Socket 11mm Socket 5/8 Spark Plug Socket T15, T35 Torx Bit 5mm Allen Bit 10mm Socket and Wrench 11mm Socket and Wrench 3/8 Drive Ratchet, Torque
Ford Mustang GT Long Tube Header Installation
 2005-2006 Ford Mustang GT Long Tube Header Installation Precision manufactured using aircraft quality T-304 stainless steel; this system is designed to endure years of heavy use. Installing a Borla Performance
Installation for Jeep Grand Cherokee SRT8 PN s , and 60634, 60635
 Installation for Jeep Grand Cherokee SRT8 PN s-140632, 140633 and 60634, 60635 BORLA PERFORMANCE INDUSTRIES ***** Please compare the parts in the box with the bill of materials provided ***** to assure
Please compare the parts in the box with the bill of materials provided to assure that you have all the parts necessary for this installation.
 Installation for Chevrolet Corvette C7 Stingray & ZO6 (Standard exhaust) PN s - 11862, 11863, 11868, 11869, 11877, 11878, 11880, 11881 (Optional NPP) PN s - 11874, 11855, 11875, 11856 ZO6 PN s - 11902,
Tuned Length Headers. Special Tools Required: Install Time: Difficulty: Follow these instructions carefully to ensure correct fitment and operation.
 Special Tools Required: welder / saws all Install Time: Approximately 4 Hours Difficulty: 4 out of 5 Follow these instructions carefully to ensure correct fitment and operation. STEP 1 Disconnect the negative
Installation for Dodge Challenger R/T PN s ,
 Installation for PN s-140707, 140708 ***** Please compare the parts in the box with the bill of materials provided ***** (view the following pages) to assure that you have all the parts necessary for this