Turner Front Disc Brake Conversion and Dual Master Cylinder Conversion
|
|
|
- Peter Bryant
- 6 years ago
- Views:
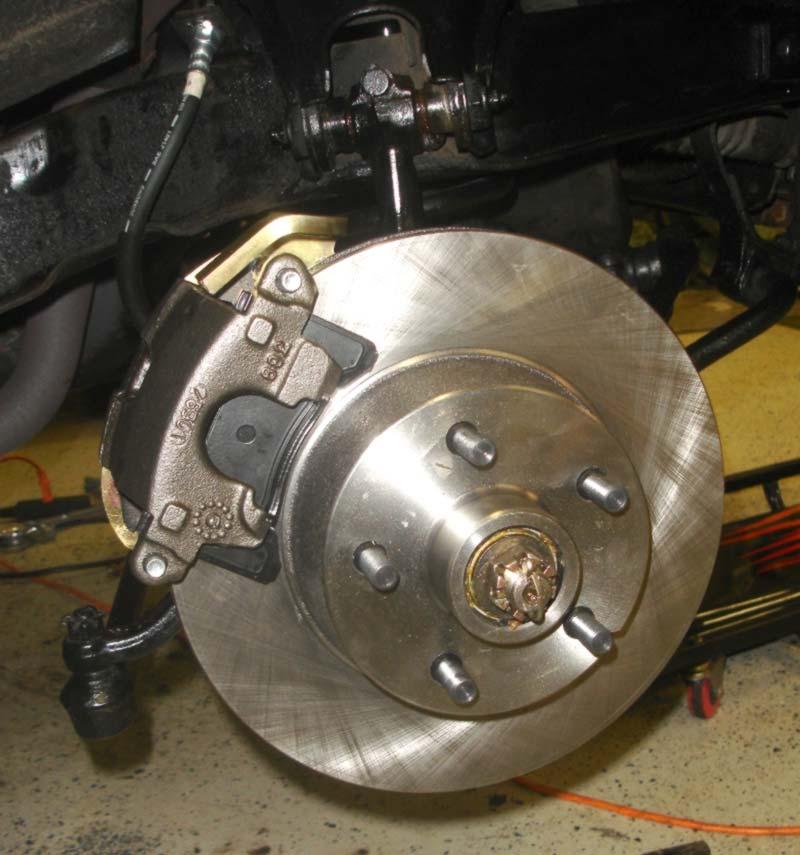
Transcription
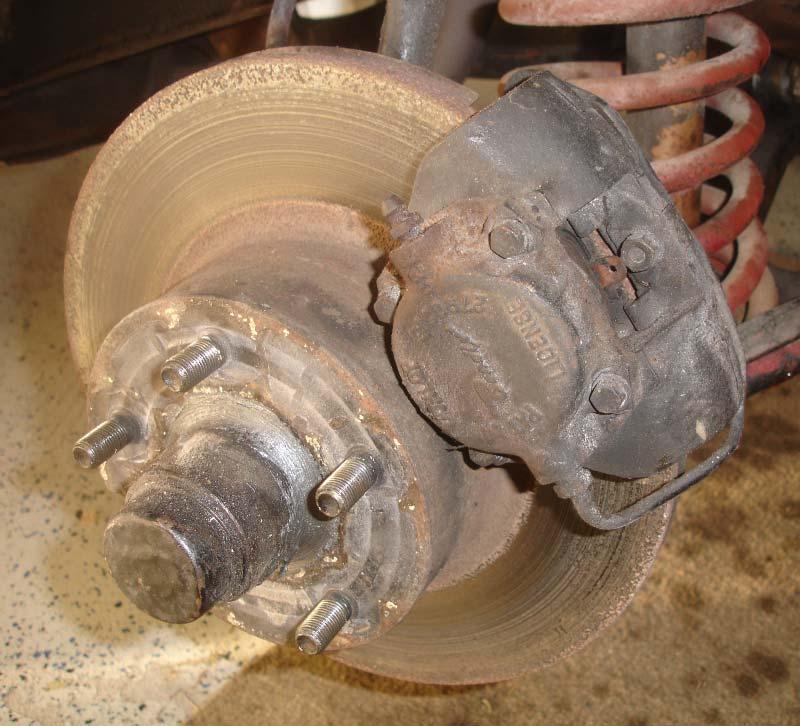
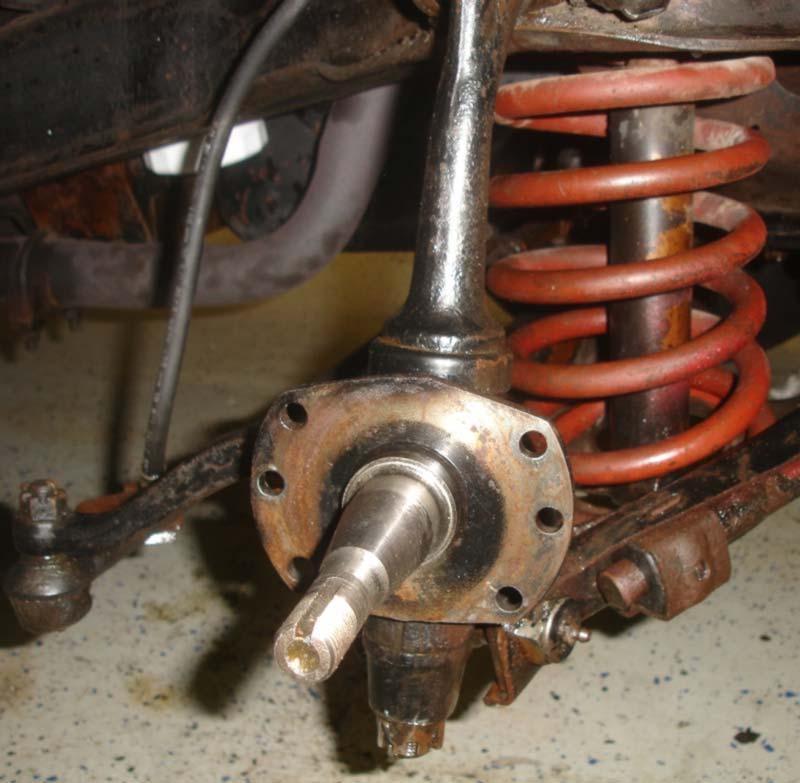
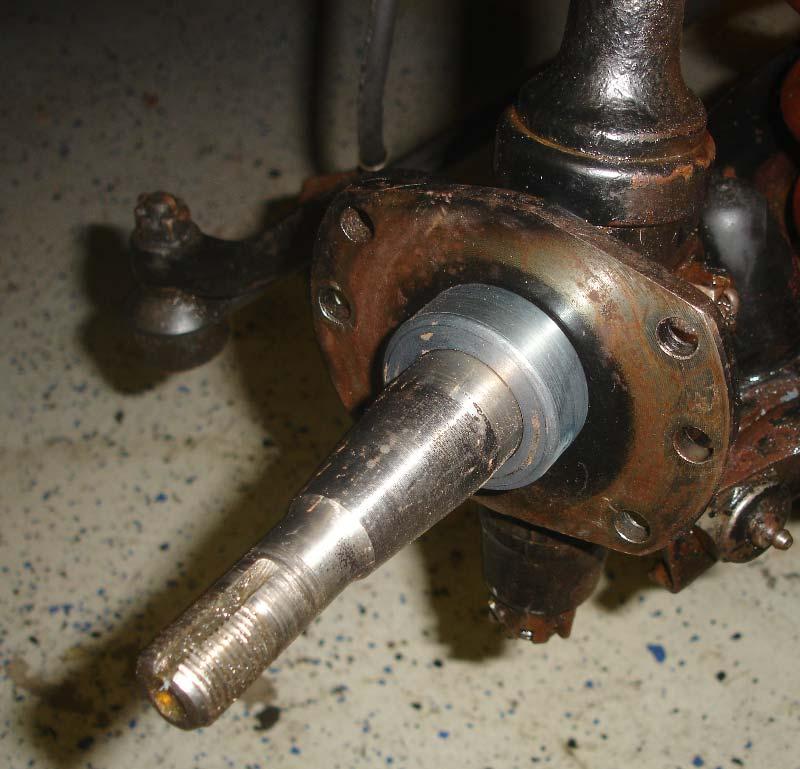
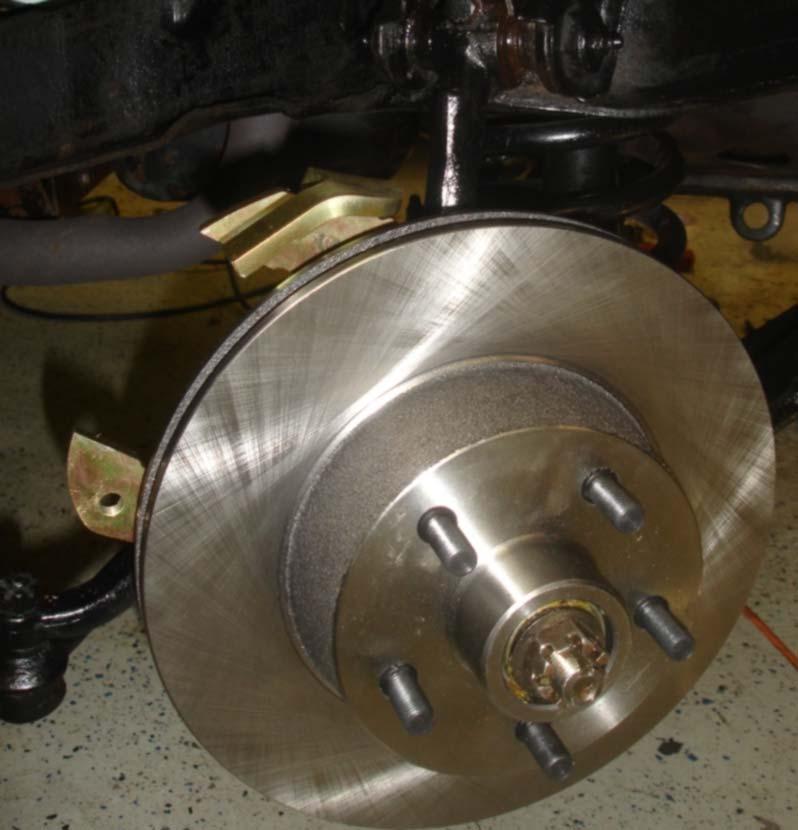
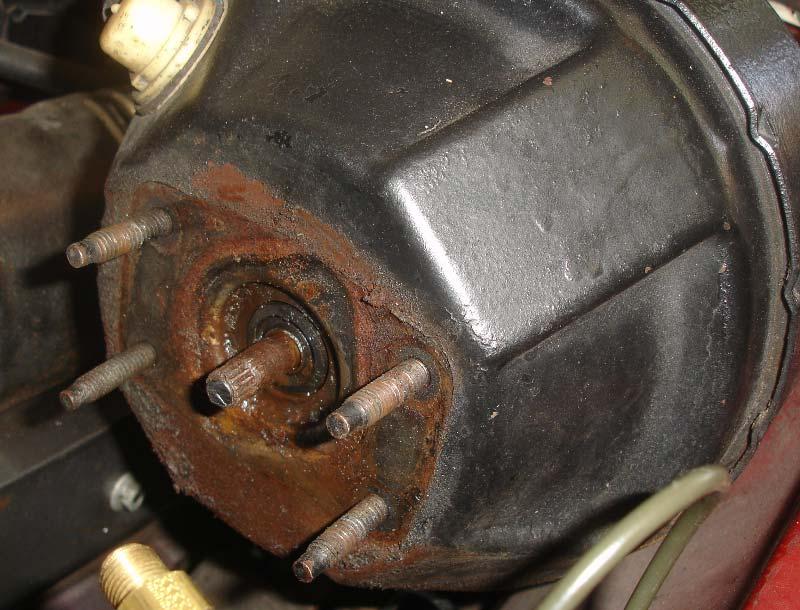
1 Turner Front Disc Brake Conversion and Dual Master Cylinder Conversion By Bill Henderson I recently purchased a 1963 Avanti R2, my first Studebaker, and it exhibited a hard pulling to the left on braking. I knew I had a problem to address before I would drive it anywhere. Investigating, I found that one of my right front disc calipers was not fully applying, and for safety s sake I knew that this job couldn t wait. I realize I could have fully overhauled the stock system and gotten it to operate properly and as well as it did when new nearly fifty years ago. But having restored several collector cars over the past twenty years, I have a preference for modern technology in critical places, especially when it concerns safety and the upgrade cannot be seen. My decision was to install the Avanti disc brake conversion marketed by Turner Brake and often advertised on these pages. At the same time, I decided to convert to a safer dual-chamber master cylinder, and to replace all brake lines on the car, both steel and rubber ones. After all, a braking system is only as reliable as its weakest part, and John F. Kennedy was in the White House when these brake fittings were last touched by a wrench. From past experience, I have learned it is a foolish waste of time trying to get them apart undamaged. Jim Turner s front disc kit is well engineered, and for me was worth every penny. He has done all the engineering for us, and installation at the wheels was relatively straight forward and easy, and the results are outstanding. The master cylinder conversion is nearly as easy, but a little more do-it-yourself knowhow is required. Follow along with the conversion. I will try to help you avoid pitfalls along the way. 1) (Picture 1) Here is where we started. Pretty grungy, and this is after a liberal dose of Gunk engine cleaner and hot water. I decided not to try to rebuild the original system. 2) (Picture 2) First remove the caliper from its attaching bolts in the back, and disconnect the brake hose from its port on the caliper. Perhaps it need not be said, but always use special brake fitting wrenches to avoid rounding the soft fittings, especially if you plan to reuse anything. This is how the spindle looks after removal of all the old brake parts. 3) (Picture 3)This machined spacer is used to adapt to the new rotor s grease seal. It is machined a couple of thousandths small, so it must be heated nearly red hot with a torch as you hold the ring with channel lock pliers. Once heated, it will slip right over the spindle base, and should only need a few taps to seat it in place.
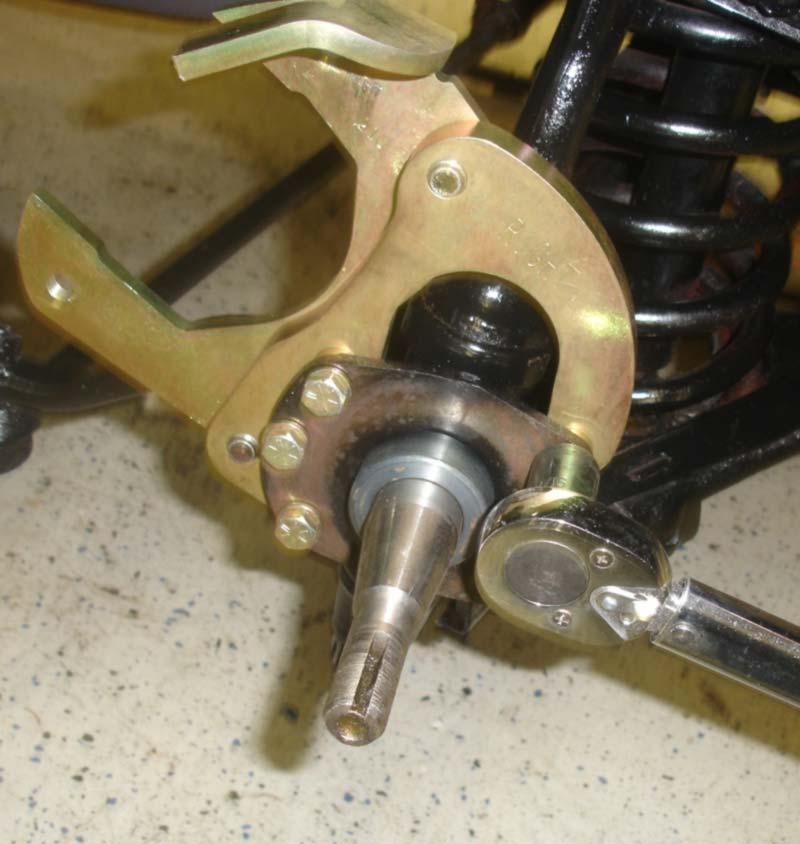
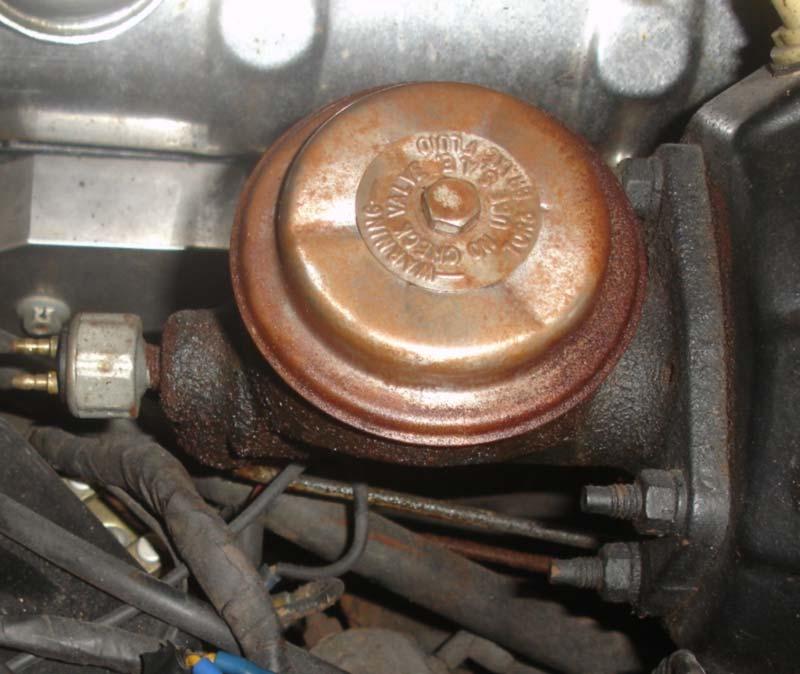
2 4) (Picture 4) The caliper mounting brackets are next to be mounted. They are clearly marked RIGHT and LEFT. Take care to use red Loctite on the threads of all bolts, even the ones that have been started for you. Lock washers are used on all bolts, and use a torque wrench to ensure that all these bolts are torqued to ft. Lbs. 5) Thoroughly work axle bearing grease into both of the supplied inside and outside wheel bearings. Slide the inside wheel bearing (the larger one) into its race in the rotor The inside bearing is covered by a grease seal, which is included in the kit. I use a shop press to seat my grease seals, but if you are very careful you can seat yours with a block of wood and a small hammer. Never hammer directly on the grease seal. 6) (Picture 5) Slide the new rotor over the spindle, insert the greased outer wheel bearing, and reuse the original keyed washer and hub nut. Torque the nut to shop manual specifications and ensure the rotor spins freely before inserting a new cotter pin. I found that the original My Studebaker dust caps fit much better than the new ones that came with the rotor, so I reused them. You may need to deform them very slightly to ensure that they fit tightly. 7) (Picture 6) Carefully clean the rotor surface back and front with brake cleaner. Now the caliper slides right into place. Notice that the caliper on the new kit is mounted behind the spindle, not in the front like the original design. A large hex head Allen wrench is used to secure the caliper in place with two special four inch bolts. 8) Repeat the entire process on the other side of the car. 9) (Picture 7) Now we can turn our attention to the replacement of the Master Cylinder. Our original one was full of rusty sludge that looked like toxic mud. We removed it and set it aside to clean and store in our box of original parts. Do future restorers a favor and save everything original you take off your car. 10) (Picture 8) The dual master cylinder from a 1973 Chrysler Newport Custom bolts right into place, and has the proper bore for our application (Raybsetos MC36307). Bench bleed your new master cylinder. If you do not do this step properly, you will never get a firm pedal no matter how many times you bleed your brakes at the wheels. This simple bench bleeder kit is available at the any auto parts store. Using a large Phillips screwdriver, depress the piston inside the bore slowly again and again, pausing a few seconds after each thrust, until no more air bubbles are seen in the tubes. 11) (Picture 9)The shaft that come out of the booster will have to be shortened for this application. Measure carefully and adjust the shaft to fit without either binding or free play. I found that my adjustment screw was rusted so solidly together that I used a cutoff wheel to simply lop the end off, then filed the stub smooth.
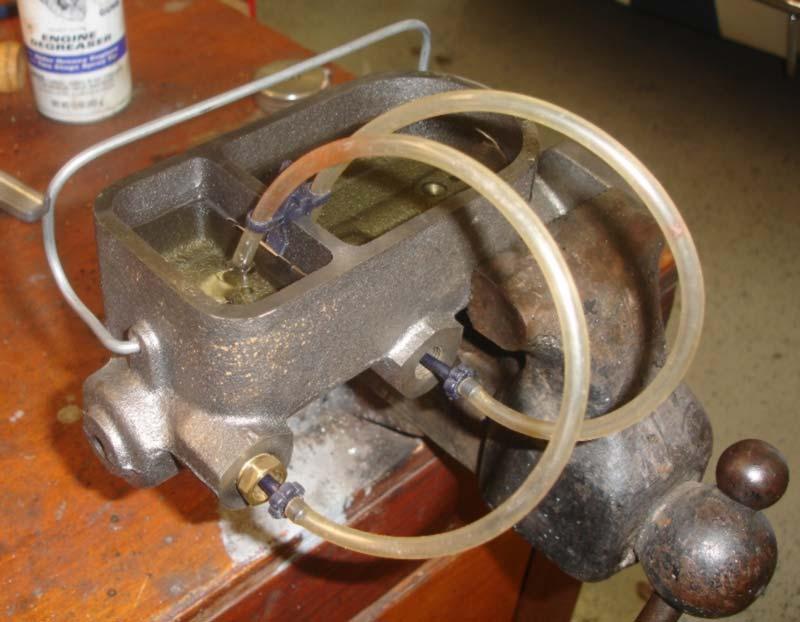
3 12) Carefully mount the new master cylinder on the car s booster, remembering that DOT 3 or 4 brake fluid makes excellent paint remover for your fenders. When doing this job, I keep everything well covered and wear rubber gloves, pausing frequently to wash my gloved hands. 13) Now comes the fun part. Re-plumbing the brake system is not terribly difficult but it is awkward to do, with small fittings in tight places. You can order a complete set of pre-bent brake lines for your Avanti (one source is or you can fabricate your own. I chose the latter route as it is less expensive, and I do not plan on entering any concours shows. You will not find steel lines of exactly the same length as the originals at AutoZone or NAPA, so you will have to make do with stock lengths or flare your own. 14) (Picture 10) This small brass multi-port junction block is factory mounted on the frame directly below the Master Cylinder. It has four ports, counter clockwise from 9 o clock, the ports feed the back brakes, right front caliper, left front caliper, and Master cylinder (the port pointing straight up). As I was replacing the old lines, I used a small cutting tool to simply snip the lines at this block. There is no point in struggling to loosen the fittings in this impossibly small space. In fact, I needed to use a torch and Vice Grips pliers to get the stubs out of the fittings while the block was tightly clamped in my table vice. Be careful with the junction block so it can be cleaned as it will be reused. This photo shows the block with new lines attached. You will notice that the original back brake port is filled with a threaded plug. That is because the back brakes now are plumbed directly into the primary port (small reservoir) of the new MC. If you plan to use an original style pressure switch for the brake lights you can mount it here instead. I have moved my brake light switch inside the car where it is activated electrically by the simple movement of the pedal (see article in Avanti Magazine issue ##), a much safer alternative in my mind. 15) (Picture 11) Steel brake lines are available in only a few choices of pre-cut lengths. Junctions allow you to connect long sections together. You can also cut and doubleflare your own lines if you want; it is not that hard to do. Some of the auto supply chains (like AutoZone) will even loan you a brake flaring kit and a tubing bender. Remember, always use double flaring on brake fittings for safety. The tube end fittings you will use need to be Inverted Flare style. Do not mix different diameters of brake tubing on your car as thicker lines deliver lower pressure. Use 3/16 line exclusively for all runs. (the fittings on the ends of 3/16 tubes are 3/8 24 thread. Confusing, because often they are referred to by the men at the parts counter simply as 3/16 lines). Never use Teflon tape or pipe dope on brake lines. The high pressure sealing comes from the flared tip pushed tightly against its matching flared seat, not from the sealing of the threads.
4 16) The large bowl on the Master Cylinder feeds the junction block, where both front calipers are plumbed. Use a 24 length of straight tube between the MC and the port on the top of the junction block, forming a loop in the middle of the run for safety. Here is a tip before using your expensive new brake lines, test bend a wire coat hanger to fit, then when you are satisfied with your work replicate the design in the brake line using the tubing bender. An important word of caution-- disconnect your battery before running these brake lines. The starter solenoid with its hot connections are right below the master cylinder on the fender apron, and the line from the MC to the junction block will run right past it. Carefully bend the tube so there is no chance of it ever coming in contact with the car s live electrical system when it is attached in place. 17) the line from the junction block to the left front brake is easy. Use a six-inch precut line (slightly longer than original) and assure that it is bent so that it will not come into contact with any moving suspension pieces. 18) The line from the junction block to the right front brake is a little tricky. The original line is about 42, but pre-cut lines are available in only 40 or 51. While one could use 2-24 lines with a junction in the middle, I decided that this would be sloppy and chose instead to cut the 51 line down to size, using the double-flaring tool to redo the end I had snipped. It worked fine and fit perfectly. 19) The final brake line travels from the MC s primary port to the rear brake hose. Originally, the factory used a 76 steel line at the rear of the car, joined to a 42 line ahead (at least they did on my car) but that was when the rear brakes were plumbed into the front junction block. Now, since we are running the line directly from the new MC to the rear hose, two 60 lines with a 12 line right between them work well. And putting the short section in the middle makes it easy to reach the junction fittings right underneath the car, as they are nestled inside the frame rails. By the way, the 17 rear rubber brake hose is available from NAPA for one, part number (Note: the final two steel lines in the system are mounted on top of the rear axle carrier, and I will replace them when I convert the back brakes to discs in the very near future. Another article to come!) 20) (Picture 12) The last parts are the tiniest but if you expect to pop by the auto parts store and pick them up on the way home from work you may be confounded by the shear number of brass fittings packed in plastic sleeves or hung in small transparent packages on the pegboard. Let me make this easy for you. If you use the Master Cylinder I referenced, here is the exact description of what you need: Primary port: Brass Dual Master Cylinder adapter fitting/ 9/16-20 Inverted Flare Male to 3/8-24 Inverted Flare Female. (Auto Zone part number BLF- 27C)
5 Secondary Port: Brass Dual Master Cylinder adapter fitting/ ½ -20 Inverted Flare Male to 3/8-24 Inverted Flare Female. (Auto Zone part number BLF- 20C) 21) (Picture 13) After bleeding the brakes at all four wheels, have a helper stand on the brake pedal while you check every fitting for leaks. Conclusion: Our results were fantastic. The car stops straight and true, and in about half the distance as it did before, all without evoking a feeling of panic. My confidence is building for my first road trip! Total time from start to finish (minus trips to the parts store and time spent compulsively cleaning and painting things) was about five hours. If you have never done anything like this before, leave yourself an entire weekend and ask a friend to help. Have fun stopping faster!
6 Picture 1
7 Picture 2
8 Picture 3
9 Picture 4
10 Picture 5
11 Picture 6
12 Picture 7
13 Picture 8
14 Picture 9

15 Picture 10

16 Picture 11


17 Picture 12

18 Picture 13
INSTALLATION INSTRUCTIONS
 INSTALLATION INSTRUCTIONS Disc Brake Spindle Kit SUM-BKA2447 1964-72 A-BODY 1967-69 F-BODY 1968-74 X-BODY Thank you for choosing SUMMIT RACING for your braking needs. Please take the time to read and carefully
INSTALLATION INSTRUCTIONS
 INSTALLATION INSTRUCTIONS BIG ROTOR / CALIPER RELOCATION REAR KIT SUM-BK1423 1999-2009 GM 1/2 Ton Trucks & SUVs Thank you for choosing SUMMIT RACING for your braking needs. Pleases take the time to read
Installation Instructions
 Preparing your vehicle to install your brake system upgrade 1. Rack the vehicle. 2. If you don t have a rack, then you must take extra safety precautions. 3. Choose a firmly packed and level ground to
INSTALLATION INSTRUCTIONS
 INSTALLATION INSTRUCTIONS PERFORMANCE AT THE WHEELS KIT W120-22, W120-23 1964 1/2-69 MUSTANG Thank you for choosing STAINLESS STEEL BRAKES CORPORATION for your braking needs. Pleases take the time to read
INSTALLATION INSTRUCTIONS
 INSTALLATION INSTRUCTIONS BIG ROTOR / CALIPER RELOCATION FRONT KITS SUM-BK1422, BK1423, BK1424 1999-2006 GM 1/2 Ton Trucks & SUVs Thank you for choosing SUMMIT RACING for your braking needs. Pleases take
Installation Instructions
 Installation Instructions Rear Disc Brake Conversion Kit Item # RC2001, RC2001X Applications: Mopar 8-3/4 & 9-3/4 Rear Axles Thank you for choosing Leed Brakes for your automotive product needs. Before
DISC BRAKE/DUAL MASTER CYLINDER CONVERSION. Tools, Equipment and Supplies Needed:
 Please take the time to read the enclosed instructions carefully. If you have any questions, call our Product Assistance personnel for clarification. It is important to note that these instructions contain
INSTALLATION INSTRUCTIONS
 INSTALLATION INSTRUCTIONS PERFORMANCE AT THE WHEELS KITS W156-6 & W156-7 1965-74 MOPAR B & E BODY Thank you for choosing STAINLESS STEEL BRAKES CORPORATION for your braking needs. Pleases take the time
Installation Instructions
 Installation Instructions Rear Disc Brake Conversion Kit Item # RC4001, RC4001X Applications: Mopar 7.25, 8.25, 9.25 Axles Thank you for choosing Leed Brakes for your automotive product needs. Before you
A /F/X Body Instruction Packet Rear Disc Conversion
 A /F/X Body Instruction Packet Rear Disc Conversion 64-72 A Body / 67-81 F Body / 62-74 X Body This kit is for axles with a 3 1/8 spread center to center on the top two bolt holes (pictured left). Rotor
INSTALLATION INSTRUCTIONS
 INSTALLATION INSTRUCTIONS R1 REAR DRUM TO DISC BRAKE CONVERSION KIT A130-3 JEEP CJ SERIES W/AMC-20 REAR AXLES AND 5 x 5-1/2" BOLT CIRCLE Thank you for choosing STAINLESS STEEL BRAKES CORPORATION for your
55-64 Full Size GM (Impala, Bel Air, etc.) This kit is for axles with a 3 3/8 spread center to center on the top two bolt holes (pictured left).
 This kit is for axles with a 3 3/8 spread center to center on the top two bolt holes (pictured left).") SUM-BK1624A Full Size GM Installation Instructions Rear Disc Conversion 55-64 Full Size GM (Impala, Bel Air, etc.) This kit is for axles with a 3 3/8 spread center to center on the top two bolt holes (pictured
SUM-BK1624A Full Size GM Installation Instructions Rear Disc Conversion 55-64 Full Size GM (Impala, Bel Air, etc.) This kit is for axles with a 3 3/8 spread center to center on the top two bolt holes (pictured
Tools, Equipment and Supplies Needed:
 153-162 DISC BRAKE/DUAL MASTER CYLINDER CONVERSION Please take the time to read the enclosed instructions carefully. If you have any questions, call our Product Assistance personnel for clarifi cation.
INSTALLATION INSTRUCTIONS
 INSTALLATION INSTRUCTIONS FRONT BIG BRAKE CONVERSION KIT A112-5 1987-93 FORD MUSTANG Thank you for choosing STAINLESS STEEL BRAKES CORPORATION for your braking needs. Pleases take the time to read and
Eliminator Vented Disc Brakes Owners Manual
 Eliminator Vented Disc Brakes Owners Manual TIE DOWN ENGINEERING 255 Villanova Drive SW, Atlanta, GA 30336 www.tiedown.com (404) 344-0000 Fax (404) 349-0401 Instruction Sheet #08075 101310,C752 Eliminator
INSTALLATION INSTRUCTIONS
 INSTALLATION INSTRUCTIONS BILLET ALUMINUM ALL-IN-ONE MASTER CYLINDERS A0472, -1, -2, -3, -4, -5 A0473, -1, -2, -3, -4, -5 A0474, -1, -2, -3, -4, -5 Thank you for choosing STAINLESS STEEL BRAKES CORPORATION
INSTALLATION INSTRUCTIONS
 INSTALLATION INSTRUCTIONS REAR DISC CONVERSION KIT A136-1 1976-86 AMC 20 AXLES WITH WARN FULL FLOATING AXLE CONVERSION Thank you for choosing STAINLESS STEEL BRAKES CORPORATION for your braking needs.
INSTALLATION INSTRUCTIONS
 INSTALLATION INSTRUCTIONS DISC BRAKE CONVERSION KITS A120-4 & A120-5 1964-1/2-66 Ford & Mercury Thank you for choosing STAINLESS STEEL BRAKES CORPORATION for your braking needs. Pleases take the time to
INSTALLATION INSTRUCTIONS
 INSTALLATION INSTRUCTIONS POWER FRONT DISC CONVERSION KIT A126-7 1963-66 CHEVY C10 PICKUP NON-POWER FRONT DISC CONVERSION KIT A126-8 1963-72 CHEVY C10 PICKUP Thank you for choosing STAINLESS STEEL BRAKES
1969 Camaro. Concourse Style Disc Brake Conversion Kit Instllation Instructions
 Concourse Style Disc Brake Conversion Kit Instllation Instructions 1969 Camaro (1970 Chevelle Kit Shown) This document contains our regular disc brake conversion instructions with the addition of GM assembly
INSTALLATION INSTRUCTIONS
 INSTALLATION INSTRUCTIONS PERFORMANCE AT THE WHEELS KIT W155-5 CHRYSLER 8 3 /4" & 9 3 /4" REAR AXLES Thank you for choosing STAINLESS STEEL BRAKES CORPORATION for your braking needs. Please take the time
INSTALLATION INSTRUCTIONS
 INSTALLATION INSTRUCTIONS REAR DISC BRAKE CONVERSION KIT A126-3 1988-98 CHEVY K1500 4WD 10" DRUMS Thank you for choosing STAINLESS STEEL BRAKES CORPORATION for your braking needs. Pleases take the time
SUSP-09, Rear Wheel Bearing Replacement - Steel Trailing Arm. Acrobat Printable Version
 SUSP-09, Rear Wheel Bearing Replacement - Steel Trailing Arm Introduction Acrobat Printable Version I'd like to thank Ben Davis for providing the pictures for this procedure. Ben took the time to take
A/F/X Body GM Installation Instructions
 A/F/X Body GM Installation Instructions Power Disc Conversion 64-72 A Body / 67-69 F Body / 68-74 X Body 9 slimline booster pictured Your new disc brake conversion kit can be bolted up with standard hand
INSTALLATION INSTRUCTIONS
 INSTALLATION INSTRUCTIONS REAR DISC BRAKE CONVERSION KIT A126-1 1973-87 CHEVROLET 1/2 TON 2WD Thank you for choosing STAINLESS STEEL BRAKES CORPORATION for your braking needs. Pleases take the time to
INSTALLATION INSTRUCTIONS
 INSTALLATION INSTRUCTIONS REAR DISC BRAKE CONVERSION KIT A158 1994-97 Dodge Ram 1500 (2WD & 4WD) and REAR DISC BRAKE CONVERSION KIT A158-1 1998-01 Dodge Ram 1500 (2WD & 4WD) Thank you for choosing STAINLESS
INSTALLATION INSTRUCTIONS
 INSTALLATION INSTRUCTIONS REAR DISC BRAKE CONVERSION KITS A112, A112-1 & A112-93 1979-93 FORD MUSTANG with 7.5" & 8.8" AXLES Thank you for choosing STAINLESS STEEL BRAKES CORPORATION for your braking needs.
FORD FAIRLANE Booster Conversion Kit ( TORINO, RANCHERO )
") 1966-1971 FORD FAIRLANE Booster Conversion Kit ( TORINO, RANCHERO ) F R Unboxing your kit: 1. Remove new booster, bracket assembly and master cylinder from their boxes and inspect the parts. 2. New boosters
1966-1971 FORD FAIRLANE Booster Conversion Kit ( TORINO, RANCHERO ) F R Unboxing your kit: 1. Remove new booster, bracket assembly and master cylinder from their boxes and inspect the parts. 2. New boosters
Mopar 8 3/4 & 9 3/4 (Dana) Installation Instructions Rear Disc Conversion
 Installation Instructions Rear Disc Conversion") Mopar 8 3/4 & 9 3/4 (Dana) Installation Instructions Rear Disc Conversion This kit is for either Mopar 8 ¾ or Mopar 9 ¾ (Dana). This kit is designed to work with axles with either GM 5 x 4.75 Bolt Pattern
Mopar 8 3/4 & 9 3/4 (Dana) Installation Instructions Rear Disc Conversion This kit is for either Mopar 8 ¾ or Mopar 9 ¾ (Dana). This kit is designed to work with axles with either GM 5 x 4.75 Bolt Pattern
No Modify Power Brake Kit Instructions
 No Modify Power Brake Kit Instructions Above are photos of the kit as shipped. Included is the booster, bracket, master cylinder, master cylinder brake lines, adjustable pushrod with rubber seal and vacuum
Installation Instructions
 Installation Instructions Rear Disc Brake Conversion Kit Item # RC1001, RC1001X Applications: 64-72 A-body, 67 F-Body, 63-67 X-body with Non Staggered Shocks Thank you for choosing GPS Auto for your automotive
INSTALLATION INSTRUCTIONS
 INSTALLATION INSTRUCTIONS FX4 ELITE REAR DISC CONVERSION KITS WITH INTERNAL PARKING BRAKE A110-14, A111-25, A111-29 for FORD 8" & 9" REAR ENDS Thank you for choosing STAINLESS STEEL BRAKES CORPORATION
INSTALLATION INSTRUCTIONS
 INSTALLATION INSTRUCTIONS REAR CONVERSION KIT A111-2 (FORD 8" & 9" SMALL BEARING) & REAR CONVERSION KIT A111-3 (FORD 9 TORINO) Thank you for choosing STAINLESS STEEL BRAKES CORPORATION for your braking
Eliminator Vented Disc Brakes Owners Manual
 Eliminator Vented Disc Brakes Owners Manual TIE DOWN ENGINEERING 255 Villanova Drive SW, Atlanta, GA 30336 www.tiedown.com (404) 344-0000 Fax (404) 349-0401 2008 TIE DOWN INC. ALL RIGHTS RESERVED Instruction
INSTALLATION INSTRUCTIONS
 INSTALLATION INSTRUCTIONS REAR DISC CONVERSION KIT A128-4 1997-2004 JEEP WRANGLER (TJ) WITH DANA 44 AXLES (non-abs) Thank you for choosing STAINLESS STEEL BRAKES for your braking needs. Pleases take the
EGR Performance Brakes Assembly Instructions DODGE DANA 70 '87 - '93 (Will not fit stock sized dual rear wheels)
") EGR Performance Brakes Assembly Instructions DODGE DANA 70 '87 - '93 (Will not fit stock sized dual rear wheels) Got Brakes? Parts List (2) Vented Rotors (2) Multi hole Cable Mount & L Brkt (2) Axle Tube
EGR Performance Brakes Assembly Instructions DODGE DANA 70 '87 - '93 (Will not fit stock sized dual rear wheels) Got Brakes? Parts List (2) Vented Rotors (2) Multi hole Cable Mount & L Brkt (2) Axle Tube
NEW BRAKE INSTALLATION. Let us show you how a
 Tech Article From Newsletter 17.2-2nd Quarter of 2011 NEW BRAKE INSTALLATION Let us show you how a Big Brake Install is easier than you think!! So, you have a 572 (or a hot 383) in your shoebox... you
INSTALLATION INSTRUCTIONS
 INSTALLATION INSTRUCTIONS REAR DISC BRAKE CONVERSION KIT A125-3 1965-72 GM A-BODY 10 & 12 BOLT AXLES Thank you for choosing STAINLESS STEEL BRAKES CORPORATION for your braking needs. Pleases take the time
82-92 CAMARO, FIREBIRD RACE/STREET 4-PISTON FRONT BRAKE KIT INSTRUCTIONS
 M- F 8:00a.m.-8:00p.m. EST. 82-92 CAMARO, FIREBIRD RACE/STREET 4-PISTON FRONT BRAKE KIT INSTRUCTIONS YOU WILL NEED TO MODIFY YOUR SPINDLE. NOTE: You will need to cut the factory caliper mounting ears off
INSTALLATION INSTRUCTIONS PERFORMANCE AT THE WHEELS KIT W125
 INSTALLATION INSTRUCTIONS PERFORMANCE AT THE WHEELS KIT W125 1968-81 CAMARO & FIREBIRD 10 & 12 BOLT W/"C" CLIPS Thank you for choosing STAINLESS STEEL BRAKES CORPORATION for your braking needs. Pleases
INSTALLATION INSTRUCTIONS R1 REAR CONVERSION KIT
 INSTALLATION INSTRUCTIONS R1 REAR CONVERSION KIT INSTRUCTION FOR ASSEMBLY OF JEEP CJ SERIES W/AMC 20 REAR AXLES, 5 x 5-1/2" BOLT CIRCLE WITH A130-4 FULL FLOATING AXLE OR A130-5 (1 PIECE AXLE) Thank you
Figure 1 Factory G50 update and old Shift Fork Shaft
 911 Clutch Job So you have one of the best 911s there is, a 87-89 G50 Porsche. However, after many years of service, it is time for a clutch. Maybe, the rubber clutch disc has failed, or the clutch is
Installing Rear Brake Pads on a WK Jeep
 Installing Rear Brake Pads on a WK Jeep Step by Step By Chirpz Disclaimer: I do not claim that this procedure is the right way or even the best way to change your rear brake pads. This is what I did after
INSTALLATION INSTRUCTIONS
 INSTALLATION INSTRUCTIONS REAR DISC BRAKE CONVERSION KIT A125-2 1955-70 FULL SIZE CHEVROLET Thank you for choosing STAINLESS STEEL BRAKES CORPORATION for your braking needs. Pleases take the time to read
INSTALLATION INSTRUCTIONS
 INSTALLATION INSTRUCTIONS REAR CONVERSION KITS SUM-BK1326-X, SUM-BK1326-99904, SUM-BK1327-X, SUM-BK1327-99904, SUM-BK1328-X, SUM-BK1328-99904 FORD 8 and 9 AXLES WITH GM & FORD BOLT PATTERN Thank you for
INSTALLATION INSTRUCTIONS
 INSTALLATION INSTRUCTIONS REAR DRUM TO DISC BRAKE CONVERSION KIT A130 JEEP CJ SERIES W/AMC-20 REAR AXLES AND 5 x 5-1/2" BOLT CIRCLE Thank you for choosing STAINLESS STEEL BRAKES CORPORATION for your braking
Ford 8, 9 Small Bearing Installation Instructions Rear Disc Conversion
 Ford 8, 9 Small Bearing Installation Instructions Rear Disc Conversion This kit is for Ford 9 rear axles with the small (2.835 ) style bearing and Ford 8 rear ends. This kit is designed to work with axles
INSTALLATION INSTRUCTIONS
 INSTALLATION INSTRUCTIONS REAR DISC BRAKE CONVERSION KIT A157 1991-2004 Dodge Dakota 2WD 1991-2002 Dodge Dakota 4WD 1998-2002 Dodge Durango Thank you for choosing STAINLESS STEEL BRAKES CORPORATION for
INSTALLATION INSTRUCTIONS
 INSTALLATION INSTRUCTIONS REAR DISC CONVERSION KIT A126-2 1988-98 C1500 2WD 10" REAR DRUM Thank you for choosing STAINLESS STEEL BRAKES CORPORATION for your braking needs. Pleases take the time to read
55-64 Full Size Chevy
 55-64 Full Size Chevy Installation Instructions Power Disc Conversion 9 slimline booster pictured Your new disc brake conversion kit can be bolted up with standard hand tools. The only tools you may not
BRAKE SYSTEM Nissan 240SX DESCRIPTION BRAKE BLEEDING * PLEASE READ FIRST * BLEEDING PROCEDURES ADJUSTMENTS BRAKE PEDAL HEIGHT SPECS TABLE
 BRAKE SYSTEM 1990 Nissan 240SX 1990 BRAKE SYSTEMS Nissan Disc & Drum Axxess, Maxima, Pathfinder, Pickup, Pulsar NX, Sentra, Stanza, 240SX, 300ZX DESCRIPTION All brake systems are hydraulically operated
G5 Stainless Steel Brakes Owners Manual
 G5 Stainless Steel Brakes Owners Manual Important: Read all of this Stainless Steel Disc Brake Manual before starting installation or removal of any part on the disc brakes. TIE DOWN ENGINEERING 255 Villanova
INSTALLATION INSTRUCTIONS
 INSTALLATION INSTRUCTIONS PERFORMANCE AT THE WHEELS KIT W125-42 GM 10 & 12 Bolt Rear Axles with Staggered or non-staggered Shocks with C-Clips Thank you for choosing STAINLESS STEEL BRAKES CORPORATION
INSTALLATION INSTRUCTIONS
 INSTALLATION INSTRUCTIONS DISC BRAKE CONVERSION KITS A121-1, A121-2, A121-3, A121-4 1967-69 Ford & Mercury Thank you for choosing STAINLESS STEEL BRAKES CORPORATION for your braking needs. Pleases take
Performance Brake Caliper Guide Bushing Set Installation Guide
 Performance Brake Caliper Guide Bushing Set Installation Guide Proper service and repair procedures are vital to the safe, reliable operation of all motor vehicles as well as the personal safety of those
Front Suspension Redo
 Front Suspension Redo Message: First, thanks to all the previous posters for guidance in my doing the suspension. As thanks, here s the updated document for doing the front suspension. Procedure: While
93-02 CAMARO BILLET HUB STYLE KIT
 93-02 CAMARO BILLET HUB STYLE KIT FOR ANY QUESTIONS, PLEASE CALL US @ (727-347-9915) M-TH 8:00A.M. 8:00P.M., FR 8:00A.M.-7:00P.M. EST CLOSED SATURDAYS AND SUNDAYS YOU WILL NEED TO MODIFY YOUR SPINDLE.
INSTALLATION INSTRUCTIONS
 INSTALLATION INSTRUCTIONS COMP. R AND COMP. S QUICK CHANGE KITS A200, A200-1 Thank you for choosing STAINLESS STEEL BRAKES CORPORATION for your braking needs. Pleases take the time to read and carefully
Converting a Series Land Rover to front wheel disc brakes using the kit made by Torrel Industries Ltd,
 Converting a Series Land Rover to front wheel disc brakes using the kit made by Torrel Industries Ltd, Torrel Industries ltd Series Land Rover front brake conversion kit: Difficulty - Low Except for one
DBK FULL-SIZE CHEVY DISC BRAKE conversion KIT
 DBK5964 1959-1964 FULL-SIZE CHEVY DISC BRAKE conversion KIT impala, bel air, biscayne Installation Instructions does not fit 14" rims must ust 15" or larger for this kit to be installed correctly on your
INSTALLATION INSTRUCTIONS
 INSTALLATION INSTRUCTIONS FRONT DISC BRAKE CONVERSION KITS A148-9 & A148-15 1949-54 Chevy Trucks Thank you for choosing STAINLESS STEEL BRAKES CORPORATION for your braking needs. Please take the time to
55-64 Full Size Chevy Installation Instructions Standard Disc Conversion
 55-64 Full Size Chevy Installation Instructions Standard Disc Conversion DBMC09, PV71 & PVB71 Pictured (Booster, master cylinder & valve setups may vary by upgrades selected) Your new disc brake conversion
A/F/X Body GM Installation Instructions Manual Disc Conversion
 A/F/X Body GM Installation Instructions Manual Disc Conversion 64-72 A Body / 67-69 F Body / 62-74 X Body DBMC09 & PVK71 pictured above (Booster, master & valve setups may vary by upgrades selected) Your
79-93 MUSTANG 2 PISTON FLOATER FRONT BRAKE KIT INSTRUCTIONS
 79-93 MUSTANG 2 PISTON FLOATER FRONT BRAKE KIT INSTRUCTIONS Preparing the Spindle FOR ANY QUESTIONS PLEASE CALL US @(727) 347-9915 M-F 8:00 AM -8:00 PM EST YOU WILL NEED TO MODIFY YOUR SPINDLE. Note: Some
INSTALLATION INSTRUCTIONS
 INSTALLATION INSTRUCTIONS REAR DISC BRAKE CONVERSION KITS SUM-BK1329-X, SUM-BK1329-99904, SUM-BK1330-X, SUM-BK1330-99904 CHRYSLER 8 3 /4", 9 3 /4" and 2-PIECE REAR AXLES Thank you for choosing SUMMIT RACING
Scan this code with your smart phone - Facebook Photo Gallery
 www.airkewld.com Page 1 of 8 T-2 Front Disc Brake Install It is recommended to read and comprehend this install guide BEFORE beginning the disc brake conversion. This set was tested for use on a Volkswagen
RHINO SUSPENSION SYSTEM INSTALLATION INSTRUCTIONS
 PARTS INCLUDED: 2 FRONT UPPER A-ARMS 2 FRONT LOWER A-ARMS 2 UNI-BALL JOINTS 2 UNI-BALL JOINT STUDS 2 UNI-BALL JOINT CAPS 2 RETAINING RINGS 1 FRONT SHOCK ASSEM. 2 DELRON STEERING STOPS 2 SHOCK MOUNT SPACERS
Final Assembly Instructions Portside Cruiser
 Final Assembly Instructions Portside Cruiser Thank you for buying your new bicycle from L.L.Bean. Read these instructions carefully before beginning the final assembly. Prior to shipping, our expert cycling
H31 BOOSTER REBUILD & MASTER CYLINDER
 2010 1991 BMW 750iL George Fontes gajfontes@yahoo.com H31 BOOSTER REBUILD & MASTER CYLINDER Rebuild hydraulic booster and replace Master Cylinder. Page 1 of 16 Master Cylinder Removal & Brake Booster Rebuild
82-92 CAMARO, FIREBIRD/78-87 REGAL, MONTE CARLO, GRAND PRIX/ S-10 RACE/STREET 4-PISTON FRONT BRAKE KIT INSTRUCTIONS
 82-92 CAMARO, FIREBIRD/78-87 REGAL, MONTE CARLO, GRAND PRIX/ S-10 RACE/STREET 4-PISTON FRONT BRAKE KIT INSTRUCTIONS 1 AEROSPACE COMPONENTS 727.347.9915 82-92 CAMARO/78-87 REGAL YOU WILL NEED TO MODIFY
 This document provides instructions for removing and installing a Front Wheel / Rotor on a Ducati Superbike. The torque values used are for the 748/916/996 from 1994 to 2001 and may be applicable for later
NC Little Big Brake Kit 14-16XXX
 NC Little Big Brake Kit 14-16XXX Congrats on purchasing our NC little big brake kit! These brakes have many benefits over stock, not least of which are weight loss and improved pedal feel. These instructions
OVERHAULING BRAKE CALIPERS GUIDE by Mr. Stefnwolf. This guide is for a 1982 GSX750ET but I expect most of the GS series to be similar if not the same.
 OVERHAULING BRAKE CALIPERS GUIDE by Mr. Stefnwolf This guide is for a 1982 GSX750ET but I expect most of the GS series to be similar if not the same. Badly corroded calipers (caused by moisture in the
APPLIED GMC / 1 (800) KATO RD. FREMONT, CA GMC ALL DISC BRAKE KIT
 KATO RD. FREMONT, CA GMC ALL DISC BRAKE KIT") APPLIED GMC 510-440-1101 / 1 (800) 752-7502 47626 KATO RD. FREMONT, CA 94538 GMC ALL DISC BRAKE KIT Shade Tree Mechanic's Guide to Disc Brake Upgrade Installation Instructions Written by: Edited by: Randy
APPLIED GMC 510-440-1101 / 1 (800) 752-7502 47626 KATO RD. FREMONT, CA 94538 GMC ALL DISC BRAKE KIT Shade Tree Mechanic's Guide to Disc Brake Upgrade Installation Instructions Written by: Edited by: Randy
A/F/X Body GM Installation Instructions Manual Disc Conversion
 A/F/X Body GM Installation Instructions Manual Disc Conversion 64-72 A Body / 67-69 F Body / 62-74 X Body DBMC09 & PVK71 pictured above (Booster, master & valve setups may vary by upgrades selected) Your
INSTALLATION INSTRUCTIONS
 INSTALLATION INSTRUCTIONS REAR DRUM TO DISC BRAKE CONVERSION KIT A118 pre-1985 Ford F150 (except 1983-1984 w/super H/D axle) Thank you for choosing STAINLESS STEEL BRAKES CORPORATION for your braking needs.
INSTALLATION INSTRUCTIONS
 INSTALLATION INSTRUCTIONS DISC BRAKE CONVERSION KIT A120-20, A120-21 1964 1 /2-66 Ford & Mercury Thank you for choosing STAINLESS STEEL BRAKES CORPORATION for your braking needs. Pleases take the time
Gearbox Assembly 101. Introduction. Before Beginning. By Mark Schutzer 4/13/06
 Gearbox Assembly 101 By Mark Schutzer 4/13/06 Introduction If you are planning to re-motor an old brass locomotive you may want to upgrade to a new gearbox at the same time. The early 60 s and 70 s gearboxes
INSTALLATION INSTRUCTIONS
 INSTALLATION INSTRUCTIONS INSTRUCTION FOR ASSEMBLY OF JEEP CJ SERIES W/AMC 20 REAR AXLES, 5 x 5-1/2" BOLT CIRCLE WITH A130-1 FULL FLOATING AXLE OR A130-2 (1 PIECE AXLE) Thank you for choosing STAINLESS
My Hawk build Part 8 by Stuart Clarke
 My Hawk build Part 8 by Stuart Clarke Front hubs, brakes and brake lines. There was still no news on my rear springs so I thought I d find something else to get on with. I had the front hubs, brake calipers
PYRTE. Building The Front Axle, Fork and Steering
 PYRTE Building The Front Axle, Fork and Steering The front axle on this traction engine is a very simple affair, in that it is a rectangular steel rod, sat on edge, with a pivot in the centre, which is
INSTALLATION INSTRUCTIONS
 INSTALLATION INSTRUCTIONS REAR DISC CONVERSION KIT SUM-BK1414-X 1997-2004 JEEP WRANGLER (TJ) WITH DANA 44 AXLES (non-abs) Thank you for choosing SUMMIT RACING for your braking needs. Pleases take the time
Our goal is to make the install a breeze. Please read the entire guide before beginning.
 www.airkewld.com Page 1 of 6 IRS Axle Kit Install IRS Axle Kit Install Our goal is to make the install a breeze. Please read the entire guide before beginning. KITS SHOULD INCLUDE 2 - Control-arm mounting
INSTALLATION GUIDE. RMS510, 511, 512, 513, 511MC 510-OR, 512-OR Manual Revision:
 REKLUSE MOTOR SPORTS z-start Dual-Actuated Brake Kit INSTALLATION GUIDE RMS510, 511, 512, 513, 511MC 510-OR, 512-OR 196-210 Manual Revision: 051309 2002-2009 Rekluse Motor Sports Rekluse Motor Sports,
SUM Chevy Truck frame mount booster kit
 SUM-760211 1955-1959 Chevy Truck frame mount booster kit Unboxing your kit: 1. Remove new booster, bracket assembly and master cylinder from their boxes and inspect the parts. 2. New boosters come with
INSTALLATION INSTRUCTIONS
 INSTALLATION INSTRUCTIONS FRONT DISC BRAKE CONVERSION KITS: A132-1, A133, A133-1 A134, A134-1 1968-73 MUSTANG/FORD Thank you for choosing STAINLESS STEEL BRAKES CORPORATION for your braking needs. Please
A proportioning valve is used to regulate brake pressure between front and rear brakes. Rear brakes on all models are self-adjusting.
 Page 1 of 21 ARTICLE BEGINNING DESCRIPTION & OPERATION WARNING: For warnings and procedures regarding vehicles equipped with Anti- Lock Brake Systems (ABS), see ANTI-LOCK BRAKE SYSTEM article in the BRAKES
*Some speedometers have these additional electronic connections. If yours does, then remove the smaller slotted screws shown.
 www.odometergears.com 1981-1985 240 Cable-Driven Speedometers (NOT for 1986 and later electronic units) http://www.davebarton.com/240-odometer-repair.html For this set of instructions below, I will not
Improving the gearshift feel in an SW20.
 Improving the gearshift feel in an SW20. Part one In 3 parts. The SW20 gearshift can be often be greatly improved by eliminating play in the shift linkages, and this article covers three areas that need
INSTALLATION INSTRUCTIONS
 INSTALLATION INSTRUCTIONS FRONT DISC BRAKE CONVERSION KIT A129-2 1959-64 Full Size Chevrolet Car and FRONT DISC BRAKE CONVERSION KITS A129-3 & A129-4 1965-68 Full Size Chevrolet Car Thank you for choosing
60 76 A Body Mopar Power Disc Conversion Installation Instructions
 62-72 B & E BodyMopar 60 76 A Body Mopar Power Disc Conversion Installation Instructions Special A-Body only parts shown below (In addition to parts above for A-Body cars, part # MDC66DC & MDC46DC) Your
MOPAR RACE/STREET FRONT BRAKE KIT INSTRUCTIONS. FOR ANY QUESTIONS, PLEASE CALL M-F 8:00a.m.-8:00p.m. EST.
 MOPAR RACE/STREET FRONT BRAKE KIT INSTRUCTIONS 1 AEROSPACE COMPONENTS 727.347.9915 You will need some items for best results when installing your Aerospace Brake kit. The following is recommended: At least
ALLDATA Online Saturn L200 L4-2.2L VIN F - Base Brake Bleeding. Base Brake Bleeding
 Page 1 of 9 Base Brake Bleeding BASE BRAKE BLEEDING TOOLS REQUIRED J-439l5 Brake Bleed Adapter J29532 Pressure Bleeder MANUAL BLEEDING NOTICE: Brake fluid is corrosive to painted surfaces. Take care not
This is a guide to assist you adjust the valve clearance on a 2l V6 MIVEC engine found in a Mitsubishi FTO GPX
 Adjusting the valve clearance on a 2L V6 FTO engine This is a guide to assist you adjust the valve clearance on a 2l V6 MIVEC engine found in a Mitsubishi FTO GPX Disclaimer: This guide is to assist you
The Ford Model A Water Pump
 The Ford Model A Water Pump George Washington Chapter, Inc. 3903 Old Lee Highway Fairfax, VA 22030 1 Table of Contents Introduction/Specifications.. 3 1. Water Pump Inspection and Removal. 4 a. Removal..
2011+ Adjustable Tie-rod Ends (Mm5TR-2)
") 3430 Sacramento Dr., Unit D San Luis Obispo, CA 93401 Telephone: 805/544-8748 Fax: 805/544-8645 www.maximummotorsports.com 2011+ Adjustable Tie-rod Ends (Mm5TR-2) Instructions 1. Set the parking brake
3430 Sacramento Dr., Unit D San Luis Obispo, CA 93401 Telephone: 805/544-8748 Fax: 805/544-8645 www.maximummotorsports.com 2011+ Adjustable Tie-rod Ends (Mm5TR-2) Instructions 1. Set the parking brake
Mustang 7.5 Limited Slip Differential (28 Spline) V8; V6:
 V8; V6:") Mustang 7.5 Limited Slip Differential (28 Spline) 79-85 V8; 86-10 V6: Required Tools: Ratchet Wrench Torque Wrench 1/2", 5/16, 3/4", 12mm and 15mm Sockets Lug nut Wrench Dial Indicator Digital Measuring
Mustang 7.5 Limited Slip Differential (28 Spline) 79-85 V8; 86-10 V6: Required Tools: Ratchet Wrench Torque Wrench 1/2", 5/16, 3/4", 12mm and 15mm Sockets Lug nut Wrench Dial Indicator Digital Measuring
This file is available for free download at
 This file is available for free download at http://www.iluvmyrx7.com This file is fully text-searchable select Edit and Find and type in what you re looking for. This file is intended more for online viewing
INSTALLATION INSTRUCTIONS
 INSTALLATION INSTRUCTIONS COMP CALIPER QUICK CHANGE KIT A213 1968-73 MUSTANG Thank you for choosing STAINLESS STEEL BRAKES CORPORATION for your braking needs. Pleases take the time to read and carefully
INSTALLATION GUIDE. RMS500, RMS501, RMS502, RMS503, RMS506, RMS507, RMS508, RMS509, -OR Manual Revision:
 REKLUSE MOTOR SPORTS z-start Brake Kit INSTALLATION GUIDE RMS500, RMS501, RMS502, RMS503, RMS506, RMS507, RMS508, RMS509, -OR 196-200 Manual Revision: 051309 2009 Rekluse Motor Sports Rekluse Motor Sports,