Information Booklet WW20072
|
|
|
- Winifred Shields
- 6 years ago
- Views:
Transcription


1 Information Booklet WW20072
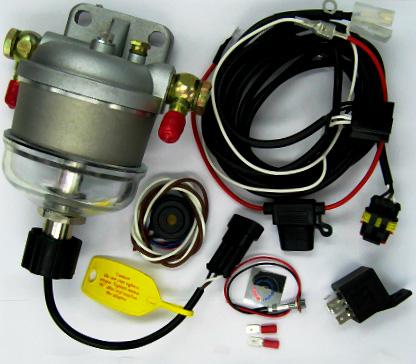
2 Included in the box 1 x Information Booklet 1 x Electrical Kit 1 x Water Watch Unit 1 x Water Watch Equipped Sticker 1 x Warning Sticker Bracket kits & instructions supplied separately IMPORTANT! Please ensure that you have read and understand this information booklet completely. Incorrect installation or servicing may void warranty. For after sales support or if you have further questions, please contact the Water Watch team at: Responsive Engineering Australia Pty Ltd Tel Fax responsiveengineering@bigpond.com
3 Contents Congratulations, you have purchased an Australian designed and built Water Watch, made from quality components, built and tested in Australia before each purchase. Why is Water Watch essential for common rail diesel fuel systems? 4 Location Diagram 5 Fitting Instructions 6-8 Wiring Diagram 9 Service Instructions Notes on Proper Use 12 Lifetime Warranty Guarantee 13 Parts List Log More Products 18 Important Information & Warnings Read this information first! Product Information WW
4 Why is Water Watch essential for common rail diesel fuel systems? Water Watch is proudly made in Australia and specifically designed for Common Diesel Rail Vehicles. Approximately 85% of the fuel in a common rail fuel system is circulated throughout the entire fuel system and is returned to the tank every hour the engine is operated. This high fuel flow rate, combined with the high temperature and pressure within a common rail fuel system makes it extremely vulnerable to damage if water is present in the fuel. Just fitting an extra fuel filter or water trap will not adequately protect your common rail diesel engine fuel system from expensive damage due to water in the fuel. Water Watch traps and retains free water from the fuel and provides a timely warning both visual and audible to the driver that water is present in the fuel system. Water Watch alarm sounds when only 5mls of water is trapped in the bowl, giving the driver the opportunity to stop and remove the water before damage occurs. Other water traps without an alarm, water can accumulate and be circulated throughout the fuel system without the drivers knowledge. These water traps may only be inspected for water at vehicle servicing times or at irregular intervals. This will be too late and damage to expensive fuel system components may have already occurred. 4 Product Information WW20072


5 Location Diagram Water Watch is located in the supply line from the fuel tank and before the original fuel filter. Common Rail Factory Fitted Filter High Pressure Pump Fuel Return Injectors Fuel Tank Fuel in Common Rail Diesel is also used to cool the system, so it is circulated through the system up to 60 litres per hour. Product Information WW
6 Fitting Instructions These instructions are for fitting to a 12/24 Volt system. we recommend consulting an auto electrician for wiring of your vehicle. ENSURE THAT THE VEHICLES BATTERY IS DISCONNECTED PRIOR TO INSTALLATION. AND THE ENGINE BAY IS FREE OF DUST AND DIRT. 1. Mount the Water Watch assembly after the fuel tank and before the original fuel filter in your vehicle, be sure to mount as vertical as possible. Ensure fuel flow is according to the arrow on the top of the filter housing. DO NOT REMOVE THE VEHICLES GENUINE FUEL FILTER ASSEMBLY. 2. Bolt relay into suitable position near Water Watch unit using 6mm bolt, washer and nut. 3. Mount the supplied LED Lamp to a visible place on your dashboard. Remove nut and washer behind LED - slide sticker onto back of LED and mount on dash, securing with washer and nut. 4. Mount supplied buzzer behind/ under your vehicles dashboard - the alarm sound is louder when the buzzer faces into the cab. Adjust direction to suit your own requirements. 5. Locate wire which has battery voltage when ignition is on and connect to a White wire at either the relay end or alternatively the opposite end (under dash end) of the wiring harness. If this wire is not from a fused source, fit the fuse holder and 5 amp fuse as supplied (refer to the wiring diagram). 6. White wire at relay end of the harness should be secured to the rest of the harness and insulated or removed if not used. 7. Connect the Black wire with eye terminal at the relay end to vehicle earth. 8. Connect the Red wire from both the LED light and buzzer to the wire at the under dash end of the wiring harness. 6 Product Information WW20072

7 Fuse LED Light Sensor Plug Buzzer White wire to Red wire on buzzer and light. Earth Wire To IGN ON white wire. Select 1 only Brown wire to Black wire on light. Brown wire to Blue or Black wire on buzzer. Relay & Plug Continued On Following Pages 1 Product Information WW
8 Fitting Instructions (continued) Buzzer Options 9A Option 1 Continuous Warning Connect the black wire of the LED light and buzzer to the brown wire at the dash end of the wiring harness. 9B Option 2 Pulse Warning Connect the blue wire of the buzzer and the black wire of the LED light to the brown wire under the dash end of the wiring harness. Note: red wire to power (white wire) Note: LED light and buzzer wiring connections should be soldered at joins. The Water Watch assembly incorporates a self check circuit. The LED light and buzzer will activate for approximately 3-4 seconds when the ignition switch is turned ON. If the LED light and buzzer does not function when the ignition is turned on there may be a malfunction in the circuit. Any malfunction of the warning system should be inspected and rectified immediately to achieve the maximum protection for your vehicles fuel system. Apply warning sticker supplied on appropriate area on vehicles windscreen. Place this information booklet and other appropriate paperwork in glove box for future reference. More information, photos and videos are available on our website 8 Product Information WW20072


 Brown wire")


9 Wiring Diagram White Wire = Power in Harness Fuse White wire to Positive (+) from ignition switch Ignition Switch Probe Black wire to vehicle earth or battery negative (-) Brown wire (signal) Pin 85 Pin 86 Relay Pin 87 Pin 30 Light Buzzer Red wire to vehicle battery voltage via ignition switch Earth Product Information WW

 must only be tightened to a tension of approx 25inch/pounds (2.8NM).")
10 Service Instructions (4) Centre Bolt Water Watch must sound the alarm for 3-4 seconds each time the ignition is switched on to check the circuit and to let you know that it is working. Bleeder Bolt (2) Sensor Screw (3) O Ring Seal (1) Electrical Plug Note: If it is necessary to remove glass bowl assembly, then the centre bolt (4) must only be tightened to a tension of approx 25inch/pounds (2.8NM). 10 Product Information WW20072
11 Service Instructions WATER WATCH WARNING! If this alarm activates after the initial pre-check alarm or during normal operation STOP THE ENGINE as soon as it is safe to do so and follow these simple instructions. Read the instructions fully before proceeding to drain. Check visually for water in the glass bowl. It may be difficult to see the water. We recommend as a precaution to proceed with draining the Water Watch bowl - the sensor is very accurate, the water may be dispersed within the fuel. 1. Unplug electrical plug (1) on sensor from the wiring harness. 2. Unscrew sensor (2) and remove momentarily to allow water to flush from bowl. Fluids should drain from glass bowl very quickly. (Bleeder/Banjo bolt may be loosened if draining is slow) 3. When liquid has drained, carefully retighten the sensor screw - 90 degrees after O Ring (3) makes contact. Warning - Do Not Overtighten Sensor - see notes on page Reattach the electrical plug (1) to wiring harness. 5. Prime the engine s fuel system (refer to owner s manual). 6. Check that no further water is entering the glass bowl and Water Watch warning ceases to sound alarm after pre-check. 7. If no more water is evident and/or alarm warning sounds again, this will indicate more water in your fuel supply (tank). 8. If you still have water in your fuel supply, do not operate engine as damage to fuel injection components will occur. Product Information WW
12 Notes on Proper Use Water Watch is fitted to assist in detecting and removing water in the fuel supply during normal operation of the vehicle. Water Watch is installed in the fuel supply line PRIOR to the factory filter. DO NOT OVER TIGHTEN SENSOR. Screw the sensor into the adaptor until the seal washer just touches the adaptor, then tighten a further 90 degrees by hand pressure only. Water Watch is designed to enhance the original filtration system by removing water and debris and warning the operator of contaminated fuel without causing restriction to fuel flow. If the warning buzzer and lamp are activated after the initial start-up pre-test, then you must stop the engine as quickly as it is safe to do so, drain the contents of the bowl as detailed in the service instructions (pages 10 & 11) before proceeding to operate the engine again. Should Water Watch alarms reactivate, indicating continued amounts of water entering your fuel supply, the contents of your fuel supply should be removed and the supply tanks cleaned. Failure to do so may cause serious damage to the fuel system and engine components. Water Watch s ability to protect these systems is limited by the capacity of the collection bowl where water and debris are collected. It is recommended that the Water Watch unit is checked regularly for fuel quality and the removal of debris from the bowl. 12 Product Information WW20072
13 Lifetime Warranty Guarantee Our commitment to quality includes our service. Should you, contrary to expectations, experience defects due to manufacturing faults, Responsive Engineering will provide you with a lifetime warranty against defects as follows: The product is guaranteed to be free of manufacturing and workmanship defects when used under normal conditions and care and in accordance with our instructions on use. Defects that do occur will be repaired, replaced at our discretion, solely at our option with no charge for parts. The benefits conferred by this warranty are in addition to all rights and remedies in respect of the product that the consumer has under the Competition and Consumer Act 2010 and similar state and territory laws. Extent of Warranty The warranty is limited to defects in workmanship or parts of the Water Watch unit. All defective products or parts will be replaced. This warranty does not extend to manuals and packaging, electrical lines or electrical components, fuel lines or other installation accessories to the Water watch unit. Exclusions This warranty does not cover: > Any defect caused by an accident, misuse, abuse, improper installation or operation or lack of reasonable care. > Any product that has not been installed, operated or maintained in accordance with the manufacturer s instructions provided with this product. > Any damage caused by improper power input, improper cable connection, failure to unplug the sensor from wiring prior to removal and installation, or over tightening the sensor into the Water Watch unit. Product Information WW
14 WW20072 Parts List REM2016 REM2017 REM2018 REM2014 REM2015 REM2013 REM2001 REM2012 REM2002 REM2003 REM2004 REM2005 REM2003A REM2006 REM2007A REM2021 REM2011 REM2007 REM Product Information WW20072
15 Should your Water Watch require replacement parts due to damage or reinstallation in another vehicle, please contact Responsive Engineering. Qty WW20072 Part 2 REM2001 Banjo Bolt 1 REM2002 O Ring 1 REM2003 O Ring 1 REM2003A O Ring 1 REM2004 Diffuser 1 REM2005 Skirt 1 REM2006 Bowl 1 REM2007 Sensor 1 REM2007A Sensor Seal 1 REM2008 C nector Loom 1 REM2011 Adapter 2 REM2012A Banjo 8mm 2 REM2012B Banjo 10mm 2 REM2012C Banjo 12mm 2 REM2013 Washer 1 REM2014 Bleed Bolt 1 REM2015 Washer 1 REM2016 Centre Bolt 1 REM2017 O Ring 1 REM2018 Seating 1 REM2021 O Ring 1 REM2000 Seal Kit Product Information WW
16 Log For notes on Water Watch system e.g: Last time Water Watch indicated alarm. Water Watch Installation Date: 16 Product Information WW20072
17 Product Information WW

18 More Products Responsive Engineering is an Australian company dedicated to finding innovative solutions to protect your Diesel Fuel System Water Watch Mounting bracket kits are supplied separately to Water Watch units and are designed to suit many diesel vehicles. Full list available on our web site Contents include: quality powder coated steel bracket specifically designed to fit your vehicle, additional fuel hose, clamps or quick connect fittings, nuts, bolts, washers and fitting instructions specific to your vehicles requirements. Also available from Responsive Engineering: Diesel Key prevents miss-fuelling with petrol. Diesel Key has a locking system which will only open when exactly the correct nozzle size is inserted into the receiver. Diesel Key prevents any access to the fuel tank either to put fuel in or out without the correct nozzle. Responsive Fuel Additive fuel conditioner specifically designed for Common Rail Diesel fuel systems 18 Product Information WW20072
19 WARNING! DO NOT DAMAGE YOUR SENSOR! UNCLIP SENSOR FROM WIRING HARNESS BEFORE TURNING SENSOR SCREW. Twisting the wiring coming from the sensor will damage the circuit board inside the sensor unit. After loosening/removing sensor unit from Water Watch to remove water/contamination. Reinstall sensor with care. Screw the sensor into the adapter until the seal washer just touches the adapter, then tighten a further 90 degrees by hand pressure only. Take care not to put undue strain on the wire from the sensor unit when reconnecting to the wiring harness plug. Rough handling or excessive force can damage the connection and allow water to enter the plug; this may give you a false warning or cause a malfunction with the Water Watch Alarm operation. The sensor should not require adjustment on installation. It is only if the sensor is removed and replaced that the above instructions apply. Product Information WW
20 IMPORTANT! Please ensure that you have read and understand this information booklet completely. Incorrect installation or servicing may void warranty. WATER WATCH WARNING! Should Water Watch alarm activate when driving - Pull up as soon as it is safe to do so and go to service instructions on pages For after sales support or if you have further questions, please contact the Water Watch team at: Responsive Engineering Australia Pty Ltd Tel Fax responsiveengineering@bigpond.com
LCD EWP /FAN DIGITAL CONTROLLER Installation Instructions
 77 Taras Avenue P.O. Box 363 Altona North Vic 3025 Australia Phone: +61(0)3 9369 1234 Fax: +61(0)3 9369 3456 Email: info@daviescraig.com.au Web: www.daviescraig.com.au LCD EWP /FAN DIGITAL CONTROLLER Installation
ULX210. Register your product. Send us your photos. Warranty COLOR CHANGING LED UNDERCAR LIGHTING SYSTEM. Installation Manual
 Register your product In order to provide you with prompt warranty service and technical support please register your product on line at www.varad.com/register. Be sure to have your product serial number
SLX300. Register your product. Send us your photos. Warranty COLOR CHANGING HEADLIGHT ACCENT LIGHTING SYSTEM. Installation Manual
 Register your product In order to provide you with prompt warranty service and technical support please register your product on line at www.varad.com. Be sure to have your product serial number ready.
AL-KO ESC USER MANUAL
 Vehicle Technology QUALITY FOR LIFE AL-KO ESC USER MANUAL OPERATING INSTRUCTIONS WARRANTY DETAIL About AL-KO ESC The new AL-KO ESC (Electronic Stability Control) is a sway and swerve stability control
SILVAN AUSTRALIA PTY. LTD.
 Instruction Manual MANSP55 REV C 31/10/14 Spotpak Redline 25, 55 & 100L 12V and Rechargeable SILVAN AUSTRALIA PTY. LTD. ABN 48 099 851 144 VICTORIA (HEAD OFFICE) 244-264 Greens Rd, Dandenong South, 3175
MODEL NUMBER: BD-116C USER GUIDE
 Airbrush MODEL NUMBER: BD-116C USER GUIDE WEBSITE: EMAIL: www.airbrushheaven.co.uk enquiries@airbrushheaven.co.uk 1 YEAR WARRANTY Contents 1. Welcome Section 2. General Information & Safety Instructions
TBE-700. Operation, Safety and Maintenance Manual. Stainless Steel Weld Cleaning System. Ensitech Pty Ltd
 Stainless Steel Weld Cleaning System Operation, Safety and Maintenance Manual TBE-700 TBE-700 Instruction Manual Oct 2013 (USA) FOREWORD FOREWORD This manual is a very important tool! Keep it with the
MODEL NUMBER: BD-132 USER GUIDE
 Airbrush MODEL NUMBER: BD-132 USER GUIDE WEBSITE: EMAIL: www.airbrushheaven.co.uk enquiries@airbrushheaven.co.uk 1 YEAR WARRANTY Contents 1. Welcome Section 2. General Information & Safety Instructions
Vehicle Rear Observation System With Integrated Parking Sensors
 Vehicle Rear Observation System With Integrated Parking Sensors Model: CAMSBAR Installation/User Manual Features: 2.5" LCD Color Display 2 Ultra Sonic Rear Obstacle Sensors On-screen Display Function Automatically
INSTALLATION INSTRUCTIONS
 REV 3 05/13/2016 INSTALLATION INSTRUCTIONS PART NO. 960001T 960003T PRODUCT DESCRIPTION: Full size Powered Light Bar Mid size Powered Light Bar Sport Bar and lights sold separately shown for reference
IMPORTANT INFORMATION
 Table of Contents IMPORTANT INFORMATION Section 1B - Maintenance MAINTENANCE 1 B Specifications........................... 1B-1 Special Tools........................... 1B-2 Mercury/Quicksilver Lubricants
OWNER S MANUAL PRODUCT CODE: 2006T
 Jul-18 Product Code: 2006T OWNER S MANUAL PRODUCT CODE: 2006T HYDRAULIC PIPE BENDER 12,000KG Model Capacity Bending Die No of Attachments 12,000kg 1/2", 3/4", 1", 1-1/4", 1-1/2", 2" 6 Made in China to
LED LIGHT BAR INSTRUCTION MANUAL 4WD ACCESSORIES W 2
 4WD ACCESSORIES LED LIGHT BAR INSTRUCTION MANUAL It is highly recommended to use a licensed auto electrician to install the LED Light Bar and the accompanying wiring harness. The warranty on this product
Fitting Instructions
 Dual Battery Kit Fitting Instructions Fitting Instructions We recommend that the is installed by a licensed auto-electrician. WARNING: Like any addition to your 12v set-up, ensure you ve installed a fuse
Ford 6.0L Powerstoke Regulated Fuel Return
 Ford 6.0L Powerstoke Regulated Fuel Return ! WARNING REGARDING EMISSIONS LAWS Not legal for sale or use on pollution-controlled motor vehicles anywhere in the United States. Legal ONLY for off-road competition
DAVIES, CRAIG PROPRIETARY LIMITED A.B.N A.C.N MELBOURNE AUSTRALIA
 DAVIES, CRAIG PROPRIETARY LIMITED A.B.N. 71 004 918 825 A.C.N. 004 918 825 MELBOURNE AUSTRALIA 77 Taras Avenue P.O. Box 363 Altona North Vic 3025 Australia Phone: +61(0)3 9369 1234 Fax: +61(0)3 9369 3456
advanced FLOW engineering Instruction Manual P/N: Make: Dodge Model: Diesel Trucks Year: Engine: L6-5.9L (td)
") advanced FLOW engineering Instruction Manual P/N: 42-12021 Make: Dodge Model: Diesel Trucks Year: 2003-204.5 Engine: L6-5.9L (td) Please read the entire instruction manual before proceeding. Ensure all
advanced FLOW engineering Instruction Manual P/N: 42-12021 Make: Dodge Model: Diesel Trucks Year: 2003-204.5 Engine: L6-5.9L (td) Please read the entire instruction manual before proceeding. Ensure all
ULX210 COLOR CHANGING LED UNDERCAR LIGHTING SYSTEM
 ULX210 COLOR CHANGING LED UNDERCAR LIGHTING SYSTEM Installation Manual Technical Specifications Colors: 1000 Patterns: 1 Strobe, 1 breathing Auto Color Change, 9 preset colors Auxiliary input for trigger
HALLMARK INDUSTRIES INC
 Performance Part No. HP. CONVERTIBLE JET PUMP USER S MANUAL GPH of Water @ Total Discharge Pressure of 40 psi Max. Pressure Max suction (shallow well) Max Suction (deep well) Max GPM (@0 head) Max Discharge
INSTALLATION INSTRUCTIONS
 REV 3 05/13/2016 PART NO. 911000T 911000PS 915000T 915000PS PRODUCT DESCRIPTION: Sport Bar 2.0, Full size Textured Black Sport Bar 2.0, Full size Polished Stainless Steel Tubes Sport Bar 2.0, Mid size
advanced FLOW engineering Instruction Manual P/N: Make: Ford Model: Diesel Trucks Year: Engine: V8-7.3L (td)
") advanced FLOW engineering Instruction Manual P/N: 42-13011 Make: Ford Model: Diesel Trucks Year: 1999-2003 Engine: V8-7.3L (td) Please read the entire instruction manual before proceeding. Ensure all components
advanced FLOW engineering Instruction Manual P/N: 42-13011 Make: Ford Model: Diesel Trucks Year: 1999-2003 Engine: V8-7.3L (td) Please read the entire instruction manual before proceeding. Ensure all components
SERVICE SCHEDULE. Zero-Turn Mowers
 SERVICE SCHEDULE Zero-Turn Mowers OWNER & MOWER DETAILS Mr/Mrs/Ms: Given Names: Surname: Address: Suburb: State: Postcode: Telephone: Email: Model No.: Serial No.: Engine Model/Type/Code: DEALER DETAILS
MP V 8A Electronic Smart Charger. Instruction and Information Manual
 MP7428 12V 8A Electronic Smart Charger Instruction and Information Manual In order to ensure correct and safe usage of your battery charger, you should read these instructions carefully. Please retain
PLATINUM Sport Haltech GM LS1 / LS6 Terminated Engine Harness (HT045650) QUICK START GUIDE
 QUICK START GUIDE") PLATINUM Sport 2000 Haltech GM LS1 / LS6 Terminated Engine Harness (HT045650) QUICK START GUIDE LIMITED WARRANTY Lockin Pty Ltd trading as Haltech warrants the Haltech TM Programmable Fuel Injection System
PLATINUM Sport 2000 Haltech GM LS1 / LS6 Terminated Engine Harness (HT045650) QUICK START GUIDE LIMITED WARRANTY Lockin Pty Ltd trading as Haltech warrants the Haltech TM Programmable Fuel Injection System
advanced FLOW engineering Instruction Manual P/N: Make: RAM Model: Diesel Trucks Year: Engine: L6-6.7L (td)
") advanced FLOW engineering Instruction Manual P/N: 42-12035 Make: RAM Model: Diesel Trucks Year: 2013-2016 Engine: L6-6.7L (td) Please read the entire instruction manual before proceeding. Ensure all components
advanced FLOW engineering Instruction Manual P/N: 42-12035 Make: RAM Model: Diesel Trucks Year: 2013-2016 Engine: L6-6.7L (td) Please read the entire instruction manual before proceeding. Ensure all components
Important Information
 Boat Lift Boss Installation Instructions For Metal Craft Lifts (Kit 3005.7204) Important Information Before installation, read and understand all instructions and warnings. All 120 Volt units MUST have
Kwikee IMGL Step Control Testing Procedure #82-ST0500
 Kwikee IMGL Step Control Testing Procedure #82-ST0500 TABLE OF CONTENTS Introduction 2 Resources Required 2 General Service Notes 3 Preparation 5 Troubleshooting and Test Procedures 5 Testing the Step
WORKMATE TM Portable Generators
 Owner s Guide for WORKMATE TM Portable Generators We are pleased to advise that your ADVANCED POWER WORKMATE Portable Generator Set is covered by warranty for a period of 36 months* from the date of its
Installation Manual v1.0: Twin CP3 Fuel Injection Kit Dodge 6.7L
 04/05/2012 Dodge 2010-2011 6.7L Twin CP3 701-900-2356-INST Installation Manual v1.0: Twin CP3 Fuel Injection Kit 2010-2011 Dodge 6.7L Figure 1 - Full Kit Photo 29 Figure 2 - Hardware Kit (800) 949-60002
MANUAL SERVICE MANUAL FOR HYDRASTAR HYDRAULIC TRAILER BRAKE ACTUATORS
 MANUAL 440-1008 SERVICE MANUAL FOR HYDRASTAR HYDRAULIC TRAILER BRAKE ACTUATORS THIS DOCUMENT TO BE USED FOR HBA-10, HBA-12, HBA-16, MHBA-10, MHBA-12, MHBA-16 ACTUATORS ECN 04007 Manual 440-1008 Rev E Page
PRODUCT MANUAL. Backpack Sprayer 12L
 PRODUCT MANUAL Backpack Sprayer 12L Contents D A E B I H F C G A. Pump lever brace B. Pump lever with lance holder C. Spray Bottle D. Pump Assembly E. Extendable fibreglass lance with three nozzle options
Installation Manual v2.2: Twin CP3 Fuel Injection Kit Dodge 5.9L
 12/13/11 ATS Twin CP3 Kit 701-900-2272-INST Installation Manual v2.2: Twin CP3 Fuel Injection Kit 2003-2004 Dodge 5.9L Figure 1 - Full Kit Photo 26 Figure 2 - Hardware Kit 1 Please read all instructions
Water in Fuel Sensor Kit
 03/08/2016 1050355-1050356 Water in Fuel Sensor Kit (I-00369) 1 Water in Fuel Sensor Kit Fast and Accurate Detection of Water in Diesel Fuel 1050355 Universal Kit For use with BD FlowMax water separator
15,000kg HYDRAULIC BOTTLE JACK
 Product Code: 2013 OWNER S MANUAL PRODUCT CODE: 2013 15,000kg HYDRAULIC BOTTLE JACK Lifting Capacity 15,000kg Max. Lifting Height 447mm Min. Lifting Height 227mm Hydraulic Lift 125mm Screw Adjustment 70mm
VERSION 2017 V.1.0
 1 2 3 VERSION 2017 V.1.0 1300 278 283 BEFORE USING THIS PRODUCT, PLEASE READ THESE INSTRUCTIONS OF USE CAREFULLY AND MAKE YOURSELF FULLY FAMILIAR WITH THE SYSTEM. PLEASE KEEP THESE INSTRUCTIONS IN A SAFE
Ford Mustang V6 OEM-Style Fog Light Kit Parts List: Quantity: Tool List:
 2015-2017 Ford Mustang V6 OEM-Style Fog Light Kit Parts List: Quantity: Tool List: LED Foglights/ Bezels 2 Flat head & Phillips screwdriver (if you ordered part#3600) Ratchet & Socket set OR Wiring harness
MK Rittenhouse & Sons Ltd. 115 Litre/30 US Gallon Greenhouse Sprayer Manual
 MK Rittenhouse & Sons Ltd. 115 Litre/30 US Gallon Greenhouse Sprayer Manual TABLE OF CONTENTS Introduction 3 Precautions & Maintenance 4-5 Piston pump Care & Maintenance 5-6 Shut Down & Winterizing 6 Troubleshooting
USER MANUAL PLEASE READ AND UNDERSTAND THIS MANUAL COMPLETELY BEFORE OPERATING THE PRODUCT.
 Throttle Controller Unit USER MANUAL PLEASE READ AND UNDERSTAND THIS MANUAL COMPLETELY BEFORE OPERATING THE PRODUCT. Step 1. To maximise the chances of a successful install it is very important to complete
Congratulations. You ve just purchased the most advanced flasher available on the market today. This
 Congratulations. You ve just purchased the most advanced flasher available on the market today. This solid-state module is designed to interface with Ford s shutter system in each headlight assembly. When
Artesian2 Owners Manual
 Artesian2 Owners Manual Energy-Efficient, Self Priming Centrifugal Pumps Discharge Inlet Important Safety Instructions Please read all instructions completely before you install or operate your new pump.
Please visit for the latest version of these installation instructions.
 Please visit www.blueox.com for the latest version of these installation instructions. BX1730 Attachment Tab Height: 16 Serial Number Attachment Tab Width: 23 Please read BOTH these and the General Information
INSTALLATION INSTRUCTIONS MECHANICAL GAUGES
 1062650-1966-77 MECHANICAL GAUGES QUESTIONS: If after completely reading these instructions you have questions regarding the operation or installation of your instrument(s), please contact Hardin Marine
HA PRO INSTALLERʼS MANUAL. HA-008 v3. User s/installer s Manual
 HA-008 v3 HA - 280 PRO User s/installer s Manual INSTALLERʼS MANUAL Manufacturer: COMMERCIAL ELECTRONICS 264 HAYDONS ROAD, WIMBLEDON, LONDON SW19 8TT. UK TEL: +44 020 8404 7105 FAX: +44 020 8404 7104 http://www.hawkcaralarm.com
A) 8 Pin Female. CUSTOMER WIRING INSTRUCTIONS TO SUIT : Ford EL Manual Universal Instructions
 8 Pin Female. CUSTOMER WIRING INSTRUCTIONS TO SUIT : Ford EL Manual Universal Instructions") CUSTOMER WIRING INSTRUCTIONS TO SUIT : Ford EL Manual Universal Instructions Lay the C.A.E Engine loom in vehicle and plug in all the sensors. ( The sensor plugs can only be connected one way ). Mount
CUSTOMER WIRING INSTRUCTIONS TO SUIT : Ford EL Manual Universal Instructions Lay the C.A.E Engine loom in vehicle and plug in all the sensors. ( The sensor plugs can only be connected one way ). Mount
CUSTOMER WIRING INSTRUCTIONS TO SUIT: BA-BF XR6 and XR8 Universal Auto or Manual Trans
 , CUSTOMER WIRING INSTRUCTIONS TO SUIT: BA-BF XR6 and XR8 Universal Auto or Manual Trans Lay the C.A.E Engine loom in vehicle and plug in all the sensors. ( The sensor plugs can only be connected one way
Please visit for the latest version of these installation instructions.
 Please visit www.blueox.com for the latest version of these installation instructions. Attachment Tab Height: 24-1/2 BX2675 (Incudes Super Duty & ACC) Serial Number Attachment Tab Width: 34-1/2 Please
BATTERYLESS JUMP STARTER CAPACITOR INSTRUCTION MANUAL. W 2 AFTER SALES SUPPORT
 CAPACITOR BATTERYLESS JUMP STARTER Suitable for vehicles up to: 5L Petrol and 3L Diesel INSTRUCTION MANUAL AFTER SALES SUPPORT AUS 1300 883 104 W 2 www.4x4tough.com.au sales@4x4tough.com.au MODEL: 17-031000
INSTALLATION INSTRUCTIONS
 REV 3 05/13/2016 INSTALLATION INSTRUCTIONS PART NO. 702002T PRODUCT DESCRIPTION: REAR INNER FENDER LINER APPLICATION: JEEP WRANGLER / WRANGLER UNLIMITED PRODUCT SAFETY & LEGAL DISCLAIMER IMPORTANT READ
APS F-Body Twin Pump Fuel Supply System - APSGMF-FSS/01
 APS F-Body Twin Pump Fuel Supply System - APSGMF-FSS/01 1 Remove the fuel tank from the vehicle in accordance with the factory service manual. 2 Remove the stock fuel pump assembly from the fuel tank in
INSTALLATION INSTRUCTIONS PART NUMBER:
 Equipped with AEM Dryflow Filter No Oil Required! INSTALLATION INSTRUCTIONS PART NUMBER: 22-547 2003-2006 NISSAN 350Z V6-3.5L C.A.R.B. E.O. # D-670 * NOTE: Legal in California only for racing vehicles
ELECTRIC WATER PUMP (EWP ) KIT INSTALLATION INSTRUCTIONS
 KIT INSTALLATION INSTRUCTIONS") 77 Taras Avenue P.O. Box 363 Altona North Vic 3025 Australia Phone: +61(0)3 9369 1234 Fax: +61(0)3 9369 3456 info@daviescraig.com.au ELECTRIC WATER PUMP (EWP ) KIT INSTALLATION INSTRUCTIONS EWP80, EWP115,
77 Taras Avenue P.O. Box 363 Altona North Vic 3025 Australia Phone: +61(0)3 9369 1234 Fax: +61(0)3 9369 3456 info@daviescraig.com.au ELECTRIC WATER PUMP (EWP ) KIT INSTALLATION INSTRUCTIONS EWP80, EWP115,
INSTALLATION INSTRUCTIONS
 REV 3 05/13/2016 INSTALLATION INSTRUCTIONS PART NO. 55311T / 55316T / 55321T 55326T / 55341T / 55346T PRODUCT DESCRIPTION: RC2 LR CENTRAL MOUNT RC2 LR BOTTOM MOUNT PRODUCT SAFETY & LEGAL DISCLAIMER IMPORTANT
advanced FLOW engineering Air Intake System Product Guide Make: GM Model: Trucks (GMT900) Year: Engine: V8-6.0L P/N: &
 Year: Engine: V8-6.0L P/N: &") advanced FLOW engineering Air Intake System Product Guide Make: GM Model: Trucks (GMT900) Year: 2009-2010 Engine: V8-6.0L P/N: 51-11742 & 54-11742 Please read the entire product guide before proceeding.
advanced FLOW engineering Air Intake System Product Guide Make: GM Model: Trucks (GMT900) Year: 2009-2010 Engine: V8-6.0L P/N: 51-11742 & 54-11742 Please read the entire product guide before proceeding.
ESE Series Cast Iron Sewage Pumps
 Owner s Manual ESE Series Cast Iron Sewage Pumps TABLE OF CONTENTS General Safety.................... 2 Specifications..................... 3 Installation.................... 4 & 5 Troubleshooting...................
16A. STARTING - CHARGING Starter: Removal - Refitting REFITTING 16A-11 K4M II - REMOVAL OPERATION III - FINAL OPERATION
 STARTING - CHARGING Starter: Removal - Refitting 16A K4M II - REMOVAL OPERATION III - FINAL OPERATION JR5 a Clip: -the gearbox control cable sleeve stops on the gearbox, - the control cables onto the gearbox.
Part No EWP & FAN DIGITAL CONTROLLER INSTRUCTIONS
 77 Taras Avenue P.O. Box 363 Altona North Vic 3025 Australia Phone: +61(0)3 9369 1234 Fax: +61(0)3 9369 3456 Email: info@daviescraig.com.au Web: www.daviescraig.com.au Part No. 8020 - EWP & FAN DIGITAL
PRODUCT MANUAL. Heavy Duty Backpack Sprayer 16L
 PRODUCT MANUAL SUPERIOR PERFORMANCE Heavy Duty Backpack Sprayer 16L Contents A D E B I H F C G A. Pump lever brace B. Pump lever with lance holder C. Spray Bottle D. Pump Assembly E. Telescopic stainless
Stop! Read this important information before proceeding any further.
 Part Number 1008 1073 Toyota 5SFE Stop Read this important information before proceeding any further. Thank you for purchasing a quality Kiwi Cylinder Heads product. Please read the following information
EWP 110 INSTALLATION INSTRUCTIONS
 PTY. DAVIES, CRAIG LTD. A.B.N. 71 004 918 825 A.C.N. 004 918 825 MELBOURNE AUSTRALIA EWP 110 INSTALLATION INSTRUCTIONS DAVIES, CRAIG EWP (ELECTRIC WATER PUMP) AND OPTIONS FOR PUMP CONTROL Congratulations
AccuSpark. Fitting and Information Guide For. Modules Distributors coils Tools. Modern Ignition for Classic cars
 AccuSpark Modern Ignition for Classic cars Fitting and Information Guide For Modules Distributors coils Tools www.accuspark.co.uk 1 Before fitting AccuSpark Distributors AccuSpark electronic ignition kit.
OWNER S MANUAL. 6. If you aren t competent to instal the pump, get help from a qualified source.
 OWNER S MANUAL RK2 Systems Pro Pump Energy-Efficient, Self Priming Centrifugal Pumps Important Safety Instructions Please read all instructions completely before you install or operate your new pump. Save
QUICK START GUIDE OWNER S MANUAL AL50 SERIES SAND FILTRATION TECHNOLOGY PLEASE CALL DO NOT RETURN TO STORE
 QUICK START GUIDE OWNER S MANUAL SAFETY, INSTALLATION, OPERATION & PARTS AL50 SERIES SAND FILTRATION TECHNOLOGY PLEASE CALL 877-278-2797 DO NOT RETURN TO STORE! WARNING This equipment must be installed
Artesian Owners Manual
 Artesian Owners Manual Energy-Efficient, Self Priming Centrifugal Pumps Discharge Inlet Important Safety Instructions Please read all instructions completely before you install or operate your new pump.
PRESSURE BOOSTER 150
 PRESSURE BOOSTER 150 Owners Manual! WARNING This equipment must be installed and serviced by a qualified technician. Improper installation can create electrical hazards which could result in property damage,
USER INSTRUCTIONS STRIKER LED USER INSTRUCTIONS
 USER INSTRUCTIONS STRIKER LED USER INSTRUCTIONS 1 DIY TWIN PACK WITH INSTALLATION KIT CONTENTS 2 x Striker LED driving lights 2 x Spot filters 2 x Reversible mount and hardware 1 x User instructions 1
12V 160A/24V 185A MANUAL WORKSHOP BATTERY CHARGER
 12V 160A/24V 185A MANUAL WORKSHOP BATTERY CHARGER P/No. HDBC200 IMPORTANT SAFETY INFORMATION Please read this manual thoroughly before use and store in a safe place for future reference. WARNING Explosive
USB Charge Port Installation Instructions
 USB Charge Port Installation Instructions Lifetime Technical Support support@logolites.com 770-476-7322 www.logolites.com Manual 100-0014C Thank you for purchasing a Logo Lites USB Charge Port! USB Charge
CONGRATULATIONS ON THE PURCHASE OF YOUR THUNDER BAR DRIVING LIGHT
 CONGRATULATIONS ON THE PURCHASE OF YOUR THUNDER BAR DRIVING LIGHT For your personal safety read, understand and follow the information provided in this instruction manual. 1 FEATURES High output 3W Cree
Rotrex C-type Superchargers. Setup and maintenance
 Rotrex C-type Superchargers Setup and maintenance Index Welcome 3 Key points 4 Lubrication system 5 Routing of oil lines 6 Connecting the parts 6 Initial start up 9 Oil level check and maintenance 10 Testing
Installation Manual v1.0: Twin CP3 Fuel Injection Kit Dodge 5.9L
 Installation Manual v1.0: Twin CP3 Fuel Injection Kit 2004.5-2007 Dodge 5.9L Figure 1 - Full Kit Photo 25 Figure 2 - Hardware Kit Please read all instructions before installation. This kit is not emissions
INSTALLATION INSTRUCTIONS
 PART NO. 8060 - EWP 150 (12V) ALLOY ELECTRIC WATER PUMP INSTALLATION INSTRUCTIONS PLEASE READ THESE INSTRUCTIONS IN THEIR ENTIRETY BEFORE YOU START WORK THE EWP IS A CIRCULATION PUMP IDEAL FOR CLOSED CIRCUIT
Black Diamond Motorized Flush Mount Instructions
 Black Diamond Motorized Flush Mount Instructions 1 Installation Parts List Mounting Brackets Wall Switch / Limit Setting Tool Mounting Bracket Screws & Driver Bit (#2 Robertson) Wall Switch Cable (8 Length)
8 Pin Female Plug. WIRING INSTRUCTIONS TO SUIT : Holden VT V6+V8
 WIRING INSTRUCTIONS TO SUIT : Holden VT V6+V8 Lay the C.A.E Engine loom in vehicle and plug in all the sensors. (The sensor plugs can only be connected one way). Mount the C.A.E Control Loom with the relays
Please visit for the latest version of these installation instructions.
 Please visit www.blueox.com for the latest version of these installation instructions. Attachment Tab Height: 21 Serial Number Attachment Tab Width: 31.25 Please read BOTH these and the General Information
MODEL 7100 PORTABLE PIN WELDER OPERATOR S MANUAL
 Model 7100 Portable Pin Welder MODEL 7100 PORTABLE PIN WELDER OPERATOR S MANUAL Copyright: March 22, 2005 Revised: December 20, 2016 Gripnail Corporation An Employee Owned Company 97 Dexter Road East Providence,
User Manual SPOTTING SCOPE X 60
 User Manual SPOTTING SCOPE 20-60 X 60 Scope of delivery / Parts of device A 1 2 4 3 B 6 7 5 9 8 WARNING! WARNING! Keep plastic films and bags well away from babies and small children. They present a risk
Please visit for the latest version of these installation instructions.
 Please visit www.blueox.com for the latest version of these installation instructions. BX1139 2018 Jeep Wrangler / Wrangler Unlimited (JL) (All Models w/standard Bumper) Attachment Tab Height: 18 Serial
OWNER S MANUAL EVOLUTION 3500, 4500, 5500, & 8500 SERIES PUMPS
 OWNER S MANUAL EVOLUTION 3500, 4500, 5500, & 8500 SERIES PUMPS IMPORTANT SAFETY INSTRUCTIONS When installing and using this electrical equipment, basic safety precautions should always be followed, including
G8 Portable Fuel Transfer Pump Owner s Manual
 G8 Portable Fuel Transfer Pump Owner s Manual GENERAL INFORMATION This pump is designed for use only with gasoline (up to 15% alcohol blends such as E15), diesel fuel (up to 20% biodiesel blends such as
KWIKEE #888 ELECTRIC STEP. Owner's Manual ( )
") KWIKEE #888 ELECTRIC STEP Owner's Manual (1422279) TABLE OF CONTENTS Safety Information 2 Motor Assembly Identification 3 Product Information 4 Steps With Control Unit 4 Steps Without Control Unit 4 General
KWIKEE #888 ELECTRIC STEP Owner's Manual (1422279) TABLE OF CONTENTS Safety Information 2 Motor Assembly Identification 3 Product Information 4 Steps With Control Unit 4 Steps Without Control Unit 4 General
Please visit for the latest version of these installation instructions.
 Please visit www.blueox.com for the latest version of these installation instructions. BX2414 2019 Ram 1500 (Includes Rebel) (No Classic) Attachment Tab Height: 17 Serial Number Attachment Tab Width: 38.5
Mercedes MBE 906/ L & 7.2L Engine Module. Part # Installation Instructions
 1999-2006 Mercedes MBE 906/926 6.4L & 7.2L Engine Module Part # 15000 Installation Instructions 15000_revC 1999-2006 Mercedes 6.4L & 7.2L Engine Module +12 volts red wire. Ground black wire Injector Terminals
RESOL SBS 1000 * * Connection Operation
 RESOL SBS 1000 Connection Operation FlowCon SBS 1000 A www.resol.de *48003820* 48003820 Thank you for buying this RESOL product. Please read this manual carefully to get the best performance from this
USER MANUAL PLEASE READ AND UNDERSTAND THIS MANUAL COMPLETELY BEFORE OPERATING THE PRODUCT.
 Throttle Controller Unit USER MANUAL PLEASE READ AND UNDERSTAND THIS MANUAL COMPLETELY BEFORE OPERATING THE PRODUCT. Step 1. With the Vehicle OFF, Disconnect the accelerator pedal sensor. Connect the two
This is to be wired to the start position on the ignition switch. If using an Automatic gearbox, wire this up through the inhibitor switch first.
 Lay the C.A.E Engine loom in vehicle and plug in all the sensors. ( The sensor plugs can only be connected one way ). Mount the C.A.E Control Loom with the relays and circuit breakers to passenger side
42 Series Step. Owner's Manual #842A. Equipped with a Permanent Magnet Motor. Table of Contents
 Owner's Manual #842A 10/05 Kwikee #1422258, Rev. 0A ED 42 Series Step Equipped with a Permanent Magnet Motor D IS C O N TI N U For steps with Control Unit 909510000 and steps without Control Units Table
VT Oil-Free Range Operators Handbook
 VT Oil-Free Range Operators Handbook Covering Models:- VT7 / VT7D VT10 / VT10D VT200 / VT200D VT300 / VT300D VT00 / VT00D BAMBI AIR COMPRESSORS LTD 12 Thimble Mill Lane Heartlands Birmingham B7 HT Tel:
Users Manual Certified Series Direct Drive Pump 1-7 LPM
 Users Manual Certified Series Direct Drive Pump 1-7 LPM Safety, Operating, Installation, and Maintenance Instructions 600 S 56 th Street #9 Chandler, AZ 85226 Phone: 480-507-6478 Fax: 480-838-2232 www.fogco.com
INSTALLATION INSTRUCTIONS
 ELECTRIC RETRACTABLE HARD TONNEAU COVER INSTALLATION INSTRUCTIONS BedLocker shown on 2002 Dodge Ram Pace Edwards Company 2400 Commercial Blvd. Centralia WA 98531 (800) 338-3697 toll free (360) 736-9991
230VAC Power Inverter 400W Owner s Manual
 400W 230VAC Power Inverter 400W Owner s Manual For safe and optimum performance, the Enerdrive epower Inverter must be used properly. Carefully read and follow all instructions and guidelines in this manual
INSTALLATION INSTRUCTIONS
 REV 3 05/13/2016 INSTALLATION INSTRUCTIONS PART NO. 702001T PRODUCT DESCRIPTION: FRONT INNER FENDER LINER APPLICATION: JEEP WRANGLER / WRANGLER UNLIMITED PRODUCT SAFETY & LEGAL DISCLAIMER IMPORTANT READ
255 Liter/Hr, In Tank Fuel Pump For Chrysler Front Wheel Drive Vehicles Catalog # INSTALLATION INSTRUCTIONS
 255 Liter/Hr, In Tank Fuel Pump For 1984-1990 Chrysler Front Wheel Drive Vehicles Catalog # 17934 INSTALLATION INSTRUCTIONS PLEASE study these instructions carefully before installing your new In-Tank
INSTALLATION INSTRUCTIONS
 REV 2 12/7/2016 INSTALLATION INSTRUCTIONS PART NO. 6841555 PRODUCT DESCRIPTION: OE XTREME BRACKETS PRODUCT SAFETY & LEGAL DISCLAIMER APPLICATION: FORD F-150, F-250, F-350 REGULAR CAB FORD F-250, F-350
Kwikee # Series Step OWNER'S MANUAL ( )
") Kwikee #842 42 Series Step OWNER'S MANUAL (1422258) TABLE OF CONTENTS Safety Information 2 Product Information 3 Step with Control Unit 3 Operation 3 General Service 4 Prior To Operation 4 Adjusting Cam
Kwikee #842 42 Series Step OWNER'S MANUAL (1422258) TABLE OF CONTENTS Safety Information 2 Product Information 3 Step with Control Unit 3 Operation 3 General Service 4 Prior To Operation 4 Adjusting Cam
Owner s Manual Supplement. Liquefied Petroleum Gas (LPG) Fuel System for 1998 GM Medium Duty Chassis (C-60/C-70) with 6.0L and 7.
 Fuel System for 1998 GM Medium Duty Chassis (C-60/C-70) with 6.0L and 7.") Owner s Manual Supplement Liquefied Petroleum Gas (LPG) Fuel System for 1998 GM Medium Duty Chassis (C-60/C-70) with 6.0L and 7.0L V8 OWNERS MANUAL SUPPLEMENT Table of Contents Refueling Your Vehicle...1
Owner s Manual Supplement Liquefied Petroleum Gas (LPG) Fuel System for 1998 GM Medium Duty Chassis (C-60/C-70) with 6.0L and 7.0L V8 OWNERS MANUAL SUPPLEMENT Table of Contents Refueling Your Vehicle...1
12/24V 30A AUTOMATIC/MANUAL WORKSHOP BATTERY CHARGER
 12/24V 30A AUTOMATIC/MANUAL WORKSHOP BATTERY CHARGER P/No. HDBC45 IMPORTANT SAFETY INFORMATION Please read this manual thoroughly before use and store in a safe place for future reference. WARNING Explosive
Please visit for the latest version of these installation instructions.
 Please visit www.blueox.com for the latest version of these installation instructions. BX1126 Attachment Tab Height: 14-1/2 Serial Number Attachment Tab Width: 24 Please read BOTH these and the General
Instruction Manual. Single Acting Hydraulic Aluminium Pull Cylinders RAP Series. Maximum Operating Pressure 700 bar
 Single Acting Hydraulic Aluminium Pull Cylinders RAP Series Maximum Operating Pressure 700 bar ABSOLUTE EQUIPMENT PTY LTD 2/186 Granite Street, GEEBUNG QLD 4034 Australia sales@absoluteequipment.com.au
ACF Operation Manual
 ACF-3000 Operation Manual MAHLE Aftermarket Inc., RTI Division 10 Innovation Drive York, Pennsylvania 17402 USA Phone: 717-840-0678 Toll Free: 800-468-2321 Web-site: www.rtitech.com Manual P/N: 035 81825
Q21 TRACK SYSTEM FOR NISSAN NP300 NAVARA DUAL CAB 2015+
 FIRST TIME INSTALLATION Please read instructions carefully before installation. Check the contents of the kit. Contact your Prorack dealer if any parts appear missing or damaged. IMPORTANT WARNING! IT