STREET SCENE EQUIPMENT,INC. CONNECTING STREET SCENE SIGNAL MIRRORS
|
|
|
- Suzan Walsh
- 6 years ago
- Views:
Transcription
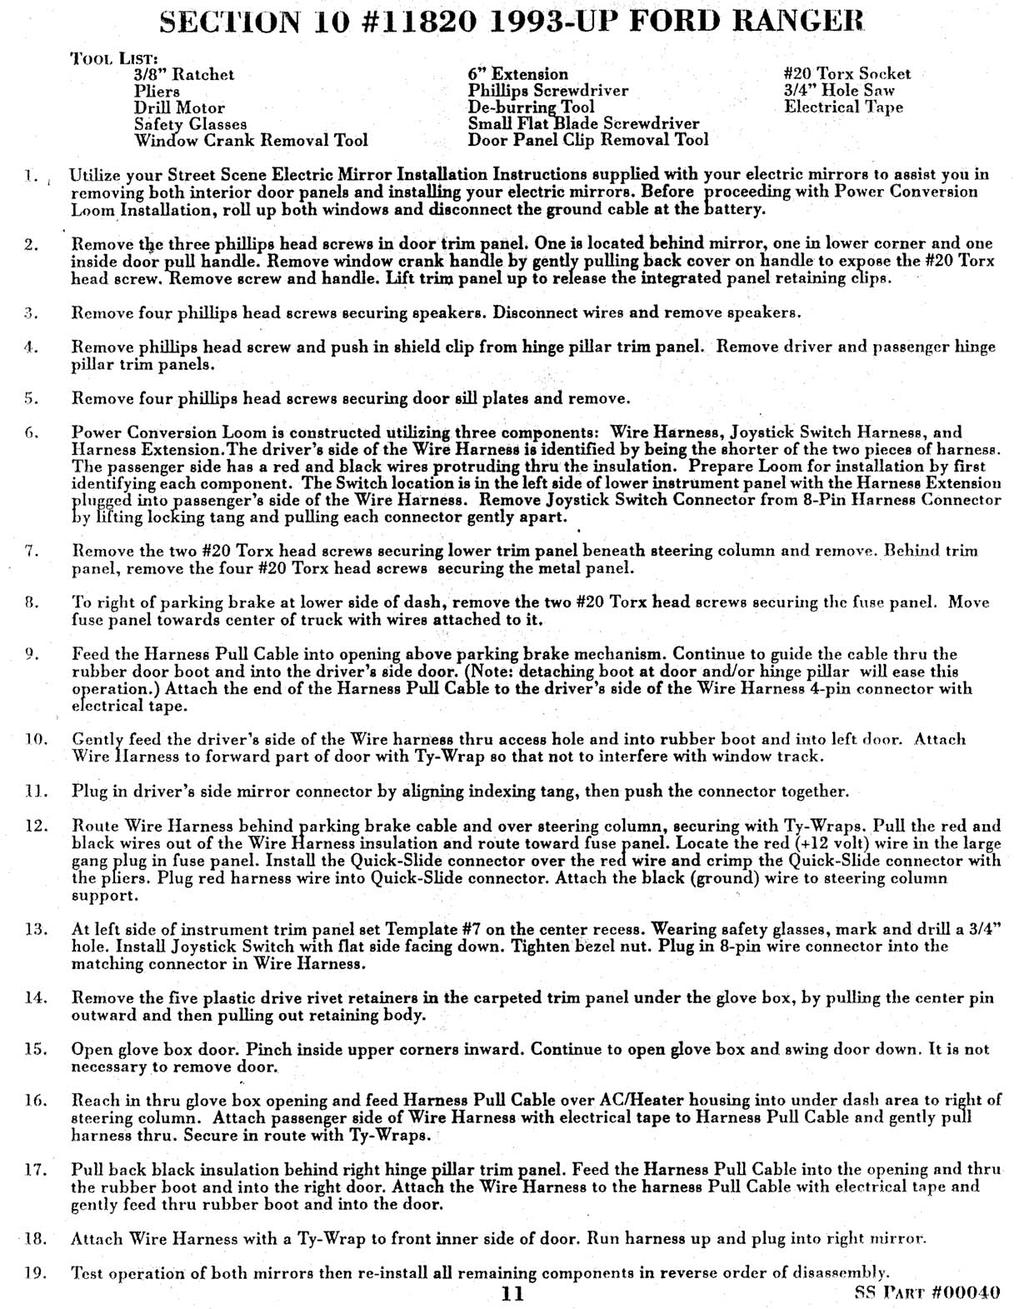
1 STREET SCENE EQUIPMENT,INC. CONNECTING 365 McCormick Avenue STREET SCENE SIGNAL MIRRORS Phone (714) Fax (714) CONNECTING STREET SCENE SIGNAL MIRRORS INSTRUCTIONS FOR PART NUMBERS Install Street Scene Signal Mirrors to doors following installation instructions. 2. Before beginning electrical hook-up, check the operation of turn signals in the front and rear of vehicle. If any problem exist, repair before installing Street Scene Signal Mirrors. 3. Remove the door sill plates and kick panels. 4. Run the RED / BLACK wire on the mirror into the door. Pull out the rubber boot from the door and door frame. Guide the wire harness out of the hole vacated by the rubber boot. 5. Pull the rubber boot wire through the rubber bootand into the vehicle. Replace the rubber boot between the door and door frame. 6. Do the same on the passenger side. Run the wire across the dash past the steering column to the extreme left side of dash. 7. The electrical wiring for the Fored Ranger is located along the corner of the door frame. Roll over part of the carpeting along the door frame to expose the electrical wiring. Guide the wire harness from mirrors down to the wire bundle. 8. Locate the GREEN WITH ORANGE STRIPE wire from within the wire bundle. Turn the ignition key so that electrical power is on and activate the driver's side turn signal. Probe the wire with a test light to verify that flashing turn signal power is present. Label that wire as " DRIVER'S SIDE TURN ". 9. Locate the ORANGE WITH BLUE STRIPE wire from within the wire bundle. Activate the passenger side turn signal and probe the wire with the test light to verify that flashing turn signal is present. Label that wire as " PASSENGER SIDE TURN ". 10. Make sure the harnesses are routed securely to the vehicles wire bundle and enough slack is left for splicing. 11. Splice the RED wire from the driver's side harness into the GREEN WITH ORANGE STRIPE wire previously labeled " DRIVER'S SIDE TURN ". 12. Splice the RED wire from the passenger side harness into the ORANGE WITH BLUE STRIPE wire prevoiusly labeled " PASSENGER SIDE TURN ". When splicing do not cut any wires. Use the quick splice connectors provided. 13. Strip and twist together the ends of the BLACK wires from both harness. Crimp them together in the supplied ring connector and ground to a suitable nearby location on the metal framework of the vehicle. 14. Activate each turn signal to verify that the Stret Scene Signal Mirrors are working properly. 15. Replace all trim pieces removed. 1/1701 SSE Connecting Signal Mirrors Ford Ranger
2 STREET SCENE EQUIPMENT,INC. CONNECTING STREET SCENE 365 McCormick Avenue HEATED MIRROR CONVERSION KIT Phone (714) Fax (714) Connecting Street Scene Heated Mirror Conversion Kit Instructions For Part Numbers: SPECIAL NOTE: If you are installing Street Scene Mirrors with Signal option, the wiring for the heaters will have a push on terminal and a ring connector on. The wires for the signal system will have no connectors on them. Do not mix up 1. Install Street Scene Heated Mirrors following mirror installation instructions. 2. Mount the switch in a suitable location. A good place is on the lower dash panel or below the headlight switch on the early models. Drill a 1/2" diameter hole and insert the switch from the front side and insatll the nut from the backside and tighten. NOTE: LOCATION OF WIRES ON SWITCH Top Of Switch: ( Marked "Earth" ) Black wire from four foot power connecting harness. Center Of Switch: ( Marked "Load" ) Red wires from right & left mirror heaters. Bottom Of Switch: ( Marked "Supply" ) Red wire from four foot power connecting harness. Locate a switched 12 volt power supply at the fuse panel ( Power goes off when ignition switch is in the " off " position). Using the blue quick splice connector supplied, crimp the Red wire from the switch harness to the wire found at the fuse block. DO NOT connect to a constant 12 volt power supply. 3. Remove the door sill plates and kick panels. 4. Run the Red / Black wire on the mirror into the door. Pull out the rubber boot from the door and door frame. Guide the wire harness out of the hole vacated by the rubber boot. 5. Pull the rubber boot out from the door frame.guide the wire through the rubber boot and into the vehicle. Replace the rubber boot between the door and door frame. Do the same on the passenger side. Run the wire across the dash past the steering column to the extreme left side of dash. 6. Connect the RED wire from the right and left wire harness to the center pin on the switch using the " One to Two " connector. 7. Attach the BLACK wires with the ring connectors to a suitable nearby ground location on the metal framework on the vehicle. 1/10/01 SSE Heated Mirror Conversion Kit Ford Ranger
 477-0707 Fax (714) 426-0591 CAL - Vu MIRROR INSTALLATION INSTRUCTIONS NOTE: Please check year,make, and model against application part number.")
3 STREET SCENE EQUIPMENT,INC McCormick Avenue 93 - UP Phone (888) Fax (714) CAL - Vu MIRROR INSTALLATION INSTRUCTIONS NOTE: Please check year,make, and model against application part number. Be sure both mirror heads and mounting plates are left & right side before painting. Parts that have been painted are not eligible for return. NOTE: Check Your Mirror Plugs To Make Sure They Plug Into Your wire harness before painting, If painted warranty will be void. NOTE: Mirrors are designed for specific year vehicles. Although mirror may appear to be the same, the electrical connectors will vary year to year. If your mirror does not plug into your factory wire harness, please check your part number and application guide. NOTE: Do Not Use Loctite On Threads. Warranty Will Be Void If Used NOTE: Do Not Attempt To Remove Glass For Paint Damage Could Ocurr And Glass Will Break. NOTE: Do Not Over Tighten Nuts, Mounting Brackets Will Crack VERY IMPORTANT! Read and understand all directions, then check the following parts list before starting installation. PARTS LIST 2 Mirror Heads 1 Instruction Sheet 6 6 mm Nuts 2 Mirror Plates 1 Street Scene Decal TOOL LIST 3/8" ratchet, 6" extension, 10mm socket, 11mm socket, # 20 torx socket, small flat blade screwdriver, phillips screwdriver. 1. Roll down windows then use a phillips head screwdriver to remove the three screws securing the door panel. One is located in the upper front corner, the second in the lower rear corner, and the third inside the door pull handle. 2. If equipped with manual windows, remove window crank handle by gently inserting small blade screw driver underneath the side of cover on handle. Pry gently upward to open cover. Remove the # 20 torx head screw. 3. If equipped with power windows, remove Power Assist Control Panel by grasping panel and pulling gently upward. Unplug electrical connectors. 4. With palm of hand, gently tap door panel upward to release the panel retaining hooks. Pull area below door release lever toward you and lift door panel up to remove. 5. Unplug wire harness connector, then remove stock mirror using a 11 mm socket and extension. Remove gasket from back of stock mirror. 6. Install Cal-Vu mounting plates to mirror heads ( nuts provided ) using a 10mm socket. 7. Place gasket over Cal-Vu mounting plate. Then install Cal-Vu mirror to vehicle using stock hardware. Plug in wire harness connector. 8. Install door panel by lining up hooks on door panel with slots in door and sliding door panel down. 9. Install remaining components in reverse order of disassembly. 8/9/00 SSE
4
5
Signal Mirror Installation Instructions
 Signal Mirror Installation Instructions Chevy Blazer 1992-1994, Chevy Suburban 1992-1999, Chevy Tahoe 1995-1999, Chevy Tahoe Limited 2000, GMC Suburban 1992-1999, GMC Yukon 1992-1999, GMC Yukon Denali
Signal Mirror Installation Instructions
 Signal Mirror Installation Instructions Ford F-250/F-350 Pick-Up, Super-Duty 1998-2006 Ford Excursion XLT/Limited 2000-2002 Ford Excursion (all models) 2003-2006 THE safety accessory of the 21st Century.
Signal Mirror Installation Instructions
 Signal Mirror Installation Instructions Ford F-250 to F-750 Pick-Up, Super-Duty 1998-2007 Trailer Tow Mirror Ford Excursion XLT/Limited 2000-2002 Trailer Tow Mirror Ford Excursion (all models) 2003-2005
Push Start Ignition (05-10 All) Installation
 Installation") Tools Required: Phillips head screwdriver Flat head screwdriver Ratchet 7mm Socket Torx T20 bit Wire strippers/cutters Hand file Needle nose pliers Installation Instructions: Push Start Ignition (05-10
Tools Required: Phillips head screwdriver Flat head screwdriver Ratchet 7mm Socket Torx T20 bit Wire strippers/cutters Hand file Needle nose pliers Installation Instructions: Push Start Ignition (05-10
Signal Mirror Installation Instructions Toyota Sequoia Limited, 2004 Toyota Tundra D-Cab
 Signal Mirror Installation Instructions 2001 2006 Toyota Sequoia Limited, 2004 Toyota Tundra D-Cab Toyota Sequoia Limited 2004 Toyota Tundra D-Cab THE safety accessory of the 21 st Century. P/N 210-0064-0
THE safety accessory of the 21 st Century.
 00 006 Chevrolet SSR Signal Mirror Installation Instructions THE safety accessory of the st Century. Note: Professional Installation Recommended Warranty does not cover damage to the vehicle or mirror
M GT 2005 up Mustang ENGINE START Push-Button INSTRUCTION SHEET
 Please contact the Ford Racing Techline for the most current instruction information @ (800) FORD-788!!! PLEASE READ THE FOLLOWING INSTRUCTIONS CAREFULLY PRIOR TO INSTALLATION!!! OVERVIEW: The following
STREET SCENE EQUIPMENT,INC.
 STREET SCENE EQUIPMENT,INC. 950-76570 BLACK CHROME 365 McCormick Avenue 950-77570 SATIN FINISH Costa Mesa, Ca. 92626 950-78570 CHROME FINISH Phone (714) 426-0590 Fax (714) 426-0591 2007-2008 TOYOTA TUNDRA
INSTALLATION INSTRUCTIONS
 INSTALLATION INSTRUCTIONS Models: 7105 & 7105TK Dodge Ram 1500 ('02 Current) Ram 2500 & 3500 '03 - Current with stock manual mirrors. IF YOU DO NOT CURRENTLY HAVE MANUAL MIRRORS, THE WRONG SET HAS BEEN
* * Inside Toyota Avalon. Tools Required IMPORTANT
 Revision 08/02/16 2013- Toyota Avalon IMPORTANT Before starting, compare items on your invoice with items received. Carefully check through packaging material. If any item is missing, please call Crutchfield
INSTALLATION INSTRUCTIONS
 INSTALLATION INSTRUCTIONS Model: 8510 & 8510TK Ford E Series Van 1994 2002 with stock power mirrors Tools required for the installation are: 7/16 socket, T20 screwdriver or 8mm socket, screwdriver, phillips
INSTALL INSTRUCTIONS
 INSTALL INSTRUCTIONS Models: 6005 & 6005TK (For Non Electric Mirrors) GM CK Body Style If your stock mirrors are stock electric the wrong set has been ordered. Do not attempt to manually extend or retract
INSTALLATION INSTRUCTIONS
 Rear Vision System Tailgate Handle Camera Mirror Display 2004-2014 Ford F-150 and 2008-2015 Ford Super Duty (Kit part numbers 9002-9521) Kit Contents: Mirror Tailgate Handle with camera and harness Interior
Z-Gate Universal Shifter
 Installation Instructions Z-Gate Universal Shifter Fits: GM, Ford, Lincoln and Chrysler Transmissions See Application Guide for Specific Applications Part #80681 Rev 06/01/2018 WORK SAFELY! For maximum
Installation Instructions Z-Gate Shifter
 Installation Instructions Z-Gate Shifter Part Number 80681 1998, 2001 by B&M Racing and Performance Products The B&M Z-Gate shifter can be used in vehicles equipped with most popular three speed automatic
Depress each tab as you pull the bezel off. The bezels are tight. L.H. shown.
 2013-2014 Ford Mustang V6 & Boss 302 Lower Valance Fog Light Kit Parts List: Quantity: Tool List: Fog light & bulb with bracket 2 Flat head & Phillips screwdriver Black bezels 2 Ratchet & Socket set OR
CONTENTS TOOLS REQUIRED:
 CONTENTS 1EA. SUBWOOFER ASSEMBLY P/N 77KICK13SUBASSEMBLY 1EA. SUB BRACKET P/N 05030060AA 1EA. 200 WATT AMP P/N REBTL200 1EA. AMP BRACKET P/N RMDR 1EA. POWER HARNESS P/N RHRAMP 1EA. OVERLAY HARNESS P/N
Backside License Plate Mount for Jeep JK Wrangler
 REQUIRED TOOLS 10mm SOCKET 13mm SOCKET 4mm HEX KEY WIRE CRIMPS WIRE STRIPPERS ELECTICAL TAPE SCREW DRIVER KIT CONTAINS BACKSIDE MOUNT LICENSE PLATE BRACKET WITH LEDS PLASTIC PASS-THROUGH GROMMET STAINLESS
Jeep Wrangler Adjustable Infrared Light Rear Vision Camera System for Factory Display Radios 2007 Current (Kit # )
") Jeep Wrangler Adjustable Infrared Light Rear Vision Camera System for Factory Display Radios 2007 Current (Kit # 9002-8857) Items Included in the Kit Required Tools & Supplies Camera Chassis Harness Power
Jeep Wrangler Adjustable Infrared Light Rear Vision Camera System for Factory Display Radios 2007 Current (Kit # 9002-8857) Items Included in the Kit Required Tools & Supplies Camera Chassis Harness Power
TCI FastGate Shifter Installation Instructions
 151 INDUSTRIAL DRIVE ASHLAND, MISSISSIPPI 38603 http://www.tciauto.com TELEPHONE: 662-224-8972 FAX LINE: 662-224-8255 E-MAIL: tech@tciauto.com TCI 616541 FastGate Shifter Installation Instructions The
80703 & Backside License Plate Mount for Jeep JK Wrangler (80707) & 10+ (80703)
 & 10+ (80703)") 80703 Backside Mount 80707 Backside Mount REQUIRED TOOLS 10mm SOCKET 13mm SOCKET 4mm HEX KEY WIRE CRIMPS WIRE STRIPPERS ELECTICAL TAPE SCREW DRIVER KIT CONTAINS BACKSIDE MOUNT LICENSE PLATE BRACKET WITH
80703 Backside Mount 80707 Backside Mount REQUIRED TOOLS 10mm SOCKET 13mm SOCKET 4mm HEX KEY WIRE CRIMPS WIRE STRIPPERS ELECTICAL TAPE SCREW DRIVER KIT CONTAINS BACKSIDE MOUNT LICENSE PLATE BRACKET WITH
ATTENTION. Custom Dynamics UTV Turn Signal Kit Installation Instructions
 Custom Dynamics UTV Kit Installation Instructions We thank you for purchasing the Custom Dynamics UTV LED Kit. Our products utilize the latest technology and high quality components to ensure you the most
TOYOTA CAMRY HANDS FREE BLU LOGIC Preparation
 TOYOTA CAMRY 2008- HANDS FREE BLU LOGIC Preparation Part #: PT923-00111 Conflicts: JBL Audio, Factory Navigation NOTE: Part number of this accessory may not be the same as the part number shown. Kit Contents:
CONTENTS TOOLS REQUIRED:
 CONTENTS 1EA. FIVE CHANNEL AMPLIFIER P/N MPDSP033AA 1EA. AMPLIFIER BRACKET P/N RM11JK41 1EA. POWER HARNESS P/N RH41JKP 1EA. OVERLAY HARNESS P/N RH41JK 1EA. FUSE 30 AMP P/N RFUSE30 6EA. WIRE TIE P/N RFZIP6
Fog Lamp Instructions
 Fog Lamp Instructions 2011+ Ford Super Duty Congratulations on your purchase of a high quality PUTCO product. Should you need any application or technical assistance feel free to call us at: 1-800-247-3974
Installation Instructions. QuickSilver Shifter. Fits: GM, Ford, Chrysler Transmissions See Application Guide for Specific Applications Part # 80683
 Installation Instructions QuickSilver Shifter Fits: GM, Ford, Chrysler Transmissions See Application Guide for Specific Applications Part # 80683 WORK SAFELY! For maximum safety, perform this installation
INSTALLATION INSTRUCTIONS
 Jeep Wrangler Rear Vision Camera, 2007 Current (Kit # 9002-8838) Items Included in the Kit Camera Chassis Harness Zip lock bag with 15 Wire Ties & 3 Push Nuts These Instructions Required Tools & Supplies
Remove black panel shown. Save 6 retaining pins for re-install later. Pry up on center part of pin first. Then pry out entire retaining pin.
 2005-2009 Ford Mustang V6 Fog Light Wiring Kit Parts List: Quantity: Tools Required: Wiring harness 1 Flat head screwdriver Supplemental wire leads 2 Ratchet & Socket set OR Wire tap red 2 Adjustable Wrench
RANGER 900 POWER STEERING KIT
 RANGER 900 POWER STEERING KIT P/N 2880083 APPLICATION MY14 AND NEWER RANGER XP 900 MODELS IMPORTANT It is strongly recommended that this kit be installed by an authorized Polaris dealer. NOTE Use of this
Turn Signal / Horn Kit PN 7101 by All years Polaris RZR 1000 and RZR 900, 900-4, 900 trail, 900S and 900XC STOP - THIS KIT IS DESIGNED
 All years Polaris RZR 1000 and 1000-4 2015 RZR 900, 900-4, 900 trail, 900S and 900XC STOP - THIS KIT IS DESIGNED SPECIFICALLY FOR ALL YEAR AND MODEL POLARIS RZR 1000 AND 1000-4. ALSO THE 2015 POLARIS RZR
SCION xb 2004 SECURITY (V5) Section I Installation Preparation. Part Number:
 Section I Installation Preparation. Part Number:") Section I Installation Preparation Part Number: 08586 52960 Section I Installation Preparation Kit Contents Item # Quantity Reqd. Description 1 1 Wire Harness 2 1 Mounting Bracket 3 1 GBS ECU 4 1 Security
Section I Installation Preparation Part Number: 08586 52960 Section I Installation Preparation Kit Contents Item # Quantity Reqd. Description 1 1 Wire Harness 2 1 Mounting Bracket 3 1 GBS ECU 4 1 Security
Signal Mirror Installation Instructions Standard West Coast Mirror
 Signal Mirror Installation Instructions Standard West Coast Mirror THE safety accessory of the 21 st Century. P/N 210-0058-0 Rev A1 (6-29-04), GG 2002 Muth Mirror Systems, LLC. Note: Professional Installation
Raxiom Factory GPS Rear Back-up Camera Kit (07-17 Wrangler)
") Raxiom Factory GPS Rear Back-up Camera Kit (07-17 Wrangler) Installation Time: 2.5-3Hrs Tools Required: 7mm Socket & Driver 10mm Socket 10mm Open end wrench Knife / Razor blade Zip-ties Wire Cutters Needle
Raxiom Factory GPS Rear Back-up Camera Kit (07-17 Wrangler) Installation Time: 2.5-3Hrs Tools Required: 7mm Socket & Driver 10mm Socket 10mm Open end wrench Knife / Razor blade Zip-ties Wire Cutters Needle
INSTALLATION INSTRUCTIONS
 INSTALLATION INSTRUCTIONS Accessory Application Publications No. AII 26042-26353 XM INTERFACE ODYSSEY EXCEPT EX-L WITH NAVI/RES Issue Date FEB 2004 PARTS LIST 8 Wire ties XM Radio Attachment P/N 08B15-S0X-100
GENUINE PARTS INSTALLATION INSTRUCTIONS
 GENUINE PARTS INSTALLATION INSTRUCTIONS 1. 2. 3. 4. DESCRIPTION: APPLICATION: PART NUMBER: KIT CONTENTS: Security light Kit Maxima 999F4 AX009 - Universal Security Lighting Kit. Item QTY Description Service
INSTALLATION INSTRUCTIONS
 INSTALLATION INSTRUCTIONS Accessory P/N 08E10-TA0-100 Application 2008 ACCORD 2-AND 4-DOOR Publications No. AII 35358 Issue Date AUG 2007 PARTS LIST Ambient Light Kit 2 Ambient lights Fuse label Washer
Please read thoroughly before starting installation and check that kit contents are complete.
 Rear Vision System Mirror Display 2013-Current Ram (Kit part number 1009-9518) Please read thoroughly before starting installation and check that kit contents are complete. Items Included in the Kit: Rear
INSTALLATION INSTRUCTIONS
 INSTALLATION INSTRUCTIONS Accessory Application Publications No. AUTOMATIC AII 27160 2005 CR-V Issue Date ATTACHMENT KIT SEP 2004 PARTS LIST Automatic Day/Night Mirror Attachment Kit (sold separately)
Hush-O-Matic MRS Control Package
 Hush-O-Matic MRS Control Package 06-49192 Congratulations on your purchase! The Hush-O-Matic MRS Control package allows you to choose a few different modes including always quiet and always loud. Controlling
INSTALLATION INSTRUCTIONS
 INSTALLATION INSTRUCTIONS Contents Description: Auto-Dimming Rearview Mirror with Compass Part Number: 990B0-35007 Applications: SX4 Hatchback, 2007- SX4 Sedan, 2008- Installation Time:.5 HRS Ref. Part
INSTALLATION INSTRUCTIONS
 Rear Vision System Tailgate Emblem Camera Mirror Display 2009-Current Ford F-150 and 2010-Current Super Duty (Kit part number 1008-9527) Kit Contents: Mirror Tailgate Emblem Mount with Camera Interior
INSTALLATION INSTRUCTIONS
 INSTALLATION INSTRUCTIONS Accessory Application Publications No. SYSTEM 2005 ACCORD All 27511 (DX, LX) 2-AND 4-DOOR Issue Date AUG 2004 PARTS LIST Security System Attachment (LX): P/N 08E55-SDA-100A Unit
TOYOTA TACOMA HANDS FREE BLU LOGIC Preparation. Item 5 Item 6 Item 7 Item 8. Item 4. General Applicability Note: Recommended Tools
 TOYOTA TACOMA 2008- HANDS FREE BLU LOGIC Preparation Part #: PT923-00098 Conflicts: JBL Audio, Factory Navigation Kit Contents: NOTE: Part number of this accessory may not be the same as the part number
Essentials. Simple and Easy to Follow Installation Manual % Free Call! Expert Advice.
 Essentials Simple and Easy to Follow Installation Manual % Free Call! %800-745-5337 Expert Advice DVD Headrest JK Wrangler Installation Instructions Note: Be sure to read this entire instruction sheet
Ford Mustang V6 OEM-Style Fog Light Kit Parts List: Quantity: Tool List:
 2015-2017 Ford Mustang V6 OEM-Style Fog Light Kit Parts List: Quantity: Tool List: LED Foglights/ Bezels 2 Flat head & Phillips screwdriver (if you ordered part#3600) Ratchet & Socket set OR Wiring harness
Hurst VMATIC3 INSTALLATION
 FORM 159 8530 07/12 Hurst VMATIC3 3-Speed & 4-Speed Automatic Shifter Catalog #3838530 2012 by Hurst Performance The Hurst Vmatic3 shifter can be used in vehicles equipped with most popular three speed
TOOLS REQUIRED: Panel Removal Tool Phillips Screwdriver 10mm Nut Driver Ratchet 10mm Socket 7mm Wrench 7mm Nut Driver Straight Screwdriver
 CONTENTS: 1EA. FIVE CHANNEL AMPLIFIER/BRACKET ASSEMBLY P/N MPDSP039AA 1EA. OVERLAY HARNESS P/N RH41LX10 3EA. 7MM SCREWS P/N RF7MM 6EA. WIRE TIE P/N RFZIP6 1EA. 30 AMP FUSE P/N RFUSE30 1EA. INSTRUCTIONS
Replacing the Gear Drive Motor Assembly and GFCI Module for Operation with the Chain Drive Motor Assembly
 Replacing the Gear Drive Motor Assembly and GFCI Module for Operation with the Chain Drive Motor Assembly Kit Contents B00009035-3 Motor Drive Assembly (Return original to CMI) B00007698-8 GFCI Module
1. Disconnect the battery. This is important! This will prevent air bag deployment.
 PARTS PACKING LIST Evaporator assembly Drain tube Plastic air plug Hardware package 11040 3601 W. Clarendon Phoenix, Arizona 85019 (602) 233-0090 800-648-4475 www.ackits.com 2003-4 Jeep Wrangler EVAPORATOR
INSTALLATION INSTRUCTIONS
 INSTALLATION INSTRUCTIONS Accessory Application Publications No. AII 22903-22963 ODYSSEY Issue Date MAY 2002 PARTS LIST Subwoofer Kit: P/N 08A39-EP7-100 Subwoofer 2 Cushion tapes 8 Wire ties (1 not used)
ROUSH Active IO Exhaust. Installation Instructions P/N: (R LITE) Fastback GT Convertible GT V8
 Fastback GT Convertible GT V8") Installation Instructions P/N: 422128 (R1318-5231LITE) Fastback GT Convertible GT V8 39555 Schoolcraft Rd, Plymouth MI, 48170 800.59.ROUSH ROUSH Active IO Exhaust Installation Instructions P/N: 422128
Installation Instructions P/N: 422128 (R1318-5231LITE) Fastback GT Convertible GT V8 39555 Schoolcraft Rd, Plymouth MI, 48170 800.59.ROUSH ROUSH Active IO Exhaust Installation Instructions P/N: 422128
Instructions for installing Extendable Replacement Mirrors for Ford HD vehicle.
 Instructions for installing Extendable Replacement Mirrors for Ford HD vehicle. Manual CIPA # 82100 Right Hand #82110 Left Hand #82111 Electric CIPA # 72100 #72110 #72111 Heated / Electric CIPA # 72500
SCION tc SECURITY (V5) Preparation
 Preparation") Preparation Part Number: PT398-21070 Kit Contents Item # Quantity Reqd. Description 1 1 2 1 GBS ECU Hardware Bag Contents Item # Quantity Reqd. Description 1 1 V5 Security ECU 2 1 ECU Mounting Bracket
Preparation Part Number: PT398-21070 Kit Contents Item # Quantity Reqd. Description 1 1 2 1 GBS ECU Hardware Bag Contents Item # Quantity Reqd. Description 1 1 V5 Security ECU 2 1 ECU Mounting Bracket
GENUINE PARTS INSTALLATION INSTRUCTIONS
 GENUINE PARTS INSTALLATION INSTRUCTIONS 1. 2. 3. 4. DESCRIPTION: Security Light Kit APPLICATION: Altima Coupe and Sedan (2011+) PART NUMBER: 999F4 AX008 - Universal Security Lighting Kit. KIT CONTENTS:
LGT-306L / LB Club Car Precedent LED Light Bar Bumper Kit Installation Instructions
 LGT-306L / LB Club Car Precedent LED Light Bar Bumper Kit Installation Instructions Caution: Please read through the instructions carefully. Before starting this project, remove the system s positive and
TOYOTA VENZA HANDS FREE BLU LOGIC Preparation
 TOYOTA VENZA 2009- HANDS FREE BLU LOGIC Preparation Part #: PT923-00111 Conflicts: JBL Audio NOTE: Part number of this accessory may not be the same as the part number shown. Kit Contents: For kits manufactured
INSTALLATION INSTRUCTIONS 97 FORD EXPEDITION
 INSTALLATION INSTRUCTIONS 97 FORD EXPEDITION 1. Read the instructions completely and carefully before you begin. Check the kit for proper contents (refer to the part s list and the picture diagrams). Before
TOYOTA PRIUS 2004 TVIP V2 (GBS ADD ON) Section I Installation Preparation
 Section I Installation Preparation") Section I Installation Preparation Part Number: 08586 47840 Section I Installation Preparation Kit Contents Item # Quantity Reqd. Description 1 1 Wire Harness 2 1 3 1 ECU Mounting Bracket Hardware Bag
Section I Installation Preparation Part Number: 08586 47840 Section I Installation Preparation Kit Contents Item # Quantity Reqd. Description 1 1 Wire Harness 2 1 3 1 ECU Mounting Bracket Hardware Bag
INSTALLATION INSTRUCTIONS
 INSTALLATION INSTRUCTIONS Accessory Application 2013 ACCORD 2 AND 4-DOOR Publications No. AII 13003 Issue Date AUG 2012 PARTS LIST Attachment Kit P/N 08V03-T2A-100 Automatic day/night mirror harness Operating
General Applicability: KIA Sorento. Issues Current Kit does not allow for CAN DATA remote access
 Document #730135 Created ACH 08/02/2018 Revised ACH 08/20/18 A2 General Applicability: 2018-19 KIA Sorento Issues Current Kit does not allow for CAN DATA remote access Kit Contents: Item# Component Description
INSTALLATION INSTRUCTIONS
 INSTALLATION INSTRUCTIONS Accessory Accessory Hands Free Link Application 2008 ACCORD 2 AND 4-DOOR Publications No. AII 38281 Issue Date NOV 2007 PARTS LIST Attachment Kit P/N 08E02-TA0-100 trim retainer
INSTALLATION INSTRUCTIONS
 INSTALLATION INSTRUCTIONS Accessory Application Publications No. All 12035 SYSTEM 2012 RIDGELINE Issue Date NOV 2011 PARTS LIST Security System Attachment Kit: P/N 08E55-SJC-101 Flange bolt Unit bracket
* * Inside Ram. Tools Required 1500, 2500, 3500 IMPORTANT
 Revision 10/07/14 IMPORTANT Before starting, compare items on your invoice with items received. Carefully check through packaging material. If any item is missing, please call Crutchfield Technical Support
TOYOTA tc HANDS FREE BLU LOGIC Preparation
 TOYOTA tc 2011- HANDS FREE BLU LOGIC Preparation Part #: PT923-00111 Conflicts: JBL Audio, Factory Navigation NOTE: Part number of this accessory may not be the same as the part number shown. Kit Contents:
GENUINE ACCESSORIES INSTALLATION INSTRUCTIONS
 GENUINE ACCESSORIES INSTALLATION INSTRUCTIONS PART NUMBERS: APPLICABLE MODELS: 0000-89-G14A (PORT) Electrochromic Mirror Kit w/ Compass/Temp/HomeLink 2004 Mazda 3 0000-8C-G14A (PDC) KIT CONTENTS: ITEM
 INSTALLATION INSTRUCTIONS Accessory Application Publications No. All 38163 XM SATELLITE RADIO SYSTEM 2008 ODYSSEY Issue Date OCT 2007 PARTS LIST XM Radio Attachment (sold separately): P/N 08B15-SHJ-100A
INSTALLATION INSTRUCTIONS
 Rear Vision System Mirror Display 2004 onwards Ford F-150 and 2008 onwards Ford Super Duty (Kit part numbers 1008-9520 and 1008-9525) Kit Contents: RVS Interior (shorter) Harness RVS Chassis (longer) Harness
MK7 GTI Electronic Folding Mirror Conversion
 MK7 GTI Electronic Folding Mirror Conversion 01 Mirror and Switch Installation 1. Using a soft pry tool remove the trim panel on the driver side door handle. 02 2. Remove 2 T-30 torx screws. 03 3. On the
INSTALLATION INSTRUCTIONS FOR THE TOMAHAWK ELECTRIC REVERSE
 INSTALLATION INSTRUCTIONS FOR THE TOMAHAWK ELECTRIC REVERSE LAST UPDATED: April 2018 Thank you for choosing the Motor Trike Electric Reverse. We ask that you read the directions before you start and follow
LEXUS RC 350/RC-F ILLUMINATED DOOR SILLS Preparation
 Preparation Part Number: PT944-24150 Kit Contents Item # Quantity Reqd. Description 1 2 Inner LED Scuff 2 2 Outer Scuff 3 1 Hardware Bag Hardware Bag Contents Item # Quantity Reqd. Description 1 15 20
TOYOTA TACOMA EC REARVIEW MIRROR Preparation
 Preparation Part Number: PT374-35052 Kit Contents Item # Quantity Reqd. Description 1 1 AD Mirror Assembly 2 1 Hardware bag Hardware Bag Contents Item # Quantity Reqd. Description 1 1 T-tap Connectors,
Installation Instructions Right Hand Drive Megashifter
 Installation Instructions Right Hand Drive Megashifter Part Number 80685 1995, 2001, 2006, 2010 by B&M Racing & Performance Products The B&M Right Hand Drive Megashifter is designed specifically for vehicles
Light Truck MegaShifter
 Installation Instructions Light Truck MegaShifter The B&M Light Truck Megashifter shifter is designed to be used in most light trucks equipped with most popular three speed or four speed automatic transmissions.
INSTALLATION INSTRUCTIONS JEEP 2011-UP JK SECURITY FULL CONSOLE #274
 INSTALLATION INSTRUCTIONS JEEP 2011-UP JK SECURITY FULL CONSOLE #274 PARTS CHECKLIST Tuffy Console #9 Left Front Mounting Bracket #10 Right Front Mounting Bracket #11 Electronics mounting bracket #12 Divider
PRO RATCHET UNIVERSAL SHIFTER
 Installation Instructions PRO RATCHET UNIVERSAL SHIFTER Fits: GM, Ford and Chryslers w/automatic Transmission See Application Guide for Specific Vehicles Catalog # 80842 WORK SAFELY! For maximum safety,
TOYOTA CAMRY EC REARVIEW MIRROR Preparation
 TOYOTA CAMRY 2010 - EC REARVIEW MIRROR Preparation Part Number: 00016-09101 Code: CM9 Kit Contents Item # Quantity Reqd. Description 1 1 AD Mirror Assembly w/ Compass 2 1 Hardware bag Hardware Bag Contents
Installation Instructions Megashifter
 Installation Instructions Megashifter The B&M Megashifter shifter can be used in vehicles equipped with most popular three speed or four speed automatic transmissions. Your B&M Megashifter comes equipped
Toggle Button Kit. Installation Instructions MK5 / MK6 Golf, MK5 Jetta
 Toggle Button Kit Installation Instructions MK5 / MK6 Golf, MK5 Jetta Thank you for choosing the Double Apex Toggle Button kit. If you have any questions about the installation please do not hesitate to
CHEVY NOVA w/reverse Four Panel Sequential LED Taillight Kit Installation Guide
 1970-72 CHEVY NOVA w/reverse Four Panel Sequential LED Taillight Kit Installation Guide Kit Contents: 4 LED panels 4 rubber grommets 1 power wire with t-tap 1 driver side LED harness, 24 (5 pin) 1 passenger
* * APPLICABLE MODELS: 2016 > CX-3
 PART NUMBER: 0000 8C S01(DIO) / 0000 89 S07(PIO) GENUINE ACCESSORIES INSTALLATION INSTRUCTIONS Rev. AAA *550-0688-000* APPLICABLE MODELS: 2016 > CX-3 REQUIRED COMPONENTS: ITEM QTY DESCRIPTION Usage Chart
Turn Signal Kit Installation Instructions for Model A Fords & Other Antique Vehicles
 Turn Signal Kit Installation Instructions for Model A Fords & Other Antique Vehicles Lifetime Technical Support support@logolites.com 770-476-7322 www.logolites.com Manual 100-0005N Thank you for purchasing
Important! The subwoofer system is designed to be used only with the rear seat in the up position only.
 Important! The subwoofer system is designed to be used only with the rear seat in the up position only. CONTENTS 1EA. SUBWOOFER ASSEMBLY 2EA. BRACKET LOWER 2EA. BRACKET UPPER 1EA. OVERLAY HARNESS 2EA.
Installation Instructions Unimatic Shifter
 Installation Instructions Unimatic Shifter Universal Shifter for Automatic Transmissions Part Number 80775 2000 by B&M Racing & Performance Products LLC The B&M Unimatic is a universal shifter that will
CONTENTS: 1EA. SUBWOOFER HARNESS 2PIECE TOOLS REQUIRED:
 CONTENTS: 1EA. SUBWOOFER ENCLOSURE 1EA. SUBWOOFER HARNESS 2PIECE 2EA. T-TAP 1EA. FUSE 30 AMP 6EA. WIRE TIES 1EA. INSTRUCTIONS P/N 77KICK14SUBASSEMBLY P/N RHPM1 P/N RFTTAPB P/N RFUSE30 P/N RFZIP6 P/N RBI77KICK14
Installation of Auto Meter Cobalt Boost/Vacuum Gauge:
 Installation of Auto Meter Cobalt Boost/Vacuum Gauge: Fitment: All 79-14 models. This installation was completed on a 2004 Mustang GT, and should be identical for all 1999-2004 model Mustangs. Time needed:
Installation Instructions for Lingenfelter GM 2500 Suburban & Yukon XL Auxiliary Fan System (with AC clutch controlled fan output)
") Installation Instructions for Lingenfelter 2007-2013 GM 2500 Suburban & Yukon XL Auxiliary Fan System (with AC clutch controlled fan output) PN L300080607 Revision - 1.1 Lingenfelter Performance Engineering
Installation Instructions for Lingenfelter 2007-2013 GM 2500 Suburban & Yukon XL Auxiliary Fan System (with AC clutch controlled fan output) PN L300080607 Revision - 1.1 Lingenfelter Performance Engineering
INSTALLATION INSTRUCTIONS Mitsubishi Lancer Evolution VIII / IX Fuel Surge Tank Kit Document#
 d INSTALLATION INSTRUCTIONS Mitsubishi Lancer Evolution VIII / IX Fuel Surge Tank Kit Document# 19-0077 Brie Tech Support: info@radiumauto.com CAUTION: Exercise extreme caution when working with the fuel
INSTALLATION INSTRUCTIONS
 INSTALLATION INSTRUCTIONS Accessory Application Publications No. AII 26031 2004 ODYSSEY Issue Date AUG 2003 NOTE: You cannot install the subwoofer in a vehicle equipped with both an under seat Navigation
IT IS IMPORTANT THAT YOU OBTAIN THE CORRECT INFORMATION FOR YOUR VEHICLE, OR DAMAGE TO THE WIRING SYSTEM COULD OCCUR.
 Instructions for Universal Harness PRINT THESE INSTUCTIONS Gentex Mirror Installation Instructions Provided by www.rearviewautomirrors.com These instructions have been prepared to provide you with details
ACE AUDIO KIT P/N
 ACE AUDIO KIT P/N 2879703 Application SPORTSMAN ACE MODELS Before you begin, read these instructions twice and check to be sure all parts and tools are accounted for. Please retain these installation instructions
TOYOTA TACOMA TVIP V3 (RS3200) Section I - Installation Preparation
 Section I - Installation Preparation") Section I - Installation Preparation Part Number: 08586-04810 Section I - Installation Preparation Kit Contents Item # Quantity Reqd. Description 1 1 Wire Harness 2 1 Status Monitor 3 1 Piezo Buzzer 4
Section I - Installation Preparation Part Number: 08586-04810 Section I - Installation Preparation Kit Contents Item # Quantity Reqd. Description 1 1 Wire Harness 2 1 Status Monitor 3 1 Piezo Buzzer 4
Installation Instructions StarShifter
 Installation Instructions StarShifter Part Number 80675 2000 by B&M Racing & Performance Products LLC The B&M StarShifter can be used in vehicles equipped with most popular three speed automatic transmissions.
Installation Instructions Unimatic Shifter
 Installation Instructions Unimatic Shifter Universal Shifter for Automatic Transmissions Part Number 80775 2010, 2000 by B&M Racing & Performance Products The B&M Unimatic is a universal shifter that will
INSTALLATION INSTRUCTIONS
 INSTALLATION INSTRUCTIONS Accessory Application Publications No. CD CHANGER ATTACHMENT KIT ODYSSEY AII 22030 Issue Date AUG 2000 PARTS LIST CD Changer Attachment Kit: P/N 08B12-S0X-100 Right side rail
Ford 7.3L Powerstroke Positive Air Shutoff
 24 October 2012 Ford 7.3L 1999.5-2003 Positive Air Shutoff 1 1999.5-2003 Ford 7.3L Powerstroke Positive Air Shutoff P/N# 1036700 P/N# 1036700-M UPLEASE READ ALL INSTRUCTIONS BEFORE INSTALLATION 24 October
PN PONTIAC FIREBIRD. Kit Contents: Four Panel Sequential LED Tail Light Kit Installation Guide
 1969 PONTIAC FIREBIRD Four Panel Sequential LED Tail Light Kit Installation Guide Kit Contents: 4 LED panels 4 rubber grommets 1 power wire 2 pigtail harness kits 2 crimp terminal kits PN 1100569 1969
Installation Instructions Sport Shifter
 The B&M Sport Shifter can be used in vehicles equipped with most popular three speed or four speed automatic transmissions. It is equipped with neutral safety and backup light switches, transmission brackets
FULL SIZE RANGE ROVER REMOTE STARTER INSTALLATION INSTRUCTIONS
 2010-2012 FULL SIZE RANGE ROVER REMOTE STARTER INSTALLATION INSTRUCTIONS During your first installation of this product, you will benefit from these complete instructions. After performing two or three,
* * APPLICABLE MODELS: 2014 > Mazda 3
 PART NUMBER: 0000 8C L48 (DIO) / 0000 89 L84 (PIO) GENUINE ACCESSORIES INSTALLATION INSTRUCTIONS Rev. AAA *550-0700-000* APPLICABLE MODELS: 2014 > Mazda 3 REQUIRED COMPONENTS: ITEM QTY DESCRIPTION Usage
Technical Support (707)
") Installation Instructions UNIMATIC SHIFTER Fits: GM, Powerglide, Ford and Chrysler Transmissions See Application Guide for Specific Vehicles Catalog # 80775 WORK SAFELY! For maximum safety, perform this
Installation Instructions UNIMATIC SHIFTER Fits: GM, Powerglide, Ford and Chrysler Transmissions See Application Guide for Specific Vehicles Catalog # 80775 WORK SAFELY! For maximum safety, perform this