YOU CAN DO IT: SPITFIRE SEAT RE-COVERING STEP-BY
|
|
|
- Elvin Clark
- 6 years ago
- Views:
Transcription
1 YOU CAN DO IT: SPITFIRE SEAT RE-COVERING STEP-BY BY-STEP
2

3 TO SAVE TIME, UNBOLT SEATS FROM HINGES...

4 NOTE PLACEMENT OF CLIPS, HOGRINGS BEFORE DISASSEMBLY. REFER TO OTHER SEAT WHEN IN DOUBT.

5 BEGIN PULLING CLIPS WHICH HOLD THE SEAT BACK TO THE LOWER FRAME.

6 REMOVE HARDWARE: RECLINER LEVER AND SEAT HOLD DOWN LEVER

7 NOTE HINGES ON FRONT OF SEAT BOTTOM AS WELL AS HOGRING SPACING AND PLACEMENT OF ORIGINAL SEAT

8 SEAT BACK WITH COVER REMOVED -NOTICE DETERIORATED WEBBING AND LIGHT SURFACE RUST ON CAGE.

9 FIBER BOARD PANELS HOLD DOWN SEAT BACK SIDES TO LOWER FRAME. THESE WILL BE HOMEMADE IN THE PROCESS.

10 A SAFETY CLIP HOLDS THE HEADREST IN...

11 WE RE DEFINITELY REPLACING THE SEAT BACK FOAMS! PULL EM OFF GENTLY - THEY ARE MERELY GLUED TO THE SEATBACK FRAME.

12 PRY THE SEAT BOTTOM FRAME FROM THE CAGE WITH A SCREWDRIVER. IT MAY BEND THE SHAPE - BEND BACK WITH PLIERS LATER.

13 NOW THE BOTTOM IS HELD TO THE FRAME BY THE HINGES SHOWN EARLIER. RE-FITTING IS A REVERSAL OF THE REMOVAL! NOW, JUST PULL THE BOTTOM OFF THE CAGE FRAME.

14 WITH THE BOTTOM FREE FROM THE FRAME, USE HEAVY PLIERS TO WREST THE HOGRINGS FROM THE SEAT BOTTOM FRAME. NOTE HOW VINYL IS BUNCHED UP AND THE HOGRINGS PIERCE THE VINYL TO HOLD VINYL TO FRAME.

15 NOW, THE FOAM/VINYL IS SEPARATED FROM THE SEAT BOTTOM FRAME. WE ARE USING NEW FOAMS, SO THERE S S NO NEED TO SEPARATE THE FOAM FROM THE VINYL...
,")
16 WE NOW PREPARE THE FRAMES FOR NEW FOAM/COVERS. REMOVE THE WEBBING, WIRE BRUSH THE FRAMES, RUST TREAT (NAVAL JELLY), PRIME AND PAINT THE SEAT FRAMES.

17 PAINT OPERATIONS ARE PERFORMED IN THE BACK YARD, FAR AWAY FROM AUTOMOTIVE FINISHES!

18 I DECIDED TO REUSE THE WEBBING FROM THE RIGHT SEAT ON THE LEFT, AND TO RE- DO THE RT. SEAT WEBBING WITH NYLON STRAPS. WE MUST RE-USE THE ORIGINAL CLIPS... DISASSEMBLE ROTTED WEBBING.

19 OPERATIONS RESUME INDOORS ON CARDBOARD. WEAVE THE NEW NYLON WEBBING FROM THE LOCAL FABRIC SHOP ONTO THE OLD CLIPS. THERE ARE MANY WAYS TO REPLACE YOUR OLD WEBBING...

20 WITH WEBBING DONE, GLUE THE NEW SEAT BACK FOAM TO THE FRAME. NOTE NICE, NEW BLACK PAINT. ALSO, TRY FITTING TOGETHER THE SEAT BOTTOM FOAM AND SUPPORT BOARD TO LOWER FRAME

21 INSTALL THE HOGRINGS! BEGIN BY PULLING THE VINYL OVER THE FOAM AND INSTALL RINGS AT REAR OF SEAT FIRST...

22 TOP VIEW OF SEAT BOTTOM FRONT. HOG RINGS ALREADY INSTALLED ON REAR OF VINYL COVER TO THE BOTTOM SEAT FRAME. MR. KITTY S S LOOKING TO GET HURT IF HE SITS HERE NOW!

23 TURNING TO THE SEAT BACK COVER, MAKE CARDBOARD TEMPLATES AND FIT EM INTO THE SIDE POCKETS. OLD FIBER BOARD SHOWN...

24 CUT NEW SIDE BOARDS FROM MASONITE. FIT THEM INTO THE POCKETS AND TRIM THE BOARDS AS NECESSARY SO THEY DON T T BULGE OR CUT INTO NEW VINYL...

25 DRILL OUT RIVETS SO WE CAN RE-USE THE ORIGINAL CLIPS. IT S S IMPT. TO MAKE THE NEW SEATS FIT WELL AND NOT SAG...

26 NOTE ANGLE OF CLIPS: DETERMINE ANGLE BY FITTING SEATBACK COVER OVER FOAM, INSTALL BOARDS, MARK POSITION OF RECEIVER SLOTS ON FRAMES. TAKE YOUR TIME! RIVET CLIPS ONTO BOARDS.

27 CONFIRM CLIP PLACEMENT. ON DOOR SIDE OF SEAT, MARK & DRILL HOLE FOR RECLINER LEVER. RE-INSTALL BOARD, CUT ONLY THE INNER HOLE FOR LEVER NOW. MAKE THE OUTER HOLE LATER...

28 PULL THE CLOTH HOLD DOWN FLAP THRU THE BACK SEAT FOAM S S SLIT. DON T T CLIP DOWN YET-WE MUST GLUE THE SEAT COVER TO THE FOAM TO ELIMINATE WRINKLES AND GET CONTOURS CORRECT.

29 SPRAY GLUE INTO THE COVER & SMOOTHE THE COVER ONTO THE FOAM WE VE ALREADY SPRAY ADHESIVE D THE TOP AND SIDES OF THE FOAM AND INSIDES OF THE COVER. THE COVER IS SMOOTHED DOWN. PAY ATTENTION TO THE SIDE BOLSTERS IN RELATION TO THE SEAMS OF THE COVER. THE IDEA IS TO GET THE FOAM AND THE COVER TOGETHER, WRINKLE -FREE.

30 REPLACE THE COMPLETED SEAT BOTTOM ASSEMBLY ONTO THE SEATBACK FRAME.

31 NOW THE SEATBACK COVER FLAP CAN BE PULLED TIGHTLY DOWN AND CLIPPED TO THE TUBULAR CROSS MEMBER OF THE SEAT BACK FRAME. SMOOTHE THE COVER ONCE AGAIN ON THE FACE SIDE...

32 WE ARE ALMOST FINISHED! INSTALL HOLD-DOWN DOWN LEVER AND CLIP DOWN THE SEAT BACK COVER TO LOWER FRAME.

33 SPRAY ADHESIVE TO FINISH BOTTOM EDGE OF SIDE BOARDS AND EXCESS VINYL FLAPS. PULL THE BOARDS DOWN AND SEAT THE CLIPS INTO THE FRAME. CUT OUTER HOLE FOR RECLINER LEVER NOW...

34 NOW, LEVER IS INSTALLED AND SEAT CAN BE RE- INSTALLED IN THE CAR. CONTINUE TO SMOOTHE OUT THE FACING ONCE RE- INSTALLED!

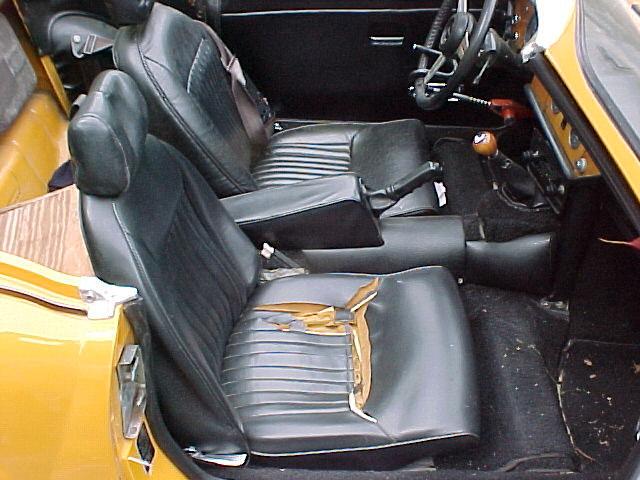
35 PHILLIP COLWART - HAMMOND, LA...ENJOYING THOSE NEW SEATS AT THE N AWLINS BRITISH CAR SHOW MARCH 24, 2001! E ME WITH ANY QUESTIONS...
Front Bucket Seat Upholstery
 Specter Off-Road, Inc. 21600 Nordhoff St. Chatsworth, CA 91311 USA www.sor.com, (818)882-1238, Fax: (818) 882-7144 sor@sor.com Luxury Seat Upholstery Installation Instructions Front Bucket Seat Upholstery
2. Front Seat FRONT SEAT
 SEATS 2. Front Seat A: REMOVAL 1) Disconnect the ground cable from battery. CAUTION: The airbag system is fitted with a backup power source. If the airbag system is serviced within 20 seconds after the
7. Side Airbag Module
 AIRBAG SYSTEM Side Airbag Module 7. Side Airbag Module A: REMOVAL Refer to CAUTION of General Description before handling the airbag module. NOTE: Remove
Mustang CDC Lightbar (94-04) - Installation Instructions
 - Installation Instructions") Mustang CDC Lightbar (94-04) - Installation Instructions The below installation instructions work for the following products: Classic Design Concepts Mustang Convertible Lightbar (94-04 Carbon Fiber) Classic
Mustang CDC Lightbar (94-04) - Installation Instructions The below installation instructions work for the following products: Classic Design Concepts Mustang Convertible Lightbar (94-04 Carbon Fiber) Classic
RedlineGoods Tacoma Installation Manual
 RedlineGoods 2016+ Tacoma Installation Manual AUTOMATIC SHIFT BOOT AND EBRAKE BOOT Press down on the factory shift boot collar to disconnect it from the shift knob. Unscrew shift knob Pull up on the rear
DODGE SLT Installation Instructions
 1994-97 DODGE SLT 40-20-40 Installation Instructions Step 1. Driver and Passenger Bottoms/DB&PB: All the parts of the seat cover are labeled inside. Use the seat cover piece identification chart to ID
COMPONENTS Toyota RAV ACCESSORIES & EQUIPMENT Front Seat - RAV4
 2005 ACCESSORIES & EQUIPMENT Front Seat - RAV4 COMPONENTS Fig. 1: Identifying Front Seat Components & Torque Specifications FRONT SEAT ASSEMBLY REMOVAL CAUTION: Wear safety gloves, because the cutting
Wildcat System Instructions
 Wildcat System Instructions NOTE: Most steps contained in these instructions will need to be repeated on the other side of the vehicle. Prior to assembly of windshield it is necessary to establish what
Installation Instructions Trektop NX
 Installation Instructions Trektop NX Vehicle Application: Jeep Wrangler (JK) 2 Door 2007 Current Part Number: 56822 www.bestop.com - We re here to help! Visit our web site and click on Ask a Question.
Fabric Replacement Top Without Upper Doors
 Fabric Replacement Top Without Upper Doors Installation Guidelines For: 1997-2002 Jeep Wrangler TJ w/factory Frame PN: 10-40-TJ19702!!STOP!! Before proceeding make sure the top is the correct item for
INSTALLATION INSTRUCTIONS JEEP 2011-UP JK SECURITY FULL CONSOLE #274
 INSTALLATION INSTRUCTIONS JEEP 2011-UP JK SECURITY FULL CONSOLE #274 PARTS CHECKLIST Tuffy Console #9 Left Front Mounting Bracket #10 Right Front Mounting Bracket #11 Electronics mounting bracket #12 Divider
Installation Instructions Trektop NX
 Installation Instructions Trektop NX Vehicle Application: Jeep Wrangler (JK) 2 Door 2007 Current Part Number: 56822 www.bestop.com - We re here to help! Visit our web site and click on Ask a Question.
1464. Interior Installation. Cover Rear Seat Support Cut the vinyl to approximately the size of the rear seat support.
 Chapter 37 (Video Clip 37) - Interior Installation 1464. Interior Installation Cover Rear Seat Support 1465. Cut the vinyl to approximately the size of the rear seat support. 1466. Make a dry fit of the
Installation Instructions Supertop for Truck
 Installation Instructions Supertop for Truck Vehicle Application: Ford F-150 5.5 Ft. Styleside 2004 and newer Part Number: 76309 www.bestop.com - We re here to help! Visit our web site and click on Ask
MGB V8 Roadster restoration project Report 138
 24th May 2017. FITTING THE CARPETS - continued I have included quite a lot of detail and photographs on the carpet and trim fitting, as it may help those who decide to do this job on their own car. The
Door panel insert trim replacement Volvo V70
 Door panel insert trim replacement 1998-2000 Volvo V70 Tools needed: Torx Driver T25, Putty Knife, Bone Tool (optional), Heat gun or Dremel cutting tool, wire brush (or use a plastic tile and grout brush),
Installation Instructions Cable Top Twill Replace-a-top with Tinted Windows Upper Door Skins not included
 Installation Instructions Cable Top Twill Replace-a-top with Tinted Windows Upper Door Skins not included Vehicle Application Jeep Wrangler (JK) 2 Door 2011 and newer Part Number: 79846 Will fi t 54722
Installing Custom Puddle Lamps 2009 Subaru Forester
 Installing Custom Puddle Lamps 2009 Subaru Forester By John Perkins This guide will assist you in installing a set of LED puddle lamps on a 2009 Subaru Forester. This is NOT using the $150 Subaru kit.
Installation Instructions Cable Top Twill Replace-a-top with Tinted Windows
 Installation Instructions Cable Top Twill Replace-a-top with Tinted Windows Vehicle Application Jeep Wrangler Unlimited (JK) 4 Door 2011 and newer Part Number: 79847 Will fi t 54723 Upper Door Skins not
FPU SYSTEMS OPERATION MANUAL BOH PORTABLE DRAWER MODULE (PDM) (INCLUDING REPAIR PARTS & SPECIAL TOOL LIST) BOH FPU Field Pack-up Units CHAPTER 5
 (INCLUDING REPAIR PARTS & SPECIAL TOOL LIST) BOH FPU Field Pack-up Units CHAPTER 5") FPU SYSTEMS OPERATION MANUAL BOH PORTABLE DRAWER MODULE (PDM) (INCLUDING REPAIR PARTS & SPECIAL TOOL LIST) BOH FPU Field Pack-up Units CHAPTER 5 UNIT MAINTENANCE INSTRUCTIONS 06 BOH Environmental LLC This
FPU SYSTEMS OPERATION MANUAL BOH PORTABLE DRAWER MODULE (PDM) (INCLUDING REPAIR PARTS & SPECIAL TOOL LIST) BOH FPU Field Pack-up Units CHAPTER 5 UNIT MAINTENANCE INSTRUCTIONS 06 BOH Environmental LLC This
Lexus ES Fine Mesh and Adaptive Cruise Control Fine Mesh Grilles Upper and Lower Replacements
 IMPORTANT: PLEASE KEEP THIS INSTRUCTION MANUAL FOR FUTURE REFERENCE! 2013-15 Lexus ES Fine Mesh and Adaptive Cruise Control Fine Mesh Grilles Upper and Lower Replacements Part #1372-0102-13 / Black Ice
Vehicle Specific Instruction Notes
 Vehicle Specific Instruction Notes Most later model vehicles use a plastic and felt anchoring strip in place of the older metal rods. We have provided rod pouches on all of our new seat skins that will
Installation Instructions Supertop NX Twill
 Installation Instructions Supertop NX Twill Vehicle Application: Jeep Wrangler Unlimited 2007 Current Part Number: 54823 www.bestop.com - We re here to help! Visit our web site and click on Ask a Question.
In area - A -, a proper seal must be made against the top of the window glass.
 Door window, adjusting Page 1 of 3 Audi > B3 > 1994-1998 Body Exterior, Interior 61 - Convertible top, checking and adjusting Door window, adjusting Sections C-C and D-D. Adjust door window so that window
Installing the Side Rockers
 Page 1 of 12 Installing the Side Rockers The Prius PLUS Performance side rockers are without a doubt the easiest parts to install of the 7-piece package. It should take you no more than 20 minutes per
FRONT DOOR COMPONENTS
 BO4 FRONT DOOR COMPONENTS BO5 ADJUSTMENT OF FRONT DOOR 1. ADJUST DOOR IN FORWARD /REARWARD AND VERTICAL DIRECTIONS Using SST, adjust the door by loosening the body side hinge bolts. SST 0981200010 2. ADJUST
Installation Instructions Cable Top Twill Replace-a-top with Tinted Windows
 Installation Instructions Cable Top Twill Replace-a-top with Tinted Windows Vehicle Application Jeep Wrangler (JK) 2 Door 2011 and newer Part Number: 79846 Will fi t 54722 Upper Door Skins not included
Installation Instructions Supertop NX
 Installation Instructions Supertop NX Vehicle Application: Jeep Wrangler JK 2 Door 2007 Current Part Number: 54722 www.bestop.com - We re here to help! Visit our web site and click on Ask a Question. Click
Scratchbuilding an F25 Well Flat Car
 Scratchbuilding an F25 Well Flat Car By David J. Vinci (Flat Figure 1) Well flats are a pretty rare car type generally, but the Pennsy seems to have had the lion s share of variety. Most of these cars
Installation Instructions Supertop for Truck
 Installation Instructions Supertop for Truck US Patent 6827391 Vehicle Application: Toyota Tacoma Double Cab 2005-2011 (5 ft.) Part Number: 76308 INSTALLATION TIME SKILL LEVEL 1-1/2 Hours 2 - Moderately
Stop! Read This Important Information.
 Stop! Read This Important Information. Stop, Do Not Proceed, Read This This door replacement kit is designed for the replacement of doors on a Supertop ONLY! This door will not work on any other style
Installation Instructions Tigertop
 Installation Instructions Tigertop Vehicle Application Jeep CJ5 1955 1975 Part Number: 51405 Jeep M38, A1 1951 1971 Part Number: 51405 www.bestop.com - We re here to help! Visit our web site and click
2014 Subaru of America, Inc. All rights reserved. SERVICE BULLETIN. Service Procedure to Address a Wind Rushing Sound from the Front Door Sash Area
 ATTENTION: GENERAL MANAGER q PARTS MANAGER q CLAIMS PERSONNEL q SERVICE MANAGER q IMPORTANT - All Service Personnel Should Read and Initial in the boxes provided, right. 2014 Subaru of America, Inc. All
Installation Instructions Harley-Davidson Saddlebag Lids
 Installation Instructions Harley-Davidson Saddlebag Lids Thank you for your purchase of Bagger Audio Saddlebag Lids for your Harley- Davidson motorcycle. We have carefully engineered these products to
FRONT DOOR COMPONENTS
 BO4 FRONT DOOR COMPONENTS BO5 COMPONENTS (Cont d) BO6 ADJUSTMENT OF FRONT DOOR 1. ADJUST DOOR IN FORWARD/REARWARD AND VERTICAL DIRECTIONS Using SST, adjust the door by loosening the body side hinge bolts.
Fabric Replacement Top Installation Instructions
 Fabric Replacement Top Installation Instructions For: GEO Tracker, Suzuki Sidekick & Vitara 1986-1994 Parts List Top, Soft (1) Rear Window (1) WARNING This product is designed to enhance the appearance
Installation Instructions Supertop for Truck
 Installation Instructions Supertop for Truck Vehicle Application: Toyota Tacoma Double Cab 2005 - Current (5 ft.) Part Number: 76308 US Patent 6827391 www.bestop.com - We re here to help! Visit our web
Convertible Top Installation Instructions
 Convertible Top Installation Instructions For: 1995-1998 Geo Tracker & Suzuki Sidekick Parts List Top, Soft (1) Rear Window (1) Quater Window, Rt. (1) Quarter Window, Lt. (1) WARNING This product is designed
2002 Convertible Cloth Sleeve Convertible Cloth Attachment
 2002 Glass Convertible Top on 2000-2001 Frame Submitted by Clovis, North Texas S2000 Owners Club So what s the difference? Honestly, not much. The 2000 soft top cloth has attachment points for each of
INSTALLATION INSTRUCTIONS
 INSTALLATION INSTRUCTIONS Document# 19-0038 2004+ Lotus Elise (Series 2) Rear Clamshell Removal Kit Safely support the vehicle. This is a two-person job. Allow 1 to 2 hours for initial disassembly. Have
Installation Instructions Supertop for Truck
 Installation Instructions Supertop for Truck US Patent 6827391 Vehicle Application: Ford F150 1987-1996 (8 ft.) Part Number: 76315 Ford F250 1987-1998 (8 ft.) Part Number: 76315 Ford F350 1987-1998 (8
Installation Instructions Supertop for Truck
 Installation Instructions Supertop for Truck Vehicle Application: Ford F-150 Regular / Super Cab 2004 2011 (6.5 ft.) Part Number: 76305 US Patent 6827391 www.bestop.com - We re here to help! Visit our
Detroit Speed, Inc Chevy II Mini-Tubs P/N:
 Detroit Speed, Inc. 1962-67 Chevy II Mini-Tubs P/N: 040404 The Detroit Speed, Inc. Mini-Tubs are inner wheel housings designed to accommodate wider tire and wheel packages, including tires as wide as 295mm
*70200BAG1* 70200BAG FORD F150 GRILLE LIGHT MOUNT
 927020000 *70200BAG1* 70200BAG1 2015-2018 FORD F150 GRILLE LIGHT MOUNT PRIOR TO INSTALLATION Make sure the kit is complete and you have read these instructions thoroughly before beginning installation.
Half Door Installation Instructions
 Half Door Installation Instructions For: CJ5 (1976-1983) Part Number: 53027 Congratulations on your purchasing decision. Bestop designed these Doors to give you years of dependability and performance with
Installation Instructions Trektop NX
 Installation Instructions Trektop NX Vehicle Application: Jeep Wrangler TJ 1997 2006 Part Number: 56820 www.bestop.com - We re here to help! Visit our web site and click on Ask a Question. Click here for
CARE & PREVENTIVE MAINTENANCE GUIDE
 CARE & PREVENTIVE MAINTENANCE GUIDE FOR CADET TRUCK BODIES Model Year 2014 COMPOSITE MAINTENANCE AND REPAIR To keep the exterior of your fiberglass truck body in good condition, periodic preventative care
Provided by varn82. Tools Required:
 Provided by varn82 Tools Required: - 3/8 Ratchet - 1/2" Socket - T45 Socket - 5/16 Socket - 2mm Allen Key - Razor Blades - Side Cutters - Hog Rings - Pliers - Phillips & Fllathead Screwdrivers - Staple
1. Front Fascia Removal 1.1 Remove the 6 plastic clips that secure the upper valance, then remove. 1.2 Remove 6 upper bolts that hold the grille and f
 STRUT 2015 GMC Denali Collection Installation Manual " 1. Front Fascia Removal 1.1 Remove the 6 plastic clips that secure the upper valance, then remove. 1.2 Remove 6 upper bolts that hold the grille and
Lincoln Mark VII Hood Insulation Repair Version written by AZMarkVII
 Lincoln Mark VII Hood Insulation Repair Version 20061223 written by AZMarkVII My hood insulator was, for the most part, intact. It had some tears and the surface material was missing in areas as large
INSTALLATION INSTRUCTIONS
 INSTALLATION INSTRUCTIONS Accessory Application Publications No. SYSTEM S2000 AII 26324 Issue Date OCT 2004 PARTS LIST Headrest Speaker System P/N 08A54-S2A-100 3 Small wire ties 2 Headrest speakers 9
DISASSEMBLY We suggest the vehicle be allowed to cool for an hour or two before you begin since you will be working around the exhaust system.
 Installation Instructions Short Throw Shifter Fits: 1984-2006 BMW 3 Series E30, E36 & E46 1987-2006 BMW 3 Series M3 & 1996-2002 BMW 5 Series Catalog # 45126 WORK SAFELY! For maximum safety, perform this
Installation Instructions Supertop for Truck
 Installation Instructions Supertop for Truck US Patent 6827391 Vehicle Application: Dodge Ram 1500 / 2500 Regular / Quad / Mega Cab 6.5' Bed 2002 2011 Part Number: 76304 www.bestop.com - We re here to
Replace-a-Top. Installation Instructions. 60th Anniversary Top INSTALLATION TIME SKILL LEVEL TOOLS. Vehicle Application:
 Installation Instructions Replace-a-Top 60th Anniversary Top Vehicle Application: Jeep Wrangler CJ5 1976 1983 Part Number: 51117 Fits the OEM bows and door frames. www.bestop.com - We re here to help!
INSTALLATION INSTRUCTIONS
 INSTALLATION INSTRUCTIONS Accessory Application 2012 CIVIC 4-DOOR Publications No. AII 45625-46263 Issue Date MAY 2011 PARTS LIST Trunk spoiler Left trunk spring (marked yellow) Template 4 Clip grommets
Lexus NX Fine Mesh and Dynamic Radar Cruise Control Fine Mesh Grilles
 IMPORTANT: PLEASE KEEP THIS INSTRUCTION MANUAL FOR FUTURE REFERENCE! 2015-16 Lexus NX Fine Mesh and Dynamic Radar Cruise Control Fine Mesh Grilles Upper Insert - factory chrome surround and emblem reused
 2//2010 Section 01-14A: Handles, Locks, Latches and Mechanisms Workshop Manual REMOVAL AND INSTALLATION Procedure revision date: 03/16/1998 Latch, Door Front 1. Position door glass in the up position.
Installation Instructions Specialty Tigertop
 Installation Instructions Specialty Tigertop Vehicle Application Jeepster Commando 1967 1973 Part Number: 51311 www.bestop.com - We re here to help! Visit our web site and click on Ask a Question. Click
Installation Instructions
 by Installation Instructions For: CJ5 (1955-1975) and M38, A1 (1951-1971) Part Number 51405 WARNING This product is designed primarily to enhance the appearance of the vehicle and to shield the occupants
REASSEMBLY SE INSTALL REAR SEATBACK LOCK ASSEMBLY (a) Install the rear seatback lock with the 2 bolts. Torque: 18 N*m (185 kgf*cm, 13 ft.
 Install the rear seatback lock with the 2 bolts. Torque: 18 N*m (185 kgf*cm, 13 ft.") AT REAR AT ASMBLY (for RH Side) 49 REASMBLY CAUTION: Wear protective gloves. Sharp surfaces on the rear seat cushion frame and the rear seatback frame could cause injuries to your hands. 1. INSTALL REAR
AT REAR AT ASMBLY (for RH Side) 49 REASMBLY CAUTION: Wear protective gloves. Sharp surfaces on the rear seat cushion frame and the rear seatback frame could cause injuries to your hands. 1. INSTALL REAR
Full Top Deck Kit. Installation Instructions
 Full Top Deck Kit For: De fe nde r 90 1997 Model Year Installation Instructions Pa rt Num be r: 71741AM WARNING Installation Tips This product is designed primarily to enhance the appearance of the vehicle
A guide to Fabricating and Installing a Height-Adjustable seat in a Toyota Prius
 A guide to Fabricating and Installing a Height-Adjustable seat in a 2004-2006 Toyota Prius Please note, this document is a guide, not step-by-step instructions. Nor will this document be expanded to become
SafeGuard Flex Seat Maintenance Guide
 SafeGuard Flex Seat Maintenance Guide 1) Preparation For Removal And Replacement Of Seat Back Covers And Retractor Assemblies a) Unlatch seat cushion and pivot cushion up and forward. b) Separate seat
INSTALLATION INSTRUCTIONS
 OEM Recessed Lip Camera with Harness and Slimline Mirror (Kit part number 9002-8724) Please read thoroughly before starting installation and check that kit contents are complete. Items Included in the
Installation Instructions Supertop NX
 Installation Instructions Supertop NX Vehicle Application: Jeep Wrangler Unlimited 2007 Current Part Number: 54723 www.bestop.com - We re here to help! Visit our web site and click on Ask a Question. Click
INSTALLATION OF THE ENCLOSURE FOR THE MULE 3010 TRANS INSTALLATION GUIDE FOR THE MULE 3000 TRANS ENCLOSURE P. 1. Sept 07
 INSTALLATION GUIDE FOR THE MULE 3000 TRANS ENCLOSURE P. 1 INSTALLATION OF THE ENCLOSURE FOR THE MULE 3010 TRANS Sept 07 www.essexmfg.com PO Box 92864 Southlake, TX 76092 Ph:888-643-7739 INSTALLATION GUIDE
Installation Instructions Trektop NX Twill
 Installation Instructions Trektop NX Twill Vehicle Application: Jeep Wrangler TJ 1997 2006 Part Number: 56920 www.bestop.com - We re here to help! Visit our web site and click on Ask a Question. Click
Webasto Products N.A. Inc.
 Webasto Products N.A. Inc. Hollandia 300 Large Hollandia 300 Large Sliding Shade INSTALLATION MANUAL (SECTION - 1) CONTENTS OF THE WEBASTO 300 LARGE INSTALLATION & SERVICE MANUAL SECTION SUBJECT PAGE NUMBER
RAM Extend-A-Fender Fender Flares Set of 4
 RAM Extend-A-Fender Fender Flares Set of 4 STEP 1 PRIOR TO INSTALLATION A) Bushwacker only approves installing the fl ares according to these written instructions with the hardware provided. WARNING: Failure
Peg-Harness installation instructions
 Peg-Harness installation instructions I know it s not the easiest thing to do, but PLEASE READ THESE INSTRUCTIONS COMPLETELY so you will understand what you are trying to accomplish before you start drilling
Installation Instructions Fabric Replacement Top with Tinted Side
 Installation Instructions Fabric Replacement Top with Tinted Side and Rear Windows Upper Door Skins not included Vehicle Application Jeep Wrangler Unlimited TJ 2004 2006 Part Number: 79140 www.bestop.com
How to remove and replace the Foonf/Fllo fabric
 How to remove and replace the Foonf/Fllo fabric Remove Headrest Locate the Troubleshooting Tool behind the manual on the back of the car seat, as shown in Figure 1. Raise Headrest to highest position by
Installation Instructions Trektop
 Installation Instructions Trektop Vehicle Application Jeep Wrangler (JK) Unlimited 2007 Current Part Number: 56805 www.bestop.com - We re here to help! Visit our web site and click on Ask a Question. Click
2000 Mr2 Spyder Seat Cover Replacement Project
 2000 Mr2 Spyder Seat Cover Replacement Project Tool List: Plastic Trim Tool, Hog Ring Pliers, Medium or Heavy Duty Wire Cutters, 12mm socket, 14mm Socket, Ratchet, Extension, Flat Head Screwdriver & Gloves
Factory Five Racing, Inc. 818 Kit Assembly manual revision 1i update
 Factory Five Racing, Inc. 818 Kit Assembly manual revision 1i update Pedal box...1 Cable Accelerator Pedal (2002-2005)...2 OEM seats...7 Windshield... 13 Center console... 19 Pedal box Attach the pedal
Installation Instructions Sailcloth Replace-a-top with Tinted Windows
 Installation Instructions Sailcloth Replace-a-top with Tinted Windows Upper Door Skins not included Vehicle Application Jeep Wrangler (JK) 2 Door 2007 and newer Part Number: 79136 www.bestop.com - We re
Replay Fabric Replacement Top
 Replay Fabric Replacement Top Installation Instructions For: GEO Tracker, Suzuki Sidekick Part Number: 51137 & Vitara 1986-1994 WARNING This product is designed to enhance the appearance of the vehicle
Installation Instructions
 Installation Instructions Trektop Doors not included Vehicle Application Jeep Wrangler Unlimited 2007 2011 Part Number: 56805 www.bestop.com - We re here to help! Visit our web site and click on Ask a
Shelby GT500 Front Fascia Conversion Kit (05-09 All) Item # Installation Time: 1 Day. Required tools:
 Item # Installation Time: 1 Day. Required tools:") Shelby GT500 Front Fascia Conversion Kit (05-09 All) Item #53611 Installation Time: 1 Day Required tools: Phillips Screw driver 10mm Socket + Ratchet/Wrench 8mm Socket + Ratchet/Wrench 5mm Socket + Ratchet/Wrench
Shelby GT500 Front Fascia Conversion Kit (05-09 All) Item #53611 Installation Time: 1 Day Required tools: Phillips Screw driver 10mm Socket + Ratchet/Wrench 8mm Socket + Ratchet/Wrench 5mm Socket + Ratchet/Wrench
INSTALLATION INSTRUCTIONS
 INSTALLATION INSTRUCTIONS Accessory Application Publications No. AII 27871 CIVIC IN-DASH CD CHANGER 2- AND 4-DOOR Issue Date AUG 2004 PARTS LIST In-Dash CD Changer Attachment: P/N 08B06-S5D-110 CD Changer
75 5 ENGINE HOOD/DOOR
 OVERHAUL Installation is in the reverse order of the removal. But the installation is indicated only when it has a point. In the RH side, work in the same procedure as in the LH side. 755 750DN01 1. REMOVE
Table Of Contents RV WEATHERSTRIPPING
 Table Of Contents WEATHERSTRIPPING SLIDE OUT SEALS....................... 2 DRIP RAIL SEALS....................... 4 VENT HATCH......................... 4 STATIONARY GLASS.................... 5 SLIDING
INTERCOOLER UPGRADE INSTALLATION INSTRUCTIONS PART NUMBER D
 INTERCOOLER UPGRADE INSTALLATION INSTRUCTIONS PART NUMBER D330-0021 APPLICATION: 2014-16 F22 228i & xdrive coupe (see restrictions below) 2015-16 F23 228i & xdrive convertible 2012-16 F30 328i & xdrive
Convertible Top Installation Instructions
 Convertible Top Installation Instructions For: 1995-1998 Geo Tracker & Suzuki Sidekick Part Number: 51364 Parts List Top, Soft (1) Window (1) Quater Window, Rt. (1) Quarter Window, Lt. (1) WARNING This
Installation Instructions Halftop
 Installation Instructions Halftop Vehicle Application: Jeep Wrangler TJ with Factory Soft Top 1997 2002 Part Number: 53809 US Patent D474,145 www.bestop.com - We re here to help! Visit our web site and
International Scout Traveler Installation Instructions
 International Scout Traveler Installation Instructions Tools needed: 9/64 drill bit 1/8 drill bit #2 Philips bit for drill Tape measure Pencil Drill #3 Philips Screwdriver #2 Philips Screwdriver Utility
1. General Description
 General Description 1. General Description A: COMPONENT (1) (2) (3) (4) (5) (6) (7) (8) (9) (10) (24) (23) (22) (21) (20) (19) (18) (17) (16) (15) (14) (13) (12) (11) AB-02007 (1) Curtain airbag module
WARNING. BX Suzuki Grand Vitara Installation Instructions. Bolt Torque Specifications. Bolt Torque Specifications
 Attachment Tab Height: 21-1/2 Attachment Tab Width: 24 Please read BOTH these and the General Instructions prior to installing or operating this equipment. 1. Blue Ox towing products and accessories are
RoadComfort TM. Installation Manual Vibration Massage & Heat
 RoadComfort TM Vibration Massage & Heat Installation Manual 1-562-447-1780 WWW.RELAXOR.COM Table of Contents I Required tools II System Configuration III Motor Placement Bottom IV Motor Placement Back
Mustang Classic LightBar Instructions
 1994-2004 Mustang Classic LightBar Instructions Note: Read installation instructions before starting. Component List: 1 LightBar 4 Poly Plugs 4 LightBar Bolts 4 LightBar Washers 2 LightBar Rivets 2 Light
RADIO CONTROL MODEL HURRICANE
 RADIO CONTROL MODEL VQAA040G VQAA040B HURRINE Almost ready to fly SPECIFITIONS Wingspan...63 in. / 161cm Length...50 in. / 129cm Engine...50~60 2T / 70~90 4T Or Electric equivalent. RC Functions: Motor
Installation Instructions Sailcloth Replace-a-top with Tinted Windows
 Installation Instructions Sailcloth Replace-a-top with Tinted Windows Upper Door Skins not included Vehicle Application Jeep Wrangler Unlimited (JK) 4 Door 2007 and newer Part Number: 79137 www.bestop.com
Installation Instructions Tigertop
 Installation Instructions Tigertop Vehicle Application Jeep CJ3B 1953 1964 Part Number: 51404 www.bestop.com - We re here to help! Visit our web site and click on Ask a Question. Click here for more Jeep
INTERCOOLER UPGRADE INSTALLATION INSTRUCTIONS PART NUMBER D
 INTERCOOLER UPGRADE INSTALLATION INSTRUCTIONS PART NUMBER D330-0021 APPLICATION: 2014-16 F22 228i & xdrive coupe (see restrictions below) 2012-16 F30 328i & xdrive sedan 2014-16 F31 328i xdrive wagon 2014-16
Intercooler Installation For Ford 7.3L Powerstroke trucks -- Installation Instructions L Ford Powerstroke
 12 March 2010 1042700-Ford 7.3L Intercooler Installation 1 Intercooler Installation For 1999-2003 Ford 7.3L Powerstroke trucks -- Installation Instructions -- 1042700 7.3L Ford Powerstroke PLEASE READ
2 Piece Soft Door Installation Instructions
 2 Piece Soft Door Installation Instructions For: Wrangler/TJ (1997-on) Part Number: 51789 Note: Use of this product will eliminate the factory side mirrors and requires the removal of the entry light bulbs.
INSTALLATION INSTRUCTIONS INFINITI CELLPORT UNIVERSAL HANDS FREE SYSTEM
 INSTALLATION INSTRUCTIONS 1. DESCRIPTION: INFINITI CELLPORT UNIVERSAL HANDS FREE SYSTEM 2. APPLICATION: 2002 Q45 3. PART NUMBER: 948T3CELLR95 (VPC) or 999Q2TN000 (PDC) 4. TOOLS REQUIRED: a. Loctite 242
Installation Instructions For: Suzuki Samurai, All Years Part Number: TM
 Installation Instructions For: Suzuki Samurai, All Years Part Number: 51761 TM Patent Pending WARNING This product is designed to enhance the appearance of the vehicle and to shield the occupants from
2015 Chevrolet Silverado HD E-Power & Fine Mesh Grilles
 IMPORTANT: PLEASE KEEP THIS INSTRUCTION MANUAL FOR FUTURE REFERENCE! 2015 Chevrolet Silverado HD E-Power & Fine Mesh Grilles Upper Black Mesh Part #1415-010U-15EP / Upper Chrome Mesh Part #1415-010U-15EPC
2005+ Roll Bar (Mm5RB-20.1 to -20.6) Recommended Center punch 1/8" pilot drill 1-3/4" Hole saw 2" Hole saw
 Recommended Center punch 1/8 pilot drill 1-3/4 Hole saw 2 Hole saw") 3430 Sacramento Dr., Unit D San Luis Obispo, CA 93401 Telephone: 805/544-8748 Fax: 805/544-8645 www.maximummotorsports.com 2005+ Roll Bar (Mm5RB-20.1 to -20.6) Recommended Center punch 1/8" pilot drill
3430 Sacramento Dr., Unit D San Luis Obispo, CA 93401 Telephone: 805/544-8748 Fax: 805/544-8645 www.maximummotorsports.com 2005+ Roll Bar (Mm5RB-20.1 to -20.6) Recommended Center punch 1/8" pilot drill