Accel 300+ Ignition Control System (84-95) - Installation Instructions
|
|
|
- Anissa Lawrence
- 6 years ago
- Views:
Transcription

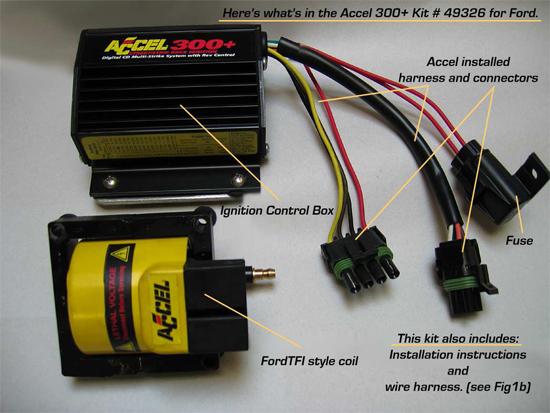
1 Accel 300+ Ignition Control System (84-95) - Installation Instructions The below installation instructions work for the following products: Accel 300+ Ignition Control System (84-95) Please read through the instructions carefully before starting this project. Take the time to get all the materials together as well as all the safety equipment. Intro: Aftermarket ignition systems are not a new concept to those who are looking for more power and better response from their car. Analog systems from many different companies have been on the market for decades and have been used with great success in both race and street applications. Current modern ignition technology has advanced into the digital age with excellent results. I was looking to improve the ignition system in my car beyond the commonly practiced ways (i.e. better spark plug wires, higher quality plugs, hotter coil, etc.). Having installed those things, I saw improvement, but wanted more. The fact remained that I was still getting just one spark per firing event. It was time for a change I needed more and stronger sparks! The Accel 300+ Ignition System offers exactly that. Installed on: 1991 Mustang LX- 5.0 HO with 138,000 mi. (Stock heads, manifold, throttle body, injectors, MAF, distributor, coil and EEC- IV computer). Engine modifications are: BBK cold air intake, Ford Racing spark plug wires, Accel spark plugs and a MSD cap/ rotor set because I like red. Kit Includes : Accel 300+ Ignition Control Box Accel TFI style High Output Coil Accel to Ford TFI Wiring Harness A packet of connectors/ tie-wraps/screws/accessories Installation Instructions
2

3 Tools needed: Small jewelers size flat blade screwdriver. #1 Phillips head screwdriver Pliers 1/2" Socket wrench and socket 7/16" Socket wrench and socket 1/4" Socket wrench and socket Power drill and drill bit for # 10 sheet metal screws Small wire cutters. Pre-Installation Prep 1. Look over the kit contents and read through the instructions carefully. Take note that page 4 has the specific instructions and a chart for setting the built-in Rev Limiter. 2. Now is the time to decide on where the Ignition Control Box will be located. Determine the mounting location of the Coil. Consider the layout of the Wiring Harness based on the location of the Ignition Control Box and Coil. The Accel to Ford TFI Harness is a group of wires inside a protective cover. It should be routed away from any heat sources, moving parts and other high-energy electrical wires 3. Remove the three screws that attach the end plate to the Control Box (the plain side, not the wire harness side). Inside you ll see a rotary dial and 4 dip switches; use these to set the Rev Limit for your RPM. I turned the dial to 5 and put all 4 switches in down position, based on a limit of 5,750 RPM for 8 cylinders (according to the Accel chart). 4. Page 4 of the Instructions gives detailed information and a chart on how to adjust the Rev Limiter to your desired RPM. I chose to set the Rev Limit at 5,750 RPM because that is just about where red-line is on the factory tach. When finished, re-install the side plate using the original three screws. Fig2a


4 Fig2b 5. Note: I used a mounting plate in this installation that was left over from a different project and is not included as part of the Accel 300+ Ignition Kit. This plate is not required to complete this installation; it is just an accessory I chose to use. See Fig1c below. Fig1c
, disconnect the negative battery cable from the battery. 7. Remove the plastic coil/ solenoid cover by loosening the screws that hold it in place.")

5 6. Park on a level spot, set the hand brake, pop the hood and take the keys out of the ignition. Open the hood and set the prop rod securely. Using the 1/2 socket (or appropriate size), disconnect the negative battery cable from the battery. 7. Remove the plastic coil/ solenoid cover by loosening the screws that hold it in place. (See: Fig3a) Disconnect the factory TFI harness from the coil and gently move it aside. Remove the coil primary wire from the coil tower, leaving the other end connected to the distributor cap. Using the 1/4 socket, remove the 4 screws located in the corners of the coil and lift the coil from the mounting bracket. Fig3a 8. If you are going to relocate the new coil, remove the bracket and mount it in its new place. I chose to use the stock mounting location for the Accel Coil, so I left the bracket in place. (See: Fig4a)

6 Fig 4a 9. Using the supplied new rubber-backed washers and screws, attach the Accel Coil to the mounting bracket. Tighten the screws just snugly with the 1/4 socket. I used the rubber-backed washers between the bracket and coil to reduce vibrations getting to the coil. Do not over-tighten these little screws or you risk stripping out the bracket holes. With the new coil in place (See: Fig5a below), move to the mounting location of the Ignition Control Box. Fig5a

7 10. Position the box at the desired location then, using the mounting flange holes as a guide, mark the location of the mounting holes. Center punch and drill out the mounting holes to accept the Phillips head screws. Using the Phillips screwdriver, the provided screws and washers, screw the Accel Control Box securely into place. I chose the area as seen in Fig6a and Fig7a with the end plate still accessible for any later Rev Limiter changes. Fig6a
 Use small wire cutters to snip off the tie-wrap and un-coil the Accel to Ford TFI Wiring Harness. 12.")
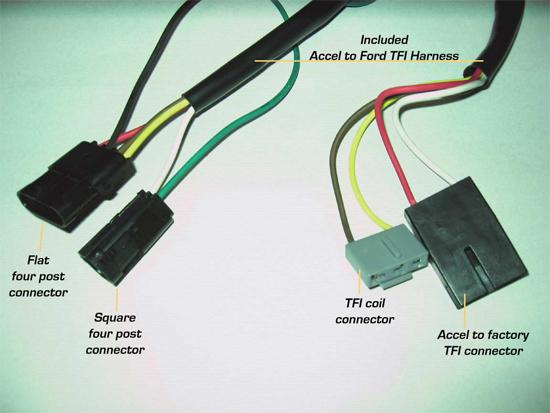
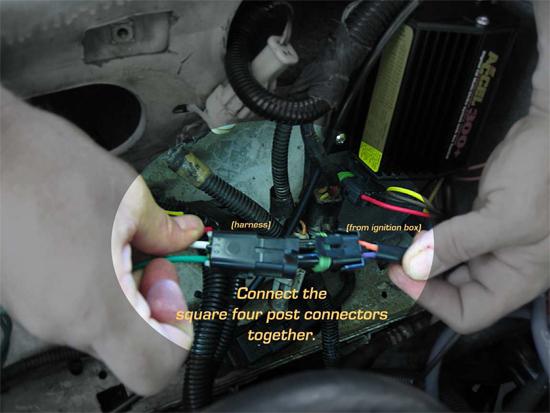
8 Fig7a 11. Locate the 2 installed four post connectors (one is square- the other is flat). (See:Fig7a) Use small wire cutters to snip off the tie-wrap and un-coil the Accel to Ford TFI Wiring Harness. 12. Connect the Control box to the Wiring Harness by matching the connectors, square to square and flat to flat. (See: Fig7a above and Fig7b, Fig7c below).

9 Fig7b Fig7c

 Fig7d 15.")
10 13. Locate the black colored ground wire coming out of the Control Box, it has large serrated ring terminal on the end. Select a clean, paint-free, rust-free, bare metal spot on the chassis to attach the negative ground wire or drill a new hole and use the supplied screws to attach the wire. I used one of the many existing holes and a supplied screw from the kit. 14. The green wire coming from the Control Box is for an aftermarket tach, if equipped. My car does not have another tach, so I coiled this wire up and tucked it away for future use. (See: Fig7d) Fig7d 15. With the Harness fully connected to the Ignition Control Box, route the harness toward the Coil location. It is important to position the harness away from any heat sources, moving parts and high-energy wires. I ran the harness over the radiator support, then over to the stock coil location. It was more than long enough to reach without any modifications or extensions (which is a BIG help!). (See: Fig8a) Remember to leave some slack in the harness to allow for movement, the harness should not be pulled or stretched tight.
 The remaining connector gets plugged into the Accel coil. Again, the keyed connector makes this easy. Double check that all the connectors are completely snapped together firmly.")

11 Fig8a 16. Connect the Accel TFI adapter to the Ford factory ignition connector (we moved it aside in step 4). These are keyed one-way connectors which help to eliminate wiring mix-ups. (See: Fig8b) The remaining connector gets plugged into the Accel coil. Again, the keyed connector makes this easy. Double check that all the connectors are completely snapped together firmly. Fig8b 17. Confirm that the Ignition Control Box has a solid negative ground. Re-attach the coil primary wire to the tower on the Accel coil. Some dielectric grease on the wire boot will help seal out moisture. Securely position the wiring harness with the supplied zip-ties. 18. Replace anything that was moved or removed during the installation. Like radiator supports, the air intake, MAF, filter, etc. 19. Finally, attach the negative battery cable to the battery. At this point if you hear any noises, see or smell smoke immediately disconnect the negative battery cable. Then investigate the cause. If not, then proceed. 20. Remove all tools and loose parts from the engine compartment area. Look again just to be sure. (See: Fig9a) Fig9a
12 21. The black wire from the One Touch Top Module is for use with a light bar, allowing the third brake light to be disabled when the top is up. This wire is a ground wire, so the wire doesn t need a wire nut. However, I went ahead and placed one on it for the future when a light bar is added. That way I already have the wire nut handy. 22. Take a deep breath, and then Start the engine. My engine was a bit rough for a minute or two at first, but then after the factory EEC-IV settled-in the idle smoothed right out. I understand that the EEC-IV may need some time to learn what the new Control Box is doing and recover from being disconnected. 23. Turn off the car, put the tools away, wash up and now it's time to go for a test drive! Right away I noticed a big improvement in throttle response. Installation instructions provided by AmericanMuscle customer Curt Calfee Find more how-tos, instructions and videos at
MSD 6AL Ignition Module w/ Rev Control - Installation Instructions
 MSD 6AL Ignition Module w/ Rev Control - Installation Instructions The below installation instructions work for the following products: MSD 6AL Ignition Module w/ Rev Control Please read through the instructions
Mustang Headlight w/ CCFL Halo (05-09) - Installation Instructions
 - Installation Instructions") Mustang Headlight w/ CCFL Halo (05-09) - Installation Instructions The below installation instructions work for the following products: Chrome Mustang Headlight w/ CCFL Halo (05-09) Smoked Mustang Headlight
Mustang Headlight w/ CCFL Halo (05-09) - Installation Instructions The below installation instructions work for the following products: Chrome Mustang Headlight w/ CCFL Halo (05-09) Smoked Mustang Headlight
Mustang HID Headlight Installation Guide (9007)
") Mustang HID Headlight Installation Guide 1994-2004 (9007) The below installation instructions work for the following products: 9007 Bulb HID Headlight Coversion Kit 1994-2004 The following are a set of
Mustang HID Headlight Installation Guide 1994-2004 (9007) The below installation instructions work for the following products: 9007 Bulb HID Headlight Coversion Kit 1994-2004 The following are a set of
C&L Cold Air Intake (03-04 Mach 1) - Installation Instructions
 - Installation Instructions") C&L Cold Air Intake (03-04 Mach 1) - Installation Instructions The below installation instructions work for the following products: C&L Cold Air Intake (03-04 Mach 1) Please read through the instructions
C&L Cold Air Intake (03-04 Mach 1) - Installation Instructions The below installation instructions work for the following products: C&L Cold Air Intake (03-04 Mach 1) Please read through the instructions
FULL LENGTH HEADERS/ CATTED HEAD PIPES
 INSTALLATION INSTRUCTIONS INS232 2016-2018 CAMARO 6.2L V8 FULL LENGTH HEADERS/ CATTED HEAD PIPES Part #4044 and 40440 Special Tools required: 10mm, 12mm, 13mm, 15mm Socket and Wrenches, Pliers, Saw, Welder
C&L Cold Air Intake (05-09 V6) - Installation Instructions
 - Installation Instructions") C&L Cold Air Intake (05-09 V6) - Installation Instructions The below installation instructions work for the following products: C&L Cold Air Intake (05-09 V6) Please read through the instructions carefully
C&L Cold Air Intake (05-09 V6) - Installation Instructions The below installation instructions work for the following products: C&L Cold Air Intake (05-09 V6) Please read through the instructions carefully
Mustang One-Touch Convertible Top Module (2005+) - Installation Instructions
 - Installation Instructions") Mustang One-Touch Convertible Top Module (2005+) - Installation Instructions The below installation instructions work for the following products: Mustang One-Touch Convertible Top Module (2005+) Please
Mustang One-Touch Convertible Top Module (2005+) - Installation Instructions The below installation instructions work for the following products: Mustang One-Touch Convertible Top Module (2005+) Please
Mustang Speed Calibrator Installation Guide
 Mustang Speed Calibrator Installation Guide The below installation instructions work for the following products: 1994-2004 Manual & 1994-1998 Automatic Speed Calibrator Parts included in the SpeedCal kit.
BBK Liquid-Filled Fuel Pressure Gauge (86-93) - Installation Instructions
 - Installation Instructions") BBK Liquid-Filled Fuel Pressure Gauge (86-93) - Installation Instructions The below installation instructions work for the following products: BBK Liquid-Filled Fuel Pressure Gauge (86-93) Please read
BBK Liquid-Filled Fuel Pressure Gauge (86-93) - Installation Instructions The below installation instructions work for the following products: BBK Liquid-Filled Fuel Pressure Gauge (86-93) Please read
Steeda Billet Charge Motion Control Plates (05-08 GT) - Installation Instructions
 - Installation Instructions") Steeda Billet Charge Motion Control Plates (05-08 GT) - Installation Instructions The below installation instructions work for the following products: Steeda Billet Charge Motion Control Plates (05-08
Steeda Billet Charge Motion Control Plates (05-08 GT) - Installation Instructions The below installation instructions work for the following products: Steeda Billet Charge Motion Control Plates (05-08
Procharger Stage II Intercooled Supercharger System (11-14 GT)
") Procharger Stage II Intercooled Supercharger System (11-14 GT) Installation Time: Approximately one day. Installed on 2012 Mustang GT 5.0/Manual Required Tools 3/8 Socket Set (Standard and Metric) 1/2
Procharger Stage II Intercooled Supercharger System (11-14 GT) Installation Time: Approximately one day. Installed on 2012 Mustang GT 5.0/Manual Required Tools 3/8 Socket Set (Standard and Metric) 1/2
Installation of Auto Meter Cobalt Boost/Vacuum Gauge:
 Installation of Auto Meter Cobalt Boost/Vacuum Gauge: Fitment: All 79-14 models. This installation was completed on a 2004 Mustang GT, and should be identical for all 1999-2004 model Mustangs. Time needed:
2015+ HELLCAT 6.2L HEMI System vehicle specific plate system xx
 These installation instructions will guide you through installing the Nitrous Outlet 2015+ Hellcat 6.2L Hemi Vehicle Specific Plate System on your vehicle. Before you get started, remember to never use
BBK Intake Manifold Kit ( L) - Installation Instructions
 - Installation Instructions") BBK Intake Manifold Kit (86-93 5.0L) - Installation Instructions The below installation instructions work for the following products: BBK Intake Manifold Kit (86-93 5.0L) Please read through the instructions
BBK Intake Manifold Kit (86-93 5.0L) - Installation Instructions The below installation instructions work for the following products: BBK Intake Manifold Kit (86-93 5.0L) Please read through the instructions
Intake Kit Supplement for CRV and Pathfinder
 Intake Kit Supplement for CRV and Pathfinder This guide will briefly outline how to install the intake kits for the Honda CRV and Nissan Pathfinder. This is a pretty basic job, but for the average person
Remove black panel shown. Save 6 retaining pins for re-install later. Pry up on center part of pin first. Then pry out entire retaining pin.
 2005-2009 Ford Mustang V6 Fog Light Wiring Kit Parts List: Quantity: Tools Required: Wiring harness 1 Flat head screwdriver Supplemental wire leads 2 Ratchet & Socket set OR Wire tap red 2 Adjustable Wrench
Mustang Clear Lens Instrument Cover (90-93) - Installation Instructions
 - Installation Instructions") Mustang Clear Lens Instrument Cover (90-93) - Installation Instructions The below installation instructions work for the following products: Mustang Clear Lens Instrument Cover (90-93) Please read through
Mustang Clear Lens Instrument Cover (90-93) - Installation Instructions The below installation instructions work for the following products: Mustang Clear Lens Instrument Cover (90-93) Please read through
Shotgun Single Barrel HPFP install guide
 Shotgun Single Barrel HPFP install guide Thank you for your purchase of the VTT Shotgun Single Barrel HPFP upgrade! First thing to do when you open your box is to make sure all parts are in their respective
Installation Instructions for BMR Lowering Springs Performance ( Mustang GT)
") Installation Instructions for BMR Lowering Springs Performance (2015-2017 Mustang GT) Time Required: 3+ hours Notes: This install was done with the performance springs from BMR, but install should be the
Installation Instructions for BMR Lowering Springs Performance (2015-2017 Mustang GT) Time Required: 3+ hours Notes: This install was done with the performance springs from BMR, but install should be the
2010 Mustang V6 Shaker CDC #
 - - Incomplete 2010 Mustang V6 Shaker CDC # 1011-7002-01 Component Check List: Quantity/Description Part # Engine Cover Assembly 1011-6000-01 1 Engine Cover w/ Upper Air Tube 0511-2100-01 1 Aluminum Shaker
PLEASE READ ALL DIRECTIONS BEFORE STARTING INSTALLATION
 PARTS LIST FUEL AND IGNITION 2012 Polaris RZR 570 Installation Instructions 1 Power Commander 1 USB Cable 1 CD-ROM 1 Installation Guide 2 Power Commander Decals 2 Dynojet Decals 2 Velcro 1 Alcohol swab
Intercooler Installation For Ford 7.3L Powerstroke trucks -- Installation Instructions L Ford Powerstroke
 12 March 2010 1042700-Ford 7.3L Intercooler Installation 1 Intercooler Installation For 1999-2003 Ford 7.3L Powerstroke trucks -- Installation Instructions -- 1042700 7.3L Ford Powerstroke PLEASE READ
Mustang CDC Lightbar (94-04) - Installation Instructions
 - Installation Instructions") Mustang CDC Lightbar (94-04) - Installation Instructions The below installation instructions work for the following products: Classic Design Concepts Mustang Convertible Lightbar (94-04 Carbon Fiber) Classic
Mustang CDC Lightbar (94-04) - Installation Instructions The below installation instructions work for the following products: Classic Design Concepts Mustang Convertible Lightbar (94-04 Carbon Fiber) Classic
Throttle Body Spacer (05-09 V6) - Installation Instructions
 - Installation Instructions") Throttle Body Spacer (05-09 V6) - Installation Instructions The below installation instructions work for the following products: Throttle Body Spacer (05-09 V6) Steeda 2005+ 4.0L V6 Intake Throttle Body
Throttle Body Spacer (05-09 V6) - Installation Instructions The below installation instructions work for the following products: Throttle Body Spacer (05-09 V6) Steeda 2005+ 4.0L V6 Intake Throttle Body
Z-Gate Universal Shifter
 Installation Instructions Z-Gate Universal Shifter Fits: GM, Ford, Lincoln and Chrysler Transmissions See Application Guide for Specific Applications Part #80681 Rev 06/01/2018 WORK SAFELY! For maximum
J&M Mustang Adjustable Panhard Rod (05-09) - Installation Instructions
 - Installation Instructions") J&M Mustang Adjustable Panhard Rod (05-09) - Installation Instructions The below installation instructions work for the following products: J&M Mustang Adjustable Panhard Rod (05-09) Please read through
J&M Mustang Adjustable Panhard Rod (05-09) - Installation Instructions The below installation instructions work for the following products: J&M Mustang Adjustable Panhard Rod (05-09) Please read through
Deuce/Ace Installation Instructions
 HARDWARE KIT: Upper Mounting Plate: 2-7/16" (11mm) X 3.5" bolts 2-7/16" flange nuts 2-2" spacers 2-7/16" trim cap mounting washers 2 - plastic trim caps TOOLS NEEDED: safety glasses wrenches 16mm or 5/8"
FR500 Mustang Steering Wheel Installation Guide
 FR500 Mustang Steering Wheel Installation Guide The below installation instructions work for the following products: Ford Mustang FR500 Style Steering Wheel Replacement This install guide is for the FR500
Backwater Performance Systems Large Vanguard Mikuni Twin Carburetor Kit
 Backwater Performance Systems Large Vanguard Mikuni Twin Carburetor Kit 1. Throttle Cable Twin (CKC-41) 2. Carburetor VM30mm (CKC-40) 3. Loctite 242.5mL (A-210) 4. Air Cleaner Filter 6000 (EC-86) 5. Rev
Cervini's Functional Ram Air Kit (05-09) - Installation Instructions
 - Installation Instructions") Cervini's Functional Ram Air Kit (05-09) - Installation Instructions The below installation instructions work for the following products: Cervini's Functional Ram Air Kit for 05-09 Ram Air Hood Cervini's
Cervini's Functional Ram Air Kit (05-09) - Installation Instructions The below installation instructions work for the following products: Cervini's Functional Ram Air Kit for 05-09 Ram Air Hood Cervini's
Performance Inlet Manifold
 Performance Inlet Manifold Tools needed (some tools not required on some models): 13mm Combination Wrench Flat Blade Screwdriver T30 Torx Driver T25 Torx Driver 10mm Combination Wrench and/or Socket with
Rear Parking Brake Cable (93 Cobra)
") Rear Parking Brake Cable (93 Cobra) Materials in the box: Brake Cable Tools Needed: One jack and four jack stands. One socket wrench with a 12mm, 13mm ( ½ inch, 12 point DEEP WALL DO NOT FORGET THIS) and
Rear Parking Brake Cable (93 Cobra) Materials in the box: Brake Cable Tools Needed: One jack and four jack stands. One socket wrench with a 12mm, 13mm ( ½ inch, 12 point DEEP WALL DO NOT FORGET THIS) and
L Intake Manifold Part #
 86-93 5.0L Intake Manifold Part #5001-5002 I N S T A L L A T I O N I N S T R U C T I O N S Supplied Materials Bottom cover, Upper manifold, Lower manifold, Plenum cover plate, 1501 Throttle body (comes
Maximum Motorsports Caster/Camber Plates Installation Guide (94-04)
") Maximum Motorsports Caster/Camber Plates Installation Guide (94-04) The below installation instructions work for the following products: Maximum Motorsports Caster/Camber Plates (94-04) Please read through
Maximum Motorsports Caster/Camber Plates Installation Guide (94-04) The below installation instructions work for the following products: Maximum Motorsports Caster/Camber Plates (94-04) Please read through
Depress each tab as you pull the bezel off. The bezels are tight. L.H. shown.
 2013-2014 Ford Mustang V6 & Boss 302 Lower Valance Fog Light Kit Parts List: Quantity: Tool List: Fog light & bulb with bracket 2 Flat head & Phillips screwdriver Black bezels 2 Ratchet & Socket set OR
Rear Vision System Liftgate Emblem Camera for Aftermarket Display Ford Flex (Kit part number )
") Rear Vision System Liftgate Emblem Camera for Aftermarket Display 2009-2012 Ford Flex (Kit part number 1008-6509) Kit Contents: Liftgate Emblem Mount with Camera Chassis Harness with RCA (Note: In some
Rear Vision System Liftgate Emblem Camera for Aftermarket Display 2009-2012 Ford Flex (Kit part number 1008-6509) Kit Contents: Liftgate Emblem Mount with Camera Chassis Harness with RCA (Note: In some
Installation Instructions Z-Gate Shifter
 Installation Instructions Z-Gate Shifter Part Number 80681 1998, 2001 by B&M Racing and Performance Products The B&M Z-Gate shifter can be used in vehicles equipped with most popular three speed automatic
Thank you for purchasing the Dezod Motorsports Return Fuel System for your Scion tc.
 Thank you for purchasing the Dezod Motorsports Return Fuel System for your Scion tc. We took much pride in putting together a fuel system that would deliver a maximum amount of fuel as simply as possible
Stack Racing 70mm Throttle Body for Ford Mustang 5.0 (GT, Cobra)
") Stack Racing 70mm Throttle Body for 1994-1995 Ford Mustang 5.0 (GT, Cobra) Installation Time: Approximately 1 hour Tools Required: Flat head screwdriver Phillips head screwdriver ¼ or 3/8 ratchet 6-9 extension
Stack Racing 70mm Throttle Body for 1994-1995 Ford Mustang 5.0 (GT, Cobra) Installation Time: Approximately 1 hour Tools Required: Flat head screwdriver Phillips head screwdriver ¼ or 3/8 ratchet 6-9 extension
MAZDASPEED3 Intercooler Instructions
 MAZDASPEED3 Intercooler Instructions Congratulations on your purchase of the COBB Tuning Front Mount Intercooler System for your 2007-2009 Mazdaspeed3. The following instructions should assist you through
List of parts needed below. Tools needed
 1 BMW 645 Coolant leak repair (Cap with Seal Repair and Expanding Coolant Pipe Installation w Pics) By Michael R. Brown (Estimated time to complete the job is 6-8 hrs) List of parts needed below. BMW PART
M V Intake Manifold INSTRUCTION SHEET
 Please visit www.fordracingparts.com for the most current instruction information.!!! PLEASE READ ALL OF THE FOLLOWING INSTRUCTIONS CAREFULLY PRIOR TO INSTALLATION. AT ANY TIME YOU DO NOT UNDERSTAND THE
Ford Racing SVT Performance Cooling Fan (05-14 GT, GT500)
") Ford Racing SVT Performance Cooling Fan (05-14 GT, GT500) Time Necessary: Approximately 60-90 minutes Tools Required: 8mm wrench 8mm socket (3/8 drive, optional) 10mm socket (3/8 drive) 10mm deep socket
Ford Racing SVT Performance Cooling Fan (05-14 GT, GT500) Time Necessary: Approximately 60-90 minutes Tools Required: 8mm wrench 8mm socket (3/8 drive, optional) 10mm socket (3/8 drive) 10mm deep socket
SR Performance Twin 62mm Throttle Body for GT
 Required Tools: SR Performance Twin 62mm Throttle Body for 2005-2010 GT Flat-head screwdriver Ratchet Small extension 10mm socket 8mm socket T20 Torx bit Needle nose pliers 5mm allen wrench Recommended
PLEASE READ ALL DIRECTIONS BEFORE STARTING INSTALLATION
 PARTS LIST 2013-2014 Honda CB500 / CBR500R Installation Instructions 1 Power Commander 1 USB Cable 1 Installation Guide 2 Power Commander Decals 2 Dynojet Decals 2 Velcro strips 1 Alcohol swab 1 Posi-tap
Professional Products Satin Upper Intake Plenum Installation Guide ( L 2V)
") Professional Products Satin Upper Intake Plenum Installation Guide (96-04 4.6L 2V) The below installation instructions work for the following products: Professional Products Satin Upper Intake Plenum (96-04
Professional Products Satin Upper Intake Plenum Installation Guide (96-04 4.6L 2V) The below installation instructions work for the following products: Professional Products Satin Upper Intake Plenum (96-04
Toyota Tacoma Winch Mount Bumper Installation Instructions Tools Required: Transmission cooler relocation brackets Torque Wrench
 2016-2017 Toyota Tacoma Winch Mount Bumper Installation Instructions Tools Required: Items Included: Small flat head screw driver Winch Mount Ratchet, 10mm, 12mm, 14mm, 17mm & Skid Plate 19mm sockets Transmission
H F G I. A (1) Reducer. pg.2
 Reducer. pg.2") 301009 B A D C E H F G I J L M A (1) Reducer B (1) Coolant hose C (1)Block off bracket D (3) Clamps E (1) Cooler side block off plate F (1) Turbo manifold block off plate G (1) Intake manifold side blocker
301009 B A D C E H F G I J L M A (1) Reducer B (1) Coolant hose C (1)Block off bracket D (3) Clamps E (1) Cooler side block off plate F (1) Turbo manifold block off plate G (1) Intake manifold side blocker
Single Barrel Shotgun HPFP Install Guide
 Single Barrel Shotgun HPFP Install Guide Thank you for purchasing the VTT Single Barrel Shotgun HPFP upgrade kit! PLEASE READ THE ENTIRE GUIDE BEFORE BEGINNING INSTALLATION! The first thing you should
Installation Instructions for the ACCEL 300plus ThunderSport Ignition Kit #49310
 Installation Instructions for the ACCEL 300plus ThunderSport Ignition Kit #49310 Cleveland, Ohio 216.398.8300 www.mrgasket.com INTRODUCTION The ACCEL 300plus ThunderSport Ignition Kit #49310 is designed
ATTENTION. Custom Dynamics UTV Turn Signal Kit Installation Instructions
 Custom Dynamics UTV Kit Installation Instructions We thank you for purchasing the Custom Dynamics UTV LED Kit. Our products utilize the latest technology and high quality components to ensure you the most
C&L Upper Intake Plenum (96-04 GT):
:") C&L Upper Intake Plenum (96-04 GT): Tools Needed: Flat-Head Screwdriver 10mm Socket 5/16 Socket 1/4 or 3/8 Ratchet 2 Ratchet Extension Time Required: Approximately 1 hour Installation Instructions: 1.
C&L Upper Intake Plenum (96-04 GT): Tools Needed: Flat-Head Screwdriver 10mm Socket 5/16 Socket 1/4 or 3/8 Ratchet 2 Ratchet Extension Time Required: Approximately 1 hour Installation Instructions: 1.
INSTALLATION INSTRUCTIONS
 Rear Vision System Aftermarket and Factory 5.0, 8.4 and 6.1 MyGig Touch Screen Display (Factory Display requires Chrysler/Dodge dealer to activate) 2009 Current* Dodge Ram (Kit part number 1009-6503) *NOTE:
Prerequisites: Shop Manual (recommended) pages 3-9 through 3-13.
 pages 3-9 through 3-13.") Prerequisites: Order your gaskets average about $25.00 bucks X 2 so $50.00 4NK-11193-00-00 Obtain a shim kit (Should have several 265 and 270s) (Some dealers will exchange) Obtain a Valve Bucket Tool YM-33961
Prerequisites: Order your gaskets average about $25.00 bucks X 2 so $50.00 4NK-11193-00-00 Obtain a shim kit (Should have several 265 and 270s) (Some dealers will exchange) Obtain a Valve Bucket Tool YM-33961
LPE C5 Battery Relocation Kit
 LPE C5 Battery Relocation Kit The LPE C5 Corvette battery relocation kit improves vehicle weight distribution by moving weight to the rear of the vehicle. The improved weight distribution increases traction
Raxiom Factory GPS Rear Back-up Camera Kit (07-17 Wrangler)
") Raxiom Factory GPS Rear Back-up Camera Kit (07-17 Wrangler) Installation Time: 2.5-3Hrs Tools Required: 7mm Socket & Driver 10mm Socket 10mm Open end wrench Knife / Razor blade Zip-ties Wire Cutters Needle
Raxiom Factory GPS Rear Back-up Camera Kit (07-17 Wrangler) Installation Time: 2.5-3Hrs Tools Required: 7mm Socket & Driver 10mm Socket 10mm Open end wrench Knife / Razor blade Zip-ties Wire Cutters Needle
Installation Instructions. QuickSilver Shifter. Fits: GM, Ford, Chrysler Transmissions See Application Guide for Specific Applications Part # 80683
 Installation Instructions QuickSilver Shifter Fits: GM, Ford, Chrysler Transmissions See Application Guide for Specific Applications Part # 80683 WORK SAFELY! For maximum safety, perform this installation
Ford Racing 4.6L 3V Crate Engine Control Pack
 Ford Racing 4.6L 3V Crate Engine Control Pack Installation Time: 3-6 hours on a Foxbody Mustang Tools Required: Basic English and Metric Socket and Wrench Set Flat and Phillips Screwdrivers Torx bits Hammer
SCT Mustang 4-Bank Eliminator Chip w/ Free Custom Tunes (88-04) - Installation Instructions
 - Installation Instructions") SCT Mustang 4-Bank Eliminator Chip w/ Free Custom Tunes (88-04) - Installation Instructions The below installation instructions work for the following products: SCT Mustang 4-Bank Eliminator Chip w/ Free
SCT Mustang 4-Bank Eliminator Chip w/ Free Custom Tunes (88-04) - Installation Instructions The below installation instructions work for the following products: SCT Mustang 4-Bank Eliminator Chip w/ Free
HIGH FLOW COLD AIR INTAKE SYSTEM INSTALLATION INSTRUCTIONS D , D A
 HIGH FLOW COLD AIR INTAKE SYSTEM INSTALLATION INSTRUCTIONS D760-0320, D760-0320A 1992-95 325i, is 1995 M3 (3.0L) Parts List: 1 Intake Tube 1 Silicone Hose 1 Air Flow Meter Bracket 1 Hose Clamp (#36z) 1
PLEASE READ ALL DIRECTIONS BEFORE STARTING INSTALLATION
 PARTS LIST 2006-2014 Suzuki M109R / C109R Installation Instructions 1 Power Commander 1 USB Cable 1 Installation Guide 2 Power Commander Decals 2 Dynojet Decals 2 Velcro strips 1 Alcohol swab 1 Zip tie
INSTALLATION INSTRUCTIONS
 Rear Vision System Aftermarket Display 2007-Current Chevrolet Silverado, Silverado HD; GMC Sierra, Sierra HD (Kit part number 9002-9560) Kit Contents: Chassis Harness with RCA (Note: In some cases a RCA
Installing LED courtesy lights in Mustang.
 Installing LED courtesy lights in 2005 2010 Mustang. This procedure is to provide you with the basics for installing LED strips under the dash and changing the map or courtesy lights to LED. Use the Ford
Table Of Contents TABLE OF CONTENTS INTRODUCTION INSTALLATION OPERATING INSTRUCTIONS APPENDIX ABOUT THE JUICE... 3 SAFETY TERMS...3 INTRODUCTION...
 Ford Juice installation Instructions **read important safety information in this manual** TABLE OF CONTENTS F o r d J u i c e Table Of Contents ABOUT THE JUICE... 3 SAFETY TERMS...3 INTRODUCTION... 3 PRODUCT
Volvo P1 Air Intake. ELEVATE Turbo Intake Pipe. MAF Sensor. Inlet Manifold. Air Filter Housing. ECU Cover
 Volvo P1 Air Intake Tools needed: 13mm Combination Wrench Flat Blade Screwdriver T30 Torx Driver T25 Torx Driver 8mm Combination Wrench and/or Socket with Ratchet 10mm Combination Wrench and/or Socket
2012 SLK V6 (M276 Engine) Spark Plug Replacement
 Spark Plug Replacement") 2012 SLK 350 3.5 V6 (M276 Engine) Spark Plug Replacement Proceed at your own risk. I read the Mercedes repair documents pertaining to changing the R172 SLK M276 V6 engine s spark plugs that I could find
2012 SLK 350 3.5 V6 (M276 Engine) Spark Plug Replacement Proceed at your own risk. I read the Mercedes repair documents pertaining to changing the R172 SLK M276 V6 engine s spark plugs that I could find
INSTALLATION INSTRUCTIONS
 Toyota 24-pin Dual Camera Blind Spot Monitoring System (Kit # 9002-2911) Please read thoroughly before starting installation and check that kit contents are complete. Items Included in the Kit: 2 Adjustable
INSTALLATION INSTRUCTIONS
 INSTALLATION INSTRUCTIONS Accessory Application Publications No. P/N 08E49-S2A-100 2004 S2000 AII 26325 Issue Date OCT 2003 PARTS LIST Hood switch harness TOOLS AND SUPPLIES REQUIRED #2 Phillips screwdriver
PLEASE READ ALL DIRECTIONS BEFORE STARTING INSTALLATION
 PARTS LIST 2015 BMW S1000RR Installation Instructions 1 Power Commander 1 USB Cable 1 CD-ROM 1 Installation Guide 2 Power Commander Decals 2 Dynojet Decals 2 Velcro 1 Alcohol swab 2 Posi-taps THE IGNITION
Special Note About The JDM High Performance Water Pump:
 Page 1 of 30 JDM Engineering, Inc. home Call Us! 732-780- 0770 back to Installation Instructions Electric Fan Upgrade Kit Electric Fan Wiring Diagram Thank you for your purchase of the JDM Engineering
Installation Instructions
 Instructions Created by an: DIY Underhood LED Lighting Kit (SKU# DIY-E-UHLK) Installation Instructions NOTICE: This Under Hood Light Kit was installed on a 2002 Toyota Tacoma. However, these instructions
BBK Long Tube Header and Shorty Mid-pipe (05-10 GT):
:") Time Required: Approximately 6-8 Hours BBK Long Tube Header and Shorty Mid-pipe (05-10 GT): Tools Required: Floor Jack or Ramps Jack Stands (unless you used a ramp) 5mm, 8mm, 10mm, 12mm, 22mm sockets/open
Time Required: Approximately 6-8 Hours BBK Long Tube Header and Shorty Mid-pipe (05-10 GT): Tools Required: Floor Jack or Ramps Jack Stands (unless you used a ramp) 5mm, 8mm, 10mm, 12mm, 22mm sockets/open
PLEASE READ ALL DIRECTIONS BEFORE STARTING INSTALLATION
 PARTS LIST 2015 KTM RC390 2015 KTM 390 Duke Installation Instructions 1 Power Commander 1 USB Cable 1 Installation Guide 2 Power Commander Decals 2 Dynojet Decals 2 Velcro strips 1 Alcohol swab 1 O2 Optimizer
Table of Contents. 4 Getting Started 4 About the Juice 5 Safety Terms 5 Product Registration 6 Important Notes 7 Truck Orientation
 Table of Contents 4 Getting Started 4 About the Juice 5 Safety Terms 5 Product Registration 6 Important Notes 7 Truck Orientation 8 Juice Installation 1999-2003 (7.3L) 8 Supplied Items & Required Tools
INSTALLATION INSTRUCTIONS
 INSTALLATION INSTRUCTIONS Accessory Application Publications No. AII 26031 2004 ODYSSEY Issue Date AUG 2003 NOTE: You cannot install the subwoofer in a vehicle equipped with both an under seat Navigation
Cold Air Intake Installation Instructions
 BAVARIAN AUTOSPORT Cold Air Intake Installation Instructions Page 1/5 3.06 INS264 NOTE: The vehicle shown for this installation is equipped with ASC+T. If your vehicle dos not have this feature, installation
Ford Racing Performance Improvement Intake Manifold (96-04 GT) Time Necessary: Approximately 4 hours
 Time Necessary: Approximately 4 hours") Ford Racing Performance Improvement Intake Manifold (96-04 GT) Time Necessary: Approximately 4 hours Tools Required: Ratchet and socket set Torque wrench Large adjustable wrench Needle nose pliers A dozen
Ford Racing Performance Improvement Intake Manifold (96-04 GT) Time Necessary: Approximately 4 hours Tools Required: Ratchet and socket set Torque wrench Large adjustable wrench Needle nose pliers A dozen
PLEASE READ ALL DIRECTIONS BEFORE STARTING INSTALLATION
 Parts List 2013-2014 Honda CBR600RR Installation Instructions 1 Power Commander FC 1 USB Cable 1 Installation Guide 2 Dynojet Decals 2 Velcro 1 Alcohol swab 1 O2 Optimizer THE IGNITION MUST BE TURNED OFF
INSTALLATION INSTRUCTIONS
 INSTALLATION INSTRUCTIONS 275+ & 300+ STREET / STRIP DIGITAL MULTI-STRIKE CD IGNITION CONTROLLER GENERAL INFORMATION The features of the 275+ and 300+ Ignitions are the same, with one exception: the 300+
Turner M50 Manifold Adapter Install. April 26, 2012
 April 26, 2012 Models: 1996-99 E36 328i/M3; 1997-98 E39 528i, 1997-98 Z3 2.8, 1998-2000 MZ3 S52 Product(s): Turner M50 Manifold Adapter Kit Subject: Installation Guidelines and Tips This guide will aid
PLEASE READ ALL DIRECTIONS BEFORE STARTING INSTALLATION
 PARTS LIST 2017 Victory 106 Models Installation Instructions 1 Power Commander 1 USB Cable 1 Installation Guide 2 Power Commander Decals 2 Dynojet Decals 2 Velcro strips 1 Alcohol swab 2 O2 Optimizers
BBK Ceramic Long Tube Headers (99-04 Cobra and Mach 1) - Installation Instructions
 - Installation Instructions") BBK Ceramic Long Tube Headers (99-04 Cobra and 03-04 Mach 1) - Installation Instructions The below installation instructions work for the following products: BBK Ceramic Long Tube Headers (99-04 Cobra
BBK Ceramic Long Tube Headers (99-04 Cobra and 03-04 Mach 1) - Installation Instructions The below installation instructions work for the following products: BBK Ceramic Long Tube Headers (99-04 Cobra
Ford Mustang V6 OEM-Style Fog Light Kit Parts List: Quantity: Tool List:
 2015-2017 Ford Mustang V6 OEM-Style Fog Light Kit Parts List: Quantity: Tool List: LED Foglights/ Bezels 2 Flat head & Phillips screwdriver (if you ordered part#3600) Ratchet & Socket set OR Wiring harness
ENG-16, Turbocharger Replacement (Including Tips on K27 Turbocharger Installation)
") ENG-16, Turbocharger Replacement (Including Tips on K27 Turbocharger Installation) Introduction Replacing the turbocharger on a 951 is not extremely difficult. However, it is very tedious because there
ENG-16, Turbocharger Replacement (Including Tips on K27 Turbocharger Installation) Introduction Replacing the turbocharger on a 951 is not extremely difficult. However, it is very tedious because there
INSTALLATION MANUAL
 315000 INSTALLATION MANUAL EGR & Cooler Race Kit for 2015+ 6.7L Ford Powerstroke WARNING ONLY install this kit if you are using a tuner that disables the EGR sensors & circuit system. Any product that
Installation Guide for Rough Country 30 in. Chrome Series LED Light Bar w/ Hood Mounting Brackets
 Installation Guide for Rough Country 30 in. Chrome Series LED Light Bar w/ Hood Mounting Brackets Installation Time: 1 Hour Tools Required Trim removal tool (plastic or wood to prevent scratches on the
2015+ S550 MUSTANG Battery Relocation Kit WR-BTRYRELOKIT-LH WR-BTRYRELOKIT-RH
 2015+ S550 MUSTANG Battery Relocation Kit WR-BTRYRELOKIT-LH WR-BTRYRELOKIT-RH The Watson Racing Battery Relocation Kit is NOT designed to protect you in the case of an accident, and therefore is INTENDED
Kit Part Number:
 Equipped with AEM DRYFLOW Filter No oil required! Kit Part Number: 21-573 2006-2008 Toyota Yaris 1.5L *Legal in California only for racing vehicles which may never be used upon a highway. 2008, Advanced
Small knife. Remove black panel shown. Save 6 retaining pins for re-install later.
 2005-2009 Ford Mustang V6 Fog Light Wiring Kit Parts List: Quantity: Tools Required: Wiring harness 1 Flat head screwdriver PB-3425 Parts Bag 1 Ratchet & Socket set OR Ford OEM Switch (if you 1 Adjustable
Slingshot Rotrex Supercharger Kit
 Slingshot Rotrex Supercharger Kit This supercharger kit improves on the Slingshot by forcing more dense air into the engine and creating more power. Installation time of the supercharger depends on you
INSTALLATION INSTRUCTIONS
 9002-6513 Rear Vision System W/ Zoom Aftermarket and Factory 8.4 Touch Screen Display (Factory Display requires Chrysler/Dodge dealer to activate) 2009 2012 RAM (Part B) 2013 Current RAM (Part A) NOTE:
BBK LONG TUBE HEADERS (99-04 GT, Mach 1, Bullitt)
") BBK LONG TUBE HEADERS (99-04 GT, Mach 1, Bullitt) Install Time: Approx. 8-10 hrs Parts Needed: BBK Long Tube Headers Shorty mid pipe X/H O2 wiring harness extensions Hi-temp thread locker Tools Required:
BBK LONG TUBE HEADERS (99-04 GT, Mach 1, Bullitt) Install Time: Approx. 8-10 hrs Parts Needed: BBK Long Tube Headers Shorty mid pipe X/H O2 wiring harness extensions Hi-temp thread locker Tools Required:
-Magnet (not completely necessary but can come in handy)
") McLeod High Performance Hydraulic Clutch Line Upgrade (05-14 V8) Included in kit: -New clutch line -2 fittings Required Tools: -Floor jack and jack stands (or a lift) -Flashlight -Angled pick tool -13mm
McLeod High Performance Hydraulic Clutch Line Upgrade (05-14 V8) Included in kit: -New clutch line -2 fittings Required Tools: -Floor jack and jack stands (or a lift) -Flashlight -Angled pick tool -13mm
Electronic Jet Kit Instructions
 Ver. 1.01 KFX 450 TFI-6040ST Thank you for choosing the Techlusion Electronic Jet Kit for your KFX 450, the TFI. The TFI is usable only for the following models: Kawasaki KFX 450 Thank you for choosing
INSTALLATION INSTRUCTIONS
 Rear Vision System Tailgate Emblem Camera Aftermarket Display 2009-Current Ford F-150 and 2010-Current Super Duty (Kit part number 1008-6509) Kit Contents: Tailgate Emblem Mount with Camera Chassis Harness
PRO RATCHET UNIVERSAL SHIFTER
 Installation Instructions PRO RATCHET UNIVERSAL SHIFTER Fits: GM, Ford and Chryslers w/automatic Transmission See Application Guide for Specific Vehicles Catalog # 80842 WORK SAFELY! For maximum safety,
Ford Racing Mustang K-Springs (05-09 GT) - Installation Instructions
 - Installation Instructions") Ford Racing Mustang K-Springs (05-09 GT) - Installation Instructions The below installation instructions work for the following products: Ford Racing Mustang K-Springs (05-09) Please read through the instructions
Ford Racing Mustang K-Springs (05-09 GT) - Installation Instructions The below installation instructions work for the following products: Ford Racing Mustang K-Springs (05-09) Please read through the instructions
Cold Air Intake Installation Instructions
 Page 1/5 3.04 INS262 BAVARIAN AUTOSPORT Cold Air Intake Installation Instructions NOTE: Throughout the instructions the term AFM is used. It refers to the Air Flow Meter which is located between the engine
Installation Instructions Right Hand Drive Megashifter
 Installation Instructions Right Hand Drive Megashifter Part Number 80685 1995, 2001, 2006, 2010 by B&M Racing & Performance Products The B&M Right Hand Drive Megashifter is designed specifically for vehicles
Light Truck MegaShifter
 Installation Instructions Light Truck MegaShifter The B&M Light Truck Megashifter shifter is designed to be used in most light trucks equipped with most popular three speed or four speed automatic transmissions.