ASSEMBLY & INSTALLATION INSTRUCTIONS REVISION 1
|
|
|
- Timothy Lee
- 6 years ago
- Views:
Transcription


1 ASSEMBLY & INSTALLATION INSTRUCTIONS REVISION 1


2 MOUNTING ITEMS A PN B PN C PN D PN L1 L2 PN PN


3 HARDWARE * Some shelving staxx may contain extra hardware E M6 PN F M6 PN J PN G Part supplied with blue frame grips PN I PN H PN TOOLS 4 PH2 3
4 1. Exxpand block assembly Reference steps 1-7 Exxpand Installation summary: 2. Place the Exxpand block in the vehicle and place it in the best position for EcoFix bracket mounting Refer to step 1 for specific guidance on horizontal braces 3. Bend EcoFix mounting brackets for the side wall fastening Refer to steps Mark the floor and wall mounting positions Refer to step 10 for floor mounting 5. Remove Exxpand block from vehicle 6. Drill all marks on vehicle floor and side wall mounting positions 7. Insert rivnuts in vehicle floor & wall Refer to step 10 for floor 8. Place the Exxpand block back in the vehicle 9. Align Exxpand block according to the floor and wall mounting points. 10. First, install floor mounting hardware, second install all hardware for sidewall mounting Refer to steps 10-11! Note: Van specific instructions located on pages

5 1 "A" Dimension The measurement from vehicle floor to a horizontal mounting brace on the vehicle sidewall. a Note: Not all vehicles will have a horizontal mounting option. a 5


6 a a a a! When a horizontal mounting brace is unavailable, the vertical bracing will become your primary mounting source. Place the Exxpand unit in a position that allows for secure mounting to vertical braces. 6
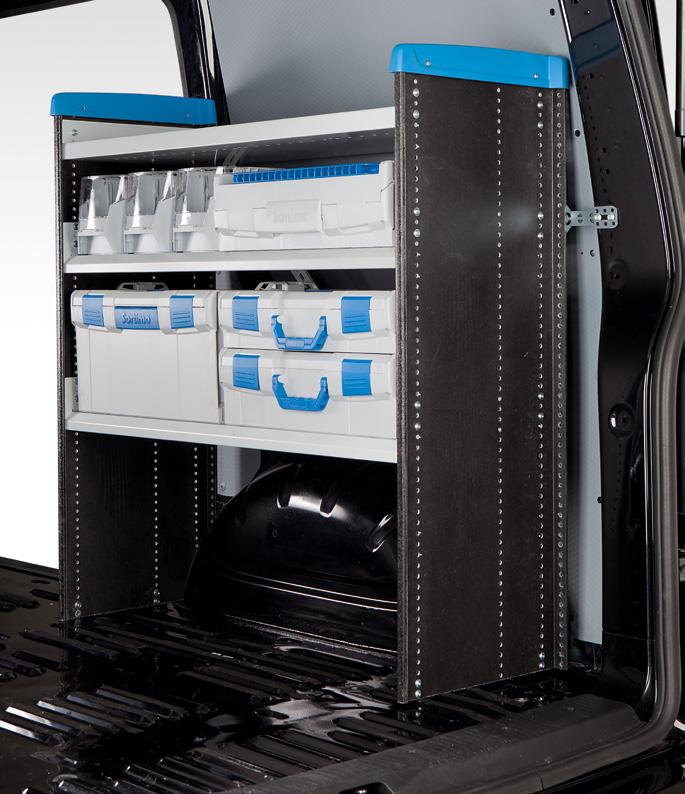
. Top Shelf Top shelf must be mounted to allow for a minimum of two open holes above for clearance of Sortimo top piece. (See step 6).")
7 2 PN PN E F 10 "A" Dimension Shelf Only attach the shelf to the pultrusion with the side mounting bolts at this time. Leave the rear holes open for mounting purposes (reference page 5). Top Shelf Top shelf must be mounted to allow for a minimum of two open holes above for clearance of Sortimo top piece. (See step 6). 2x 4 Bottom Shelf Bottom shelf needs to be placed in a way so that it will clear the wheel well. Assemble all other shelves as pictured. 7


8 3 PN PN PN x A 2x A 8x E 8x F 10 2x 4 A! Floor angles should face the front of the vehicle per crash test data depicted in illustration below. A ÅA Æ ÅA 8


9 ! In certain vehicles this will not be possible due to mounting obstructions. When this happens you must use the supplied backing plates in conjunction with the mounting foot that is facing the incorrect way to help strengthen the side wall pultrusion. Vehicle Front The above photo simulates an obstruction not allowing the floor angle to be placed facing forward in its correct position. This shows the placement of the backing plates to help strengthen sidewall pultrusion. 9
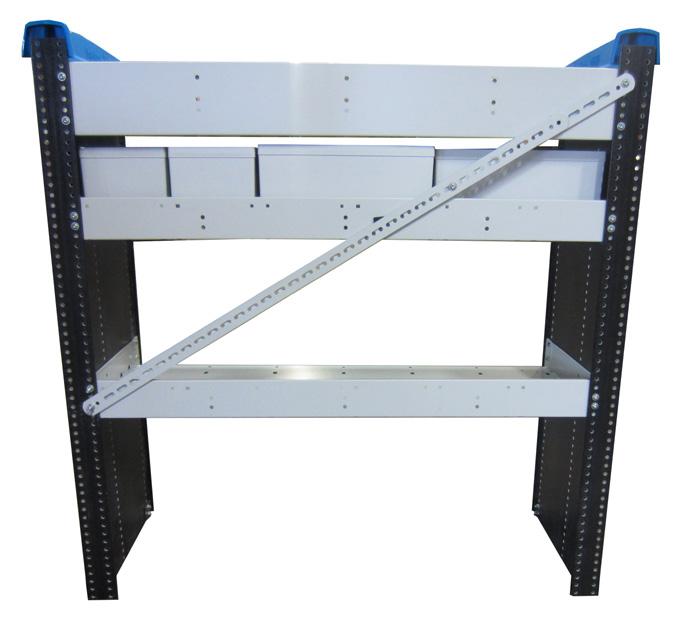
10 4 PN x B 4 4x E 4x F PN PN ! Primary Method for ease of installation around wheel well. Æ Æ Diagonal brace must always start at the top of the stack from the front of the vehicle descending rearward on the Exxpand unit. Æ 10

11 5 PN PN PN x E 8x F 10 J N F N M B E B M J M B F N M B E N 11

12 6 PN x C 2x G PH2 *Do not over tighten 2x 12

13 7 1. Insert plastic slide into the holes 2. Push it forward as far as it will go 3. Press plastic slide down until it snaps in. 13


14 8 EcoFix bracket bending & mounting rules. L1 PN PN L2 14


 Do not bend")


 If necessary the brackets can be")
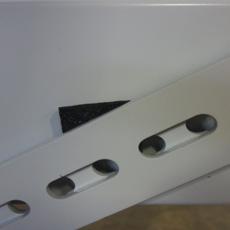
15 8 EcoFix bracket bending & mounting rules. Bracket Bending Tool PN Bending brackets by hand is allowable NO 90 degree bends (instead use 2x45's) Do not bend EcoFix brackets past a 60/120 degree bend Bend fastening brackets 1 time. (Straightening and rebending a bracket will cause embrittlement.) If necessary the brackets can be twisted (max 90 degrees). See below image. Acceptable Acceptable Unacceptable Unacceptable 15


16 8 EcoFix bracket bending & mounting rules Horizontal Plane It is recommended to keep the EcoFix bracket on a horizontal plane when mounting it from the Exxpand unit to the wall. However, that is not always attainable. In this situation you are allowed to break the horizontal plane up to a 45 degree angle. See images below Acceptable Horizontal Plane Horizontal Plane Unacceptable Horizontal Plane Horizontal Plane 16


17 8 EcoFix bracket bending & mounting rules. Directional & thrust motion brackets are required for mounting the Exxpand unit to the vehicle wall. The table below defines how many are required per unit size. Figures are derived from crash test data and should be closely adhered to. Exxpand Unit EcoFix Brackets Installation Kits Directional Brackets Thrust Brackets A combination of direction and thrust motion is ok. Fastening bracket in direction motion Fastening bracket in thrust motion Direction motion 17

.")
.")

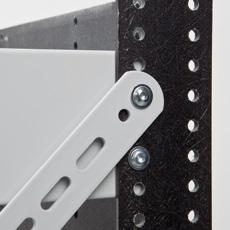
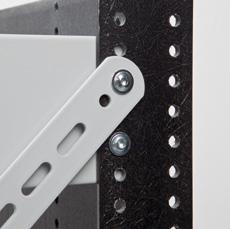
18 ! Note: The EcoFix mounting brackets must be attached to the shelves or the supplied mounting adapter plate. They are not allowed to attach to the end panels only. a The mounting adapter plate is to be installed on the back of the unit and MUST be touching/spanning 2 shelves (see illustration below). Using existing/included hardware from the assembly hardware kit, you MUST fasten the bracket a minimum of two points on each shelf upper and lower (4 total points of contact). The hardware at ALL 4 mounting locations MUST go through the Shelf Staxx Stability Bracket, shelf staxx side panel AND SHELF. The same applies when using this bracket on an end panel that supports a -1 and -2, you must place hardware on both sides of the stability bracket (8 total points of contact, see illustration below). With the Exxpand Stability Mounting Adapter Plate correctly mounted, you are allowed to mount the EcoFix bracket anywhere on the adapter plate. 18


19 9 D PN PN F 10 Note: Primary Method: You must mount the EcoFix bracket to the end panel and a shelf. Secondary Method: Brackets may be attached to a shelf in certain situations. It is not allowed to attach the EcoFix brackets to the end panel only. M N D 2x 2 Primary Method 2x F L1/L2 M N D Secondary Method 2x F L1/L2 N D 19


20 10 H PN I PN ø A B CAUTION Prior to drilling, so as not to cut electric wires, fuel lines, brake lines etc., check behind and underneath drilling and mounting locations. Failure to heed this warning will result in death or serious injury.! 20


21 10 H 13 I PN PN PN When installing on a padded floor, or in the event that the vehicle floor ribbing may cause the shelf to be unstable or elevated, use provided spacers in between factory floor and shelving unit for compression. 2x 21


22 11 Whenever possible, the use of two rivnuts and bolts are required to anchor the EcoFix bracket to the vehicle. 22
23 READY 23


24 VAN SPECIFIC INSTRUCTIONS! 2014 Ford Transit Connect The following steps for Ford Transit Connect installation are imperative due to location of the vehicle fuel tank. Place the Exxpand unit in the vehicle. There should be approximately a 1 1/2 to 2 gap between the Exxpand unit and the van wall. Make sure the rear of the unit is touching the factory moulding across the rear of the vehicle. 1 1/2-2 Front Mounting Locations Figure showing front street side mounting locations, curb side typical. Use a 1/8 bit with drill stop to drill pilot holes to identify mounting locations as denoted. Drill stop should be positioned at 3/4. Street Side of Vehicle Use Supplied M6 rivnuts and MM1 bolts for Transit Connect floor mount only. Due to factory installed plastic molding at both street side & curb side door ways, the front floor angle brackets must be facing rearward. Use supplied backing plates as shown on front of unit. 24


25 VAN SPECIFIC INSTRUCTIONS Chevrolet/ GMC Full Size Van Curbside specific rear of block will require backing plates due to wheel well width. Ram C/V Curb side of vehicle only will require the trimming of factory ductwork. Using headliner as a guide, trim along the ductwork where ductwork meets factory headliner so that cut is flush. Depending on whether your Ram C/V is equipped with Sortimo floor or aluminum floor will determine the mounting locations on the floor angle bracket. 25
26 TECHNICAL NOTES For fitting side panels to special requirements, we recommend following tools: BOSCH-Order-Number Jig Saw Suction device C3 100 Saw blade PLEASE PAY ATTENTION Cutting side panels harms stability of the racking, therefore, do not cut out a width (w) of more than 3.93 inches and a height (h) of more than inches. h h w w 26
27 MAXIMUM LOAD Shelves Maximum area load lbs 220 lbs MAX. 220 lbs È MAX. 220 lbs È MAX. 220 lbs È AREA BLOCK 27

28 Grid L-BOXX LS-BOXX i-boxx-rack 10 Grid = 10 holes 12 Grid = 12 holes 18 Grid = 18 holes 21 Grid = 19 holes 22 Grid = 22 holes 26 Grid = 26 holes 31 Grid = 29 holes Grid S-BOXX M-BOXX T-BOXX 8 Grid = 8 holes 12 Grid = 12 holes 28

29 DISTANCE = GRID 1 GRID 10 GRID = 170 mm Warranty and Limitation of Liability SORTIMO N.A. warrants its van interior equipment to be free from defects in material and workmanship, under normal use and service for a period of three years or 36,000 miles, whichever occurs first, after the date of delivery to the original retail purchaser, when installed by an authorized SORTIMO Distributor and/or SORTIMO N.A. Upfit facility. Products not installed by an authorized SORTIMO Distributor and/or SORTIMO Upfit facility will not be subject to any warranty whatsoever and ANY AND ALL WARRANTIES WHATSOEVER RELATIVE TO SUCH SALES ARE HEREBY FULLY AND EXPRESSSLY DISCLAIMED. This warranty only provides for the following remedy: repairs at the point of SORTIMO N.A. s main place of business or any of its Distributor locations, or part replacements in part or in full to correct any defects related to material and workmanship. This warranty does not apply to products not installed by an authorized SORTIMO Distributor and/or SORTIMO N.A. Upfit facility. 29
MERCEDES METRIS PARTITION INSTALLATION INSTRUCTIONS
 MERCEDES METRIS PARTITION INSTALLATION INSTRUCTIONS www.sortimo.knapheide.com www.sortimo.knapheide.com The following instructions detail the procedure for installing a Sortimo By Knapheide Partition in
Fig & MOUNTING RAIL INSTALLATION KIT
 16100 & 16200 MOUNTING RAIL INSTALLATION KIT 09/28/06 CUSTOM MOUNTING BRACKETS REQUIRED ON SOME INSTALLATIONS DEALER/INSTALLER: 1) Provide this manual to end user. 2) Physically demonstrate procedure in
TABLE OF C ONENT S 2
 1 TABLE OF CONENTS 2 Sortimo by Knapheide is a strategic partnership between Sortimo International, a global leader in mobile racking products and The Knapheide Manufacturing Company, the nation s leading
COVER PAGE BASE RAIL MOUNTING KIT 10 BOLT RAIL KIT NOTE!
 COVER PAGE 30035 BASE RAIL MOUNTING KIT 10 BOLT RAIL KIT NOTE! If you have a newer model year truck you must go to one our websites for the most recent updated instructions. www.reeseproducts.com or www.draw-tite.com
Assembly, Installation, Operation and Maintenance Instructions. Base Rail Bracket Kit. For updates see PRODUCT SUPPORT tab at
 Assembly, Installation, Operation and Maintenance Instructions P/N: 32831 Base Rail Kit For updates see PRODUCT SUPPORT tab at www.huskytow.com Provide a copy of these Instructions to the end user of this
2017 VAN STORAGE EQUIPMENT GM VAN SOLUTIONS FOR GMC SAVANA CHEVROLET EXPRESS CHEVROLET CITY EXPRESS
 0 VAN STORAGE EQUIPMENT GM VAN SOLUTIONS FOR GMC SAVANA CHEVROLET EXPRESS CHEVROLET CITY EXPRESS WWW.WEATHERGUARD.COM DESIGNED WITH THE PROFESSIONAL IN MIND WEATHER GUARD Van Solutions deliver unmatched
**DO NOT EXCEED RECOMMENDED VEHICLE TOWING WEIGHT!** FORD F-250, F-350
 6065 SUBKIT 7/7/0 **DO NOT EXCEED RECOMMENDED VEHICLE TOWING WEIGHT!** FORD F-50, F-50 PAGE OF WARNING!! BRAKE, FUEL, AND ELECTRICAL LINES MAY NEED TO BE LOOSENED OR REPOSITIONED TO PROVIDE CLEARANCE FOR
**DO NOT EXCEED RECOMMENDED VEHICLE TOWING WEIGHT!** FORD F-250, F-350
 60647 SUBKIT 7/3/204 **DO NOT EXCEED RECOMMENDED VEHICLE TOWING WEIGHT!** FORD F-250, F-350 PAGE OF 4 WARNING!! BRAKE, FUEL, AND ELECTRICAL LINES MAY NEED TO BE LOOSENED OR REPOSITIONED TO PROVIDE CLEARANCE
VAN STORAGE SOLUTIONS FOR THE WAY YOU WORK
 WWW.WEATHERGUARD.COM VAN STORAGE SOLUTIONS FOR THE WAY YOU WORK Weather Guard / KNAACK 420 E. Terra Cotta Ave. Crystal Lake, IL 60014 USA 800-456-7865 (Toll Free) 800-334-2981 (Fax) Knaack.OrderEntry@wernerco,.com
MOUNTING RAILS ***DO NOT EXCEED VEHICLE MANUFACTURER'S RECOMMENDED TOWING CAPACITY.***
 10/30/2017 PAGE 1 OF 6 Parts List ITEM QTY PART NUMBER DESCRIPTION 1 2 CM-16150-MR MOUNTING RAILS 2 2 CM-16150-FB.375" FRONT BRACKET 3 1 CM-16150-PSRB.375" PASSENGER SIDE REAR BRACKET 4 1 CM-16150-DSRB.375"
**DO NOT EXCEED RECOMMENDED VEHICLE TOWING WEIGHT!**
 60660 SUBKIT 7/8/0 **DO NOT EXCEED RECOMMENDED VEHICLE TOWING WEIGHT!** DODGE 500 / 3500 SHORT AND LONG BED PAGE OF 5 WARNING!! BRAKE, FUEL, AND ELECTRICAL LINES MAY NEED TO BE LOOSENED OR REPOSITIONED
DODGE / RAM 1500 *** DO NOT EXCEED VEHICLE MANUFACTURER'S RECOMENDED TOWING CAPACITY ***
 6444 DODGE / RAM 500 6/8/207 OF 5 *** DO NOT EXCEED MANUFACTURER'S RECOMENDED TOWING CAPACITY *** ITEM QTY PART NUMBER 0 /2-3 x 2" 2 4 /2-3 x 3/4, GR8 3 4 CM-SP2 4 2 CM-SP6 5 4 HFN 23, GR8 6 2 CM-SP4 7
Fig & MOUNTING RAIL INSTALLATION KIT
 16100 & 16200 MOUNTING RAIL INSTALLATION KIT 04/04/2018 CUSTOM MOUNTING BRACKETS REQUIRED ON SOME INSTALLATIONS DEALER/INSTALLER: 1) Provide this manual to end user. 2) Physically demonstrate procedure
Installation Instructions READ THOROUGHLY BEFORE BEGINNING Signature Series Rail Kit Dodge Ram Trucks-all, including Mega-cabs
 INDEX Failure to follow all of these instructions may result in death or serious injury!. GUIDELINES FOR MATCHING TOW VEHICLE AND TRAILER. Pages -. DRILLED AND BOLTED INSTALLATION FIGURE. Page 4. NO-DRILL,
WARNING NOTICE CAUTION ASSEMBLY INSTRUCTIONS
 MODEL 284 EZ-GLIDE SYSTEM 10' HIGH CUBE VAN DRIVER SIDE ALUMINUM DROP DOWN LADDER RACK ATTENTION Read and understand all instructions and warnings before operating or using this product. WARNING This product
ATTENTION: PLEASE READ AND UNDERSTAND ALL INSTRUCTIONS AND WARNINGS BEFORE ASSEMBLING, INSTALLING OR USING THIS PRODUCT.
 INSTALLATION MANUAL PROMASTER MOUNTING CHANNEL KIT (2115-0-01) ATTENTION: PLEASE READ AND UNDERSTAND ALL INSTRUCTIONS AND WARNINGS BEFORE ASSEMBLING, INSTALLING OR USING THIS PRODUCT. 1/2 in Wrench/ Socket
INSTALLATION MANUAL ALUMINUM & STEEL SIDE BOX
 TRUCK STORAGE SOLUTIONS SECURING YOUR REPUTATION INSTALLATION MANUAL ALUMINUM & STEEL SIDE BOX STEEL & ALUMINUM SIDE BOX WITH PACK RAT DRAWER UNITS MODELS ATTENTION: PLEASE READ AND UNDERSTAND ALL INSTRUCTIONS
31015 INSTALLATION INSTRUCTIONS
 0 INSTALLATION INSTRUCTIONS Safety glasses should be worn at all times while installing this product. YEARS: 00-CURRENT MAKE: DODGE RAM MODEL: 00 STYLE: TRUCK WARNING: NEVER EXCEED YOUR VEHICLE MANUFACTURER'S
ULTRA WEIGHT DISTRIBUTING HITCH SYSTEM INSTALLATION/OPERATION INSTRUCTIONS
 ULTRA-FAB PRODUCTS, INC. 57985 St. Rd. 19 South, Elkhart, Indiana 46517 ULTRA WEIGHT DISTRIBUTING HITCH SYSTEM ULTRA WEIGHT DISTRIBUTING HITCH SYSTEM INSTALLATION/OPERATION INSTRUCTIONS ITEM # 1 EXPLODED
Mustang Billet Aluminum Pedal Cover Kit P/N R (Manual) and R (Automatic) Installation Instructions
 and R (Automatic) Installation Instructions") 2005-06 Mustang Billet Aluminum Pedal Cover Kit P/N R08050020 (Manual) and R08050021 (Automatic) Installation Instructions 1305-R08050026-AA Page 1 of 7 1-800-59-ROUSH Before installing this Roush Performance
2005-06 Mustang Billet Aluminum Pedal Cover Kit P/N R08050020 (Manual) and R08050021 (Automatic) Installation Instructions 1305-R08050026-AA Page 1 of 7 1-800-59-ROUSH Before installing this Roush Performance
DECKED BEST PRACTICES: INSTALLING VAN SHELVING
 DECKED BEST PRACTICES: INSTALLING VAN SHELVING DECKED is providing these instruction guidelines as a courtesy to our customers. While DECKED has attempted to ensure that these instructions are accurate
INSTALLATION INSTRUCTIONS MOUNTING KIT FOR ELITE SERIES
 INSTALLATION INSTRUCTIONS MOUNTING KIT FOR ELITE SERIES DO NOT EXCEED VEHICLE MANUFACTURER S RATING FOR 5th WHEEL TOWING OR MAXIMUM GROSS TRAILER WEIGHT OF 18,000lb. / 8160kg. DEALER/INSTALLER: (1) Provide
CHEVROLET TAHOE/DENALI/AVALANCHE/YUKON/ SILVERADO/SIERRA 2007+
 CHEVROLET TAHOE/DENALI/AVALANCHE/YUKON/ SILVERADO/SIERRA 2007+ INSTALLATION INTRODUCTION 1. REMOVING THE FENDER AND DOORS FROM THE A-PILLAR AND DISCONNECTING THE WIRE HARNESS @ THE DOOR JAM 2. REMOVING
14012 INSTALLATION INSTRUCTIONS
 0 INSTALLATION INSTRUCTIONS Safety glasses should be worn at all times while installing this product. YEARS: 05-PRESENT MAKE: FORD MODEL: TRANSIT STYLE: VAN WARNING: NEVER EXCEED YOUR VEHICLE MANUFACTURER'S
Factory Five Racing, Inc. 818 Kit Assembly manual revision 1J update
 Factory Five Racing, Inc. 818 Kit Assembly manual revision 1J update Turbo coolant overflow tank...1 Shifter handle...4 Install...4 Door skin...7 Door Liner... 10 Side mirrors... 14 Door handles and pulls...
Assembly, Installation, Operation and Maintenance Instructions. Base Rail Bracket Kit. For updates see PRODUCT SUPPORT tab at
 Assembly, Installation, Operation and Maintenance Instructions P/N: 31408 Base Rail Bracket Kit For updates see PRODUCT SUPPORT tab at www.huskytow.com Provide a copy of these Instructions to the end user
RV-10 Center Arm Rest Console
 RV-10 Center Arm Rest Console Important Notice: This manual contains important information that may affect the safety of your aircraft. Read the Warranty / Agreement below. There is information in the
LOWER SPARE TIRE ENLARGE HOLE CLEAN WELDNUTS FISHWIRE HARDWARE
 0 INSTALLATION INSTRUCTIONS Safety glasses should be worn at all times while installing this product. YEARS: 05 MAKE: FORD MODEL: TRANSIT STYLE: VAN WARNING: NEVER EXCEED YOUR VEHICLE MANUFACTURER'S RECOMMENDED
3.5" Oval Bull Bar. Part No. B1519S/B. PARTS LIST: Qty Part Description Qty Part Description
 ` 3.5" Oval Bull Bar Part No. B1519S/B Fits: 2017 Ford F250/350/450/550 Super Duty THE BULL BAR MAY INTERFERES WITH PARKING SENSORS, PROXIMITY SENSORS AND CRUISE CONTROL SENSORS. REMOVE CONTENTS FROM BOX.
U.S. patented and other patents pending
 TRANSIT RACKS This information is owned and distributed by Sportworks Northwest, Inc. 15540 Woodinville Redmond Road, NE Bldg. A-200, Woodinville, WA 98072. The information provided herein is for use as
INSTALLATION INSTRUCTIONS Mopar Performance 2 Lift System 2009 and Newer Dodge Ram 1500 (DS) 4WD PART NUMBER P
 4WD PART NUMBER P") INTRODUCTION Installation requires a professional mechanic. Prior to beginning, inspect the vehicle s steering, driveline, and brake systems, paying close attention to the suspension link arms and bushings,
INTRODUCTION Installation requires a professional mechanic. Prior to beginning, inspect the vehicle s steering, driveline, and brake systems, paying close attention to the suspension link arms and bushings,
AEROMOTIVE Part # and F-Body Fuel System Kit INSTALLATION INSTRUCTIONS
 AEROMOTIVE Part # 17101 and 17102 93-97 F-Body Fuel System Kit INSTALLATION INSTRUCTIONS CAUTION: Installation of this product requires detailed knowledge of automotive systems and repair procedures. We
4WD FORD F150 BRONCO 4 OR 6 SERIES II RADIUS ARM SYSTEM
 BOX KIT # 63000 4WD 81-96 FORD F150 BRONCO 4 OR 6 SERIES II RADIUS ARM SYSTEM INTRODUCTION Installation requires two professional mechanics. Be sure the vehicle is in excellent working condition-repair
Technical Support Line: (952) Hanover Ave. Lakeville, MN
 Hanover Ave. Lakeville, MN") Technical Support Line: (952) 985-5675 Email: Sales@QA1.net 21730 Hanover Ave. Lakeville, MN 55044 www.qa1.net INSTALLATION INSTRUCTIONS QA1 1967-1979 Mopar A-Body Rear 6 link Conversion System QA1 p/n
Technical Support Line: (952) 985-5675 Email: Sales@QA1.net 21730 Hanover Ave. Lakeville, MN 55044 www.qa1.net INSTALLATION INSTRUCTIONS QA1 1967-1979 Mopar A-Body Rear 6 link Conversion System QA1 p/n
<THESE INSTRUCTIONS MUST BE GIVEN TO THE END USER> B&W
 B&W Trailer Hitches 1216 Hawaii Rd / PO Box 186 Humboldt, KS 66748 P:620.473.3664 F:620.869.9031 Turnoverball Gooseneck Hitch Installation Instructions
WARNING: NEVER EXCEED YOUR VEHICLE MANUFACTURER'S RECOMMENDED TOWING CAPACITY LBS. LBS.
 05 INSTALLATION INSTRUCTIONS Safety glasses should be worn at all times while installing this product. YEARS: 009-0 MAKE: CHEVROLET, BUICK & GMC MODEL: TRAVERSE, ENCLAVE & ACADIA STYLE: CROSSOVER WARNING:
In-Wall Slide-Out (Winnebago)
") In-Wall Slide-Out (Winnebago) REPIR MNUL Rev: 11.16.2017 Page 1 Winnebago In-Wall Repair Manual 22MR17 TBLE OF CONTENTS Safety Information 2 Introduction 2 Preliminary Visual Inspection 3 ssembly Removal
In-Wall Slide-Out (Winnebago) REPIR MNUL Rev: 11.16.2017 Page 1 Winnebago In-Wall Repair Manual 22MR17 TBLE OF CONTENTS Safety Information 2 Introduction 2 Preliminary Visual Inspection 3 ssembly Removal
INSTALLATION INSTRUCTIONS MOUNTING KIT FOR ELITE SERIES
 INSTALLATION INSTRUCTIONS MOUNTING KIT FOR ELITE SERIES DEALER/INSTALLER: (1) Provide this Manual to end user. END USER: (1) Save this Manual for future reference. (2) Pass on copies of Manual to any other
RAM COMMERCIAL VAN SOLUTIONS
 VAN STORAGE EQUIPMENT RAM COMMERCIAL VAN SOLUTIONS FOR PROMASTER & PROMASTER CITY VANS WWW.WEATHERGUARD.COM DESIGNED WITH THE PROFESSIONAL IN MIND WEATHER GUARD Van Solutions deliver unmatched organization,
**DO NOT EXCEED RECOMMENDED VEHICLE TOWING WEIGHT!**
 60648 SUBKIT 9/8/015 **DO NOT EXCEED RECOMMENDED VEHICLE TOWING WEIGHT!** PAGE 1 OF 5 WARNING!! BRAKE, FUEL, AND ELECTRICAL LINES MAY NEED TO BE LOOSENED OR REPOSITIONED TO PROVIDE CLEARANCE FOR NEW HARDWARE.
LAYOUT GUIDES BUYER S GUIDE
 2016 BUYER S GUIDE Helping Mobile Technicians Work More Effectively by Providing Organized Storage Solutions At Ranger Design, we believe more is possible. We believe work vehicles and the technicians
Installation Instructions
 SLP GM/Chevrolet LS3 COIL COVER KIT 2010+ Camaro 5.3L/6.2L 2007+ GMT900 5.3L/6.2L PN: 620038 Installation Instructions Important Notes: Before installing your SLP Coil Cover Kit, please read the installation
INSTRUCTION MANUAL 16K - Fifth Wheel Hitch
 You can take it with you. INSTRUCTION MANUAL 16K - Fifth Wheel Hitch Product No. 30047 DEALER/INSTALLER: END USER: (1) Provide this Manual to end user. (2) Physically demonstrate hitching and unhitching
PERMA ROLL 75. installation instructions Automatic Roll-up Door. note:
 p PERMA TECH, INC. 363 hamburg street buffalo, new york 14204 phone: (716) 854 0707 fax: (716) 854 0774 1 800 362 7325 www.permatechinc.com PERMA ROLL 75 installation instructions Automatic Roll-up Door
Installation Instructions
 Installation Instructions READ BEFORE INSTALLING UNIT For Through-the-Wall Air Conditioners INSTALLATION WARNINGS AND CAUTION Carefully read the installation manual before beginning. Follow each step as
2013 Mustang Chin Splitter
 2013 Mustang Chin Splitter P/N: 421391 (R1313-17F775-AA) Application: 2013 Ford Mustang 2013 Mustang 5.0L with Automatic/Manual Transmission 2013 Mustang 3.7L with Automatic/Manual Transmission Installation
Model FM2642 Wall Mount. Full Motion Television Wall Mount
 Model FM2642 Wall Mount Full Motion Television Wall Mount Getting Started Introduction Congratulations on the purchase of your new Audio Solutions FM2642 Television Wall Mount. For maximum benefit, please
Index. Page Number Section
 S H O C K S Index Page Number Section 1-4 GM Front Coil Over Installation 5-7 Front Smooth Body Shock Installation 7-8 Rear Smooth Body Shock Installation 8-11 Custom Coil Over Installation 12 Tuning and
U.S. patented and other patents pending
 TRANSIT RACKS This information is owned and distributed by Sportworks Northwest, Inc. 15540 Woodinville Redmond Road, NE Bldg. A-200, Woodinville, WA 98072. The information provided herein is for use as
In-Wall Slide-Out REPAIR KIT MANUAL. Rev: Page 1 In-Wall Repair Kits Manual
 In-Wall Slide-Out REPAIR KIT MANUAL Rev: 02.16.2017 Page 1 In-Wall Repair Kits Manual TABLE OF CONTENTS Safety Information 2 Introduction 2 Preliminary Visual Inspection 3 Assembly Removal Procedure 4
31056 INSTALLATION INSTRUCTIONS
 305 INSTALLATION INSTRUCTIONS Safety glasses should be worn at all times while installing this product. YEARS: 00-00 MAKE: JEEP MODEL: COMMANDER STYLE: SUV WARNING: NEVER EXCEED YOUR VEHICLE MANUFACTURER'S
Quick Release Mounting Hardware
 Mounting Hardware USER MANUAL Quick Release Mounting Hardware Stealth s User Manual and Maintenance Guide for ADI s Quick Release Mounting Hardware Customer Satisfaction 1.0 Stealth Products strives for
VAN SOLUTIONS FOR THE WAY YOU WORK TM ASSEMBLY AND INSTALLATION INSTRUCTIONS FOR QUICK CLAMP ACCESSORY CROSS MEMBER
 WWW.WEATHERGUARD.COM VAN SOLUTIONS FOR THE WAY YOU WORK TM ASSEMBLY AND INSTALLATION INSTRUCTIONS FOR QUICK CLAMP ACCESSORY CROSS MEMBER MODELS 5-3-3 AND 33-3-3 Weather Guard / Knaack 8-56-7865 (Toll Free)
FORD TRANSIT VAN SOLUTIONS
 VAN STORAGE EQUIPMENT FORD TRANSIT VAN SOLUTIONS WWW.WEATHERGUARD.COM BULKHEADS Our Low-, Mid-, and High-Roof van bulkheads allow you to separate the driver compartment from the cargo area for maximum
31065 INSTALLATION INSTRUCTIONS
 106 INSTALLATION INSTRUCTIONS Safety glasses should be worn at all times while installing this product. YEARS: 010-PRESENT MAKE: DODGE MODEL: RAM 00 STYLE: PICKUP WARNING: NEVER EXCEED YOUR VEHICLE MANUFACTURER'S
Installation Instructions
 Equipment Required: Fastener Kit: F Wrenches: 15/16, 15/16 Crowfoot Adaptor Drill Bits: 1/4 Other Tools: Drill, Reciprocating saw Optional, Raise Bed: 18mm socket, 15 extension As an option you can loosen
Quadratec 2 Coil Spacer Lift Kit
 Quadratec 2 Coil Spacer Lift Kit Installation Manual: for 2007-Current Wrangler (JK) # 16400.0X42 PARTS LIST: JK 2 Front Coil Spacers - QTY 2 JK 2 Rear Coil Spacers - QTY 2 2 Front Bump Stop Spacers -
31068 INSTALLATION INSTRUCTIONS
 0 INSTALLATION INSTRUCTIONS Safety glasses should be worn at all times while installing this product. YEARS: 009-CURRENT MAKE: FORD MODEL: F-0 STYLE: ALL WARNING: NEVER EXCEED YOUR VEHICLE MANUFACTURER'S
2. FOLLOW THE INSTRUCTIONS INCLUDED WITH THE SPECIFIC BRACKET PACKAGE THAT YOU ARE USING, TO MOUNT THE BRACKETS TO YOUR VEHICLE.
 INSTALLATION INSTRUCTIONS AND PARTS LIST MODEL: 583098, 583102, 583108, 583114, 583125, 584098, 584102, 584114, 584125 O-MEGA II 6 OVAL STEPS UNIVERSAL APPLICATION 1. READ INSTRUCTIONS COMPLETELY AND CHECK
Installation Instructions
 UNIVERSAL 20K Industry Standard Rail Universal Mounting Kit #2720 Gross Trailer Weight (Maximum)...20,000 lbs. Vertical Load Weight (Max. Pin Weight)...5,000 lbs. SYSTEM TOW CAPACITY Please note, in order
31025 INSTALLATION INSTRUCTIONS
 105 INSTALLATION INSTRUCTIONS Safety glasses should be worn at all times while installing this product. YEARS: 011 MAKE: FORD, MERCURY MODEL: ESCAPE, MARINER STYLE: SUV WARNING: NEVER EXCEED YOUR VEHICLE
Installation Instructions
 Equipment Required: Installation Instructions Fastener Kit: F Wrenches: 15/16, 10 mm Drill Bits: 1/4 Other Tools: Drill, Reciprocating Saw 9464/9474 HIDE-A-GOOSE HITCH All Fasteners Typical, Both Sides
CSA CERTIFIED Conforms to UL 507
 Installation tion Instructions Please read and save these instructions! TURBO/MAXX12 Volt All Weather RV Ventilator Fans P/N 00-965001 Deluxe Model 1200T WITH THERMOSTAT P/N 00-965007 Standard Model 3550
Please read BOTH these Installation Instructions and the General Information sheet prior to installing or operating this equipment.
 Attachment Tab Height: 24-1/4 Serial Number Attachment Tab Width: 24 Please read BOTH these and the General Information sheet prior to installing or operating this equipment. 1. Blue Ox towing products
SERIES A & AA ROLLER DOORS INSTALLATION GUIDE
 SERIES A & AA ROLLER DOORS INSTALLATION GUIDE THESE INSTRUCTIONS ARE PROVIDED FOR USE BY EXPERIENCED INSTALLERS OF GARAGE DOORS BY UNDER-TAKING THE INSTALLATION OF THIS DOOR, THE INSTALLER UNDERSTANDS
Mustang Shaker
 2005-2009 Mustang Shaker CDC #110050 ( 05/ 06) or 0711-7000-01 ( 07/ 09) Component Check List: Quantity/Description Part # CDC Installer 1 - Engine Cover Assembly 114050 1 - Aluminum Shaker Scoop 183020
Comfort Ride Shock absorber system part numbers 2450, 2460 and 2470 Installation Instructions
 Comfort Ride Shock absorber system part numbers 2450, 2460 and 2470 Installation Instructions All specifications are subject to change without notice. MOUNTING FLANGE CENTER HOLE FRONT OF Item Qty Part
INSTALLATION MANUAL PROTECT-A-RAIL CAB PROTECTOR PACK RAT DRAWER UNITS MODELS NOTICE WARNING DANGER CAUTION
 TRUCK STORAGE SOLUTIONS SECURING YOUR REPUTATION INSTALLATION MANUAL PROTECT-A-RAIL STEEL & ALUMINUM CAB SIDE PROTECTOR BOX WITH PACK RAT DRAWER UNITS PROTECT-A-RAIL CAB PROTECTOR MODELS ATTENTION: PLEASE
Mega-Flow External Damper Fans
 Mega-Flow External Damper Fans With Cone Owner s Manual Hired-Hand, Mfg., Inc. PO Box 140 1733 County Road 68 Bremen, Alabama 35033 Part No. 4801-5402 Rev 4/08 Owners Manual Mega-Flow External Damper Fans
RPM Rollbar Installation Instructions Ford Mustang 05-11
 RPM Rollbar Installation Instructions Ford Mustang 05-11 IMPORTANT READ BEFORE STARTING INSTALLATION Check for backing plate clearance between the undercarriage and fuel lines directly below area where
31033 INSTALLATION INSTRUCTIONS
 10 INSTALLATION INSTRUCTIONS Safety glasses should be worn at all times while installing this product. YEARS: 011-PRESENT MAKE: JEEP / DODGE MODEL: GRAND CHEROKEE / DURANGO STYLE: SUV WARNING: NEVER EXCEED
INSTALLATION INSTRUCTIONS QA1 P/N x400, x500, x600, x400, x500, x F100 Front Coil-over Suspension System
 INSTALLATION INSTRUCTIONS QA1 P/N 52620-x400, 52620-x500, 52620-x600, 52621-x400, 52621-x500, 52621-x600 65-72 F100 Front Coil-over Suspension System TOOLS AND SUPPLIES REQUIRED Floor Jack Two (2) Jack
Installation Instructions
 Equipment Required: Fastener Kit: F Wrenches: 3/4, 15/16, 13mm Drill Bits: 1/4, some older models a 1/2 Other Tools: Drill, Saber Saw 5/8 Fasteners From Hitch Fastener Kit Installation Instructions GOOSENECK
P/N Deluxe Model 1200T WITH THERMOSTAT P/N Standard Model 3550 WITHOUT THERMOSTAT
 Read and Save These Instructions From MaxxAir Vent Corporation TURBO/ MaxxAir the leader in RV ventilation 215120 CSA approved. Complies with UL507 TURBO/MAXX 12 Volt Installation Instructions P/N 00-965001
INSTALLATION MANUAL MODEL 1200 FULL SIZE TRUCK MODEL 1205 COMPACT SIZE TRUCK
 INSTALLATION MANUAL MODEL 1200 FULL SIZE TRUCK MODEL 1205 COMPACT SIZE TRUCK Load capacity: Up to 800 lbs. evenly distributed. Approximate Assembly and Installation Time: 60 min. (1 hr.) depending on truck
INSTALLATION INSTRUCTIONS CHEVROLET NOVA (NVR-301) INDEPENDENT REAR SUSPENSION
 INDEPENDENT REAR SUSPENSION") INSTALLATION INSTRUCTIONS 68-74 CHEVROLET NOVA (NVR-301) INDEPENDENT REAR SUSPENSION Please read these instructions completely before starting your installation. Assemble suspension on vehicle before powder-coating
INSTALLATION INSTRUCTIONS 68-74 CHEVROLET NOVA (NVR-301) INDEPENDENT REAR SUSPENSION Please read these instructions completely before starting your installation. Assemble suspension on vehicle before powder-coating
Dodge Ram 1500, Quad/Reg. Cab, w/6.4ft. & 8ft. Bed, 2 & 4 WD. For updates see PRODUCT SUPPORT tab at
 Assembly, Installation, Operation and Maintenance Instructions 2009-2016 Dodge Ram 1500, Quad/Reg. Cab, w/6.4ft. & 8ft. Bed, 2 & 4 WD. Part # 30665 Dealer / Installer: Provide a copy of these Instructions
Technical Support Line: (952) Fax Line: (952) Hanover Ave. Lakeville, MN
 Fax Line: (952) Hanover Ave. Lakeville, MN") Technical Support Line: (952) 985-5675 Fax Line: (952) 985-5679 21730 Hanover Ave. Lakeville, MN 55044 www.qa1.net INSTALLATION INSTRUCTIONS QA1 P/N CC104MU Camber Caster Plates 1994-2004 Mustang 5.0/4.6
Technical Support Line: (952) 985-5675 Fax Line: (952) 985-5679 21730 Hanover Ave. Lakeville, MN 55044 www.qa1.net INSTALLATION INSTRUCTIONS QA1 P/N CC104MU Camber Caster Plates 1994-2004 Mustang 5.0/4.6
Spring-Engaged/Hydraulically-Released BD Caliper Brake. (i) MTY (81) QRO (442) MEX (55)
 MTY (81) QRO (442) MEX (55)") Spring-Engaged/Hydraulically-Released BD Caliper Brake (i) FORM NO. L-07-E-0300 In accordance with Nexen s established policy of constant product improvement, the specifications contained in this manual
Spring-Engaged/Hydraulically-Released BD Caliper Brake (i) FORM NO. L-07-E-0300 In accordance with Nexen s established policy of constant product improvement, the specifications contained in this manual
04 & 14 F FRONT 1.0 REAR LEVELING KIT INSTALLATION
 INSTRUCTION PART NO 15312 KIT NO 3836 04 & 14 F-150 2.0 FRONT 1.0 REAR LEVELING KIT INSTALLATION READ INSTRUCTIONS COMPLETELY THROUGH BEFORE STARTING. FAILURE TO ADHERE TO THE INSTRUCTIONS WILL VOID ANY
INSTALLATION INSTRUCTIONS BASE RAIL MOUNTING KIT GM COMPOSITE BED 58208
 INSTALLATION INSTRUCTIONS BASE RAIL MOUNTING KIT GM COMPOSITE BED 58208 DEALER/INSTALLER: (1) Provide this Manual to end user. (2) Physically demonstrate procedures in this Manual to end user. (3) Have
Installation Instructions
 85-4341 rev. 04 10-15 Installation Instructions Thank you for purchasing this antisway bar kit. Please read through these instructions before installation. Rear Anti-Sway Bar Kit for Chevy 2500/3500/4500
SORTIMO: COMMERCIAL VEHICLE RACKING SOLUTIONS CUSTOMER GUIDE
 SORTIMO: COMMERCIAL VEHICLE RACKING SOLUTIONS CUSTOMER GUIDE VS/17/069- Attachment 2 Transit Connect L1 (SWB) 2013 > Transit Connect L2 (LWB) 2013 > Transit Custom L1 (SWB) 2012 > Transit Custom L2 (LWB)
Section 13. Tail Rotor Drive. RotorWay International A600 TALON Construction Manual. Section 13. Page A
 RotorWay International Page A Tail Rotor Drive Procedures covered in this section: Install driveshafts and gearboxes; install drive belt and tensioner; fabricate and install tail rotor pitch actuator arms;
Model AS-FM64 Wall Mount. Full Motion Television Wall Mount
 Model AS-FM64 Wall Mount Full Motion Television Wall Mount Getting Started Introduction Congratulations on the purchase of your new Audio Solutions AS-FM64 Television Wall Mount. For maximum benefit, please
Pickup Truck Rack. Installation instructions for Ford - Chevy - Ram
 Installation instructions for Pickup Truck Rack Ford - Chevy - Ram MyGlassTruck.com 200 Acorn Road LOCAL 856-595-9069 WEB www.myglasstruck.com Glassboro, NJ 08028 FAX 856-863-1480 1-844-364-4022 Version
ROUSH Convertible Stylebar Installation Instructions P/N: (1315-STYLEBAR) Convertible Only
 Convertible Only") Installation Instructions P/N: 421911 (1315-STYLEBAR) Convertible Only 39555 Schoolcraft Rd, Plymouth MI, 48170 800.59.ROUSH Installation Instructions P/N: 421911 (1315-STYLEBAR) Convertible Only Application:
Installation Instructions P/N: 421911 (1315-STYLEBAR) Convertible Only 39555 Schoolcraft Rd, Plymouth MI, 48170 800.59.ROUSH Installation Instructions P/N: 421911 (1315-STYLEBAR) Convertible Only Application:
PH550 Parts Cart. Distributed by Torin Jacks, Inc E. Brickell St. Ontario, CA USA
 PH550 Parts Cart This is the safety alert symbol. It is used to alert you to potential personal injury hazards. Obey all safety messages that follow this symbol to avoid possible injury or death. Questions,
INSTALLATION MANUAL Model
 VAN SOLUTIONS FOR THE WAY YOU WORK INSTALLATION MANUAL Model 2291-3-01 ATTENTION: PLEASE READ AND UNDERSTAND ALL INSTRUCTIONS AND WARNINGS BEFORE ASSEMBLING, INSTALLING OR USING THIS PRODUCT. CAUTION Be
3.5 Oval Bull Bar. Part No. B1508S/B READ INSTRUCTIONS CAREFULLY BEFORE STARTING INSTALLATION
 ` 3.5 Oval Bull Bar Part No. B1508S/B Fits: 2005-2014 Toyota Tacoma REMOVE CONTENTS FROM BOX. VERIFY ALL PARTS ARE PRESENT. 60-180 min Cutting Not Required Drilling Not Required support@trailfx.com READ
RAM 1500, 2019 CLASSIC & 2010-ON 2500/3500 INSTALLATION INSTRUCTIONS
 2009-18 RAM 1500, 2019 CLASSIC & 2010-ON 2500/3500 INSTALLATION INSTRUCTIONS Thank you for purchasing ROCKSTARTM Splash Guard Mud Flaps. Agri-Cover, Inc. proudly manufactured these mud flaps using superior
UNIVERSAL FLOOR SHIFT CONVERSION KIT
 UNIVERSAL FLOOR SHIFT CONVERSION #7668 These instructions apply to the following MR. GASKET products: 7668 - Universal Floor Shift Conversion Kit, Fits Most Rear-Wheel Drive Car Applications With Automatic
Installation Instructions LamboStyleDoors (The instruction are to be used as a reference. Please repeat for both doors)
") Installation Instructions LamboStyleDoors (The instruction are to be used as a reference. Please repeat for both doors) Pre installation check list: - Double check vehicles data with TUV certificate -
Installation Instructions LamboStyleDoors (The instruction are to be used as a reference. Please repeat for both doors) Pre installation check list: - Double check vehicles data with TUV certificate -
GT Mustang Shaker
 CD4II3CU CDC Mustang 5.0 Shaker 2011-2014 2011-2014 5.0 GT Mustang Shaker Part #1111-7000-01 Component Check List: Shaker Assembly: Part # 1 - Aluminum Shaker Scoop 183020 1 Upper Air Box 1111-3301-01
INSTALLATION INSTRUCTIONS QA1 P/N R , R , R R , R , R F100 Rear Coil-over Conversion System
 INSTALLATION INSTRUCTIONS QA1 P/N R120-170, R120-200, R120-250 R220-170, R220-200, R220-250 65-72 F100 Rear Coil-over Conversion System TOOLS AND SUPPLIES REQUIRED Floor Jack Two (2) Jack Stands Drill
R O A D M A S T E R, I N C.
 R O A D M A S T E R, I N C. 17 14 9 8 12 13 5 6 7 Note: this bracket will not fit models with Active Shutters. ITEM QTY NAME PART # 1...4...1/2 x 3 1/2 BOLT...350103-00 2...2...1/2 x 4 1/2 BOLT...350106-00
Air Conditioner for M915 A0/A1 Truck
 RD-2-4530-0 Air Conditioner for M915 A0/A1 Truck INSTALLATION INSTRUCTIONS Install refrigerant compressor per instructions provided with compressor mount kit. CAUTION: Edges of sheet metal can be sharp!
INSTALLATION MANUAL PACK RAT DRAWER UNITS MODELS NOTICE DANGER WARNING CAUTION
 TRUCK STORAGE SOLUTIONS SECURING YOUR REPUTATION INSTALLATION MANUAL ALUMINUM STEEL & ALUMINUM & STEEL SIDE ALL WITH PURPOSE CHEST PACK RAT DRAWER UNITS MODELS ATTENTION: PLEASE READ AND UNDERSTAND ALL
Adult Car Plans. A comprehensive guide to help you build an official Soap Box Derby Adult Car
 Adult Car Plans A comprehensive guide to help you build an official Soap Box Derby Adult Car 1 Table Of Contents Introduction...Page 3 Adult Car Floorboard...Page 4 Step One Steering Stop Installation...Page
RollSeal 1733 County Road 68 Bremen, Alabama Part No Rev Owner s Manual RS-Divider Curtain
 1. 2. 7 3. 4. RollSeal 1733 County Road 68 Bremen, Alabama 35033 256-287-7000 Part No 4801-5176 Rev 12-11-17 Owner s Manual RS-Divider Curtain Table of Contents 1 Warnings (Avertissements)... 3 2 Limited