Pegasus H7 Projector Angel Eye Conversion & GiSi HID Kit INSTALLATION
|
|
|
- Adelia Webb
- 6 years ago
- Views:
Transcription


 OEM")
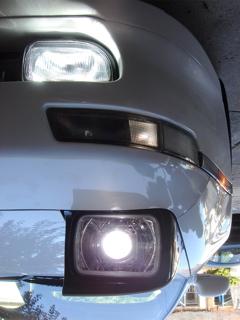
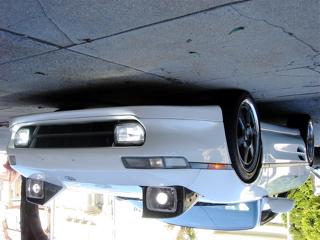
1 Pegasus H7 Projector Angel Eye Conversion & GiSi HID Kit INSTALLATION OEM MR2 lighting (Before) Pegasus headlight Conversion & GiSi HID OEM MR2 lighting (Before) OEM MR2 lighting (Before) 1 of 15 10/13/07 10:30 PM
 (Before)")
")


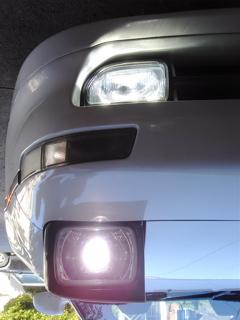
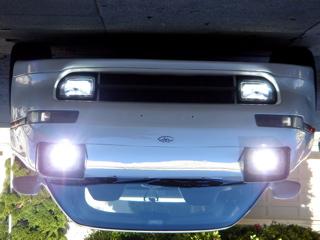
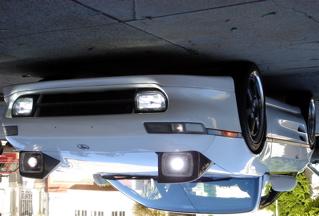
2 OEM MR2 lighting (Before) OEM MR2 lighting (Before) Comparing: Pegasus versus OEM MR2 lighting OEM MR2 lighting (Before) 2 of 15 10/13/07 10:30 PM
")


3 Pegasus & GiSi HID components (Close Up) Pegasus & GiSi HID components (Close Up) GiSi HID Super Thin Ballast & HID bulb (Close Up) GiSi HID bulb & connector plugs (Close Up) 3 of 15 10/13/07 10:30 PM


 4 of")
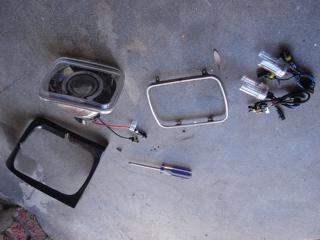
4 H4 adapter wires (One end to ballast other end to OEM MR2 factory harness H4 plug) H4 adapter wires (One end to ballast other end to OEM MR2 factory harness H4 plug) H4 adapter wires (One end to OEM MR2 factory harness H4 plug & other goes to the ballast) Lay out your parts & Tool (Phillips Screwdriver) 4 of 15 10/13/07 10:30 PM


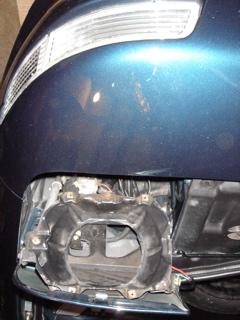
5 Use the Philips screwdriver to remove the 4 screw on the black shroud Use the Philips screwdriver to remove the 4 screw on the black shroud What it looks like after you removed: Black shroud, aluminum trim, OEM glass What it looks like after you removed: Black shroud, aluminum trim, OEM glass 5 of 15 10/13/07 10:30 PM


 6 of")
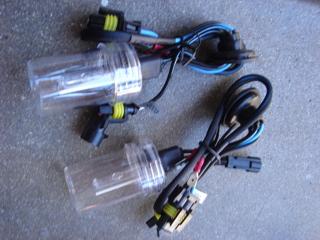
6 What it looks like after you removed: Black shroud, aluminum trim, OEM glass Remove the aluminum trim which supports the glass headlight: (4 screws = same Phillips screwdriver) Remove the aluminum trim which supports the glass headlight: (4 screws = same Phillips screwdriver) GiSi HID bulbs: (One per headlight housing) 6 of 15 10/13/07 10:30 PM
 shipping:")

 Feed the HID bulb HOLD @ black")
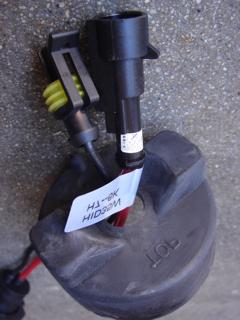
7 Unscrew the plastic casing that protcts the bulbs in shipping: (cover, cap, washer, bulb) Unscrew the plastic casing that protcts the bulbs in shipping: (cover, cap, washer, bulb) Feed the HID bulb wirethrough the Pegasus rear rubber boot hole: (NEVER touch HID bulb glass. black base) Feed the HID bulb wirethrough the Pegasus rear rubber boot hole: (NEVER touch HID bulb glass. black base) 7 of 15 10/13/07 10:30 PM


 Secure the bulb down with the prong")
 8 of 15 10/13/07")
8 Feed the HID bulb wirethrough the Pegasus rear rubber boot hole: (NEVER touch HID bulb glass. black base) GiSi HID bulb fits into the bulb slot behind each Pegasus headlight housing: (NEVER touch HID bulb glass. black base) Secure the bulb down with the prong hinge latch lock: (NEVER touch HID bulb glass. black base) Secure the bulb down with the prong hinge latch lock: (NEVER touch HID bulb glass. black base) 8 of 15 10/13/07 10:30 PM
 Trickle boot alongside the wires toward the bulb's base")


9 Squeeze the circular rubber grommit through the rubber boot hole (as shown) Trickle boot alongside the wires toward the bulb's base & fit the boot hole over the bulb's base's circular perimeter Use Electric Tape to help seal off weathering (Around the circular rubber boot & angel eye wire opening) Mount the ballast alongside the OEM factory wiring loom Make sure it's tight & does not vibrate loose (Use zip ties though the 3-4 ballast mounting holes) One ballast for driver side One ballast for passenger side 9 of 15 10/13/07 10:30 PM
 Bird's Eye View One ballast for driver side One ballast for passenger side Mount the")
 Lying under car looking")
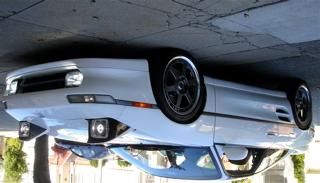
 Lying under car looking up One ballast for driver side One ballast for passenger side One")
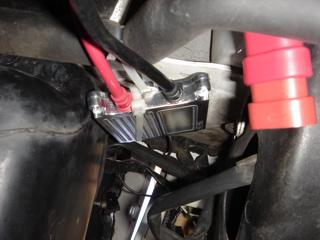
10 Mount the ballast alongside the OEM factory wiring loom Make sure it's tight & does not vibrate loose (Use zip ties though the 3-4 ballast mounting holes) Bird's Eye View One ballast for driver side One ballast for passenger side Mount the ballast alongside the OEM factory wiring loom. Make sure it's tight & does not vibrate loose (Use zip ties though the 3-4 ballast mounting holes) Lying under car looking up One ballast for driver side One ballast for passenger side Mount the ballast alongside the OEM factory wiring loom Make sure it's tight & does not vibrate loose (Use zip ties though the 3-4 ballast mounting holes) Lying under car looking up Mount the ballast alongside the OEM factory wiring loom Make sure it's tight & does not vibrate loose (Use zip ties though the 3-4 ballast mounting holes) Lying under car looking up One ballast for driver side One ballast for passenger side One ballast for driver side One ballast for passenger side 10 of 15 10/13/07 10:30 PM
 Lying under car looking")

 11 of 15 10/13/07 10:30 PM")
11 Mount the ballast alongside the OEM factory wiring loom Make sure it's tight & does not vibrate loose (Use zip ties though the 3-4 ballast mounting holes) Lying under car looking up Picture shown above taken from installation for HID headlights & HID foglight. Thus, two ballasts per side. (Only for customers who purchased HID headlight & HID foglight) Mount the ballast alongside the OEM factory wiring loom Make sure it's tight & does not vibrate loose (Use zip ties though the 3-4 ballast mounting holes) Lying under car looking up Picture shown above taken from installation for HID headlights & HID foglight. Thus, two ballasts per side. (Only for customers who purchased HID headlight & HID foglight) 11 of 15 10/13/07 10:30 PM
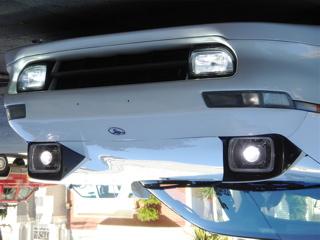
12 (Passenger side) (Driver side) 12 of 15 10/13/07 10:30 PM
 (Driver side)")


 13 of 15")
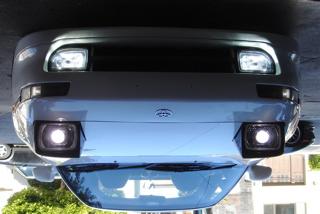
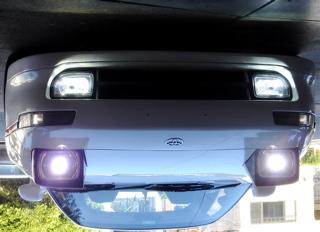
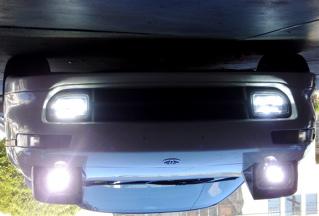
13 (Driver side) (Driver side) (Driver side) Pegasus conversion kit & GiSi HID cutoff-line for aligning your output (Use Philips screwdriver per OEM ajduster screw on headlight ) 13 of 15 10/13/07 10:30 PM

 aligning your output (Match")
 Normal height level is match to one inch")

14 Pegasus conversion kit & GiSi HID cutoff-line for aligning your output (Use Philips screwdriver per OEM ajduster screw on headlight ) Pegasus conversion kit & GiSi HID cutoff-line for aligning your output (Use Philips screwdriver per OEM ajduster screw on headlight ) Pegasus conversion kit & GiSi HID cutoff-line for aligning your output (Match the center most inner lines into one straight line) Normal height level is match to one inch above top edge of front car's rear bumper 14 of 15 10/13/07 10:30 PM
15 Main Page Copyright, of 15 10/13/07 10:30 PM
Luminator Low-Rise Headlight. Designed and built by Radioflyer Innovations
 Luminator Low-Rise Headlight system for C5 Corvette Designed and built by Radioflyer Innovations 1 Tools Required Phillips head screwdriver Flathead screwdriver Torx 15 screwdriver Torx 20 screwdriver
ProjectorZ II Xenon Headlight Installation Guide
 ProjectorZ II Xenon Headlight Installation Guide Written exclusively for Umnitza s ProjectorZ II Product This step-by-step guide is designed to be used in together with other available documentation including
V-HID Headlight Installation Instructions
 V-HID Headlight Installation Instructions Thank you for purchasing our New high quality easy to install Parts4PowerToys V-HID headlight kit for your Harley Davidson. The following installation instructions
C4 Sound Deadening & Insulation Kit Interior Removal & Installation Instructions
 C4 Sound Deadening & Insulation Kit Interior Removal & Installation Instructions Ok, let's start with taking the radio bezel dash area off first. Here is what the OEM radio looks like, and the points you
Mustang HID Headlight Installation Guide (9007)
") Mustang HID Headlight Installation Guide 1994-2004 (9007) The below installation instructions work for the following products: 9007 Bulb HID Headlight Coversion Kit 1994-2004 The following are a set of
Mustang HID Headlight Installation Guide 1994-2004 (9007) The below installation instructions work for the following products: 9007 Bulb HID Headlight Coversion Kit 1994-2004 The following are a set of
Amp & Speaker Upgrade Install Instructions for Victory Cross Country
 Amp & Speaker Upgrade Install Instructions for Victory Cross Country Tools Needed: 13mm Socket 4mm Ball Head Allen Socket 5mm Allen Wrench 10mm Wrench Wire Cutters Wire Strippers Phillips Screwdriver Pocket
Carousel Unit User Manual Replacing the Check Stand Motor
 Carousel Unit User Manual Replacing the Check Stand Motor 02/01/2017 1 Table of Contents Tools:... 3 Turn Off Power to the Unit:... 4 Remove Power Switch... 5 Remove Electric Eyes:... 6 Remove POS (Point-Of-Sale)
Current Range Rover Sport STRUT Collection Installation Manual
 2014 - Current Range Rover Sport STRUT Collection Installation Manual 1 1. Removing Main Grille and Lower Fascia 1.1 Run a line of low tack masking tape across the front of the bumper below the grille
E31 HID Install for Euro Lights By: Faisal Ahmed
 E31 HID Install for Euro Lights By: Faisal Ahmed Parts Needed: H1 HID kit High Temp 9006 Light Socket set (Available at Auto Parts Store Thanks Laszlo) Spade Connectors set (Available at Auto parts store)
How To: HID installation guide
 How To: HID installation guide Please check your local regulations to determine the suitability and legality of this installation for your vehicle. It should be noted that some HID aftermarket kits may
Shelby GT500 Front Fascia Conversion Kit (05-09 All) Item # Installation Time: 1 Day. Required tools:
 Item # Installation Time: 1 Day. Required tools:") Shelby GT500 Front Fascia Conversion Kit (05-09 All) Item #53611 Installation Time: 1 Day Required tools: Phillips Screw driver 10mm Socket + Ratchet/Wrench 8mm Socket + Ratchet/Wrench 5mm Socket + Ratchet/Wrench
Shelby GT500 Front Fascia Conversion Kit (05-09 All) Item #53611 Installation Time: 1 Day Required tools: Phillips Screw driver 10mm Socket + Ratchet/Wrench 8mm Socket + Ratchet/Wrench 5mm Socket + Ratchet/Wrench
Ford Mustang V6 OEM-Style Fog Light Kit Parts List: Quantity: Tool List:
 2015-2017 Ford Mustang V6 OEM-Style Fog Light Kit Parts List: Quantity: Tool List: LED Foglights/ Bezels 2 Flat head & Phillips screwdriver (if you ordered part#3600) Ratchet & Socket set OR Wiring harness
SCION tc FOG LIGHT. Part Number: STC-312 / STC-812
 SCION tc 2011-2013 FOG LIGHT Part Number: STC-312 / STC-812 Kit Contents Item # Quantity Reqd. Description 1 2 Fog Lamps 2 2 Fog Light bezels 3 1 Switch Assembly 4 1 Fog Light Operation guide 5 1 Harness
INSTALLATION INSTRUCTIONS FUEL SURGE TANK KIT
 INSTALLATION INSTRUCTIONS FUEL SURGE TANK KIT BMW E46 3-Series, Excl Convertible Document: 19-0056 Support: info@radiumauto.com Relieve fuel pressure in vehicle before beginingthe installation. Disconnect
PONTIAC FIREBIRD
 1974-78 PONTIAC FIREBIRD Two Panel Sequential LED Tail Light Kit Installation Guide Kit Contents: 2 LED panels 2 LED panel mount kits 6 rubber grommets 1 power wire 1 pigtail harness Kit 1 crimp terminal
TOYOTA PRIUS FOG LIGHT (Halogen or LED)
") Part Number: TPR-413 / TPR-813 Kit Contents Item # Quantity Reqd. Description 1 2 Fog Lamps 2 1 Lower Grill 3 1 Switch Assembly 4 1 Fog Light Operation guide 5 1 Harness Bag Hardware Bag Contents Item
Part Number: TPR-413 / TPR-813 Kit Contents Item # Quantity Reqd. Description 1 2 Fog Lamps 2 1 Lower Grill 3 1 Switch Assembly 4 1 Fog Light Operation guide 5 1 Harness Bag Hardware Bag Contents Item
COLD AIR INTAKE INSTALLATION INSTRUCTIONS PART NUMBER D A. APPLICATION: E36/7 M-Roadster or M-Coupe 3.
 COLD AIR INTAKE INSTALLATION INSTRUCTIONS PART NUMBER D760-0323A APPLICATION: 1998-00 E36/7 M-Roadster or M-Coupe 3.2 Liter PARTS LIST Air Filter Assembly 3 1/2" Tube Intake Shield Silicone Hose Airflow
White / Amber LED Angel Eye DIY Guide Turn Signal Method
 White / Amber LED Angel Eye DIY Guide Turn Signal Method Remove rubber trim surrounding the headlight. Remove corner light. Usually 2000-2001 e46s will have a slide in style where you press in the tab
EURO HEADLIGHT ADJUSTER REMOVAL AND INSTALLATION
 EURO HEADLIGHT ADJUSTER REMOVAL AND INSTALLATION This document is a step by step explanation of how to remove and replace the headlight adjusters in the Euro headlights. Parts needed to repair both headlights:
ACD-PRO Install in 2008 EvoX
 Turning in a counter clockwise direction, unscrew ift knob ACD-PRO Install in 2008 EvoX Slide back and remove the floor console panel assembly Pull up to remove the center console tray Disconnect the plug
KENSUN HID AUTOMOTIVE HEAD LAMP CONVERSION KIT INSTALLATION MANUAL
 1 KENSUN HID AUTOMOTIVE HEAD LAMP CONVERSION KIT INSTALLATION MANUAL 2 CONTENTS A. Before Installing B. Installing the Bulbs C. Installing the Ballasts D. For Bi Xenon Only: Installing the Relay Harness
LED Fog Light. Conflicts Note: 1832, 1852, 1856, 1872, General Applicability Fits Models
 LED Fog Light Year & Model Part Number 2017 Corolla TCO-817 Conflicts Note: 1832, 1852, 1856, 1872, 1874 General Applicability Fits Models 1863 1866 1864 1865 Additional Items Required For Installation
HID INSTALLATION ON RST1000 Futura
 HID INSTALLATION ON RST1000 Futura Disclaimer: This is a full description of what I have done to my motorcycle. I am in no way suggesting you do as I have done by following these instructions. I have not
Deep Space Lighting. VOLVO VNL BI-XENON HEADLAMP KIT Installation Instructions. Tools Needed: #2 Philips screwdriver 10mm socket and ratchet
 Deep Space Lighting VOLVO VNL BI-XENON HEADLAMP KIT Installation Instructions Estimated Installation Time: 15-45 minutes Tools Needed: #2 Philips screwdriver 10mm socket and ratchet Before starting, make
B5 A4 1.8t Front Mount Intercooler Install Instructions
 B5 A4 1.8t Front Mount Intercooler Install Instructions Only work underneath your vehicle after properly supporting it with adequate jack stands on a flat surface. NEVER work under a vehicle only supported
Tools you will need: Screwdrivers, Metric Sockets, Hook and Loop Tape or Zip Ties, Shop Light, Wire cutters, Wire crimping tool
 Overview: This guide provides instruction for installing Adventure Wagon s Auxiliary Battery Tray and the charging bundle. Package Contents: Adventure Wagon Battery Tray includes the tray plus mounting
Remove 4 circled pins. Route wiring along dashed line. Remove the 2 9mm nuts and black retaining plate that secure extractor.
 2015 Ford Mustang Turn Signal Hood Kit Parts List: Quantity: Tool List: Bracket & pre-installed lamp 2 Flat head screwdriver Wiring harness 1 Phillips screwdriver PB-3660 Parts Bag 1 Ratchet & Socket set
Amp & Speaker Upgrade Install Instructions for Road Glide
 Amp & Speaker Upgrade Install Instructions for Road Glide Tools Needed: 1/2 inch Socket Wire Cutters 7/16 inch Socket Wire Strippers 10 mm Socket Phillips Screwdriver 1/2 inch Ratchet Wrench T25 Torx driver
Conflicts. TOYOTA Prius Foglights. Part Number: Accessory Code: LF1. Factory Fog Lights
 TOYOTA Prius 2011- Foglights Part Number: 00016-47401 Accessory Code: LF1 Conflicts Factory Fog Lights Item # Quantity Reqd. Description 1 2 Fog Lamps 2 2 Fog Lamp s bezels 3 1 Switch Assembly 4 1 Fog
Headlight Removal & Installation: Mercedes W203 C Class
 Headlight Removal & Installation: 01-07 Mercedes W203 C Class Disclaimer: Buyer assumes any and all risk and liability from the installation and use of this product. Seller, author, or any of their affiliates
CVO - with ipod Amp & Speaker Upgrade Install Instructions for Batwing Fairing
 CVO - with ipod Amp & Speaker Upgrade Install Instructions for Batwing Fairing Tools Needed: 1/2 inch Socket Wire Cutters 7/16 inch Socket Wire Strippers 5/16 inch Socket Phillips Screwdriver 1/2 inch
MKV Jetta OEM Fog Installation Instructions
 Installation Procedures MKV Jetta OEM Fog This tutorial is provided as a courtesy by. Proper service and repair procedures are vital to the safe, reliable operation of all motor vehicles as well as the
Depress each tab as you pull the bezel off. The bezels are tight. L.H. shown.
 2013-2014 Ford Mustang V6 & Boss 302 Lower Valance Fog Light Kit Parts List: Quantity: Tool List: Fog light & bulb with bracket 2 Flat head & Phillips screwdriver Black bezels 2 Ratchet & Socket set OR
instrucions (NEW TRANSLATION).
.") http://www.touratech-usa.com/instl/instl_040-1504.html back to: www.touratech-usa email the webmaster Synopsis Xenon lamp (HID) is much brighter than incandescent lamps, the light is a more natural color
http://www.touratech-usa.com/instl/instl_040-1504.html back to: www.touratech-usa email the webmaster Synopsis Xenon lamp (HID) is much brighter than incandescent lamps, the light is a more natural color
UNPACK AND IDENTIFY THE FOLLOWING PARTS.
 SUT-250-M2 ASSEMBLY REQUIREMENTS *Torque all T-bolt nuts to 35-40 foot pounds. *Check all lights before towing. *Tire pressure not to exceed recommendation on serial tag. *Re-torque wheel nuts after first
Fog Lamp Instructions
 Fog Lamp Instructions 2011+ Ford Super Duty Congratulations on your purchase of a high quality PUTCO product. Should you need any application or technical assistance feel free to call us at: 1-800-247-3974
Installation Guide. Immediate support available at or contact us at
 Installation Guide Professional installation is recommended. ALL HID KITS ARE INSTALLED AT YOUR OWN RISK! OPT7 and its affiliates will not be held liable for any damage or cost associated with installation
Cut zip ties and remove 2 plastic wiring harness brackets.
 TROUBLESHOOTING: Please read and understand all installation instructions before proceeding with the installation. Included parts: 1 - New Bosch Cp3 Pump 1 - HSM Pulley 1 - Serpentine Belt 1 - Pump Bracket/
In This DIY We Will Show You How To Install Recon Backup Lamps (part # To Run On A Separate Switch & In Reverse.
 In This DIY We Will Show You How To Install Recon Backup Lamps (part # 264150 To Run On A Separate Switch & In Reverse. Please Note, There Are Many Ways of Installing These Lights, Including Wiring Methods,
Raxiom Mustang Halo Projector Headlights (2010+) - Installation Instructions
 - Installation Instructions") Raxiom Mustang Halo Projector Headlights (2010+) - Installation Instructions The below installation instructions work for the following products: Raxiom Chrome Mustang Halo Projector Headlights (2010+)
Raxiom Mustang Halo Projector Headlights (2010+) - Installation Instructions The below installation instructions work for the following products: Raxiom Chrome Mustang Halo Projector Headlights (2010+)
LoD Offroad. Jeep JK Door Linked Rear Bumper with Tire Carrier Installation Instructions
 LoD Offroad Jeep JK Door Linked Rear Bumper with Tire Carrier Installation Instructions Please read through the instructions before beginning any part of the installation process. Packaging List: 1-Rear
QUICK GUIDE. Table of Contents. Headlight Installation Guide - English P. 03
 3 Table of Contents Headlight Installation Guide - English P. 03 Headlight Installation Guide - Spanish P. 12 Registration Card - English P. 17 Registration Card - Spanish P. 18 Please contact Spyder Auto
Product Packing List
 Product Packing List Product: SDHQ-55-1650-G3 Description: 2016+ Toyota Tacoma Hidden Winch Mount (1) Winch Mount SDHQ-55-1650-G3-A (2) Lower Support Brackets SDHQ-55-1650-G3-B (1) Lower Bumper Bracket
Mustang Headlight w/ CCFL Halo (05-09) - Installation Instructions
 - Installation Instructions") Mustang Headlight w/ CCFL Halo (05-09) - Installation Instructions The below installation instructions work for the following products: Chrome Mustang Headlight w/ CCFL Halo (05-09) Smoked Mustang Headlight
Mustang Headlight w/ CCFL Halo (05-09) - Installation Instructions The below installation instructions work for the following products: Chrome Mustang Headlight w/ CCFL Halo (05-09) Smoked Mustang Headlight
INSTALLATION INSTRUCTIONS FORD SUPER DUTY NOTE: (Vehicle Retains Tow Hook) PART # P3064
 PART # P3064") INSTALLATION INSTRUCTIONS 2011-14 FORD SUPER DUTY 250-550 NOTE: (Vehicle Retains Tow Hook) PART # P3064 PARTS LIST: Qty Description Qty Description 1 Grill Guard 2 10mm x mm Hex Bolts 1 Driver/Left Lower
INSTALLATION INSTRUCTIONS 2011-14 FORD SUPER DUTY 250-550 NOTE: (Vehicle Retains Tow Hook) PART # P3064 PARTS LIST: Qty Description Qty Description 1 Grill Guard 2 10mm x mm Hex Bolts 1 Driver/Left Lower
Fig A ADDICTIVE DESERT DESIGNS. Preparation: Removal: Release these clips
 Preparation: Disconnect the negative battery terminal. Park the vehicle on level ground and set the emergency brake. We recommend reading through the installation instructions in whole before performing
Fitting instructions for Lynx R Fairing DR650
 Fitting instructions for Lynx R Fairing DR650 Thank you for purchasing the Lynx fairing. We hope the design features will extend the enjoyment of your DR. Parts List 1 x Fairing and screen with two thumb
SAFETY THIS PRODUCT IS FOR OFFROAD USE ONLY. ALL LIABILITY FOR INSTALLATION AND USE RESTS WITH THE OWNER.
 Installation Instructions SAFETY Your safety and the safety of others is very important. In order to help you make informed decisions about safety, we have provided installation instructions and other
Installation Manual TWM Performance Short Shifter Nissan 350Z, 370Z Infiniti G35, G37
 Installation Manual TWM Performance Short Shifter Nissan 350Z, 370Z Infiniti G35, G37 It is preferable to park on a flat surface, as you will have to engage and disengage the hand brake and shift from
D40C HINGE # x Support Plate x M8 Bolt 8 x M8 Washer 6 x M6 20mm Bolts 6 x M6 Washers 19 x Screws
 HINGE # 1017 2 x Support Plate 1018 8 x M8 Bolt 8 x M8 Washer 6 x M6 20mm Bolts 6 x M6 Washers 19 x Screws 2 x Lid mount gas strut bracket 1041 2 x Self tap strut mount 1040 1 x Central Lock bracket 1510
Deuce/Ace Installation Instructions
 HARDWARE KIT: Upper Mounting Plate: 2-7/16" (11mm) X 3.5" bolts 2-7/16" flange nuts 2-2" spacers 2-7/16" trim cap mounting washers 2 - plastic trim caps TOOLS NEEDED: safety glasses wrenches 16mm or 5/8"
Replacing the X Axis Belt
 Overview This Document is designed to guide you through replacing the X axis belt on your Epilog Zing laser Engraver. Requirements: Tools: Replacing the X Axis Belt For the Epilog Zing Laser Engraver Revision
SAFETY THIS PRODUCT IS FOR OFFROAD USE ONLY. ALL LIABILITY FOR INSTALLATION AND USE RESTS WITH THE OWNER.
 SAFETY Your safety and the safety of others is very important. In order to help you make informed decisions about safety, we have provided installation instructions and other information. These instructions
LED Fog Light & DRL 2in1. TOYOTA RAV4 Part Number: Accessory Code: L D4000
 TOYOTA RAV4 Part Number: 00016-00081 Accessory Code: L D4000 2017 LED Fog Light & DRL 2in1 Conflicts - Vehicles w/o factory fog lights, Model 4476 Kit Contents Item # Quantity Reqd. Description 1 2 Fog
Part Number: TRA-316/TRA-816
 Date: 07.29.2016 TOYOTA RAV4 2016- FOG LIGHT (Halogen/LED) Part Number: TRA-316/TRA-816 Kit Contents Item # Quantity Reqd. Description 1 2 Light Housings 2 2 Light Bezels 3 1 Wire Harness Bag* 4 1 Connector
SAFETY. Injury hazard
 SAFETY Your safety and the safety of others is very important. In order to help you make informed decisions about safety, we have provided installation instructions and other information. These instructions
2010 Toyota Prius Fog Light Retrofit
 2010 Toyota Prius Fog Light Retrofit A DIY prospective Last updated: Friday, December 25, 2009 *** Disclaimer Use this document and its contents at your own risk! *** Forward: This document was compiled
MOUNT BRACKET PARTS and HARDWARE: Installation parts with * come loose in hardware kit bag. Other parts are preassembled
 INSTALL INSTRUCTIONS C-DMM-2006 Dash Monitor Mount 2017-2019 F-250, 350, 450 Pickup, F-450 and 550 Cab Chassis, 2015-2019 Ford F-150 and 2018-2019 Expedition Notes: 1. The C-DMM-2000 series Dash Monitor
Supply Valve Replacement
 This procedure is to help facilitate the replacement of the25.1-25.4 supply valves. Solenoid Supply Valves Note: You will need the following tools: Socket Wrench with extension and a 3/8 Socket Size 1
Ford F-150 Speaker Replacement Instructions
 Ford F-150 Speaker Replacement Instructions This article was downloaded from http://www.fordf150.net Be sure to go there to view and download the other how-to articles. Thanks to John Meyer for contributing
LABOUR ESTIMATE GUIDE
 INSTALLATION INSTRUCTIONS FOR 2001-2005 Audi A4 1.8T These instructions are applicable to vehicles equipped with either manual or automatic transmissions Thank you for choosing to purchase a Carbonio Intake
Fitting instructions for Lynx R Fairing CRF 250L
 Fitting instructions for Lynx R Fairing CRF 250L Thank you for purchasing the Lynx fairing. We hope the design features will extend the enjoyment of your CRF. Parts List 1 x Fairing and screen with two
SCION xa 2004 SATELLITE RADIO TUNER Section I Installation Preparation
 Section I Installation Preparation Part Number: PT546 52040 Section I Installation Preparation Kit Contents Item # Quantity Reqd. Description 1 1 Satellite Tuner 2 1 Ground Cable 3 1 Tuner Cable 4 2 Tuner
RS5mesh style Grille. Audi A5/S5. Installation Instructions. pre-facelift ES best viewed in Acrobat Reader
 Audi A5/S5 pre-facelift RS5mesh style Grille Installation Instructions ES2627648 This tutorial is provided as a courtesy by ECS Tuning. best viewed in Acrobat Reader Proper service and repair procedures
REAR STEEL BUMPER INSTALLATION INSTRUCTIONS Runner
 REAR STEEL BUMPER INSTALLATION INSTRUCTIONS 2010+ 4Runner Version 2.1.0 - September 2016 Thank you for purchasing the Southern Style OffRoad Toyota 4Runner 5 th Gen Modular Rear Plate Steel Bumper. It
TrailGator REAR BUMPER INSTALLATION INSTRUCTIONS Runner
 TrailGator REAR BUMPER INSTALLATION INSTRUCTIONS 2010+ 4Runner Version 3.1.0 - December 2018 Thank you for purchasing the Southern Style OffRoad Toyota 4Runner 5 th Gen Modular Rear Plate Steel Bumper.
SAFETY THIS PRODUCT IS FOR OFFROAD USE ONLY. ALL LIABILITY FOR INSTALLATION AND USE RESTS WITH THE OWNER.
 SAFETY Your safety and the safety of others is very important. In order to help you make informed decisions about safety, we have provided installation instructions and other information. These instructions
2007 Current Jeep Wrangler JK Stealth Fighter Front Bumper Installation Instructions
 2007 Current Jeep Wrangler JK Stealth Fighter Front Bumper Installation Instructions PREPARATION 1. Disconnect the negative terminal on the battery. Park the vehicle on level ground and set the emergency
Headlight Removal & Installation: VW Jetta Mk.4 / Bora
 Headlight Removal & Installation: 99-04 VW Jetta Mk.4 / Bora Disclaimer: Buyer assumes any and all risk and liability from the installation and use of this product. Seller, author, or any of their affiliates
Remove black panel shown. Save 6 retaining pins for re-install later. Pry up on center part of pin first. Then pry out entire retaining pin.
 2005-2009 Ford Mustang V6 Fog Light Wiring Kit Parts List: Quantity: Tools Required: Wiring harness 1 Flat head screwdriver Supplemental wire leads 2 Ratchet & Socket set OR Wire tap red 2 Adjustable Wrench
Replacing a Load Cell in the 400 Series Force Plate
 Replacing a Load Cell in the 400 Series Force Plate Determining which load cell is faulty You will first need to determine which load cell is at fault. To do this you will need the XPV7 diagnostic software.
This harness kit includes: Installing the Hybrid ReVolt Universal grid charger in an Insight
 Installing the Hybrid ReVolt Universal grid charger in an Insight This harness kit includes: Insight harness (2000 to 2006) (a) 4 #6 mounting screws for bulkhead (c) 2 sheet metal screws for fan board
C15C C15C. Page 1 of 20
 2 x Lid Front Hinge 1135 8 x M8 Bolt 8 x M8 Washer (3mm Thick) 4 x M6 Large washers 4 x M6 Spring washers 4 x M6 x 40mm Bolts 6 x M6 20mm Bolts 6 x M6 Washers 20 x Screws 2 x Lid mount gas strut bracket
Part Number: T4R-2N1. Hardware Bag Contents. General Applicability Models with factory fog light. Conflicts -
 Date: 07.30.2015 TOYOTA TUNDRA 2014-2016 LED Fog Light & DRL 2 in 1 Part Number: T4R-2N1 Kit Contents Item # Quantity Reqd. Description 1 2 DRL + Fog Light Housing 2 1 Driver Box 3 1 Harness bag 4 1 User
#1 PROVIDER OF HID KITS.
 Please read the reference handbook carefully before removing original car lighting from the vehicle. Please read through the entire handbook carefully before installing the HID system. Following this guide
EXTERNAL OIL FILTER SYSTEM WITH COOLANT FILTER KIT
 EXTERNAL OIL FILTER SYSTEM WITH COOLANT FILTER KIT External Oil Filter with Coolant Filter Kit PACKING LIST: QTY. 4 4 Description Oil Filter Coolant Filter Small Brass 90 Fitting Large Brass 90 Fitting
Revised 10/23/2015 Page 2 of 10
 1.Remove the gauge, side panels, hood and headlight. Remove the air box from the throttle bodies then remove the seat and gas tank. 2.Carefully remove temp sensor from air box using a small pick or screw
SCION tc FOG LIGHT (Halogen or LED)
") Part Number: STC-314 / STC-814 Kit Contents Item # Quantity Reqd. Description 1 2 Fog Lamps 2 2 Fog Light bezels 3 1 Switch Assembly 4 1 Fog Light Operation guide 5 1 Harness Bag Hardware Bag Contents
Part Number: STC-314 / STC-814 Kit Contents Item # Quantity Reqd. Description 1 2 Fog Lamps 2 2 Fog Light bezels 3 1 Switch Assembly 4 1 Fog Light Operation guide 5 1 Harness Bag Hardware Bag Contents
INSTALLATION INSTRUCTIONS JEEP 2011-UP JK SECURITY FULL CONSOLE #274
 INSTALLATION INSTRUCTIONS JEEP 2011-UP JK SECURITY FULL CONSOLE #274 PARTS CHECKLIST Tuffy Console #9 Left Front Mounting Bracket #10 Right Front Mounting Bracket #11 Electronics mounting bracket #12 Divider
NBH110SY FITTING INSTRUCTIONS. VF COMMODORE 5-13 on 76mm NUDGE BAR VEHICLE FRONTAL PROTECTION SYSTEM (VFPS) FOR AIR BAG & ADR COMPLIANT VEHICLES
 FOR AIR BAG & ADR COMPLIANT VEHICLES") NBH110SY FITTING INSTRUCTIONS REPLACES: 00.00.00 REVISED: 26.11.13. Check installation hardware before commencing. 1. Lift bonnet. VF COMMODORE 5-13 on 76mm NUDGE BAR VEHICLE FRONTAL PROTECTION SYSTEM
NBH110SY FITTING INSTRUCTIONS REPLACES: 00.00.00 REVISED: 26.11.13. Check installation hardware before commencing. 1. Lift bonnet. VF COMMODORE 5-13 on 76mm NUDGE BAR VEHICLE FRONTAL PROTECTION SYSTEM
HID XENON. [I n s t a l l a t i o n G u i d e ] H E A D L I G H T S. Method of installing the bulb and ballast.
![HID XENON. [I n s t a l l a t i o n G u i d e ] H E A D L I G H T S. Method of installing the bulb and ballast.](/thumbs/76/74317385.jpg "HID XENON. [I n s t a l l a t i o n G u i d e ] H E A D L I G H T S. Method of installing the bulb and ballast.") HID XENON H E A D L I G H T S [I n s t a l l a t i o n G u i d e ] Please read the installation guide carefully before removing original car lighting from the vehicle. Please read through the entire installation
HID XENON H E A D L I G H T S [I n s t a l l a t i o n G u i d e ] Please read the installation guide carefully before removing original car lighting from the vehicle. Please read through the entire installation
HID XENON HEADLIGHTS. [ Installation Guide] 1. Parts Included In Kit. Method of installing the bulb and ballast.
![HID XENON HEADLIGHTS. [ Installation Guide] 1. Parts Included In Kit. Method of installing the bulb and ballast.](/thumbs/73/68689032.jpg "HID XENON HEADLIGHTS. [ Installation Guide] 1. Parts Included In Kit. Method of installing the bulb and ballast.") Please read the installation guide carefully before removing original car lighting from the vehicle. Please read through the entire installation guide carefully before installing the HID system. Following
Please read the installation guide carefully before removing original car lighting from the vehicle. Please read through the entire installation guide carefully before installing the HID system. Following
Part Number: STC-314. Special Chemicals 3M Silicon Sealant
 Date: 08.11.2014 SCION tc 2014-15 FOG LIGHT (Halogen or LED) Part Number: STC-314 Kit Contents Item # Quantity Reqd. Description 1 2 Fog Lamps 2 2 Fog Light bezels 3 1 Switch Assembly 4 1 Fog Light Operation
PART NUMBER: H630SSJ000. Kit Contents: A. Amplifier with Bracket (1) D. Badge (2) with push nuts (4)
 D. Badge (2) with push nuts (4)") Kit Contents: A. Amplifier with Bracket (1) D. Badge (2) with push nuts (4) E. Clip B. Harness (1) C. Cable tie (8) F. Mounting Hardware (2) G. Replacement Speaker (2) H. HVAC Duct extension (2) IMPORTANT:
Kit Contents: A. Amplifier with Bracket (1) D. Badge (2) with push nuts (4) E. Clip B. Harness (1) C. Cable tie (8) F. Mounting Hardware (2) G. Replacement Speaker (2) H. HVAC Duct extension (2) IMPORTANT:
ECO-SERIES REAR BUMPER FORD F150 PART # FD-2962
 15-16 FORD F150 PART # FD-2962 Body Armor 4x4 272 Corporate Terrace St. Corona, CA 92879 951-808-0750 Customer Service hours: M-TH: 7:30am to 4:30 PM Pacific Time Friday: 8 AM Noon Pacific Time PARTS LIST:
TOYOTA FJ CRUISER / 4RUNNER COLD AIR INTAKE Section I Installation Preparation. 4.0L V6 (1GR) Roller Rocker Part Number(s): PTR
 Roller Rocker Part Number(s): PTR") Section I Installation Preparation Part Number(s): PTR03-89100 Kit Contents Item # Quantity Reqd. Description 1 1 Air Filter (P/N: PTR43-00083) 2 1 Upper Air Box 3 1 Lower Air Box 4 1 Hump Coupler 5 1
Section I Installation Preparation Part Number(s): PTR03-89100 Kit Contents Item # Quantity Reqd. Description 1 1 Air Filter (P/N: PTR43-00083) 2 1 Upper Air Box 3 1 Lower Air Box 4 1 Hump Coupler 5 1
SAFETY THIS PRODUCT IS FOR OFFROAD USE ONLY. ALL LIABILITY FOR INSTALLATION AND USE RESTS WITH THE OWNER.
 SAFETY Your safety and the safety of others is very important. In order to help you make informed decisions about safety, we have provided installation instructions and other information. These instructions
Locate the 4 screws on each side of the vehicle, on the inner fender well liner. Remove them with a Torx T25 bit:
 Installation Instructions for TyrolSport UG SM IC. The first step in installing the UG SMIC is removing the front bumper. Locate the 4 screws on each side of the vehicle, on the inner fender well liner.
Projector39/Umnitza BMW Headlight & Re-Installation for E39s Predator Angel Eyes, and Lamin-X Installation
 Projector39/Umnitza BMW Headlight & Re-Installation for E39s Predator Angel Eyes, and Lamin-X Installation Now it is time to remove the headlights! Obviously you have to open the hood to do this. 100_3630.jpg
INSTALLATION INSTRUCTIONS
 INSTALLATION INSTRUCTIONS Accessory Application Publications No. P/N 08V31-SDA-102 2007 ACCORD 4-DOOR AII 32672 Issue Date JULY 2006 NOTE: Fog lights can be installed in a vehicle equipped with a factory
INSTALLATION INSTRUCTIONS
 INSTALLATION INSTRUCTIONS Accessory Application Publications No. P/N 08V31-SDN-100 2004 ACCORD 2-DOOR AII 25735 Issue Date SEP 2003 NOTE: The outside temperature gauge can not be installed in a vehicle
05-08 GT. Hellion Power Systems Mustang Kit Instructions
 Hellion Power Systems 05-08 Mustang Kit Instructions 1. Disconnect Battery 2. Drain Radiator, keep fluid for re-installation. 3. Remove air box and inlethoses. 6. Next, underneath, punch oil pan for turbo
INSTALLATION INSTRUCTIONS
 INSTALLATION INSTRUCTIONS Accessory Application Publications No. P/N 08V31-SDA-102 2007 ACCORD HYBRID AII 32762 Issue Date JULY 2006 NOTE: The outside temperature gauge cannot be installed in a vehicle
TOYOTA TACOMA Part Number: TTA-BGB16-DRL TTA-BGP16-DRL
 TOYOTA TACOMA 2016-17 Date: 10.29.2016 Billet Grille w/led DRL Part Number: TTA-BGB16-DRL TTA-BGP16-DRL Kit Contents Item # Quantity Reqd. Description 1 2 LED DRL 2 1 Driver Box 3 1 Switch 4 1 User Card
Signal Mirror Installation Instructions
 etae Signal Mirror Installation Instructions BMW K1200LT Motorcycle 1999-2009 THE safety accessory of the 21 st Century. P/N 210-0074-0 Rev D7 (12-10-08), BTV 2002 Muth Mirror Systems, LLC. Please read
SDHQ F-150 Winch Mount System Installation
 SDHQ 2015+ F-150 Winch Mount System Installation Recommended Tools: Door panel removal tool Needle Nose Pliers 10mm Socket or Wrench 13 mm or ½ Socket (⅜ Drive) 14 mm or 9/16 Socket (⅜ Drive) 21 mm or
VW SCIROCCO TWINTERCOOLER INSTALLATION INSTRUCTIONS
 VW SCIROCCO TWINTERCOOLER INSTALLATION INSTRUCTIONS Tools needed: T25 torx driver Small flat head screwdriver 12mm & 13mm socket, with ratchet Dremel or similar with cut off disc Large Phillips screwdriver
INSTALLATION INSTRUCTIONS FOR THE MOTOR TRIKE CROSS COUNTRY / CROSS ROADS / HARD BALL RAKE KIT
 INSTALLATION INSTRUCTIONS FOR THE MOTOR TRIKE CROSS COUNTRY / CROSS ROADS / HARD BALL RAKE KIT Thank you for choosing the Motor Trike Cross Country / Cross Roads / Hard Ball rake kit. We ask that you read
INSTALLATION INSTRUCTIONS
 INSTALLATION INSTRUCTIONS FUEL SURGE TANK INSTALLATION KIT 1999-2006 BMW E46 COUPE Document# 19-0056 Support: info@radiumauto.com Note: This kit was designed for a standard single pump Radium Engineering
RedlineGoods Tacoma Installation Manual
 RedlineGoods 2016+ Tacoma Installation Manual AUTOMATIC SHIFT BOOT AND EBRAKE BOOT Press down on the factory shift boot collar to disconnect it from the shift knob. Unscrew shift knob Pull up on the rear