Ball Joint Replacement for 2005 F L SuperDuty SRW, 4x4 with ESOF
|
|
|
- Estella Gallagher
- 6 years ago
- Views:
Transcription
 two AC3Z-1S175-A = updated axle shaft \"dust")
1 Ball Joint Replacement for 2005 F L SuperDuty SRW, 4x4 with ESOF Parts required: two 5C3Z-4A322-AA = hub / steering knuckle o-ring (my originals were yellow, the replacements are black) two AC3Z-1S175-A = updated axle shaft "dust seal" two 5C3Z-3254-A = steering knuckle / axle shaft seal upper and lower ball joints ( I went with Moog from rockauto.com) = two K80026 and two K8607T two 5C3Z-1K106-AB = hub lock service kit (optional, at your discretion) * = Installer/Remover, Drive Pinion Oil Seal * (F250/350); * (F450/550) = Installer / Wheel Knuckle Seal Special tools* - This job requires some special tools - ones you either make yourself, figure out close substitutions from a hardware store, or buy from Ford. If you have at your disposal the proper Ford tools, I would HIGHLY recommend them. The details below describe how you can complete the job with common parts from a hardware store, but great care must be taken to ensure each seal is seated properly and to the correct depth. If not, you run the risk of severe damage to the bearings, hub, axle shaft and knuckle. YOU'VE BEEN WARNED! 1) Brake caliper removed. You must not let the caliper hang by the hose; I use an old coat hanger to suspend the caliper. Be warned: the caliper bolts took an incredible amount of muscle not only to break them loose, but to fully extract them (mine were coated with a lot of thread lock). I had to use a pipe slipped over the end of my socket wrench to break them loose. 2 Brake caliper bolts reinstallation torque = 225 Nm (166 lb-ft).


2 2) Removing the ABS sensor. There was so much brake dust and dirt on the outside of mine, that I initially had a hard time figuring out what portion of it actually separated from the hub. I suppose you could leave it in place and just unfasten enough retaining clips to set the hub off to the side, but I found it far easier to remove it. There is a small sealing o-ring that provides a little bit of resistance when first pulling it out. The bottom photo shows it removed completely, and the hub is actually pulled out a bit from the steering knuckle. 1 ABS sensor reinstallation torque = 18 Nm (13 lb-ft)

3 3) Hub lock pulled free. This is held in with three small Torx screws. The service manual says you might have to jiggle the drive shaft a bit to loosen the spline fit, though mine came out with ease. You might have to gently pry it loose from the hub face, the gasket can sometimes be a little sticky. There is a Ford service kit for the hub lock which includes a new o-ring (orange one seen below) and a new gasket that fits between the hub face and the hub lock flange. They claim a new o-ring and gasket should be used when removing and installing the hub lock - you might be able to get away without replacing it, but you run the risk of creating a vacuum leak, which will cause your hubs not to automatically lock when selecting 4x4 from the dash. 3 hub lock Torx screws reinstallation torque = 6 Nm (55 lb-in)
.")
4 4) Snap ring. Oh the dreaded snap ring. This is what's visible when the hub lock is removed. Out of this entire job, this snap ring was one of the two most frustrating aspects (the other being the ball joints themselves, more on that later). There is not a lot of clearance between the OD of the spline on the drive shaft and the ID of the spline on the hub. This, combined with the depth that the snap ring sits at, makes it difficult to extract.

5 Adding to the frustration is that none of the normal, readily available sources of inexpensive auto tools (AutoZone, Checker, Napa, Carquest, Craftsman, Pep Boys, etc) carry a set of snap ring pliers that are long enough. Trust me. I spent all day Saturday driving around to these places. The only place that had something viable was Harbor Freight. A friend of mine classified Harbor Freight as "a great place to get a tool if you need it to last just for the day". That couldn't be more true when it comes to their snap ring pliers. They did have a large set of snap ring pliers that are deep enough, but I bent the first set, and had to go back and get another set (I was more gentle this time). Note the required length of the pliers below - the pliers need to reach about 4 inches in to get to the snap ring. If I were to do this job again, I would get with a local Snap-On or Matco rep and spend the money for the correct tool. It will turn 30 min of cursing and swearing (per side) into a simple 5 second task.

6 5) Now that snap ring is removed, remove the 4 nuts on the backside of the steering knuckle and the hub can be pulled free and set to the side. Note the large black seal inside the steering knuckle. This is a very tight fit, and needs to be pounded on from the back side to remove it (which subsequently destroys it, requiring a new one for re-assembly). Before removing it, measure the depth where the seal sits - this will come in handy when installing the new one. In order to get better access to the back side, I found it easier to disconnect the tie rod end first, allowing the knuckle to swing about on the ball joints. This way you can pound a couple times on one side, swing it, pound on the other side, etc. This seal may be harder to remove than you think. Keep pounding, it will eventually come out. 4 hub nuts reinstallation torque = 180 Nm (133 lb-ft)

7 6) The driver's side tie rod end is easy, but the passenger side is a little more difficult since it's attached to the drag link. I found it easiest to loosen the nut so it's flush with the bottom of the drag link stud and give it a couple whacks from the bottom with a small sledgehammer. I tried a couple different pullers that I rented, but there's no good spot for all the puller arms to grab on to. The drag link will not pull completely free from the steering knuckle without loosening the stabilizer bar nut (both sides) and swinging the stabilizer bar up and out of the way. When you're done, grab another wire hanger and secure both the tie rod and drag link out of the way. In the picture below, the tie rod end is precariously balanced on the sledgehammer just for the picture, don't leave it this way! 1 Tie rod end nut reinstallation torque = 70 Nm (52 lb-ft)
 and keep it from crashing to the floor.")
8 7) Loosen the nuts on the ball joints to be flush with the stud, then start whacking with the sledgehammer. With the nuts still on the stud, this will retain the steering knuckle (very heavy) and keep it from crashing to the floor. This is what it looks like with the steering knuckle removed:

 adapters to make this part of the job go smoothly.")
9 8) Unlike earlier model years, you don't have to worry about messing up the position of the camber adjusting sleeve upon reinstallation of the steering knuckle. As long as the flat edge is facing inward, that's all you have to worry about. 9) Removing and installing and the ball joints from the steering knuckle - the other single most frustrating aspect of the job. Not that it's particularly hard, if you have the right tools. The ball joint press kits and oversized 4WD adapter kits that you can rent from the auto parts stores don't have the right sized (diameter and depth) adapters to make this part of the job go smoothly. I solved it by rigging up a combination of adapters and plate steel to finally get it to work, but not after several attempts of trying different combinations (and more cursing). It was kind of like working on a puzzle with pieces from another puzzle, but trying to force them together anyway. Depending on what you have lying around your garage, you might have something that will work in a similar fashion:

10 10) This is just a shot of a good tip I read in one of the other write-ups. When you first begin to tighten the lower ball joint nut, eventually the stud will begin to turn in the joint instead of the nut turning on the stud shaft. By placing a floor jack under the knuckle and providing a bit of pressure, the stud will begin to seat in the knuckle, keeping it from turning and allowing the nut to turn on the stud shaft once again. You can also see in this shot the stabilizer arm that was loosened to provide room for the drag link to be removed from the steering knuckle. Carefully follow the torque instructions that came with the new ball joints.

11 11) I forgot to take a picture of the top ball joint nut during install, but this is important to note. Surprise! On the Moog ball joints, it's a 33mm nut, bigger than the OEM nut. What does this mean? Because the centerline of the upper ball joint is angled towards the coil spring, the larger nut means that you will not be able to get a socket and a torque wrench on this larger nut (at least I couldn't). Solution? A crowfoot. Problem is, good luck finding that 33 mm crowfoot. I poked around on ebay and scored this handy dandy item for a mere $25:

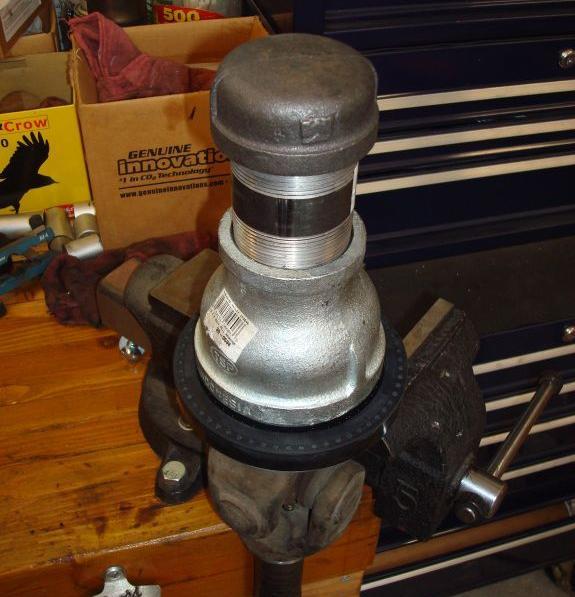
12 12) Installing the new drive shaft / steering knuckle seal. At my local Ace Hardware store I found some plumbing pieces that ended up working adequately as a seal installation tool. A galvanized 2" cap, pipe, and 3" X 2" reducer screwed together to fit the job nicely. Just be careful to get the seal started evenly. This is where the Ford tool would save some headaches - I'm assuming it pilots on some portion of the shaft to seat the seal evenly. I hung the axle from my vice just above the u-joint - I can't imagine trying to do it any other way.
13


14 13) Axle tube seal (i.e. dust seal). This is an updated seal that superseded the one that was on my truck. Rather than fitting on the axle shaft, it lightly presses into the flange on the end of the axle tube. I found that a 4" PVC coupler with a piece of wood to lightly bang on made a perfect tool to press this in place: This is the seal before and after installation:


15 This is the documentation that came with the updated seal:


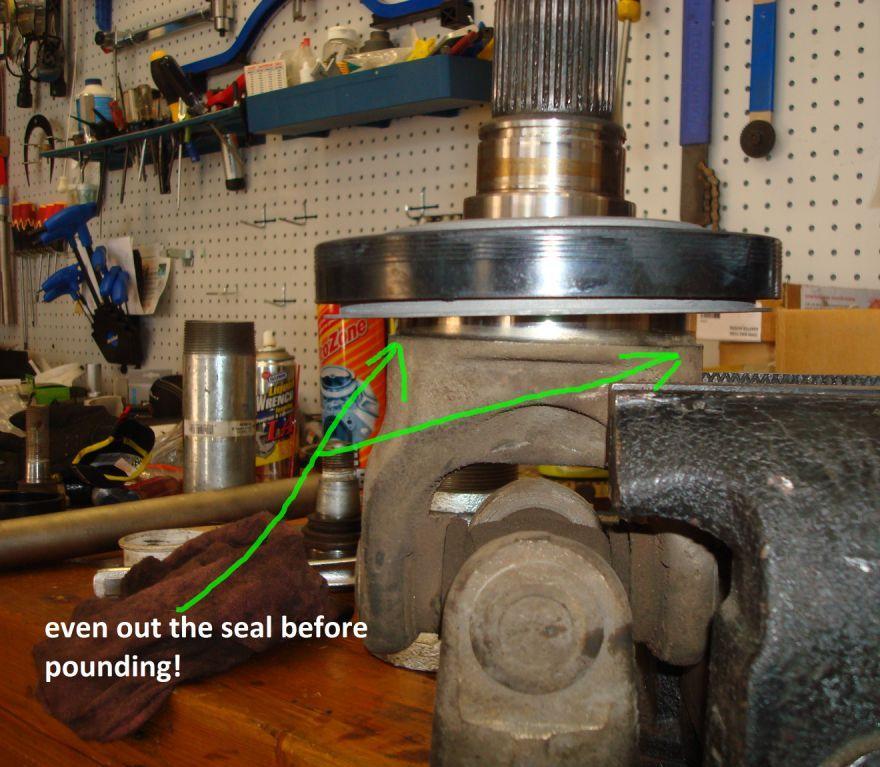
16 14) Installing the axle shaft / seal assembly. I apologize for forgetting to take a picture of this step, but I realized a lot of this stuff after the fact. If you remembered to measure the depth of the old seal, use that to determine how far to seat the new seal / axle assembly. If not, the outboard outer edge of the seal needs to sit right at or just a millimeter or two inboard of the second stepped diameter in the knuckle. I don't know if the inboard outer edge of the seal is structurally sound enough to stop itself at the right depth against the last, smallest diameter step in the knuckle. The installation tool from Ford seats it at a specific depth, so if you're making do without and you go too far, you're faced with tearing it out, buying a new seal, and trying again. So, what did I use to pound this seal in? A threaded 4" diameter PVC coupler and an end cap and a 3 lb sledge hammer. Pounding on PVC isn't the greatest (or probably safest) but I really wailed on it and it eventually got there. In a write up for a 7.3L ball joint procedure, the author states he got the knuckle seal just deep enough to seat the hub, then used the hub nuts to draw everything together. YOU CANNOT DO THIS - at least not on the 6.0L. There needs to be space between the outboard face of the knuckle seal and the inboard side of the hub. If you use the hub to "press" the knuckle seal, the rotating hub will grind the face of the knuckle seal, filling the area with metal shavings, destroying the knuckle seal and causing a vacuum leak. When you think the seal is pressed deep enough, dry fit the hub and ensure it spins smoothly and freely. Below is what I used to pound the seal in. The OD of the PVC coupler is just shy of the seal OD, so while not ideal, it works in a pinch.

17 15) This is a shot of the axle installed with the new dust seal. It's a little alarming at first because it looks like the axle isn't completely seated, but this is just because the old seal that was seated on the shaft isn't there anymore, exposing a fresh, shiny metal surface:

18 16) Sweet! The Moog ball joints come with Zerk fittings, and fortunately the upper one clears the u-joint on my model year. From the other ball joint write-ups, it appears this was a problem with earlier model years:
upper and lower ball joints ( I went with Moog from rockauto.com): two K80026 and two K8607T
: two K80026 and two K8607T") Parts required: two 5C3Z*4A322*AA = hub / steering knuckle o-ring two AC3Z*1S175*A = updated axle shaft "dust seal" two 5C3Z*3254*A = steering knuckle / axle shaft seal upper and lower ball joints ( I
Parts required: two 5C3Z*4A322*AA = hub / steering knuckle o-ring two AC3Z*1S175*A = updated axle shaft "dust seal" two 5C3Z*3254*A = steering knuckle / axle shaft seal upper and lower ball joints ( I
Front Axle Pinion Seal Replacement
 Front Axle Pinion Seal Replacement by Flopster843 10 Apr 2016 The AAM 925 axle used on the front of Dodge Ram trucks is a decent unit, but it does have its flaws. This axle lacks lockout hubs on the front
what you need to do is hit the taper housing as hard as you can with your hammers AT THE SAME TIME and at a slight angle, what will happen is you
 first things first, get the car on axle stands and the wheels off. Open the bonnet to let more light through to the area in which you'll be working. The following guide shows the passenger side being done
Rear Wheel Removal (by BassCliff)
") Rear Wheel Removal (by BassCliff) Hello to my GS riding friends! After picking up a nail in my rear tire (while on the freeway at 75mph!) I thought I would take a few pictures to help illustrate the rear
Rear Wheel Removal (by BassCliff) Hello to my GS riding friends! After picking up a nail in my rear tire (while on the freeway at 75mph!) I thought I would take a few pictures to help illustrate the rear
1986 Rear Disk Brake Upgrade. All hard lines mounted to the rear axle with mounting screws. 1/4" fittings
 1986 Rear Disk Brake Upgrade Being well prepared for a project of this size is the key to success. I thought I was well prepared by doing a lot of research and getting all of the required parts before
BBK Ceramic Long Tube Headers (99-04 Cobra and Mach 1) - Installation Instructions
 - Installation Instructions") BBK Ceramic Long Tube Headers (99-04 Cobra and 03-04 Mach 1) - Installation Instructions The below installation instructions work for the following products: BBK Ceramic Long Tube Headers (99-04 Cobra
BBK Ceramic Long Tube Headers (99-04 Cobra and 03-04 Mach 1) - Installation Instructions The below installation instructions work for the following products: BBK Ceramic Long Tube Headers (99-04 Cobra
Changing the Struts on a WK Jeep CRD
 Changing the Struts on a WK Jeep CRD Step by Step By Chirpz Disclaimer: I do not claim that this procedure is the right way or even the best way to change your struts. This is what I did after reading
Rebuilding the Alternator for a 2007 Honda Accord 4CYL. Honda CYL Alternator (Denso)
") Rebuilding the Alternator for a 2007 Honda Accord 4CYL Honda 2007 4CYL Alternator (Denso) The OEM brushes and bearings for this alternator are available for purchase online. On my vehicle with ~240k miles,
Rebuilding the Alternator for a 2007 Honda Accord 4CYL Honda 2007 4CYL Alternator (Denso) The OEM brushes and bearings for this alternator are available for purchase online. On my vehicle with ~240k miles,
Disco 3 Clock Spring / Rotary Coupler replacement
 Disco 3 Clock Spring / Rotary Coupler replacement I recently had to change my Clock spring and thought some folks may find it helpful to see what it entailed. I did lots of reading around but couldn t
Installation Instructions for BMR Lowering Springs Performance ( Mustang GT)
") Installation Instructions for BMR Lowering Springs Performance (2015-2017 Mustang GT) Time Required: 3+ hours Notes: This install was done with the performance springs from BMR, but install should be the
Installation Instructions for BMR Lowering Springs Performance (2015-2017 Mustang GT) Time Required: 3+ hours Notes: This install was done with the performance springs from BMR, but install should be the
At Mark's suggestion I thought I'd write this up so future Coupe lovers can have as much fun* as I did with this job.
 At Mark's suggestion I thought I'd write this up so future Coupe lovers can have as much fun* as I did with this job. My enormous thanks to forum members, particularly glorfindel, for their advice when
BBK LONG TUBE HEADERS (99-04 GT, Mach 1, Bullitt)
") BBK LONG TUBE HEADERS (99-04 GT, Mach 1, Bullitt) Install Time: Approx. 8-10 hrs Parts Needed: BBK Long Tube Headers Shorty mid pipe X/H O2 wiring harness extensions Hi-temp thread locker Tools Required:
BBK LONG TUBE HEADERS (99-04 GT, Mach 1, Bullitt) Install Time: Approx. 8-10 hrs Parts Needed: BBK Long Tube Headers Shorty mid pipe X/H O2 wiring harness extensions Hi-temp thread locker Tools Required:
SUSP-09, Rear Wheel Bearing Replacement - Steel Trailing Arm. Acrobat Printable Version
 SUSP-09, Rear Wheel Bearing Replacement - Steel Trailing Arm Introduction Acrobat Printable Version I'd like to thank Ben Davis for providing the pictures for this procedure. Ben took the time to take
E31 Repair Procedure Replace Front Wheel Hub/Bearing Assembly
 E31 Repair Procedure 31-21 Replace Front Wheel Hub/Bearing Assembly Disclaimer This repair procedure is provided as is and is not authoritative with respect to any BMW repair operation. Mark F. Fling is
Rear End Installation and Bearing Kit - 8.8in (86-12 V8; V6)
") Rear End Installation and Bearing Kit - 8.8in (86-12 V8; 11-13 V6) Tools Required: Jack Stands 5 Floor Jack 2 Oil Pans 1 Wheel Blocks 2 Differential Oil 3 qts Friction Modifier 3 bottles Tube of Black
Rear End Installation and Bearing Kit - 8.8in (86-12 V8; 11-13 V6) Tools Required: Jack Stands 5 Floor Jack 2 Oil Pans 1 Wheel Blocks 2 Differential Oil 3 qts Friction Modifier 3 bottles Tube of Black
How to replace your Turbo Actuator Step by Step
 How to replace your Turbo Actuator Step by Step Special thanks to other forum members who have previously dealt with this problem! Old By Chirpz New Your Turbo is a lot tougher than the electric actuator
Installation Instructions
 Preparing your vehicle to install your brake system upgrade 1. Rack the vehicle. 2. If you don t have a rack, then you must take extra safety precautions. 3. Choose a firmly packed and level ground to
Full Tilt Boogie (FTBR) Subframe Bushing Kit Install (99-04 Cobra)
 Subframe Bushing Kit Install (99-04 Cobra)") Full Tilt Boogie (FTBR) Subframe Bushing Kit Install (99-04 Cobra) Tools Required: Jack and jack stands (Or a lift) Metric sockets 8,12,15,18,21mm and a 12pt 12mm socket for driveshaft bolts T40 torx bit
Full Tilt Boogie (FTBR) Subframe Bushing Kit Install (99-04 Cobra) Tools Required: Jack and jack stands (Or a lift) Metric sockets 8,12,15,18,21mm and a 12pt 12mm socket for driveshaft bolts T40 torx bit
RHINO SUSPENSION SYSTEM INSTALLATION INSTRUCTIONS
 PARTS INCLUDED: 2 FRONT UPPER A-ARMS 2 FRONT LOWER A-ARMS 2 UNI-BALL JOINTS 2 UNI-BALL JOINT STUDS 2 UNI-BALL JOINT CAPS 2 RETAINING RINGS 1 FRONT SHOCK ASSEM. 2 DELRON STEERING STOPS 2 SHOCK MOUNT SPACERS
Installing Rear Brake Pads on a WK Jeep
 Installing Rear Brake Pads on a WK Jeep Step by Step By Chirpz Disclaimer: I do not claim that this procedure is the right way or even the best way to change your rear brake pads. This is what I did after
Ford Racing BOSS 302 Engine Oil Cooler (11-14 GT)
") Tools needed: 14mm hex socket 7mm socket/wrench 8mm socket/wrench Ford Racing BOSS 302 Engine Oil Cooler (11-14 GT) 10mm socket (for airbox removal) ¾ inch or 19mm wrench Torque wrench Appropriate ratchets
Tools needed: 14mm hex socket 7mm socket/wrench 8mm socket/wrench Ford Racing BOSS 302 Engine Oil Cooler (11-14 GT) 10mm socket (for airbox removal) ¾ inch or 19mm wrench Torque wrench Appropriate ratchets
2001 V70 T5 ETM Removal and Cleaning Directions
 2001 V70 T5 ETM Removal and Cleaning Directions Howard Cheng howardc64@gmail.com 10/24/05 Version 1.4 Read this before you start I performed this ETM cleaning because I had gotten 2 reduced performance
Front Suspension Redo
 Front Suspension Redo Message: First, thanks to all the previous posters for guidance in my doing the suspension. As thanks, here s the updated document for doing the front suspension. Procedure: While
Mercedes Diesel Valve Adjustment Procedure
 1 of 30 5/30/2008 12:58 PM Home Cars for sale Trucks for sale Where we are Links to other diesel sites About us Why diesel? Diesel Videos How they work How they sound FAQ Dodge Diesel Maintenance tips,
Another CJ picture guide to replacing the key cylinder in a non-tilt steering column
 Another CJ picture guide to replacing the key cylinder in a non-tilt steering column by John Strenk Well I'm sure it's happened to all of us one time or another. You park your jeep and go to turn off your
Another CJ picture guide to
 Another CJ picture guide to replacing the key cylinder in a non-tilt steering column by John Strenk Well I'm sure it's happened to all of us one time or another. You park your jeep and go to turn off your
STEP #1: Remove the wheels from the truck. There are (6) 21mm lug nuts holding each wheel on... Remember Lefty Loosy, Righty Tighty.
 21mm lug nuts holding each wheel on... Remember Lefty Loosy, Righty Tighty.") - CustomTacos.com Page 1 of 36 How-To: Toytec Lift Install Read all of these install instructions prior to installing Toytec's suspension lift. I cannot be held responsible for any damages or personal
- CustomTacos.com Page 1 of 36 How-To: Toytec Lift Install Read all of these install instructions prior to installing Toytec's suspension lift. I cannot be held responsible for any damages or personal
Some tips and tricks I learned from getting clutch out of vehicle Skoda Octavia year 2000
 Some tips and tricks I learned from getting clutch out of vehicle Skoda Octavia year 2000 Last change 2013-Oct-11 I bought Haynes manual for a starter. That s something well worth it s cost I believe.
HOW TO MODIFY A STOCK DODGE KEGGER INTAKE MANIFOLD
 HOW TO MODIFY A STOCK DODGE KEGGER INTAKE MANIFOLD Even though this 3.9L V6 intake manifold is smaller than the 5.2L and 5.9L V8 intake manifolds, the same instructions apply to all 3 engines. If you are
Door Panel Removal & Window Stop Adjustment
 Door Panel Removal & Window Stop Adjustment By: Jeff Wolford Disclaimer: This is simply an article of how I fixed my car. I m not responsible if you break, scratch, or mess up anything following my example.
*Some speedometers have these additional electronic connections. If yours does, then remove the smaller slotted screws shown.
 www.odometergears.com 1981-1985 240 Cable-Driven Speedometers (NOT for 1986 and later electronic units) http://www.davebarton.com/240-odometer-repair.html For this set of instructions below, I will not
The Basics. What goes wrong?
 The Basics Let's cover some basic information on AH, TC, and ABS. In simple terms, these three systems combine data from wheel speed sensors, yaw rate sensors, steering wheel position sensors, along with
Rebuilding of the Dana 25 (front axle) Chris Stout
 Chris Stout") The inside gears and bearings were all in excellent condition. A fluid change and some good cleaning was all the was necessary. However, the pinion shaft seal was shot as were the front wheel bearings
The inside gears and bearings were all in excellent condition. A fluid change and some good cleaning was all the was necessary. However, the pinion shaft seal was shot as were the front wheel bearings
Mirrored from:
 Mirrored from: http://www.wranglerforum.com/f274/install-synergy-suspension-ball-joints-write-up-147062.html 03-18-2012, 02:43 AM #1 SilverSport Supporting Member WF Supporting Member Install Synergy Suspension
How I installed new brake pads on my i with Sport Package (should be fine for other E39 s) By Robert B.
 By Robert B.") How I installed new brake pads on my 1999 528i with Sport Package (should be fine for other E39 s) How I installed new brake pads on my 1999 528i with Sport Package (should be fine for other E39 s) By
How I installed new brake pads on my 1999 528i with Sport Package (should be fine for other E39 s) How I installed new brake pads on my 1999 528i with Sport Package (should be fine for other E39 s) By
E46 FUEL FILTER CHANGE Pics from CI
 1 of 10 5/3/2010 1:48 PM E46 FUEL FILTER CHANGE Pics from 2001 330CI Bellows Expansion Joints Metal Bellows Expansion Joints in Every Style from Flexicraft www.flexicraft.com/metal_bellows Ask a BMW Mechanic
Mustang 7.5 Limited Slip Differential (28 Spline) V8; V6:
 V8; V6:") Mustang 7.5 Limited Slip Differential (28 Spline) 79-85 V8; 86-10 V6: Required Tools: Ratchet Wrench Torque Wrench 1/2", 5/16, 3/4", 12mm and 15mm Sockets Lug nut Wrench Dial Indicator Digital Measuring
Mustang 7.5 Limited Slip Differential (28 Spline) 79-85 V8; 86-10 V6: Required Tools: Ratchet Wrench Torque Wrench 1/2", 5/16, 3/4", 12mm and 15mm Sockets Lug nut Wrench Dial Indicator Digital Measuring
Rear drum to disk conversion for a 00 Toyota Camry LE 4 cylinder
 Rear drum to disk conversion for a 00 Toyota Camry LE 4 cylinder *** Read and use at your own discretion I assume no liability for what you or anyone else does with this information. By reading this, you
WARNING: Only perform this installation if you are experienced, fully equipped mechanic.
 DYNATRAC V3.2 2005-Present Ford Super Duty 250/350-4x4, Front Axle, Free Spin Conversion Kit Some of the less common tools, which will be required: 6 point Spanner socket (OTC #7090-A or equivalent). These
VW & Audi TDI CR140 ECO KIT Installation Guide
 VW & Audi TDI CR140 ECO KIT Installation Guide This guide is to help you install your new Rawtek DPF, EGR & Adblue Delete Exhaust ECO Kit on your (2009-2014) VW / Audi with 2.0l CR140 Diesel Engine. Note:
BMW 3 Series E46 Front Wheel Bearing
 BMW 3 Series E46 Front Wheel Bearing Replacement A step-by-step guide on BMW 3 Series E46 Front Wheel Bearing Replacement. Written By: Danielle 2017 guides.drivediy.com Page 1 of 13 INTRODUCTION Discover
Replacing the hub oil seal.
 Replacing the hub oil seal. The most common reason for hub oil seal failure is a blocked axle breather, so check this first before you start. Remove the brass bell-shaped fitting on the top of the axle,
REPLACEMENT OF TRANSMISSION EXTENSION-CASE GASKET AND OUTPUT-SHAFT SEAL ON 95 XJ6
 D. Jensen 2006 Distribution: www.jag-lovers.com REPLACEMENT OF TRANSMISSION EXTENSION-CASE GASKET AND OUTPUT-SHAFT SEAL ON 95 XJ6 V. 1.0 June 2006 The Fine Print: The following is a summary of my experience
Brake Caliper Rebuild - Part Numbers & Tips Per Jim Millet, 3/15/2005
 Per Jim Millet, 3/15/2005 Not too difficult a job. Rears are easier than fronts to access. You ll need the following gasket sets: Front caliper gasket set, P/N 34 11 1 157 037, MSRP $13.58 Rear caliper
Wheel Bearing Replacement Passat TDI
 Rear Bearing/hub assembly replacement This is a fairly straight forward process. Pictures are not necessary for most of this procedure for a person with skills to do this repair. Anyone who thinks they
Commander SUSPENSION SYSTEM INSTALLATION INSTRUCTIONS
 PARTS INCLUDED: 2 - FRONT UPPER A-ARMS 2 - FRONT LOWER A-ARMS 4 - COTTER PINS 2-12MM JAM NUTS 2 - TIE ROD EXTENDERS 8- FLANGED DELRON BUSHINGS 4- DELRON CASTER SPACERS 6 - GREASE FITTINGS 3 - BEARING REMOVAL
Aamir_bt The legend..
 Aamir_bt The legend.. How to do timing on a 4XE1-W (DOHC) engine. well i decided to to a write up for DOHC timing since there was only the SOHC written up, and i had to do a timing belt on my stylus anyways,
Slave Cylinder Weep Hole Drilling Procedure
 Slave Cylinder Weep Hole Drilling Procedure Tools Required: T20 Torx Driver T25 Torx Driver T25 Torx Bit with ¼ Ratchet Wrench 4mm Hex Key (Allen wrench) 5mm Hex Key 6mm Hex Key 8mm Hex Key 12mm Hex Key
Audi A8 Transmission Service By Barry Lenoble and Paul Waterloo
 Page 1 of 18 Technical & Maintenance Upgrades & Style Used A8 Buyer's Checklist Marketplace On Track Gallery Links Contact Home Audi A8 Transmission Service By Barry Lenoble and Paul Waterloo Background
U-Score U-Score AAC Rank AAC Rank Vocabulary Vocabulary
 go 1 927 you 2 7600 i 3 4443 more 4 2160 help 5 659 it 6 9386 want 7 586 in 8 19004 that 9 10184 like 10 1810 what 11 2560 make 12 1264 is 13 10257 on 14 6674 out 15 2350 do 16 2102 here 17 655 eat 18
BMW 528i E39 Sunroof Repair
 These instructions will help guide you through the repair process for broken sunroof control rails on an E39 chassis. Before I get started, I want to give a shout-out to a couple people who also posted
JBA Cat4ward Shorty Header Install (05-10 Mustang GT and Bullitt)
") JBA Cat4ward Shorty Header Install (05-10 Mustang GT and 08-09 Bullitt) Installation Time: 6-8 Hours (Depending on Tools and Help) Tools Required: 8mm Socket 10 mm Socket 13mm Socket 15mm Deep Socket Ratchet
JBA Cat4ward Shorty Header Install (05-10 Mustang GT and 08-09 Bullitt) Installation Time: 6-8 Hours (Depending on Tools and Help) Tools Required: 8mm Socket 10 mm Socket 13mm Socket 15mm Deep Socket Ratchet
J&M Mustang Adjustable Panhard Rod (05-09) - Installation Instructions
 - Installation Instructions") J&M Mustang Adjustable Panhard Rod (05-09) - Installation Instructions The below installation instructions work for the following products: J&M Mustang Adjustable Panhard Rod (05-09) Please read through
J&M Mustang Adjustable Panhard Rod (05-09) - Installation Instructions The below installation instructions work for the following products: J&M Mustang Adjustable Panhard Rod (05-09) Please read through
M52tu-M54 VANOS Assembly & Timing Using G.A.S. Professional Cam Tool Kit
 Home BMW Solutions Porsche Solutions DIY Tech Engine Services Dyno Services Machining About Contact Store Tool Rental M52tu-M54 VANOS Assembly & Timing Using G.A.S. Professional Cam Tool Kit This procedure
DESCRIPTION Acura TSX SUSPENSION Front - TSX. NOTE: For system description and component location, see Fig. 1.
 2004 SUSPENSION Front - TSX DESCRIPTION NOTE: For system description and component location, see Fig. 1. Fig. 1: Identifying Front Suspension Components Wednesday, March 12, 2008 8:30:45 8:30:55 PM Page
How To: Fix That Ugly Hanging E-Brake Cable A CFans Members Mod Project by dirtydawg
 How To: Fix That Ugly Hanging E-Brake Cable A CFans Members Mod Project by dirtydawg Skill Level: Easy Disclaimer: Please use caution and seek professional assistance when necessary. ColoradoFans.com,
WD Dodge Suspension Kit
 92137600 02-05 2WD Dodge 1500 6 Suspension Kit Thank you for choosing Rough Country for your suspension needs. Rough Country recommends a certified technician installs this system. In addition to these
No Drill Modern Gas Shock Installation on a 1931 Ford Model A Coupe
 No Drill Modern Gas Shock Installation on a 1931 Ford Model A Coupe Today we are not going to cover something new but just a little insider info in to what we do during our time off at Apex Tool Company.
Gearbox Assembly 101. Introduction. Before Beginning. By Mark Schutzer 4/13/06
 Gearbox Assembly 101 By Mark Schutzer 4/13/06 Introduction If you are planning to re-motor an old brass locomotive you may want to upgrade to a new gearbox at the same time. The early 60 s and 70 s gearboxes
OVER THE KNUCKLE 1-TON STEERING INSTALLATION INSTRUCTIONS
 OVER THE KNUCKLE 1-TON STEERING INSTALLATION INSTRUCTIONS TOOLS NEEDED Grinder with cutoff wheel, sawzall, cutting torches, or a plasma cutter Welder (for optional sway bar mounts) Hand drill with a ½
Fanatec GT3RS V1 to GT3RS V2 Tutorial
 Fanatec GT3RS V1 to GT3RS V2 Tutorial by Roy Visser 1 How to update your Fanatec GT3RS V1 wheel to a GT3RS V2 wheel Welcome to this guided and detailed tutorial for upgrading your Fanatec GT3RS V1 wheel
Air Compressor/Water Pump IV - Pilot Valve Stem, Test & Installation
 Page 1 of 8 Air Compressor/Water Pump Part IV Pilot Valve Stem, Test & Installation Nelson Riedel Nelson@NelsonsLocomotive.com Initial: 1/13/04 Last Revised: 0 Valve Test: I decided to test the steam valves
Two bolts at. Two each side where studs pass through. rear. Two bolts at. front. Front-most bolt for diagonal brace. Rear jacking point
 The following describes the process of changing the transmission s gear oil in my own 2008 CS 6sp. I have no relationship with any of the products mentioned, other than being a satisfied consumer. Exercise
PRE-INSTALLATION Ford F150 4WD 4" Suspension Lift Kit
 2009-2013 Ford F150 4WD 4" Suspension Lift Kit PRE-INSTALLATION 25007 2 - Knuckle (Driv/Pass) 2 - Crossmember (Front/Rear) 2 - Differential Bracket (Driv/Pass) 1 - Diff. Brace Bracket (Pass) 2 - Front
How to Change Front Brake Pads on a Toyota Corolla
 How to Change Front Brake Pads on a Toyota Corolla Link to this article on (All other links in this document are disabled) Follow this picture guide to change the front brake pads on a 2003-2008 Toyota
 www.odometergears.com Mercedes-Benz Mechanical Odometer Repair This how to can be used for all mechanical repairs as the only difference will be the removal of the instrument cluster. http://www.dieselgiant.com/repairyourodometer.htm
Installation Guide for Rough Country 2.5 inch Lift Kit w/o Shocks (07-15 Wrangler JK) Item # J10212
 Item # J10212") Installation Guide for Rough Country 2.5 inch Lift Kit w/o Shocks (07-15 Wrangler JK) Item # J10212 Installation Time: 3 Hours Tools Required: Jack (2 helps, but not needed) Jack stands(2 3-ton, 2 2-ton)
Installation Guide for Rough Country 2.5 inch Lift Kit w/o Shocks (07-15 Wrangler JK) Item # J10212 Installation Time: 3 Hours Tools Required: Jack (2 helps, but not needed) Jack stands(2 3-ton, 2 2-ton)
Tools needed: Here is a pic of the shift kit I used. It is a Transgo brand and as you can see, it just a bag full of springs and one valve.
 Before installing a shift kit, be sure the transmission is in good operating order. If your transmission is making noises, slipping, shifting bad or the fluid looks brown or smells burnt, take the transmission
Replace clutch and flywheel * (Volkswagen Sharan 2010-Present)
") Replace clutch and flywheel * (Volkswagen Sharan 2010-Present) *Caution! This instructions are created by random users and must be used as a reference only! Please, take all safety precautions, and if
Replace clutch and flywheel * (Volkswagen Sharan 2010-Present) *Caution! This instructions are created by random users and must be used as a reference only! Please, take all safety precautions, and if
Z32 Solid Rear Subframe Bushing Installation
 Z32 Solid Rear Subframe Bushing Installation Thank you for purchasing a set of Sonic Motorsport (NZ) designed and 300 Degree produced solid subframe bushings! Over time the OEM subframe bushings will fail.
09-UP FORD F150 6 LIFT KIT
 92159800 09-UP FORD F150 6 LIFT KIT THANK YOU FOR CHOOSING ROUGH COUNTRY FOR YOUR SUSPENSION NEEDS. Rough Country recommends a certified technician install this system. In addition to these instructions,
Seadoo Supercharger Removal Guide RXP
 Seadoo Supercharger Removal Guide RXP RXT, RXT X, RXP X and GTX models are very similar and Removal and Installation is similar. The Ceramic washers installed by the OE manufacturer do not completely disintegrate
Connecting the rear fog light on the A4 Jetta, while keeping the 5 Light Mod
 Connecting the rear fog light on the A4 Jetta, while keeping the 5 Light Mod DISCLAIMER: I'm human and make mistakes. If you spot one in this how to, tell me and I'll fix it This was done on my 99.5 Jetta.
2008 Toyota Tundra 4WD Brake Job: A Quick Job and Even Quicker Write-Up.
 FRONT BRAKES: 2008 Toyota Tundra 4WD Brake Job: A Quick Job and Even Quicker Write-Up. 1. Remove this bolt holding brake line bracket to the suspension. 2. I had to replace all 4 rotors at 60K miles, so
W123 Transmission Vacuum Modulator Adjustment DIY - measure it the 'right' way
 W123 Transmission Vacuum Modulator Adjustment DIY - measure it the 'right' way Why do you need to do this?: You need to do this to properly check the internal hydraulic pressure of the transmission, either
This Document is property of Old New England Marine
 A lot of you folks out there seem to be tearing into carbs quite a bit. Before you choose to open up a carb, you really need to look at what's feeding the carb first, and that is the boats fuel system.
YOU MAY WANT TO FIRST TRY TO LOOSEN THE FILTER HOUSING
 2005 XC90 Tune-up (5-cyl) Including: Oil Change - Spark Plugs - Fuel Filter - Cabin Filter First off - let me say that I am an amateur (at best) mechanic, and I claim no responsibility for whatever you
Subaru Front Mount Intercooler Kit STI Subaru Front Mount Intercooler Kit STI
 Subaru Front Mount Intercooler Kit STI 2008-2014 715500 Subaru Front Mount Intercooler Kit STI 2008-2014 Congratulations on your purchase of the Subaru Front Mount Intercooler Kit STI 2008-2014. The following
Spikes-Spider Hub Installation
 Spikes-Spider Hub Installation The instructions that are provided with the Spikes Spiders are pretty good. I've created this page for two reasons: to show those that are thinking of buying a set exactly
PRE-INSTALLATION. INSTALLATION INSTRUCTIONS Front Ford F150 4WD 4" Suspension Lift Kit
 2015 Ford F150 4WD 4" Suspension Lift Kit PRE-INSTALLATION 2 - Knuckle (Driv/Pass) 2 - Crossmember (Front/Rear) 2 - Differential Bracket (Driv/Pass) 1 - Diff. Brace Bracket (Pass) 2 - Front Brake Line
Brake Upgrades for FWD/4WD with 5x100 stud pattern
 Brake Upgrades for FWD/4WD with 5x100 stud pattern These started out as my original front brakes, & because I m more of a twisty road person, than straight line speed, I didn t think they d be adequate.
This guide will explain how to remove the old springs from the car and replace them with lowering springs.
 fubar Guide: Fitting lowering springs to the Mk2 Clio The method described below worked for me. I am not saying it is the only method to complete the task. I will not accept any responsibility for damage
BEW engine timing belt replacement procedure from MOGolf (as demonstrated on a 2004 Jetta).
.") BEW engine timing belt replacement procedure from MOGolf (as demonstrated on a 2004 Jetta). Based on the procedure published by Volkswagen, but modified for the "average" shadetree mechanic. Some special
BEW engine timing belt replacement procedure from MOGolf (as demonstrated on a 2004 Jetta). Based on the procedure published by Volkswagen, but modified for the "average" shadetree mechanic. Some special
Installation Instructions
 Instructions Created by an: 86-95 Suzuki Samurai Samurai Front Axle Knuckle Rebuild Kits (SKU# SAX-KRK) Installation Instructions Revised 6-6-14 Suggested Tools: CAUTION: Safety glasses should be worn
Audi B6/B7 A4/S4 Rear Wheel Bearing Service Kit
 Audi B6/B7 A4/S4 Installation Tutorial ES2561175 This tutorial is provided as a courtesy by ECS Tuning. Proper service and repair procedures are vital to the safe, reliable operation of all motor vehicles
Днепр) Russian Motorcycle Carburetors Part 2B: PZ-24 and PZ-28 Carburetor Assembly and Jet Drilling
 Russian Motorcycle Carburetors Part 2B: PZ-24 and PZ-28 Carburetor Assembly and Jet Drilling") Ural (Урал( Урал) - Dnepr (Днепр( Днепр) Russian Motorcycle Carburetors Part 2B: PZ-24 and PZ-28 Carburetor Assembly and Jet Drilling (applies also to K-37 K and K-38 K carbs) Ernie Franke eafranke@tampabay.rr.com
Ural (Урал( Урал) - Dnepr (Днепр( Днепр) Russian Motorcycle Carburetors Part 2B: PZ-24 and PZ-28 Carburetor Assembly and Jet Drilling (applies also to K-37 K and K-38 K carbs) Ernie Franke eafranke@tampabay.rr.com
05/06 Gsxr 1000 Clutch Mod
 By: Ali (Jetspeedz) 05/06 Gsxr 1000 Clutch Mod Parts: 21472-41G10 - WASHER, CLUTCH - $10.09 From 06 Gsxr 750 Opt: 11482-40F00 - GASKET, CL COVER - $8.29 Tools: 13/64 Drill bit, 30mm, 12mm, 10mm, 8mm sockets,
*1224BAG1* WD GM KNUCKLE KIT
 92122400A *1224BAG1* Thank you for choosing Rough Country for your suspension needs. 2014-15 4WD GM 1500 5 KNUCKLE KIT Rough Country recommends a certified technician install this system. In addition to
Rebuilding the Power Steering Pump for a 2007 Honda Accord 4CYL
 Rebuilding the Power Steering Pump for a 2007 Honda Accord 4CYL Disclaimer: I have benefited greatly from others who have taken the time to post auto repair videos/tutorials online. To try and return the
FORD RACING DIFFERENTIAL COVER 8.8 IRS
 FORD RACING DIFFERENTIAL COVER 8.8 IRS Tools Needed: Socket set, metric and standard Sledge hammer Puller device, pitman puller Jack Jack stands Flat head screw drivers Torque wrench, capable of 8 ft/lbs
SLOWINGDOWN. For those looking for the ultimate heartpounding STAINLESS STEEL BRAKES DELIVERS WITH AN AWESOME MID-YEAR NOVA BRAKE KIT
 SLOWINGDOWN STAINLESS STEEL BRAKES DELIVERS WITH AN AWESOME MID-YEAR NOVA BRAKE KIT By Tony Gutierrez Photography by the author For those looking for the ultimate heartpounding enjoyment, strap yourself
The Driveshaft Shop Aluminum One Piece Driveshaft (05-10 GT)
") Install Time: 2-3 Hours Tools Needed: Metric Hex Key Set 10mm, 13mm, 15mm deep socket 12 point 12mm deep socket ⅜ Rachet 5 ½ Rachet Extensions ½ Drive Breaker Bar Blue Thread Locker Rubber Mallet Pry Bar
Install Time: 2-3 Hours Tools Needed: Metric Hex Key Set 10mm, 13mm, 15mm deep socket 12 point 12mm deep socket ⅜ Rachet 5 ½ Rachet Extensions ½ Drive Breaker Bar Blue Thread Locker Rubber Mallet Pry Bar
Brake System Rebuilding the brake calipers
 Page 1 of 39 Brake System Rebuilding the brake calipers Written by the backyard hack mechanic Sean750 Document history: # 14 Jan 2004 added pictures of rear caliper rebuild kit # 13 Nov 2004 added more
Replacing MK4 Golf/Jetta radiator mounts in-car
 Replacing MK4 Golf/Jetta radiator mounts in-car This is a guide to replacing the radiator mounts in a MK4 Golf/Jetta. This involves moving the core support to the service position which allows you to do
There is hence three things you can do - add oil, adjust the temp that the clutch begins to engage, or do both.
 As most of you may be aware, I have been doing a lot of research lately on our cooling system in the 80's including the fact that we have a dead spot on the OEM temp gauge which prompted me to not rely
PRODUCT USE INFORMATION
 921545200 *54520BAG1* 54520BAG1 Thank you for choosing Rough Country for all your suspension needs. 2009-17 Ford F150 3 Suspension Kit Rough Country recommends a certified technician install this system.
6 S-10 Pickup/Jimmy/Blazer Torsion Bar Drop Kit
 92124300 6 S-10 Pickup/Jimmy/Blazer Torsion Bar Drop Kit Thank you for choosing Rough Country for all your suspension needs. Rough Country recommends a certified technician install this system. In addition
This is what we are trying to create in the steps below
 You will need: (1) Some 3/4 aluminium or steel flat bar (+/- 1 foot) (2) About 12 of 3 Aluminium or steel tubing. (2) Piece of 3X3 silicone hose and 2 hose clamps (3) 1 K&N (or similar) high flow filter
FD Transmission Rebuild: Parts Inspection
 FD Transmission Rebuild: Parts Inspection Now that everything is disassembled, cleaned, and bagged in labeled Zip-Locs, it s time to decide what to replace. Warning: I m not a transmission specialist I
2014 F /6 LIFT KIT
 92157500 2014 F-150 4 /6 LIFT KIT THANK YOU FOR CHOOSING ROUGH COUNTRY FOR YOUR SUSPENSION NEEDS. Rough Country recommends a certified technician install this system. In addition to these instructions,