AFTER INSTALLATION, IF IT DOES NOT WORK OR STOPS WORKING SEE PAGE
|
|
|
- Reynold Merritt
- 6 years ago
- Views:
Transcription


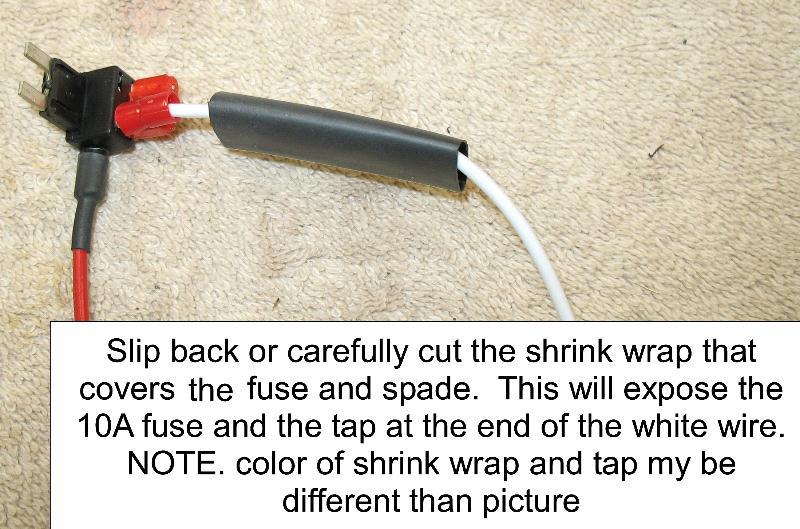
1 Z06/ZR C6 (w/npp option) WILD 2 MILD EXHAUST CONTROL (rev.1/20/11) Please read these instructions completely, prior to installing the WILD 2 MILD Z06 exhaust control. This product is patent pending and is not to be reproduced without the written consent of nakidparts.com. If the car is going to be left IDLE for an extended period of time (3-4 weeks) without starting. The control should be set to OFF prior to shutting the car down. This will minimize battery drain. In the OFF position 4+ months is not an issue or if you use a battery maintainer it s not an issue. The last 2 pages show an alternate method of installation that has 0 battery drain but will cause the exhaust to always start in the OFF or wild setting. Tools required: 7mm socket, wrench or a pair of pliers Remove the passenger side floor mat. Reach up and pull down the passenger side floorboard to access the fuse block. Remove the 10A fuse located on the bottom right side (see fig. 1) AFTER INSTALLATION, IF IT DOES NOT WORK OR STOPS WORKING SEE PAGE 5 Insert the new fuse adapter into the slot you just removed the 10A fuse from. The adapter must be installed as shown with the white wire facing up and the red wire facing the center console. Remove the grounding screw, and re-install it with the two black ground wires by inserting the screw through the connector, tighten. Slip the control box into the location shown and place the blue antenna wire tucking it into the space shown (see fig. 2)
 OFF will make the exhaust flaps stay open 100% of the time. The car will always start in the position it was shut down in.")
 and you cannot program to the visor, see mounting on page 3 If you have the")
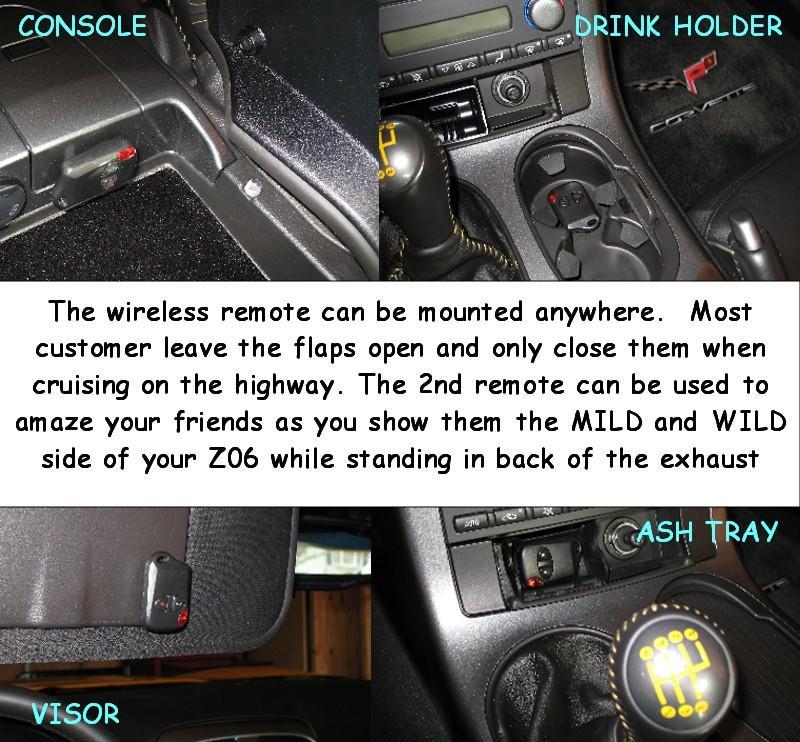
2 Tuck in all wires so they do not stick above the black box above and below the fuses. Fold back the floorboard and re-install the mat. With the car running, test the switch using the remote control. ON will put the exhaust into the stock mode (quite up till 3500 RPM) OFF will make the exhaust flaps stay open 100% of the time. The car will always start in the position it was shut down in. Once the buttons are pressed, it will take a few seconds for the flaps to activate. The remotes also will work from outside the car. HOMELINK Up to 10/2006 (after 10/06 GM used a new company car2u that does not lean codes so it can not be programmed) and you cannot program to the visor, see mounting on page 3 If you have the homelink system in the driver s visor, you can program the system to run from two of the buttons. One button for on and one button for off. If you only have one spare button you can program the on button. This will allow you to put it back into the OEM mode since it started in the open mode. This information is also in your owner s manual plus information on erasing and reprogramming. NOTE: this unit will work with either of the supplied remotes or the OEM visor mounted Homelink system. It will not work with other visor-mounted units. GM has been testing other visor units, so you may not have a Homelink system. If you have a visor unit with a single LED with the home symbol around it you have Homelink and this can be programmed. If you have 3 LED s, you do not have Homelink and you may not be able program this unit. It will still function fine with the provided remotes. IMPORTANT: IN STEP 4, DO NOT RELEASE EITHER BUTTON UNTIL THE RED LED STOPS FLASHING. Installation and use of this product is done at the owners / installers own risk. The seller of this product is not responsible for any damage or injury caused by the use or installation of this product. No refunds or returns on this item. If defective it will be replaced only.

3 Zero Drain Install


4 Be sure to still ground the black wire here
5 PROBLEM SOLVING: 1. Check the picture below and make sure you have the ground installed on the correct screw. 2. Check both remotes, does one work or do they work interment? 99% of the problems have to do with loose or dead batteries, don t assume if you see the red led light that the battery is OK, it could be low. Remove the small Phillips screw on the back of the remote. If you have a volt meter check and see that you have 12.2vdc. Gently bend in the negative tab a little and make sure you reinstall with the correct polarity. If you need a battery we have them or you can purchase them 27A is the type, radio shack has them.
DOOR LIMITS A) ENGAGE CHAIN/BELT CONNECTOR TO CARRIAGE CAUTION B) CLOSE TRAVEL LIMIT
 ENGAGE CHAIN/BELT CONNECTOR TO CARRIAGE CAUTION B) CLOSE TRAVEL LIMIT") 20 6 DOOR LIMITS Severe injury or death can result if the door closing force is set too high. Never increase the door closing force above the minimum required to move the door. Never adjust force to compensate
20 6 DOOR LIMITS Severe injury or death can result if the door closing force is set too high. Never increase the door closing force above the minimum required to move the door. Never adjust force to compensate
Stand Alone Fog Lights Installation Instructions
 Tools Required: 1. Trim Removal tool or protected flat screwdriver 2. #2 Phillips Screwdriver 3. 10mm socket 4. 10mm wrench 5. 8mm or 5/16 socket 6. Adjustable Pliers 7. Electrical Tape WARNING!!! Disconnect
SR Performance Twin 62mm Throttle Body for GT
 Required Tools: SR Performance Twin 62mm Throttle Body for 2005-2010 GT Flat-head screwdriver Ratchet Small extension 10mm socket 8mm socket T20 Torx bit Needle nose pliers 5mm allen wrench Recommended
INSTALLATION INSTRUCTIONS
 INSTALLATION INSTRUCTIONS Accessory Application Publications No. XM RADIO SYSTEM (EXCEPT LX) 2006 ODYSSEY All 30392 Issue Date AUG 2005 PARTS LIST XM Radio Attachment (sold separately): P/N 08B15-SHJ-100
Installation Manual TWM Performance Short Shifter Subaru STi 2008+
 - 1 - Installation Manual TWM Performance Short Shifter Subaru STi 2008+ Please Note: It is preferable to park on a flat surface, as you will have to engage and disengage the hand brake and shift from
WARNING! DIGITAL TUNING, INC. TAKES NO RESPONSIBILITY FOR DAMAGE TO ECU OR CAR DUE TO IMPROPER INSTALLATION OR MISUSE OF PRODUCT.
 digital tuning Rtek7 ECU Upgrade for S5 Turbo II WARNING! DIGITAL TUNING, INC. TAKES NO RESPONSIBILITY FOR DAMAGE TO ECU OR CAR DUE TO IMPROPER INSTALLATION OR MISUSE OF PRODUCT. IT IS YOUR RESPONSIBILITY
Retro it Steering Column
 Retro it Steering Column INSTALLATION INSTRUCTIONS for 1970-74 Cuda/Challenger FOR PART NUMBER S: 1620810010, 1620810020, 1620810051, 1620820010, 1620820020, 1620820051 S I NCE 1986 Instruction # 8000000005
SCAMA10. Designed for Chevrolet Camaro vehicles. Subwoofer Assembly. Subwoofer Bracket Wire Ties x6 Wire Taps x2 Rubber Bumper
 SCAMA10 Designed for 2010-2015 Chevrolet Camaro vehicles Subwoofer Assembly Subwoofer Harness Subwoofer Bracket Wire Ties x6 Wire Taps x2 Rubber Bumper 2012 Stillwater Designs SCAMA10-A3-20151028 M6 Nut
GENUINE ACCESSORIES INSTALLATION INSTRUCTIONS
 GENUINE ACCESSORIES INSTALLATION INSTRUCTIONS PART NUMBERS: APPLICABLE MODELS: 0000-89-G14A (PORT) Electrochromic Mirror Kit w/ Compass/Temp/HomeLink 2004 Mazda 3 0000-8C-G14A (PDC) KIT CONTENTS: ITEM
MAX FLOW FUEL KIT KIA FORTE SX HYUNDAI VELOSTER TURBO INSTALLATION INSTRUCTIONS
 MAX FLOW FUEL KIT KIA FORTE SX 2014+ HYUNDAI VELOSTER TURBO INSTALLATION INSTRUCTIONS Installation: Tools needed: 1/4 or 3/8 drive ratchet Different length extensions 8mm socket / 10mm socket / 12mm socket
INSTALLATION INSTRUCTIONS
 INSTALLATION INSTRUCTIONS Accessory Application Publications No. All 30528 INTERFACE 2006 CR-V Issue Date SEP 2005 PARTS LIST XM Radio Unit Kit (sold separately): P/N 08A15-EX5-000 2 Wire tie with clips
Connecting the rear fog light on the A4 Jetta, while keeping the 5 Light Mod
 Connecting the rear fog light on the A4 Jetta, while keeping the 5 Light Mod DISCLAIMER: I'm human and make mistakes. If you spot one in this how to, tell me and I'll fix it This was done on my 99.5 Jetta.
Installation Instructions QUICKSILVER CONSOLE SHIFTER Fits: Chevelle / El Camino
 WORK SAFELY! For maximum safety, perform this installation on a clean, level surface and with the engine turned off. Place blocks or wedges in front of and behind both rear wheels to prevent movement in
Jeep Wrangler (TJ)
") INSTALLATION GUIDE APPLICATION MODEL YR PART # Bestop PART # Jeep Wrangler (TJ) 2003 2006 10-03315-10 751-01 INSTALLATION TIME 3:00 hrs SKILL LEVEL 1 2 3 4 4= Experienced TOOLS REQUIRED Safety goggles
INSTALLATION GUIDE APPLICATION MODEL YR PART # Bestop PART # Jeep Wrangler (TJ) 2003 2006 10-03315-10 751-01 INSTALLATION TIME 3:00 hrs SKILL LEVEL 1 2 3 4 4= Experienced TOOLS REQUIRED Safety goggles
PRAMCQ13. Designed for Dodge Ram vehicles with base audio Not Compatible with 2018 and newer Dodge Ram vehicles
 PRAMCQ13 Designed for 2013 2017 Dodge Ram vehicles with base audio Not Compatible with 2018 and newer Dodge Ram vehicles Subwoofer Alternate Amplifier Bracket Amplifier Subwoofer Harness Subwoofer Amplifier
BMW 3Series (E46) Installation Guide StealthOne Version 1.6
 Installation Guide StealthOne Version 1.6") BMW 3Series (E46) Installation Guide StealthOne Version 1.6 Copyright Fontana Enterprises, 2008 All rights reserved. Product Information Copyright Copyright Fontana Enterprises, 2008 All rights reserved.
BMW 3Series (E46) Installation Guide StealthOne Version 1.6 Copyright Fontana Enterprises, 2008 All rights reserved. Product Information Copyright Copyright Fontana Enterprises, 2008 All rights reserved.
Z-Gate Universal Shifter
 Installation Instructions Z-Gate Universal Shifter Fits: GM, Ford, Lincoln and Chrysler Transmissions See Application Guide for Specific Applications Part #80681 Rev 06/01/2018 WORK SAFELY! For maximum
2015 Mustang Lightbar (All Models) CDC#
 CDC#") 2015 Mustang Lightbar (All Models) CDC# 1511-7000-01 Components: 1 CDC Lightbar Note: READ instructions before starting installation!!! CDC Part# Driver side bracket 0511-6001-05 Passenger side bracket
2015 Mustang Lightbar (All Models) CDC# 1511-7000-01 Components: 1 CDC Lightbar Note: READ instructions before starting installation!!! CDC Part# Driver side bracket 0511-6001-05 Passenger side bracket
MINI Smartphone Mount Pro Series Ver 1.1 CRMC-1000-R130. Instructions for both the XL Scissor and XXL Clamshell Cradles for Gen 2 MINIs.
 MINI Smartphone Mount Pro Series Ver 1.1 CRMC-1000-R130 Instructions for both the XL Scissor and XXL Clamshell Cradles for Gen 2 MINIs 1 of 5 Overview XL Scissor and XXL Clamshell Cradles for Gen 2 MINIs
Lokar Cable Operated Sensor Kit Installation Instructions
 Lokar Cable Operated Sensor Kit Installation Instructions For GM TH350, TH400, TH200, 200-4R, 700-R4, 4L60 (and 4L60E, 4L80E with Long Selector Shaft) Index Cable Stop Lokar Cable Operated Sensor Kit Installation
INSTALLATION INSTRUCTIONS FOR MK4 VOLKSWAGEN JETTA (BORA) /GOLF 1.8T, 2.0L, VR6, & R32 MODELS ALSO FITS ALL MODELS OF SEAT LEON & TOLEDO
 /GOLF 1.8T, 2.0L, VR6, & R32 MODELS ALSO FITS ALL MODELS OF SEAT LEON & TOLEDO") CI100001 INSTALLATION INSTRUCTIONS FOR 1999.5-2005 MK4 VOLKSWAGEN JETTA (BORA) /GOLF 1.8T, 2.0L, VR6, & R32 MODELS ALSO FITS ALL MODELS OF SEAT LEON & TOLEDO Thank you for choosing to purchase a Carbonio
CI100001 INSTALLATION INSTRUCTIONS FOR 1999.5-2005 MK4 VOLKSWAGEN JETTA (BORA) /GOLF 1.8T, 2.0L, VR6, & R32 MODELS ALSO FITS ALL MODELS OF SEAT LEON & TOLEDO Thank you for choosing to purchase a Carbonio
Two panel Sequential LED Taillight kit installation guide
 1970 CHEVELLE Two panel Sequential LED Taillight kit installation guide Kit Contents: 2 LED panels 2 rubber grommets 1 power wire with t-tap 1 driver side LED harness, 24 1 passenger side LED harness,
Instructions for repairing the F-Body Hatch Pull-Down Unit By Lon Salgren (ls90rs)
") Instructions for repairing the 1986-87 F-Body Hatch Pull-Down Unit By Lon Salgren (ls90rs) Lonsal@adelphia.net CAUTION: Completely read and understand the instructions before proceeding. There are some
Instructions for repairing the 1986-87 F-Body Hatch Pull-Down Unit By Lon Salgren (ls90rs) Lonsal@adelphia.net CAUTION: Completely read and understand the instructions before proceeding. There are some
Installation Instructions Console Megashifter
 Installation Instructions Console Megashifter 1968-1969 Camaro Part Number 81035 This B&M Megashifter is designed to fit in the console of a 1968-1969 Chevrolet Camaro. In 1968, these vehicles were equipped
Lippert Components, Inc. Informational Publication ENTRY DOOR LATCH INFORMATION - SOUTHCO
 Lippert Components, Inc. Informational Publication LIP Sheet - 0182 revd ENTRY DOOR LATCH INFORMATION - SOUTHCO SOUTHCO, Inc. door latches are used in Lippert s Keyless Entry Door systems. All Southco
Rekluse Motor Sports. The z-start Clutch KTM LC4 ( )
") Rekluse Motor Sports The z-start Clutch KTM LC4 (1999 2005) Installation Guide Copyright 2002-2004 Rekluse Motor Sports z-start Revision 3.000 RMS630 KTM LC4 191-280 Manual Revision: 103105 Rekluse Motor
Rekluse Motor Sports The z-start Clutch KTM LC4 (1999 2005) Installation Guide Copyright 2002-2004 Rekluse Motor Sports z-start Revision 3.000 RMS630 KTM LC4 191-280 Manual Revision: 103105 Rekluse Motor
SR Performance Aluminum Radiator - Manual (96 4.6L)
") SR Performance Aluminum Radiator - Manual (96 4.6L) Tools needed 1. Large and small pair of pliers 2. 8mm and 10mm deep socket and extensions 3. Spare Rags 4. Large Drain Pan 5. Funnel with small opening
SR Performance Aluminum Radiator - Manual (96 4.6L) Tools needed 1. Large and small pair of pliers 2. 8mm and 10mm deep socket and extensions 3. Spare Rags 4. Large Drain Pan 5. Funnel with small opening
DDMWorks Race Intake for Mazda Miata
 DDMWorks Race Intake for 1999-2005 Mazda Miata f This DDMworks Race Intake improves your Mazda Miata by supplying your engine with cold pressurized air for it to breathe in through a free flowing filter
Intercooler Installation For Ford 7.3L Powerstroke trucks -- Installation Instructions L Ford Powerstroke
 12 March 2010 1042700-Ford 7.3L Intercooler Installation 1 Intercooler Installation For 1999-2003 Ford 7.3L Powerstroke trucks -- Installation Instructions -- 1042700 7.3L Ford Powerstroke PLEASE READ
INSTALLATION INSTRUCTIONS Toyota FJ Cruiser DEMELLO-OFFROAD.
 INSTALLATION INSTRUCTIONS Item Description Vehicle 3 piece Rear Bumper 2007-2014 Toyota FJ Cruiser DEMELLO-OFFROAD www.demello-offroad.com 12785 magnolia ave Riverside ca 92503 Suite 1 phone: 1-951-735-4417
Factory Five Racing, Inc. 818 Kit Assembly manual revision 1i update
 Factory Five Racing, Inc. 818 Kit Assembly manual revision 1i update Pedal box...1 Cable Accelerator Pedal (2002-2005)...2 OEM seats...7 Windshield... 13 Center console... 19 Pedal box Attach the pedal
INSTALLATION INSTRUCTIONS
 INSTALLATION INSTRUCTIONS Accessory REMOTE CONTROL Application 2014 TSX (L4) Publications No. BII 50198 Issue Date SEPT 2013 PARTS LIST Remote Engine Starter Unit Kit P/N 08E91-TK4-200A Fuse label Transmitter
X-Type w/ non-premium sound amplifier installation instructions
 X-Type w/ non-premium sound amplifier installation instructions 1. Pull radio from dash (see Radio Removal Instructions ) 2. Disconnect wiring harness from back of radio by pushing in tab on plug and pulling
* * APPLICABLE MODELS: 2017 > CX-5
 PART NUMBER: 0000 8C R06(DIO) / 0000 89 R28(PIO) GENUINE ACCESSORIES INSTALLATION INSTRUCTIONS Rev. AAA *550-0681-000* APPLICABLE MODELS: 2017 > CX-5 REQUIRED COMPONENTS: ITEM QTY DESCRIPTION Usage Chart
INSTALLATION INSTRUCTIONS PART NUMBER: C/P
 Equipped with AEM Dryflow Filter No Oil Required! INSTALLATION INSTRUCTIONS PART NUMBER: 21-725C/P 2011-2016 SCION TC L4-2.5L LEGAL IN CALIFORNIA ONLY FOR RACING VEHICLES WHICH MAY NEVER BE USED, REGISTERED
Installation Instructions for Chevrolet Colorado, GMC Canyon, LT, Z71, With Factory Fog Lights
 Installation Instructions for 2015-2018 Chevrolet Colorado, GMC Canyon, LT, Z71, With Factory Fog Lights This kit is designed to allow use of your factory fog light operation along with an addition auxiliary
Headlight Removal & Installation: BMW E36
 Headlight Removal & Installation: BMW E36 Disclaimer: Buyer assumes any and all risk and liability from the installation and use of this product. Seller, author, or any of their affiliates assume no liability
DEMA 257C / 257CV PRO BATTERY DRAIN CHIEF INSTALLATION & OPERATING INSTRUCTIONS
 DEMA 257C / 257CV PRO BATTERY DRAIN CHIEF INSTALLATION & OPERATING INSTRUCTIONS Note This dispenser is designed for injecting drain and grease trap products in locations where an outlet isn t available.
Important! The subwoofer system is designed to be used only with the rear seat in the up position only.
 Important! The subwoofer system is designed to be used only with the rear seat in the up position only. CONTENTS 1EA. SUBWOOFER ASSEMBLY 2EA. BRACKET LOWER 2EA. BRACKET UPPER 1EA. OVERLAY HARNESS 2EA.
Installation Instructions MX-5 Dual Air Horns
 440 Rutherford St. P.O. Box 847 Goleta, CA 93117 1-800-667-7872 FAX 805-692-2525 www.mossmotors.com Tools required: Phillips screwdriver, 8mm, 10mm and 21mm sockets, 8mm and 10mm combination wrenches,
INSTALLATION INSTRUCTIONS
 INSTALLATION INSTRUCTIONS F A I R I N G K I T BAGGERNATION.COM 602.840.4205 Thank you for choosing a Paul Yaffe s Bagger Nation product! We strive every day to bring you the highest quality designs and
Service Manual Gulf Stream Electronic Full Wall Slide Systems
 Service Manual Gulf Stream Electronic Full Wall Slide Systems CONTENTS Page Before you operate the slide system 2 Operating Instructions 3 Preventive maintenance 3 Manually overriding your slide system
INSTALLATION INSTRUCTIONS
 INSTALLATION INSTRUCTIONS Accessory Application Publications No. AII 27871 CIVIC IN-DASH CD CHANGER 2- AND 4-DOOR Issue Date AUG 2004 PARTS LIST In-Dash CD Changer Attachment: P/N 08B06-S5D-110 CD Changer
INSTALLATION INSTRUCTIONS
 INSTALLATION INSTRUCTIONS Accessory Application Publications No. SYSTEM 2005 ACCORD All 27511 (DX, LX) 2-AND 4-DOOR Issue Date AUG 2004 PARTS LIST Security System Attachment (LX): P/N 08E55-SDA-100A Unit
INSTALLATION INSTRUCTIONS
 INSTALLATION INSTRUCTIONS Accessory REMOTE CONTROL Application Publications No. 2012 ACCORD AII 46522 2-DOOR Issue Date (A/T ONLY) AUG 2011 PARTS LIST Remote Engine Starter Unit Kit P/N 08E91-E22-101A
Mishimoto Performance Aluminum Radiator w/ Stabilizer - Manual (97-04 GT, Mach 1; Cobra)
") Mishimoto Performance Aluminum Radiator w/ Stabilizer - Manual (97-04 GT, Mach 1; 97-01 Cobra) Installed on: 2000 Mustang GT (manual transmission) Tools: 8mm socket 10mm socket 13mm socket 3/4" wrench
Mishimoto Performance Aluminum Radiator w/ Stabilizer - Manual (97-04 GT, Mach 1; 97-01 Cobra) Installed on: 2000 Mustang GT (manual transmission) Tools: 8mm socket 10mm socket 13mm socket 3/4" wrench
INSTALLATION INSTRUCTIONS
 INSTALLATION INSTRUCTIONS Accessory REMOTE CONTROL Application 2011 ODYSSEY (EXCEPT LX) Publications No. AII 43923 Issue Date SEP 2010 PARTS LIST Remote Control Engine Starter Unit Kit P/N 08E91-E22-101A
THIS GUIDE IS INTENDED FOR DEALERS AND SOLAR COMFORT TECHNICIANS ONLY AND IS NOT MEANT OR INTENDED TO BE REPRODUCED OR DISTRIBUTED TO THE CONSUMER
 THIS GUIDE IS INTENDED FOR DEALERS AND SOLAR COMFORT TECHNICIANS ONLY AND IS NOT MEANT OR INTENDED TO BE REPRODUCED OR DISTRIBUTED TO THE CONSUMER Table of Contents Page Tools Needed (A) 3 Replacement
MANUAL FOR THE NM100 ADJUSTABLE SHORT SHIFTER
 MANUAL FOR THE NM100 ADJUSTABLE SHORT SHIFTER P.O. BOX 313 ~ ODESSA, FL 33556 ~ 1-844-NUM-RACE Tools Needed T20 Torx Driver T27 Torx Driver Needle Nose Pliers ¼ Ratchet with 10MM Socket 3MM Allen Wrench
INSTALLATION INSTRUCTIONS
 INSTALLATION INSTRUCTIONS Accessory REMOTE CONTROL Application 2008 ACCORD 4-DOOR Publications No. AII 35365 Issue Date AUG 2007 PARTS LIST U Accessory User s Information Manual Remote Engine Starter Unit
INSTALLATION INSTRUCTIONS
 INSTALLATION INSTRUCTIONS Accessory REMOTE CONTROL Application Publications No. 2009 ACCORD AII 39977-40931 4-DOOR Issue Date (A/T ONLY) NOV 2008 PARTS LIST Remote Engine Starter Unit Kit P/N 08E91-E22-100A
COBB Fuel Pressure Regulator Kit
 315100 COBB Fuel Pressure Regulator Kit 2008+ Subaru STI Congratulations on your purchase of the COBB Tuning Fuel Pressure Regulator Kit for your 2008+ Subaru STI. The following instructions will assist
GENUINE PARTS INSTALLATION INSTRUCTIONS
 GENUINE PARTS INSTALLATION INSTRUCTIONS 1. DESCRIPTION: Auto-Dimming Mirror with Compass and Homelink 2. APPLICATION: Juke (2011) 3. PART NUMBER: 999L1 VW002 4. KIT CONTENTS: Item Qty Description Service
Installation Guide for Rough Country 30 in. Chrome Series LED Light Bar w/ Hood Mounting Brackets
 Installation Guide for Rough Country 30 in. Chrome Series LED Light Bar w/ Hood Mounting Brackets Installation Time: 1 Hour Tools Required Trim removal tool (plastic or wood to prevent scratches on the
Kit Part Number:
 Equipped with AEM DRYFLOW Filter No oil required! Kit Part Number: 21-568 2005-2006 Scion TC 2.4L *Legal in California only for racing vehicles which may never be used upon a highway. 2009, Advanced Engine
Gentex by MITO Corporation Installation Instructions KIT CONTENTS: Item Qty Part Number Description 1
 1 of 14 5/5/2008 9:05 AM Installation Instructions KIT CONTENTS: Item Qty Part Number Description 1 GEN-K2 7 Pin - Night Vision Safety (NVS) Mirror 1 of the GEN-K3 7 Pin NVS Mirror w/map Lamps following
LABOUR ESTIMATE GUIDE
 INSTALLATION INSTRUCTIONS FOR 2003-Current Audi S4 (B6 & B7) Includes Sedan, Avant, & Cabriolet These instructions are applicable to vehicles equipped with either manual or automatic tiptronic transmissions
Sprayer Control. Manual for SprayLink Cable Installations. Tank. Jet Agitator. Agitator Valve. Diaphragm Pump. Pressure Transducer.
 Sprayer Control Plumbing & Installation Manual for SprayLink Cable Installations Tank Jet Tank Shut-Off Diaphragm Pump Electric Ball s Transducer Strainer Relief Regulating Copyrights 2012 TeeJet Technologies.
INSTALLATION INSTRUCTIONS
 INSTALLATION INSTRUCTIONS Accessory REMOTE CONTROL Application 2012 ODYSSEY (EXCEPT LX) Publications No. AII 46745 Issue Date SEP 2011 PARTS LIST Remote Control Engine Starter Unit Kit P/N 08E91-E22-101A
Technical Support (707)
") Installation Instructions CONSOLE MEGASHIFTER Fits: 1982-1992 Camaro & Firebird w/automatic Transmission *except 1988-1992 Firebird Formula Model Catalog # 80692 WORK SAFELY! For maximum safety, perform
Installation Instructions CONSOLE MEGASHIFTER Fits: 1982-1992 Camaro & Firebird w/automatic Transmission *except 1988-1992 Firebird Formula Model Catalog # 80692 WORK SAFELY! For maximum safety, perform
Designed for 2015 Ford F150 Super-Cab and Super-Crew vehicles (Compatible in vehicles with or without Sony System. M6 Bolt X 2
 SF150SC15 Designed for 2015 Ford F150 Super-Cab and Super-Crew vehicles (Compatible in vehicles with or without Sony System Subwoofer Assembly Amplifier Relocation Bracket (not used on non Sony trucks)
INSTALLATION INSTRUCTIONS
 INSTALLATION INSTRUCTIONS Accessory Application Publications No. SECURITY SYSTEM P/N 08E49-SDA-100 ACCORD 2- AND 4-DOOR AII 30666 Issue Date AUG 2005 PARTS LIST Hood switch harness Illustration of the
ADDICTIVE DESERT DESIGNS
 Preparation: Disconnect the negative battery terminal. Park the vehicle on level ground and set the emergency brake. We recommend reading through the installation instructions in whole before performing
Front Bucket Seat Upholstery
 Specter Off-Road, Inc. 21600 Nordhoff St. Chatsworth, CA 91311 USA www.sor.com, (818)882-1238, Fax: (818) 882-7144 sor@sor.com Luxury Seat Upholstery Installation Instructions Front Bucket Seat Upholstery
Kwikee IMGL Step Control Testing Procedure #82-ST0500
 Kwikee IMGL Step Control Testing Procedure #82-ST0500 TABLE OF CONTENTS Introduction 2 Resources Required 2 General Service Notes 3 Preparation 5 Troubleshooting and Test Procedures 5 Testing the Step
Adjustable Fan Controller for the Mazda6
 Adjustable Fan Controller for the Mazda6 Scott Burton January 2008 With technical advice provided by ShaDrag and DJQuick of Mazda6Club The Mazda6 engine management computer is tuned to optimize the operation
Installation Instructions Z-Gate Shifter
 Installation Instructions Z-Gate Shifter Part Number 80681 1998, 2001 by B&M Racing and Performance Products The B&M Z-Gate shifter can be used in vehicles equipped with most popular three speed automatic
08-18 STI Flex Fuel Bluetooth Mk2 Kit Install Instructions For Cobb Tuning Access Port
 For Cobb Tuning Access Port Delicious Tuning 1948 Don Lee Place Suite #7 Escondido, CA 92029 408-480-0995 Rough Draft BJP Rev: 2.0 Date: 2/1/17 FFBT parts: (1) Ethanol Content Analyzer Module (1) Ethanol
RT1 SLIP-ON EXHAUST HONDA CBR600RR REV. A
 08-50-43733 REV. A PARTS INCLUDED Ref. Part Number Description Qty 1) 00-200-00064 Slip-on S-bend Assembly 1 2) 00-200-00088 RT1 Aluminum Muffler Assembly 1 3) 03-46-43058 Muffler Mounting Strap 1 4) 07-27-42566
CONTENTS TOOLS REQUIRED:
 CONTENTS 1EA. SUBWOOFER ASSEMBLY P/N 77KICK13SUBASSEMBLY 1EA. SUB BRACKET P/N 05030060AA 1EA. 200 WATT AMP P/N REBTL200 1EA. AMP BRACKET P/N RMDR 1EA. POWER HARNESS P/N RHRAMP 1EA. OVERLAY HARNESS P/N
DASH AUDIO KIT P/N APPLICATION BEFORE YOU BEGIN KIT CONTENTS. Instr Rev 01 04/16 Page 1 of 6. Verify accessory fitment at Polaris.com.
 DASH AUDIO KIT P/N 2882030 APPLICATION Verify accessory fitment at Polaris.com. BEFORE YOU BEGIN Read these instructions and check to be sure all parts and tools are accounted for. Please retain these
INSTALLATION INSTRUCTIONS
 INSTALLATION INSTRUCTIONS Accessory (LX) Application 2008 ACCORD 2- AND 4-DOOR Publications No. AII 35373 Issue Date AUG 2007 PARTS LIST Automatic Day/Night Mirror Attachment Kit P/N 08V03-TA0-100 Fuse
PCAMA13MY. Designed for Chevrolet Camaro vehicles with MyLink. Subwoofer Assembly. Subwoofer Bracket Wire Ties x6 Rubber Bumper
 PCAMA13MY Designed for 2013-2015 Chevrolet Camaro vehicles with MyLink Subwoofer Assembly Subwoofer Harness Adapter Harness Subwoofer Bracket Wire Ties x6 Rubber Bumper 2012 Stillwater Designs PCAMA13MY-A3-20151028
INSTALLATION INSTRUCTIONS
 INSTALLATION INSTRUCTIONS Accessory Application Publications No. REMOTE CONTROL 2009 MDX BII 40030 Issue Date JULY 2008 PARTS LIST Remote Engine Starter Unit Kit P/N 08E91-E22-200B Remote Control Engine
OEM Cruise Control Installation in GMC/Chevy NBS trucks
 OEM Cruise Control Installation in 99-02 GMC/Chevy NBS trucks May 2008 ~ Rampage_Rick Having just installed factory cruise control in my 00 Sierra, I thought I d share the fun. I followed the steps outlined
Down South Vettes Leather Sun visor Installation Instructions.
 Down South Vettes Leather Sun visor Installation Instructions. Difficulty: 3 out of 5. Time: Plan on about 30 minutes. The tools used are:? A medium blade screw driver? A small flashlight may help get
Installation Instructions. QuickSilver Shifter. Fits: GM, Ford, Chrysler Transmissions See Application Guide for Specific Applications Part # 80683
 Installation Instructions QuickSilver Shifter Fits: GM, Ford, Chrysler Transmissions See Application Guide for Specific Applications Part # 80683 WORK SAFELY! For maximum safety, perform this installation
Toyota 4RUNNER With/MR Overhead Video
 Toyota 4RUNNER With/MR 2010-10.2 Overhead Video Part Number: 00016-00110; Fit Kit-00110-14, Beige 00016-00120; Fit Kit-00120-14, Gray Accessory Code: ED7 Conflicts: Vehicles without a sunroof Kit Contents:
Lokar Cable Operated Sensor Kit Installation Instructions
 Lokar Cable Operated Sensor Kit Installation Instructions For GM TH350, TH400, TH200, 200-4R, 700-R4, 4L60 (and 4L60E, 4L80E with Long Selector Shaft) Building American Quality With A Lifetime Warranty!
Your Legal Fuel Tank Source.
 February 23, 2015 IS# 808 Page 1 of 13 THANK YOU FOR PURCHASING A TRANSFER FLOW 40 GALLON TOOLBOX REFUELING SYSTEM. PLEASE READ THE FOLLOWING PROCEDURES CAREFULLY BEFORE STARTING THE INSTALLATION. CAUTION:
* * APPLICABLE MODELS: 2014 > Mazda 3
 PART NUMBER: 0000 8C L48 (DIO) / 0000 89 L84 (PIO) GENUINE ACCESSORIES INSTALLATION INSTRUCTIONS Rev. AAA *550-0700-000* APPLICABLE MODELS: 2014 > Mazda 3 REQUIRED COMPONENTS: ITEM QTY DESCRIPTION Usage
Installation Manual TWM Performance Kia Forte Short Shifter
 Installation Manual TWM Performance Kia Forte 2009+ Short Shifter Begin the installation by parking on a flat surface, as you will have to engage and disengage the hand brake and shift from gears to neutral.
C&L Cold Air Intake (05-09 V6) - Installation Instructions
 - Installation Instructions") C&L Cold Air Intake (05-09 V6) - Installation Instructions The below installation instructions work for the following products: C&L Cold Air Intake (05-09 V6) Please read through the instructions carefully
C&L Cold Air Intake (05-09 V6) - Installation Instructions The below installation instructions work for the following products: C&L Cold Air Intake (05-09 V6) Please read through the instructions carefully
SWRA211. T-TAP x2 10MM BOLT FUSE WIRE TIES x6 SUBWOOFER ASSEMBLY 200 WATT AMP BRACKET ASSEMBLY POWER HARNESS OVERLAY HARNESS.
 SWRA211 Designed for 2011-2014 Jeep Wrangler two door with base audio or premium audio T-TAP x2 10MM BOLT FUSE WIRE TIES x6 SUBWOOFER ASSEMBLY 200 WATT AMP BRACKET ASSEMBLY POWER HARNESS 2012 Stillwater
* * APPLICABLE MODELS: 2016 > CX-3
 PART NUMBER: 0000 8C S01(DIO) / 0000 89 S07(PIO) GENUINE ACCESSORIES INSTALLATION INSTRUCTIONS Rev. AAA *550-0688-000* APPLICABLE MODELS: 2016 > CX-3 REQUIRED COMPONENTS: ITEM QTY DESCRIPTION Usage Chart
INSTALLATION INSTRUCTIONS
 THANK YOU FOR CHOOSING KURYAKYN! Protect yourself and others from possible injury and property damage or loss. Pay close attention to all instructions, warnings, cautions, and notices regarding the installation,
Tooling List 10mm Wrench 10mm Socket 3/8 Drive 3/8 Drive Ratchet Flat Head Screwdriver
 Thank you for purchasing the CorkSport Cold Air Box. Protect your short ram intake from excessive engine bay heat with our two piece cold air box. CAD designed and thermoformed this box fits like it was
I n s t a l l a t i o n I n s t r u c t i o n s
 MG Midget and Austin-Healey Sprite Supercharger Alternator Conversion FOR 1961-1967 Midget (up to car# G-AN4-60459) and Sprite (up to car# H-AN9-72040) PART # 130-108 440 Rutherford St. P.O. Box 847 Goleta,
* * APPLICABLE MODELS: 2014 > Mazda 6
 PART NUMBER: 0000 8C H02(DIO) / 0000 89 H18(PIO) GENUINE ACCESSORIES INSTALLATION INSTRUCTIONS Rev. AAA *550-0694-000* APPLICABLE MODELS: 2014 > Mazda 6 REQUIRED COMPONENTS: ITEM QTY DESCRIPTION Usage
INSTALLATION INSTRUCTION PART NUMBER:
 Equipped with AEM Dryflow Filter No Oil Required! INSTALLATION INSTRUCTION PART NUMBER: 24-6003 1994-2001 ACURA Integra L4-1.8L Manual Trans. C.A.R.B. E.O. # D-670 Non VTEC models ONLY AEM bypass valves
Installation Manual TWM Performance Short Shift Kit 2006 and up Toyota Yaris
 Installation Manual TWM Performance Short Shift Kit 2006 and up Toyota Yaris 1. Unscrew the shift knob by rotating counter clockwise. 2. Remove the carpet or mat at the bottom of the cup holder at the
We thank you for purchasing a manual petcock conversion kit from Murphs!
 We thank you for purchasing a manual petcock conversion kit from Murphs! The first step is removing the gas tank from the bike. We suggest running the tank down to reserve before removal, both for the
Gentex by VOXX Corporation Installation Instructions
 Gentex by VOXX Corporation Installation Instructions Bezelled ADVGEN45A4 Bezelled w/ Homelink ADVGEN80EXP ADVGEN45A4PW4 ADVGEN40A4 Frameless ADVGEN8EXP Frameless w/ Homelink ADVGEN85EXP ADVGEN45AB5 TOOLS
PONTIAC FIREBIRD
 1974-78 PONTIAC FIREBIRD Two Panel Sequential LED Tail Light Kit Installation Guide Kit Contents: 2 LED panels 2 LED panel mount kits 6 rubber grommets 1 power wire 1 pigtail harness Kit 1 crimp terminal
Flex Fuel Bluetooth Kit WRX install instructions
 Delicious Tuning 1948 Don Lee Place Suite #7 Escondido, CA 92029 408-480-0995 BJP Rev: 1.0 Date: 10/1/15 FFBT parts: (1) Ethanol Content Analyzer Module (1) Ethanol Content Analyzer Sensor (1) Sensor Bracket
OIL COOLER KIT INSTALLATION INSTRUCTIONS PART NUMBER D E92 335is (N54 engine) with BMW M-Technic bumper and with stock oil cooler
 with BMW M-Technic bumper and with stock oil cooler") OIL COOLER KIT INSTALLATION INSTRUCTIONS PART NUMBER D570-0923 APPLICATION: 2011 E92 335is (N54 engine) with BMW M-Technic bumper and with stock oil cooler Congratulations for being selective enough to
OIL COOLER KIT INSTALLATION INSTRUCTIONS PART NUMBER D570-0923 APPLICATION: 2011 E92 335is (N54 engine) with BMW M-Technic bumper and with stock oil cooler Congratulations for being selective enough to
Raxiom Factory GPS Rear Back-up Camera Kit (07-17 Wrangler)
") Raxiom Factory GPS Rear Back-up Camera Kit (07-17 Wrangler) Installation Time: 2.5-3Hrs Tools Required: 7mm Socket & Driver 10mm Socket 10mm Open end wrench Knife / Razor blade Zip-ties Wire Cutters Needle
Raxiom Factory GPS Rear Back-up Camera Kit (07-17 Wrangler) Installation Time: 2.5-3Hrs Tools Required: 7mm Socket & Driver 10mm Socket 10mm Open end wrench Knife / Razor blade Zip-ties Wire Cutters Needle
APIKOL AAN INTAKE MANIFOLD INSTALLATION INSTRUCTIONS
 APIKOL AAN INTAKE MANIFOLD INSTALLATION INSTRUCTIONS Estimated Installation Time: Approximately 2 hours Parts that will need to be modified/removed (Details provided later in the instructions): Intercooler
Bonneville/Thruxton A.R.K. Guide
 Kit Includes: 1. Hardware 2. 3M Double Sided Tape 3. Jet Kit 4. Carburetor Support Brace 5. 2 x K&N Air Filters 6. Crankcase Breather Filter Fits The Following Motorcycles: Triumph Thruxton Triumph Bonneville
SRAMCQ09. Designed for Dodge Ram vehicles Stillwater Designs SRAMCQ Subwoofer. Subwoofer Harness.
 SRAMCQ09 Designed for 2009-2018 Dodge Ram vehicles Subwoofer Alternate Amp Bracket Subwoofer Harness Subwoofer Amplifier Wire Ties x 6 Adapter Harness Subwoofer Power Harness Bolt (only for solid rear