EGL MOTOR OWNER S MANUAL-LYDA203E-6 WARNING: READ THIS MANUAL CAREFULLY!
|
|
|
- Allen Harrell
- 6 years ago
- Views:
Transcription


1 EGL MOTOR OWNER S MANUAL-LYDA203E-6 WARNING: READ THIS MANUAL CAREFULLY!
2 INTRODUCTION Thank you for your purchase LINGYING ATV LYDA203E-6 series. This manual will provide you with a good basic understanding of the features and operation of this ATV. This manual includes important safety information. It provides information about special techniques and skills necessary to ride your ATV. It also includes basic maintenance and inspection procedures. Please be close reading this manual, it will maximize the performance and lifetime of ATV. 2 / 46
3 IMPORTANT MANUAL INFORMATION FAILURE TO FOLLOW THE WINNINGS AND COUTAINED IN THIS MANUAL CAN RESULT IN SERIOUS INJURY OR DEATH. The safety alert symbol means attention! Failure to follow warning instructions could result in severe injury or death to the machine operator, a bystander or others who inspection or repairing the machine. CAUTION: A caution shows special precautions that must be taken to avoid damage to the machine. NOTE: A note provides key information to make procedures easier or much clearer. 3 / 46
4 CONTENTS Important manual information 2 Safety information..4 Specification 7 Description..8 Identification number records.9 Control function.10 Main switch.10 Left switch 11 Light switch.12 Choke 12 Throttle lever 12 Clutch lever..14 Brake lever 14 Brake pedal..15 Front and rear brakes.20 Brake fluid level 20 Brake fluid leakage..20 Fuel..21 Engine oil 22 Coolant reservoir..23 Operation.25 Starting a cold engine..25 To start out and accelerate.27 To decelerate..27 Engine break-in.28 Periodic maintenance and adjustment.28 Air filter element cleaning.30 Carburetor adjustment 31 Main technical specifications of the engine 32 Operation and maintenance 32 Troubleshooting of the engine 33 Troubleshooting of cooling system 36 Electric fan wiring diagram 37 Inspection of brake system 37 Brake pads inspection 38 Clutch lever free play adjustment 39 Lubricating the drive chain 40 Brake pedal lubrication 40 Lubrication for a-arm 41 Rear axle system lubrication.41 Rear arm pivot lubrication..41 Cleaning and storage.42 4 / 46
5 SAFETY INFORMATION ATV is not a toy, it can be hazardous to operate. An ATV handles difficultly from other vehicles. The accident such as collision and rollover will happen, even while turning and riding back, on hill or over obstacles, If you fail to proper precautions. Severe injury or death can result if you don t follow below instructions: 1. Careful reading and complete understood this manual. 2. Never operates an ATV without proper training 3. Always obey the age recommendation. A child under 16 years old should never operate an ATV which engine size more than 90cc. Never allow a child under age 16 to operate the ATV without adult supervision, and never allow continue to use ATV if the child doesn t has the ability to handle it safely. 4. Always avoid riding ATV on any sidewalks, steep slope, public street, dirt and loose surface. 5. Never operate ATV without wearing a proper helmet, and you should also wear the eye protection, gloves, boots, protective clothing as well. 6. Never consume alcohol or drugs before or during you operating this ATV 7. Never attempt wheelies, jumps, or other stunts 8. Never operate at excessive speed for your skills or the conditions, always go at the speed which is proper for the terrain, visibility, operating conditions as your experience. 9. Always inspect your ATV each time you use it, to make sure it is satisfied with the safety condition. always adhere with the inspection and maintenance procedures and schedule which described in this manual. 10. Always keeps the both hands and feet on the proper position while operating this ATV 11. Always drive slowly and great careful when operate the ATV on unfamiliar terrain, always be alert to changing the terrain condition when you operating the ATV. 12. Never operate on excessively rough, slippery or loose terrain until you familiarized and can control ATV on such terrain. 13. Never operate the ATV on hills too steep beyond your skills, practices the smaller hills before you try to larger ones. 5 / 46
6 14. Always follow the proper procedures for climb hills as described in this manual, check the terrain carefully before you start up any hill, shift your weight forward, never accelerate suddenly or sudden change the gears. 15. Always follow the proper procedures for go down hills and for braking on hills as described in this manual, also check the terrain carefully before you start down hills, shift your weight backward, never go down a hill at high speed, avoid go down a hill at an angle that would cause the vehicle to incline sharply to one side, go straight down the hill where possible. 16. Always follow the proper procedures for stall or roll backward when climbing a hill, to avoid stall, use the proper gear and maintain a stable speed when climbing a hill. If you stall or backwards, follow the special procedure for braking described in this manual, dismount on the uphill side or to a side if straight uphill. Turn on the ATV and remount. 17. Always check the obstacles before operate in a new area, never attempt to operate over large obstacles. 18. Always be careful when skidding or sliding, learn to safely control skidding or sliding by practicing at low speed an on level smooth terrain. 19. Never modify the ATV though improper installation or use of accessories. 20. Always keep the safe distance with other vehicles. POTENTIAL HAZARD Improper handling of gasoline WHAT CAN HAPPEN Gasoline can catch fire and you will be burned. HOW TO AVOID THE HAZARD Always turn off the engine while refueling, don t refuel immediately after the engine has been running long time and it is still very hot. Don t spill gasoline on the engine or muffler when refueling. Never refuel while smoking or nearby other stuffs which can be flammable. When transporting the ATV with other vehicle, ensure it is kept upright and that the fuel cock is in the off position. Otherwise, fuel might leak out of the carburetor or tank. 6 / 46


7 WHAT CAN HAPPEN Gasoline is poisonous and can cause injuries. HOW TO AVOID THE HAZARD If you should swallow some gasoline or inhale a lot of vapor, or get some gasoline on your eyes, see doctor immediately, if gasoline spills on your skin, wash with soap and water. 7 / 46
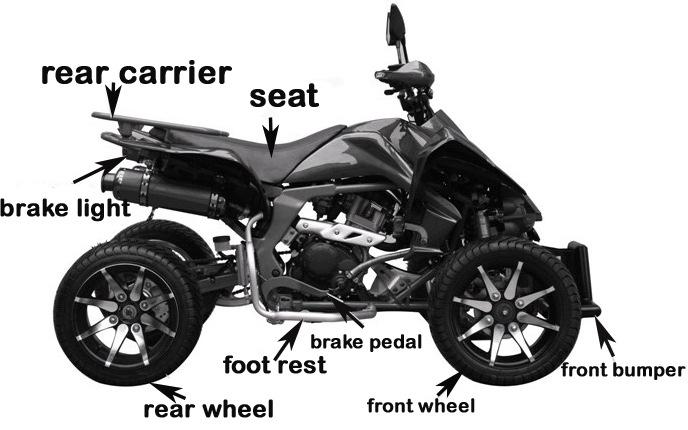
8 Specification Model LYDA203E-6 Overall length 1700mm Max power 11.5Kw /6500±500 r / min Overall width 1270mm Max speed 80km/h Overall height 1020mm Max torque 17.5N.m /5500±500r / m Seat height 740mm Engine oil type SF15W / 40 GB Wheel base 1160mm Engine oil capacity 1.1L Ground clearance 160mm Fuel capacity 6.3L Minimum turning radius Spark plug type D8TC Net weight 195KG Lubrication Press/splash Engine type 4-stroke,single cylinder, water cooled Front brake type disc Displacement 250cc Rear brake type disc Compression ratio 10.0 :1 magneto Permanent magnetic Ignition type CDI Start system Electric DESCRIPTION NOTE: The ATV you have purchased may slightly difference with these drafts or pictures of this manual. 8 / 46

9 9 / 46


10 Identification number records Record the identification numbers information in below space will provide assistance when you order parts or for reference in case stolen. Vehicle identification number: Engine number: Vehicle identification number is stamped on the frame. Engine number is stamped on the bottom of engine left side. 10 / 46

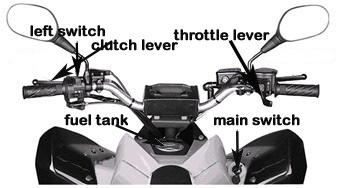
11 Control function Show a potential hazard that could result in severe injury or death. Main switch Functions of the each switch positions are as below: ON: The engine can be started only at this position OFF: All electric circuits are turned off, the key can be removed in this position 11 / 46

12 Left switch 1. Engine stop switch 2. Start switch 3. Turning light switch 4. Horn button 5. Light switch 6. Choke Engine switch stop Make sure the engine switch stop at the RUN position before starting the engine, the engine stop switch control the ignition and can be used to stop engine at all times, especially in the emergency, the engine will not start while this switch is on the OFF position. Start switch The engine will be starting when this switch is pushed backward Turning light switch The left indicator will be working when push this switch to left side, conversely, right indicator working. 12 / 46
13 Light switch Set the switch to LO position to turn on the low beam and the taillight. Set the switch to HI position to turn on the high beam and the taillight Set the switch to OFF position to turn off all lights. Choke The choke is used to help starting a cold engine. Throttle lever Once the engine is running, regulate the throttle lever will accelerate the engine, control the speed of engine machine by mutative the throttle position, since the throttle is loaded with spring, the machine speed will down and return to the idle if hand removed from throttle. 1. Throttle Before starting the engine, check the throttle to be sure it is work smoothly, also make sure it can be back to the idle once the lever released. POTENTIAL HAZARD Malfunction of throttle WHAT CAN HAPPEN The throttle could be hard to operate, will be difficult to accelerate or decelerate when you need to. It could cause a heavy accident. HOW TO AVOID THIS HAZARD 13 / 46

14 Check the throttle lever before you start the engine, if it doesn t work smoothly, check for the reason, correct the problem before riding the ATV. Consult the professional expert or get assistance from dealer if you can t figure out and solve the problem yourself. Speed limiter The speed limiter keeps the throttle from fully opening when the throttle lever pushed to maximum. Turning the adjustable screw limits to adjust the engine power and increase or decrease the speed of ATV. A: distance of ajustable screw no more than 1.2cm Potential hazard Improper operate the speed limiter and throttle WHAT CAN HAPPEN The throttle cable could be damaged, improper operate throttle could result in lose control, have an accident or injury. HOW TO AVOID THE HAZARD Always adjusts the speed limiter within safety distance. 14 / 46


15 Clutch lever The clutch lever is located on the left handlebar, pull the clutch lever to handlebar to disengage the clutch, and release the lever to engage the clutch. The clutch lever should be pulled rapidly and released slowly for smooth clutch operation. Brake lever The brake lever is located on the right handlebar. Pull it toward the handlebar to apply the front brake. 15 / 46


16 Brake pedal The brake pedal is located on the right side of machine, push down the pedal to apply the rear brake Parking brake lever Use the parking brake when you have to park your ATV, especially on a slope 1 park brake locked position, move the parking brake lever to a direction apply the parking brake, 2 unlocked position, move the parking lever to direction b to release the park brake. 16 / 46

17 Potential hazard Improper operate the parking brake WHAT CAN HAPPEN The ATV could start moving unexpectedly if the parking brake is not applied before starting the engine. This could result in beyond control or a collision. The brake disc could overheat if you ride ATV without releasing the parking brake. it could loss of the brake performance and an accident might to happen, and you will wear out the brake earlier. HOW TO AVOID THE HAZARD Always check the parking brake before starting the engine. Always make sure you have released the parking brake before you ride ATV Gear shift lever This machine is equipped with a 4-speed forward with reverse transmission. The gear shift lever is located on the left side of engine and is used to combination with the clutch when shifting. 17 / 46


18 Fuel tank cap Remove the fuel tank cap by turning it counterclockwise as the cambered arrow of below picture showing. Fuel cock The fuel cock supplies the fuel from tank to carburetor. The fuel cock has 3 positions. OFF: fuel will not flow at this position, always turn the fuel cock to this position when the engine is not running. ON: fuel can flows to the carburetor from tank, provides the normal riding when the fuel cock in this position RES: this shows reserve, turn to this position if you run out of the fuel while riding. Then fill the tank in the first possibility. Return the fuel cock to ON position after you filled the fuel. 18 / 46


19 Seat To remove the seat, inset your hand between the rear of seat and the rear fender, pull the seat lock lever upward and pull up the seat at the rear. To install the seat, insert the protecting of front seat into front seat holder and push down the seat at reat. 1. Protecting NOTE: make sure the seat is securely fitted. 19 / 46
20 PRE-OPERATION CHECKS Before ride this ATV, please check the below points: Description Routine Front and rear brake Check operation, lever free play, fluid level and fluid leakage. Fill brake fluid if necessary Clutch Check operation, condition and free play Parking brake Check operation, condition and cable length fuel Check fuel level, fill with fluid if necessary Engine oil Check fuel level, fill with engine oil if necessary Coolant reservoir Check coolant level in reservoir, fill with coolant if necessary chain Check chain slack and condition, adjust if necessary throttle Check for proper throttle cable and free play Rims and tires Check pressure, wear, damage Fittings and fasteners Check all fittings and fasteners Lights and switches Check for proper operation. Tire Check for the pressure and the wear condition Potential hazard Failure to inspect the ATV before operating Failure to properly maintain the ATV WHAT CAN HAPPEN Increase the possibility of an accident or equipments damaged HOW TO AVOID THE HAZARD Always inspect your ATV each time to make sure the ATV is in safe operating condition. Always follow the inspection and the maintenance procedures and the schedule. 20 / 46
21 Front and rear brakes Brake lever and brake level Check the free play in the brake lever and the pedal height, if the condition is incorrect, should adjust it and make sure it can be proper working after adjustment. Check the operation of the brake lever and the brake pedal, they should move smoothly and a firm feeling when the brakes are applied, if not, adjust it to correct condition. Brake fluid level Check the brake fluid level, fill fluid if necessary. Brake fluid leakage Check to see if any brake fluid is leaking out of the pipe joints or brake fluid reservoirs. If there is any leakage, consult with dealer to inspect the bake system. Brake operation Test the brakes at slow speed after starting out to make sure working properly. If the brakes don t provide braking performance, inspect the condition of brake pads for wear. POTENTIAL HAZARD Driving with improperly operating brakes WHAT CAN HAPPEN You could lose braking ability, which could lead to an accident. HOW TO AVOID THE POTENTIAL HAZARD Always check the brakes before every ride. Don t ride ATV if you find any problem with the brakes, Adjust the brake to be correct, if the problem cannot be done correct, consult the dealer. 21 / 46
22 FUEL Make sure there is enough gasoline in the tank Recommended fuel: RQ-90 or higher classification Unloaded gasoline only Fuel tank capacity: 6.3L CAUTION Use only unloaded gasoline, the use of leaded gasoline will lead to severe damage to internal engine parts, such as the valves and piston rings, as well as the exhaust system. POTENTIAL HAZARD Careless when refill fuel WHAT CAN HAPPEN Fuel can spill, which can cause a fire and severe injury. Fuel expands when it heat up, if the fuel tank is overfilled, fuel could spill out due to heat from engine or sun. HOW TO AVOID THE HAZARD Don t overfill the fuel tank. Take care not to spill out, especially on the engine or exhaust pipe. Wipe up any spilled fuel right now. Make sure the cap of fuel tank was closed securely. Don t refuel right after the engine has been running and it is still very hot. 22 / 46

23 Engine oil Make sure the engine oil keeps at the specified level. Add engine oil if necessary. Check the engine oil level as below procedures: The level must be kept between the upper and lower level which marks on the dipstick 1. Start the engine and let it on idle few minutes 2. Stop the engine and put on the ATV on the level ground 3. Remove the oil dipstick, wipe it clean, and reinsert into the dipstick, then repull out to check the level of engine oil if keep on the specified position, add if necessary Change the engine oil The engine oil quantity is the most important cause for the engine life. Change the engine oil as specified maintenance schedule. 1. Drain out the engine oil completely 2. Refill the specified classification engine oil to proper level. CAUTION In order to prevent clutch slippage (since the engine oil also lubricates the clutch), do not mix any chemical additives, make sure that no foreign material enters the crankcase. Recommended engine oil type and quantity: CF15W/40 GB / 46

24 Coolant reservoir Check the coolant level in the coolant reservoir when the engine is cold, since the coolant level will vary with engine temperature. If the coolant level lack of, add distilled water up the level to satisfy with normal coolant level. Change the coolant every two years. CAUTION Hard water or salt water is harmful to the engine. You may use the soft water if you cannot get the distilled water. Coolant reservoir capacity: 1L NOTE: The radiator fan operation is completely automatic. It s switched on or off according to the coolant temperature of the radiator. The switch will be on in 80±4 and will be off in 72±4. Chain Check the general condition of the chain and check the chain slack before every ride. Lubricate and adjust the chain if necessary. Throttle level Check to see that throttle level operates correctly. It must open smoothly and spring back to the idle position when released. Have a dealer repair as necessary for proper operation. Fittings and fasteners Always check the tightness of chassis fittings and fasteners before a ride. 24 / 46
25 Lights Check the headlight and tail/brake light to make sure they are in the working conditions, repair as necessary for proper operation. Tire POTENTIAL HAZARD Operate this ATV with improper tires, or with improper or uneven tire pressure. WHAT CAN HAPPEN Use of the improper tires on this ATV, or operation of this ATV with improper tire pressure, may cause loss of control and lead to risk or accident. HOW TO AVOID THE HAZARD 1. Always comply with below recommended tire type and pressure. 2. Check and adjust the tire pressure when the tires was cold. 3. Tire pressure must be equal on both sides 4. Higher pressure may cause the tire to burst. Inflate the tire very slowly and carefully. Fast inflate could cause the tires burst 5. Check the tire wear limit very often. When the tire groove decrease to half of tire wear limit due to wear, replace the Tire wear limit 25 / 46
26 Operation Indicates a potential hazard that could result in serious injury or death Potential hazard Operating ATV without being familiar with all controls What can happen Loss of control, which could cause an accident or injury How to avoid the hazard Read the owner s manual carefully, if there is a control or function you don t understand, ask your dealer. Starting a cold engine 1. Set the parking brake 2. Turn the fuel cock to ON 3. Turn the main switch to ON 4. Shift the transmission to neutral Note: the engine can be started at the following conditions When the transmission is in neutral, the neutral indicator should come on. When the clutch is disengaged with the transmission in any position. However, it s recommend to shift into neutral before starting. 5. Use the choke as figure direction 26 / 46
 Start the cold engine with the choke in position b, continue to warm up the engine after started until it idles smoothly and return it to position a before riding. 6.")
27 (in position a the choke is closed, position b the choke is opened and cold start position.) Start the cold engine with the choke in position b, continue to warm up the engine after started until it idles smoothly and return it to position a before riding. 6. Completely close the throttle lever and start the engine by pushing the start switch Note: if the engine fails to start, release the start switch, then try it again. Pause a few seconds before next attempt. Each cranking should be as short as possible to preserve battery energy. Don t crank the engine more than 10 seconds on each attempt. Starting a warm engine To start a warm engine, refer to the description of starting a cold engine, the choke should not be used, the throttle should be worked somewhat. Warming up To get maximum engine life, always warm up the engine before starting off. Never accelerate hard with a cold engine. Caution: Do not coast for long distance with the engine off. Also don t tow the machine a long distance. Because the lubrication is functional when the engine running. Lack of the lubrication may cause damage. Always use the clutch when changing the gears. The engine, transmission, drive train are not designed to withstand the shock of forced shifting and can be damaged by shift without clutch. 27 / 46
28 To start out and accelerate: 1. Release the throttle lever, and release the parking brake. CAUTION: Always close the throttle while shifting gears. Otherwise, the engine and drive train will be damaged. 2. Pull the clutch to disengage the clutch. 3. Shift into first gear 4. Open the throttle little and little, at the same time release the clutch lever slowly. 5. Once the ATV has reached adequate speed, release the throttle, and at the same time quickly pull in the clutch lever. 6. Shift into second gear. 7. Open the throttle and gradually release the clutch lever. 8. Follow the same procedure when shift next higher gears. POTENTIAL HAZARD Open the throttle abruptly or release the clutch lever too quickly WHAT CAN HAPPEN This would increase the chance of an accident, including collision, overturn. HOW TO AVOID THE HAZARD Open the throttle gradually, as well as release the clutch lever slowly To decelerate: When you want to slowing or stop, release the throttle and apply the brake smoothly and evenly. When you slow down, shift to a suitable lower gear. Be sure the engine has sufficiently slowed before engaging a lower gear. Improper use of the brake or shifting can cause the tires to lose traction. Reduce control and up the chance of accident. 28 / 46
29 Engine break-in This is the most important period in the life of your ATV. because the engine is brand new, you can t put an excessive load and over speed on it for the first several hours or within 500km running. During this time, the various parts in the engine wear and polish themselves to the correct operating clearances. During this period, never full throttle operation. After engine break-in, change the engine oil also oil filter and so on involved parts, check and adjust the valve clearance, free play of the clutch. Periodic maintenance and adjustment Periodic inspection, adjustment and lubrication will keep your machine in the safest and most efficient condition possible. Safety is an obligation of the machine owner. The most important points of machine inspection, adjustment and lubrication are described on below pages. ITEM valves Cooling system Spark plug Air filter element Carburetor Exhaust system Fuel pipe ROUTINE INITIAL EVERY 320km 1200km 2400km 2400km 4800km Check valves Adjust it if necessary Check for leakage Repair if necessary Replace coolant yearly Check condition, Check the gap and clean Replace if necessary Clean Replace if necessary Clean every 300km-500km, more often in wet or dust areas Check choke operation Adjust the idle speed Check for leakage, Tighten if necessary Replace the gasket if necessary Check the fuel hose for crack or damaged Replace if necessary 29 / 46
30 Engine oil Engine oil filter element Brake Clutch wheels Wheel bearings Steering system Front and rear suspension Upper and lower arm pivot Steering column Rear arm pivot Rear axle system Fittings and fasteners Replace(warm engine before draining) Replace Check operation/fluid leakage/ Correct if necessary Check operation Adjust if necessary Check balance/wearing/damage Replace if necessary Check bearing gap/damage Replace if damaged Check operation, Repair if damaged Check toe-in, adjust if necessary Check operation, Adjust if necessary Lubricate every 6 months Lubricate every 6 months Check all fittings and fasteners Correct if necessary Some of above items require special tools, technical skills, please get service from dealer if necessary. 30 / 46


31 Air filter element cleaning NOTE: There is a hose at the bottom of air filter case. If dust or water collects in this hose, empty the hose and clean the air filter element and air filter case. 1. Remove the seat 2. Remove the air filter cover 3. Remove the air filter element 4. Wash the air filter element gently and thoroughly, then install the air filter element, cover, seat. NOTE: The air filter element should be cleaned every 24-48hours, more often if the ATV is operated in extremely dusty areas. Each time air filter element maintenance has done, check the air input to the air filter case for obstruction. Tighten all fittings securely to avoid the possibility of unfiltered air entering the engine. CAUTION Never operate the engine with the air filter element removed. This will allowed the unfiltered air to enter the engine, causing rapid engine wear and possible engine damage, in addition, operation without the air filter element will affect carburetor jetting with subsequent poor performance and possible engine overheating. 31 / 46
32 Carburetor adjustment The carburetor is a vital part of the engine and requires very skilled adjustment. Most adjusting should be worked by dealers who has professional knowledge and experience to do. However, the idling speed may be performed by the owner as a part of the usual maintenance routine. CAUTION The carburetor was set by producer after many tests. If the settings are disturbed without skilled technical knowledge, poor engine performance and damage may happen. Spark plug Inspection and installation The spark plug is an important engine component and is easy to inspect. The condition of spark plug can indicate the condition of the engine. The ideal color on the white insulator around the center electrode is a medium-to-light tan color for an ATV is being ridden normally. Don t attempt to diagnose such problems yourself. You should periodically remove and inspect the spark plug because heat and deposits will cause the spark plug to slowly break down and erode. If electrode erosion becomes excessive, or if carbon and other deposits are excessive, you should replace the spark plug with specified type D8TC. Installation: 1. Remove the spark plug cap from spark plug 2. Clean the surface of the spark plug gasket, and wipe off any grime from the spark plug threads 3. Measure the electrode gap with a wire thickness gauge and, if necessary adjust the gap to specified as below: 32 / 46
33 Main Technical Specifications of the Engine b. lubricating oil:sf15w / 40 GB Type:one cylinder, four stroke, water cooling, under-layout cam, inclined 2. Main specifications of performance: a. Rated power& corresponding rev:11.5kw /6500±500 r / min b. Max. torque& corresponding rev.17.5n.m /5500±500r / min c. Min. no load speed::1400±100 r /min d. Min fuel consumption:354 g / kw.h c. lubrication oil capacity: 1.1L 9. Dimension: 358mm 355 mm 450mm 10. Net weight: 34 kg 11. Coolant:coolant with glycol and corrupt inhibitor(the 4916# coolant produced by Chongqing yiping chemical Co.,Ltd. are recommended) 3. Main specifications of configuration: a. bore stroke mm b. displacement ml c. compression ratio :1 d. ignition type capacity net mass e. ignition advanced angle top dead center15 /1400r/min f. lubricating system pressing and splashing g. inlet/exhaust valve clearance: 0.04~0.06mm(cooled) 4. Clutch type manual, wet and multiple disc 5. Gearshift 5 speeds 6. Starting system electrical starting and kick starting 7. Spark plug type D8TC 8. Fuel& oil: a. gasoline No.: RQ 90 GB/T Note:Add the coolant as the following table in low-temperature area. No:4916 Manufacturer:Chongqing yiping chemical Co.,Ltd. Coolant V% Distilled water V% Ice point Open temperature of thermostat valve is 72±2,fully open temperature of the valve is Heat sensor switch is got through at 80±4 and disconnected at 72±4 Operation and Maintenance 33 / 46
34 1. If the engine is started at non-neutral, disengage the clutch; and if the engine is started at cooled state, close the choke and operate the throttle while starting. Open the choke after the engine has operated about 1 min. 2. Increase the engine speed after running 1 to 3 minutes. Do not add the load while the engine is still cold. 3. When using the electrical starter, the starting time should be less than 5 seconds, and the second starting must be 10 seconds later. If the engine fails to start for 5 times, check whether the engine (vehicle) parts have failures. Never push the starting button after the engine has started. 4. Adjustment of idle speed a. Warm the engine to normal working temperature. 1 b. Tighten idle adjustment screw, and return 1 4 turns. c. Adjust the throttle plunger stop screw until the speed has reached the regulated idle speed. The engine is easy to stop if the speed is too low. d. Adjust the idle adjustment screw left and right, and tighten it at the position where the engine is getting a highest stable speed. e. Readjust the throttle plunger stop screw until the engine is getting a normal idle speed. f. Repeat the above c,d,e steps until the engine idle speed is no more change no matter you tighten or loosen the idle adjustment screw. a new motorcycle. Never open the throttle completely nor use the same speed for a long time. The speed can not exceed 50Km/h. b. Do not overload the engine during the grinding period of 500 to 1000 kilometers. Never open the throttle completely. The vehicle is allowed to run at 80 percent of each speed and do not use the same speed for a long time. c. Maintenance the engine after per 500Km as the following: replace the engine oil and clean the filter. Check the state of valve clearance and clutch disengaged stroke, readjust as necessary. 6. Daily maintenance: a. Change the engine oil per 2000 kilometers after the grinding period. You can also replace the engine oil ahead if it has deteriorated in quality b. Check the engine oil before daily running. If the oil is below the lower scale of oil dipstick, refill the oil to the upper scale. c. Check the coolant before daily running. Open the water tank to check whether there is enough coolant in it. Refill as necessary. d. Check the state of valve clearance. Normally, the valve clearance has been factory set. Adjust the valve clearance to 0.04mm~0.06mm if there is failure. e. Check the state of carburetor. Clean and adjust as necessary. f. Check and clean the air cleaner as necessary. g. Inspect all bolts for tightness and tighten as necessary. 5. Grind and maintenance of a new engine: This period is very important for new engine as poor grinding would increase the engine s failure. a. Do not overload the engine during the grinding period of 0 to 500 kilometers for 34 / 46
35 Troubleshooting of the Engine 1 The engine starts hard or fails to start. Problem Cause Correction Operation Improper operation Strictly follow the instruction Fuel switch is turned off or the fuel has run out Turn on the switch or refill fuel Fuel Clean and dredge up the fuel Fuel switch or the fuel filter is plugged system pipe Carburetor plugged Clean the carburetor Mixed gas is over thick or over thin Adjust the mixed gas ratio Electrical Too much carbon Remove the carbon deposit Circuit deposit on spark plug and clean it with gasoline Spark plug Incorrect spark plug problem Reset the spark plug gap gap Defective spark plug Replace Electrical Defective ignition coil Replace parts failure Defective C.D.I Replace Defective magneto coil or defective welding Replace or re-welding Improper circuit connecting or open circuit Check and get through All joint- face leaks Tighten all joint bolts Air cleaner plugged Clean Spark plug leaks Tighten the spark plug Tighten the nut on cylinder Cylinder gasket leaks cover Cylinder Valve leaks Re-grinding or replace Gas pipe compression pressure is low Piston ring or cylinder body abraded Replace Remove the carbon deposit exhaust port of cylinder and dredge up the muffler block or muffler Carbon deposit on Incorrect valve clearance Readjust the valve clearance Others Wrong fuel type Replace 2. Poor idle speed Problem Cause Correction Readjust the idle Improper adjustment of carburetor adjustment bolt No idle Fuel pipe and gas pipe plugged Clean the fuel and gas pipe speed Oil level of float chamber is too low Adjust the oil level to the set height Idle Elasticity of carburetor throttle speed is spring is too weak Replace the spring 35 / 46
36 too high Idle speed jet is wide Replace the carburetor Incorrect ignition timing Adjust the ignition time Idle Mixed gas is over thick or over speed is Adjust the carburetor thin unstable Spark plug gap is narrow Reset the spark plug gap 3. The engine works unstable. Problem Cause Correction Fuel pipe Fuel pipe is semi-open Dredge up the fuel pipe High voltage wire or ignition coil has leaks Replace Electrics Capacitor is turnoff or has leaks Replace Too much carbon deposit on spark plug electrodes Remove the carbon deposit 36 / 46
37 4. The engine is overheating. Problem Cause Correction Defective cooling system (see Poor radiating chapter 5) Repair or replace parts condition Running at high speed in a place for a long time Stop the engine for cooling The engine is operated at a low Improve operation method or speed or running at poor quality Over loading or stop the engine for a while road for a long time run at high The engine is operated at the fully speed for a Adjust the throttle open throttle for a long time long time Clutch slip Adjust Muffler plugged Remove the carbon deposit Defective fuel Mixed gas is over thick or over system thin Adjust the carburetor Lubricating No enough lubricating oil Refill the lubricating oil system Defective lubricating oil Replace the lubricating oil 5. The engine stops automatically. Problem Cause Correction The fuel has run out of Refill fuel Chapter 4 Ignition Wiring Diagram red rectifier black/red pink/red I black/yellow regulator D C chief switch green yellow black blue/white black/white green illuminating switch load 12V7AH high pressure bag magneto green Fuel failure system There is no output fuel Oil way plugged Carburetor plugged Clean oil way Clean the carburetor spark plug Electrics Interruption of firing Check the electric wire from the spark plug to magneto The engine is Piston seizure Repair or replace piston seizure Other mechanical seizure failure Replace or repair 37 / 46
38 6 clutch failure Problem Cause Correction Clutch slip Clutch segregation is not completely Improper adjustment of clutch operation system or defective clutch Defective friction plate Spring elasticity is weakened or the length is shortened 7. Gear shifting failure Improper segregation stroke Improper thickness of friction plate Spring elasticity is not uniform Adjust, repair or replace Replace Replace Adjust, repair or replace Replace Adjust the spring Problem Cause Correction No gear shifting Gear shifting is difficult Gearbox broken off automatically Poking fork broken or bend Poking fork pothook or gearshift shaft assembly broken or distorted Clutch segregation is not completely Gear shifting operation is not right Poking fork pothook is broken or centrifugated Defective gear shifting cylindrical cam slot or pin Defective gear coupling pawl or hole No enough elasticity of limit spring Defective gear shifting cylindrical cam and poking fork Replace the poking fork Replace Treat the problem as clutch failure and solve it Improve the operation Replace Replace Replace gear Replace the spring Replace cam or poking fork Troubleshooting of Cooling System Phenomena: poor engine dynamic performance, water thermometer mercurial is pointed at the red area for a long time, and the coolant is boiling and squirting out from the tank. (The cooling system is working normally if the mercurial reached at the red area rapidly and then fallen.) The reason for over high water temperature is as the following: 1. Defective water thermometer or heat sensor switch; 2. Defective radiator cover;main valve or negative pressure valve is insensitive; 3. Radiator or thermal fin plugged; 4. There is no enough coolant in the radiator or the location of radiator or water pipe is over low, which caused the poor circulation; 5. Water pipe or water jacket plugged; 6. Water pump failure; 7. Improper installation of fan or defective fan; 8. Defective cooling pipe(has gas resistance); 9. Radiator small circulation pipe leaks ; 10. Radiator sub-jug is not get through with the atmosphere. The reason for water thermometer can not indicates the temperature changes or the indications is not precise: 1. Defective water thermometer or heat sensor parts, 2. Defective thermostat. The reason for water leakage: 1.Poor mechanical sealing. 2.O-ring aging and poor sealing, which is shown by the water leakage from the joint of water pump cover and right cover. 3.Defective water pipe. 4.Defective cylinder gasket. Open the water tank cover and increase the speed to see if there is water from the water tank cover. Replace the cylinder gasket if there is water run out. 5.Defective water pipe clip and the fixing is not reliable. Replace or tighten the clamp as necessary. 38 / 46

39 Electric Fan Wiring Diagram Negative Green DJ221 Front and rear hydraulic disc brake The ATV is equipped with hydraulic disc brake for front and rear, the brake pedal controls front and rear hydraulic disc brake together. Positive Blue/White DJ622-A The two plugs is reversal. Throttle lever adjustment NOTE: Adjust the engine idling speed before adjusting the throttle lever free play. 1. Loosen the locknut 2. Turn the adjusting bolt until the throttle lever free play has 2-4mm 3. Tighten the locknut. 1. Locknut 2. Adjustable bolt 3. Throttle lever Free play 39 / 46 Inspection of brake system The brake system should be inspected every day before your ride ATV 1. Check the main cylinder for proper level 2. Check to see there is no leakage of the system 3. Check the brake hose and main cylinder for crack. 4. Check the brake pads for wearing. CAUTION The hydraulic disc brake is designed to operate under high pressure. For the benefit of safety and reliability, the service life of brake hose, main cylinder as well as brake liquid must be abided with the specified of this manual. If the brake system work not properly, like fell not strong enough, be blocked can t moving, please consult your dealer to correct the malfunctions for avoid the potential hazard causing by defective brake.

 on the 56mm-60mm. 4.")
40 Brake pads inspection,aadjusting bolt,blocknut,cadjust nut,d.lock nut A cable,athe wearing section of brake pad Inspect the wearing section of brake pad, if it was wore out almost bare, replace a new set of brake pad. Parking brake adjustment Parking brake adjustment may be required if the parking brake does not hold properly. length 1. Loosen the locknut and adjust the adjusting nut on the brake cable 2. Fully loosen the locknut and the adjusting bolt at the rear brake caliper. 3. Turn the adjusting nuts on the brake cable till the cable length(a) on the 56mm-60mm. 4. Tighten the locknut on the brake cable and adjusting bolt at the rear brake caliper. POTENTIAL HAZARD Operating with improperly adjusted brakes WHAT CAN HAPPEN The brake could malfunction, causing reduced braking performance. This could increase the chance of a collision or accident. HOW TO AVOID THE HAZARD After adjusting the parking brake, block the rear of the machine off the ground and spin the rear wheels. Check to make sure there is no brake drag. 40 / 46

41 Clutch lever free play adjustment The clutch lever free play should be adjusted to 8-13mm Drive chain slack adjustment 1.Loosen the locknut of 1 and 2 2. adjust the locknut of 3 and 4 both them frontward till chain at the proper degree of tightness 3. After adjusting, tighten the locknuts of 1 and Adjust nut c. free play Fully turn the adjusting nut at the clutch lever in direction a to increase the free play or in direction b to decrease the free play. Drive chain slack check NOTE: Move the ATV back and forth to find the tightest position of the drive chain. Check or adjust the chain slack while it is in the tightest position To check the drive chain slack, all tires must be touching the ground and there should be no weight on it. 41 / 46

42 Lubricating the drive chain The drive chain must be cleaned and lubricated at the intervals specified in the periodic maintenance and lubrication chart. Otherwise it will quickly wear out, especially when riding in dusty or wet areas, service the drive chain as below: Damaged control cables WHAT CAN HAPPEN Corrosion can result when the outer covering of control cables becomes damaged. Cables also can become frayed. Operation of controls could be limited, which could cause an accident or injury. HOW TO AVOID THE HAZARD Inspect cables frequently. Replace damaged cables. Lubricate the inner cables and the cable ends. If the cables do not operate smoothly, to replace it. Brake pedal lubrication Lubricates to the pivot CAUTION: The drive chain must be lubricated after washing the ATV or riding in the rain. 1. Clean the drive chain with kerosene and a small soft brush. 2. Wipe the drive chain dry 3. Thoroughly lubricate the drive chain. CAUTION: Do not use engine oil or any other lubricants for the drive chain, as they may contain substances that could damage the chain. Cable inspection and lubrication POTENTIAL HAZARD 42 / 46


43 Lubrication for A-arm Lubricates the front upper and lower A-arms pivots Rear arm pivot lubrication Lubricates the rear arm pivot 1 upper arm grease nipple 2 lower arm grease nipple 43 / 46
44 Battery Battery electrolyte is poisonous, never discard it at random. Handle it be comply with national or local environmental protection rules. This ATV is equipped with a sealed type battery. Therefore it is not necessary to check the electrolyte or add distilled water in the battery. If the battery seems to have discharged, consult dealer. CAUTION: Do not try to remove the sealing caps of battery cells. You may damage the battery. POTENTIAL HAZARD Failure to handle battery or battery electrolyte carefully WHAT CAN HAPPEN You could be poisoned. You could be severely burned by the sulfuric acid in battery electrolyte. Battery produce explosive gases. HOW TO AVOID THE HAZARD Avoid contact with skin, eyes or clothing. Always shield eyes when working near battery. Keep out of the children. Battery maintenance When the ATV is not used for long time, remove the battery and store it in a cool, dark place. completely recharge the battery before reinstallation. CLEANING AND STORAGE A. CLEANING Frequent, thorough cleaning of your ATV will not only enhance its appearance but also will improve its general performance and extend the useful life of many components. 1. Before cleaning the ATV 44 / Block off the end of exhaust pipe to prevent water entry 3. Make sure the spark plug and all filler caps are properly installed. 4. If the engine case is excessively greasy, apply degreaser with a paint brush. Do not apply degreaser to the chain, sprockets or wheel axles. 5. Rinse the dirt and degreaser off with a garden hose has enough pressure to work. 6. Gently Wash all surfaces with warm water and detergent once the majority dirt has been rinsed off. 7. Rinse the ATV off immediately with clean water and dry all surfaces with clean towel or soft absorbent cloth. 8. Dry the chain and lubricate it to prevent rust. 9. Automotive type wax may be applied to all painted and chromed surfaces. POTENTIAL HAZARD Operation with wet brakes after washing WHAT CAN HAPPEN Wet brakes may have reduced stopping ability, increasing the chance of accident. HOW TO AVOID THE HAZARD Test the brakes after washing. Apply the brakes several times at slow speed to let friction dry out the linings. B. STORAGE 1. Empty the fuel of tank and carburetor. 2. Clean the drive chain thoroughly and lubricate it. 3. Block up the frame to raise all wheels off the ground 4. Tie a plastic bag over the entry of exhaust pipe to prevent the moisture from entering. 5. Remove the battery and to be properly storage.
45 NOTE: Make the necessary repairs before storing the ATV. Assembling figure for that was disassembled while packing 45 / 46
46 46 / 46 Circuit diagram
ATV-320 R OWNER S MANUAL
 ATV-320 R OWNER S MANUAL FOREWORD May we, the manufacturer, take this opportunity to thank you for choosing our ATV to serve you. This Owner s Manual is prepared for you to properly operate in safety.
YFZ450S OWNER S MANUAL WARNING. READ THIS MANUAL CAREFULLY! It contains important safety information.
 READ THIS MANUAL CAREFULLY! It contains important safety information. OWNER S MANUAL WARNING LIT-11626-17-11 YFZ450S This ATV should not be ridden by anyone under 16 years of age. 5TG-28199-10 EBU00776
ATV-320 S/U ATV-320SD S/U OWNER S MANUAL V
 ATV-320 S/U ATV-320SD S/U OWNER S MANUAL V1.0 2014.03.01 0 FOREWORD May we, the manufacturer, take this opportunity to thank you for choosing our ATV to serve you. This Owner s Manual is prepared for you
NOTES FOR SAFETY OPERATOR-ONLY.
 NOTES FOR SAFETY Both the parents and their child must fully understand everything in this manual before riding. This vehicle is for OPERATOR-ONLY. This vehicle is only designed for operation on level,
YFM35RY OWNER S MANUAL WARNING. READ THIS MANUAL CAREFULLY! It contains important safety information.
 READ THIS MANUAL CAREFULLY! It contains important safety information. OWNER S MANUAL WARNING LIT-11626-22-12 YFM35RY This ATV should not be ridden by anyone under 16 years of age. 5YT-28199-16 EBU17092
YFZ450V OWNER S MANUAL. READ THIS MANUAL CAREFULLY! It contains important safety information.
 READ THIS MANUAL CAREFULLY! It contains important safety information. OWNER S MANUAL w LIT-11626-19-32 YFZ450V This ATV should not be ridden by anyone under 16 years of age. 5TG-28199-12 EBU13320 INTRODUCTION
ATV-50/90/100 I/II/V OWNER S MANUAL
 1 ATV-50/90/100 I/II/V OWNER S MANUAL FOREWORD May we, the manufacturer, take this opportunity to thank you for choosing our ATV to serve you. This Owner s Manual is prepared for you the details as to
CONTENT. 3. Maintenance
 CONTENT Foreword -------------------------------------------------------------------------------------------- 1 1. The performance, technical parameters and structure of Go Kart--------------------------------------------2
AIR-COOLED DIESEL GENERATOR OWNERʼS MANUAL. This manual contains important safety information. TDG2500E TDGW7000E TDG7000SE TDG4500E
 AIR-COOLED DIESEL GENERATOR OWNERʼS MANUAL This manual contains important safety information. TDG2500E TDGW7000E TDG7000SE TDG4500E TDG8000-3 TDG7000SE-3 TDG7000E TDG8000E TDGW7000SE TDG7000E3 TDGW8000E
May we, the manufacturer, take this opportunity to thank you for choosing our ATV to serve you.
 FOREWORD May we, the manufacturer, take this opportunity to thank you for choosing our ATV to serve you. This Owner s Manual is prepared for you the details as to operate and maintenance necessarily to
YFS200V OWNER S MANUAL. READ THIS MANUAL CAREFULLY! It contains important safety information.
 READ THIS MANUAL CAREFULLY! It contains important safety information. OWNER S MANUAL w LIT-11626-19-14 YFS200V This ATV should not be ridden by anyone under 16 years of age. 5VM-28199-13 EBU13320 INTRODUCTION
3. INSPECTION/ADJUSTMENT
 3 3 INSPECTION/ADJUSTMENT SERVICE INFORMATION -------------------------------------------- 3-1 MAINTENANCE SCHEDULE ---------------------------------------- 3-2 FUEL LINE/FUEL FILTER -------------------------------------------
1.CONTENTS 1. Contents Control location Before riding Safe riding Driving Use genuine spare parts Use
 1.CONTENTS 1. Contents... 1 2. Control location... 3 3. Before riding... 4 4. Safe riding... 4 5. Driving... 5 6. Use genuine spare parts... 5 7. Use of each component... 6 Gauges... 6 Operation of ignition
Light condition and operation Windshield glass condition Wiper blade condition Paint condition and corrosion Fluid leaks Door and hood lock condition
 GENERAL CHECKS Engine Compartment The following should be checked regularly: Engine oil level and condition Transmission fluid level and condition Brake fluid level Clutch fluid level Engine coolant level
INSPECTION/ADJUSTMENT
 3 3 INSPECTION/ADJUSTMENT SERVICE INFORMATION----------------------------------------------------------------------- 3-1 MAINTENANCE SCHEDULE-------------------------------------------------------------------
CHASSIS CONTENTS EXTERIOR PARTS 6-1 FRAME COVER 6-2 REAR FRAME COVER 6-4 FRONT WHEEL 6-6 FRONT BRAKE 6-10 HANDLEBARS 6-17 FRONT FORK 6-19
 CHASSIS CONTENTS EXTERIOR PARTS 6- FRAME COVER 6- REAR FRAME COVER 6-4 FRONT WHEEL 6-6 FRONT BRAKE 6-0 HANDLEBARS 6-7 FRONT FORK 6-9 STEERING 6-6 REAR WHEEL 6-3 REAR BRAKE 6-39 6 REAR SHOCK ABSORBER 6-43
OWNERS MANUAL. Two Stroke Dirt Bike. Distributed by SSR Motorsports. Address: Alondra Blvd, Norwalk CA
 OWNERS MANUAL Two Stroke Dirt Bike Distributed by SSR Motorsports Address: 12825 Alondra Blvd, Norwalk CA 90650 www.ssrmotorsports.com Please note that this is a general manual. The model of the vehicle
BT49QT-9O3 User s Manual
 BT49QT-9O3 User s Manual Preface Thank you very much for purchasing BAOTIAN brand motorcycle of model BT49QT-9O3, which developed by BAOTIAN MOTORCYCLE INDUSTRIAL CO., LTD. And welcome to join the driver
3. INSPECTION/ADJUSTMENT
 3 SERVICE INFORMATION...3-0 FINAL REDUCTION GEAR OIL...3-7 MAINTENANCE SCHEDULE...3-2 DRIVE BELT...3-7 FUEL FILTER...3-3 BRAKE SHOE...3-8 THROTTLE OPERATION...3-3 BRAKE ADJUSTING NUT...3-8 AIR CLEANER...3-4
BLAZER250 OWNER S MANUAL BOOK FORWARD. Sincerely appreciate your choice of our vehicle, we will provide you the best services.
 BLAZER250 OWNER S MANUAL BOOK FORWARD Sincerely appreciate your choice of our vehicle, we will provide you the best services. This Owner s manual contains important safety and maintenance information.
Electric Car User Manual
 Electric Car User Manual The owner s manual contains important safety information as well as assembly, use and maintenance instructions. The Ride-on Car must be assembled by an adult who has read and understands
Water pump Owner's Manual
 Water pump Owner's Manual Safety Precautions I. General Safeguards Please read this operation manual to have a thorough understanding of the content there before use the product. Failure to do so may lead
YFM7FGPW OWNER S MANUAL LIT B WARNING. READ THIS MANUAL CAREFULLY! It contains important safety information.
 READ THIS MANUAL CAREFULLY! It contains important safety information. OWNER S MANUAL WARNING LIT-11626-20-11 YFM7FGPW This ATV should not be ridden by anyone under 16 years of age. 3B4-28199-10 EBU17091
CHASSIS CONTENTS EXTERIOR PARTS 7-1 FRONT WHEEL 7-2 FRONT BRAKE 7-6 HANDLEBARS 7-13 FRONT FORK 7-15 STEERING 7-23 REAR WHEEL 7-26 REAR BRAKE 7-30
 CHASSIS CONTENTS EXTERIOR PARTS 7- FRONT WHEEL 7-2 FRONT BRAKE 7-6 HANDLEBARS 7-3 FRONT FORK 7-5 STEERING 7-23 REAR WHEEL 7-26 REAR BRAKE 7-30 REAR SHOCK ABSORBER 7-32 SWING ARM 7-33 7 7- CHASSIS EXTERIOR
3. INSPECTION/ADJUSTMENT
 SERVICE INFORMATION...3-0 FINAL REDUCTION GEAR OIL...3-7 MAINTENANCE SCHEDULE...3-2 DRIVE BELT...3-7 FUEL FILTER...3-3 BRAKE SHOE...3-8 THROTTLE OPERATION...3-3 BRAKE ADJUSTING NUT...3-8 AIR CLEANER...3-4
YFM7FGPY OWNER S MANUAL WARNING. READ THIS MANUAL CAREFULLY! It contains important safety information.
 READ THIS MANUAL CAREFULLY! It contains important safety information. OWNER S MANUAL WARNING LIT-11626-22-42 YFM7FGPY This ATV should not be ridden by anyone under 16 years of age. 43P-28199-10 EBU17092
WEBER CARBURETOR TROUBLESHOOTING GUIDE
 This guide is to help pinpoint problems by diagnosing engine symptoms associated with specific vehicle operating conditions. The chart will guide you step by step to help correct these problems. For successful
Engine Does Not Start or Is Hard to Start Cause of Trouble. 1. Open the drain screw, and check Fuel not supplied (1) Fuel tank empty
 Fuel tank empty") 20. Engine Does Not Start or Is Hard to Start 20-1 Engine Output Insufficient 20-2 Poor Performance at Low Speed and Idling 20-3 Poor Performance at High Speed 20-3 Unsatisfactory Operation 20-4 Fuel Gauge
20. Engine Does Not Start or Is Hard to Start 20-1 Engine Output Insufficient 20-2 Poor Performance at Low Speed and Idling 20-3 Poor Performance at High Speed 20-3 Unsatisfactory Operation 20-4 Fuel Gauge
Gasoline Inverter Generator
 user manual Gasoline Inverter Generator table of contents Preface Introduction... Safety Information Exhaust fumes are poisonous... Fuel is highly flammable and poisonous... Engine and muffler may be hot...
YFM66FAV OWNER S MANUAL WARNING. READ THIS MANUAL CAREFULLY! It contains important safety information.
 READ THIS MANUAL CAREFULLY! It contains important safety information. OWNER S MANUAL WARNING LIT-11626-19-09 YFM66FAV This ATV should not be ridden by anyone under 16 years of age. 2C6-28199-10 EBU00776
AG-HA-2500N GASOLINE GENERATOR
 AG-HA-2500N GASOLINE GENERATOR OWNER S MANUAL BEFORE OPERATING THIS EQUIPMENT PLEASE READ THESE INSTRUCTIONS CAREFULLY (I)WARNING 1. Read the operator s instruction manual. 2. Attention! Exhaust gases
SECTION 8 2 DO IT YOURSELF MAINTENANCE. Chassis
 DO IT YOURSELF MAINTENANCE Chassis SECTION 8 2 Checking the coolant level of the traction motor................ 184 Checking the radiator....................................... 185 Checking brake fluid........................................
SECTION 6 2 SERVICE PROCEDURES AND SPECIFICATIONS. Engine. Specifications
 SERVICE PROCEDURES AND SPECIFICATIONS Engine SECTION 6 2 Specifications........................................... 170 Fuel.................................................... 172 Facts about engine oil
Owner s/operator s Manual
 Water Pump MP2533E2 Owner s/operator s Manual Completely read and understand this manual before using this product. Foreword This Owner s/ Operator s Manual is designed to familiarize the operator with
CHASSIS CONTENTS EXTERIOR PARTS 6-1 FRONT WHEEL 6-2 FRONT BRAKE 6-6 HANDLEBARS 6-12 REAR WHEEL 6-30 REAR BRAKE 6-34 REAR SHOCK ABSORBER 6-36
 CHASSIS CONTENTS EXTERIOR PARTS 6-1 FRONT WHEEL 6-2 FRONT BRAKE 6-6 HANDLEBARS 6-12 FRONT FORK ( ) 6-14 FRONT FORK ( ) 6-20 STEERING 6-27 REAR WHEEL 6-30 REAR BRAKE 6-34 REAR SHOCK ABSORBER 6-36 6 SWING
SECTION 6 2 SERVICE PROCEDURES AND SPECIFICATIONS. Engine. Specifications
 SERVICE PROCEDURES AND SPECIFICATIONS Engine SECTION 6 2 Specifications........................................... 162 Fuel.................................................... 164 Facts about engine oil
YFM125GZ This A This ATV should not be ridden by anyone under 16 years of age.
 READ THIS MANUAL CAREFULLY! It contains important safety information. OWNER S MANUAL WARNING LIT--- YFMGZ This A This ATV should not be ridden by anyone under years of age. C-- EBU0 Read this manual carefully
KING CANADA 950W PORTABLE GENERATOR MODEL: KCG-951G INSTRUCTION MANUAL COPYRIGHT 2011 ALL RIGHTS RESERVED BY KING CANADA TOOLS INC.
 KING CANADA 950W PORTABLE GENERATOR MODEL: KCG-951G INSTRUCTION MANUAL COPYRIGHT 2011 ALL RIGHTS RESERVED BY KING CANADA TOOLS INC. WARRANTY & SERVICE INFORMATION 1-YEAR LIMITED WARRANTY FOR THIS 950W
Part 7 DO IT YOURSELF MAINTENANCE
 Part 7 DO IT YOURSELF MAINTENANCE Chapter 7 2 Engine and Chassis Checking the engine oil level Checking the engine coolant level Checking brake fluid Checking power steering fluid Checking tire pressure
RASER R1/ RASER FX OWNER'S MANUAL
 RASER R1/ RASER FX OWNER'S MANUAL IMPORTANT NOTES FOR SAFE OPERATION FAILURE TO FOLLOW THE INSTRUCTIONS CONTAINED HEREIN MAY RESULT IN DAMAGE TO YOUR SCOOTER, DECREASE ENGINE LIFE, CAUSE INJURY TO YOURSELF
YFM660FR OWNER S MANUAL WARNING. READ THIS MANUAL CAREFULLY! It contains important safety information.
 READ THIS MANUAL CAREFULLY! It contains important safety information. OWNER S MANUAL WARNING LIT-11626-16-34 YFM660FR This ATV should not be ridden by anyone under 16 years of age. 5KM-28199-11 EBU00776
LDG6000SA DIESEL GENERATOR OWNERS MANUAL
 LDG6000SA DIESEL GENERATOR OWNERS MANUAL BEFORE OPERATING THIS EQUIPMENT PLEASE READ THESE INSTRUCTIONS CAREFULLY Preface Thank-you for purchasing this generator. This operation manual contains information
HS500ATV OWNER S MANUAL POWERSPORTS. Model: No one under the age of 16 should operate this ATV
 POWERSPORTS OWNER S MANUAL Model: HS500ATV No one under the age of 16 should operate this ATV (888) 405-8725 Coleman Powersports 1775 E. University Dr., Tempe, AZ 85281 colemanpowered.com Owner Manual
PERIODIC MAINTENANCE
 PERIODIC MAINTENANCE CONTENTS PERIODIC MAINTENANCE SCHEDULE 2 1 MAINTENANCE PROCEDURES 2 3 2 BATTERY 2 3 CYLINDER HEAD NUTS AND EXHAUST PIPE NUTS 2 4 CYLINDER HEAD AND CYLINDER 2 4 SPARK PLUG 2 4 FUEL
PF-4000, PF-4010, PF-4210 MULTI-PURPOSE ENGINE
 PF-4000, PF-4010, PF-4210 MULTI-PURPOSE ENGINE Date 09-26-01 Supplier To The Outdoor Power Equipment Industry ISM, Inc. 1028 4 th Street SW Auburn, WA 98001 Phone: (253) 333-1200 Fax: (253) 333-1212 WWW.TANAKA-USA.COM
SECTION 7 2 DO IT YOURSELF MAINTENANCE MR2 U. Engine and Chassis
 SECTION 7 2 DO IT YOURSELF MAINTENANCE Engine and Chassis Checking the engine oil level................................. 168 Checking the engine coolant level............................ 169 Checking brake
OWNER S MANUAL POWERSPORTS HS360ATV HS400ATV. No one under the age of 16 should operate this ATV
 POWERSPORTS ORTS OWNER S MANUAL HS360ATV HS400ATV No one under the age of 16 should operate this ATV (888)-405-8725 Coleman Powersports 364 S. Smith Rd. Tempe, AZ. 85281 REV032514 Owner s Manual Owner
WARM ENGINE STARTING PROCEDURE
 saw starting COLD ENGINE STARTING PROCEDURE 1. Pull the choke lever out. 2. Lock the throttle in the start position by depressing and holding the throttle lock button (C) while releasing the trigger (A)
WARNING - BEFORE YOU DRIVE
 See back cover for a pre-ride checklist section 3 operation WARNING - BEFORE YOU DRIVE 1. Always perform a pre-ride inspection of the vehicle using the checklist provided on the back cover of this manual.
Trench Filler for Compact Utility Loaders
 Form No. 3353-608 Rev A Trench Filler for Compact Utility Loaders Model No. 22472 260000001 and Up Operator s Manual Register your product at www.toro.com Original Instructions (EN) Contents Page Introduction................................
SERIES OFF-ROAD KART USER S MANUAL. Thank you very much for your choice of this Off-road Kart.
 SERIES OFF-ROAD KART USER S MANUAL Dear Sir or Madam, Thank you very much for your choice of this Off-road Kart. This Off-road Kart is manufactured according to the full survey of market demand. We hope
Wheel Horse. 44 Snowthrower. for 5xi Lawn and Garden Tractors. Model No & Up. Operator s Manual
 FORM NO. 8 Rev A Wheel Horse Snowthrower for 5xi Lawn and Garden Tractors Model No. 7966 890050 & Up Operator s Manual IMPORTANT: Read this manual, and your tractor manual, carefully. They contain information
I: INSPECT AND CLEAN, ADJUST, LUBRICATE OR REPLACE IF NECESSARY C: CLEAN A: ADJUST R: REPLACE L: LUBRICATE I: INSPECTION D: DIAGNOSE
 2. Periodic Maintenance > Periodic Maintenance Chart XCITING 400i Maintenance Schedule Perform the pre-ride inspection (Owner's Manual) at each scheduled maintenance period. This interval should be judged
NILFISK BA 500 Service Manual
 NILFISK BA 500 Service Manual Model 66324400 12/94 Form Number 043023 TABLE OF CONTENTS Batteries...21 Brush Drive Belt Adjustment Or Replacement...7 Brush Drive Motor - Carbon brush Inspection... 8 Brush
5. FUEL SYSTEM 5-0 FUEL SYSTEM UXV 500
 5 FUEL SYSTEM 5 SERVICE INFORMATION------------------------------------------------ 5-02 TROUBLESHOOTING----------------------------------------------------- 5-03 FUEL TANK -----------------------------------------------------------------
Instruction Manual. Vibratory Plate Compactor
 Instruction Manual Vibratory Plate Compactor Model VPC45R Model VPC65R Model VPC85R Model VPC95R Table of Contents 1. INTRODUCTION...1 2. SAFETY...1-2 3. SPECIFICATIONS.....2 4. APPLICATION.. 2 5. CHECK
The following procedures should be observed to ensure safe driving.
 Driving the vehicle The following procedures should be observed to ensure safe driving. n Starting the hybrid system ( P. 162) n Driving STEP 1 With the brake pedal depressed, shift the shift lever to
MXU 300/250/150 OFF-ROAD
 OWNER'S MANUAL KWANG YANG MOTOR CO.,LTD. MXU 300/250/150 OFF-ROAD Issued: 01.JUL.2005 IMPORTANT NOTICES READ THIS MANUAL CAREFULLY Your Owner's Manual contains important information on safety, operation,
MIKUNI VM26 Carburetor Kit Instruction Manual
 MIKUNI VM26 Carburetor Kit Instruction Manual (For exclusive use in the Super Head 4VALVE+R-equipped motorcycle) Item No. (Carburetor set) AKEGAWA-made products. Please strictly follow the following instructions
RedGum GP160 Splitter. Owner s Manual
 RedGum GP160 Splitter Owner s Manual Product Description & Intended Purpose: This Log Splitter / Wood Splitter is an outdoor product that splits wood logs for use as fuel in a fireplace or a woodstove.
5. FUEL SYSTEM 5-0 FUEL SYSTEM MXU 250R/300R
 5 FUEL SYSTEM 5 SERVICE INFORMATION------------------------------------------------ 5-2 TROUBLESHOOTING----------------------------------------------------- 5-3 FUEL TANK -----------------------------------------------------------------
SECTION 4 - FUEL/LUBRICATION/COOLING
 For Arctic Cat Discount Parts Call 606-678-9623 or 606-561-4983 SECTION 4 - FUEL/LUBRICATION/COOLING 4 TABLE OF CONTENTS Carburetor Specifications... 4-2 Carburetor Schematic... 4-2 Carburetor... 4-3 Cleaning
SMQGZ F-02 PORTABLE WATER PUMP QGZ F INSTRUCTION MANUAL
 SMQGZ40-35-144F-02 PORTABLE WATER PUMP QGZ40-35-144F INSTRUCTION MANUAL The following information relates to protecting YOUR SAFETY and PREVENTING EQUIPMENT PROBLEMS. To help you recognize this information.
BRAKE SYSTEM Return To Main Table of Contents
 BRAKE SYSTEM Return To Main Table of Contents GENERAL... 2 BRAKE PEDAL... 10 MASTER CYLINDER... 13 BRAKE BOOSTER... 16 BRAKE LINE... 18 PROPORTIONING VALVE... 19 FRONT DISC BRAKE... 20 REAR DRUM BRAKE...
COLT 2310, 2510, AND 2712 COM PACT TRACTORS CHAPTER 9 TROUBLESHOOTING AND ANALYSIS
 COLT 2310, 2510, AND 2712 COM PACT TRACTORS CHAPTER 9 TROUBLESHOOTING AND ANALYSIS 9-A-1 UPON RECEIVING ANENGINE FORRE- PAIR. Learn the history of the unit from the customer. While the customer is present
Operating and Assembly Manual
 Model 470-/H/PRO/IC Operating and Assembly Manual Midwest Equipment Manufacturing, Inc. 5225 Serum Plant Road Thorntown, IN 46071 11-11-11 SAFETY RULES Remember, any power equipment can cause injury if
WARNING. The engine exhaust from this product contains chemicals known to cause cancer, birth defects or other reproductive harm.
 WARNING The engine exhaust from this product contains chemicals known to cause cancer, birth defects or other reproductive harm. We ve created a web site just for YOU! S S S S S S Check it out... Technical
February 26, ch.12.notebook. Ch. 12. Preventative Maintenance and Troubleshooting. Feb 23 5:03 PM
 Ch. 12 Preventative Maintenance and Troubleshooting Feb 23 5:03 PM 1 Why PM? preventive maintenance certain maintenance tasks must be performed regularly to keep an engine working properly helps premature
Racing NAVODILO ZA UPORABO USER'S MANUAL
 Racing NAVODILO ZA UPORABO USER'S MANUAL TOMOS USER'S MANUAL YOUNGST'R YOUNGST'R FULL RACING 45 1 CONTENTS Warnings 3 Riding Safety Tips 3 Technical Specification 4-5 Technical Description 6-9 Vehicle
OWNER S MANUAL XV125S 5AJ E3
 OWNER S MANUAL XVS AJ--E INTRODUCTION Welcome to the Yamaha world of motorcycling! EAU0000 As the owner of a XVS, you are benefiting from Yamaha s vast experience in and newest technology for the design
3. INSPECTION/ADJUSTMENT
 3 3 INSPECTION/ADJUSTMENT SERVICE INFORMATION-------------------------------------------------- 3-1 MAINTENANCE SCHEDULE---------------------------------------------- 3-3 FUEL LINE---------------------------------------------------------------------
MODEL 565CKG Operating and Assembly Manual Midwest Equipment Manufacturing, Inc Serum Plant Road Thorntown, IN 46071
 MODEL 565CKG Operating and Assembly Manual Midwest Equipment Manufacturing, Inc. 5225 Serum Plant Road Thorntown, IN 46071 11-20-14 SAFETY RULES Remember, any power equipment can cause injury if operated
Instruction manual DENVER DBO
 Instruction manual DENVER DBO-6500 www.facebook.dk/denver-electronics Before operating this vehicle, read all the instructions for safe assembly and operations. User s manual can guide you through the
OWNERS MANUAL. KXDMOTO.de. KXDMOTO.de. Content. Original instructions. Manufacturer: Zhejiang Kingroma Industrial & Trading CO.,LTD.
 OWNERS MANUAL Manufacturer: Zhejiang Kingroma Industrial & Trading CO.,LTD. Address:NO.1 Baihe Road, Baihuashan Industrial Area, Wuyi, Zhejiang China Please note that this is a general manual. So, the
Earth Auger MAG500 MAG500RS
 Earth Auger MAG500 MAG500RS US Owner s/operator s Manual Completely read and understand this manual before using this product. - 0 - Foreword This Owner s/ Operator s Manual is designed to familiarize
STIGA TORNADO 51 S 51 SE PRO 51 S
 STIGA TORNADO 51 S 51 SE PRO 51 S 8211-0225-09 SVENSKA S 1 2 3 1. 2. ADD FULL FULL ADD ADD FULL 0,15 l. 3. LS 45 4. XTE 60 3x 5. LS 45 6. XTE 60 STOP I H 7. 8. 2 S SVENSKA 9. 10. 11. 12. LS 45 0,75 mm
YFM7FGPA YFM7FGPHA This ATV should not be ridden by anyone under 16 years of age.
 READ THIS MANUAL CAREFULLY! It contains important safety information. OWNER S MANUAL WARNING LIT-11626-24-05 YFM7FGPA YFM7FGPHA This ATV should not be ridden by anyone under 16 years of age. 1DT-28199-10
1. GENERAL INFORMATION
 GENERAL INFORMATION ENGINE SERIAL NUMBER ---------------------------------------------- - SPECIFICATIONS ---------------------------------------------------------- - 2 SERVICE PRECAUTIONS ------------------------------------------------
12. FRONT WHEEL/FRONT BRAKE/
 12 4.5kgm 0.9kg-m 4.5kg-m 12-0 SERVICE INFORMATION... 12-1 HYDRAULIC BRAKE... 12-10 TROUBLESHOOTING... 12-2 FRONT SHOCK ABSORBER... 12-16 FRONT WHEEL... 12-3 STEERING HANDLEBAR... 12-19 FRONT BRAKE...
Mongoose 270 OWNER'S MANUAL OFF-ROAD
 OWNER'S MANUAL Mongoose 270 OFF-ROAD Do not remove this Owner s Manual from this ATV according to the guidelines and agreement with the U.S. Consumer Product Safety Commission. Read this manual carefully.
MODEL HD99 HYDRAULIC ONE MAN TOWABLE EARTHDRILL
 DO NOT THROW AWAY IMPORTANT MANUAL MODEL HD99 HYDRAULIC ONE MAN TOWABLE EARTHDRILL Operators Manual GROUND HOG, INC. P.O.BOX 290 San Bernardino, CA. 92402 Phone (909) 478-5700 Fax (909) 478-5710 E-mail:
Owner s Manual for 16 Slider
 Owner s Manual for 16 Slider This manual contains important safety, assembly, operation and maintenance information. Please read and fully understand this manual before operation. Save this manual for
OWNER S MANUAL. Blizzard 150. For more information on ATV Safety contact the Ricky Power Sports, LLC Toll Free at:
 OWNER S MANUAL Blizzard 150 For more information on ATV Safety contact the Ricky Power Sports, LLC Toll Free at: 1-844-250-2199 Always wear a helmet: It could save your life! Do not remove the owner s
DC MOTOR MAINTENANCE ALL ELECTRIC LIFT TRUCKS PART NO SRM 294
 DC MOTOR MAINTENANCE ALL ELECTRIC LIFT TRUCKS PART NO. 897076 620 SRM 294 SAFETY PRECAUTIONS MAINTENANCE AND REPAIR When lifting parts or assemblies, make sure all slings, chains, or cables are correctly
IMPORTANT INFORMATION
 Table of Contents IMPORTANT INFORMATION Section 1B - Maintenance MAINTENANCE 1 B Specifications........................... 1B-1 Special Tools........................... 1B-2 Mercury/Quicksilver Lubricants
Disc Brake System ( For Cross-Country)
") Technical Service Instructions General Safety Information Disc Brake System ( For Cross-Country) SI-8C60F t WARNING Please use extra caution to keep your fingers away from the rotating disc brake rotor
Technical Service Instructions General Safety Information Disc Brake System ( For Cross-Country) SI-8C60F t WARNING Please use extra caution to keep your fingers away from the rotating disc brake rotor
SAFE OPERATION 1. BEFORE OPERATION
 1 The best insurance against accidents is to abide by the safety regulations. Read and understand this manual carefully before operating the excavator. Every user, however experienced, should carefully
SAFE DRIVE IMPORTANT. SMR Motorcycle congratulates you on choosing one of its products. ATTENTION
 1 SAFE DRIVE This vehicle must only be run on racetracks and away from normal roads. Parents are responsible for the safety of children, therefore they must pay the utmost attention to them; Always wear
MANUAL SHIFT AND AUTOMATIC TRANSMISSIONS
 CHAPTER 17 MANUAL SHIFT AND AUTOMATIC TRANSMISSIONS The vehicle driver must be prepared to drive vehicles with either manual or automatic transmission. Each transmission type requires specific methods
SPECIFICATIONS SUBJECT TO CHANGE WITHOUT NOTICE
 PREFACE The following manual is only a guide to assist you and is not a complete or comprehensive manual of all aspects of maintaining and repairing your generator. The equipment you have purchased is
No part of this publication may be reproduced without written permission.
 Thank you for purchasing a Honda generator. This manual covers operation and maintenance of the EB3000 and EB4000 generators. All information in this publication is based on the latest product information
3. INSPECTION/ADJUSTMENT
 3 INSPECTION/ADJUSTMENT SERVICE INFORMATION------------------------------------------------ 3-1 MAINTENANCE SCHEDULE-------------------------------------------- 3-3 FUEL LINE/THROTTLE OPERATION---------------------------------
MUDD-OX INC. MAX AND BUFFALO ATV OPERATOR S MANUAL MODEL YEARS DO NOT REMOVE THIS OPERATOR S MANUAL FROM THIS VEHICLE
 MUDD-OX INC. MAX AND BUFFALO ATV OPERATOR S MANUAL MODEL YEARS 1990-2015 DO NOT REMOVE THIS OPERATOR S MANUAL FROM THIS VEHICLE For parts and accessories visit www.max6x6.com 1 Your ATV can be hazardous
BR-250 / BR-250SS / M2-250 SERVICE MANUAL
 BR-250 / BR-250SS / M2-250 SERVICE MANUAL Manufactured by PGO of Motive Power Industry Co., Ltd 1. INSPECTION/ADJUSTMENT 1 1 INSPECTION/ADJUSTMENT SERVICE INFORMATION -------------------------------------------------
Finishing Mower Estate 72
 Finishing Mower Estate 72 Owners/Operators Manual & Spare Parts List Issue Date: October 2011 1 Introduction Your FIELDMASTER Estate 72 Finishing Mower has been designed to do a range of work to your satisfaction.
142F 144F GASOLINE ENGINE SM-142F-01A INSTRUCTION MANUAL
 142F 144F GASOLINE ENGINE SM-142F-01A INSTRUCTION MANUAL Thank you for purchasing our engine. This manual covers the operation and maintenance of your engine. All information in this publication is base
SAVE THESE INSTRUCTIONS
 OPERATION MANUAL WARHORSE IMPORTANT SAFETY INSTRUCTIONS WARNING: Failure to observe these instructions can cause personal injury to machine operator or bystanders. WARNING: Asphyxiation Hazard. An improperly
GASOLINE GENERATOR SET USER S MANUAL
 GASOLINE GENERATOR SET USER S MANUAL Foreword Thank you for purchasing our gasoline generator and hope that you will enjoy operating your unit, one of the finest models in the market. This Manual provides
OWNER S MANUAL YZF600R 4TV E4
 OWNER S MANUAL YZF600R 4TV-28199-E4 EAU00001 INTRODUCTION Welcome to the Yamaha world of motorcycling! As the owner of a YZF600R, you are benefiting from Yamaha s vast experience in and newest technology
WARNING! Ensure that there are no naked flames around the product! Do not smoke while filling fuel and oil!
 Engine Oil and Fuel Engine Operation This product is equipped with a 4 stroke engine. Before operation you have to add proper fuel and engine oil. DO NOT MIXTURE THEM! 1. Place the product on a stable,