Ferrari 328 Standard Brake System Bleed/Flush (Non-ABS)
|
|
|
- Adelia Francine Barnett
- 6 years ago
- Views:
Transcription
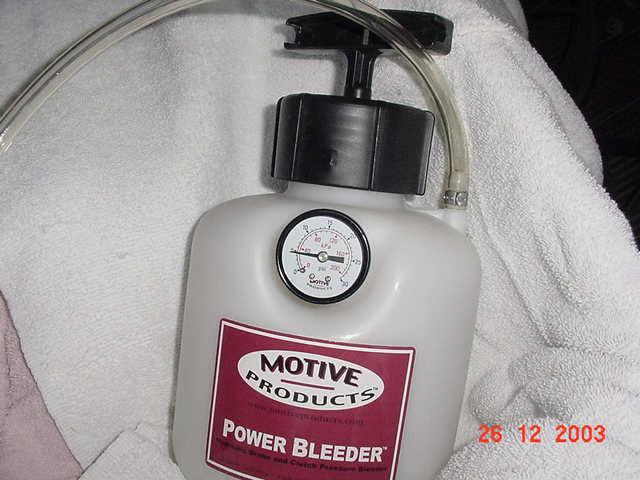
1 Ferrari 328 Standard Brake System Bleed/Flush (Non-ABS) Carl Rose December 2003 Annual brake fluid replacement is recommended as routine system maintenance (more frequently if car driven vigorously) or at time of brake pad replacement. DOT-3/4 brake fluid is hydrophilic (absorbs water) which over time can corrode components & damage seals, resulting in leaks & poor braking performance. The uses a conventional hydraulic four-wheel vacuum-assist disk brake system with integral cable-actuated parking brake mechanism in center of rear rotors. Original factory front brake pads incorporate a small grounding circuit lead to illuminate dashboard light when wear limit reached. Proper caliper bleeding sequence is farthest from master cylinder to nearest, or RR LR RF LF. All 1989 models were equipped with Teves II ABS. Bleeding process may be similar on 1989 ABS-equipped cars; I understand imperative not to allow master cylinder reservoir to drain completely or specific tools are required to cycle the ABS unit valves to expel trapped air. ABS can also be bled directly at the wheels with ignition on using accumulator as pump. However I ve not personally done this & thus cannot comment. [example shown is US car but cars are identical] Time required: About 1.5 hours for first time, probably a bit less with practice. Tools required: Jack & stands Wheel blocks 22mm lug nut socket (Snap-On #AS-281 aluminum-lined 7/8 shown) Torque wrench 7mm, 5/8, and 9/16 combination wrenches Medium Philips screwdriver Special Tools: Motive-Power Pressure Bleeder ( $49.95 for basic version with 1101 adaptor cap; economical to purchase with set of adaptors to fit multiple vehicles for $ About 2 feet 3/16 ID clear plastic tubing (local hardware store <$.30/ft);
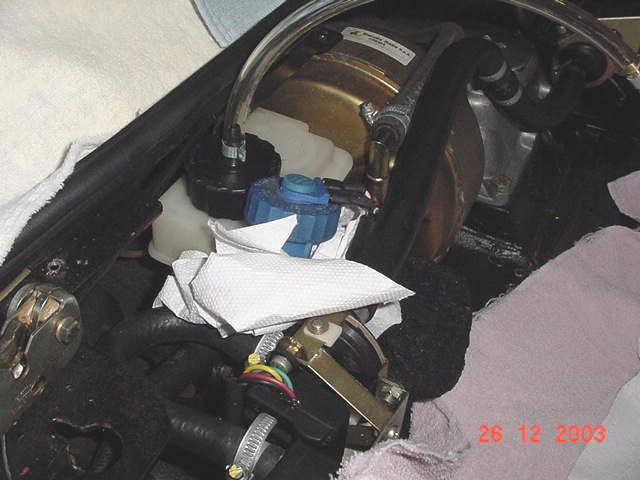
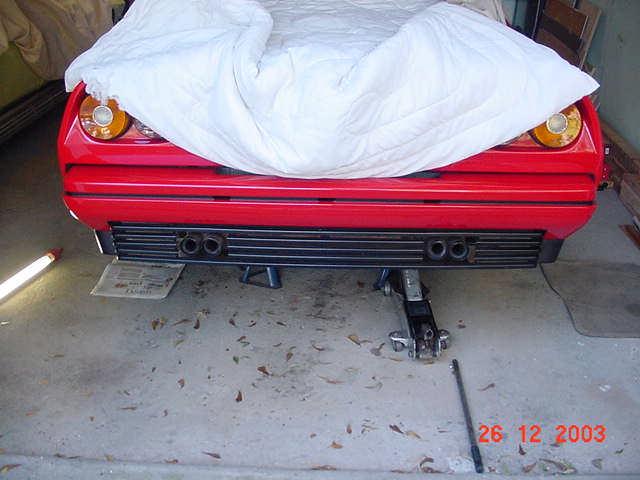
2 Parts: Disposable large clear jar/container (I used soda fountain Styrofoam cup with lid) 60cc syringes (2) DOT-4 brake fluid 1 quart (AGIP Super HD DOT 4 is factory-specified); good substitutes include Castrol LMA, Valvoline SynPower, Ford Heavy- Duty, and ATE. I used ATE Blue ($10/liter; may be alternated yearly with ATE Type 200 Gold) to visually determine when fresh fluid arrives at bleeder screw. Silicone fluid is not recommended by the factory due to aeration concerns. Even should you have to purchase all the tools likely less expensive than single dealer service charge. References Haynes Automotive Brake Manual #10410/2112 (ISBN # X) covers conventional hydraulic systems with brief chapter on ABS; a manual specifically focusing on ABS systems (Automotive ABS Brake Manual #10411) also provides a good overview of multiple ABS systems & theory of operation. Note: Wear safety goggles & gloves when working with DOT-4 brake fluid. Cover exposed areas of the car thoroughly as it is highly corrosive on contact with painted surfaces or your eyes & skin. Obviously properlyfunctioning brakes are important on a high-performance car; bleeding is not a difficult job but take the time to do properly. Some authorities recommend tapping the brake pedal slowly while the bleeder screw Is open to create pulsations that tend to purge air from the system. Open the front decklid. I elected to remove the cowl cover (Philips screws around perimeter) for better access to master cylinder although this isn t strictly necessary. Note towels draped over front of car for protection from accidental spill:

3 Unfortunately the factory located the master cylinder cap slightly underneath the cowl lip, making removal challenging (center sensor pivots as cap loosened). Unscrew master cylinder cap, tilt the reservoir slightly towards front of car and maneuver out. Set the cap assembly off to side on a paper towel. I then suctioned out approximately 120cc of old fluid (but did not run reservoir dry) using syringe to prevent running old fluid through the system:

4 Screw the #1101 PowerBleeder cap onto the master cylinder; again will have to tilt reservoir to tighten snugly. Attach the reservoir tubing to the pressure cap; I had a small leak at this junction & would recommend sealing threads with Teflon tape. Tighten fittings with 9/16 & 5/8 wrenches, pressurize (with plunger) to 10psi & confirm no leaks:
5
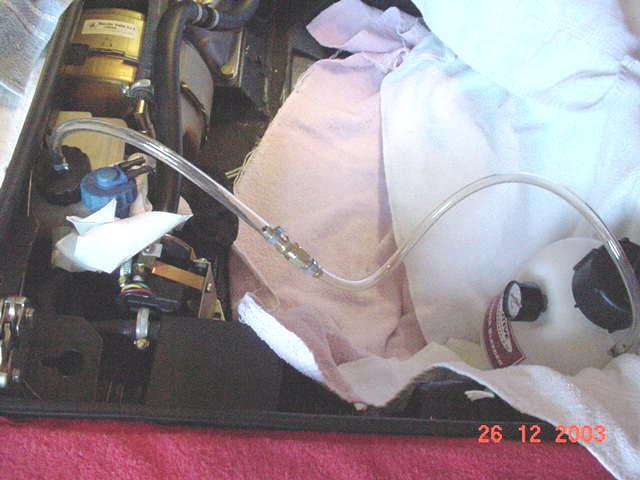
6 Remove plunger assembly and fill tank with 1 liter/quart of new brake fluid. Pressurize PowerBleeder to 10psi and carefully set in spare tire well. The internal pick-up tube location is marked with blue tape:

7

8 Following is complete procedure with wheel removal for individual caliper access. This is probably important the first time flushing is done, but brake system can be flushed with car on ground by blind technique of reaching behind wheel; however, one does risk dripping brake fluid on inside of wheels. Block the front wheels. Loosen the lug bolts on all four wheels. Brake system is properly bled from most distant caliper (from MC) first, followed by next closest, etc. I elected to lift the entire rear of the car. Jack up both rear frame rails & place stands underneath. Remove right rear wheel:
9
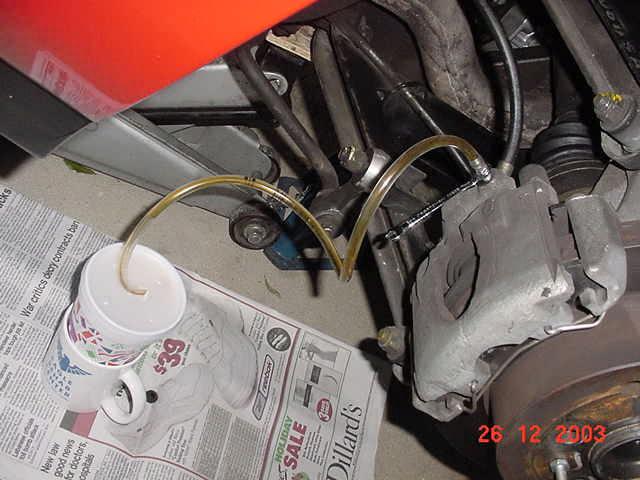
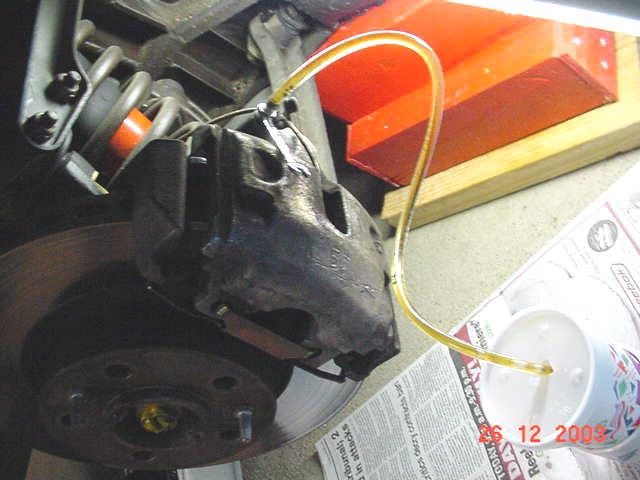
10 328 has a single 7mm hex bleeder screw per caliper. Remove protective rubber cap & firmly push first box end of wrench then plastic tubing over nipple and put other end in container. Make sure it stays there you don t want pressurized brake fluid squirting all over I used a Styrofoam cup (in coffee mug for stability) with tubing running through lid. Slowly loosen the bleeder screw (standard thread direction) until brake fluid flows through tubing:
11
. I did not have to re-pressurize the PowerBleeder during procedure.")
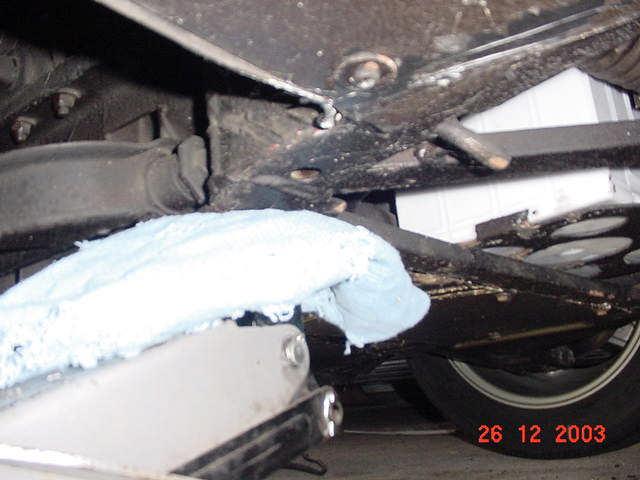
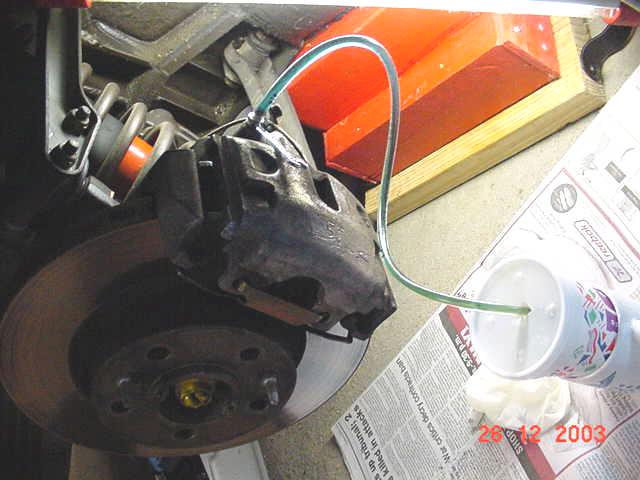
12 Close bleeder screw when new brake fluid (blue in picture) appears: The farthest line takes the longest, perhaps 5 minutes, for new brake fluid to appear. Tighten bleeder screw and remove tubing. Replace rubber cap. Take care not to splash free end of tubing (remember brake fluid will rapidly dissolve paint). I did not have to re-pressurize the PowerBleeder during procedure. Now is an excellent opportunity to inspect the rotor for scoring, pads for thickness, and flexible brake line for cracking. If all is well replace wheel and install lug bolts to snug. Bleeding process at left rear is identical. Replace left rear wheel, snug lug bolts, and return car to ground. Move wheel blocks to rear wheels. Turning to the front, lift from left side & place stand under frame rail just behind the A-arm support; picture illustrates jacking point (I used a wooden block stand instead of jack stand):
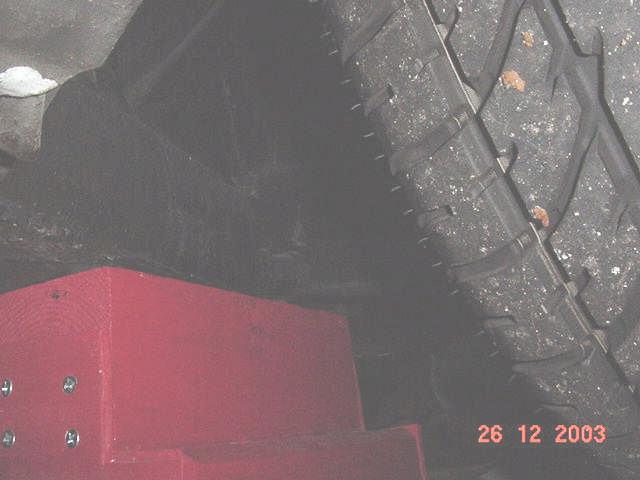
13
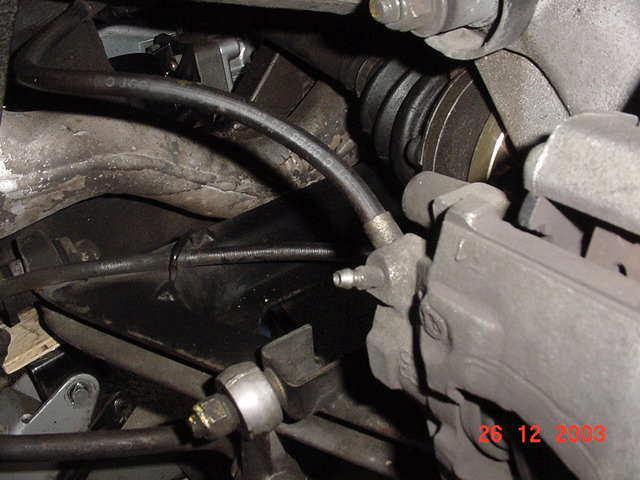
14 Remove left front wheel. Note the pad wear indicator grounding lead running through the bleeder rubber cap. As previous, remove cap & affix hex wrench and tubing. Open bleeder until new fluid appears:
15
16 Tighten bleeder screw, remove tubing, and replace rubber cap. Replace front wheel & return car to ground. Repeat procedure on opposite side. Before concluding final caliper bleed, tilt the PowerBleeder tank away from the internal pick-up tube. Open the bleeder screw until little or no brake fluid remains in the tubing from tank to MC (don t allow the MC reservoir go dry or you ll have to repeat entire bleeding process). Close bleeder & install rubber cap. Slowly loosen the large plunger cap on the tank to release pressure. Replace wheel and return car to ground. Loosen the tubing junction. As previously mentioned, I had a slight amount of leakage & would recommend Teflon tape for better sealing. Being careful not to drip any brake fluid, very carefully unscrew adaptor from MC. Fluid level should be approximately 3cm from reservoir thread lip to prevent overflow when cap replaced. Aspirate or add new fluid with syringe as required. Replace MC cap. Carefully remove protective towels. Replace fiberglass cowl covering (if removed). Using torque wrench, tighten all lug bolts to 72 ft-lbs. Test brake pedal for firm feel; I didn t have any problems with centering valve ( Brake Failure light went off as usual about 10 seconds after turning key to position II).
Brake Fluid Exchange
 Brake Fluid Exchange OJT / Practice DTOG Proficiency Exam Date: Trainee: Trainer: Service Center: Brake Fluid Exchange 1. Prepare for service Wear proper Personal Protective Equipment Recommended PPE:
ALLDATA Online Saturn L200 L4-2.2L VIN F - Base Brake Bleeding. Base Brake Bleeding
 Page 1 of 9 Base Brake Bleeding BASE BRAKE BLEEDING TOOLS REQUIRED J-439l5 Brake Bleed Adapter J29532 Pressure Bleeder MANUAL BLEEDING NOTICE: Brake fluid is corrosive to painted surfaces. Take care not
Ferrari 328 Intake Airbox-to-Ascending Coolant Pipe Interference: Inspection & Repair
 Ferrari 328 Intake Airbox-to-Ascending Coolant Pipe Interference: Inspection & Repair Carl Rose and David Handa August 2003 Credit for recognition of this potential problem goes to Mr. David Handa, who
INSTALLATION INSTRUCTIONS
 INSTALLATION INSTRUCTIONS REAR DISC CONVERSION KIT A126-2 1988-98 C1500 2WD 10" REAR DRUM Thank you for choosing STAINLESS STEEL BRAKES CORPORATION for your braking needs. Pleases take the time to read
general booster conversion kit instructions
 general booster conversion kit instructions your kit may look slightly different than above instructions are general and work for many builds Unboxing your kit: 1. Remove new booster, bracket assembly
DISC BRAKE/DUAL MASTER CYLINDER CONVERSION. Tools, Equipment and Supplies Needed:
 Please take the time to read the enclosed instructions carefully. If you have any questions, call our Product Assistance personnel for clarification. It is important to note that these instructions contain
INSTALLATION INSTRUCTIONS
 INSTALLATION INSTRUCTIONS REAR DISC BRAKE CONVERSION KIT A126-3 1988-98 CHEVY K1500 4WD 10" DRUMS Thank you for choosing STAINLESS STEEL BRAKES CORPORATION for your braking needs. Pleases take the time
INSTALLATION INSTRUCTIONS
 INSTALLATION INSTRUCTIONS PERFORMANCE AT THE WHEELS KIT W120-22, W120-23 1964 1/2-69 MUSTANG Thank you for choosing STAINLESS STEEL BRAKES CORPORATION for your braking needs. Pleases take the time to read
INSTALLATION INSTRUCTIONS
 INSTALLATION INSTRUCTIONS DISC BRAKE CONVERSION KIT A120-20, A120-21 1964 1 /2-66 Ford & Mercury Thank you for choosing STAINLESS STEEL BRAKES CORPORATION for your braking needs. Pleases take the time
Brake master cylinder replacement
 Brake master cylinder replacement 8-25-2010 I had replaced the front brake master cylinder a few years ago when it developed a bad leak, at that time, I ordered a new master cylinder from Spartan, very
TOYOTA TUNDRA BIG BRAKE KIT Section I - Installation Preparation
 TOYOTA TUNDRA 2007- BIG BRAKE KIT Section I - Installation Preparation Part Number: PTR09-34070 Kit Contents Item # Quantity Reqd. Description 1 1 Brake Rotor, LH Front 2 1 Brake Rotor, RH Front 3 1 Brake
Vacuum Bleeder Kit. Product:
 Vacuum Bleeder Kit Product: 119-020 Warning! These pumps are not approved for use with combustible materials such as gasoline, kerosene, or diesel fuel. Serious injury or damage may occur if pump is used
BLEEDING BRAKE SYSTEM
 BLEEDING BRAKE SYSTEM CAUTION: Brake fluid is harmful to painted and plastic surfaces. If brake fluid is spilled onto a painted or plastic surface, immediately wash it with water. Bleed hydraulic system
INSTALLATION INSTRUCTIONS
 INSTALLATION INSTRUCTIONS REAR DISC BRAKE CONVERSION KITS A112, A112-1 & A112-93 1979-93 FORD MUSTANG with 7.5" & 8.8" AXLES Thank you for choosing STAINLESS STEEL BRAKES CORPORATION for your braking needs.
Mopar 8 3/4 & 9 3/4 (Dana) Installation Instructions Rear Disc Conversion
 Installation Instructions Rear Disc Conversion") Mopar 8 3/4 & 9 3/4 (Dana) Installation Instructions Rear Disc Conversion This kit is for either Mopar 8 ¾ or Mopar 9 ¾ (Dana). This kit is designed to work with axles with either GM 5 x 4.75 Bolt Pattern
Mopar 8 3/4 & 9 3/4 (Dana) Installation Instructions Rear Disc Conversion This kit is for either Mopar 8 ¾ or Mopar 9 ¾ (Dana). This kit is designed to work with axles with either GM 5 x 4.75 Bolt Pattern
This chapter covers the location and servicing of the front brake components for the KYMCO MXU 700i and MXU 500i models.
 KYMCO MXU 500i/700i Repair Manual Brake System 9.Brake System This chapter covers the location and servicing of the front brake components for the KYMCO MXU 700i and MXU 500i models. 1.Brake Discs... 9-3
INSTALLATION GUIDE. RMS510, 511, 512, 513, 511MC 510-OR, 512-OR Manual Revision:
 REKLUSE MOTOR SPORTS z-start Dual-Actuated Brake Kit INSTALLATION GUIDE RMS510, 511, 512, 513, 511MC 510-OR, 512-OR 196-210 Manual Revision: 051309 2002-2009 Rekluse Motor Sports Rekluse Motor Sports,
INSTALLATION INSTRUCTIONS
 INSTALLATION INSTRUCTIONS PERFORMANCE AT THE WHEELS KITS W156-6 & W156-7 1965-74 MOPAR B & E BODY Thank you for choosing STAINLESS STEEL BRAKES CORPORATION for your braking needs. Pleases take the time
INSTALLATION INSTRUCTIONS
 INSTALLATION INSTRUCTIONS REAR DISC CONVERSION KIT A128-4 1997-2004 JEEP WRANGLER (TJ) WITH DANA 44 AXLES (non-abs) Thank you for choosing STAINLESS STEEL BRAKES for your braking needs. Pleases take the
for filling and bleeding hydraulic disk brake systems Instruction
 Seite 1 von 6 Instruction All processes described in this instruction are applicable for brake fluid DOT4 and hydraulic fluid based on mineral oil. Never the less the fluids must never be mixed up, otherwise
INSTALLATION INSTRUCTIONS
 INSTALLATION INSTRUCTIONS COMP. R AND COMP. S QUICK CHANGE KITS A200, A200-1 Thank you for choosing STAINLESS STEEL BRAKES CORPORATION for your braking needs. Pleases take the time to read and carefully
H31 BOOSTER REBUILD & MASTER CYLINDER
 2010 1991 BMW 750iL George Fontes gajfontes@yahoo.com H31 BOOSTER REBUILD & MASTER CYLINDER Rebuild hydraulic booster and replace Master Cylinder. Page 1 of 16 Master Cylinder Removal & Brake Booster Rebuild
INSTALLATION INSTRUCTIONS
 INSTALLATION INSTRUCTIONS REAR DISC BRAKE CONVERSION KIT A158 1994-97 Dodge Ram 1500 (2WD & 4WD) and REAR DISC BRAKE CONVERSION KIT A158-1 1998-01 Dodge Ram 1500 (2WD & 4WD) Thank you for choosing STAINLESS
INSTALLATION INSTRUCTIONS
 INSTALLATION INSTRUCTIONS REAR DISC BRAKE CONVERSION KIT A126-1 1973-87 CHEVROLET 1/2 TON 2WD Thank you for choosing STAINLESS STEEL BRAKES CORPORATION for your braking needs. Pleases take the time to
INSTALLATION INSTRUCTIONS
 INSTALLATION INSTRUCTIONS Disc Brake Spindle Kit SUM-BKA2447 1964-72 A-BODY 1967-69 F-BODY 1968-74 X-BODY Thank you for choosing SUMMIT RACING for your braking needs. Please take the time to read and carefully
INSTALLATION GUIDE. RMS500, RMS501, RMS502, RMS503, RMS506, RMS507, RMS508, RMS509, -OR Manual Revision:
 REKLUSE MOTOR SPORTS z-start Brake Kit INSTALLATION GUIDE RMS500, RMS501, RMS502, RMS503, RMS506, RMS507, RMS508, RMS509, -OR 196-200 Manual Revision: 051309 2009 Rekluse Motor Sports Rekluse Motor Sports,
INSTALLATION INSTRUCTIONS
 INSTALLATION INSTRUCTIONS REAR DISC CONVERSION KIT SUM-BK1414-X 1997-2004 JEEP WRANGLER (TJ) WITH DANA 44 AXLES (non-abs) Thank you for choosing SUMMIT RACING for your braking needs. Pleases take the time
Ford 8, 9 Small Bearing Installation Instructions Rear Disc Conversion
 Ford 8, 9 Small Bearing Installation Instructions Rear Disc Conversion This kit is for Ford 9 rear axles with the small (2.835 ) style bearing and Ford 8 rear ends. This kit is designed to work with axles
INSTALLATION INSTRUCTIONS
 INSTALLATION INSTRUCTIONS BIG ROTOR / CALIPER RELOCATION REAR KIT SUM-BK1423 1999-2009 GM 1/2 Ton Trucks & SUVs Thank you for choosing SUMMIT RACING for your braking needs. Pleases take the time to read
55-64 Full Size GM (Impala, Bel Air, etc.) This kit is for axles with a 3 3/8 spread center to center on the top two bolt holes (pictured left).
 This kit is for axles with a 3 3/8 spread center to center on the top two bolt holes (pictured left).") SUM-BK1624A Full Size GM Installation Instructions Rear Disc Conversion 55-64 Full Size GM (Impala, Bel Air, etc.) This kit is for axles with a 3 3/8 spread center to center on the top two bolt holes (pictured
SUM-BK1624A Full Size GM Installation Instructions Rear Disc Conversion 55-64 Full Size GM (Impala, Bel Air, etc.) This kit is for axles with a 3 3/8 spread center to center on the top two bolt holes (pictured
INSTALLATION INSTRUCTIONS
 INSTALLATION INSTRUCTIONS PERFORMANCE AT THE WHEELS KIT W125-42 GM 10 & 12 Bolt Rear Axles with Staggered or non-staggered Shocks with C-Clips Thank you for choosing STAINLESS STEEL BRAKES CORPORATION
A /F/X Body Instruction Packet Rear Disc Conversion
 A /F/X Body Instruction Packet Rear Disc Conversion 64-72 A Body / 67-81 F Body / 62-74 X Body This kit is for axles with a 3 1/8 spread center to center on the top two bolt holes (pictured left). Rotor
INSTALLATION INSTRUCTIONS
 INSTALLATION INSTRUCTIONS BIG ROTOR / CALIPER RELOCATION FRONT KITS SUM-BK1422, BK1423, BK1424 1999-2006 GM 1/2 Ton Trucks & SUVs Thank you for choosing SUMMIT RACING for your braking needs. Pleases take
INSTALLATION INSTRUCTIONS
 INSTALLATION INSTRUCTIONS DISC BRAKE CONVERSION KITS A121-1, A121-2, A121-3, A121-4 1967-69 Ford & Mercury Thank you for choosing STAINLESS STEEL BRAKES CORPORATION for your braking needs. Pleases take
SW20 Coolant System Maintenance.
 SW20 Coolant System Maintenance. This article contains information on how to change and bleed the coolant, as well as flushing the system. It is based on information in the service manual, tips gathered
INSTALLATION INSTRUCTIONS R1 REAR CONVERSION KIT
 INSTALLATION INSTRUCTIONS R1 REAR CONVERSION KIT INSTRUCTION FOR ASSEMBLY OF JEEP CJ SERIES W/AMC 20 REAR AXLES, 5 x 5-1/2" BOLT CIRCLE WITH A130-4 FULL FLOATING AXLE OR A130-5 (1 PIECE AXLE) Thank you
Hawk HP Performance Brake Pads (94-98 GT/V6 Front Pair) - Installation Instructions
 - Installation Instructions") Hawk HP Performance Brake Pads (94-98 GT/V6 Front Pair) - Installation Instructions The below installation instructions work for the following products: Hawk HP Plus Performance Brake Pads (94-98 GT/V6
Hawk HP Performance Brake Pads (94-98 GT/V6 Front Pair) - Installation Instructions The below installation instructions work for the following products: Hawk HP Plus Performance Brake Pads (94-98 GT/V6
INSTALLATION INSTRUCTIONS
 INSTALLATION INSTRUCTIONS DISC BRAKE CONVERSION KITS A120-4 & A120-5 1964-1/2-66 Ford & Mercury Thank you for choosing STAINLESS STEEL BRAKES CORPORATION for your braking needs. Pleases take the time to
FORD FAIRLANE Booster Conversion Kit ( TORINO, RANCHERO )
") 1966-1971 FORD FAIRLANE Booster Conversion Kit ( TORINO, RANCHERO ) F R Unboxing your kit: 1. Remove new booster, bracket assembly and master cylinder from their boxes and inspect the parts. 2. New boosters
1966-1971 FORD FAIRLANE Booster Conversion Kit ( TORINO, RANCHERO ) F R Unboxing your kit: 1. Remove new booster, bracket assembly and master cylinder from their boxes and inspect the parts. 2. New boosters
Tools, Equipment and Supplies Needed:
 153-162 DISC BRAKE/DUAL MASTER CYLINDER CONVERSION Please take the time to read the enclosed instructions carefully. If you have any questions, call our Product Assistance personnel for clarifi cation.
Replacing a Brake Line by UCLA-Vstar, April 2007
 Replacing a Brake Line by UCLA-Vstar, April 2007 Replacing a brake line may seem intimidating if you ve never bled brakes before, and especially if you cannot find a stepby-step how-to. Here s a crude
19. HYDRAULIC BRAKE 19-1 SYSTEM COMPONENTS FRONT MASTER CYLINDER SERVICE INFORMATION 19-3 FRONT BRAKE CALIPER 19-15
 19. HYDRAULIC BRAKE SYSTEM COMPONENTS- 19-2 FRONT MASTER CYLINDER 19-10 SERVICE INFORMATION 19-3 FRONT BRAKE CALIPER 19-15 TROUBLESHOOTING 19-4 REAR MASTER CYLINDER 19-18 BRAKE FLUID REPLACEMENT/ REAR
INSTALLATION & USER S GUIDE
 REKLUSE MOTOR SPORTS The Rekluse Left Hand Rear Brake Kit INSTALLATION TIPS INSTALLATION & USER S GUIDE Doc ID: 196-5301 Doc Rev: 031016 Before continuing, we recommend watching the Brake Kit Installation
INSTALLATION INSTRUCTIONS
 INSTALLATION INSTRUCTIONS REAR DISC BRAKE CONVERSION KIT A157 1991-2004 Dodge Dakota 2WD 1991-2002 Dodge Dakota 4WD 1998-2002 Dodge Durango Thank you for choosing STAINLESS STEEL BRAKES CORPORATION for
INSTALLATION INSTRUCTIONS
 INSTALLATION INSTRUCTIONS R1 REAR DRUM TO DISC BRAKE CONVERSION KIT A130-3 JEEP CJ SERIES W/AMC-20 REAR AXLES AND 5 x 5-1/2" BOLT CIRCLE Thank you for choosing STAINLESS STEEL BRAKES CORPORATION for your
INSTALLATION INSTRUCTIONS
 INSTALLATION INSTRUCTIONS PERFORMANCE AT THE WHEELS KIT W155-5 CHRYSLER 8 3 /4" & 9 3 /4" REAR AXLES Thank you for choosing STAINLESS STEEL BRAKES CORPORATION for your braking needs. Please take the time
INSTALLATION INSTRUCTIONS
 INSTALLATION INSTRUCTIONS COMP CALIPER QUICK CHANGE KIT A213 1968-73 MUSTANG Thank you for choosing STAINLESS STEEL BRAKES CORPORATION for your braking needs. Pleases take the time to read and carefully
ANTI-LOCK BRAKE SYSTEM
 ANTI-LOCK BRAKE SYSTEM 1992 Infiniti G20 1990-92 BRAKES Infiniti Anti-Lock Brake System Infiniti; G20, M30, Q45 DESCRIPTION & OPERATION The Anti-Lock Brake System (ABS) prevents wheel lock-up during abrupt
INSTALLATION INSTRUCTIONS
 INSTALLATION INSTRUCTIONS POWER FRONT DISC CONVERSION KIT A126-7 1963-66 CHEVY C10 PICKUP NON-POWER FRONT DISC CONVERSION KIT A126-8 1963-72 CHEVY C10 PICKUP Thank you for choosing STAINLESS STEEL BRAKES
INSTALLATION INSTRUCTIONS
 INSTALLATION INSTRUCTIONS FRONT BIG BRAKE CONVERSION KIT A112-5 1987-93 FORD MUSTANG Thank you for choosing STAINLESS STEEL BRAKES CORPORATION for your braking needs. Pleases take the time to read and
INSTALLATION INSTRUCTIONS
 INSTALLATION INSTRUCTIONS FX4 ELITE REAR DISC CONVERSION KITS WITH INTERNAL PARKING BRAKE A110-14, A111-25, A111-29 for FORD 8" & 9" REAR ENDS Thank you for choosing STAINLESS STEEL BRAKES CORPORATION
Installation Instructions
 Installation Instructions Rear Disc Brake Conversion Kit Item # RC1001, RC1001X Applications: 64-72 A-body, 67 F-Body, 63-67 X-body with Non Staggered Shocks Thank you for choosing GPS Auto for your automotive
Two bolts at. Two each side where studs pass through. rear. Two bolts at. front. Front-most bolt for diagonal brace. Rear jacking point
 The following describes the process of changing the transmission s gear oil in my own 2008 CS 6sp. I have no relationship with any of the products mentioned, other than being a satisfied consumer. Exercise
INSTALLATION INSTRUCTIONS PERFORMANCE AT THE WHEELS KIT W125
 INSTALLATION INSTRUCTIONS PERFORMANCE AT THE WHEELS KIT W125 1968-81 CAMARO & FIREBIRD 10 & 12 BOLT W/"C" CLIPS Thank you for choosing STAINLESS STEEL BRAKES CORPORATION for your braking needs. Pleases
LEXUS IS 250 Front Performance Brake Kit Section I - Installation Preparation
 LEXUS IS 250 Front 2006- Performance Brake Kit Section I - Installation Preparation Part Number: PTR09-53080 Kit Contents Item # Quantity Reqd. Description 1 1 Brake Rotor, LH Front 2 1 Brake Rotor, RH
J&M Stainless Steel Teflon Brake Lines - Front (94-98 Cobra)
") J&M Stainless Steel Teflon Brake Lines - Front (94-98 Cobra) Time Required: 30min-1 hour. Tools and Supplies Required: Jack Jack Stands Lug Wrench or 13/16 Socket 10mm Socket Socket Wrench Torque Wrench
J&M Stainless Steel Teflon Brake Lines - Front (94-98 Cobra) Time Required: 30min-1 hour. Tools and Supplies Required: Jack Jack Stands Lug Wrench or 13/16 Socket 10mm Socket Socket Wrench Torque Wrench
BRK JL CC5 K Hydraulic Front Brake Kit For Club Car DS Model Installation Instructions
 BRK JL CC5 K Hydraulic Front Brake Kit For Club Car 1982-2005 DS Model Installation Instructions Kit Components: A) Master Cylinder Mounting Bracket (x1) B) Master Cylinder Assembly (x1) C) Brake Line
2003 Jaguar X-Type BRAKES' 'Disc - X-Type
 REAR DISC BRAKE CALIPER WARNING: Brake dust, if inhaled can damage your health. Always remove brake dust using a vacuum brush. Do not use a compressed air line to disperse brake dust into the atmosphere.
Brake Bleeding Theory and Procedure
 Brake Bleeding Theory and Procedure Proper service and repair procedures are vital to the safe, reliable operation of all motor vehicles as well as the personal safety of those performing the repairs.
1999 Toyota RAV BRAKES Disc & Drum - Trucks & Vans
 DESCRIPTION & OPERATION 1999-2000 BRAKES Disc & Drum - Trucks & Vans WARNING: For warnings and procedures regarding vehicles equipped with Anti-Lock Brake Systems (ABS), see appropriate ANTI-LOCK article.
Please Read Instructions Completely Before Starting Your Installation QTY. PART NO. DESCRIPTION
 INSTRUCTIONS 916-31926 Master Cylinder and Pedal Assembly Speedway Motors, Inc. 2015 Master Cylinder and Pedal Assembly Model T Model A, and '32 Fords The master cylinder is suitable for 4-wheel disc or
INSTALLATION INSTRUCTIONS
 INSTALLATION INSTRUCTIONS REAR DISC CONVERSION KIT A136-1 1976-86 AMC 20 AXLES WITH WARN FULL FLOATING AXLE CONVERSION Thank you for choosing STAINLESS STEEL BRAKES CORPORATION for your braking needs.
INSTALLATION INSTRUCTIONS
 INSTALLATION INSTRUCTIONS REAR DISC BRAKE CONVERSION KIT A117-1, A117-2 1991-97 S10 PICKUP & BLAZER 1985-02 ASTRO AND SAFARI VAN Thank you for choosing STAINLESS STEEL BRAKES CORPORATION for your braking
INSTALLATION INSTRUCTIONS
 INSTALLATION INSTRUCTIONS REAR DISC BRAKE CONVERSION KIT A125-3 1965-72 GM A-BODY 10 & 12 BOLT AXLES Thank you for choosing STAINLESS STEEL BRAKES CORPORATION for your braking needs. Pleases take the time
INSTALLATION INSTRUCTIONS
 INSTALLATION INSTRUCTIONS FRONT DISC BRAKE CONVERSION KIT A129-2 1959-64 Full Size Chevrolet Car and FRONT DISC BRAKE CONVERSION KITS A129-3 & A129-4 1965-68 Full Size Chevrolet Car Thank you for choosing
M-2300-M Mustang GT Rear Disc Brake Bracket Kit INSTALLATION INSTRUCTIONS
 Please contact the Tech Line for the most current instruction information (800) 367-3788!!! PLEASE READ THE FOLLOWING INSTRUCTIONS CAREFULLY PRIOR TO INSTALLATION!!! INTRODUCTION: This kit allows for the
INSTALLATION INSTRUCTIONS
 INSTALLATION INSTRUCTIONS INSTRUCTION FOR ASSEMBLY OF JEEP CJ SERIES W/AMC 20 REAR AXLES, 5 x 5-1/2" BOLT CIRCLE WITH A130-1 FULL FLOATING AXLE OR A130-2 (1 PIECE AXLE) Thank you for choosing STAINLESS
Trailer Brake System Bleeding Procedure:
 Trailer Brake System Bleeding Procedure: The procedure immediately below assumes that a power bleeder will be used. Two people will be required to bleed the brakes if bleeding is to be performed conventionally
M-2300-T 6-Piston Mustang Brake Kit INSTALLATION INSTRUCTIONS
 Please visit www.fordracingparts.com for the most current instruction information!!! PLEASE READ ALL OF THE FOLLOWING INSTRUCTIONS CAREFULLY PRIOR TO INSTALLATION. AT ANY TIME YOU DO NOT UNDERSTAND THE
-Magnet (not completely necessary but can come in handy)
") McLeod High Performance Hydraulic Clutch Line Upgrade (05-14 V8) Included in kit: -New clutch line -2 fittings Required Tools: -Floor jack and jack stands (or a lift) -Flashlight -Angled pick tool -13mm
McLeod High Performance Hydraulic Clutch Line Upgrade (05-14 V8) Included in kit: -New clutch line -2 fittings Required Tools: -Floor jack and jack stands (or a lift) -Flashlight -Angled pick tool -13mm
BX-1000 Hydraulic Brake System Azusa 8 inch Diameter Wheel
 BX-1000 Hydraulic Brake System Azusa 8 inch Diameter Wheel Installation Manual Made by Free Bird Innovations - 1380 Legion Road - Detroit Lakes - MN 56501 PLEASE READ THROUGH THE ENTIRE MANUAL BEFORE INSTALLING
Angle Mounted Master Cylinder Bleeding Procedure
 Angle Mounted Master Cylinder Bleeding Procedure All angle-mounted master cylinders. Unable to obtain a firm brake pedal when bleeding master cylinder on vehicle Cause: Air trapped in the upper end of
Bearhawk #164 Three Sigma Checkout Report. Date: 1 Mar 08
 Bearhawk #164 Three Sigma Checkout Report Date: 1 Mar 08 Objective: Fill brake system(s) with fluid. Test brake operation. Answer the burning question of whether the parking brake valve is a one-way or
93-02 CAMARO BILLET HUB STYLE KIT
 93-02 CAMARO BILLET HUB STYLE KIT FOR ANY QUESTIONS, PLEASE CALL US @ (727-347-9915) M-TH 8:00A.M. 8:00P.M., FR 8:00A.M.-7:00P.M. EST CLOSED SATURDAYS AND SUNDAYS YOU WILL NEED TO MODIFY YOUR SPINDLE.
63-82 CORVETTE IMPALA KIT INSTRUCTIONS
 63-82 CORVETTE 61-69 IMPALA KIT INSTRUCTIONS RACE, STREET, 2 PISTON AND 4 PISTON FRONT KITS ARE ALL COVERED IN THESE INSTRUCTIONAL SHEETS. 1 AEROSPACE COMPONENTS 727.347.9915 Preparing the spindle: You
Installing Rear Brake Pads on a WK Jeep
 Installing Rear Brake Pads on a WK Jeep Step by Step By Chirpz Disclaimer: I do not claim that this procedure is the right way or even the best way to change your rear brake pads. This is what I did after
Powerslot Mustang Rotors (Rear Pair GT/V6) - Installation Instructions
 - Installation Instructions") Powerslot Mustang Rotors (Rear Pair 94-04 GT/V6) - Installation Instructions The below installation instructions work for the following products: Powerslot Mustang Rotors (Rear Pair 94-04 GT/V6) Please
Powerslot Mustang Rotors (Rear Pair 94-04 GT/V6) - Installation Instructions The below installation instructions work for the following products: Powerslot Mustang Rotors (Rear Pair 94-04 GT/V6) Please
INSTALLATION INSTRUCTIONS
 INSTALLATION INSTRUCTIONS INSTALLATION INSTRUCTIONS FOR A136 REAR DRUM TO DISC BRAKE CONVERSION KIT for 1970-75 Jeep, CJ SERIES with Dana 44 flanged axle Thank you for choosing STAINLESS STEEL BRAKES CORPORATION
TH!NK neighbor Section 2 Chassis Section 2 Chassis
 General Specifications... 2 Torque Specifications... 2 Description and Operation... 4 Wheel Alignment Angles... 4 Brakes... 4 Diagnosis and Testing... 6 Ball Joint Inspection... 6 Wheel Bearing Inspection...
SUM Chevy Truck frame mount booster kit
 SUM-760211 1955-1959 Chevy Truck frame mount booster kit Unboxing your kit: 1. Remove new booster, bracket assembly and master cylinder from their boxes and inspect the parts. 2. New boosters come with
DESCRIPTION & OPERATION
 2004 BRAKES Disc - TSX DESCRIPTION & OPERATION WARNING: DO NOT use air pressure or a dry brush to clean brake assemblies. Avoid breathing brake dust. Use OSHA-approved vacuum cleaner for cleaning and collecting
MOTORVAC. BrakeVac-II. MODEL NUMBER Brake Fluid Service System. Operator Manual MotorVac
 MOTORVAC BrakeVac-II MODEL NUMBER 500-800 Brake Fluid Service System Operator Manual Why should the Brake system be Flushed? Brake fluid is hygroscopic meaning it can absorb moisture from the air resulting
INSTALLATION INSTRUCTIONS
 INSTALLATION INSTRUCTIONS REAR DRUM TO DISC BRAKE CONVERSION KIT A118 pre-1985 Ford F150 (except 1983-1984 w/super H/D axle) Thank you for choosing STAINLESS STEEL BRAKES CORPORATION for your braking needs.
Installation Instructions
 Replacement Proportioning Valve for BrakeMaster model 9060 Installation Instructions Part number 900001 Time Tested Time Proven ROADMASTER, Inc. 6110 NE 127th Ave. Vancouver, WA 98682 800-669-9690 Fax
Revised BX-1000 BLACK MAX
 Revised 8-22-12 BX-1000 BLACK MAX PLEASE READ THROUGH THE ENTIRE MANUAL BEFORE INSTALLING YOUR BRAKE SYSTEM WARNING - DO NOT USE BRAKE FLUID - USE ATF HYDRAULIC FLUID ONLY **IMPORTANT** DO NOT USE ANY
EagleMotorsports.com Dear Valued Customer,
 Dear Valued Customer, Thank you for choosing the Stallard brand and establishing this partnership. We appreciate the opportunity to assist you and look forward to promoting your future success. The staff
BrakeVac-II Brake Fluid Service System
 BrakeVac-II Brake Fluid Service System Part No. 500-800/500-805 USER MANUAL 500-800 (Serial Numbers 800-200 and up) 500-805 (Serial Numbers 805-0700 and up) 324 Blundell Rd. Mississauga ON Tel. 905.65.8620
INSTALLATION INSTRUCTIONS
 INSTALLATION INSTRUCTIONS FRONT DISC BRAKE CONVERSION KITS: A132-1, A133, A133-1 A134, A134-1 1968-73 MUSTANG/FORD Thank you for choosing STAINLESS STEEL BRAKES CORPORATION for your braking needs. Please
INSTALLATION INSTRUCTIONS
 INSTALLATION INSTRUCTIONS REAR DISC CONVERSION KIT A128 1990-1995 JEEP WRANGLER (YJ) WITH DANA 35 AXLES (non-abs) Thank you for choosing STAINLESS STEEL BRAKES CORPORATION for your braking needs. Pleases
Installation Guide. Installing the FRK Hydraulic Compact Unit (HCU) on International School Buses TP-0913 Issued 1 Technical Bulletin
 on International School Buses TP-0913 Issued 1 Technical Bulletin") Issued 12-08 Installation Guide Installing the FRK 08-10086 Hydraulic Compact Unit (HCU) on International School Buses Issued 1 Technical 12-08 Bulletin Hazard Alert Messages Read and observe all Warning
Issued 12-08 Installation Guide Installing the FRK 08-10086 Hydraulic Compact Unit (HCU) on International School Buses Issued 1 Technical 12-08 Bulletin Hazard Alert Messages Read and observe all Warning
Brake System Diagnosis and Service
 AUMT 1310 - Brake System Diagnosis and Brake System Inspection Brake System Diagnosis and Donald Jones Brookhaven College Road test Hydraulic system Leaks Fluid condition Disc brakes Rotors and pads Drum
Dura Force Disc Brake System Service Manual
 TS 20809_a 3501 Shotwell Drive ISO/TS 16949:2002 Registered (PH): 937.743.8125 Franklin, OH 45005 www.waltheremc.com (FX): 937.743.8232 Table of Contents General Description 1 3 Fastener Torque Chart 4
Air-Assist Service Jack Max. Capacity: 10 Tons
 Form No. 565786 Parts List & Operating Instructions for: 1511B Air-Assist Service Jack Max. Capacity: 10 Tons 109 67 66 68 77 69 70 78 95 94 107 106 108 26 71 72 72 93 X L 65 75 92 91 90 89 88 87 86 85
INSTALLATION INSTRUCTIONS
 INSTALLATION INSTRUCTIONS REAR CONVERSION KIT A111-2 (FORD 8" & 9" SMALL BEARING) & REAR CONVERSION KIT A111-3 (FORD 9 TORINO) Thank you for choosing STAINLESS STEEL BRAKES CORPORATION for your braking
Installation Instructions
 Installation Instructions Rear Disc Brake Conversion Kit Item # RC4001, RC4001X Applications: Mopar 7.25, 8.25, 9.25 Axles Thank you for choosing Leed Brakes for your automotive product needs. Before you
DESCRIPTION & OPERATION
 DESCRIPTION & OPERATION ANTI-LOCK BRAKING 1998-99 BRAKES Anti-Lock/TCS - Corvette The Anti-Lock Brake System (ABS) and Traction Control System (TCS) increases vehicle control during severe deceleration
INSTALLATION INSTRUCTIONS
 INSTALLATION INSTRUCTIONS FORCE 10 SPORT R1 REAR DISC CONVERSION KIT A126-50 2005-10 Chevrolet Silverado and GMC Sierra Thank you for choosing STAINLESS STEEL BRAKES CORPORATION for your braking needs.
1994 Mazda MX-5 Miata. ANTI-LOCK BRAKE SYSTEM 1994 BRAKES Mazda - Anti-Lock
 ANTI-LOCK BRAKE SYSTEM 1994 BRAKES Mazda - Anti-Lock DESCRIPTION The Anti-Lock Brake System (ABS) control unit senses reductions in front and rear wheel speed and modulates hydraulic pressure to the brakes
Installation Instructions
 Preparing your vehicle to install your brake system upgrade 1. Rack the vehicle. 2. If you don t have a rack, then you must take extra safety precautions. 3. Choose a firmly packed and level ground to
BRAKE SYSTEM Nissan 240SX DESCRIPTION BRAKE BLEEDING * PLEASE READ FIRST * BLEEDING PROCEDURES ADJUSTMENTS BRAKE PEDAL HEIGHT SPECS TABLE
 BRAKE SYSTEM 1990 Nissan 240SX 1990 BRAKE SYSTEMS Nissan Disc & Drum Axxess, Maxima, Pathfinder, Pickup, Pulsar NX, Sentra, Stanza, 240SX, 300ZX DESCRIPTION All brake systems are hydraulically operated