|
|
|
- Hugo Bruce
- 6 years ago
- Views:
Transcription
 E31 Common")

1 Page 1 of 19 Welcome, goldeneye006 Notifications My Profile Settings Log Out Forum What's New? Home Classifieds Vendors Vendor Specials Store New Rules Posts Private Advertising Messages FAQ Calendar Community Forum Actions Quick Links Advanced Search Forum BMW Models 8 Series (E31) E31 Common Problems and DIY Fixes HowTo-> Interior: Seatbelt repair Results 1 to 1 of 1 Thread: HowTo-> Interior: Seatbelt repair Thread Tools Search Thread , 12:22 PM 8Tech Member #1 Join Date: Apr 2008 Location: UK Posts: 1,254 My Cars: BMW 850CSi, E53 X5 4.8iS Feedback Score: 0 HowTo-> Interior: Seatbelt repair Here is a part 1 of 2 on repair of the seatbelt that some people find quite daunting. It is fairly straightforward and part 1 can be done by anyone with pretty basic tools. What I am going to show here, is how to remove and install the seatbelt mechanism and belt assembly, and part 2 will show how to replace the webbing if yours is damaged, or you want a different colour, rather than replace the entire assembly, as most colours are no longer available and they are damn expensive anyway. How about bright red in a red car, or blue in a car with blue piping on the leather? There are dozens of colours and shades available. So how to remove the belt? Firstly, move the seat fully forward and as high as possible.

.")
2 Page 2 of 19 There are 2 small torx bolts buried in the side cover where circled. Next, undo the small crosshead screw at the front of the seat panel, behind the pocket (if fitted). Carefully pop off the side of the pocket to get access to the screw


3 Page 3 of 19 and remove it. Now gently pull off the seat adjuster knobs and behind the front one, remove the 2 very small crosshead screws.


4 Page 4 of 19 You should now be able to loosen the side cover, disconnect the switches wiring connectors and lift the panel away. Next, using a small pin, push in where shown in red, to release the clip shown in yellow, and remove the rear shell.


5 Page 5 of 19 Now remove the headrest by rolling it forward as shown, and use a twisting back and forth motion, whilst pushing away from you. You can now remove the front shell by removing the two tiny torx screws. There is one on the outside where shown, but the inner one is only accessible once you have lowered the seat and the headrest post has risen to clear the seat backrest.

6 Page 6 of 19


7 Page 7 of 19 Now you can pop off the screw covers either side of the seat, and remove the screws. (5 times longer than they need to be but fitted just to be a PITA as they are so difficult to get to. Surprised they didn't threadlock them!)


8 Page 8 of 19 to access the inner one, you may need to remove the handbrake gaiter to get access to it. I used this... like this...


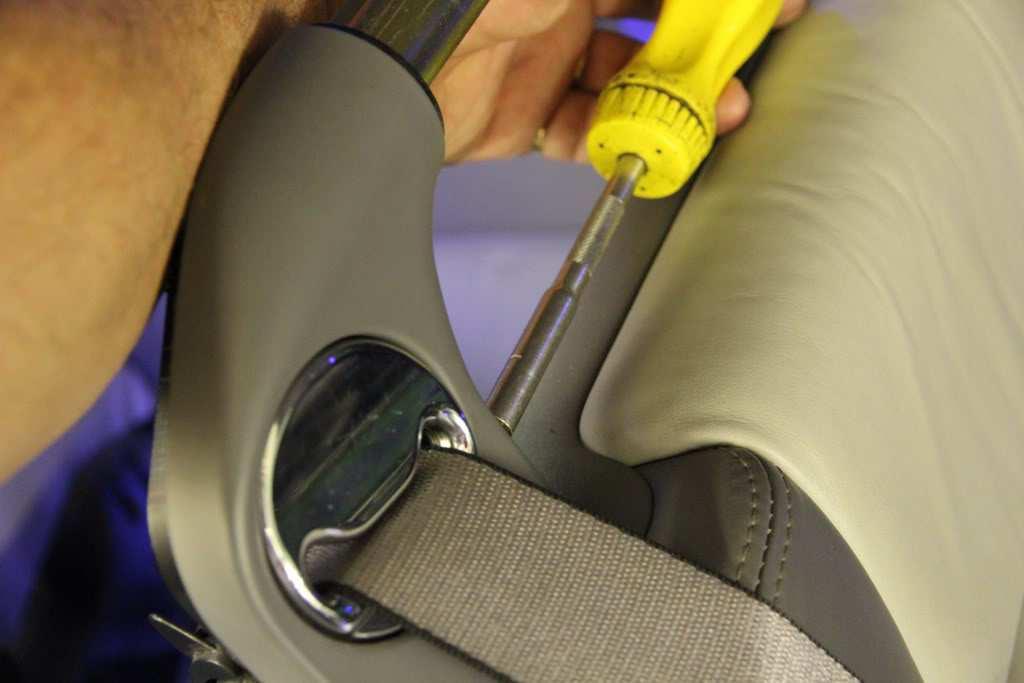
9 Page 9 of 19 Using a hex key, disconnect the side anchor position of the belt... and remove the front shoulder shell previously disconnected.

10 Page 10 of 19 The seat back pulls back at the bottom and then lift off two hooks near the top of the seat...

11 Page 11 of 19 You now need to lift the outer edge of the back up, and thread the belt webbing through it...


12 Page 12 of 19 and then slide the seat back along the headrest bar to remove it. Now you need to lower the seat again so that you can access the two 13mm shallow head bolts...circled in red...

13 Page 13 of 19 I found they were so shallow, the lead on a normal socket slipped-off, so I used a Snap-On wrench...


14 Page 14 of 19 Now, in the position circled, you will find a zip-tie retaining the belt control cable. This needs to be cut... so that the cable can be removed from the drive motor...

15 Page 15 of 19 and the reel hex head bold accessed and removed.

16 Page 16 of 19 You can now slide the seatbelt complete up from the seat frame...

17 Page 17 of 19 and thats it! All done.

18 Page 18 of 19 Easy eh? Stay tuned for part 2 where it gets a bit tricky. 8Tech. Quick Navigation E31 Common Problems and DIY Fixes Go Top «Previous Thread Next Thread» Bookmarks Digg del.icio.us Facebook Twitter Posting Permissions You may not post new threads You may not post replies You may not post attachments You may edit your posts BB code is On Smilies are On [IMG] code is On [VIDEO] code is On HTML code is Off Forum Rules
19 Page 19 of 19 Follow --vb4 Default Style Bimmerforums - The Ultimate BMW Forum Archive Top All times are GMT -5. The time now is 04:11 AM. Powered by vbulletin Copyright 2016 vbulletin Solutions, Inc. All rights reserved. Copyright Bimmerforums.com Bimmerforums.com is not affiliated with BMW NA or BMW AG. All logos are registered trademarks of their official owners. Digital Point modules: Sphinx-based search
 Page 1 of 14 Welcome, goldeneye006 Notifications My Profile Settings Log Out Forum What's New? Home Classifieds Vendors Vendor Specials Store New Rules Posts Private Advertising Messages FAQ Calendar Community
 Page 1 of 33 Welcome, goldeneye006 Notifications My Profile Settings Log Out Forum What's New? Home Classifieds Vendors Vendor Specials Store New Rules Posts Private Advertising Messages FAQ Calendar Community
M60/M62 Camshaft Sensor Replacement
 Page 1 of 10 Welcome, goldeneye006 Notifications My Profile Settings Log Out Forum What's New? Home Classifieds Vendors Vendor Specials Store New Rules Posts Private Advertising Messages FAQ Calendar Community
BMW E31 AMBIENT INTERIOR LIGHTS MODIFICATION
 Page 1 of 7 Welcome, goldeneye006 Notifications My Profile Settings Log Out Forum What's New? Home Classifieds Vendors Vendor Specials Store New Rules Posts Private Advertising Messages FAQ Calendar Community
 Page 1 of 11 Welcome, goldeneye006 Notifications My Profile Settings Log Out Forum What's New? Home Classifieds Vendors Vendor Specials Store New Rules Posts Private Advertising Messages FAQ Calendar Community
DIY: Bake Caliper Rebuild - Bimmerforums - The Ultimate BMW Forum
 Page 1 of 16 Bimmerforums - The Ultimate BMW Forum > Bimmerforums - BMW Car/Model Specific > 3 series (E21, E30, E36, E46, E9x, F30) > 1983-1991 (E30) DIY: Bake Caliper Rebuild Welcome, bdbernard. You
E28/30 Homelink Install by Brad Denton
 Page 1 of 7 e30tech.com Forums> Technical> Electronics & Lighting DIY Homelink Install User Name User Name Password Remember Me? Log in Register FAQ Members List Sponsors Advertise Shop Today's Posts Search
How To Guide: Replace airbag steering wheel with non-airbag wheel - e30tech.com Foru... Page 1 of 10
 How To Guide: Replace airbag steering wheel with non-airbag wheel - e30tech.com Foru... Page 1 of 10 e30tech.com Forums> Technical> Appearance How To Guide: Replace airbag steering wheel with non-airbag
 Page 1 of 8 membership rennlist gallery sponsors chat upload photo classifieds Rennlist Discussion Forums > Water Cooled Technical Discussion Areas > 928 Forum Differential adjusments Welcome, TheoJ. You
 Page 1 of 6 LOGOUT 141 39 FORUMS 1 2 3 M3 M4 5 M5 6 M6 Z4 X1 X3 X5 X6 7 For sponsorship renewals, please use the vendor control panel. User CP BMW Garage BMW Meets New Posts Search Quick Links Log Out
CanuckMark Altimoderator
 Navigation Tuning Emotion Forums > BMW > DIY/Tech Tips Water Pump Replacement DIY User Name Password User Name Remember Me? Log in Register FA Members List Calendar Today's Posts Search Thread Navigation
Home User CP Go Premium Search Quick Links Log Out Create a Member Journal Vendor Deals Member
 1 of 17 7/27/2009 5:41 PM STI Forum Shop Sponsors Advertise Rules FAQ Membe Home User CP Go Premium Search Quick Links Log Out Create a Member Journal Vendor Deals Member IWSTI Mechanic Gloves for the
Extreme Customs Oshkosh Wisconsin almost killed me. davidbates65. Extreme Customs Oshkosh Wisconsin almost killed me.
 davidbat Forums Gallery Tools Marketplace New Posts How-Tos Site Guidelines Go Premium! Ford Truck Enthusiasts Forums > Super Duty/Heavy Duty > 1999 to 2016 Super Duty > Extreme Customs Oshkosh Wisconsin
Found a great injector cleaning DIY! - R3VLimited Forums
 Page 1 of 9 R3VLimited Forums > Technical Forums > General Technical Found a great injector cleaning DIY! User Name User Name Password Remember Me? Log in Register Gallery FAQ Members List Calendar Today's
BMW E61 Hydraulic Pump replacement instructions
 BMW E61 Hydraulic Pump replacement instructions This DIY will guide you through the tasks needed to successfully replace your defective tailgate hydraulic pump Difficulty 3 of 10. The most difficult part
60 lb Fuel Injector Install Instructions - SVTPerformance
 Page 1 of 18 Home Page SVTP Forums SVTP Store Arcade Trader Ratings TimeSlip Database Photo Gallery User CP New Posts Search Quick Links Log Out Welcome, sonicmach1. You last visited: Yesterday at 06:44
egr and butterfly valve pics
 Page 1 of 16 Forum Gallery Shop Sponsors Home FAQ New Posts Private Messages Search Members Members Map Calendar Groups Profile Donate Log Out [heine] Announcement: Please provide feedback on electronic
User CP FAQ Members List Calendar New Posts Search Quick Links Log Out
 1 of 6 1/10/2008 9:51 PM SVRider Board > Workshop > 03 + SV650 Tech Reload this Page Shocking Developement...ZX10 rear shock on a '06 VS650S Welcome, wamanning. You last visited: Today at 02:24 PM Private
This is a hobby website dedicated to the Kawasaki KLR650 motorcycle. I make no claim concerning the
 KLR650 Homepage Contact Me You must remove the "REMOVE-THIS" in my email address for it to work. This is a hobby website dedicated to the Kawasaki KLR650 motorcycle. I make no claim concerning the accuracy
Installation Manual TWM Performance Short Shifter Cobalt SS/SC, SS/TC, HHR SS, Ion Redline and Saab 9-3
 Page 1 Installation Manual TWM Performance Short Shifter Cobalt SS/SC, SS/TC, HHR SS, Ion Redline and Saab 9-3 Please Note: It is preferable to park on a flat surface, as you will have to engage and disengage
Racoon FFNC Site AdminHondaSUV Elder
 1 of 63 4/6/2012 6:06 PM Home Forums CR-V Element Pilot HR-V Marketplace Local Clubs Search HondaSUV Forums - Discussion forum and bulletin board for Honda CR-V, CRV, Element, Pilot, HR-V owners > 1997
How I Installed the Edgerider Wheels on my Gammill Classic Plus
 How I Installed the Edgerider Wheels on my Gammill Classic Plus Jeffrey Lomicka May 15, 2004 I'd been looking forward to installing these wheels since I tried them this year at MQX. This is my pictorial
2007 Lexus RX350 AFS 3phase motor Pinout (Koito HLSA-33001)
") 1 z 5 8. 3. 2014 7:30 User Name Password Log in Remember Me? Help Register The Buzz Main Forum Search New Posts Gallery TRS Store Mark Forums Read Search Main Forum General Discussion General Discussion
1 z 5 8. 3. 2014 7:30 User Name Password Log in Remember Me? Help Register The Buzz Main Forum Search New Posts Gallery TRS Store Mark Forums Read Search Main Forum General Discussion General Discussion
ebay.co.uk: 1995 E36 BMW M3 GT (item end time 24-Jul-06 18:47:33 BST)
") Page 1 of 8 home pay register sign out site map Start new search Search Advanced Search Back to homepage Listed in category: Cars, Parts & Vehicles > Cars > BMW 1995 E36 BMW M3 GT British Racing Green
Page 1 of 8 home pay register sign out site map Start new search Search Advanced Search Back to homepage Listed in category: Cars, Parts & Vehicles > Cars > BMW 1995 E36 BMW M3 GT British Racing Green
2k2GT Registered User
 1 of 44 7/22/2009 01:17 Corral Forums > Modular Tech Forums > GT & SOHC My J.R. Granatelli K-member install story...56k death Welcome, xomp. You last visited: Today at 12:07 AM Private Messages: Unread
The following information shows the steps to change the rear brake pads and rotors on an E36 chassis.
 1 of 20 1/18/2010 9:15 PM See More DIY Articles Bookmark Site! The following information shows the steps to change the rear brake pads and rotors on an E36 chassis. Disclaimer: The following information
 Page 1 of 14 This install requires work on your supplemental restraint system and could cause injury or damage to your car. If you are not comfortable performing the steps detailed here then do not attempt
perelet Member 1 of 26 7/26/2014 9:31 AM Thread: E39 6cyl oil pan gasket replacement illustrated E39 6cyl oil pan gasket replacement illustrated
 1 of 26 7/26/2014 9:31 AM User Name Password Log in Remember Me? Help Register Forum What's New? Home Classifieds Vendors Vendor Specials Store New Rules Posts FAQ Advertising Calendar Community Forum
Tools needed: Here is a pic of the shift kit I used. It is a Transgo brand and as you can see, it just a bag full of springs and one valve.
 Before installing a shift kit, be sure the transmission is in good operating order. If your transmission is making noises, slipping, shifting bad or the fluid looks brown or smells burnt, take the transmission
2002 Ford Expedition Sport Utility 4D
 2002 Ford Expedition - Trade In Value, blue book value - Official Kelley... http://www.kbb.com/kbb/usedcars/pricingreport.aspx?yearid=2002&... 1 of 3 11/30/2008 3:43 PM Send to Printer 2002 Ford Expedition
Improving the gearshift feel in an SW20.
 Improving the gearshift feel in an SW20. Part one In 3 parts. The SW20 gearshift can be often be greatly improved by eliminating play in the shift linkages, and this article covers three areas that need
PMX-2 RZR WIRE KIT RFRZ-PMXWH1. Serial Number: Date of Purchase: Installation & Operation
 Installation assistance available at: www.rockfordfosgate.com/rftech 600 South Rockford Drive Tempe, Arizona 85281 United States Direct: (480) 967-3565 Toll Free: (800) 669-9899 ROCKFORDFOSGATE.COM PMX-2
Door panel removal F07 5 GT
 Things needed Decent plastic trim removal tools Torx 30 Spare door clips 07147145753 I got away with a set of 5 but if I did it again I d be cautious and get 10. From prior experience if they are damaged
CorkSport ort Mazda 3 Adjustable Shifter Mazdaspeed 3, Mazda 3 6-speed and Mazda3 SkyActiv 6-speed
 Part # Axl-6-963 CorkSport ort Mazda 3 Adjustable Shifter 2010-2013 Mazdaspeed 3, 2010-2013 Mazda 3 6-speed and 2012-2013 Mazda3 SkyActiv 6-speed Pre-Installation Notes: The CorkSport Adjustable Short
Installing Rear Brake Pads on a WK Jeep
 Installing Rear Brake Pads on a WK Jeep Step by Step By Chirpz Disclaimer: I do not claim that this procedure is the right way or even the best way to change your rear brake pads. This is what I did after
IMT O-Ring replacement (short route) w/pics FAQ - Jaguar Forums - Jaguar Enthusiasts...
 w/pics FAQ - Jaguar Forums - Jaguar Enthusiasts...") IMT O-Ring replacement (short route) w/pics FAQ - Jaguar Forums - Jaguar Enthusiasts... Page 1 of 12 Difficulty level: moderate Tools needed: flat screw driver, 8mm socket (1/4" drive helps), 13mm socket,
IMT O-Ring replacement (short route) w/pics FAQ - Jaguar Forums - Jaguar Enthusiasts... Page 1 of 12 Difficulty level: moderate Tools needed: flat screw driver, 8mm socket (1/4" drive helps), 13mm socket,
Steeda Billet Charge Motion Control Plates (05-08 GT) - Installation Instructions
 - Installation Instructions") Steeda Billet Charge Motion Control Plates (05-08 GT) - Installation Instructions The below installation instructions work for the following products: Steeda Billet Charge Motion Control Plates (05-08
Steeda Billet Charge Motion Control Plates (05-08 GT) - Installation Instructions The below installation instructions work for the following products: Steeda Billet Charge Motion Control Plates (05-08
Your G3 buggy is fitted with three switches on the front part of the body:
 CONTENTS Buggy operation... 3 General Maintenance... 5 Technical Maintenance... 6 Front wheel bearing replacement... 6 Rear wheel bearing replacement... 7 Chain replacement... 8 Chain Adjustment... 9 Brake
INSTALLATION INSTRUCTIONS JEEP 2011-UP JK SECURITY FULL CONSOLE #274
 INSTALLATION INSTRUCTIONS JEEP 2011-UP JK SECURITY FULL CONSOLE #274 PARTS CHECKLIST Tuffy Console #9 Left Front Mounting Bracket #10 Right Front Mounting Bracket #11 Electronics mounting bracket #12 Divider
Remove the 3-11mm nuts holding mirror on. Don t drop the nuts!
 2005-2012 Ford Mustang Puddle Lamp Kit Parts List: Quantity: Tool List: LED Lamps 2 Flat head screwdriver Seals 2 Ratchet & Socket set OR Nuts 2 Adjustable Wrench Wiring harness 1 Drill & 11/16 th bit
BMW E46 Convertible Hydraulic Line #23 Replacement Guide Created by taylor192 of E46Fanatics.com
 BMW E46 Convertible Hydraulic Line #23 Replacement Guide Created by taylor192 of E46Fanatics.com BMW E46 Line #23 Replacment Guide, page 1 of 23 Background: Line #23 runs from the valve block on the driver's
Owners Manual For 05 Tahoe Z71 4x4
 Owners Manual For 05 Tahoe Z71 4x4 Jun 16, 2015 CHEVROLET TAHOE OWNERS GUIDE Did you searching for Chevrolet Tahoe Owners Guide? This is the best place to read chevrolet tahoe owners guide before service
AGCO. Corn Header Manual d HEADSIGHT.COM
 AGCO Corn Header Manual 09020401d HEADSIGHT.COM 574.546.5022 About Headsight Headsight Contact Info Headsight, Inc. 4845 3B Road Bremen, IN 46506 Phone: 574-546-5022 Fax: 574-546-5760 Email: info@headsight.com
Slave Cylinder Weep Hole Drilling Procedure
 Slave Cylinder Weep Hole Drilling Procedure Tools Required: T20 Torx Driver T25 Torx Driver T25 Torx Bit with ¼ Ratchet Wrench 4mm Hex Key (Allen wrench) 5mm Hex Key 6mm Hex Key 8mm Hex Key 12mm Hex Key
INSTALLATION INSTRUCTIONS
 INSTALLATION INSTRUCTIONS Accessory Application Publications No. ATTACHMENT (EX-L WITH NAVI) 2008 RIDGELINE AII 36587 Issue Date MAY 2007 PARTS LIST Attachment Kit P/N: 08B21-SJC-102 Template Rear camera
Installation Instructions
 86-95 Suzuki Samurai Heater Water Control Valve Wire Cable (SKU# SIB-HCVW) Installation Instructions CAUTION: Safety glasses should be worn at all times when working with vehicles and related tools and
If there is additional labor or other costs above the 4 hrs labor you must call VMAC for approved coverage
 Installation Manual for the A500027 RAPTAIR MF Dual Air Filter Retrofit Kit Author: Brian Collings Date: 15/07/2014 1900997 - Manual, Installation (A500027) Systems or Parts Affected: D600005BETA01-D600005BETA59
Fanatec GT3RS V1 to GT3RS V2 Tutorial
 Fanatec GT3RS V1 to GT3RS V2 Tutorial by Roy Visser 1 How to update your Fanatec GT3RS V1 wheel to a GT3RS V2 wheel Welcome to this guided and detailed tutorial for upgrading your Fanatec GT3RS V1 wheel
HP Modular Cooling System 200/100 Options Installation Guide
 HP Modular Cooling System 200/100 Options Installation Guide Abstract This document is intended for the person who installs racks and rack products, is qualified in performing installations, and trained
MKVI Jetta Fog Light Kit
 MKVI Jetta Fog Light Kit Part Number VW Jetta Fog Light Installation This tutorial is provided as a courtesy by ECS Tuning. Proper service and repair procedures are vital to the safe, reliable operation
BJ74SY FITTING INSTRUCTIONS
 BJ74SY FITTING INSTRUCTIONS REPLACES: 00.00.00 REVISED: 05.08.13. Check installation hardware before commencing. 1. Lift bonnet. JEEP GRAND CHEROKEE OVERLAND WK MY14 6/13on BIG TUBE PROTECTION BAR WITH
BMW M3 GT ( LIMITED EDITION ONE OF FIFTY ) POSS PX Item number:
 POSS PX Item number:") Page 1 of 8 home pay register sign in site map Start new search Search Advanced Search Back to list of items Listed in category:cars, Parts & Vehicles > Cars > BMW BMW M3 GT ( LIMITED EDITION ONE OF FIFTY
Page 1 of 8 home pay register sign in site map Start new search Search Advanced Search Back to list of items Listed in category:cars, Parts & Vehicles > Cars > BMW BMW M3 GT ( LIMITED EDITION ONE OF FIFTY
SR Performance Twin 62mm Throttle Body for GT
 Required Tools: SR Performance Twin 62mm Throttle Body for 2005-2010 GT Flat-head screwdriver Ratchet Small extension 10mm socket 8mm socket T20 Torx bit Needle nose pliers 5mm allen wrench Recommended
M52tu-M54 VANOS Assembly & Timing Using G.A.S. Professional Cam Tool Kit
 Home BMW Solutions Porsche Solutions DIY Tech Engine Services Dyno Services Machining About Contact Store Tool Rental M52tu-M54 VANOS Assembly & Timing Using G.A.S. Professional Cam Tool Kit This procedure
Hard Bar Sport, M1/M2 Hard Core Hardtop, M2 Sport, and Xtreme Installation Instructions
 HARDWARE KIT: Hard Bar Sport, M1/M2 Hard Core Shoulder Harness Guide Relocation Assemblies: 2-3/8" X 1" grade 8 bolts 4-3/8" flat washers 2-3/8" lock nuts 2 - brass bushings 2 - plastic trim caps 2-3/8"
SafeGuard Flex Seat Maintenance Guide
 SafeGuard Flex Seat Maintenance Guide 1) Preparation For Removal And Replacement Of Seat Back Covers And Retractor Assemblies a) Unlatch seat cushion and pivot cushion up and forward. b) Separate seat
G.A.S. M54 DISA Repair Kit D.I.Y. Instructions
 Home BMW Solutions Porsche Solutions DIY Tech Engine Services Dyno Services Machining About G.A.S. Contact G.A.S. M54 DISA Repair Kit D.I.Y. Instructions The installation of the German Auto Solutions DISA
Extreme Customs Oshkosh Wisconsin almost killed me. Chuck-B
 davidbat Forums Gallery Tools Marketplace New Posts How-Tos Site Guidelines Go Premium! Ford Truck Enthusiasts Forums > Super Duty/Heavy Duty > 1999 to 2016 Super Duty > Extreme Customs Oshkosh Wisconsin
4. Remove the bed bolts A.) Using a 1/2 socket, remove the four inner bed bolts. B.) Using a T-25 Torx driver, remove the four outer bed bolts.
 Using a 1/2 socket, remove the four inner bed bolts. B.) Using a T-25 Torx driver, remove the four outer bed bolts.") Installation Instructions Part Number 883-282 Intake kit with scoop 2008-14 Polaris Ranger RZR 800 Tools Required For Installation: 7/16 and 1/2 Wrenches. 10mm, 7/16, and 1/2 Sockets. T-25 Torx driver.
Installation Instructions Part Number 883-282 Intake kit with scoop 2008-14 Polaris Ranger RZR 800 Tools Required For Installation: 7/16 and 1/2 Wrenches. 10mm, 7/16, and 1/2 Sockets. T-25 Torx driver.
FOG LAMPS INSTALL KIT
 FOG LAMPS INSTALL KIT PT CRUISER INSTALLATION INSTRUCTIONS Read entire instructions thoroughly before starting. For proper aiming of fog lamps, follow procedures in the service manual. NOTES: Left and
PARTS TOOLS. Set Screw. Washer (2) Blue Bushing (2) Black Bushing (2) B&M Short Throw Shifter. Jam Nut Grease. Retaining Ring (2) Insert (2)
 Blue Bushing (2) Black Bushing (2) B&M Short Throw Shifter. Jam Nut Grease. Retaining Ring (2) Insert (2)") Installation Instructions SHORT THROW SHIFTER Fits: Porsche Boxter, Boxter S, 911, 996 Cayman & Cayman S models See Application Guide for specific year ranges and engine sizes Catalog # 45135 WORK SAFELY!
Installation Instructions SHORT THROW SHIFTER Fits: Porsche Boxter, Boxter S, 911, 996 Cayman & Cayman S models See Application Guide for specific year ranges and engine sizes Catalog # 45135 WORK SAFELY!
White / Amber LED Angel Eye DIY Guide Turn Signal Method
 White / Amber LED Angel Eye DIY Guide Turn Signal Method Remove rubber trim surrounding the headlight. Remove corner light. Usually 2000-2001 e46s will have a slide in style where you press in the tab
Ads by Google Car Trouble Subaru Forester Subaru Outback Car Diagnostics Subaru WRX
 Search Search Ads by Google Car Trouble Subaru Forester Subaru Outback Car Diagnostics Subaru WRX Subaru Forester Owners Forum > Technical Forums and Vehicle Assistance > Problems, Maintenance, and Warranty
Fitting Instructions For The TDV6 EGR Blanking Kit To A 2006 Model Discovery 3 TDV6 GHSE
 Part Number DA1112 Fitting Instructions For The TDV6 EGR Blanking Kit To A 2006 Model Discovery 3 TDV6 GHSE You do this modification at your own risk. Britpart won t be held responsible for what is written
MKVI Jetta Fog Light Kit
 MKVI Jetta Fog Light Kit Part Number VW Jetta Fog Light Installation This tutorial is provided as a courtesy by ECS Tuning. Proper service and repair procedures are vital to the safe, reliable operation
364 RTE.122 ST.GERMAIN DE GRANTHAM, QUÉBEC J0C 1K0 TEL: (819) Fax (819) CHAIN ASSEMBLIES
 Fax (819) CHAIN ASSEMBLIES") 0 ARTHUR STREET NORTH, ELMIRA, ONTARIO N3B 1Z9 TEL: (519) 669-405 FAX: (519) 669-1436 PAGE 1 CHAIN ASSEMBLIES ITEM # G-7 TIE DOWN CHAIN - 3150 LBS. RATED W.L.L. LIST PRICE 601068 1/4 Gr. 70 x 1' c/w Grab
0 ARTHUR STREET NORTH, ELMIRA, ONTARIO N3B 1Z9 TEL: (519) 669-405 FAX: (519) 669-1436 PAGE 1 CHAIN ASSEMBLIES ITEM # G-7 TIE DOWN CHAIN - 3150 LBS. RATED W.L.L. LIST PRICE 601068 1/4 Gr. 70 x 1' c/w Grab
Brake Caliper Rebuild - Part Numbers & Tips Per Jim Millet, 3/15/2005
 Per Jim Millet, 3/15/2005 Not too difficult a job. Rears are easier than fronts to access. You ll need the following gasket sets: Front caliper gasket set, P/N 34 11 1 157 037, MSRP $13.58 Rear caliper
BMW Z3 E36 Outside Wing Door Mirror Roadster Coupe Corroded Snapped Spindle Repair Fix Kit Installation Guide Instructions
 BMW Z3 E36 Outside Wing Door Mirror Roadster Coupe Corroded Snapped Spindle Repair Fix Kit Installation Guide Instructions by x8rltd on August 6, 2015 Intro: BMW Z3 E36 Outside Wing Door Mirror Roadster
Volkswagen MKV/VI R32/Golf/Golf R Hatch Pop Kit
 Volkswagen MKV/VI R32/Golf/Golf R Hatch Pop Kit Installation Tutorial MKV R32/Golf ES#1895197 MKVI Golf/Golf R ES#2083320 This tutorial is provided as a courtesy by ECS Tuning. Proper service and repair
Rebuilding the Power Steering Pump for a 2007 Honda Accord 4CYL
 Rebuilding the Power Steering Pump for a 2007 Honda Accord 4CYL Disclaimer: I have benefited greatly from others who have taken the time to post auto repair videos/tutorials online. To try and return the
Another CJ picture guide to
 Another CJ picture guide to replacing the key cylinder in a non-tilt steering column by John Strenk Well I'm sure it's happened to all of us one time or another. You park your jeep and go to turn off your
Service Instruction Front Suspension PASHLEY-MOULTON. 1.0 General Description. 2.0 Adjustment
 Service Instruction Front Suspension PASHLEY-MOULTON 1 General Description 2 Adjustment 3 Problems and their Remedies 3.1 Clunking or Banging Noises 3.2 Suspension Squeaking 3.3 Seized Suspension 4 Disassembly
Installation Instructions For Part Number: Intake kit with scoop
 Installation Instructions For Part Number: 883-282 Intake kit with scoop 2008-14 Polaris Ranger RZR 800 Tools Required For Installation: 7/16 and 1/2 Wrenches. 10mm, 7/16, and 1/2 Sockets. T-25 Torx driver.
The economical 42U cabinet that s easy to transport and assemble on-site.
 RMT3200A-R2 Universal Flat Pack Cabinet The economical 42U cabinet that s easy to transport and assemble on-site. Customer Support Information Order toll-free in the U.S.: Call 877-877-BBOX (outside U.S.
Factory safe air/fuel ratio s for Optimum performance Patent# 7,359,795
 Part Number SP1125 2007-09 BMW 335i 2008-09 BMW135i 3.0L Twin Turbo L6 This kit is equipped with the Injen/AMSOIL Ea nanofiber dry filters, Ea nanofiber filters do not require oil. 1-2 piece air intake
DESCRIPTION Acura TSX SUSPENSION Front - TSX. NOTE: For system description and component location, see Fig. 1.
 2004 SUSPENSION Front - TSX DESCRIPTION NOTE: For system description and component location, see Fig. 1. Fig. 1: Identifying Front Suspension Components Wednesday, March 12, 2008 8:30:45 8:30:55 PM Page
Written By: Hybrid Racing
 LSD Install on K-Series Transmission This product may not be legal for highway use. Hybrid Racing is not responsible for any direct or indirect, actual or incidental expense attributed to the use of any
b o o s t r e t a i n e r v a l v e
 b o o s t r e t a i n e r v a l v e i n s t a l l a t i o n i n s t r u c t i o n s For questions or tech support, CONTACT US! Email: greg@hiperformancestore.com sales@hpsimotorsports.com Sites: www.hiperformancestore-fiat.com
User Manual. Please read this user manual before use Edition
 User Manual Please read this user manual before use. 2015.7.9 Edition Information on how to use GT Roller Flex3 GT Roller Flex3 is a new type trainer that has unique structure and characters. Read this
Deuce/Ace Installation Instructions
 HARDWARE KIT: Upper Mounting Plate: 2-7/16" (11mm) X 3.5" bolts 2-7/16" flange nuts 2-2" spacers 2-7/16" trim cap mounting washers 2 - plastic trim caps TOOLS NEEDED: safety glasses wrenches 16mm or 5/8"
CORN HEADER MANUAL: CNH PRE-2012
 CORN HEADER MANUAL: CNH PRE-2012 09020201c HEADSIGHT.COM 574.546.5022 About Headsight Headsight Contact Info Headsight, Inc. 4845 3B Road Bremen, IN 46506 Phone: 574-546-5022 Fax: 574-546-5760 Email:
Installation and Care Instructions
 WARDS WARDS REPLACE BATTERIES, REPLACE BATTERIES, WARDS WARDS REPLACE BATTERIES, REPLACE BATTERIES, THANK YOU for purchasing a Hunter Douglas Brilliance PowerRise shade. Your new shade has been custom
COYOTE STP (Service Termination Point)
") JANUARY 2017 COYOTE STP (Service Termination Point) Be sure to read and completely understand this procedure before applying product. Be sure to select the proper PREFORMED product before application.
JANUARY 2017 COYOTE STP (Service Termination Point) Be sure to read and completely understand this procedure before applying product. Be sure to select the proper PREFORMED product before application.
INSTRUCTIONS FOR FRONT AND REAR SPEEDBUMPS (3-6 LIFTS)
") INSTRUCTIONS FOR FRONT AND REAR SPEEDBUMPS (3-6 LIFTS) www.teraflex.com #95850 JK Front/Rear 3"-3.5" Lift 3" Travel SpeedBump Kit w/ Bumpstops, Spacers, Rear Microcellular Front Rear Important Notes: Prior
INSTRUCTIONS FOR FRONT AND REAR SPEEDBUMPS (3-6 LIFTS) www.teraflex.com #95850 JK Front/Rear 3"-3.5" Lift 3" Travel SpeedBump Kit w/ Bumpstops, Spacers, Rear Microcellular Front Rear Important Notes: Prior
Installation instructions, accessories. Multimedia monitor with DVD, Dual screen. Multimedia monitor with DVD, Dual screen V1.
 Installation instructions, accessories Instruction No 30756560 Version 1.2 5 Part. No. 30756177 Multimedia monitor with DVD, Dual screen Volvo Car Corporation Multimedia monitor with DVD, Dual screen-
Tru-Billet Climate Control Knob Installation Instructions
 P/N S197-525-07 2007-08 Tru-Billet Climate Control Knob Installation Instructions Thank you for your purchase of SilverHorse Racing products. Please read all directions before beginning the installation.
S40 V40 Timing Belt Change Published on January 31, 2011 by Mr. Winkey
 1 of 7 8/7/2012 9:31 PM Volvospeed HOME REVIEWS REPAIRS MODIFICATIONS REFERENCE FORUMS FOR SALE PROJECT CAR Latest Articles Reverse Clutch Bleeding For External Or Internal Slave Cylinder K-PAX Racing
M7 R52S & R53 Cold Air Intake Installation Guide 53-3M7301
 M7 R52S & R53 Cold Air Intake Installation Guide 53-3M7301 M7 Speed engineers and manufactures the highest quality MINI COOPER accessories and performance parts available anywhere on Planet Earth! Please
Instructional Video Productions and Sales
 Instructional Video Productions and Sales Home DVD Info Pictorials Sales Images Updates to DVDs Contact Information Final Drive Fluid Service If you are interested in a video version of this pictorial,
Mazdaspeed 6 Version 2 Oil Catch Can Kit Install Guide
 Mazdaspeed 6 Version 2 Oil Catch Can Kit Install Guide Copyright DD2, Inc. 1 WARNING: By installing this Product, you understand that: The buyer/user assumes all risk as to quality, performance and use
57-1. Front door. Tools. Special tools and equipment. T Socket 3320/2 Bit insert for Socket T Assembly tool
 57-1 Front door Tools Special tools and equipment T 10011 Socket 3320/2 Bit insert for 3320 3410 Socket T 10034 Assembly tool 57-2 Front door, assembly overview Note: The instrument panel must be removed
OEM Cruise Control Installation in GMC/Chevy NBS trucks
 OEM Cruise Control Installation in 99-02 GMC/Chevy NBS trucks May 2008 ~ Rampage_Rick Having just installed factory cruise control in my 00 Sierra, I thought I d share the fun. I followed the steps outlined
ARK Lowering Springs GT-F and GT-S. (LF , LS ) for BMW F30 328i/335i BMW F32 438i/435i
 for BMW F30 328i/335i BMW F32 438i/435i") ARK Lowering Springs GT-F and GT-S (LF0330-0012, LS0330-0012) for BMW F30 328i/335i BMW F32 438i/435i Congratulations on purchasing an ARK Performance lowering spring set! Please read and understand the
ARK Lowering Springs GT-F and GT-S (LF0330-0012, LS0330-0012) for BMW F30 328i/335i BMW F32 438i/435i Congratulations on purchasing an ARK Performance lowering spring set! Please read and understand the
Ford Super Duty Dash Lighting LED Upgrade F250 4x4 XLT Sport Crew Cab
 Page 1 of 32 Ford Super Duty Dash Lighting LED Upgrade 2004 F250 4x4 XLT Sport Crew Cab Back to 2004 F250 Main Page Click Here for a PDF version of this article ** Updated 12/15/09 ** New version of the
Mazda 3 Owners Manual Uk
 Mazda 3 Owners Manual Uk Mazda 6/Mazdaspeed 6 Manuals Online. This website contains some popular Mazda 6 and Mazdaspeed 6 owner and service real workshop manual at your Mazda This Gregory's service and
WHL82 Wheel Kit. Wheel Kit Installation Instructions REQUIRED TOOLS PARTS
 WHL82 Wheel Kit Wheel Kit Installation Instructions The following instructions are intended to assist the user in installing the WHL82 Wheel Kit onto Multiquip MVC82VH/ VHW (with serial numbers C-2073
PRODUCT: JL Dual Rate Lift Kit, RockSport Edition READ INSTRUCTIONS IN FULL BEFORE INSTALLATION. QUESTIONS? CALL M-F 7:00 AM 5:00 PM PST
 PRODUCT: JL Dual Rate Lift Kit, RockSport Edition READ INSTRUCTIONS IN FULL BEFORE INSTALLATION. QUESTIONS? CALL 916-631-8071 M-F 7:00 AM 5:00 PM PST REV: A 08-07-2018 II-7633 The MetalCloak experience
C35 Mobius Floor Lamp & C Page 1 of 7
 Mobius Floor Lamp 23-4505 & 23-4505C Page 1 of 7 Prepare Base (Figures 1& 2) A 8-32 Screw (2) B Wireway Cover Plate C Base D Lower Pipe Assembly E Threaded Stud (4) F Hex Nut (4) 1. Carefully unpack the
Acura NSX Harness Bar Parts List and Installation Instructions
 Acura NSX Harness Bar Parts List and Installation Instructions DISCLAIMER Harness bars are not intended for roll over protection. This harness bar is intended to facilitate the installation of four-, five-
Explorerfix Child Car Seat. Group 1 & 2. Instructions. Suitable for use from 9kgs (20lbs) to 25kgs (55lbs) Approximately 9 months to 6 years
 to 25kgs (55lbs) Approximately 9 months to 6 years") Explorerfix Child Car Seat Group 1 & 2 Suitable for use from 9kgs (20lbs) to 25kgs (55lbs) Approximately 9 months to 6 years Instructions Important: Keep for future reference Please read these instructions
Explorerfix Child Car Seat Group 1 & 2 Suitable for use from 9kgs (20lbs) to 25kgs (55lbs) Approximately 9 months to 6 years Instructions Important: Keep for future reference Please read these instructions