Rear Girling Shock Absorber Renewal
|
|
|
- Marian Jennings
- 6 years ago
- Views:
Transcription
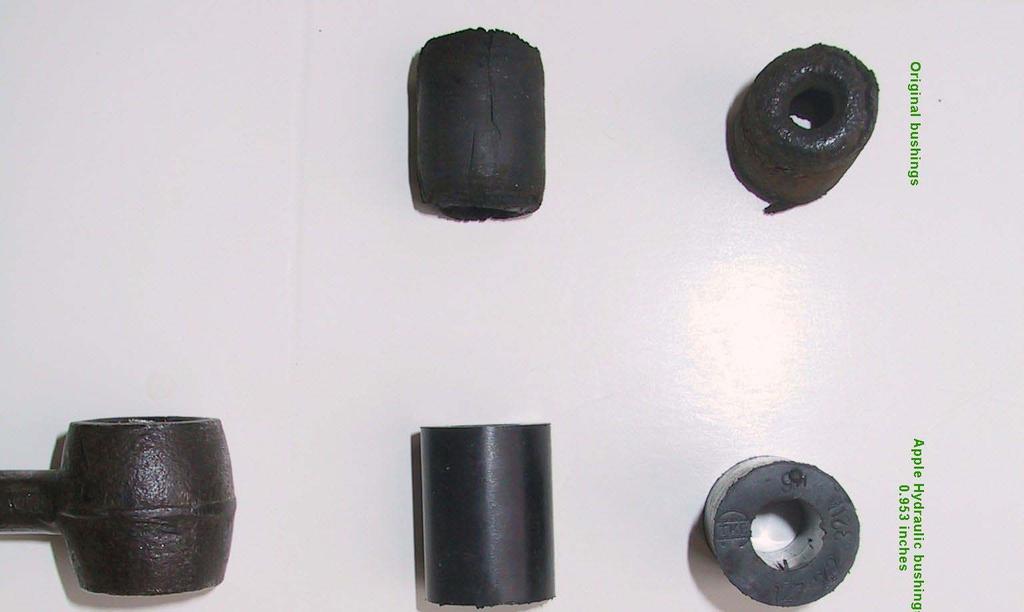
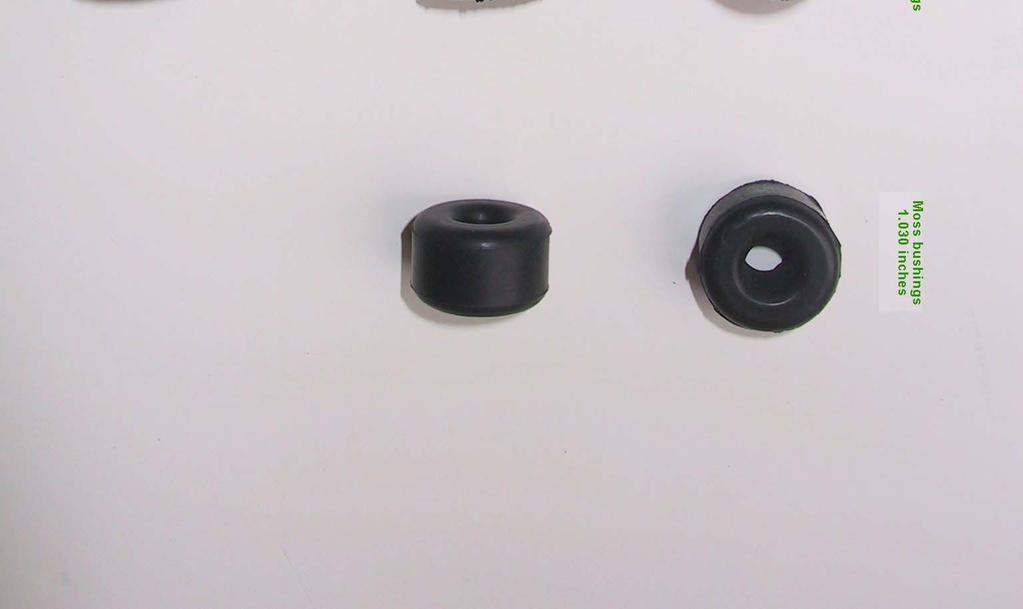
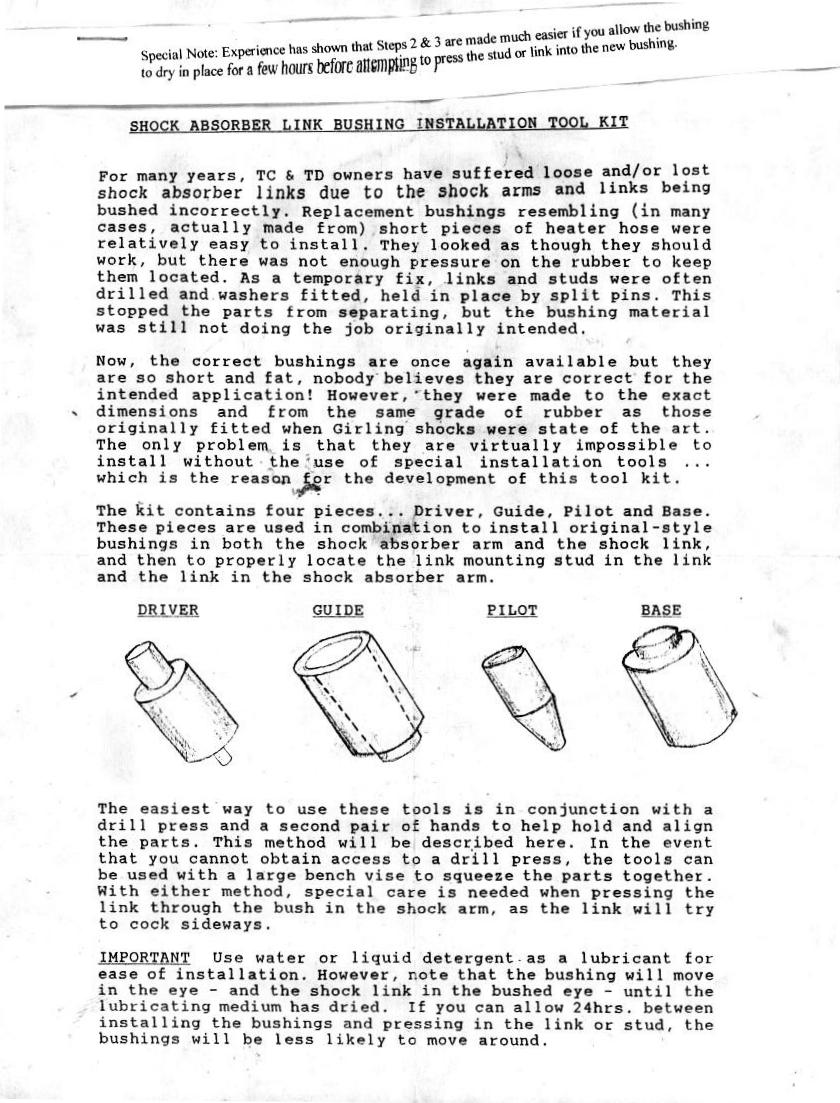
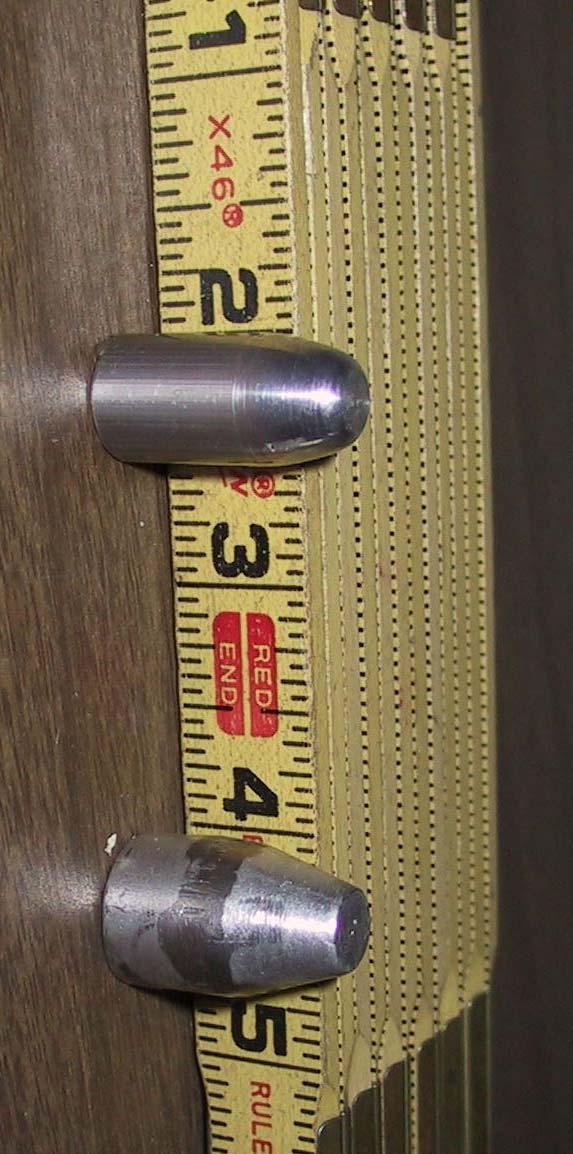
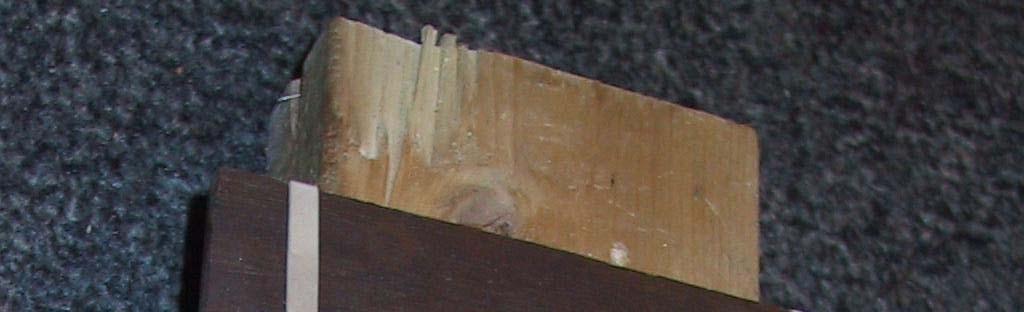
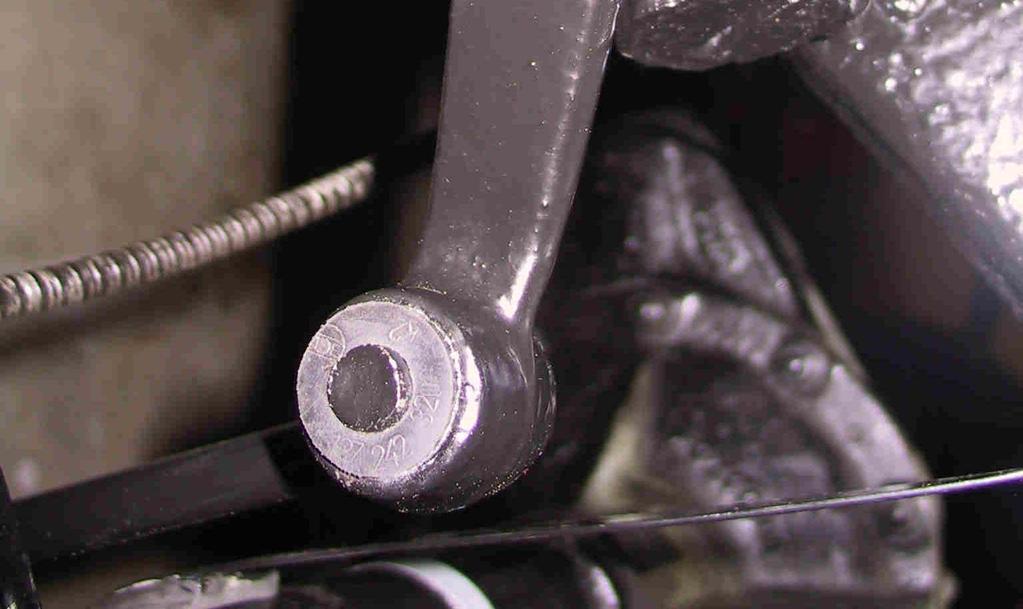
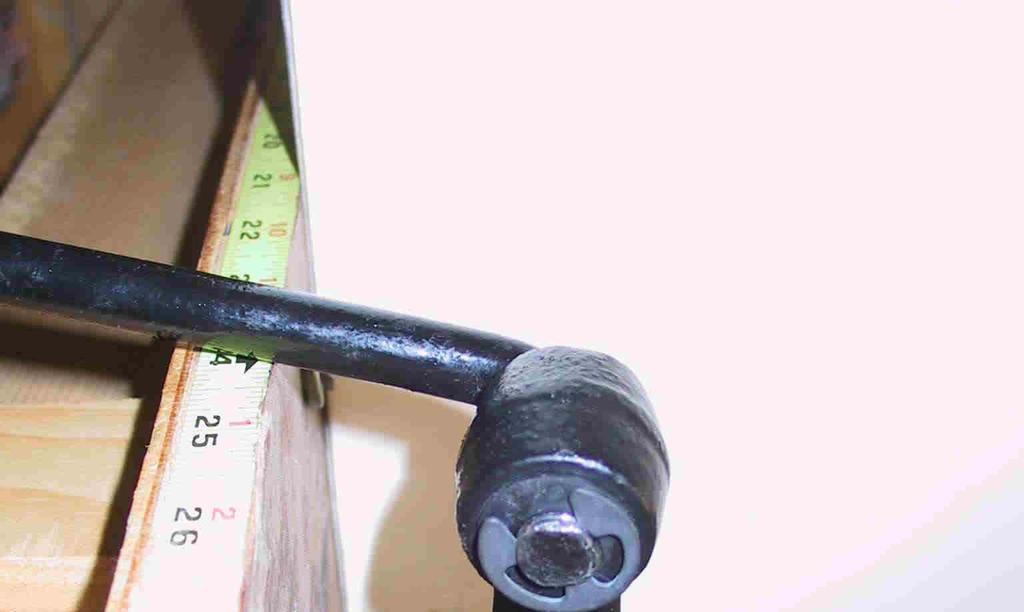
1 Rear Girling Shock Absorber Renewal Larry Shoer, Massachusetts, USA, Posted 19 July 2004 at 02:13:14 UK time This spring I renewed the rear Girling shock absorbers on my MG TD. I share my notes, in case they may be of interest to others: Problem: The rubber bushings in the shock absorber assemblies were badly deteriorated. One shock link became detached from its associated rubber bushing, which was the catalyst for undertaking this project. I spoke with Lazar at Apple Hydraulics ( He suggested that if the Girling shock absorbers were working properly it was best not to open them. Proper operation of the Girlings is indicated by the ability to move the shock absorber arm smoothly from one extreme position to the other. When pressing against the arm, the arm should move slowly. The shock arms should maintain the position in which they are last placed. My Girlings operated as described, so I did not open them up or send them out for rebuilding. I found two sources for the rubber bushings (two bushings required per Girling shock absorber assembly). Moss Motors ( is one source (part number , $5.15 per bushing). Another is Apple Hydraulics ($3.75 per bushing). The Moss bushings are an extremely hard rubber, shaped like a doughnut, and approximately 5/8 thick. The thickness is only approximately half that of the socket in which it is to be inserted. The diameter of the Moss bushing is The Apple bushings are also a hard rubber, although seemingly not quite so hard as the Moss bushings. The Apple bushings are of a size to fill the entire socket. The diameter of the Apple bushing is Although I purchased both Moss and Apple bushings, I used the Apple bushings. (If interested, I can a picture comparing the two different bushings.) Using wire brushes mounted in my drill press I removed flaking and deteriorated paint from the shock absorber components. A hand operated 3/4 wire brush does an excellent job of cleaning inside the socket where the rubber bushings are fitted. (These brushes are used in plumbing applications to clean 3/4 copper pipe fittings and are readily available.) I used the POR15 paint system (Marine Clean, Metal Ready, and POR15 semi-gloss chassis black) on all parts ( Do not paint the 1 in length metal surfaces that will contact the rubber bushings. I found that POR15, in particular, produces a sufficiently slippery surface that there is a tendency for the rubber bushing assemblies to separate while on the road if the contact surfaces are painted with POR15. (The problem of the rubber bushing assemblies coming apart is also discussed in the TD-TF archives.) Trial and error led me to a modification of the shock link and stud that appears to prevent them from being pushed out of the rubber bushings. As previously described, the portions of these parts that wind up inside the rubber bushing were not painted. I used a Dremel composite cutoff wheel chucked in my drill press and, holding the parts by hand, grooved a total of four circles along the 1 unpainted metal. Although not measured, the grooves were approximately 1/16 deep. I treated the exposed metal surfaces with Metal Ready, which both etches the metal and prevents the metal surface from rusting. As a result of these modifications the portion of the shock link and stud inside the rubber bushing is held much more tenaciously from slipping out of the bushing, resulting from the increased surface area from the Metal Ready treatment and the rubber deforming into the circular depressions. Although I had use of a Moss bushing installation kit, I made some of my own tools to facilitate the installation of the rubber bushings. In particular, I found that the Moss pilot (used to guide the suspension component into the rubber bushing) at 5/8 is sufficiently large as to be difficult to use. (The pilot looks like a bullet.) I fabricated my own pilot from ½ aluminum rod stock. I used a piece of scrap 2x4 wood to make a cradle for the shock link in which the rubber bushing would be placed. Make sure to leave room for the pilot when it clears the rubber bushing. (Picture available.) A drill press was used to press parts into place. Note added later: Sockets from a socket set can be substituted for some of the specialized Moss tools and used in conjunction with the drill press to facilitate the removal and installation of the rubber bushings.
2 To facilitate the installation of the rubber bushing in the socket, I lubricated the inside of the socket and the rubber bushing with clear GE silicone caulk. I learned from other projects that uncured silicone caulk is exceedingly slippery. The rubber bushings were easy to install in the metal socket using the Moss installation kit. In fact, the bushing position could be easily fine-tuned after installation. The cured silicone caulk provided a small degree of lubricity even after curing. Any excess, exposed silicone caulk is easy to rub off. I did not want to use silicone caulk as the lubricant on the inside of the rubber bushing to minimize the chance the inserted piece could be pushed out. I used mineral spirits (paint thinner) instead. It was a greatly inferior lubricant, but evaporated completely after use. Although I do not have many miles on the TD since completing the shock absorber renewal, everything seems to be holding well. My thanks to Evan Ford, who helped me from afar with this project. Larry Shoer, Massachusetts, USA, larryshoer@comcast.net Posted 24 October 2004 at 02:30:19 UK time This is a follow-up to my posting on 19 July One of the shock links I installed popped out of the lower bush. I was not completely surprised, however, as the silicone caulk I used to lubricate the bush during link installation continued to provide a fairly slippery surface, even after the caulk set. I was able to displace the link in the bush with finger pressure, and not a heck of a lot, either. Also, I had not scored circles around the lower pin (stud) to help resist sideways motion in the bush, as I did on the driver's side. * I used a Dremel cutoff wheel chucked in my drill press to score approximately four or five circles around the lower pin where it rides in the bush. The last circle was placed as close to the end of the pin as possible, to accommodate a spring steel "E" clip. The E clip is anodized black, of similar diameter to the rubber bush, and rather inconspicuous when mounted. I view the E clip as added insurance, but I am not sure that it is really needed. * I used uncured butyl rubber as my lubricant, so that when cured it would provide good frictional characteristics between the rubber bush and the "ribbed" link or pin. (The butyl rubber is used to seal rubber roof sections. I purchased it in a construction supply store some time ago for a roofing project-what else. It comes in a standard caulk tube, is called RBP Roofing System Lap Sealant LST-1. The ingredients are Mineral Spirits, Carbon black, Butyl rubber compound, and Polyisobutylene.) After the butyl rubber cured, I could not displace the pin or link in the bushing as was the case with silicone caulk. The assembly has now been tested for many miles and many different road conditions. Unlike before, the links have remained firmly bedded in the rubber bushes. Larry Shoer, Massachusetts, USA, larryshoer@comcast.net Posted 24 October 2004 at 15:36:40 UK time Although others have described the use of a cotter pin, I wasn't sure there was room for both a cotter pin and a backing washer, as I would want to do. The black "E" clip was a way to keep the space requirements to a minimum and make a modification that was largely inconspicuous. I think what really solved the problem was the combination of circles (grooves) cut in the link and stud, etching the metal for improved frictional characteristics, and the uncured butyl rubber roofing sealant. I am curious to know if others have good luck with this method.

3
4
5
6

7


8


9
Re-building a Caliper
 Re-building a Caliper by Leslie Henson The pistons in the calipers on the 90 are in very poor condition, and although the brakes work ok, it plays on our mind that the pistons are badly corroded, and it
Modular Engine 1, 2008 revision August 3, 2008
 Modular Engine 1, 2008 revision August 3, 2008 David Kerzel 2008 Back in 2002 I wanted to build a bunch of different engines without a lot of detail to learn how to build an engine, what works and what
Rebuilding of the Dana 25 (front axle) Chris Stout
 Chris Stout") The inside gears and bearings were all in excellent condition. A fluid change and some good cleaning was all the was necessary. However, the pinion shaft seal was shot as were the front wheel bearings
The inside gears and bearings were all in excellent condition. A fluid change and some good cleaning was all the was necessary. However, the pinion shaft seal was shot as were the front wheel bearings
MGB V8 Roadster restoration project
 12 th January 2017. I had a bit of a disaster this morning. I was trying to fit the ends of the front anti roll bar into the blast cabinet, when I let go, the roll bar dropped out and scratched the front
Volvo 1800 Dash Pad Replacement
 Volvo 1800 Dash Pad Replacement (courtesy of John Garden State Chapter Volvo Club America) Reupholstering the dash Well it has been some time since I have been online in the forum. Winter is a quite time
NISSAN FIGARO NIGGLES PART 4 I CAN T SEEM TO FIND NEW TYRES FOR MY FIGARO
 NISSAN FIGARO NIGGLES PART 4 I CAN T SEEM TO FIND NEW TYRES FOR MY FIGARO There were two sizes of tyres fitted to the Figaro originally: 155SR12 or 165 70 12. Don t mix these sizes on the car all four
Tools & Parts I Used. Here's everything that comes with the kit.
 Ford Super Duty Power Tailgate Lock Install 2004 F250 4x4 XLT Sport Crew Cab Back to 2004 F250 Main Page This page describes the steps to install the Pop & Lock PL8250 power tailgate lock kit. This kit
MGB V8 Roadster restoration project Report 103
 23th December 2016. Wishing all V8 members a Happy Christmas. I now have a list of jobs that need doing to the MG. I shall work through the list. If it s possible, I shall attempt to finish each job before
SHARK UPPER WINDSHIELD FRAME & WINDSHIELD REPLACEMENT. Text and Photos by TOM BENFORD
 Text and Photos by TOM BENFORD I purchased a fathom green 69 big-block tri-power T-top coupe with only 42,000 original miles on it recently. I'm the third owner of the car, and I got it for a very good
Rebuilding the HE-120 Redrive
 Rebuilding the HE-120 Redrive Rick Cavallaro Disclaimer: I am NOT an expert mechanic. If something looks or sounds wrong in these directions, it probably is. I d be happy to receive any tips or feedback
Memories of a Power Brakes conversion on a 1971 Corvette
 Memories of a Power Brakes conversion on a 1971 Corvette I did the job all by myself, except for the brake bleeding. Looks like an easy job but its not, you definitely need some experience to avoid screw
VAN GUNDY & FICK. ELgcirical Lngmeermg. Raisers' ^l:t.s-s ilegd&lw: D. p. DNIV.OV ' OIL 1*;. ;,,; I; 'i. / v- ''UK ','.!'
 I ' i ' I; 'i VAN GUNDY & FICK ','.!' if / v- ''UK Raisers' ^l:t.s-s ilegd&lw: ELgcirical Lngmeermg P C D. p. 1912 1*;. ;,,; DNIV.OV - I CAJJtiTO MS a V.UUf./UVV". "I*. ' OIL THE UNIVERSITY OF ILLINOIS
Improving the gearshift feel in an SW20.
 Improving the gearshift feel in an SW20. Part one In 3 parts. The SW20 gearshift can be often be greatly improved by eliminating play in the shift linkages, and this article covers three areas that need
DUAL REMOTE OIL FILTER MODIFICATION 4 TH GENERATION FIREBIRDS
 Written by Dave Dorey (lonetechie) Copyright FirebirdNation.com The following article details how I installed a dual remote oil filter system on my 2001 Formula Firebird. If you decide to tackle this project,
upper and lower ball joints ( I went with Moog from rockauto.com): two K80026 and two K8607T
: two K80026 and two K8607T") Parts required: two 5C3Z*4A322*AA = hub / steering knuckle o-ring two AC3Z*1S175*A = updated axle shaft "dust seal" two 5C3Z*3254*A = steering knuckle / axle shaft seal upper and lower ball joints ( I
Parts required: two 5C3Z*4A322*AA = hub / steering knuckle o-ring two AC3Z*1S175*A = updated axle shaft "dust seal" two 5C3Z*3254*A = steering knuckle / axle shaft seal upper and lower ball joints ( I
First, check and record the camber and caster readings, they will be adjusted later.
 First, check and record the camber and caster readings, they will be adjusted later. The caliper-mounting bosses are machined perpendicular to the spindle so they are an excellent place for the level.
Rebuilding the Power Steering Pump for a 2007 Honda Accord 4CYL
 Rebuilding the Power Steering Pump for a 2007 Honda Accord 4CYL Disclaimer: I have benefited greatly from others who have taken the time to post auto repair videos/tutorials online. To try and return the
283F & 327F Engines : Distributor Cap Modification Kit Development Project
 283F & 327F Engines : Distributor Cap Modification Kit Development Project By Dick Morland Chris Craft offered the "F" series engines (283 F & 327 F) in Commanders from 23' to 35'. There are a lot of these
Rear Shock Replacement 2007 Honda Accord
 P a g e 1 Rear Shock Replacement 2007 Honda Accord This is step-by-step documentation for replacing the rear shock absorbers in a 2007 Honda Accord. Hopefully it will be of use to you if you are about
Front Suspension Redo
 Front Suspension Redo Message: First, thanks to all the previous posters for guidance in my doing the suspension. As thanks, here s the updated document for doing the front suspension. Procedure: While
Kobo/XCSoar Large Battery Notes -
 Kobo/XCSoar Large Battery Notes - www.50k-or-bust.com These notes relate to the modification of Kobo Mini and Touch ebook readers by fitting a GPS chip (technically a GPS module) for navigation only or
Top Down Rollstar Shade Installation Instructions
 Top Down Rollstar Shade Installation Instructions Thank you for purchasing your new Rollstar shade. It has been custom-made from the highest quality materials to the dimensions you specified. With proper
BBK Ceramic Long Tube Headers (99-04 Cobra and Mach 1) - Installation Instructions
 - Installation Instructions") BBK Ceramic Long Tube Headers (99-04 Cobra and 03-04 Mach 1) - Installation Instructions The below installation instructions work for the following products: BBK Ceramic Long Tube Headers (99-04 Cobra
BBK Ceramic Long Tube Headers (99-04 Cobra and 03-04 Mach 1) - Installation Instructions The below installation instructions work for the following products: BBK Ceramic Long Tube Headers (99-04 Cobra
This guide will explain how to remove the old springs from the car and replace them with lowering springs.
 fubar Guide: Fitting lowering springs to the Mk2 Clio The method described below worked for me. I am not saying it is the only method to complete the task. I will not accept any responsibility for damage
 Installing Seat Belts in my Tudor August 2009 My '29 Tudor was restored about 25 years ago by my brother-in-law. He restored it to close to original, but made a few changes that many will claim are for
A/F/X Body GM Installation Instructions Manual Disc Conversion
 A/F/X Body GM Installation Instructions Manual Disc Conversion 64-72 A Body / 67-69 F Body / 62-74 X Body DBMC09 & PVK71 pictured above (Booster, master & valve setups may vary by upgrades selected) Your
1204AA Ford Mustang Double Adjustable Trailing Arms
 1204AA 79-04 Ford Mustang Double Adjustable Trailing Arms Special Tools Required for this Installation - 4 post lift or alignment rack preferable - Air Chisel, Angle Finder (Digital Preferred), Dead blow
C & W Restoration Update May 2011
 C & W Restoration Update May 2011 LBSCR 8-Compartment Third 2403 Sure and steady progress has been maintained in several of the work areas of 2403 since our last update. One of the most significant tasks
Rollstar Shade Installation Instructions
 Rollstar Shade Installation Instructions All Lifting Systems Inside or Outside Mount Thank you for purchasing your new Rollstar shade. It has been custom-made from the highest quality materials to the
MGB V8 Roadster restoration project Report 97
 28th November 2016 APPLYING SOUND DEADENING MATERIAL I thought that I better get on with applying the sound proofing to the bodyshell before the carpet set arrives from Moss. The first thing to do was
Troubleshooting Guide for Okin Systems
 Troubleshooting Guide for Okin Systems More lift chair manufacturers use the Okin electronics system than any other system today, mainly because they re quiet running and usually very dependable. There
Next, set the bar level and tighten it down. Do this on both the driver and passenger sides.
 Next, set the bar level and tighten it down. Do this on both the driver and passenger sides. Using two tape measures, measure the outside width at the front and the rear of the tubes. The front dimension
Deuce/Ace Installation Instructions
 HARDWARE KIT: Upper Mounting Plate: 2-7/16" (11mm) X 3.5" bolts 2-7/16" flange nuts 2-2" spacers 2-7/16" trim cap mounting washers 2 - plastic trim caps TOOLS NEEDED: safety glasses wrenches 16mm or 5/8"
GP114S-C CERAMIC COATED HEADER
 GP114S-C CERAMIC COATED HEADER HAS AIR INJECTION, OLD BODY STYLE FOR CHEVROLET/GMC 98-99 PICKUP 5.0L-5.7L 98-99 YUKON/DENALI/TAHOE 5.7L 98-99 SUBURBAN 5.7L 98-99 CADILLAC ESCALADE 5.7L 2/4 WD D GIBSON
Next, chase the threads in the lower A-arm mounts with the 5/8-18 tap and blowout any remaining particles.
 Next, chase the threads in the lower A-arm mounts with the 5/8-18 tap and blowout any remaining particles. Now, apply some anti-seize to the threads of the pivot stud. Also put anti-seize inside the bore
Sport Sway Bar Kit Mustang
 Sport Sway Bar Kit 22102 2005 Mustang Installation of Hotchkis Front Sway Bar 1F Raising Vehicle Securely block the rear wheels of the vehicle. Use a jack to lift up the front of the vehicle and use jack
MGB V8 Roadster restoration project Report 128
 20th March 2017. Sorry to keep you in suspenders between report 127 and report 128, with regards to the indicator stalk switch. INDICATOR & HORN STALK SWITCH - continued After removing all the internal
Chevrolet Generator Rebuild and Restoration
 Rich Mozzetta PDF compiled by Dave Zuberer Chevrolet Generator Rebuild and Restoration I had 2 old Chevy generators and I used parts from both to create a new one for a 1960 Corvette project. Both generators
Fabricating and Installing Headlight Relays. Mike Graham
 Fabricating and Installing Headlight Relays Mike Graham For some time I had been reading about the benefits of installing headlight relays. As I understand it, there are two principal benefits: the load
Wench With a Wrench. By Gail Wagner. A Shocking Discussion. Should I or Shouldn t I? That is The Question
 By Gail Wagner Wench With a Wrench A Shocking Discussion There are lots of things you want out of your Miata driving experience and one of them is a smooth ride. A key factor that contributes to this experience
Mityvac MV8000 O-ring Replacement
 A vacuum pump must be air tight in order to operate. A leak in your vacuum pump will potentially complicate the diagnosis of vacuum systems or make bleeding automotive fluids more difficult. Learn to replace
The Ford Model A Water Pump
 The Ford Model A Water Pump George Washington Chapter, Inc. 3903 Old Lee Highway Fairfax, VA 22030 1 Table of Contents Introduction/Specifications.. 3 1. Water Pump Inspection and Removal. 4 a. Removal..
Rear Wheel Removal (by BassCliff)
") Rear Wheel Removal (by BassCliff) Hello to my GS riding friends! After picking up a nail in my rear tire (while on the freeway at 75mph!) I thought I would take a few pictures to help illustrate the rear
Rear Wheel Removal (by BassCliff) Hello to my GS riding friends! After picking up a nail in my rear tire (while on the freeway at 75mph!) I thought I would take a few pictures to help illustrate the rear
Tip: Axle Bearing Replacement Date:
 Hi All, Some time ago I came into possession of some Donnerbüchsen or Thunder Boxes, Märklin items 4313,4314 and 4315 which were no longer usable as the axle bearings had worn out causing the wheels to
FD Transmission Rebuild: Parts Inspection
 FD Transmission Rebuild: Parts Inspection Now that everything is disassembled, cleaned, and bagged in labeled Zip-Locs, it s time to decide what to replace. Warning: I m not a transmission specialist I
1969 Camaro. Concourse Style Disc Brake Conversion Kit Instllation Instructions
 Concourse Style Disc Brake Conversion Kit Instllation Instructions 1969 Camaro (1970 Chevelle Kit Shown) This document contains our regular disc brake conversion instructions with the addition of GM assembly
New Coil-Spring Front End on Original Stock Chassis
 1949-1954 Chevy Car Coil-Spring Front End Tech line: 1-855-693-1259 www.totalcostinvolved.com Read and understand these instructions before starting any work! USE THE PARTS LIST BELOW TO MAKE SURE YOUR
A/F/X Body GM Installation Instructions Manual Disc Conversion
 A/F/X Body GM Installation Instructions Manual Disc Conversion 64-72 A Body / 67-69 F Body / 62-74 X Body DBMC09 & PVK71 pictured above (Booster, master & valve setups may vary by upgrades selected) Your
PLEASE READ THROUGH THE WHOLE WRITE UP BEFORE ACTUALLY USING IT!!!!
 JDM power folding mirror switch install into stock USDM harness. By: Greg L., Zeke21 on twinturbo.net PLEASE READ THROUGH THE WHOLE WRITE UP BEFORE ACTUALLY USING IT!!!! This is how I was able to get the
HEIDTS SUPERIDE IRS INSTALLATION INSTRUCTIONS INDEPENDENT REAR SUSPENSION
 HEIDTS SUPERIDE IRS INDEPENDENT REAR SUSPENSION Please read these instructions completely before starting your installation. Remember the basic rule for a successful installation: Measure Twice, Weld Once.
Troubleshooting Guide for Limoss Systems
 Troubleshooting Guide for Limoss Systems NOTE: Limoss is a manufacturer and importer of linear actuators (motors) hand controls, power supplies, and cables for motion furniture. They are quickly becoming
Clutch Slave. Page 1 of cylinder V8. 4-cylinder The muck and gunge both inside and outside
 Page 1 of 28 4-cylinder V8 Clutch Slave 4-cylinder The muck and gunge both inside and outside Cleaned, seal positioning disc separated from the spring, and the external boot turned inside-out and its clamping
TMS Trailing Arm Race Bushings
 PART # TSU9980020 TMS Trailing Arm Race Bushings TMS Trailing arm race bushings replace the stock rubber bushings, and were developed in conjunction with the TMS SPEED World Challenge Racing Team. Over
Rear Subframe Setup & Installation Instructions Camaro/Firebird
 Rear Subframe Setup & Installation Instructions 1967-69 Camaro/Firebird Introduction Congratulations on the purchase of your Art Morrison Enterprises rear subframe. This subframe is the result of 35+ years
Welded corner of solar panel
 My name is Matt, I live in Indianapolis, Indiana and this is my version of Gary s $1K solar hot water system. I would like to start by saying thanks to Gary not only for all that he has posted on the internet
I cannot believe it has been so long since my last update. A lot has happened and I will try to bring everyone up to speed. First of all, I had my
 I cannot believe it has been so long since my last update. A lot has happened and I will try to bring everyone up to speed. First of all, I had my left knee replaced about 5 weeks ago. Needless to say
Slide the billet aluminum cap over the bushing and secure with the 3/8-16 x 2 1/2 socket head allen and locknuts provided.
 Slide the billet aluminum cap over the bushing and secure with the 3/8-16 x 2 1/2 socket head allen and locknuts provided. Put the urethane bushings into the upper antiroll-bar-link eyebolt. Coat the bushings
C5 Audi Allroad (Wabco) Suspension Compressor Strip/Repair.
 Suspension Compressor Strip/Repair.") C5 Audi Allroad (Wabco) Suspension Compressor Strip/Repair. Here are some of my experiences stripping 2 off Audi Allroad C5 suspension compressors to see what makes them tick; The compressor is fairly
C5 Audi Allroad (Wabco) Suspension Compressor Strip/Repair. Here are some of my experiences stripping 2 off Audi Allroad C5 suspension compressors to see what makes them tick; The compressor is fairly
Service Instruction Front Suspension PASHLEY-MOULTON. 1.0 General Description. 2.0 Adjustment
 Service Instruction Front Suspension PASHLEY-MOULTON 1 General Description 2 Adjustment 3 Problems and their Remedies 3.1 Clunking or Banging Noises 3.2 Suspension Squeaking 3.3 Seized Suspension 4 Disassembly
Cordless Drill Hydro Generator (9 May 05) Pico-Hydro Power using a Cordless Drill as DC Generator
 Pico-Hydro Power using a Cordless Drill as DC Generator") Pico-Hydro Power using a Cordless Drill as DC Generator Water wheel construction: One soon will get tired of hand cranking and will want to find a better way. In the near continuous raining condition as
Pico-Hydro Power using a Cordless Drill as DC Generator Water wheel construction: One soon will get tired of hand cranking and will want to find a better way. In the near continuous raining condition as
55-64 Full Size Chevy Installation Instructions Standard Disc Conversion
 55-64 Full Size Chevy Installation Instructions Standard Disc Conversion DBMC09, PV71 & PVB71 Pictured (Booster, master cylinder & valve setups may vary by upgrades selected) Your new disc brake conversion
Tip: LED Lighting for the 4367 SBB Euro City Set, 4366 and 4368 Cars Date: , Corrections Modified , Photos
 Hi All, I have had the 4367 SBB Euro City set with extra cars 4366 and 4368 since 1998, apart from a test run on the layout they have stayed in storage ever since. I decided to change some rolling stock
We all put our heads together to try and determine what the facts were. They were as follows:
 VWvortex Forums > Eos > How to solve (or prevent) Eos Roof leaks As many of you know, I don t own an Eos. This makes it difficult to provide practical advice based on my own experience with the car, as
POWER STEERING PUMP REBUILDING SPK101 Read instructions completely before removal & disassembly
 POWER STEERING PUMP REBUILDING SPK101 Read instructions completely before removal & disassembly DISASSEMBLY: 1. Remove pump from car and allow to drain. 2. Remove pulley from front of pump. This requires
Door Panel Removal & Window Stop Adjustment
 Door Panel Removal & Window Stop Adjustment By: Jeff Wolford Disclaimer: This is simply an article of how I fixed my car. I m not responsible if you break, scratch, or mess up anything following my example.
INSTALLATION OF A WARN M8000 WINCH IN A HIDDEN MOUNT ON THE 2001 EXPLORER SPORT TRAC
 INSTALLATION OF A WARN M8000 WINCH IN A HIDDEN MOUNT ON THE 2001 EXPLORER SPORT TRAC By: Kyle Schwulst Email: bigmellon@yahoo.com BACKGROUND I have always wanted a winch on my vehicle. There is just something
Custom Dynamics Technical Bulletin
 Custom Dynamics Technical Bulletin Troubleshooting Connection Issues with Turn Signals This bulletin is for the purpose of helping customers solve connection/operation issues on Custom Dynamics LED replacement
351GF-15. Hydrant Coupler INSTALLATION / OPERATION / MAINTENANCE MODEL
 INSTALLATION / OPERATION / MAINTENANCE MODEL 351GF-15 Hydrant Coupler 351GF-15 Hydrant Coupler This installation/operation/maintenance guide is designed to provide instructions for the installation operation
1203AA GM A-BODY Double Adjustable Trailing Arms
 1203AA 64-67 GM A-BODY Double Adjustable Trailing Arms Warning: This installation should be performed by a trained professional. Note, pictures in this booklet are from a 77-96 GM B Body. Installation
top tip FIt GUIdE FIttING GUIdE HoW to... EssENtIaLs
 FIt GUIdE Check the condition of the front balljoints; there s no point in doing all this work only to have to change the front arms again in the near future. HoW to... FIt MK1 FoCUs PoLY BUsHEs Polyurethane
Trackstar Motorized Folding Shade Installation Instructions
 Trackstar Motorized Folding Shade Installation Instructions Thank you for purchasing your new Trackstar folding shade. It has been custom-made from the highest quality materials to the dimensions you specified.
Eibach Pro-Damper Shocks & Struts (05-09 All):
:") Eibach Pro-Damper Shocks & Struts (05-09 All): Required tools: 3/8 and 1/2 drive ratchets 7, 8, 10, 15, 16, 17, 18, 21 & 22 mm open ended wrenches 8 & 10 mm box end wrenches 10mm socket 13, 15 & 18 mm
Eibach Pro-Damper Shocks & Struts (05-09 All): Required tools: 3/8 and 1/2 drive ratchets 7, 8, 10, 15, 16, 17, 18, 21 & 22 mm open ended wrenches 8 & 10 mm box end wrenches 10mm socket 13, 15 & 18 mm
1209A GM B-BODY Double Adjustable Trailing Arms
 1209A 78-96 GM B-BODY Double Adjustable Trailing Arms Warning: This installation should be performed by a trained professional. Tools Required for this Installation - 4 post lift or alignment rack preferable
Converting a Series Land Rover to front wheel disc brakes using the kit made by Torrel Industries Ltd,
 Converting a Series Land Rover to front wheel disc brakes using the kit made by Torrel Industries Ltd, Torrel Industries ltd Series Land Rover front brake conversion kit: Difficulty - Low Except for one
My Hawk build part 24 by Stuart Clarke. Getting ready to turn the key.
 My Hawk build part 24 by Stuart Clarke Getting ready to turn the key. Things had moved on quite nicely now and the end was virtually in sight. It was getting to that do or die moment when I find out if
TCI Trans-Scat
 Page 1 of 5 Return to Instruction Sheet index TCI 400000 Trans-Scat Turbo Hydramatic 400-1965-Up This kit will allow you to re-program your transmission valve body. This kit will give you firm positive
Dexter Never-Adjust Brake Install
 Dexter Never-Adjust Brake Install Arctic Fox 2007 29-5T Warning: This involves lifting your trailer, working under and around it. If you do not have the correct equipment and knowledge for this, please
The TR8 TPS (Throttle Potentiometer Switch ERC 3619 NLA)
") The TR8 TPS (Throttle Potentiometer Switch ERC 3619 NLA) My TR8 Efi had been running odd for some time with on occasions a very strong HC smell. Unfortunately with its MOT looming it was fairly obvious
The TR8 TPS (Throttle Potentiometer Switch ERC 3619 NLA) My TR8 Efi had been running odd for some time with on occasions a very strong HC smell. Unfortunately with its MOT looming it was fairly obvious
Right On Replicas, LLC Step-by-Step Review * 1959 Cadillac Eldorado Hardtop 1:25 Scale Revell Model Kit # Review
 Right On Replicas, LLC Step-by-Step Review 20150608* 1959 Cadillac Eldorado Hardtop 1:25 Scale Revell Model Kit #85-4361Review With the dawn of the space age the styling cues in Detroit took to the skies
Installation Manual TWM Performance Short throw shifter 2001 and up Hyundai Accent
 Installation Manual TWM Performance Short throw shifter 2001 and up Hyundai Accent 1. Place the vehicle on a flat surface with blocks in front and behind the wheels preventing unwanted movement. The car
Compact 6-Speed and Reverse Gearbox
 Compact 6-Speed and Reverse Gearbox By Alan Wenbourne Downloaded from the South East London Meccano Club Website www.selmec.org.uk The Gearbox During the construction of my demonstration Direct Shift Gearbox
HotGrips Installation
 Page 1 of 8 HotGrips Installation There are two general solutions when it comes to upgrading any motorcycle with heated grips. Heated membranes that fit under the stock grips or complete replacement grips
$1.00 FOR THE TQIO/RCIO
 $1.00 FOR THE TQIO/RCIO m mm HDBBYSHOP Champion Jay Halsey has an impressive track record. One of Jay's advantages is a whisper smooth tranny thanks to his dad, Jim. Now you can build a Halsey transmission!
INSTALLATION MANUAL. SKYLINE ROOF RACK Toyota Tacoma 3 rd Gen (2016+)
") INSTALLATION MANUAL SKYLINE ROOF RACK Installation Time = 1 Hour Difficulty = Intermediate CONTACT US http://www.tmt4x4.com GET CONNECTED! @ TMT4x4 Sales@TMT4x4.com +01 786 210 5352 03 WARNING! READ ALL
INSTALLATION MANUAL SKYLINE ROOF RACK Installation Time = 1 Hour Difficulty = Intermediate CONTACT US http://www.tmt4x4.com GET CONNECTED! @ TMT4x4 Sales@TMT4x4.com +01 786 210 5352 03 WARNING! READ ALL
Cane Creek Double Barrel Instructions
 Cane Creek Double Barrel Instructions Congratulations on your purchase of the Cane Creek Double Barrel rear shock. Developed in partnership with Öhlins Racing, the Double Barrel brings revolutionary suspension
TAS002 TORQUE ARM CONVERSION INSTALLATION INSTRUCTIONS Camaro and Firebird Ford 9
 TAS002 TORQUE ARM CONVERSION INSTALLATION INSTRUCTIONS 1967-1969 Camaro and Firebird Ford 9 Please take note before proceeding with this installation: This product may interfere with certain exhaust kits.
Part # C-10 Level 1 Air Suspension System
 350 S. St. Charles St. Jasper, In. 47546 Part # 11330199 63-72 C-10 Level 1 Air Suspension System Front Components: 1 11331099 Front CoolRide Kit for Stock Lower Arms 1 11330509 RQ Series Front Shock Kit
Ford 8, 9 Small Bearing Installation Instructions Rear Disc Conversion
 Ford 8, 9 Small Bearing Installation Instructions Rear Disc Conversion This kit is for Ford 9 rear axles with the small (2.835 ) style bearing and Ford 8 rear ends. This kit is designed to work with axles
Figure 1: Valve housing smooth vs. o-ring groove
 If you are driving an older Corvette, and by that I mean a C2 or C3, it will eventually get to a point where the Power Steering Control Valve (PSCV) will leak and require attention. In 2002, I had to repair
928 Hatch Motor Exorcism Happy Ending!
 Having had repeated issues with my Porsche hatch motor I m convinced it s both ill conceived/unreliable and a fundamentally over complex solution. There are many other hatch releases out there that do
Hitachi Alternator Upgrade for Series I E-Types Ray Livingston (831) Home (831) Cell
 Home (831) Cell") Hitachi Alternator Upgrade for Series I E-Types Ray Livingston (831) 457-1373 Home (831) 234-0858 Cell rayl@atc.creative.com The Hitachi alternator for a 1986 Nissan pickup is a perfect replacement for
Hitachi Alternator Upgrade for Series I E-Types Ray Livingston (831) 457-1373 Home (831) 234-0858 Cell rayl@atc.creative.com The Hitachi alternator for a 1986 Nissan pickup is a perfect replacement for
Steeda Sport Mustang Lowering Springs (2005+) - Installation Instructions
 - Installation Instructions") Steeda Sport Mustang Lowering Springs (2005+) - Installation Instructions The below installation instructions work for the following products: Steeda Sport Mustang Lowering Springs (2005+) Please read
Steeda Sport Mustang Lowering Springs (2005+) - Installation Instructions The below installation instructions work for the following products: Steeda Sport Mustang Lowering Springs (2005+) Please read
Using your Digital Multimeter
 Using your Digital Multimeter The multimeter is a precision instrument and must be used correctly. The rotary switch should not be turned unnecessarily. To measure Volts, Milliamps or resistance, the black
MAESTRO INSTALLATION. Determine where you are going to locate both the rooftop sensors and the read-out.
 MAESTRO INSTALLATION PROPER INSTALLATION IS IMPORTANT. IF YOU NEED ASSISTANCE, CONSULT A CONTRACTOR, ELECTRICIAN OR TELEVISION ANTENNA INSTALLER (CHECK WITH YOUR LOCAL BUILDING SUPPLY, OR HARDWARE STORE
This section is about my departed 1991 Mustang that I lost in Hurricane Katrina and the engine build I did for it.
 This section is about my departed that I lost in Hurricane Katrina and the engine build I did for it. When I acquired it in 1999, it was already equipped with the obligatory K&N, headers, pulleys, 3.73s,
Topic: Friction. Planes, Trains, and Automobiles. A Poppins Book Nook Science Experiment. My Name Is:
 Planes, Trains, and Automobiles A Poppins Book Nook Science Experiment Topic: Friction My Name Is: ---------------------------------------------------------------------------------------------------------
Char-Griller Smokin Pro Modifications
 Char-Griller Smokin Pro Modifications By Phil Lee aka HawgHeaven Right out of the box, the Char-Griller Smokin Pro has a few design deficiencies that need to be addressed, and are fairly easy to remedy.
Focus ST Carbon Fiber Intake
 791400 - Focus ST Carbon Fiber Intake 791400 COBB Focus ST Carbon Fiber Intake Congratulations on your purchase of the COBB Tuning Carbon Fiber Intake System! The following instructions will assist you
LINDGREN-PITMAN General Maintenance of Lindgren-Pitman Hydraulic Systems & Equipment
 LINDGREN-PITMAN General Maintenance of Lindgren-Pitman Hydraulic Systems & Equipment Page 1 Lindgren Pitman hydraulic driven equipment is designed to give long reliable service with a minimum of repairs
Troubleshooting Guide for Pumps ATD ATD ATD5289
 PROBLEM: Your pump does not work? There are Three Basic Problems! Troubleshooting Guide for Pumps ATD5217 - ATD5219 - ATD5289 Air Motor Operates but nothing comes out. This is the most common problem.