Operators Manual. For all Versions of. Victor 2 / Victor 2 Plus / Victor 2 Super SIMONINI FLYING SRL
|
|
|
- Hilary Boone
- 6 years ago
- Views:
Transcription
1 Operators Manual For all Versions of Victor 2 / Victor 2 Plus / Victor 2 Super SIMONINI FLYING SRL Via Per Marano San Dalmazio di Serramazzoni (Mo) P.I and C.F Tel: 0536/ Fax: 0536/ info@simonini-flying.com
2 THIS MANUAL IS THE INTELLECTUAL PROPERTY OF SIMONINI FLYING SLR AND MUST NOT BE REPRODUCED OR COPIED BY ANY MEANS WITHOUT PRIOR WRITTEN PERMISSION OF THE AUTHOR. Important Notice DANGER THIS ENGINE, BY ITS DESIGN, MAY BE SUBJECT TO SUDDEN STOPPAGE. ENGINE STOPPAGE CAN RESULT IN CRASH LANDINGS. SUCH CRASH LANDINGS CAN LEAD TO SERIOUS INJURY OR DEATH AND OR DAMAGE TO PROPERTY. DO NOT FLY THE AIRCRAFT EQUIPPED WITH THIS ENGINE AT LOCATIONS, AIRSPEEDS, ALTITUDES OR OTHER CIRCUMSTANCES FROM WHICH A SUCCESSFUL ENGINE OFF LANDING CANNOT BE MADE, AFTER SUDDEN ENGINE STOPPAGE, EITHER DELIBERATE OR ACCIDENTAL OR INCIDENTAL. WARNING THIS ENGINE IS NOT A CERTIFICATED AIRCRAFT ENGINE. IT HAS NOT RECEIVED ANY SAFETY OR DURABILITY TESTING NOR DOES IT CONFIRM TO ANY AIRCRAFT STANDARDS. IT IS FOR USE IN EXPERIMENTAL, UNCERTIFICATED AIRCRAFT AND VEHICLES ONLY, WHERE ENGINE FAILURE WILL NOT COMPROMISE SAFETY. THE USER ASSUMES ALL RISK OF USE AND ACKNOWLEDGES BY HIS USE THAT HE KNOWS THIS ENGINE IS LIABLE TO STOP SUDDENLY.
3 CONTENTS SAFETY DESCRIPTION OF ENGINE EACH ENGINE IS SUPPLLED WITH: VICTOR 2 PLUS DIMENSIONS EXPLODED VIEW OF VICTOR 2 / VICTOR 2 PLUS / Victor 2 Super ENGINE PARTS LIST FORSIMONIHI VICTOR 2 ENGINE FUEL AND OIL Mixing procedure: Oil Mixing Ratios GEARBOX OIL FUEL PUMP BREAKING IN PROCEDURE STARTING PROCEDURE NORMAL WORKING CONDITIONS CARBURETOR BING CARBURETOR EXPLODED VIEW EXHAUST SYSTEM REDUCTION GEARBOX REDUCTION RATIOS AVAILABLE Propeller Mass Moment of Inertia: Propeller Mass Balance and Pitch setting for Ground Adjust Propeller: Procedure to fill gear box oil: Procedure to drain gear box oil: Exploded View of Simonini Type C Gearbox Part list for Simonini Type "C" Gear Box IGNITION SYSTEM IGNITION CIRCUIT DIAGRAM SPARK PLUGS I
4 13. ELECTRICAL STARTER Typical Electric Wiring Schematic for Starter Motor BATTERY Power source: Relay for power Supply to starter: Fuse: Typical wiring diagram INSTRUMENTS Minimum instruments required with the engine: Special operation condition Engine mounted inside cowling: LIQUID COOLING SYSTEM: AIR FILTERATION SYSTEM MAINTENENCE SCHEDULES: Description of checks Initial Start-up Procedure: Storage procedure CHECK FOR CARBON BUILD-UP AND RING CONDITION GEARBOX MAINTENANCE TORQUE DATA: WEAR LIMITS: TECHNICAL DATA Description Temperature Ignition and Generator System FUEL SYSTEM: OTHER INFORMATION STANDARD VERSION INCLUDE WEIGHT OPERATING LIMITATION WARRANTY CONDITION II
5 ANNEX DECLARATION OF QUALITY Record no 14: Aluminum Alloy LM DUCATI Regulator DUCATI Alternator III
6 SAFETY Safety is paramount and all persons using this engine must be responsible for their own safety as well as the safety of those in the vicinity and those who may be affected. We include some important safety information and tips; however this list is neither complete nor comprehensive. GENERAL SAFETY POINTERS 1. Never mix fuel in an enclosed space or area where the fumes could be accidentally ignited or may cause self-combustion. 2. Ensure that all controls work in the correct sense and that you know ON and OFF positions of the throttle and ignition. Make sure that these are easily accessible when in the process of starting the engine and that you can operate them in the correct sense instinetive1y and immediately. 3. Ensure that no fuel can be spilled on to the hot exhaust or hot engine parts. Use only safety approved fuel containers and never transport fuel in an unsafe manner. 4. Do not refuel the aircraft or vehicle with engine running. 5. Check all engine mounts and frames regularly as well as all the drive components, fuel lines, wiring and fuel and air filters. 6. Check for fuel contamination, air vents and exhausts. Protect engine while it is not in use from any Contamination entering fuel or carburetor system. 7. Ensure that you remove all storage protection before starting the engine. 8. Maintain your engine in top condition and assume it is going STOP running at any time. Ensure that you have a way out to safety in event of unexpected failure. 9. Never run the engine on the ground with the propeller turning unless you are doing so in a designated engine run up area and can observe anyone or anything entering the danger area. 1
7 10. If Starting by hand cranking the propeller, have an observer who is well briefed and can act as a safety officer. Ensure Aircraft is suitably restrained. 11. Never leave your aircraft with the engine running. You may be held responsible if the aircraft causes an accident even If you are not in the cockpit. 12. Always maintain the engine / aircraft log and enter any unusual engine behavior. Do not fly until the problem has been corrected and the corrective action recorded in the logbook. 2
8 1. DESCRIPTION OF ENGINE 1.1 EACH ENGINE IS SUPPLLED WITH: Bing carburetors (BING 54 36mm for Victor 2 and Victor 2Plus, BING 54 38mm for Victor2Super), air filters, fuel pump, exhaust systems, electric starter, reduction gear type C with elastic joint on primary gear, system to charge battery in flight. 1.2 VICTOR 2, VICTOR2PLUS AND VICTOR2SUPER ENGINES DIMENSIONS 3
9 1.3 EXPLODED VIEW OF VICTOR 2 / VICTOR 2 PLUS / VICTOR 2 SUPER ENGINE Exploded view of Victor 2 engines. Part list as numbered items. 4
10 1.4 PARTS OF SIMONINI VICTOR 2 / VICTOR 2 PLUS / VICTOR 2 SUPER ENGINES PART# DESCRIPTION QUANTITY 1 BOLTS FOR EXHAUST MANIFOLD x4 4 2 EXHAUST MANIFOLD x EXHAUST MANIFOLD GASKET x CYLINDER BOTTOM GASKET x2 2 5 CYLINDER x2 2 6 VYTON 0 RING x 2 OUTER STUD FOR CYLINDER HEAD, 6 FOR EACH CYLINDER 12 8 CYLINDER HEAD x CYLINDER HEAD WASHER, 6 FOR EACH CYLINDER CAP NUTS FOR CYLINDER HEAD, 6 FOR EACH CYLINDER VYTON 0 RING x 2 INNER 2 12 WATER OUTLETS TOP AND BOTTOM x HOSE CLIPS FOR WATER OUTLET AND HOSE PIPE BENDS x HEAT DISSIPATER TOP I BOTTOM 1 15 HOSE PIPE HEAT DISSIPATOR TO WATER PUMP MM. BOLT TO HOLD WATER PUMP POSITION 1 17 WATER PUMP 1 18 ENGINE COVER PLATE, MAG END MM. BOLT TO HOLD MAGNETO MM. SCREWS TO HOLD ENGINE COVER PLATE 6 21 NUT TO POSITION WATER PUMP 1 22 HOSE PIPES WITH 90 DEG. BEND FROM CYLINDER HEADS TO HEAT 4 DISSIPATERS x4 23 WATER PUMP BELT 1 24 FLAT WASHER FOR WATER PUMP 1 25 WATER PUMP BELT PULLEY MM. BOLT 1 27 WASHER 8MM ENGINE MAG END CASING 1 29 BOLT 8MM GASKET INLET AT REED VALVES x REED VALVES x RUBBER FLANGE TO HOLD CARBURETORS x HOSE CLIPS TO HOLD CARBURETORS x CARBUREITORS x SPRING WASHERS FOR CARBURETOR BOLTS x CARBURETOR BOLTS 6 MM x BREATHER TUBE FOR CARBURETORS x HOSE CLAMPS x 2 FOR AIR FILTERS 2 39 A IR FIL1ERS x SPRING WASHERS FOR CRANKCASE 8mm CRANKCASE 1 42 WASHER FOR DEPRESSION OUTLET FROM CRANKCASE 1 5
11 43 DEPRESSION OUTLET FOR FUEL PUMP 1 44 NUT FOR ELECTRIC STARTER x WASHER FOR ELECTRIC STARTER x SPRING WASHER FOR ELECTRIC STARTER x BOLT FOR ELECTRIC STARTER x ELECTRIC STARTER 1 49 PISTON ASSEMBLY CONNECTING ROD ASSEMBLY x OIL SEAL 4 52 CIRCLIPS FOR Oil SEALS 7 53 BEARINGS 2 54 CONROD PIN 2 55 CRANKSHAFT WITH WOODRUFF KEY HOUSING SHAFT 2 56 CRANKSHAFT WITH MALE SPLINE 1 57 BEARING 2 58 CRANKSHAFT WITH FEMALE SPLINE 1 59 WOODRUFF KEY 1 2. FUEL AND OIL The VICTOR 2 / VICTOR 2 PLUS / Victor 2 Super engine uses unleaded or leaded petrol at least 87 octane rating. The engine requires the petrol to be premixed with two-stroke oil. STOP: Do not run the engine without ensuring that it is correctly loaded (e.g. propeller is mounted). Fuel contamination can be a major cause of engine failure. Ensure that your fuel container is clean inside before you use it to fill up with fuel or oil. Filter all fuel that goes into the fuel container. Also use a filter when transferring fuel from fuel container into the aircraft tanks. The Victor 2 / Victor 2 Plus / Victor 2 Super engine is designed to run on unleaded petrol or leaded petrol or avgas mixed with 2 Semi-synthetic Oil. The Oil to be premixed with fuel must meet or exceed the specifications API, TC, JASO, FC. It is recommended only to use a semi- synthetic 2-stroke oil like Bardahl or MixoilSynt Api or equivalent. Use of Semi- Synthetic Oil pre-mixed in the petrol / avgas will greatly reduce the buildup of carbon deposits in the cylinder heads and pistons. This will increase your service intervals. 6
12 2.1 MIXING PROCEDURE: Use a clean container of known volume. Pour Oil into container. Pour Fuel into the can using a fine mesh filters. Close container cap firmly and shake container for a few moments so that the oil and fuel are mixed properly. 2.2 OIL MIXING RATIOS Type of fuel Fuel Qty. %age of oil Oil Qty. Type of fuel Fuel Qty. %age of oil Oil Qty. Unleaded 10 Lit. 3% 300ml. Leaded/Avgas 10 Lit. 2.5% 250ml. 15 Lit. 3% 450ml. 15 Lit. 2.5% 375ml. 20 Lit. 3% 600ml. 20 Lit. 2.5% 500ml. 25 Lit. 3% 750ml. 25 Lit. 2.5% 625ml. 30 Lit. 3% 900ml. 30 Lit. 2.5% 750ml. 33.3Lit. 3% 1lit. 40 Lit. 2.5% 1lit. 7
13 3. GEARBOX OIL Reduction Gearbox Oil in the Simonini Type "C" reduction gearbox. Recommended Oil is 9OWX/140EP. The quantity required to fill the gearbox is 170cc with gear box upright and 225cc with gear box down. Warning: Do not run the engine without sufficient oil in the Gear Box. On the side of the Gear Box there are two Allen Screws which are used to inspect and indicate the level of oil in the gear box. It is always the lower of the 2 screws that indicates maximum oil level. The lower Allen screw can be carefully opened to check that the oil leve1 is sufficient. Do not over fill above this level. When the instillation requires the gear box to be fitted with the propeller shaft below the crankshaft, the oil filler cap and the oil drain plug are interchanged. Max Oil Level 225cc Gear Box Down Max Oil Level 177cc Gear Box UP 8
14 Replace the Gearbox oil after the first 10 hours of use. The next change of Gearbox Oil is at 100 hours of use or once every 12 months, whichever comes first. Stop: Ensure before every flight that you have sufficient oil in the gearbox. 4. FUEL PUMP The Victor 2 / Victor 2 Plus /Victor 2 Super engine comes equipped with a Mikuni Membrane Pump. This is a pneumatic pump operated by the pressure pulses from the crankcase of the engine. Install the pump 3-4 cm higher than the crankcase pressure outlet. This will prevent a build-up of fuel / oil mix in the lower compartment of the fuel pump, which in turn may lead to less efficiency. The length of the tube, which connects the engine crankcase depression to the fuel pump, should be as short as possible, ideally less than 15 cm and not more than 30 cm long. If your aircraft fuel tank is located more than 50/60 cm below the carburetor and fuel pump, install an electric pump near the fuel tank. This pump will help push the fuel up to the membrane pump and prevent vapor locks pump subsequent engine failures. Please follow the fitting schedule of the electric pump. Stop: The maximum fuel pressure exerted by the electric fuel pump should not exceed 0.3 bar (4.35 psi). When fitting an electric booster fuel pump ensure that there is fuel filter installed in line before the pump. This will prevent the electric pump from clogging up with foreign material, which may result in fuel starvation and resultant engine stoppage. The electric booster fuel pump must be of the type where it allows fuel to pass through even when it is not working. 9

15 Example of electric fuel pump that may be used as a Booster pump 5. BREAKING IN PROCEDURE EACH SIMONINI VICTOR 2 / VICTOR 2 PLUS / VICTOR 2 SUPER ENGINE IS ASSEMBLED AND RUN IN AT THE FACTORY. EACH ENGINE IS SUBJECTED TO A DYNAMIC TEST. THE ENGINE IS SECURELY MOUNTED ON A TEST BENCH AND A SUITABLE PROPELLER INSTALLED ON IT. THE ENGINE IS STARTED AND KEPT RUNNING FOR UP TO 4 HOURS AT VARIABLE SPEEDS. TEMPERATURES AND POWER OUTPUTS ARE REGULARLY CHECKED WHILE THE ENGINE IS BEING RUN. THE CUSTOMER/USER IS NOT REQUIRED TO DO ANY RUNNING OR BREAKING IN PROCEDURES ON THE ENGINE. THE CARBURETORS ARE SET AT THE FACTORY FOR THE IDEAL SETTINGS. WHEN THE ENGINE IS MOUNTED ON YOUR AIRCRAFT, ENSURE THAT BOTH CARBURETOR SETTINGS ARE EQUAL WHEN INSTALLING THE THROTTLE AND CHOKE OPERATING CABLES. 10
16 ADJUST THE CARBURETOR SLIDES UNTIL YOU GET AN 8 MM GAP UNDER THE SLIDES WHEN VISIBLE FROM THE AIR FILTER SIDE. TURN THE CARBURETOR AIRSCREWS FULLY CLOSE AND THEN UNSCREW THEM BY 1 TO 1. 5TURNS. THE ENGINE SHOULD BE RUNNING AT FULL OPEN THROTTLE WITH 6500RPM. IN THE CASE OF MAX. RPM. IS NOT DEVELOPED, CHECK PROPELLER PITCH/SIZE AND MAIN JET SIZE. 6. STARTING PROCEDURE NOTE: ALL SIMONINI ENGINES ARE RUN IN AT THE FACTORY AFTER ASSEMBLY. Ensure that the engine is fitted securely to the aircraft. All electric concoctions must be checked to be correct. All fuel lines must be securely fitted. Stop: Ensure that there is sufficient fuel and oil in the fuel tank and enough oil in the gearbox. Insufficient fuel and oil will cause the engine not to Start. Ensure that there is sufficient coolant in the radiator. Insufficient coolant will cause the engine to overheat in a matter of seconds and thereafter cause seizure of the pistons and resultant catastrophic failure. With the engine cold, Open fully chokes on the Bing Carburetors. Keep throttle at the idle position. Ensure that ignition switches are ON and that you can instantly switch them off if required. Ensure that the aircraft brakes are on. If no brakes, ensure you have chocks under the wheels to stop the aircraft from rolling away unintentionally. Ensure that there is nobody near the Propeller and that the slipstream not causes damage to any other aircraft or persons or property. 11
17 Engage electric starter. As soon as the engine fires, open throttle so the engine runs at slightly over 2000/2200 rpm. Ensure that the starter motor is disengaged from the engine. Do not run the Starter motor for more than 5 seconds at a time. Once the engine fires, within 10 seconds close the Chokes and the engine should be running smoothly. Once the engine is running for about 2 minutes, increase the RPM to Check exhausts Gas temperatures on both cylinders. The difference should not exceed 20 C. Warm up the engine until the water temperature reaches 50 C. Now the engine should be ready for flight. 7. NORMAL WORKING CONDITIONS It is recommended to use as much as gas your aircraft needs, it depends on your requirements and as occasion may require. Reach height as soon as possible, above all if you are flying with a delta motor. Do not exceed maximum 6500 RPM. Do not run the engine in the climb out at Full Open Throttle for more than 3 minutes. Idling rpm should be 2000 rpm. Less than this may cause unnecessary vibrations. Higher idling rpm will cause a reduction in the fuel / air mixture enrichment in the starting circuit of the carburetor and may make cold engine start-ups difficult. Before shut down, the engine should be run until any heat build-up from previous high power settings (e.g. taxi back to hangar) has dissipated. Run the engine at 3000 rpm for 2 minutes and then at 2000 rpm or smooth idle speed for a short while. Do not idle for prolonged periods (e.g. holding point checks) as the normal rich conditions at this carburetor setting may cause high carbon deposits on the spark plugs and piston rings causing fouling. At low revolutions, the vibrations are high and the loads on the propeller, gearbox, and drive train and should be avoided for longevity of the engine. 12

18 8. CARBURETOR The Victor 2/ Victor 2 Plus / Victor 2 Super engine is equipped with 2 Bing Double Float Carburetors. The Bing Carburetor is a piston type carburetor with float Chamber. The following methods and combinations can adjust the Carburetor. 1. By Main Jet / Idle Jet / Needle Jet of various sizes. 2.The Jet Needle size and position can also be varied. 3.The Air / Fuel Mixture screw, Carburetor piston stop height can be changed. When anyone of the above components or settings is changed, it affects the others so that other small adjustments may be required. Each Carburetor must be fitted with the slide axis at right angles in relation to the crankshaft axis, both from the top and the intake side, to ensure equal fuel distribution to both cylinders. 13
19 When you receive the engine from Simonini Flying, the engine has been run in and the carburetor settings checked. NOTE: The Simonini Factory is at 600 meters above Mean Sea Level; thus when the engine is run in at the Factory, it is set to produce maximum power at that altitude. If you are to operate the engine at a very different altitude, you may need to retune the Carburetor mixture settings to produce optimum power. Stop: When you attach the throttle cable and choke cables, please ensure that you have both the carburetor slides moving exactly equally up and down in unison. If not, it will cause the engine to run rough or worse malfunction. The throttle control mechanism must enable the carburetor slides to attain their full open position. Ensure that aircraft movement or controls movement does not affect the movement of throttle and choke cables. This may cause the throttle settings to change inadvertently. Ensure that Air filters and Exhausts and Radiators are installed in place before starting the engine. They must be in place to produce proper carburetion for the engine. Special operating conditions or extreme altitude and or climatic changes will require different Jetting. Contact your dealer for the correct carburetor jets setting. The Victor 2 engine/ Victor 2 Plus / Victor 2 Super engine is fitted With "Reed Valves" between the Carburetors and the crankcase. These valves add to the efficiency of the engine in controlling carburetion and fuel economy. The Reed Valves require changing of the VALVES after 400 hours of use. 14
20 8.1 BING CARBURETOR EXPLODED VIEW 15
21 9. EXHAUST SYSTEM The Simonini Engines produce a high power output to weight ratio with the help of very highly tuned exhaust systems. The exhaust system is manufactured in the Simonini factory for each engine type. Stop: Do not attempt to make any changes to the Simonini Exhaust Systems. Any changes will invalidate the warranty and may severely reduce the performance and power output of the engine. Any changes will affect adversely the fuel economy as well as the reliability of the engine. Vibrations caused by incorrect mounting and fixing of the exhaust system will result in a reduced life span of the exhaust system. Ensure that the entire system is free from vibrations through the entire range of power settings. Ensure that there is no harmonic resonance or vibration present due to the engine, propeller and aircraft combination. This means that you must mount the exhaust system on shock resilient mounts. Ensure that the ball joints of the various exhaust system components are lined with an antigalling product (e.g. copper loaded grease or graphite dry lubricant). Secure the exhaust system to the aircraft. Secure all the springs by loosely wire locking them. 16
22 10. REDUCTION GEARBOX The Simonini Victor 2 / Victor 2 Plus / Victor 2 Super engine comes fitted With the Simonini Type "C" gearbox. There are various ratios that the customer cans specify when ordering. Please confirm and check that you have the correct reduction gear ratio for your combination of propeller, aircraft and engine REDUCTION RATIOS AVAILABLE 2.54:1 2.76:1 3.06:1 3.47:1 4.00:1 The Gear Box Input Shaft is fitted with a rubber "Donut" elastic joint that acts as a vibration damper. The Reduction Gearbox may be fitted with the drive output propeller shaft above or below the crankshaft axis PROPELLER MASS MOMENT OF INERTIA: With the Type "C" Simonini gearbox, the propeller mass moment of inertia must not exceed 6000 kg Before fitting the propeller, check with the propeller manufacturer if the mass moment inertia meets these requirements. Your warranty will be invalid if the propeller exceeds the limits PROPELLER MASS BALANCE AND PITCH SETTING FOR GROUND ADJUST PROPELLER: A new propeller must be balanced to better than one gram to avoid problems and overstressing the gearbox drive train. You must ensure that the propeller is also tracked to within 1 mm at the 17


23 tips. Check for balance and tracking of the propeller after the first fifty hours of operation and 100 hours thereafter. Stop: Imbalance in Pitch causes extreme cyclic load settings, Blade to Blade should be better than 0.1 or 6. Warning: Even though the gearbox is fitted at the factory and the engine has been run in, you must check that it has the correct type and quantity of oil in it. The oil may have been drained before dispatching the engine to you! Before you start the engine, ensure that the gearbox contains oil of the correct type and quantity. Use gearbox oil with viscosity that meets SAE 140, API GLA. It is recommended to use Castrol EP-140 for the Simonini type C gearbox. On first filling the dry gearbox you will require 170 cc of oil with gear box upright. With gear box down, you will require 225 cc of oil to fill it. The oil filler is always located on the top of the gearbox. Max Oil Level 225cc Gear Box Down Max Oil Level 177cc Gear Box UP 18
24 10.4 PROCEDURE TO FILL GEAR BOX OIL: 1. Unscrew and remove the 4cm tall ribbed aluminum heat exchanger plug on top of the gearbox. 2. Use an Allen key to unscrew the lower of the 2 Allen screws on the side of the gearbox. This lower hole is your maximum oil level indicator. 3. Fill in the correct quantity of EP 140 oil from the top of the gearbox. It will take some time for the oil to dribble down on the inside of the gearbox and start to ooze out from the oil level indicator hole. 4. Screw in the Allen screw. Torque it to 10 Nm. 5. Screw in the heat exchanger plug on top of the gearbox Torque it to 20 Nm and wire-lock. 6. Ensure that the tiny hole on top of this heat exchanger plug is free to act as a breather hole for the oil in the gearbox. Stop: You must ensure that you have sufficient oil in the gearbox for every flight PROCEDURE TO DRAIN GEAR BOX OIL: 1. After running the engine, the gearbox should be warm and the oil inside should be warm and have a low viscosity. 2. Place a container or pan under the gearbox. The container should be large enough to hold 250 ml of oil. 3. Remove the heat exchanger plug on top of the gearbox. 4. Unscrew the Lower Allen screw on the side of the gearbox. 5. Unscrew the drain plug at the bottom of the gearbox and let the oil dribble down into the collection pan or bowl. It may take a while for all the oil to dram out. 6. Clean the magneto in the drain plug and check for metal fillings. 19
25 7. After the gearbox is completely drained, screw the drain plug back in, torque is 20 Nm. Drain and change the gearbox oil after the first 10 hours of engine use. Thereafter drain and change gearbox oil every 100 hours of use or once every 12 months, whichever is sooner. You must ensure that you have sufficient oil in the gearbox for every flight. Check oil level every 50 hours. Please dispose of used oil in the correct oil disposal unit Giving due consideration to the environment 20
26 10.6 EXPLODED VIEW OF SIMONINI TYPE C GEARBOX 21
27 10.7 PART LIST FOR SIMONINI TYPE "C" GEAR BOX Part # Quantity 1 BOLT FOR PROPELLER 6 2 PLATE FOR PROPELLER HUB 1 3 POWER OUTPUT SHAFT 1 4 6MM ALLEN SCREWS FOR GEARBOX 12 5 GEARBOX FRONT COVER 1 6 GASKET 1 7 BEARING 1 8 PIN TO LOCATE GEARBOX FRONT COVER 1 9 BOLT 1 10 GEAR ASSEMBLY DRIVE GEAR AND DRIVEN GEAR 1 11 BEARING 1 12 OIL SEAL 1 13 WASHER 1 14 OIL DRAIN PLUG 1 15 BOLTS 8 16 SCREW TO CHECK MAX OIL LEVEL WITH GIB UP 1 17 SCREW TO CHECK MAX OIL LEVEL WITH GIB DOWN 1 18 OIL FILLER SCREW WITH HEAT DISSIPATER 1 19 WASHER 1 20 BOLTS 8 MM 8 21 OIL SEAL 1 22 BEARING 1 23 CIRCLIPS FOR OIL SEALS 1 24 BEARING 1 25 THRUST WASHER 1 26 CONE WASHER 1 27 BOLTS 6 28 PLATE 1 29 BEARING RING 1 22

28 31 OIL SEAL 1 32 TRIANGLE FLANGE 1 33 LOCATOR BOLT 1 34 BOLTS 6 35 RUBBER DONUT 1 36 BOLT 1 37 WASHER 1 38 BOLTS 8 39 FLY WHEEL 1 40 GEAR HOUSING IGNITION SYSTEM The Simonini Victor 2 / Victor 2 Plus / Victor 2 Super engine is equipped with a breaker-less 12 Volts 170 w Ducati Capacitor-Discharge Dual Ignition. The Ignition system consists of: 1. F1ywheel Magneto Generator. 2. Two twin Ignition Coils with Integrated Control Circuit. 3. Magnetic Pickups which act as Triggers for the Sparks. 23
29 The 12 Poles f1ywheel generator is an outer rotor type with 12 integrated permanent magnetos. The Stator is fitted with 12 coils. Out of the 12 coils, 8 Coils are used for supplying power to Auxiliary Equipment and 4 coils are used for the Twin Ignitions. The Grey cable is to be used for connection to a suitable tachometer. The two pairs of charging coils fitted on the Generator Stator are independent of each other and supply one Ignition Circuit each. The Energy supplied is stored in the Ignition Capacitor. At the moment of Ignition, the External Triggers supply an Impulse to the Control Circuits and the Ignition Condensers arc discharged via the Primary winding of the Ignition Coil. The Secondary winding supplies the High Voltage for the Ignition Spark. Before every flight, complete your pre-flight or Vital Actions Checks. Include the Checks to see that each Ignition Circuit is working independently and together. To check each Ignition Circuit is working, run the engine at 3000 to 4000 rpm. Ensure that the aircraft is stationary with brakes or chocks and pointing into the wind. Now turn one (left) Ignition Switch off. The reduction or drop in RPM must not exceed 300 RPM. Now turn the Ignition switch on. Let the RPM rise to the previous setting ( RPM). Now turn the second (right) Ignition Switches off. The reduction or drop in RPM must not exceed 300 RPM. Now turn the Ignition Switch on. Ensure that both Ignition switches are on before you proceed for rake-off. Stop: Both Ignition Circuits must be switched on before take-off! Do not carry out running tests of the ignition without the spark plugs connected and grounded to the engine. Running the engine without the spark plugs connected and grounded to the engine will cause damage of the control circuits. 24
30 11.1 IGNITION CIRCUIT DIAGRAM 25
31 12. SPARK PLUGS The Victor 2 /Victor 2 Plus / Victor 2 Super is installed with 2 NGK B9ES Spark Plugs on each Cylinder. The gap on the spark plug electrodes should be between 0.4 to 0.5 mm. As the fuel and oil that you use may vary from time to time; check the condition of all the spark plugs on your engine regularly. Remember to check and clean the spark plug caps. At the same time check for evidence of shorting caused by build-up of fretting residues (powdery substance). Clean and re-gap plugs if necessary. Gap = 0.4mm to 0.5mm Replace spark plugs every 100 hours, Always replace all the four plugs at the same time. When replacing spark plugs after checks, you should put them back in the same position. This will prevent possible damage to the cylinder head threads. Always use anti-seize paste when instilling spark plugs. If plugs are sooty with oil deposits, the engine is running too cold (i.e. too rich). The Carburetion and Air Filters should be checked for cleanliness. It is recommended only to use a semi- synthetic 2-stroke oil like Bardahl or MixoilSynt Api or equivalent. Use of Semi- Synthetic Oil pre-mixed in the petrol / avgas will greatly reduce the buildup of carbon deposits in the cylinder heads and pistons. If plugs have whitish deposits with evidence of melt droplets; it may be a lean mixture. If carburetor calibration is correct and no evidence of manifold leaks neither lack of fuel nor incorrect float settings is found, check the cooling system. The temperature measured under the spark plugs Cylinder Head Temperature (CHT) on each cylinder must not exceed 120 C. at full power. The temperature of the coolant exiting the cylinder heads (water Temperature) at maximum power must not exceed 80 C. The Normal Operating temperature range for the Coolant / Water temperature is between 55 C to 65 C. Do not take-off until the Water temperature has reached 50 C. 26
32 13. ELECTRICAL STARTER The Victor 2 /Victor 2 Plus / Victor 2 Super engine is equipped with an electric starter motor as standard. This is fitted on the magneto end of the engine. The starter motor is a high performance, lightweight device that sits alongside the engine. The starter has a ''Bendix'' clutch; which engages the ring gear fitted on the crankshaft for starting the engine. Once the engine has started, the ''Bendix'' clutch disengages the electric starter motor. A "starter engaged" lamp indicator may be installed in the cockpit to ensure that the "Bendix" clutch and solenoid switch have disengaged after the engine is running. 27
33 13.1 TYPICAL ELECTRIC WIRING SCHEMATIC FOR STARTER MOTOR. NOTE: Battery, Solenoid and Starter Motor cable is 8 mm 2 (160 A) Wiring between the Battery, Master Switch and 12 V dc feed is 4 mm 2 (25 A) All other wiring is 25 mm 2 (16 A) Starter motor, Starter switch and Voltage Regulator wiring Diagram 28
34 14. BATTERY The starter motor will need a Battery of 16 ampere hours with a high discharge rate. The cables supplying power from the battery to the starter motor should be of as short a length as practicable and should be at least 8 flexible multi-strand cables POWER SOURCE: The Simonini Victor 2 /Victor 2 Plus / Victor 2 Super engine is fitted with a Ducati generator coil, which outputs 170 watts of alternating current. The Ducati rectifier cum regulator supplied with the engine converts this electrical power output from AC to DC The rectifier / regulator outputs 13.8 volts DC. This output is then routed to the battery fitted into the aircraft. Ensure that a 15 amp fuse is fitted in line between the battery and the regulator RELAY FOR POWER SUPPLY TO STARTER: The starter relay (or solenoid) which can be supplied, with the engine must be securely mounted at a suitable place as close to the starter and battery as possible FUSE: A 15 amp fuse (no fuse should be rated greater than the smallest cable in the fused circuit) must be installed between the battery charging circuit and the main power terminal. 29
35 14.4 TYPICAL WIRING DIAGRAM NOTE: All wiring is 25 mm 2 (16 A) with the exemption of the fuel pump and 12 V dc feed wiring which is 4 mm 2 (25 A) Ignition, fuel pump ancillaries wiring diagram 30
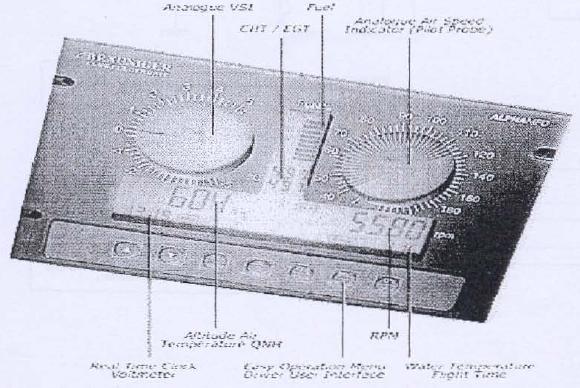
36 15. INSTRUMENTS The Victor 2 / Victor 2 Plus / Victor 2 Super engine has two separate cylinders and two separate cylinder heads inline. Each cylinder head carries 2 spark plugs. Each cylinder head feeds into the heat dissipater/coolant carrier tubes. The coolant temperature is measured on the top heat dissipater tube. Each cylinder has one exhaust pipe. The Exhaust Gas Temperature is measured at the exhaust manifold MINIMUM INSTRUMENTS REQUIRED WITH THE ENGINE: RPM counter to measure Engine Speed. Two EGT Gage to measure Exhaust Gas Temperatures at the exhaust manifold on each cylinder. Water Temperature Gauge to measure Coolant Temperature located on the top heat dissipater. Engine Hour Meter : This is essential to keep records of how many hours the engine has to run before the next service or check. Voltage / Ampere Gauge to indicate battery charge, this is necessary to ensure that the alternator is charging the battery when the engine is running. The battery must be able to supply power to the electric starter to start the engine when required. We suggest you could use the Alpha Multi Function Display (MFD) instrument with this engine. It has been specifically designed to use the connection on the 12-pole flywheel generator used on the Ducati CDI Systems. The Tachometer on the Alpha MFD measures the frequency of the pulses provided by one of the transducers supply winding where it is connected. This instrument also provides all the information required in flight and on the ground after the flight for the pilot owner to enter into the aircraft and engine log books. Be informed you can also use a simple runs indicator, connected to the grey wire. 31
37 32
38 16. SPECIAL OPERATION CONDITION If you are operating from water, i.e. float planes, beware of the following risks and take adequate protection measures: Water ingestion into the air filters in takeoff and landing due to spray and splash. Use good quality air filters (K and N type filter recommended for the Bing carburetors but in some Countries they use different air filters with a large surface which increase the performance), with the correct oil impregnation. Dry filter paper elements will absorb water causing the carburetion mixture to become over-rich resulting in loss of power. Corrosion due to water, salt-water operations will cause more corrosion than non-salt water, so ensure that you wash the aircraft and engine (when cold) after salt-water operations. Submersion in water of entire aircraft and or engine will spoil your day! 16.1 ENGINE MOUNTED INSIDE COWLING: When the engine is mounted inside a cowling you must ensure that the cowl inlet is not restricted and the exit area is double the inlet area. All the airflow entering the cowling should flow onto and thru the radiator to ensure optimum cooling. There should be no leakage of air between the inlet and exit on cowling, i.e. the radiator should not be starved of air throughput. There should be a minimum difference in air pressure between the air inlet and air exit. Extreme changes in temperature and humidity due to climatic changes can cause carburetor icing, vapor lock in fuel lines, overheating, etc. These climatic changes may cause changes in carburetor calibration and may require a change of jets, needles, etc. 33


39 17. LIQUID COOLING SYSTEM: The Simonini Victor 2 / Victor 2 Plus / Victor 2 Super engine is liquid cooled. The engine is equipped with an integral water pump, the water pump is belt driven. The coolant is pumped around the cylinders and cylinder heads under pressure from the water pump. There are 2 finned heat dissipaters which route the coolant water to and from the radiator. The top heat dissipater is fitted with a thermostat designed to open at 57 C. The other end of the top heat dissipater is to be fitted with the coolant temperature sender. The WATER PUMP DRIVE BELT must be checked for condition and tension before every 100 hours. WATER PUMP SHOWN WITH DRIVING BELT, COVER PLATE AND HOSE PIPES. Radiator Filler / Expansion Bottle with Pressure Cap. The radiator fitted to the Victor 2 /Victor 2 Plus / Victor 2 Super engine must be between 1000 to 1100 cm² radian surface areas. The radiator mountings and security must be ensured before every flight. The coolant should be a mixture of 70% water and 30% anti-freeze suitable for aluminum. If necessary, change the anti-freeze percentage to ensure the effective cooling. The maximum coolant temperature must not exceed 75 C. If on takeoff the coolant temperature exceeds 50 C. You must reduce power until the temperature drops below 50 C. 34

40 The radiator filler/ expansion bottle is of the pressure relief type with an over flow tube. Ensure that the overflow tube is routed into a bottle to capture any coolant, which may overflow due to expansion. 18. AIR FILTERATION SYSTEM The Victor 2 / Victor 2 Plus / Victor 2 Super engine has one air filter on each carburetor intake. The air filter is made from a special fabric enclosed inside a wire mesh cage. The air filters must be clean and oiled with light filter oil. The filter oil prevents moisture from clogging the filter cloth. Check the Air Filters every 50 hours for dirt and clean with filter detergent and water and re-oil if necessary. Stop: Disconnect spark plugs leads for all maintenance and inspection procedures also ensure that all ignition switches are grounded and the battery master switches are turned off. A clogged or dirty air filter can: 1. Change the fuel / air mixture and may make starting the engine difficult. 2. Make the fuel / air mixture rich causing the plugs to foul up. 35
41 3. Cause the engine to consume more fuel than normal. 4. Cause excessive carbon build-up. 19. MAINTENENCE SCHEDULES: Warning: Maintenance on engines and systems requires special knowledge and tools. It is recommended that you have a qualified person do the maintenance on the engine or take it to the authorized service centre or dealer. Service times are based on average use; assuming engine is run at least once per week for a normal operation cycle or flight. Total time before tear down is determined by the frequency and conditions of usage. The Victor 2 / Victor 2 Plus / Victor 2 Super is a very low maintenance engine, about every 150 hours using. Use the chart below as an aid. Do not overlook anything that you may find is necessary to check and replace on your particular aircraft and engine combination. It is your responsibility to check that the electrical and fuel systems around the engine are in perfect working order DESCRIPTION OF CHECKS Engine Hours Gearbox oil check X X X X X X X X X X X X X X Gearbox oil Replace X X X X X X X Gearbox Springs and Shim check, Replace if Required X X Spark plugs, check and Re-gap X X X X X X X X X X X X X X Spark Plugs Replace X X X X X X Carb. Needles, Jets, Pistons check for wear. Replace if necessary X X X Carb. Rubber Hoses, check and Replace if Required X X X X X X Carb. Air filter Clean X X X X X X X X X X X X Water Pump Drive Belt, check Condition/Replace X X X X X X X X X X X X Rubber Coupling Drive Shaft Replace X X Reed Valve Replace X X Replace Radiator Coolant X X X X X X Check Small End/Big End Bearing Play Within Limits X X X X X X 36
42 Carbon Build up, check, if More than 1.5mm, decoke Major Overhaul of complete engine X X X 19.2 INITIAL START-UP PROCEDURE: Your engine has been run in at the factory. However, after installation in your aircraft and prior to starting for the first time please use the checklist provided for initial start-up. 1 Check Engine is secure in its mounting system. Check all bolts, washers and nuts are correctly fastened with proper torque and wire-locked where required. 2 Check all electrical connections are secure and correctly made. 3 Check all fuel connections are secure and correctly made. 4 Check all Temperature senders are secure and correctly made. 5 Check Radiator is secure and filled with sufficient coolant. Check radiator cap is securely fastened and safety-locking wire fitted. 6 Check Gear Box filled with sufficient oil EP 140 type. 7 Check torque of the oil level Allen screw is 10Nm 8 Check Oil filler / heat dissipater screw is Fastened and it s torque is 20 Nm 9 Check oil drain plug is fastened with torque of 20 Nm 10 Check sufficient fuel and oil mixture is filled in the fuel tank. 11 Check both carburetors are securely fitted. Both the idle screw adjusters must be used to obtain an 8 mm gap under the throttle piston passage when viewed from the air-filter side. Refit Air filters. 12 Check the two airscrews so that they are equal at 1 to 1¼ turn open. 13 Check the battery is fully charged to enable the electric starter to turn. 14 Check aircraft is chocked and brakes applied. Ensure that the propeller slipstream will not damage anything nor hurt anyone. 15 Prime the carburetors by either hand primer or electric fuel pump. 16 Keep throttle lever in aircraft closed. Apply full choke. 17 Engage starter motor for not more than 5 seconds. 18 When engine fires, wait for 5 seconds to close choke lever so the engine runs smoothly. 19 Warm the engine up for 2 minutes and stabilize the RPM at about rpm. Check exhausts Gas Temperatures on both exhausts. They should stabilize and the difference should not exceed 20 C between the 2 cylinders 20 Wait for the coolant temperature to reach 50 C. 21 At maximum power and rpm the exhaust gas temperature should not exceed 600/620 C. 22 Run the engine at various power settings for 10 minutes. Monitor the engine instruments continuously. If any of the indicators go outside the permissible operating parameters, shut down 37
43 the engine immediately. 23 When testing is completed check everything on the engine for leaks and security of Fixing, etc STORAGE PROCEDURE If the engine is not going to be used for a period of 2 months or more, use the following procedure for storage: 1. Start the engine and remove the air filters from the carburetors. 2. Spray 2-stroke oil that you use in the petrol oil mixture directly in to the carburetor throat until the engine stalls. This will ensure that all the parts in the crankcase and the top and bottom conrod bearings are well lubricated. 3. Reinstall the air filters and after the engine has cooled down cover it with suitable covers. You may also cover the exhaust opening with suitable cover to stop foreign material from entering. 20. CHECK FOR CARBON BUILD-UP AND RING CONDITION 1. After 300 hours of engine operations remove the exhaust manifolds and check for carbon build-up around the piston rings. 2. Remove the spark plugs and shine a light thru the hole in the cylinder head to check for dark brown color of carbon build-up. 3. You only need to de-carbonize the engine every 300 hours. This will coincide with the gearbox service internal. If on observation you find that there is no sign of carbon forming, you will not need to open the cylinders and decoke. 4. However, the use of mineral oil or fuels with additives may cause carbon to build-up sooner. 5. Take precautions to prevent personal injury, i.e. safety goggles, etc. 38
44 21. GEARBOX MAINTENANCE The Simonini "C" Type Gear Box is a very low maintenance item. 1. Change the oil in the gearbox after the first 10 hours of operation. 2. Thereafter check oil level every 50 hours or if the aircraft has not been flown for more than 2 months, before the next flight. 3. The next oil change is to be done after 100 hours of operation or once every 12 months whichever is earlier. 4. Replace the coupling "donut" after 300 hours of operation, when the gear box is opened for service. Oil quantity required for gearbox: Drive shaft above crankshaft.170cc Drive shaft below crankshaft.225cc Oil type to be used is 90W / EP 140. Stop: Please dispose of used oil in an oil disposal unit. Think about the environment! 39
45 22. TORQUE DATA: M12 STARTER FLY WHEEL 70NM M8 WATER PUMP BODY 22NM M8 STARTING STATOR COIL SUPPORT 23NM M8 STARTER MOTOR 23NM M8 CYLINDER HEAD 23NM M8 CYLINDER BASE 23NM M6 REDUCTION GEAR BOX COVER 10NM M8 REDUCTION FLANGE 23NM M8 REDUCTION SEMI-BOX 23NM M8 REDUCTION CRUSE 30NM M10 RUBBER FLEXIBLE COUPLING (DONUT) 60NM M12 REDUCTION GEAR NUT 70NM M6 GEAR BOX OIL LEVEL INDICATOR 10NM - GEAR BOX OIL FILTER / HEAT DISSIPATER 20NM - GEAR BOX OIL DRAIN PLUG 20NM 23. WEAR LIMITS: PISTONS WITH NEW CYLINDERS AT ASSEMBLY WEAR LIMIT BETWEEN CYLINDER AND PISTON MAXIMUM CYLINDER CONICAL LEVEL MAXIMUM OVALISATION DATUM POINT TO MEASURE PISTON IS 12/13 mm FROM mm 0.15 mm 0.04 mm 0.04 mm MANTLE BASE DRIVE SHAFT NEW AT ASSEMBLY OUT OF CENTRE DRIVE SHAFT USED, AT ASSEMBLY AFTER SERVICE AXIAL CRANKSHAFT CLEARANCE RESILIENT RUBBER "DONUT" AT ASSEMBLY 0.01 mm 0.04 mm 0.03 mm mm 40
46 24. TECHNICAL DATA 24.1 DESCRIPTION Two stroke, two cylinders, and oil in fuel premix lubrication, water-cooled with integrated water pump and electric starter. Dual Ignition, Bing Carburetors, Reed Valves and Tuned exhaust pipes. Specification Victor 2 Victor 2 Plus Victor 2 Super BORE 80mm x 2 80mm x 2 82mm x 2 STROKE 72mm x 2 76mm x 2 76mm x 2 DISPLACEMENT 724cc 764cc 802cc COMPRESSION RATIO 9.5 TO TO TO 1 POWER OUTPUT 92 hp 6100 rpm X 102 hp 6200 rpm X 110 hp 6200 rpm X MAX TORQUE Kgm Kgm N/A MAX RPM 6200 RPM 6200 RPM N/A MAX. CYLINDER CONICAL LEVEL 0.4mm 0.4mm 0.4mm MAX.OVALISATION 0.4mm 0.4mm 0.4mm ROTATION DIRECTION CYLINDER MATERIAL PISTON MATERIAL PISTON-CYLINDER CLEARANCE Counter clockwise, viewed toward PTO without reduction gearbox Aluminum with Nicasil Ceramic Coating Aluminum with silicon Maximum 0.15mm 41
47 24.2 TEMPERATURE: CHT measured under the spark plug C (NORMAL) 120 C (MAXIMUM) Difference between 2 cylinders. 20 C EGT measured at each exhaust manifold At cruise power C (NORMAL) At maximum power at max speed. 620 C (MAXIMUM) Difference between 2 cylinders *. 20 C Water / Coolant Temperature C (NORMAL) Measured at heat dissipater. 80 C (MAXIMUM) * The exhausts Gas Temperatures are more reliable when the engine is stabilized at full power or cruise power 42
48 24.3 IGNITION AND GENERATOR SYSTEM Breaker-less DUCATI capacitor discharge dual ignition with magneto generator. GENERATOR OUTPUT W 6000 RPM, 13.5V RMS AC RECTIFICATION... DUCATI RECTIFIER REGULATOR BATTERY CHARGING... DUCATI RECTIFIER REGULATOR IGNITION TIMING mm (18 ) BTDC SPARK PLUG... NGK B9ES TWO ON EACH CYLINDER 24.4 FUEL SYSTEM: CARBURETOR. TWO BING 36 mm FOR VICTOR2 AND VICTOR2PLUS, TWO BING 38mm FOR VICTOR2SUPER WITH CABLE CHOKES AND AIR FILTERS FUEL PUMP *. MIKUNI PNEUMATIC FUEL PUMP FUEL. UNLEADED GASOLINE OR AVGAS LUBRICATION OF ENGINE. PREMIX TWO STROKE OIL IN GASOLINE 2.5% OIL BY VOLUME TO LEADED FUEL 3% OIL BY VOLUME TO UNLEADED FUEL * ADDITIONAL ELECTRIC FUEL PUMP MAY BE REQUIRED, SEE INSTALLATION NOTES 43
49 24.5 OTHER INFORMATION LUBRICATION OF REDUCTION GEARBOX... GEAR OIL API-GL4, SAE l40 EP OR 85W-140 EP DIRECTION OF PROPELLER SHAFT... CLOCKWISE VIEWED TOWARD PROPELLER FLANG STARTER... SIMONINI ELECTRIC STARTER 24.6 STANDARD VERSION INCLUDE SIMONINI VICTOR 2 / VICTOR 2 PLUS /VICTOR 2 SUPER ENGINE WITH: 1. SIMONINI REDUCTION GEAR BOX TYPE "C" 2. SIMONINI ELECTRIC STARTER (INTEGRAL) 3. BING 54 (VICTOR2 AND VICTOR2PLUS) /58 (VICTOR2SUPER) CARBURETOR 2 4. AIR FILTER S. DUCATI TWIN ELECTRONIC IGNITION SYSTEM (INTEGRAL) 6. NGK SPARK PLUGS 4 7. DUCATI RECTIFIER / REGULATOR 8. MIKUNI PNEUMATIC FUEL PUMP 9. SIMONINI EXHAUST SYSTEM 12. SIMONINI WATER PUMP (INTEGRAL) 24.7 WEIGHT ENGINE 52 KG INCLUDING: Reduction gearbox type "C" and oil, electric starter, 2 air filters, 2 carburetors, exhaust system, radiator. 44
50 25. OPERATING LIMITATION The Victor 2 / Victor 2 Plus / Victor 2 Super engine is to be operated within the operating limitations listed below. DESCRIPTION LIMITATION NOT TO EXCEED Cylinder Head Temp 120 C Exhaust Gas Temp 580 C Radiator Coolant Temp 80 C Gear Box Inertia RPM Min And Max Max Continuous RPM Max Fuel Pressure Time Between Overhaul 2200 Min 6500 Max 600RPM 0.3BAR / 4.35 psi 600 HOURS 26. WARRANTY CONDITION 1. Simonini F1ying SRL as the manufacturer warrants through their authorized distributors from the date of sale to the first customer, every Simonini Victor 2 / Victor 2 Plus / Victor 2 Super non-certified aircraft engine, sold as new and unused (except for running in procedures done by Simonini Flying SRL) and delivered by an authorized Simonini Flying SRL distributor, for a period of the earliest of: One year from shipment by Simonini The first 500 operational hours from date of first purchase for private- owners. 2. Simonini Flying SRL will, at its option, repair and or replace components defective in material and or workmanship under normal use and service with genuine Simonini components without charge for parts or labor during the warranty period. All parts replaced under the warranty will become the property of Simonini Flying SRL. 3. You must present to an authorized Simonini Flying distributor or service centre the hard copy of the Simonini Flying warranty registration card and or proof of purchase delivered to customer from the selling dealer at the time of purchase. 45
51 4. Exclusions are not covered by warranty: Normal wears on all items Replacement parts and or accessories, which are not Simonini Flying parts and or accessories Damage resulting from installation of parts other than genuine Simonini Flying parts. Damage caused by failure to provide proper maintenance as detailed in the Operators Manual. The labor, parts and lubricants cost of all maintenance services including tune-ups and adjustments will be charged to owner. Aircraft engines designed and or used for racing or commercial purposes. All optional accessories installed on aircraft engine. Damage resulting from running the aircraft engine without propeller. Damage resulting from modification to the engine not approved in writing by Simonini Flying. Damage caused by electrolysis. Cold seizure and piston scuffing. Use of a gear reduction not designed by Simonini Flying. Use of propellers, which exceed the inertia and balance limits as specified by Simonini Flying. If engine instruments recommended by Simonini Flying have not been used. Losses occurred by the aircraft engine owner other than the parts and labor, but not limited to mounting and dismounting of the engine from the aircraft, such as loss of use, transportation, towing, telephone calls, taxis, or any other incidental or consequential damage. Damage resulting from accident, fire or other casualty, misuse, abuse or neglect. Damage / rust / corrosion, premature wear to engine caused by water ingestion. Damage resulting from sand / stones infiltration. Damage resulting from any foreign material ingestion. Damage resulting from service by an unqualified mechanic. 46
TECHNICAL DATA. COMPRESSION RATUI 9,5/1 WEIGHT ready to fly CONSUMPTION at 5400RPM 5,6litres/h POWER at 6200RPM
 VICTOR 1 SUPER This handbook aims to bring to the attention of key technical, functional and maintenance of your motor VICTOR 1. Read carefully the following pages, will be synonymous with safety, reliability
VICTOR 1 44hp VICTOR 1 PLUS 48hp VICTOR 1 SUPER 54hp
 VICTOR 1 44hp VICTOR 1 PLUS 48hp VICTOR 1 SUPER 54hp This handbook aims to bring to the attention of key technical, functional and maintenance of your motor VICTOR 1. Read carefully the following pages,
Accident Prevention Program
 Accident Prevention Program Part I ENGINE OPERATION FOR PILOTS by Teledyne Continental Motors SAFE ENGINE OPERATION INCLUDES: Proper Pre-Flight Use the correct amount and grade of aviation gasoline. Never
WEBER CARBURETOR TROUBLESHOOTING GUIDE
 This guide is to help pinpoint problems by diagnosing engine symptoms associated with specific vehicle operating conditions. The chart will guide you step by step to help correct these problems. For successful
Counter-clockwise, view to output shaft Mixture 1:50, 2-stroke-oil, fuel min. 95 octane (RON)
") HIRTH 2703 Carburated - 55 hp The 2703 V is an air cooled, piston controlled 2-cylinder-inline-2-stroke engine with one or two carburetors and Nikasil coated cylinders. It has one of the highest power
HIRTH 2703 Carburated - 55 hp The 2703 V is an air cooled, piston controlled 2-cylinder-inline-2-stroke engine with one or two carburetors and Nikasil coated cylinders. It has one of the highest power
KING CANADA 950W PORTABLE GENERATOR MODEL: KCG-951G INSTRUCTION MANUAL COPYRIGHT 2011 ALL RIGHTS RESERVED BY KING CANADA TOOLS INC.
 KING CANADA 950W PORTABLE GENERATOR MODEL: KCG-951G INSTRUCTION MANUAL COPYRIGHT 2011 ALL RIGHTS RESERVED BY KING CANADA TOOLS INC. WARRANTY & SERVICE INFORMATION 1-YEAR LIMITED WARRANTY FOR THIS 950W
INSTALLATION MANUAL FOR JABIRU 5100 AIRCRAFT ENGINE
 INSTALLATION MANUAL FOR JABIRU 5100 AIRCRAFT ENGINE This Manual has been prepared as a guide to correctly install the Jabiru 5100 engine into an airframe. Should you have any questions or doubts about
Counter-clockwise, view to output shaft Mixture 1:50, 2-stroke-oil, fuel min. 95 octane (RON)
") HIRTH 2703 Carburated - 55 hp The 2703 V is an air cooled, piston controlled 2-cylinder-inline-2-stroke engine with one or two carburetors and Nikasil coated cylinders. It has one of the highest power
HIRTH 2703 Carburated - 55 hp The 2703 V is an air cooled, piston controlled 2-cylinder-inline-2-stroke engine with one or two carburetors and Nikasil coated cylinders. It has one of the highest power
Operation and Maintenance Instructions for the RAPTOR 178
 WWW.SKYTOY.COM Operation and Maintenance Instructions for the RAPTOR 178 See www.skytoy.com for updates and service bulletins. 2/1/2011 1. Parts Schematic:... 3 2. Muffler Assembly Diagram:... 4 3. Muffler
26 - COOLING SYSTEM CONTENTS ENGINE COOLING - DESCRIPTION... 3 ENGINE COOLING - OPERATION... 9 COOLING SYSTEM FAULTS... 1
 26 - COOLING SYSTEM CONTENTS Page LAND ROVER V8 DESCRIPTION AND OPERATION ENGINE COOLING - DESCRIPTION... 3 ENGINE COOLING - OPERATION... 9 FAULT DIAGNOSIS COOLING SYSTEM FAULTS... 1 REPAIR COOLANT - DRAIN
MINI2PLUS/01 RECTIFIER RE-CHARGE BATTERY MINI2PLUS/36 BEARINGS SPACER MINI2PLUS/02 COIL MINI2PLUS/37 PULLEY SEEGER MINI2PLUS/03 KIT SCREWS FOR HEAD
 TECHNICAL DATA BORE 66,4mm STROKE 58mm DISPLACEMENT 202 cc COMPRESSION RATIO 10,5/1 Weight ready to fly 18,300 kg CONSUMPTION AT 5000RPM 2,5litres/hour POWER 7500RPM 26hp STATIC THRUST Over 80Kg Lamellar
Service Instruction ENGINE COMPONENTS, INC.
 Title: Service Instruction S.I. No.: 89-5-1 Page: 1 of 5 Issued: 05/05/89 Revision: 1 (09/01/01) Technical Portions of FAA DER Approved. FAILURE OF ENGINE TO START 27 points 1. Lack of fuel 2. Ignition
HIRTH 2703 Carburated - 55 hp
 HIRTH 2703 Carburated - 55 hp The 2703 V is an air cooled, piston controlled 2-cylinder-inline-2-stroke engine with one or two carburetors and Nikasil coated cylinders. It has one of the highest power
IMPORTANT INFORMATION
 Table of Contents IMPORTANT INFORMATION Section 1B - Maintenance MAINTENANCE 1 B Specifications........................... 1B-1 Special Tools........................... 1B-2 Mercury/Quicksilver Lubricants
9.7 Replacement of the compressed air distributor
 9.6.6 9.6.7 screw in the bolt and to increase unscrew the bolt. For a complete rotation of the bolt, the variation is of 1mm. After measuring the pointer position and the compensatory adjustment screw
COLT 2310, 2510, AND 2712 COM PACT TRACTORS CHAPTER 9 TROUBLESHOOTING AND ANALYSIS
 COLT 2310, 2510, AND 2712 COM PACT TRACTORS CHAPTER 9 TROUBLESHOOTING AND ANALYSIS 9-A-1 UPON RECEIVING ANENGINE FORRE- PAIR. Learn the history of the unit from the customer. While the customer is present
HIRTH 3203 Carburated - 65 hp
 HIRTH 3203 Carburated - 65 hp 2706-65Hp engine shown with fan cooling HIRTH s most popular engine. The 3203 produces more horsepower and torque per pound than any other engine in its power class. Hirth
World Formula TECH MANUAL
 World Formula TECH MANUAL Section 1 General Rules 1. Only stock Briggs & Stratton World Formula Model # 124435-8101 will be used in this class except as provided in this Tech manual. All parts will be
solo KLEINMOTOREN GMBH
 Engine 2 489 the Engine SOLO type 2 489 Serial - no.... Manufactured... Aircraft - type... Registration no.... Owner... Log of revisions no. edition date revised page no. date of entry edition 1 revised
HOT WASHER MODEL NO: KING 125 OPERATION & MAINTENANCE INSTRUCTIONS PART NO: LS1009
 HOT WASHER MODEL NO: KING 125 PART NO: 7320170 OPERATION & MAINTENANCE INSTRUCTIONS LS1009 INTRODUCTION Thank you for purchasing this Hot Washer. This machine is a portable, high pressure power washer,
SPECIFICATIONS TEST AND ADJUSTMENT SPECIFICATIONS SPECIFICATIONS ENGINE FD620D, K SERIES
 ENGINE FD620D, K SERIES SPECIFICATIONS SPECIFICATIONS TEST AND ADJUSTMENT SPECIFICATIONS Engine Oil Pressure Sensor Activates............................... 98 kpa (14.2 psi) Oil Pressure While Cranking
SPECIFICATIONS TEST AND ADJUSTMENT SPECIFICATIONS SPECIFICATIONS ENGINE FD620D, K SERIES
 TEST AND ADJUSTMENT Engine Oil Pressure Sensor Activates............................... 98 kpa (14.2 psi) Oil Pressure While Cranking (Minimum).......................... 28 kpa (4 psi) Oil Pressure.....................................
INDEX INTRODUCTION. Reference No L-01 REVISED:
 12-21L-01 1 1 INTRODUCTION We are constantly working on technical improvement of our products. For this reason, technical data, equipment and design are subject to change without notice. All specifications
Please read this manual before using.
 HKS700E Please read this manual before using. Engine S/N: 2014 February Ver.7.00 ASTM F2339 HKS CO.,LTD 7181 KITAYAMA FUJINOMIYA SHIZUOKA JAPAN 418-0192 FAX: +81-(0)544-54-1410 E-MAIL: aircraft-engine@hks-power.co.jp
Maintenance Instruction 23.1
 Subject: Replacement of engine GROB 2500 E1/D1 by engine LIMBACH L 2400 EB1.AA Affected Aircraft: Motor glider GROB G 109 (B) Aircraft: Type G 109 (B) Registration Propeller: Type MTV-1-A/L160-03 Serial
720W PORTABLE GENERATOR
 720W PORTABLE GENERATOR MODEL NO: G720 PART NO: 8857800 OPERATION & MAINTENANCE INSTRUCTIONS LS0214 INTRODUCTION Thank you for purchasing this CLARKE 720W Portable Generator Before attempting to use this
BASIC INSTRUCTIONS SHIFTER KZ1 / KZ2 e X30 SHIFTER-TaG
 BASIC INSTRUCTIONS SHIFTER KZ1 / KZ2 e X30 SHIFTER-TaG FEEDING: by fuel mixture 98NO (min. 95NO) and 4% oil (CIK homologated). ATTENTION: the engine is supplied without oil in the gearbox. GEARBOX OIL
Manual for Engine 2350 C M A N U A L. for the. Engine SOLO Type 2350 C. Serial No.:.. Manufactured :..
 M A N U A L the Engine SOLO Type 2350 C Serial No.:.. Manufactured :.. List of changes to the manual No. Issue Page Date of filing 1 13. January 1985 Ha1-1 n/a 2 16. November 2005 Ha 3-1 n/a 3 16. November
INDEX TECHNICAL SPECIFICATIONS 2 SPECIAL TOOLS 3-4 PERIODIC MAINTENANCE 5 LUBRICANTS 6 TROUBLESHOOTING 7-14 TIGHTENING TORQUE TABLE 15
 INDEX TECHNICAL SPECIFICATIONS 2 SPECIAL TOOLS 3-4 PERIODIC MAINTENANCE 5 LUBRICANTS 6 TROUBLESHOOTING 7-14 TIGHTENING TORQUE TABLE 15 ENGINE DISASSEMBLY 16-24 ENGINE REASSEMBLY 25-37 SPECIAL 3-SHOE CLUTCH
SERVICE DATA CHAIN SAW ECHO: CS-500ES STAGE MODEL. (Serial number : and after) CONTENTS INTRODUCTION
 CONTENTS INTRODUCTION") 01-50D-01 1 0 SERVICE DATA CHAIN SAW ECHO: STAGE MODEL (Serial number : 37000001 and after) INTRODUCTION We are constantly working on technical improvement of our products. For this reason, technical data,
01-50D-01 1 0 SERVICE DATA CHAIN SAW ECHO: STAGE MODEL (Serial number : 37000001 and after) INTRODUCTION We are constantly working on technical improvement of our products. For this reason, technical data,
IMPORTANT INFORMATION
 Table of Contents IMPORTANT INFORMATION Section 1B - Maintenance MAINTENANCE 1 B Specifications................................ 1B-1 Special Tools................................ 1B-2 Quicksilver Lubricant/Sealant..................
Please read this manual before using.
 HKS700E Operations Manual Please read this manual before using. Engine S/N: 1999 July Ver.2.00 HKS CO.,LTD 7181 KITAYAMA FUJINOMIYA SHIZUOKA JAPAN 418-0192 TEL 0544-54-1781 FAX 0544-54-1410 hks_aviation@hks-power.co.jp
Instruction Manual SPE-26CC
 Instruction Manual SPE-26CC 1 Safety Precautions This engine is for experienced flyers only and could cause serious harm if used incorrectly. Always take care when running large gas engines. Read this
WORKSHOP MANUAL. Chainsaw GS35 GS350 MT350 MT3500
 WORKSHOP MANUAL Chainsaw GS35 GS350 MT350 MT3500 General failures analysis Suggested tools I. Emak tool kit II. Compression tester: to check thermal group III. Electronic tachometer: for 2 and 4 stroke
solo KLEINMOTOREN GMBH
 Engine 2625 01 the Engine SOLO type 2625 01 Serial - no.... Manufactured... Aircraft - type... Registration no.... Owner... Log of revisions no. edition date revised page no. date of entry 1 Oktober 3
12. CARBURETOR 12-0 CARBURETOR VITALITY 50
 12 12 CARBURETOR SERVICE INFORMATION (2-STROKE)... 12-2 SERVICE INFORMATION (4-STROKE)... 12-3 THROTTLE VALVE (2-STROKE)... 12-5 CARBURETOR (2-STROKE)... 12-7 AIR SCREW ADJUSTMENT (2-STROKE)... 12-13 REED
AIR COMPRESSOR OPERATING INSTRUCTION AND PARTS LIST
 AIR COMPRESSOR OPERATING INSTRUCTION AND PARTS LIST BELT TYPE IMPORTANT PLEASE MAKE CERTAIN THAT THE PERSON WHO IS TO USE THIS EQUIPMENT CAREFULLY READS AND UNDERSTANDS THESE INSTRUCTIONS BEFORE STARTING
SERVICE DATA CHAIN SAW CS-450. (Serial number : and after) CONTENTS INTRODUCTION. Reference No B-01 REVISED: ISSUED:
 CONTENTS INTRODUCTION. Reference No B-01 REVISED: ISSUED:") 01-45B-01 1 0 SERVICE DATA CHAIN SAW (Serial number : 36000001 and after) INTRODUCTION We are constantly working on technical improvement of our products. For this reason, technical data, equipment and
01-45B-01 1 0 SERVICE DATA CHAIN SAW (Serial number : 36000001 and after) INTRODUCTION We are constantly working on technical improvement of our products. For this reason, technical data, equipment and
Name Date. True-False. Multiple Choice
 Name Date True-False T F 1. Oil film thickness increases with an increase in oil temperature. T F 2. Displacement is the volume that a piston displaces in an engine when it travels from top dead center
1100W PORTABLE GENERATOR
 1100W PORTABLE GENERATOR MODEL NO: G1200 PART NO: 8010110 OPERATION & MAINTENANCE INSTRUCTIONS LS0312 INTRODUCTION Thank you for purchasing this CLARKE 1100W Portable Generator. Before attempting to use
00-36A-04 CS-350T, CS-350TES, CS-350WES 1
 00-36A-04,, 1 0 INTRODUCTION We are constantly working on technical improvement of our products. For this reason, technical data, equipment and design are subject to change without notice. All specifications,
SERVICE DATA CHAIN SAW ECHO: CS-352ES STAGE MODEL. (Serial number : and after) CONTENTS INTRODUCTION
 CONTENTS INTRODUCTION") 01-34D-01 1 0 SERVICE DATA CHAIN SAW ECHO: STAGE MODEL (Serial number : 37000001 and after) INTRODUCTION We are constantly working on technical improvement of our products. For this reason, technical data,
01-34D-01 1 0 SERVICE DATA CHAIN SAW ECHO: STAGE MODEL (Serial number : 37000001 and after) INTRODUCTION We are constantly working on technical improvement of our products. For this reason, technical data,
26cc 4.5 KWA Marine Engine
 26cc 4.5 KWA Marine Engine Thank you for purchasing your new Venom 26cc 4.5 KWA Marine Engine. Not only did you purchase a top of the line R/C Marine Engine but you have also joined the Venom Team and
SECTION 6A1-2 - ENGINE MECHANICAL - V6 SUPERCHARGED
 SECTION 6A1-2 - ENGINE MECHANICAL - V6 SUPERCHARGED CAUTION: This vehicle will be equipped with a Supplemental Restraint System (SRS). A SRS will consist of either seat belt pre-tensioners and a driver
INSTRUCTION MANUAL GASOLINE BRUSH CUTTER TR L. 42.7cc. 1.3 kw. 450 mm. Note : Read and carefully before using this machine
 INSTRUCTION MANUAL GASOLINE BRUSH CUTTER TR15142 Note : Read and carefully before using this machine 42.7cc 1.3 kw 450 mm 18" 0.70 L MANUAL SAFETY SYMBOLS AND IMPORTANT INFORMATION This symbol accompanied
SECTION 4 - FUEL/LUBRICATION/COOLING
 For Arctic Cat Discount Parts Call 606-678-9623 or 606-561-4983 SECTION 4 - FUEL/LUBRICATION/COOLING 4 TABLE OF CONTENTS Carburetor Specifications... 4-2 Carburetor Schematic... 4-2 Carburetor... 4-3 Cleaning
Engine Does Not Start or Is Hard to Start Cause of Trouble. 1. Open the drain screw, and check Fuel not supplied (1) Fuel tank empty
 Fuel tank empty") 20. Engine Does Not Start or Is Hard to Start 20-1 Engine Output Insufficient 20-2 Poor Performance at Low Speed and Idling 20-3 Poor Performance at High Speed 20-3 Unsatisfactory Operation 20-4 Fuel Gauge
20. Engine Does Not Start or Is Hard to Start 20-1 Engine Output Insufficient 20-2 Poor Performance at Low Speed and Idling 20-3 Poor Performance at High Speed 20-3 Unsatisfactory Operation 20-4 Fuel Gauge
SERVICE BULLETIN NEW MAINTENANCE SCHEDULE, CHECKLIST AND ENGINE PRESERVATION FOR ROTAX ENGINE TYPE 275, 501, 505, 535 SB SB
 MANDATORY SERVICE BULLETIN NEW MAINTENANCE SCHEDULE, CHECKLIST AND ENGINE PRESERVATION FOR ROTA ENGINE TYPE 275, 501, 505, 535 SB-505-010 SB-535-009 Repeating symbols: Please, pay attention to the following
Manual. Engine SOLO type i
 for the Engine SOLO type Serial - no.... Manufactured... Aircraft - type... Registration no.... Owner... Log of revisions no. Edition date revised page no. date of entry 1 01.09.2010 1-9 01. September
3. INSPECTION/ADJUSTMENT
 3 3 INSPECTION/ADJUSTMENT SERVICE INFORMATION -------------------------------------------- 3-1 MAINTENANCE SCHEDULE ---------------------------------------- 3-2 FUEL LINE/FUEL FILTER -------------------------------------------
13. FUEL SYSTEM/CARBURETOR/
 13 FUEL SYSTEM/CARBURETOR/FUEL PUMP FUEL SYSTEM --------------------------------------------------------- 13-1 SCHEMATIC DRAWING ---------------------------------------------- 13-2 OPERATION OF CARBURETOR
Typical Install Instructions
 Typical Install Instructions Read & understand all steps of these instructions before beginning this installation. WEBER Conversion Kit, VW T-1/2, up to 1835cc 32 / 36 DFEV Weber Carburetor These instructions
AN EXPLANATION OF CIRCUITS CARTER YH HORIZONTAL CLIMATIC CONTROL CARBURETER
 AN EXPLANATION OF CIRCUITS CARTER YH HORIZONTAL CLIMATIC CONTROL CARBURETER The Carter Model YH carbureter may be compared with a Carter YF downdraft carbureter with the circuits rearranged to operate
ENGINE LUBRICATION & COOLING SYSTEMS SECTIONLC CONTENTS. ENGINE LUBRICATION SYSTEM...2 Precautions...2
 ENGINE LUBRICATION & COOLING SYSTEMS SECTIONLC CONTENTS ENGINE LUBRICATION SYSTEM...2 Precautions...2 LIQUID GASKET APPLICATION PROCEDURE...2 Preparation...2 SPECIAL SERVICE TOOLS...2 Lubrication Circuit...3
FUEL SYSTEM/CARBURETOR/FUEL PUMP
 13 FUEL SYSTEM/CARBURETOR/FUEL PUMP FUEL SYSTEM-------------------------------------------------------------------------------------13-1 SCHEMATIC DRAWING-------------------------------------------------------------------------13-2
Gasoline Inverter Generator
 user manual Gasoline Inverter Generator table of contents Preface Introduction... Safety Information Exhaust fumes are poisonous... Fuel is highly flammable and poisonous... Engine and muffler may be hot...
Instructions for SAITO FA-200R3 (AAC) 4-Stroke Engine
 4-Stroke Engine") Instructions for SAITO FA-200R3 (AAC) 4-Stroke Engine We would like to express our sincere thanks for your purchase of the SAITO FA-200R3 engine. Please read our instructions carefully and treat your engine
Instructions for SAITO FA-200R3 (AAC) 4-Stroke Engine We would like to express our sincere thanks for your purchase of the SAITO FA-200R3 engine. Please read our instructions carefully and treat your engine
~. a~' ~ ( I o~~~ 4-0. ~Sj~' AO~ i/~ CB1000C (ij)aon'da in-ib) ~ "" ~ ~!~~P. ~ J N m (6-12 kg-em,
aon'da in-ib) ~ ~ ~!~~P. ~ J N m (6-12 kg-em,") e V ~. a~' ~ I ~ J C t \"" 8.0- ( I o~~~ ~ "" ~ ~. ~!~~P. C8 0 & 0,-t. ~ CB1000C (ij)aon'da 0.6-1.2 N m (6-12 kg-em, 5-10 in-ib) 4-0 / 4.0-6.0 N m (40-60 kg-em, 35-52 in-i b) t$ "'07~ / c;:::/ j ~Sj~'
e V ~. a~' ~ I ~ J C t \"" 8.0- ( I o~~~ ~ "" ~ ~. ~!~~P. C8 0 & 0,-t. ~ CB1000C (ij)aon'da 0.6-1.2 N m (6-12 kg-em, 5-10 in-ib) 4-0 / 4.0-6.0 N m (40-60 kg-em, 35-52 in-i b) t$ "'07~ / c;:::/ j ~Sj~'
WORKSHOP MANUAL. 63,4 cm³ chainsaws
 WORKSHOP MANUAL General failures analysis Suggested tools I. Emak tool kit II. Compression tester: to check thermal group III. Electronic tachometer: for 2 and 4 stroke engines, measurement range from
GP 123. Great Power Model Engines
 Great Power Model Engines www.gp-engine.com.tw GP 123 Displacement: 123C.C Output: 13hp Bore: 46.5mm Weight: 2300g RPM Range: 1000~7200 Recommend Gasoline Octane Number: 89~92 (R+M)/2) Warranty: 2 years
Racing Performance Catalog & Reference Guide Model/Type:
 Version 4/08 Racing Performance Catalog & Reference Guide Model/Type: 124435 8105-01 Table of Contents SAFETY... 1 WORLD FORMULA General Specs...3 Special Tools...3 Torque Specs...3 Racing Specifics...3
FUEL SYSTEM. Table of Contents. Specifications. Section 3A Fuel Delivery System. Models 6/8/9.9/10/15 CARBURETOR SPECIFICATIONS
 FUEL SYSTEM Section 3A Fuel Delivery System Table of Contents Specifications............................. 3A-1 WMC Carburetor Specifications............. 3A-2 WMC Carburetor Specifications.............
00-33A-01 CS-330T, CS-360T 1
 00-33A-01 CS-330T, CS-360T 1 0 INTRODUCTION We are constantly working on technical improvement of our products. For this reason, technical data, equipment and design are subject to change without notice.
SERVICE DATA. CS-310 (Serial number : ) (Serial number : ) CHAIN SAW 01-30A-00 CS CONTENTS INTRODUCTION
 (Serial number : ) CHAIN SAW 01-30A-00 CS CONTENTS INTRODUCTION") 01-30A-00 CS-310 1 0 SERVICE DATA CHAIN SAW CS-310 (Serial number : 11000001-11999999) (Serial number : 12000001-12999999) INTRODUCTION We are constantly working on technical improvement of our products.
01-30A-00 CS-310 1 0 SERVICE DATA CHAIN SAW CS-310 (Serial number : 11000001-11999999) (Serial number : 12000001-12999999) INTRODUCTION We are constantly working on technical improvement of our products.
SERVICE DATA CHAIN SAW ECHO: CS-280WES STAGE MODEL. (Serial number : and after) CONTENTS INTRODUCTION. Reference No B-00 ISSUED:
 CONTENTS INTRODUCTION. Reference No B-00 ISSUED:") 00-27B-00 1 0 SERVICE DATA CHAIN SAW ECHO: STAGE MODEL (Serial number : 37000001 and after) INTRODUCTION We are constantly working on technical improvement of our products. For this reason, technical data,
00-27B-00 1 0 SERVICE DATA CHAIN SAW ECHO: STAGE MODEL (Serial number : 37000001 and after) INTRODUCTION We are constantly working on technical improvement of our products. For this reason, technical data,
Rotax 447 CDI - 40 HP
 Rotax 447 CDI - 40 HP 999-667...Info Pak...$10.00 Refundable with purchase of engine 447 UL-1V : 39.6 HP @ 6300 447 UL-2V : 41.6 HP @ 6500 2 Cylinder / 2 Stroke Piston Ported, fan cooled, electronic single-ignition,
INSPECTION/ADJUSTMENT
 3 3 INSPECTION/ADJUSTMENT SERVICE INFORMATION----------------------------------------------------------------------- 3-1 MAINTENANCE SCHEDULE-------------------------------------------------------------------
WORKSHOP MANUAL TECHNICAL NETWORK LEADERSHIP WORKSHOP MANUAL 125 CC/150 CC 4-STROKE ENGINE
 WORKSHOP MANUAL TECHNICAL NETWORK LEADERSHIP WORKSHOP MANUAL - 5 CC/50 CC 4-STROKE ENGINE Workshop manual Technical network leadership TABLE OF CONTENTS TABLE OF CONTENTS TABLE OF CONTENTS... CHARACTERISTICS...
1200W INVERTER GENERATOR
 1200W INVERTER GENERATOR MODEL NO: IG1200 PART NO: 8877070 OPERATION & MAINTENANCE INSTRUCTIONS LS0117 INTRODUCTION Thank you for purchasing this CLARKE 1200W Inverter Generator. Before attempting to use
5. FUEL SYSTEM 5-0 FUEL SYSTEM UXV 500
 5 FUEL SYSTEM 5 SERVICE INFORMATION------------------------------------------------ 5-02 TROUBLESHOOTING----------------------------------------------------- 5-03 FUEL TANK -----------------------------------------------------------------
TILLOTSON LTD., CLASH INDUSTRIAL ESTATE, TRALEE, CO. KERRY, IRELAND PHONE: FAX:
 TILLOTSON LTD., CLASH INDUSTRIAL ESTATE, TRALEE, CO. KERRY, IRELAND PHONE: +353 66 7121911 FAX: +353 66 7124503 e-mail: sales@tillotson.ie SERIES SERVICE MANUAL INTRODUCTION The gasoline engine industry
Manual. Engine SOLO type 2350
 the Engine SOLO type 2350 Serial - no. Manufactured Aircraft - type... Registration no.... Owner... Log of revisions no. edition date revised page no. date of entry 1 November 16 th, 2005 1 November 16
ENGINE DRIVEN 3 FULL TRASH PUMP
 ENGINE DRIVEN 3 FULL TRASH PUMP MODEL NO: PF75 PART NO: 7230165 OPERATION & MAINTENANCE INSTRUCTIONS ORIGINAL INSTRUCTIONS LS0117 ISS 2 INTRODUCTION Thank you for choosing this Clarke Pump. The function
CARBURETOR SERVICE INFORMATION TROUBLESHOOTING THROTTLE VALVE DISASSEMBLY THROTTLE VALVE INSTALLATION...
 11 CARBURETOR SERVICE INFORMATION... 11-2 TROUBLESHOOTING... 11-2 THROTTLE VALVE DISASSEMBLY... 11-3 THROTTLE VALVE INSTALLATION... 11-4 CARBURETOR REMOVAL... 11-5 AUTO BYSTARTER... 11-6 FLOAT CHAMBER...
1) Scheduled maintenance checks
 Scheduled maintenance checks") 1) Scheduled maintenance checks Definition This section lists the periodic inspections which must be carried out after a specified periods of operation. Intervals Periodic inspections are those which must
1) Scheduled maintenance checks Definition This section lists the periodic inspections which must be carried out after a specified periods of operation. Intervals Periodic inspections are those which must
Aqua Scooter- Triton. Operations Manual
 Aqua Scooter- Triton Operations Manual Contents Technical Data... 3 Shell Components... 3 Propane Kit Components... 4 Technical Specifications... 5 Preparing the Machine... 6 Before Use... 6 Propane Kit
Reproduction. Not for. Briggsracing.com. CORPORATION Briggs & Stratton Corporation MS /08
 Briggsracing.com MS-5702-4/08 BRIGGS&STRATTON CORPORATION Post office box 702 Milwaukee, WI 53201 USA 414 259 5333 2008 Briggs & Stratton Corporation Version 4/08 Racing Performance Catalog & Reference
SERVICE DATA GT-220ES SRM-220ES TRIMMER/BRUSHCUTTER. (Serial nember : and after) (Serial nember : and after) INDEX INTRODUCTION
 (Serial nember : and after) INDEX INTRODUCTION") 10-21P-02, 1 1 SERVICE DATA TRIMMER/BRUSHCUTTER INTRODUCTION We are constantly working on technical improvement of our products. For this reason, technical data, equipment and design are subject to change
10-21P-02, 1 1 SERVICE DATA TRIMMER/BRUSHCUTTER INTRODUCTION We are constantly working on technical improvement of our products. For this reason, technical data, equipment and design are subject to change
GP-123 Owner s Manual
 GP-123 Owner s Manual www.geme.com.tw Please read these instructions carefully before operating the engine Technical Specifications Item Data Item Data Bore 46.5 mm RPM Range 1500-8900 RPM Net Weight 2300
SECTION 3.00 WARNING WARNING ENGINE STARTUP AND SHUTDOWN PRESTART INSPECTION
 SECTION 3.00 ENGINE STARTUP AND SHUTDOWN PRESTART INSPECTION Be sure that the clutch, circuit breaker, or other main power transmission device is disconnected. Generators develop voltage as soon as the
Air Compressor. Operating & Maintenance Instructions 1110 ENGINE DRIVEN - 1 -
 Air Compressor ENGINE DRIVEN Operating & Maintenance Instructions 1110-1 - Read these safety instructions before using the equipment. INTRODUCTION Thank you for purchasing this Clarke portable compressor.
Portable Electric/Gas Compressor Operating Instructions
 Portable Electric/Gas Compressor Operating Instructions NOTICE Carefully read this instruction manual before attempting to operate this compressor. MODEL # SERIAL # 1-800-551-2406 TABLE OF CONTENTS Safety
February 26, ch.12.notebook. Ch. 12. Preventative Maintenance and Troubleshooting. Feb 23 5:03 PM
 Ch. 12 Preventative Maintenance and Troubleshooting Feb 23 5:03 PM 1 Why PM? preventive maintenance certain maintenance tasks must be performed regularly to keep an engine working properly helps premature
Chapter 5 Part B: Ignition system - transistorised type
 5B 1 Chapter 5 Part B: Ignition system - transistorised type Contents Coil - testing........................................... 9 Distributor - overhaul..................................... 7 Distributor
USER S MANUAL for M19Y / BLACK MAGIC
 USER S MANUAL for M19Y / BLACK MAGIC Distributed by: JPX ITALIA Production Plant: Via Falcone 4, 42021 Barco di Bibbiano (RE) Italy Phone:(39)0522-246544 Fax:(39) 0522-246169 www.jpxitalia.com e-mail jpxitalia@jpxitalia.com
5-2 FUEL SYSTEM AND THROTTLE BODY FUEL SYSTEM FUEL DELIVERY SYSTEM The fuel delivery system consists of the fuel tank, fuel pump, fuel filters, fuel f
 FUEL SYSTEM AND THROTTLE BODY 5-1 FUEL SYSTEM AND THROTTLE BODY I CONTENTS FUEL SYSTEM 5-2 FUEL DELIVERY SYSTEM 5-2 FUEL PUMP 5-3 FUEL PRESSURE REGULATOR 5-4 FUEL INJECTOR 5-4 FUEL PUMP CONTROL SYSTEM
solo service Service-manual For the aircraft engines solo solo solo i
 solo service Service-manual For the aircraft engines solo solo solo i solo Kleinmotoren GmbH Stuttgarter Str. 41 D 71069 Sindelfingen Tel.: (0049) 7031-3010 Fax.: (0049) 7031 301195 Edition 2 dated October
SECTION 6 2 SERVICE PROCEDURES AND SPECIFICATIONS. Engine. Specifications
 SERVICE PROCEDURES AND SPECIFICATIONS Engine SECTION 6 2 Specifications........................................... 170 Fuel.................................................... 172 Facts about engine oil
HOW - TO EMISSION CONTROL BASICS EMISSION CONTROL BASICS
 HOW - TO EMISSION CONTROL BASICS EMISSION CONTROL BASICS Tool And Material Checklist Bore Brush Thermometer Portable Vacuum Pump Screwdriver Combination Wrench Set 3/8 Drive Socket Set Tachometer Rag Service
SMQGZ F-02 PORTABLE WATER PUMP QGZ F INSTRUCTION MANUAL
 SMQGZ40-35-144F-02 PORTABLE WATER PUMP QGZ40-35-144F INSTRUCTION MANUAL The following information relates to protecting YOUR SAFETY and PREVENTING EQUIPMENT PROBLEMS. To help you recognize this information.
SERVICE DATA TRIMMER/BRUSHCUTTER ECHO: SRM-236ES STAGE MODEL. (Serial number : and after) INTRODUCTION CONTENTS
 INTRODUCTION CONTENTS") 10-21V-00 SRM-236ES 1 * 1 SERVICE DATA TRIMMER/BRUSHCUTTER ECHO: SRM-236ES STAGE MODEL (Serial number : 37000001 and after) INTRODUCTION We are constantly working on technical improvement of our products.
10-21V-00 SRM-236ES 1 * 1 SERVICE DATA TRIMMER/BRUSHCUTTER ECHO: SRM-236ES STAGE MODEL (Serial number : 37000001 and after) INTRODUCTION We are constantly working on technical improvement of our products.
DIRECT-DRIVE PRESSURE WASHERS
 DIRECT-DRIVE PRESSURE WASHERS PJG SERIES PRESSURE WASHER MANUFACTURED BY: PJG-2002B PJG-2502-6.5B PJG-3002B PJG-4002B INTRODUCTION Thank you for purchasing a Mancorp Pressure Washer. This manual covers
OWNER S MANUAL G620PU-1 MODEL: G620PU WARNING 848H4893A3 (704)
") 848H4893A3 (704) OWNER S MANUAL MODEL: G620PU G620PU-1 WARNING Do not modify any parts of the engine. This engine is designed to be used to Radio controlled products. In case any modification by customer,
848H4893A3 (704) OWNER S MANUAL MODEL: G620PU G620PU-1 WARNING Do not modify any parts of the engine. This engine is designed to be used to Radio controlled products. In case any modification by customer,
Systems Operation Testing and Adjusting
 KENR6225-01 April 2008 Systems Operation Testing and Adjusting 402D-403D-404D Industrial Engine GG (Engine) GH (Engine) GJ (Engine) GK (Engine) GL (Engine) GM (Engine) GN (Engine) GP (Engine) GQ (Engine)
AIRCRAFT GENERAL KNOWLEDGE (1) AIRFRAME/SYSTEMS/POWERPLANT
 AIRFRAME/SYSTEMS/POWERPLANT") 1 In flight, a cantilever wing of an airplane containing fuel undergoes vertical loads which produce a bending moment: A highest at the wing root B equal to the zero -fuel weight multiplied by the span
1 In flight, a cantilever wing of an airplane containing fuel undergoes vertical loads which produce a bending moment: A highest at the wing root B equal to the zero -fuel weight multiplied by the span
User Manual EOS EOS 100 Booster - EOS 100 Booster ICI
 User Manual EOS 100 - EOS 100 Booster - EOS 100 Booster ICI Introduction Thank you for having purchased an EOS 100 / EOS 100 Booster / ICI engine! It can proudly be said that most probably the EOS engine
SERVICE DATA POWER PRUNER ECHO: PPF-300ES ECHO: PPT-300ES. (Serial number : and after) CONTENTS INTRODUCTION
 CONTENTS INTRODUCTION") 17-28A-00, 1 1 SERVICE DATA We are constantly working on technical improvement of our products. For this reason, technical data, equipment and design are subject to change without notice. All specifications
17-28A-00, 1 1 SERVICE DATA We are constantly working on technical improvement of our products. For this reason, technical data, equipment and design are subject to change without notice. All specifications
INTRODUCTION. Reference No S-01 REVISED:
 10-21S-01 GT-225, SRM-225 1 1 INTRODUCTION We are constantly working on technical improvement of our products. For this reason, technical data, equipment and design are subject to change without notice.
Elmendorf Aero Club Aircraft Test
 DO NOT WRITE ON THIS TEST FEB 2013 Elmendorf Aero Club Aircraft Test Cessna 172RG For the following questions, you will need to refer to the Pilots Information Manual for the C-172RG and the Auxiliary
file://c:\programdata\proquestms\partsmanagerpro\print\ ~13~11~5.html
 C60TLRZ 00 file://c:\programdata\proquestms\partsmanagerpro\print\8-9-0 ~~~5.html Page of 6 8/9/0 C60TLRZ 00 / TOP COWLING 0 Yamaha Motor Corporation, U.S.A. All rights reserved. C60TLRZ 00 file://c:\programdata\proquestms\partsmanagerpro\print\8-9-0