Important information about your new a/c system. Please read the following directions prior to installing this a/c system.
|
|
|
- Amy Wood
- 6 years ago
- Views:
Transcription

1 PAGE 1 Important information about your new a/c system. Please read the following directions prior to installing this a/c system. PN s: CK , CK , CK , CK7586SBC, CK-7486NC Jeep CJ Series Aftermarket Air Conditioning Installation instructions Contact us by or phone if you need any assistance or information regarding this a/c system SALES@NACKITS.COM *Jeep Wrangler is a registered Trademark of Daimler Chrysler Corporation
2 Important information about your system, and warranty DO NOT ADD ANY OIL TO ANY PART OF THE SYSTEM. DO NOT USE THE SIGHT GLASS TO CHARGE THE SYSTEM. DO NOT OVERCHARGE THE SYSTEM. Th Kit is designed to work with R134a refrigerant, not any other refrigerant (freon). The system has been designed and tested using R134a refrigerant. The systems performance with this freon was as expected. Vent temperature of F Degrees, and a high side pressure reading at psi. The system should not exceed 250psi on the high side, and the low side will stabilize if all is installed correctly. WE NEED THE HIGH SIDE GAUGE READING IN ORDER TO HELP WITH ANY PROBLEMS. The system needs to be evacuated for maximum performance. The system will take 1.50 lbs of R134a refrigerant, or two cans. You want the high side to be psi when the system is on and the Jeep is idle. DO NOT ADD DYE TO CHECK THE SYSTEM. WE HAVE HAD PROBLEMS WITH THE EXPANSION VALVES GETTING CLOGGED. If you have a problem with the system we ask to call before diagnosing or changing any parts. We can fix problems easier if the system is not tampered with. If you have a warranty claim you need to call prior to shipping any parts back. OUR POLICY IS TO GET THE OLD PART BACK PRIOR TO SHIPPING ANY NEW PARTS OUT. We are not responsible for the following: Clogged expansion valve from too much oil, or dye Cracked compressors from improper installation Compressor with broken valves from overcharging of oil or refrigerant Burned up clutches from to high of head pressure We will be here to serve you seven days a week by phone and / or Please contact us if you need assistance
3 PAGE 2 IMPORTANT INFORMATION ABOUT THE INSTALLATION FOR THE CJ A/C KIT Evaporator / Blower Unit information: Prior to installing your evaporator unit, make sure the blower motor spins without rubbing the case. The motor gets knocked around in shipping and may move. If the wheel is rubbing, loosen the clamp and re-center the motor. Wiring information: In order to make the installation process less complex we have simplified the wiring for this a/c system. There are only three wires to hook up. A test light will be used to hook up one wire. 1) Wire with a fuse inline. This wire hooks into an ignition source, a hot wire with the key on. Use the test light to find this source. 2) Wire with an inline plug. The inline plug goes to the switch on the drier, from the plug in the drier to the compressor. DON T HOOK THIS UP UNTIL YOU CHARGE THE SYSTEM. 3) Ground wire, there will be one wire on the blower motor that is not plugged in. Ground this wire to the chassis. (Normally Yellow or Red)
4 PAGE 3 Important information about your system, and warranty DO NOT ADD ANY OIL TO ANY PART OF THE SYSTEM. DO NOT USE THE SIGHT GLASS TO CHARGE THE SYSTEM. DO NOT OVERCHARGE THE SYSTEM. The YJ Kit is designed to work with R134a refrigerant, not any other refrigerant (freon). The system has been designed and tested using R134a refrigerant. The systems performance with this freon was as expected. Vent temperature of F Degrees, and a high side pressure reading at psi. The system should not exceed 250psi on the high side, and the low side will stabilize if all is installed correctly. WE NEED THE HIGH SIDE GAUGE READING IN ORDER TO HELP WITH ANY PROBLEMS. The system needs to be evacuated for maximum performance. The system will take 1.50 lbs of R134a refrigerant, or two cans. You want the high side to be psi when the system is on and the Jeep is idle. DO NOT ADD DYE TO CHECK THE SYSTEM. WE HAVE HAD PROBLEMS WITH THE EXPANSION VALVES GETTING CLOGGED. If you have a problem with the system we ask to call before diagnosing or changing any parts. We can fix problems easier if the system is not tampered with. If you have a warranty claim you need to call prior to shipping any parts back. OUR POLICY IS TO GET THE OLD PART BACK PRIOR TO SHIPPING ANY NEW PARTS OUT. We are not responsible for the following: Clogged expansion valve from too much oil, or dye Cracked compressors from improper installation Compressor with broken valves from overcharging of oil or refrigerant Burned up clutches from to high of head pressure We will be here to serve you seven days a week by phone and / or Please contact us if you need assistance
5 PAGE 4 Parts List Compressor with Oil PN: Compressor adapter CK-7486NC PN: GM1600 Evaporator Unit PN: Drier PN: High Low Pressure switch PN: Binary Pig Tail PN: Condenser PN: Engine Mount kit with belt CK PN: 8005 CK PN: 8011 CK-8795SBC Depends on engine specs, per customers setup CK-8795 NC No compressor bracket Hardware bag kit PN: Includes: Two grommets 12 self tapping screws #6,8,10 orings Cork tape Evap. Support Bracket Drain Tube Hose strap Wire straps Hose Kit PN:HK-920 R-134a Sticker PN: SZ100 Directions

6 PAGE 5 Step One 1. Disconnect the Negative cable first and then Positive Battery Cable. 2. Remove the Ashtray from underneath the dashboard. Slide the ashtray out of the holder in order to remove all the screws. 3. Leave all the wires going to the ashtray connected if possible, or disconnect and reconnect after the installation. Step Two Installing the Evaporator 1. Attach the Ashtray to the unit, using the three holes on the bottom side of the unit. Mounting holes for the ashtray. 2. Place the evaporator inside the vehicle. Locate the mounting holes on the bottom of the dashboard. After locating all the holes use the self-tapping screws to


7 PAGE 6 mount the unit to the bottom of the dashboard. BE SURE TO SECURE EVERY HOLE WITH A SCREW. 3. The original wires on the ashtray will hookup, as they were before you added the a/c. (if the ashtray is present in the Jeep) The lighter may have to go on the other side of the unit (passenger side). 4. Attach the steel L shaped bracket to the firewall to support the unit. This bracket secures the unit from hitting the gas pedal. 5. The bracket is going to sit next to the gas pedal, about one inch to the right of it as seen in the picture. Figure 2.3

8 PAGE 7 6. Pull the carpet back on the passenger side and locate the area for the hoses to go through the firewall. The holes will have to be drilled with a 1.25 hole saw. The center of the first hole will be two inches under the heater box and two inches two the right of the transmission tunnel curve. The second hole will be two inches to the right of the first hole. 7. Insert the two rubber grommets at this time. Lube may be needed to feed the larger a/c line through the grommet. 8. Attach the drain tube to the evaporator unit. A 5/8 will have to be drilled into the floor to the left of the first grommet. Put some tape around the drain tube at the point it goes through the floor, this will help to not severe the tube, from rubbing on the bare metal. BE SURE NOT TO DAMAGE THE TRANSMISSION.

9 PAGE 8 Step Three Installing the Drier 1. If the switch is not attached to the drier, attach it at this time. The switch only goes on hand Tight use a wrench to tighten it. BE SURE TO ONLY SNUG THE SWITCH. 2. On the passenger side inner fender well near the front of the jeep is where the drier will mount. Be sure to mount the drier on the flat surface of the inner fender well. With two self tapping screws secure the drier to the inner fender well. IN as printed on the top of the drier. RADIATOR 3. The switch of the drier can be installed on either side. The important part of the drier is that the IN marked on the top faces the front of the Jeep.

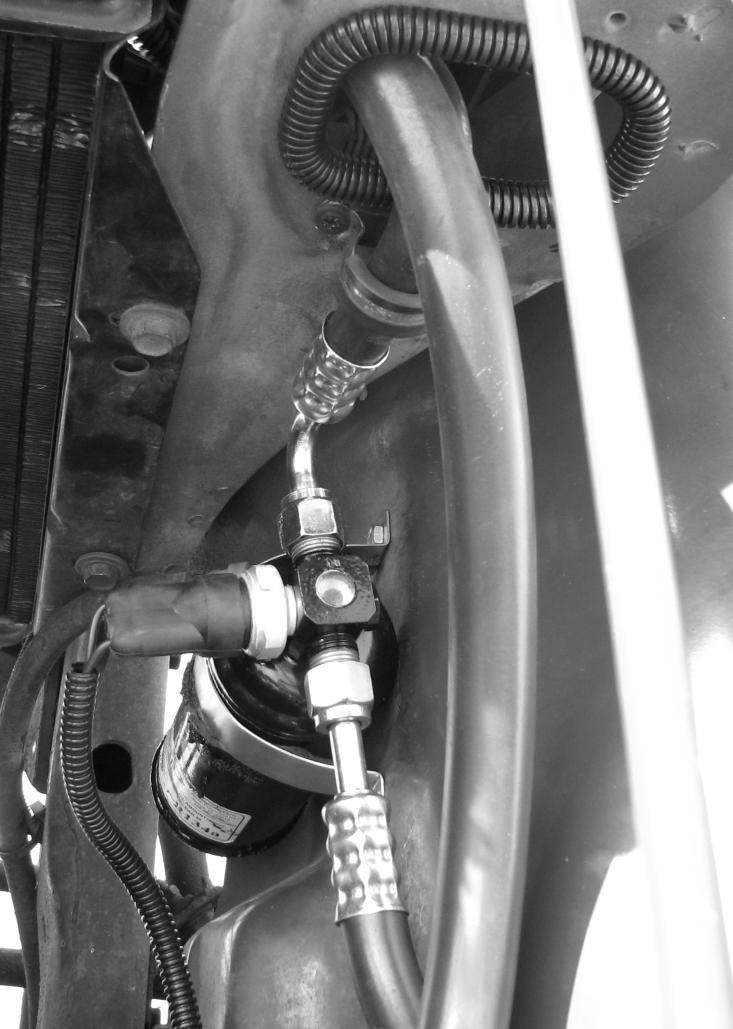
10 PAGE 9 Step Four Installing the condenser 1. There is not a direct fit in condenser for a CJ. We use the largest universal condenser in this vehicle. The condenser brackets can be bent by hand or in a vice. 2. Drain the radiator into a clean drain pan. 3. Remove the radiator fan shroud from the radiator. 4. Remove the radiator. 5. With the radiator out of the Jeep place the condenser in the Jeep. Align the condenser so it is centered with the core support. 6. The condenser has to be placed in the CJ so the fittings are on the passenger side and the LARGE FITTING IS AT THE TOP. 7. Cut a condenser mount so there are three holes on the top and bottom, repeat this step so you have two small brackets. 8. Attach the two small brackets to the second hole (across the top rail) on each end. 9. Use the self tapping screws to attach the condenser to the radiator core support. 10. After the condenser is secured in the Jeep you can make the lower brackets. These two brackets need to be bent into a L so they can attach to the flat part of the radiator core support. 11. Place the lower bracket against the radiator to find the bend to attach the bottom part of the condenser. Bend both brackets the same. 12. Attach the lower brackets to the condenser across the bottom rail. The brackets will attach to the second hole from the end.

11 PAGE We recommend attaching the hoses to the condenser before reinstalling the radiator. 14. Once the hoses are attached reinstall the Radiator, and shroud 15. Fill the Radiator with the antifreeze and water. You may have to run the Jeep in order to fill the radiator to its full capacity. Step Five Installing the compressor mount and compressor 1. This kit is designed to work with many different engine combinations; Please use the directions supplied with the mount kit to install the mount, compressor and belt. 2. The compressor can be mounted with the fittings on the side or straight up. 3. The compressor (if purchased with the kit) will be full of oil. DO NOT ADD OIL TO THE SYSTEM.

12 PAGE If you have a 304 / 360 engine you will not need any additional pulleys. The original setup used two belts on the compressor. The new compressor does not require that kind of tension. One belt will run the alternator; the other belt will run the compressor. Step Six Connecting the Hoses 1. The hoses on this kit are not pre-made. 2. The smallest hoses are # 6, the 13/32 hose is # 8, and the large hose ½ is # 10. The number 10 hose will run from the compressor to the evaporator. The number eight hose will go from the compressor to the condenser. The number six hose will go from the condenser to the drier, and the second hose will go from the drier to the evaporator. BE SURE TO PUT O-RINGS ON ALL CONNECTIONS. 3. The hose ends crimped to the hose. Any major a/c store, and some parts stores can do this, it requires a hose-crimping tool. 4. The hoses can be measured w/o crimping the fittings. When all the hoses are cut to length with the correct fittings attached, crimp the lines. On the large hose that runs through the firewall, install the grommet onto the hose prior to crimping the lines. 5. Be sure to install the o-rings on all the fittings, oil is not necessary on the o-rings.


13 Make sure the hoses do not rub any metal. Securing them with tie straps is recommended. PAGE 12
14 PAGE 13
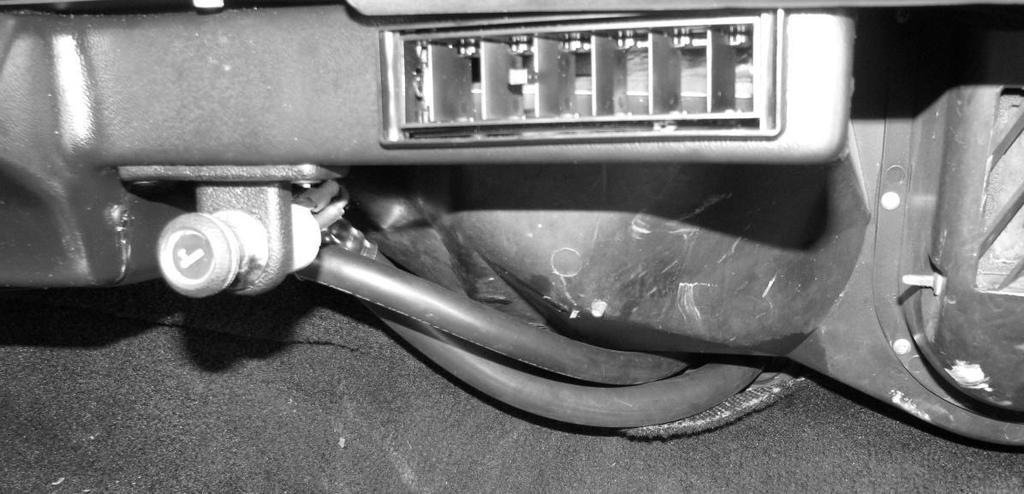
15 PAGE 14 Step Seven Finishing the installation 1. Wiring the system: This system only needs three wires to hook up the system. 2. The first wire is a red wire with an inline fuse. This is an ignition wire. Find a source that gets power with the key on, and splice / plug it into that connection. 3. The second wire is a ground wire on the blower motor. The ground wire will be yellow with a black wire plugged into it. The black wire has a loop connector on the end. Ground the loop connector to a screw on the firewall. 4. The last wire is the high low pressure switch / compressor wire. This wire has a bullet connector that allows you to unplug it to get it through the firewall. Drill a 3/16 hole or find a spare hole in the firewall to run this wire out to the engine compartment. Route the wire behind the engine, plug the round plug onto the switch on the drier, any way you cannot hook it up wrong. Plug the other end to the compressor. DO NOT TURN THE A/C ON UNTIL THE SYSTEM IS CHARGED. 5. Use the supplied hose hold-downs to keep the hoses from rubbing on moving parts; this can cause a leak in the system. 6. Place the supplied a/c system sticker to the bottom of the hood. 7. The system requires 1.5 lbs of R-134a refrigerant. Do not use substitutes, dyes, or oil mixed refrigerants. This completes the installation process. If you need any assistance please feel free to contact our technical support team by phone or . We thank you again for the business. Nostalgic AC 2124 S. Pine Ave Unit#200 Ocala, Florida sales@nackits.com

16 PAGE 15 Supplement Gas Pedal Adjustment * On some Wranglers the gas pedal has a tall piece of metal above the hole that the gas pedal cable goes through. If your Wrangler has this long pedal arm you are going to have to cut it down to clear the blower housing. We recommend cutting it down 3/16 above the large hole. See the attached pictures for a clear illustration.
Jeep Wrangler TJ 4.0 LITER Installation instructions
 www.jeepair.com 2000-2001 Jeep Wrangler TJ 4.0 LITER Installation instructions Important information about your system, and warranty DO NOT ADD ANY OIL TO ANY PART OF THE SYSTEM. DO NOT USE THE SIGHT GLASS
Jeep Wrangler 4.0 Liter TJ Jeep Wrangler 2.5 Liter TJ Installation instructions
 TM www.jeepair.com 1999 Jeep Wrangler 4.0 Liter TJ 1999-2001 Jeep Wrangler 2.5 Liter TJ Installation instructions Kit Information After 1994 every vehicle was designed for R134a refrigerant. The Jeep kit
Jeep Wrangler TJ 4.0 LITER Installation instructions
 www.jeepair.com 2002-2004 Jeep Wrangler TJ 4.0 LITER Installation instructions Kit Information These directions are for 2002-2006 model Jeep Wranglers. After 1994 every vehicle was designed for R134a refrigerant.
Jeep Wrangler TJ. Complete Air Conditioning System. Slide Control Head. Installation instructions
 WWW.JEEPAIR.COM 1996-1998 Jeep Wrangler TJ Complete Air Conditioning System Slide Control Head Installation instructions Kit Information After 1994 every vehicle was designed for R134a refrigerant. The
INSTALLATION INSTRUCTIONS
 INSTALLATION INSTRUCTIONS Accessory Application Publications No. AIR CONDITIONER CIVIC 2- AND 4-DOOR AII 24158 Issue Date SEP 2002 What s New The installation instructions for the 2003 Civic A/C are the
1. Disconnect the battery. This is important! This will prevent air bag deployment.
 PARTS PACKING LIST Evaporator assembly Drain tube Plastic air plug Hardware package 11040 3601 W. Clarendon Phoenix, Arizona 85019 (602) 233-0090 800-648-4475 www.ackits.com 2003-4 Jeep Wrangler EVAPORATOR
PERFECT FIT IN-DASH HEAT/ COOL/ DEFROST FORD FAIRLANE & CROWN VICTORIA
 PERFECT FIT IN-DASH HEAT/ COOL/ DEFROST 1955-56 FORD FAIRLANE & CROWN VICTORIA CONTROL & OPERATING INSTRUCTIONS The controls on your new Perfect Fit system, offer complete comfort capabilities in virtually
PERFECT FIT SERIES IN-DASH HEAT/ COOL/ DEFROST MUSTANG
 specializing in AIR CONDITIONING, PARTS AND SYSTEMS for your classic vehicle PERFECT FIT SERIES IN-DASH HEAT/ COOL/ DEFROST 1969-70 MUSTANG CONTROL & OPERATING INSTRUCTIONS The controls on your new Perfect
Rzr Heater System Part #
 Rzr Heater System Part # 2878135 NOTE: This heater unit installs below the center of the dash. If you have a radio mount kit (Polaris Part # 2876897) you may need to cut the top front corner off the mount
RetroAir JAGUAR XKE S1-3.8 LHD FULL KIT CONTENTS:
 RetroAir JAGUAR XKE S1-3.8 LHD FULL KIT 2-12-2011 CONTENTS: 1- Custom Design Evaporator Case &Core Assembly 1- Universal Bracket (installed) Evaporator Pak includes: 2-Custom Brackets; 2-1-¼ Grommets;
Chevrolet Truck Install Instructions. This kit is designed for the Chevrolet or GMC trucks without factory air conditioning.
 1967-1972 Chevrolet Truck Install Instructions This kit is designed for the 1967-1972 Chevrolet or GMC trucks without factory air conditioning. Glove box Heater box Heater box firewall cover Controls and
CLASSIC UPDATE WIRING KIT
 by Randy Irwin 1955-57 CLASSIC UPDATE WIRING KIT Randy Irwin - Technical Writer Randy has been involved in the Chevy parts business for over 25 years. He is a wizard at creating, making and modifying custom
1963 GEN IV SUREFIT VINTAGE AIR CONDITIONING INSTALLATION
 by Randy Irwin 1963 GEN IV SUREFIT VINTAGE AIR CONDITIONING INSTALLATION Randy Irwin - Technical Writer Randy has been involved in the Chevy parts business for over 30 years. He is a wizard at creating,
1969 CAMARO VCZ-A
 969 CAMARO w/o FACTORY AIR 55070-VCZ-A 8865 GOLL ST. - SAN ANTONIO, TX. - 78266 ph.20-654-77 - fax 20-654-33 905070-VCZ-A /22/05, 69 CAMARO w/o FAC. AIR INSTRUCTIONS PG OF 20 969 CAMARO w/o FACTORY AIR
INSTALLATION INSTRUCTIONS
 28 INSTALLATION INSTRUCTIONS SECTION - AIR SPRING SECTION 2 - AIR ACCESSORY 2-5 ! IMPORTANT PLEASE DON T HURT YOURSELF, YOUR KIT OR YOUR VEHICLE. TAKE A MINUTE TO READ THIS IMPORTANT INFORMATION. This
& 76 CHEVROLET NOVA HEATER ONLY
 specializing in AIR CONDITIONING, PARTS AND SYSTEMS for your classic hi l PERFECT FIT IN-DASH HEAT/ COOL/ DEFROST 1969-74 & 76 CHEVROLET NOVA HEATER ONLY CONTROL & OPERATING INSTRUCTIONS The controls on
I. Before starting installation
 5. Park the vehicle on a clean, dry, flat, level surface and block the tires so the vehicle cannot roll in either direction. A. Disconnect battery cables 1. Disconnect the negative cable first, then the
CHEVROLET CORVETTE
 Suggested Installation Instructions for: 658-133 and 658-134 1968-1976 Air Conditioning Retro-Fit System 1968-76 CHEVROLET CORVETTE CONTROL & OPERATING INSTRUCTIONS The controls on your new Perfect Fit
INSTALLATION INSTRUCTIONS 97 FORD EXPEDITION
 INSTALLATION INSTRUCTIONS 97 FORD EXPEDITION 1. Read the instructions completely and carefully before you begin. Check the kit for proper contents (refer to the part s list and the picture diagrams). Before
2017+ L5P Duramax 3 ½ Down Pipe & EGR Fix Kit
 2017+ L5P Duramax 3 ½ Down Pipe & EGR Fix Kit Covers installation of PN s: WCF100630, WCF100829 Note: This Kit is for off road competition use only! Off Road Competition Use Tuning & Exhaust System is
Installation Instructions
 2011-2013 LML DURAMAX COMPOUND-ADD 2011-2015 LML A Duramax TURBO KIT Add INSTALL A Turbo INSTRUCTIONS Compound Kit Installation Instructions 1-800-955-0476 - www.industrialinjection.com - info@industrialinjection.com
Ford F-100 Evaporator Kit (751153)
") an ISO 9001:2015 Registered Company 1968-72 Ford F-100 Evaporator Kit (751153) 18865 Goll St. San Antonio, TX 78266 Phone: 800-862-6658 Sales: sales@vintageair.com Tech Support: tech@vintageair.com www.vintageair.com
an ISO 9001:2015 Registered Company 1968-72 Ford F-100 Evaporator Kit (751153) 18865 Goll St. San Antonio, TX 78266 Phone: 800-862-6658 Sales: sales@vintageair.com Tech Support: tech@vintageair.com www.vintageair.com
Shotgun Double Barrel HPFP install guide
 Shotgun Double Barrel HPFP install guide Thank you for your purchase of the VTT Shotgun Double Barrel HPFP upgrade! First thing to do when you open your box is to make sure all parts are in their respective
FAX
 INSTALLATION INSTRUCTIONS 6090 Air Suspension Kit (pat. pending) 1999-2006 Tahoe, Suburban, Avalanche, Yukon Thank you for purchasing a quality Hellwig Product. PLEASE READ THIS INSTRUCTION SHEET COMPLETELY
INSTALLATION AND USER MANUAL
 INSTALLATION AND USER MANUAL SDKIT-730 & SDKIT-734 100% Bolt-On 150 PSI Train Horn System for 2011-2015 F-250 & F-350 Super Duty P/N SDKIT-730 P/N SDKIT-734 Thank you for purchasing a Kleinn Air Horns
A/C SYSTEM SPECIFICATIONS
 A/C SYSTEM SPECIFICATIONS SPECIFICATIONS Application Specification Compressor Type Matsushita Matsushita Rotary Sanden Sanden Scroll Compressor Belt Deflection (1) Used 5/16-7/16" (8-9.5 mm) New 9/32-5/16"
WOC-364 Installation Instructions Ranger XP Heater System
 WOC-364 Installation Instructions Ranger 2011-12 XP Heater System Order of installation for a Complete Enclosure Always install the Heater System first if possible NOTE: If installing the Heater System
PERFECT FIT SERIES IN-DASH HEAT/ COOL/ DEFROST 1969 CHEVROLET CAMARO/ FIREBIRD NOTE: INSTRUCTIONS DEPICT CAMARO
 specializing in AIR CONDITIONING, PARTS AND SYSTEMS for your classic vehicle PERFECT FIT SERIES IN-DASH HEAT/ COOL/ DEFROST 1969 CHEVROLET CAMARO/ FIREBIRD NOTE: INSTRUCTIONS DEPICT CAMARO CONTROL & OPERATING
Single Barrel Shotgun HPFP Install Guide
 Single Barrel Shotgun HPFP Install Guide Thank you for purchasing the VTT Single Barrel Shotgun HPFP upgrade kit! PLEASE READ THE ENTIRE GUIDE BEFORE BEGINNING INSTALLATION! The first thing you should
PRODUCT: Install Instructions, MV-1 C/O Std, With Aux Fan RELEASE DATE: 2/28/14 REVISION DATE: 9/30/2014 PART NUMBER: Rev C
 Parts List (1) 01 000 027 Switch, 4 Position Blower (1) 04 000 007 Hose, 1/2 ID Drain, 6 (1) 01 000 087 Harn, Resistor (1) 04 000 078 Tube, Convo 1/2 x 24 (2) 01 000 136 Relay, 40 Amp (1) 04 000 015 Hose,
05-08 GT. Hellion Power Systems Mustang Kit Instructions
 Hellion Power Systems 05-08 Mustang Kit Instructions 1. Disconnect Battery 2. Drain Radiator, keep fluid for re-installation. 3. Remove air box and inlethoses. 6. Next, underneath, punch oil pan for turbo
Procharger Stage II Intercooled Supercharger System (11-14 GT)
") Procharger Stage II Intercooled Supercharger System (11-14 GT) Installation Time: Approximately one day. Installed on 2012 Mustang GT 5.0/Manual Required Tools 3/8 Socket Set (Standard and Metric) 1/2
Procharger Stage II Intercooled Supercharger System (11-14 GT) Installation Time: Approximately one day. Installed on 2012 Mustang GT 5.0/Manual Required Tools 3/8 Socket Set (Standard and Metric) 1/2
Shotgun Single Barrel HPFP install guide
 Shotgun Single Barrel HPFP install guide Thank you for your purchase of the VTT Shotgun Single Barrel HPFP upgrade! First thing to do when you open your box is to make sure all parts are in their respective
97-02 JEEP TJ BODY LIFT KIT INSTRUCTIONS
 92RC60500 97-02 JEEP TJ BODY LIFT KIT INSTRUCTIONS Congratulations on your purchase of a new Rough Country 2 /3 Body Lift. We are committed to providing you with the best product available for the best
1964 Chevrolet Impala Condenser Kit with Drier (021063)
") an ISO 900:2008 Registered Company 964 Chevrolet Impala Condenser Kit with Drier (02063) 8865 Goll St. San Antonio, TX 78266 Phone: 20-654-77 Fax: 20-654-33 www.vintageair.com 9036 REV B 03/0/6, PG OF
an ISO 900:2008 Registered Company 964 Chevrolet Impala Condenser Kit with Drier (02063) 8865 Goll St. San Antonio, TX 78266 Phone: 20-654-77 Fax: 20-654-33 www.vintageair.com 9036 REV B 03/0/6, PG OF
INSTALLATION INSTRUCTIONS
 2807 INSTALLATION INSTRUCTIONS SECTION - AIR SPRING SECTION 2 - AIR ACCESSORY -6 ! IMPORTANT PLEASE DON T HURT YOURSELF, YOUR KIT OR YOUR VEHICLE. TAKE A MINUTE TO READ THIS IMPORTANT INFORMATION. This
Porsche 928 with 16v LH-Jetronic Fuel System
 Porsche 928 with 16v LH-Jetronic Fuel System Toll-Free Tech Hot Line: 877-FOR-928M 877-367-9286 Please do not copy this manual and give copies to your friends. Our ability to bring you this supercharger
BMW X-5 Evaporator Removal
 BMW X-5 Evaporator Removal Intro: The following instructions will help you in replacing the Air Conditioning Evaporator in a BMW X-5. Following these instructions is at your own risk and the author assumes
INSTALLATION INSTRUCTIONS
 INSTALLATION INSTRUCTIONS Part# 22-7810 Add On Kit for Your ADS System Contents: Complete Install Kit for Your ARB CKMTA12V Compressor For the most up-to-date instructions please visit www.updownair.com
1969 Chevrolet Chevelle Condenser Kit with Drier (021168)
") an ISO 900:008 Registered Company 969 Chevrolet Chevelle Condenser Kit with Drier (068) 8865 Goll St. San Antonio, TX 7866 Phone: 0-654-77 Fax: 0-654-33 www.vintageair.com 90368 REV B 09/0/5, PG OF 6 Table
an ISO 900:008 Registered Company 969 Chevrolet Chevelle Condenser Kit with Drier (068) 8865 Goll St. San Antonio, TX 7866 Phone: 0-654-77 Fax: 0-654-33 www.vintageair.com 90368 REV B 09/0/5, PG OF 6 Table
INSTALLATION INSTRUCTIONS
 280 INSTALLATION INSTRUCTIONS SECTION - AIR SPRING SECTION 2 - AIR ACCESSORY 2-5 ! IMPORTANT PLEASE DON T HURT YOURSELF, YOUR KIT OR YOUR VEHICLE. TAKE A MINUTE TO READ THIS IMPORTANT INFORMATION. This
NISSAN FRONTIER 2 & 4WD AUTOMATIC & MANUAL TRANS. KING & CREW CAB MODELS 3 BODY LIFT KIT INSTALLATION INSTRUCTIONS KIT# 40083
 3651 N Highway 89 Chino Valley, AZ 86323 (928) 636-7080 www.p-a-g.net NISSAN FRONTIER 2 & 4WD AUTOMATIC & MANUAL TRANS. KING & CREW CAB MODELS 3 BODY LIFT KIT INSTALLATION INSTRUCTIONS 2005-2011 KIT# 40083
BLACKBIRD INSTALLATION SUPPLEMENT
 BLACKBIRD INSTALLATION SUPPLEMENT FOR 2008-105 FORD 6.4 LITER DIESEL F-SERIES VERSION 3/10 Parts Blackbird Wiring Manual Installation Supplement 6.4 liter Diesel Owner s Manual Includes Warrantee Registration
Installation Instructions for Lingenfelter GM 2500 Suburban & Yukon XL Auxiliary Fan System (with AC clutch controlled fan output)
") Installation Instructions for Lingenfelter 2007-2013 GM 2500 Suburban & Yukon XL Auxiliary Fan System (with AC clutch controlled fan output) PN L300080607 Revision - 1.1 Lingenfelter Performance Engineering
Installation Instructions for Lingenfelter 2007-2013 GM 2500 Suburban & Yukon XL Auxiliary Fan System (with AC clutch controlled fan output) PN L300080607 Revision - 1.1 Lingenfelter Performance Engineering
an ISO 9001:2008 Registered Company 1964 CHEVY IMPALA WITHOUT FACTORY AIR REV C 7/8/14, 1964 IMPALA wo AC EVAP INST PG 1 OF 25
 an ISO 9001:2008 Registered Company 1964 CHEVY IMPALA WITHOUT FACTORY AIR 561064 903061 REV C 7/8/14, 1964 IMPALA wo AC EVAP INST PG 1 OF 25 903061 REV C 7/8/14, 1964 IMPALA wo AC EVAP INST PG 2 OF 25
Distributorless Ignition System (DIS) Application: LLV Part Number: (E) or (A) Time Required: Approx.
 Application: LLV Part Number: (E) or (A) Time Required: Approx.") www.teamwbi.com / e-mail: mip@teamwbi.com / 800-842-7285 Distributorless Ignition System (DIS) Application: 1987 1993 LLV Part Number: 01-5332 (E) or 01-5333 (A) Time Required: Approx. 1 hour Quantity
www.teamwbi.com / e-mail: mip@teamwbi.com / 800-842-7285 Distributorless Ignition System (DIS) Application: 1987 1993 LLV Part Number: 01-5332 (E) or 01-5333 (A) Time Required: Approx. 1 hour Quantity
A/C SYSTEM SPECIFICATIONS
 A/C SYSTEM SPECIFICATIONS A/C-HEATER SYSTEM - MANUAL 1997 Manual A/C-Heater System WARNING: To avoid injury from accidental air bag deployment, read and follow all SERVICE PRECAUTIONS and DISABLING & ACTIVATING
MINI MANIA REMOTE OIL COOLER INSTALLATION INSTRUCTIONS P/N NME1055
 MINI MANIA REMOTE OIL COOLER INSTALLATION INSTRUCTIONS P/N NME1055 Mini Mania s Cooper S Remote Oil Cooler Kit is designed to reduce operating temperatures by cooling the motor oil using an external radiator.
STEALTH. The MOST Versatile and Easiest To Use Towed Vehicle Braking System available! NEED HELP? Call WARNING
 0 STEALTH The MOST Versatile and Easiest To Use Towed Vehicle Braking System available! INSTALLATION manual NEED HELP? Call - -00-0- Read all instructions before installing or operating the Stealth. Failure
ADM Performance 6079 Mapleshade Lane Dallas, Texas (214)
") 1) Disconnect Battery Ground 2) Raise front end of Vehicle FAN INSTALL INSTRUCTIONS 3) Remove lower Radiator hose and drain coolant into a pan. (you will reuse coolant later) 4) Remove Air Intake piping
1) Disconnect Battery Ground 2) Raise front end of Vehicle FAN INSTALL INSTRUCTIONS 3) Remove lower Radiator hose and drain coolant into a pan. (you will reuse coolant later) 4) Remove Air Intake piping
To determine if an A/C clutch should be returned for Warranty Consideration:
 Warranty is a growing concern for all partners in the distribution of A/C Components. Because of the growing number of warranty questions, please study the following pictures to familiarize yourself with
Installation Instructions and Suggestions For Jeep YJ Fiberglass Replacement Bodies
 Installation Instructions and Suggestions For Jeep YJ Fiberglass Replacement Bodies Getting started with the removal of your existing Jeep body. Trust nothing to memory; take photos of everything at different
INSTALLATION INSTRUCTIONS
 INSTALLATION INSTRUCTIONS Accessory Application Publications No. P/N 08E49-S2A-100 2004 S2000 AII 26325 Issue Date OCT 2003 PARTS LIST Hood switch harness TOOLS AND SUPPLIES REQUIRED #2 Phillips screwdriver
This information covers the proper procedure for replacing the Volvo D16F engine in a VT or VNL chassis.
 Volvo Trucks North America Greensboro, NC USA Engine, Replacement DService Bulletin Trucks Date Group No. Page 10.2007 210 139 1(47) Engine, Replacement Volvo D16F VNL, VT W2005773 This information covers
CHEVY IMPALA
 an ISO 9001:2008 Registered Company 1961-62 CHEVY IMPALA WITHOUT FACTORY AIR 561062 903062 REV E 7/17/14, 1961-62 IMPALA wo AC EVAP INST PG 1 OF 26 903062 REV E 7/17/14, 1961-62 IMPALA wo AC EVAP INST
Rear bumper cannot be used for towing after installation of the rear bumper relocation brackets.
 921RC7020 *RC702BAG2* RC702BAG2 GM 07-13 4WD 1500 P/U 3 Body Lift Thank you for choosing Rough Country for all your suspension needs. Rough Country recommends a certified technician install this kit. Attempts
TSB #: 53 Date: 2/11/2011 HOLDEN (DELPHI) VARIABLE STROKE COMPRESSOR DIAGNOSIS STEP ACTION RESULT YES NO
 VARIABLE STROKE COMPRESSOR DIAGNOSIS STEP ACTION RESULT YES NO") HOLDEN (DELPHI) VARIABLE STROKE COMPRESSOR DIAGSIS TSB #: 53 Date: 2/11/2011 Initial Once Read: Even though the Holden variable stroke compressor manufactured by Delphi has been in the Australian market
HOLDEN (DELPHI) VARIABLE STROKE COMPRESSOR DIAGSIS TSB #: 53 Date: 2/11/2011 Initial Once Read: Even though the Holden variable stroke compressor manufactured by Delphi has been in the Australian market
INSTALLATION INSTRUCTIONS FOR THE TOMAHAWK ELECTRIC REVERSE
 INSTALLATION INSTRUCTIONS FOR THE TOMAHAWK ELECTRIC REVERSE LAST UPDATED: April 2018 Thank you for choosing the Motor Trike Electric Reverse. We ask that you read the directions before you start and follow
Chevrolet Corvette Condenser Kit with Drier ( CCA)
") an ISO 900:2008 Registered Company 969-72 Chevrolet Corvette Condenser Kit with Drier (02069-CCA) 8865 Goll St. San Antonio, TX 78266 Phone: 20-654-77 Fax: 20-654-33 www.vintageair.com 90069-CCA REV C
an ISO 900:2008 Registered Company 969-72 Chevrolet Corvette Condenser Kit with Drier (02069-CCA) 8865 Goll St. San Antonio, TX 78266 Phone: 20-654-77 Fax: 20-654-33 www.vintageair.com 90069-CCA REV C
Installation Instructions
 Installation Instructions Jeep JK 2-Door (2011 Present) Mounting Bracket and Air Line System Kit for ARB On-Board Twin Air Compressor (CKMTA12) Made in the USA Kit Contents: 1 Flat Bracket 1 Formed Bracket
Air Conditioner for M915 A0/A1 Truck
 RD-2-4530-0 Air Conditioner for M915 A0/A1 Truck INSTALLATION INSTRUCTIONS Install refrigerant compressor per instructions provided with compressor mount kit. CAUTION: Edges of sheet metal can be sharp!
PRODUCT USE INFORMATION
 9RC61000 Jeep YJ Body Lift Thank you for choosing Rough Country for all your suspension needs. This body lift fits both manual and Automatic equipped vehicles!!! Refer to last page of this Instruction
CHAPTER 21 ENVIRONMENT CONTROL. Section Title Page
 CHAPTER 21 ENVIRONMENT CONTROL Section Title Page 21-00 Description........................................ 21.1 21-10 Ventilation........................................ 21.3 21-11 Nose Vent................................
INSTALLATION INSTRUCTIONS FOR AIRTECH II / TIE-IN. For Nissan NV
 INSTALLATION INSTRUCTIONS FOR AIRTECH II / TIE-IN For Nissan NV Corporate Headquarters ProAir, LLC 28731 County Road 6; Elkhart, IN 46514 Phone: (574) 264-5494; Toll Free: 800-338-8544; Fax: (574) 264-2194
LPE C5 Battery Relocation Kit
 LPE C5 Battery Relocation Kit The LPE C5 Corvette battery relocation kit improves vehicle weight distribution by moving weight to the rear of the vehicle. The improved weight distribution increases traction
Installation Instructions
 Installation Instructions Barricade 3.5 in. Bull Bar w/ Skid Plate & 20 in. Single Row LED Light Bar Black (Polished) (210-16 JEEP WRANGLER 4 DR & 2DR) Part# J107785 J107786 Page 1 of 5 PARTS LIST: 1 Bull
INSTALLATION INSTRUCTIONS DODGE DAKOTA 2 KIT # 682 (2WD), 692 (4WD) 3 KIT # 683 (2WD), 693 (4WD)
, 692 (4WD) 3 KIT # 683 (2WD), 693 (4WD)") INSTALLATION INSTRUCTIONS 1997-1999 DODGE DAKOTA 2 KIT # 682 (2WD), 692 (4WD) 3 KIT # 683 (2WD), 693 (4WD) Installation of a Performance Accessories body lift kit will change the vehicle s center of gravity
INSTALLATION INSTRUCTIONS 1997-1999 DODGE DAKOTA 2 KIT # 682 (2WD), 692 (4WD) 3 KIT # 683 (2WD), 693 (4WD) Installation of a Performance Accessories body lift kit will change the vehicle s center of gravity
Installation Instructions
 Installation Instructions Jeep JK Unlimited (2007 Present) Mounting Bracket and Air Line System Kit for ARB On-Board Twin Air Compressor (CKMTA12) Made in the USA Kit Contents: 1 Bracket for ARB Compressor
A/C-HEATER SYSTEM - AUTOMATIC
 A/C-HEATER SYSTEM - AUTOMATIC 1988 Toyota Celica 1988 Automatic A/C-Heater Systems Celica * PLEASE READ THIS FIRST * CAUTION: When discharging air conditioning system, use only approved refrigerant recovery/recycling
This information covers the proper service procedures for the replacement of the radiator on a chassis with the Volvo D16F engine.
 Volvo Trucks North America Greensboro, NC USA This Service Bulletin replaces SB 260-32, Cooling System Service, dated (1.2007), publication no. PV776-20177193. Radiator, Replacement DService Bulletin Trucks
C FORD F250 / F L POWERSTROKE DIESEL WITH AUTOMATIC TRANSMISSIONS ONLY
 EXHAUST BRAKES C40019 1999-2003 FORD F250 / F350 7.3L POWERSTROKE DIESEL WITH AUTOMATIC TRANSMISSIONS ONLY Getting Started Thank you and congratulations on your purchase of a Pacbrake exhaust retarder.
EXTERNAL CONTROL VALVE (ECV) EQUIPPED VARIABLE A/C COMPRESSOR DIAGNOSIS PROCEDURE
 EQUIPPED VARIABLE A/C COMPRESSOR DIAGNOSIS PROCEDURE") Technical Service Bulletin GROUP DATE HVAC JUNE, 2017 NUMBER MODEL(S) 17-HA-002 Multiple Models EXTERNAL CONTROL VALVE (ECV) EQUIPPED VARIABLE A/C COMPRESSOR DIAGNOSIS PROCEDURE This bulletin supersedes
Technical Service Bulletin GROUP DATE HVAC JUNE, 2017 NUMBER MODEL(S) 17-HA-002 Multiple Models EXTERNAL CONTROL VALVE (ECV) EQUIPPED VARIABLE A/C COMPRESSOR DIAGNOSIS PROCEDURE This bulletin supersedes
INSTALLATION INSTRUCTIONS
 #52180C3 Corvette Radiator & Fan Kits #52181C3 Fits 1968-1972 Fits 1970-1982 Chevrolet Corvette C3 Note: Manual transmission preferred; automatic transmission requires a remote cooler. (pt. #4116C3 available)
Cutlass without Factory Air
 an ISO 9001: 2008 Registered Company 1970-72 Cutlass without Factory Air 561076 18865 Goll St. San Antonio, TX 78266 ph: 210-654-7171 fax: 210-654-3113 901076 REV A 9/17/12, INST 1970-72 CUTLASS wo AC
Olson Kustom Works th St SE #M, Monroe, WA (949)
") Olson Kustom Works 17404 147 th St SE #M, Monroe, WA 98272 (949)742-0613 Jesse@OKW-Inc.com FOR REVISIONS ALL 2017 BRACKET REVISIONS, revised July 2017 Thank you for your purchase from OKW. If you have
Olson Kustom Works 17404 147 th St SE #M, Monroe, WA 98272 (949)742-0613 Jesse@OKW-Inc.com FOR REVISIONS ALL 2017 BRACKET REVISIONS, revised July 2017 Thank you for your purchase from OKW. If you have
Cutlass with Factory Air
 an ISO 9001: 2008 Registered Company 1968-69 Cutlass with Factory Air 564069 18865 Goll St. San Antonio, TX 78266 ph: 210-654-7171 fax: 210-654-3113 904057 REV B 10/2/12, INST 1968-69 CUTLASS w/ AC EVAP
SMALL BLOCK FORD SERPENTINE DRIVE SYSTEM WITH & WITHOUT POWER STEERING. an ISO 9001:2008 Registered Company
 an ISO 9001:2008 Registered Company SMALL BLOCK FORD SERPENTINE DRIVE SYSTEM WITH & WITHOUT POWER STEERING 904100 REV E 01/20/15, SBF FRONTRUNNER w & wo POWER STEERING INST PG 1 OF 10 PAGES 1. COVER 2.
Rear bumper cannot be used for towing after installation of the rear bumper relocation brackets.
 921RC7030 GM 88-98 4WD 1500 P/U 3 Body Lift Thank you for choosing Rough Country for all your suspension needs. *RC703BAG2* RC703BAG2 Rough Country recommends a certified technician install this kit. Attempts
WPS-104 Heater Installation Instructions For 500EFI, 700 XP, & Crew Applications
 WPS-104 Heater Installation Instructions For 500EFI, 700 XP, & Crew Applications ORDER OF INSTALLATION FOR A COMPLETE ENCLOSURE OF A RANGERWARE WPS (Weather Protection System) IS AS FOLLOWS: 1. Heater
Z1 Motorsports 300zx 2.5 Upgraded piping & BA SMIC Install Guide
 Z1 Motorsports 300zx 2.5 Upgraded piping & BA SMIC Install Guide Congratulations on your new upgraded piping and intercooler kit, this kit has proven to provide the lowest intake air temps to date on our
07-11 GM 1500 Pickup, Avalanche, Yukon, Tahoe, Suburban Front 2.5 Kit
 92130500 07-11 GM 1500 Pickup, Avalanche, Yukon, Tahoe, Suburban Front 2.5 Kit Thank you for choosing Rough Country for all your suspension needs. Rough Country recommends a certified technician install
Chevrolet Full-Size/El Camino with 2-Lever Controls
 an ISO 9001:2008 Registered Company 1959-60 Chevrolet Full-Size/El Camino with 2-Lever Controls 561055 18865 Goll St. San Antonio, TX 78266 ph: 210-654-7171 fax: 210-654-3113 901116 REV B 7/21/14, INST
18SP680Rev3 EPA04 MBE 4000 Car Hauler Low Pressure Fuel Lines
 8SP680Rev3 EPA04 MBE 4000 Car Hauler Low Pressure Fuel Lines KIT DESCRIPTION These service kits include all necessary parts to replace the low pressure fuel lines between the fuel filter housing and fuel
Installation Manual GM VIR Eliminator Kit
 Installation Manual GM 73-76 VIR Eliminator Kit Part # 15-211 *On some vehicles accumulator may interfere with engine compartment braces,. Braces will need to be either modified or removed in order to
Mercury Cougar Condenser Kit with Drier (011067)
") an ISO 900:2008 Registered Company 967-68 Mercury Cougar Condenser Kit with Drier (0067) 8865 Goll St. San Antonio, TX 78266 Phone: 20-654-77 Fax: 20-654-33 90332 REV A /7/4, PG OF 3 Table of Contents
an ISO 900:2008 Registered Company 967-68 Mercury Cougar Condenser Kit with Drier (0067) 8865 Goll St. San Antonio, TX 78266 Phone: 20-654-77 Fax: 20-654-33 90332 REV A /7/4, PG OF 3 Table of Contents
INSTALLATION INSTRUCTIONS
 INSTALLATION INSTRUCTIONS Part# 22-7810 Jeep JK/JKU ARB Mounting Kit 2007-2018.5 For the most up to date instructions please visit www.updownair.com www.updownair.com 833 226 4863 IMPORTANT INFORMATION
1969 Firebird without Factory Air
 an ISO 9001:2008 Registered Company 1969 Firebird without Factory Air 561168 18865 Goll St. San Antonio, TX 78266 ph: 210-654-7171 fax: 210-654-3113 901125 REV B 7/14/14, INST 69 FIREBIRD wo AC EVAP KIT
1969 Firebird with Factory Air
 an ISO 9001:2008 Registered Company 1969 Firebird with Factory Air 564468 18865 Goll St. San Antonio, TX 78266 ph: 210-654-7171 fax: 210-654-3113 901124 REV B 7/14/14, INST 69 FIREBIRD w/ A/C EVAP KIT
Ford 6.7 EGR Delete Kit
 Fits: 2011 12 Powerstroke 6.7L Read instructions thoroughly before proceeding! ***This kit may void factory warranty please check with manufacturer.*** ***This kit is intended for off road use only.***
C40008 & C40009 EXHAUST BRAKES
 EXHAUST BRAKES C40008 & C40009 1995 2003 Ford F250 / F350 7.3 L Powerstroke Diesel with manual transmissions 1995 1998 Ford F250 / F350 7.3 L Powerstroke Diesel with automatic transmission* *Requires the
2006 Honda Civic SI Supercharger Kit Installation Instruction Kit #
 2006 Honda Civic SI Supercharger Kit Installation Instruction Kit #350-091 3239 MONIER CIRCLE, STE.5 RANCHO CORDOVA, CA 95742 916.635.4550 FAX 916.635.4632 www.ct-engineering.com INS-157 VERSION: 3.25.2009
Exhaust Heat Shield Instructions NC 06-15
 Exhaust Heat Shield Instructions NC 06-15 Thank you for purchasing the Track Dog Racing Exhaust Heat Shield for the 2006-2015 Mazda MX-5. Our TDR Heat Shield is designed to help maintain lower temperatures
07-11 GM 4WD 1500 P/U 1 1/4 Body Lift
 92RC70100 07-11 GM 4WD 1500 P/U 1 1/4 Body Lift Thank you for choosing Rough Country for all your suspension needs. Rough Country recommends a certified technician install this kit. Attempts to install
Mustang/Capri Fox Body 5.0 Engine Compartment Upgrade Kit - Standard (22-132)
") Classic Auto Air Mfg. 4901A W. Rio Vista Ave, Tampa, FL 33634 Toll free - 866-352-4678 9:30am 6pm M-F EST ClassicAutoAir.Com Mustang/Capri Fox Body 5.0 Engine Compartment Upgrade Kit - Standard (22-132)
Classic Auto Air Mfg. 4901A W. Rio Vista Ave, Tampa, FL 33634 Toll free - 866-352-4678 9:30am 6pm M-F EST ClassicAutoAir.Com Mustang/Capri Fox Body 5.0 Engine Compartment Upgrade Kit - Standard (22-132)
TRUCKINGTRUTH.COM T T. Daniel B s Pre-Trip Inspection Checklist
 TRUCKINGTRUTH.COM T T Daniel B s Pre-Trip Inspection Checklist 1 My pre-trip begins as I approach the vehicle. I am looking for leaks, leaning one way or the other (which may indicate a low tire or bad
ENGINE DEVELOPMENT INC.
 2003 Ford Expedition 4.6L& 5.4L We encourage you to read this manual thoroughly before you begin work, and perform the following: 1. A quick parts check to make certain your kit is complete. If you discover
Tail lights. Headlights
 Revised December 2014 02-017 Light Kit will fit Yamaha G-Series* installation instructions included: tools needed: 2 Headlights 2 Tail Lights Wiring Harness Screws Straps Hazard Switch Phillips Head Screw
Hard Brake Pedal on Cold Starts at High Altitudes (Install Auxiliary Vacuum Pump) # (04/27/2006)
 # (04/27/2006)") Document ID# 1822803 2005 Cadillac CTS Subject: Models: Hard Brake Pedal on Cold Starts at High Altitudes (Install Auxiliary Vacuum Pump) #06-05-22-003 - (04/27/2006) 2005-2006 Cadillac CTS with 2.8L Engine
Document ID# 1822803 2005 Cadillac CTS Subject: Models: Hard Brake Pedal on Cold Starts at High Altitudes (Install Auxiliary Vacuum Pump) #06-05-22-003 - (04/27/2006) 2005-2006 Cadillac CTS with 2.8L Engine
Thank you for purchasing the Craven Speed FlexPod Complete Gauge Pod Kit For R56, R58, R59, R60 with Refresh Engines (2011+)
") Thank you for purchasing the Craven Speed FlexPod Complete Gauge Pod Kit For R56, R58, R59, R60 with Refresh Engines (2011+) Before You Start Please read instructions completely before installing. These
Thank you for purchasing the Craven Speed FlexPod Complete Gauge Pod Kit For R56, R58, R59, R60 with Refresh Engines (2011+) Before You Start Please read instructions completely before installing. These
an ISO 9001: 2008 Registered Company NOVA WITH AC REV C 7/16/14, NOVA w/ AC EVAP INST PG 1 OF 25
 an ISO 9001: 2008 Registered Company 1969-72 NOVA WITH AC 565072 905073 REV C 7/16/14, 1969-72 NOVA w/ AC EVAP INST PG 1 OF 25 Table of Contents PAGES 1. COVER 2. TABLE OF CONTENTS 3. PACKING LIST / PARTS