BMW E46 318i M43, from r.
|
|
|
- Jacob Skinner
- 6 years ago
- Views:
Transcription


1 BMW E46 318i M43, from r. Originally mounted steering wheel (with a airbag for two plugs): Pic. 1 Steering wheel to be mounted (along with the radio control and cruise control): Pic. 2
. Then we take to dismantle the old wheel of the car.")

2 For start disconnect the battery, loosen the clamp using wrench nr 10, will prevent us to receive the AIRBAG error after disconnecting the wires from it (after the surgery it is advisable to wait a few minutes before proceeding with further work). Then we take to dismantle the old wheel of the car. Set the controls at the point of the most rearward of the driver and also the lowest. Rotate the steering wheel to 90, then we take to be loosening AIRBAG. AIRBAG is screwed two screws on the steering wheel. To unscrew it, use the T30 Torx key. Pic. 3 After unscrewing the first screw rotate steering wheel of 180 and unscrew the screw on the other side. After this operation pull the AIRBAG from the steering wheel: Pic. 4


3 Take out all the wires from the steering wheel, these wires do not fit to the new steering wheel. Another point is unscrewing the steering wheel. To do this, use a key 16th Pic. 5 Pull the steering Wheel, Pic. 6


4 and we assume the new. Important here is to agree to cut the steering wheel and steering column (Pic.7). Pic. 7 Tighten the steering wheel to the column, and then attaches the cable, Pic. 8


5 And to the AIRBAG Pic. 9 Then push the AIRBAG in the steering wheel - slams got going, here already do not tighten any screws. The next step is to get the plug from the other side of the AIRBAG tape. To do this, remove the cover of the steering column. At the beginning of a Phillips screwdriver, remove the screw at the top of the cover. Pic. 10


6 Then press the top cover to the left and right sides, first in step 1 and after that in step 2, while pulling it up. Pic. 11 Then in the lower cover should find two clamps, which are kept lower cover. To relieve their, push internal pins for the inside. Pic. 12


7 Once the pins are inside, release the steering lock blockade and take off the bottom cover. Then we have access to the AIRBAG tape and we can pull out from it the green plug. Pic. 13 In this plug should be missing 3 pins (8, 9, 10), which must be completed. Pic. 14
 After completing the plug, is assume to the tape again.")

8 This can be done using household ways, or buying ready wires in the BMW (20E for 3 cables, it s average worthwhile.) After completing the plug, is assume to the tape again. The next step is to connect the wires from 9 and 10 pin from green plug to the plug from the light switch. For starters, remove the decorative strips on the switch, just slightly undermine it - strip is mounted on the squeeze. Pic. 15 Then remove the light switch, he is depending on the model mounted on one or two screws. Then pull the switch (which is pretty deep.) Detachable plug from the switch. Pic. 16


9 Now drag the cables previously added to the AIRBAG tape into the light switch. We need to add here 2 of the three added wires from the pin 9 and 10. Linking is as follows: No 9 pin in the plug AITBAG strap, we connect with the pin 21 in the lights plug. No 10 pin in the plug AIRBAG strap, we connect with the pin 27 in the lights lights. Pic. 17 Turn back light switch and from now we can control the radio from our steering wheel The next stage of our work is to connect the cruise control. With this is a little more work To think about the assumption cruise control in M43 we need to purchase the following things: Stepper motor to control throttle: Pic. 18


10 Cruise control controller: Pic. 19 You also need cables with connectors, and the clutch pedal sensor. I personally managed to purchase a wires from the english version (a lot of english cars is now transported to Poland for a parts). It's a bit confusing, as some cables are too short, but you can obviously get around this little problem (see further description of assembly). My captured wires was as follows: Pic. 20


11 I described the whole process on the basis of english wires, however, if anyone possessed the same plugin can easily do the whole procedure using your own cables. First we need to separate the wires, on which we depend. We start from the plug into the stepper motor: Pic. 21 All the wires go to the blue plug it s a plug to Cruise control controller Pic.19 (that greatly simplifies the task). In the next step go to plug cruise control controller. It looks as follows: Pic. 22 Further connecting the plug wires coming out of cruise control controller are shown in the diagram below:
12 Pic. 23
13 Colors of the cables look as follows. Stepper motor plug: Tab. 1 PIN Color 1 YELLOW - VIOLET 2 BROWN 3 BLACK RED 4 YELLOW WHITE 5 BROWN BLUE 6 BLACK GREEN 7 BLACK BLUE Cruise control contro ller plug: Tab. 2 PIN Color YELLOW VIOLET BLUE BROWN BLACK GREEN BLACK --BLACK WHITE BROWN BLUE BLACK BLUE BROWN BLACK YELLOW WHITE ----WHITE VIOLET BLUE RED --BLACK RED BLUE BLACK BLUE YELLOW VIOLET YELLOW


14 With the prepared wires we go to the car. At the beginning should be mounted throttle control stepper motor. Remove the two screws holding the throttle cover. Pic. 24 Pic. 25


15 Then mount the cord from stepper motor: Pic. 26 Stepper motor mount nearby to the air filter: Pic. 27


16 Then placed in the right place cruise control controller. Originally, it should lie in a drawer behind the glove box. I am due to the fact that I had a wire from the english car, had to extend the wires, or find another location for the controller. I took advantage of the second option and decided to place the controller by the engine controller. It is located in the engine compartment. In my case there was a free place that I decided to use. Pic. 28 Pic. 29


17 Pic. 30 When the controller is already adequately positioned, you should proceed to drag the cables. At the beginning you need to plug the cables in the throttle control motor. Then drag it to the controller. We leave only one brown wire, which we join with the mass point, located next to the left turn signal. Pic.31


18 As for the rest of the wires is that we need to drag wires through the gasket that connects the engine compartment with controller storage. Pic. 32 When you drag wires, we can stick the cruise control plug into the controller. Pic. 33


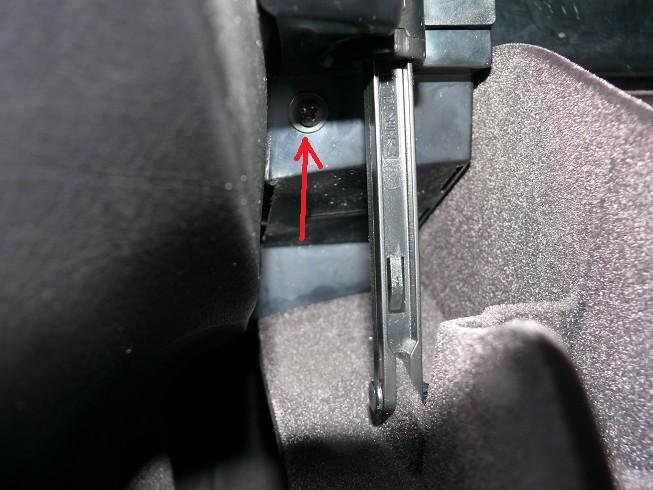
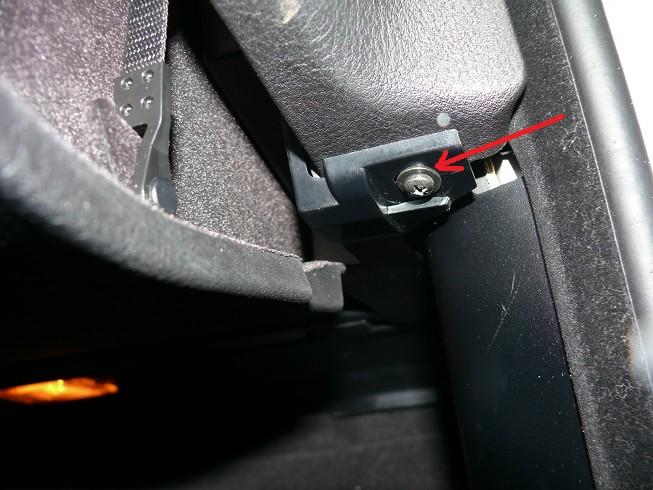
19 The next step is to drag the wires into the cabin of the car. You can use the slot located in the controller compartment. However at the beginning, remove the cover in the car under the steering column. Open the small compartment under the steering wheel and remove two screws in the upper part. Pic. 34 Pull out compartment, and then unscrew the whole lid. Unscrew the screws and fasteners as follows: Pic. 35


20 Pic. 36 Then look deeper, you may see a gap through which we can drag the wires: Pic. 37
 consists of the following wires: Tab.")
21 Pull the wires from the controller to the cabin. Then we have to separate the wires into two groups. One group stay under the steering wheel, while the second will be dragged under the glove box. The first group (under the steering column) consists of the following wires: Tab. 3 No pin in the cruise control controller plug Wire color BLUE BROWN BROWN BLACK BLUE BLACK BLUE YELLOW VIOLET YELLOW These wires must be connected as follows. Cable No. 2 from table 3 should connect to the clutch pedal sensor. The second outgoing cable from the clutch pedal sensor plugs need to be connected to the cable 13 in table 3. Is the earth that should stick in the collective ground of item. It is located just below the steering column with the main wiring harness. We have a clutch sensor, so you need to get on with the brake sensor. This sensor, in contrast to the clutch pedal sensor, of course, we have mounted in the car series. Thus, cable 26 from table 3 attaches to the wire of the same color in the cube brake pedal sensor. Pic. 38


22 Pic. 39 Once we have connected the brake pedal sensor, we take the other two wires. We start witch the cable 24 from the table 3. Connect it to the 8 pin green plug entering to the AIRBAG tape (Pic. 13 and Pic. 14). That leaves us one more cable 25 tab. 3. This cable should be connected to one of the plugins of dashboard. Since this pin is not in the plug, we can not get at the wire in it. Thus, we need to take off the dashboard. Unscrew the two screws at the top of the dashboard. Pic. 40


23 Then lightly undermine the upper part of the dashboard, and then eject them. We are interested in the white plug, located on the left side of clocks. Disconnect it from the dashboard. Here we are interested of pin 5 in the white plug. We must do it by plugging the wire No 25 from table 3. Pic. 41 Pic. 42


24 Pic. 43 After adding 5 pin, we can put together the dashboard in place. Now we have to connect 4 more wires. Wires should be drag to the fuses box. For starters, remove the glove box. Open it and pull the two tabs holding the moving part of the blove box: Pic. 44


25 Pic. 45 Then unscrew the four screws under the glove box. Pic. 46


26 Pic. 47 Now pull the lower part of the glove box. The next step is removal of the upper part of the glove box. Unscrew following screws: Pic. 48

27 Pic. 49 Pic. 50

28 Pic. 51 Pic. 52

29 After removing the glove box you can drag the 4 wires from the cruise control. They pass the pedals and the central tunnel, in the bottom spot. Pic. 53 Now open the fuse bog latches turning 45 degrees. Pic. 54

30 We are interested in cable assembly points located above the fuses. Pic. 55 To remove the assembly points, you should catch them from two sides and then push. When it jump out slowly pull out the wires. We are interested of the following wire colors: No 8 tab. 1 color black No 10 tab. 1 color black white No 17 tab. 1 color white violet No 21 tab. 1 color blue red

31 Pic. 56 Put all parts back in the car, isolates newly added wires and connect the battery. Launch the engine and check if it works. There was nothing to us but enjoy the cruise control. Contact: The author is not liable for damage caused during installation. This is only the information content.
BMW X-5 Evaporator Removal
 BMW X-5 Evaporator Removal Intro: The following instructions will help you in replacing the Air Conditioning Evaporator in a BMW X-5. Following these instructions is at your own risk and the author assumes
DVD REAR SEAT VIDEO SYSTEM
 Read entire instructions thoroughly before starting. TOOLS REQUIRED: DVD REAR SEAT VIDEO SYSTEM MINIVANS WITH ROOF RAILS INSTALLATION INSTRUCTIONS Non-metal trim stick Phillips screwdriver T15, T20, T25
Ford Racing 4.6L 3V Crate Engine Control Pack
 Ford Racing 4.6L 3V Crate Engine Control Pack Installation Time: 3-6 hours on a Foxbody Mustang Tools Required: Basic English and Metric Socket and Wrench Set Flat and Phillips Screwdrivers Torx bits Hammer
J2 Remove sound insulation/knee guard 1 and side panel 2 on center console
 J1 Preparations Drive car forward on a level surface so that wheels are straight. Disconnect battery negative lead. Turn ignition key to position 1 so that steering lock is off. J2 Remove sound insulation/knee
Some tips and tricks I learned from getting clutch out of vehicle Skoda Octavia year 2000
 Some tips and tricks I learned from getting clutch out of vehicle Skoda Octavia year 2000 Last change 2013-Oct-11 I bought Haynes manual for a starter. That s something well worth it s cost I believe.
Accessory Fuse Block. Please read this entire manual before proceeding with installation.
 Accessory Fuse Block Please read this entire manual before proceeding with installation. Kit Components: (1) Fuse Block Assembly (1) Harness (1) Positive power cable (1) Negative power cable (5) Pigtails
Door Panel Removal & Window Stop Adjustment
 Door Panel Removal & Window Stop Adjustment By: Jeff Wolford Disclaimer: This is simply an article of how I fixed my car. I m not responsible if you break, scratch, or mess up anything following my example.
OEM Cruise Control Installation in GMC/Chevy NBS trucks
 OEM Cruise Control Installation in 99-02 GMC/Chevy NBS trucks May 2008 ~ Rampage_Rick Having just installed factory cruise control in my 00 Sierra, I thought I d share the fun. I followed the steps outlined
BMW E61 Hydraulic Pump replacement instructions
 BMW E61 Hydraulic Pump replacement instructions This DIY will guide you through the tasks needed to successfully replace your defective tailgate hydraulic pump Difficulty 3 of 10. The most difficult part
GVW AGM Auxiliary Battery Kit for Air-cooled Westfalia Campers and all Vanagon NON-campers
 GVW-253-701AGM Auxiliary Battery Kit for 1980-1983 Air-cooled Westfalia Campers and all Vanagon NON-campers The purpose of this kit is to add an Interstate SLA1161 battery as an auxiliary battery under
1967 (Late) CORVETTE STANDARD (NON-ADJUSTABLE) STEERING COLUMN DISASSEMBLY & REPAIR INSTRUCTIONS PAPER #2
 CORVETTE STANDARD (NON-ADJUSTABLE) STEERING COLUMN DISASSEMBLY & REPAIR INSTRUCTIONS PAPER #2") Last Revision: 03SE2012 1967 (Late) - 1968 CORVETTE STANDARD (NON-ADJUSTABLE) STEERING COLUMN DISASSEMBLY & REPAIR INSTRUCTIONS PAPER #2 Disassembly and Repair Instructions Addressed in this Paper Degree
Last Revision: 03SE2012 1967 (Late) - 1968 CORVETTE STANDARD (NON-ADJUSTABLE) STEERING COLUMN DISASSEMBLY & REPAIR INSTRUCTIONS PAPER #2 Disassembly and Repair Instructions Addressed in this Paper Degree
Installing AMP-wiring in a New Beetle
 Installing AMP-wiring in a New Beetle Vehicle used: New Beetle 2.0i Type 9C (1999) Used set of cables: Dietz 35mm² power cable, double shielded Dietz chinch cable ( 35mm² Professional Line ) First of all:
Retro it Steering Column
 Retro it Steering Column INSTALLATION INSTRUCTIONS for 1976-86 CJ5 & CJ7 FOR PART NUMBER S: 1520800010, 1520800020, 1520800051, 1526800010, 1526800020, 1526800051 S I NCE 1986 Instruction # 8000000010
2014+ FORD FIESTA ST DIRECT-FIT OIL COOLER KIT PARTS LIST AND INSTALLATION GUIDE CAUTION PARTS INCLUDED NOTE TOOLS NEEDED INSTALL PROCEDURE
 PARTS LIST AND PARTS INCLUDED 3PC APPLICATION-SPECIFIC MOUNTING BRACKETS & SPACER 1PC 19-ROW OIL COOLER 1PC 4 ', X 1'' BRAIDED HOSE W/90-10AN FITTINGS 1PC 3'' X 2.5 '' BRAIDED HOSE W/45 AND 90-10AN FITTINGS
6V BMW i8 (5F62632) Customer Service Guide
 Customer Service Guide") 6V BMW i8 (5F62632) For internal reference only MMXIV Copyright Aria Child Inc. 1 Contents I) Check Battery... 3 II) Check Wiring Condition........... 6 III) Check Foot Pedal.......... 15 IV) Gearbox Replacement.......
6V BMW i8 (5F62632) For internal reference only MMXIV Copyright Aria Child Inc. 1 Contents I) Check Battery... 3 II) Check Wiring Condition........... 6 III) Check Foot Pedal.......... 15 IV) Gearbox Replacement.......
Adapter works mechanism diagram
 Steering Wheel Adapter Installation instruction 17/Nov/2017 V1.9 Adapter works mechanism diagram STMV1 Without heating support STMV1-H With heating support Page 1 Adapter works mechanism Connection diagram(stmv1)
Ford Super Duty F-250, F and up
 Ford Super Duty F-250, F-350 2005 and up Installing Upfitter Switches by Richard L. Ray If you want to add a few aftermarket options to your new Ford Super Duty, Ford Motor Company makes things easy for
GVW AGM Auxiliary Battery Kit for Vanagon Westfalia Full Camper
 GVW-253-700AGM Auxiliary Battery Kit for 1983-1991 Vanagon Westfalia Full Camper The purpose of this kit is to add an Interstate SLA1161 as an auxiliary battery under the driver's seat of 1983 to 1991
RAINGEAR 1955/ 1956 Chevrolet
 RAINGEAR 1955/ 1956 Chevrolet GETTING STARTED: SOME RECOMMENDATIONS PLEASE TRY OUR WAY FIRST! Note: This system is designed with built in adjustments to fit in your car. If, as you are installing it, you
Fitting Instructions
 Tow-Pro Wiring Kit Fitting Instructions Holder Colorado / Colorado 7 Accessory Kit Estimated Fitting Time: 0 Minutes FI7 Page 0 of General Notes Read through the fitting instructions before installation
ALFA ROMEO GIULIA IGNITION START / STOP BUTTON INSTALLATION ASSISTANCE GUIDE
 ALFA ROMEO GIULIA IGNITION START / STOP BUTTON INSTALLATION ASSISTANCE GUIDE HOW TO DISCONNECT THE BATTERY ON THE ALFA ROMEO GIULIA BEFORE YOU DISCONNECT THE BATTERY MAKE SURE THAT ALL THE WINDOWS ARE
INSTALLATION INSTRUCTIONS
 INSTALLATION INSTRUCTIONS Accessory TRIM Application 2009 ACCORD 4-DOOR Publications No. AII 40008 Issue Date JULY 2008 PARTS LIST Steering Wheel Trim (Without Navigation) P/N 08Z13-TA0-100 Right steering
SUSPENSION MODULE by
 SUSPENSION MODULE by Dear Customer, thank you for choosing Land Rover Passion and for purchasing the suspension module Easy Lift. This product has been designed and manufactured respecting the highest
GENUINE PARTS INSTALLATION INSTRUCTIONS
 GENUINE PARTS INSTALLATION INSTRUCTIONS 1 DESCRIPTION: 2 APPLICATION: 3 PART NUMBER(S) REQUIRED FOR INSTALLATION: Fog Lamp Kit Rogue w/ AL 999F1 G2000 (Fog Lamp Kit) 4 KIT CONTENTS: Item Qty. Part Description
INSTALLATION INSTRUCTIONS
 INSTALLATION INSTRUCTIONS 2017+ BMW R9T Racer HeliBars Replacement Triple Clamp w/built in Risers Part # HRT05126 IMPORTANT: PLEASE GIVE CUSTOMER ENCLOSED INFORMATION! Thank you for your purchase of our
Last Revision: 30JN THRU 1979 C3 CORVETTE STANDARD (NON-ADJUSTABLE) STEERING COLUMN DISASSEMBLY & REPAIR INSTRUCTIONS PAPER #2
 STEERING COLUMN DISASSEMBLY & REPAIR INSTRUCTIONS PAPER #2") Last Revision: 30JN2007 1969 THRU 1979 C3 CORVETTE STANDARD (NON-ADJUSTABLE) STEERING COLUMN DISASSEMBLY & REPAIR INSTRUCTIONS PAPER #2 Disassembly and Repair Instructions Addressed in this Paper Degree
Last Revision: 30JN2007 1969 THRU 1979 C3 CORVETTE STANDARD (NON-ADJUSTABLE) STEERING COLUMN DISASSEMBLY & REPAIR INSTRUCTIONS PAPER #2 Disassembly and Repair Instructions Addressed in this Paper Degree
 www.odometergears.com Mercedes-Benz Mechanical Odometer Repair This how to can be used for all mechanical repairs as the only difference will be the removal of the instrument cluster. http://www.dieselgiant.com/repairyourodometer.htm
Accessory Kit Estimated Fitting Time: 120 Minutes (Prado) Estimated Fitting Time: 140 Minutes (Kluger)
 Estimated Fitting Time: 140 Minutes (Kluger)") Tow-Pro Wiring Kit - Toyota Kluger / Prado Accessory Kit Estimated Fitting Time: 0 Minutes (Prado) Estimated Fitting Time: 0 Minutes (Kluger) FI99 Page 0 of Issue: Date: 0/0/0 0 General Notes Read through
Tow-Pro Wiring Kit - Toyota Kluger / Prado Accessory Kit Estimated Fitting Time: 0 Minutes (Prado) Estimated Fitting Time: 0 Minutes (Kluger) FI99 Page 0 of Issue: Date: 0/0/0 0 General Notes Read through
INSTALLATION INSTRUCTIONS
 INSTALLATION INSTRUCTIONS Accessory Application Publications No. BII 23302 2002 MDX Issue Date PN 08U97-S3V-210 (BLACK) P/N 08U97-S3V-270 (SADDLE) NOV 2001 PARTS LIST Wood trim steering wheel 1. Make sure
INSTALLATION INSTRUCTIONS FUEL SURGE TANK KIT
 INSTALLATION INSTRUCTIONS FUEL SURGE TANK KIT BMW E46 3-Series, Excl Convertible Document: 19-0056 Support: info@radiumauto.com Relieve fuel pressure in vehicle before beginingthe installation. Disconnect
FULL LENGTH HEADERS/ CATTED HEAD PIPES
 INSTALLATION INSTRUCTIONS INS232 2016-2018 CAMARO 6.2L V8 FULL LENGTH HEADERS/ CATTED HEAD PIPES Part #4044 and 40440 Special Tools required: 10mm, 12mm, 13mm, 15mm Socket and Wrenches, Pliers, Saw, Welder
Projector39/Umnitza BMW Headlight & Re-Installation for E39s Predator Angel Eyes, and Lamin-X Installation
 Projector39/Umnitza BMW Headlight & Re-Installation for E39s Predator Angel Eyes, and Lamin-X Installation Now it is time to remove the headlights! Obviously you have to open the hood to do this. 100_3630.jpg
 Page 1 of 14 This install requires work on your supplemental restraint system and could cause injury or damage to your car. If you are not comfortable performing the steps detailed here then do not attempt
RFB MK6 Jetta Fog Light Kit Wiles Rd.Coral Springs, FL
 What s Included: Tools Required: (2) Fog Lights (2) Front Grills Wire Harness Headlight Switch Hardware Kit T25 Torx Wire Cutters 10mm Socket and Rachet Headlight Switch Composite Wedge Tool 01 1. Remove
Installation Instructions Jeep CJ-7
 Retrofit Steering Column Installation Instructions 1976-86 Jeep CJ-7 For Part # s 1520800010, 152800020, 1520800051 www.ididitinc.com 610 S. Maumee St., Tecumseh, MI 49286 (517) 424-0577 (517) 424-7293
CERTAIN TRANSIT VEHICLES EQUIPPED WITH A TRAILER MODULE TRAILER MODULE FUSE AND FOOTWELL DRAINAGE HOLE
 PAGE 1 OF 19 CERTAIN 2015-2017 TRANSIT VEHICLES EQUIPPED WITH A TRAILER MODULE TRAILER MODULE FUSE AND FOOTWELL DRAINAGE HOLE OVERVIEW In the affected vehicles, it may be possible for water to pool and
VECTRIX VX-2 SERVICE MANUAL. Version 1.0/May 2011 VECTRIX, LLC
 www.vectrix.com CONTENTS SECTION A: Tools 1 Tools Needed SECTION B: Mechanical Parts 1 Front Fairing 2 Front Console Cover 3 Speedometer Cover 4 Front Vertical Panel Cover-Lower 5 Front Vertical Panel
INSTALLATION INSTRUCTIONS
 INSTALLATION INSTRUCTIONS Accessory Application Publications No. AII 24664-25319 SYSTEM 2003 CR-V Issue Date MAY 2003 PARTS LIST Security System (sold separately) P/N 08E51-EP4-100 Security System Attachment
Harnessed Bypass Module Installation Instructions
 Harnessed Bypass Module Installation Instructions The Original Secondary Air Injection System Bypass Kit Applicable for Toyota/Lexus Vehicles Introduction: A failure of any component of the Secondary Air
FR500 Mustang Steering Wheel Installation Guide
 FR500 Mustang Steering Wheel Installation Guide The below installation instructions work for the following products: Ford Mustang FR500 Style Steering Wheel Replacement This install guide is for the FR500
Retro it Steering Column
 Retro it Steering Column INSTALLATION INSTRUCTIONS for 1970-74 Cuda/Challenger FOR PART NUMBER S: 1620810010, 1620810020, 1620810051, 1620820010, 1620820020, 1620820051 S I NCE 1986 Instruction # 8000000005
Raingear Mustang Windshield Wiper System Installation Instructions E F A
 Raingear 1965-1966 Mustang Windshield Wiper System Installation Instructions J I H J G E F A D K 2 speed switch B C L Intermittent switch Please try our way first. This system is designed to fit in your
Generator, removing and
 Page 1 of 14 27-26 Generator, removing and installing CAUTION! Disconnect the battery Ground (GND) strap before working on the electrical system. Notes: Before disconnecting the battery, determine the
Models Affected: Certain 2013 Model Year Propane Vision Buses Equipped with Ford 6.8L Engines CORRECTIVE ACTION ---- PROCEDURE
 Models Affected: Certain 2013 Model Year Propane Vision Buses Equipped with Ford 6.8L Engines ISSUE Certain 2013 model year propane Vision buses equipped with Ford 6.8L engines may not have the service
SCION tc SECURITY (V5) Preparation
 Preparation") Preparation Part Number: PT398-21070 Kit Contents Item # Quantity Reqd. Description 1 1 2 1 GBS ECU Hardware Bag Contents Item # Quantity Reqd. Description 1 1 V5 Security ECU 2 1 ECU Mounting Bracket
Preparation Part Number: PT398-21070 Kit Contents Item # Quantity Reqd. Description 1 1 2 1 GBS ECU Hardware Bag Contents Item # Quantity Reqd. Description 1 1 V5 Security ECU 2 1 ECU Mounting Bracket
Part Number : DDM-07-RIS
 RACE INTAKE SYSTEM, R56 MINI Cooper S - 2007+ Part Number : DDM-07-RIS This kit includes: Part Number Description Qty DDM-07-006 DDMWorks PFB, Pressurized Filter Box 1 DDM-07-017 DDMWorks RAS, Ram Air
INSTALLATION INSTRUCTIONS
 INSTALLATION INSTRUCTIONS Accessory Application Publications No. AII 26031 2004 ODYSSEY Issue Date AUG 2003 NOTE: You cannot install the subwoofer in a vehicle equipped with both an under seat Navigation
YOU MAY WANT TO FIRST TRY TO LOOSEN THE FILTER HOUSING
 2005 XC90 Tune-up (5-cyl) Including: Oil Change - Spark Plugs - Fuel Filter - Cabin Filter First off - let me say that I am an amateur (at best) mechanic, and I claim no responsibility for whatever you
Parts and Accessories Installation Instructions
 Parts and Accessories Installation Instructions 0 40 00 60 80 80 60 00 40 0 0 40 0 3 4 5 7 6 R/T 046 0455 Z Multi-functional steering wheel (MFL) retrofit kit Cruise control (GRA) Retrofit kit for BMW
LEXUS CT 200h ILLUMINATED DOOR SILLS Preparation
 Preparation Part Number: PT922-89100 Kit Contents Item # Quantity Req'd. Description 1 1 Door Sill, Front Right Hand 2 1 Door Sill, Front Left Hand 3 1 Door Sill, Rear Right Hand 4 1 Door Sill, Rear Left
12V Chevrolet Silverado (W461-C) 12V GMC Sierra Denali (W461-G) Customer Service Guide
 12V GMC Sierra Denali (W461-G) Customer Service Guide") 12V Chevrolet Silverado (W461-C) 12V GMC Sierra Denali (W461-G) Customer Service Guide MMXIV Copyright Aria Child Inc. 1 Contents I) Check Battery... 3 II) Check Fuse Condition 6 III) Check Wiring Condition....
12V Chevrolet Silverado (W461-C) 12V GMC Sierra Denali (W461-G) Customer Service Guide MMXIV Copyright Aria Child Inc. 1 Contents I) Check Battery... 3 II) Check Fuse Condition 6 III) Check Wiring Condition....
Intake Kit Supplement for CRV and Pathfinder
 Intake Kit Supplement for CRV and Pathfinder This guide will briefly outline how to install the intake kits for the Honda CRV and Nissan Pathfinder. This is a pretty basic job, but for the average person
DrVanos.com Stage II Installation Instructions. Tool rental is available with the purchase of a vanos kit *See website for more info*
 DrVanos.com Stage II Installation Instructions Special Tools Needed: Camshaft locking tool TDC Crank pin Sprocket turning tool Tool rental is available with the purchase of a vanos kit *See website for
Turn Signal / Horn Kit PN 7101 by All years Polaris RZR 1000 and RZR 900, 900-4, 900 trail, 900S and 900XC STOP - THIS KIT IS DESIGNED
 All years Polaris RZR 1000 and 1000-4 2015 RZR 900, 900-4, 900 trail, 900S and 900XC STOP - THIS KIT IS DESIGNED SPECIFICALLY FOR ALL YEAR AND MODEL POLARIS RZR 1000 AND 1000-4. ALSO THE 2015 POLARIS RZR
FOG LAMPS INSTALL KIT
 FOG LAMPS INSTALL KIT PT CRUISER INSTALLATION INSTRUCTIONS Read entire instructions thoroughly before starting. For proper aiming of fog lamps, follow procedures in the service manual. NOTES: Left and
BMW 3 SeriesE90 - E93 Factory Alarm Install
 Instructions on a BMW 3 Series Factory Alarm Install. Written By: Danielle 2017 guides.drivediy.com Page 1 of 9 INTRODUCTION Tips on how to install a BMW 3 Series Factory alarm. Credit: CC 330i[E90Post.com
1963 GEN IV SUREFIT VINTAGE AIR CONDITIONING INSTALLATION
 by Randy Irwin 1963 GEN IV SUREFIT VINTAGE AIR CONDITIONING INSTALLATION Randy Irwin - Technical Writer Randy has been involved in the Chevy parts business for over 30 years. He is a wizard at creating,
1999 Volkswagen New Beetle GL
 Driver side airbag unit, removing and installing Removing CAUTION: Never let anyone sit in the passenger compartment when the airbag system is being worked on, especially when the airbag system is being
Installation Guide Current Ford F-250 & Ford F-350 Super Duty. Product Code: 109 & 119
 Installation Guide 2008 - Current Ford F-250 & Ford F-350 Super Duty Product Code: 109 & 119 September 1, 2012 Tools Needed Components Included 3/8" Drill P2 Tip #2 Philips Screwdriver 1/2" Drill Bit Hinged
Short Shifter Installation Instructions Miata 6-Speed manual
 Tools required: 10mm deep socket long extension ratchet small flathead screwdriver phillips-head screwdriver Short Shifter Installation Instructions 2006-14 Miata 6-Speed manual IMPORTANT NOTE: This shifter
TOYOTA RAV TVIP V3
 Section I Installation Preparation Part Number: 08586-4A872 Section I Installation Preparation Kit Contents Item # Quantity Reqd. Description 1 1 Wire Harness 2 1 Status Monitor 3 1 Piezo Buzzer 4 1 V3
Amp & Speaker Upgrade Install Instructions for Batwing Fairing
 Amp & Speaker Upgrade Install Instructions for Batwing Fairing Tools Needed: 1/2 inch Socket Wire Cutters 7/16 inch Socket Wire Strippers 10 mm Socket Phillips Screwdriver 1/2 inch Ratchet Wrench T25 Torx
I Page 1 of 5
 Page 1 of 5 MOUNTING LOCATION: Upper right side of radio cavity-es300 Right sideof radio cavity-sc430&es350 Right side of climate control-solara TOOLS REQUIRED: Hook tool / Pry tool 10mm driver/ Phillips
SPEED CONTROL 4 AND 6 CYL. JEEP WRANGLER. Read entire instructions thoroughly before starting. INSTALLATION INSTRUCTIONS TOOLS REQUIRED:
 Read entire instructions thoroughly before starting. TOOLS REQUIRED: SPEED CONTROL 4 AND 6 CYL. JEEP WRANGLER INSTALLATION INSTRUCTIONS Complete socket set Phillips screwdriver Torx drivers Wire strippers/cutters
SERVICE TOOL CONTENTS
 09-13 TOYOTA TACOMA PART NUMBER: 250-1836 CRUISE CONTROL KIT 1 3 SERVICE TOOL CONTENTS ITEM QTY DESCRIPTION PART NUMBER BASE KIT CONTENTS ITEM QTY DESCRIPTION 1 1 CONTROL SWITCH ASSEMBLY 2 2 SCREWS (M5)
RMK HANDLEBAR KIT P/N ; ; APPLICATION BEFORE YOU BEGIN KIT CONTENTS. Verify accessory fitment at Polaris.com.
 RMK HANDLEBAR KIT P/N 2883835; 2883836; 2883837 APPLICATION Verify accessory fitment at Polaris.com. BEFORE YOU BEGIN Read these instructions and check to be sure all parts and tools are accounted for.
TOYOTA TACOMA TVIP V5
 Preparation Part Number: PT398-35090 Kit Contents Item # Quantity Reqd. Description 1 1 Wire Harness 2 1 Security ECU 3 1 GBS ECU 4 1 Status Monitor/Microphone 5 2 Warning Labels (English) 6 2 Warning
Short Shifter Installation Instructions For Miata, 6-speed Manual Transmission
 Short Shifter Installation Instructions For 2006-15 Miata, 6-speed Manual Transmission PART# 994-060 Required tools: 10mm deep socket Long extension Ratchet Small flathead screwdriver Phillips-head screwdriver
Installation Manual TWM Performance Short Shifter Cobalt SS/SC, SS/TC, HHR SS, Ion Redline and Saab 9-3
 Page 1 Installation Manual TWM Performance Short Shifter Cobalt SS/SC, SS/TC, HHR SS, Ion Redline and Saab 9-3 Please Note: It is preferable to park on a flat surface, as you will have to engage and disengage
Audi A8 ( ) MMI swivelling unit repair manual
 MMI swivelling unit repair manual") Audi A8 (2003-2007) MMI swivelling unit repair manual Tools which you will need: two pcs screwdriver (any kind, for vent removing ) (you can cover the metal part with any tape to prevent making scratches
Audi A8 (2003-2007) MMI swivelling unit repair manual Tools which you will need: two pcs screwdriver (any kind, for vent removing ) (you can cover the metal part with any tape to prevent making scratches
Tools needed: Here is a pic of the shift kit I used. It is a Transgo brand and as you can see, it just a bag full of springs and one valve.
 Before installing a shift kit, be sure the transmission is in good operating order. If your transmission is making noises, slipping, shifting bad or the fluid looks brown or smells burnt, take the transmission
INSTALLATION INSTRUCTIONS
 INSTALLATION INSTRUCTIONS Accessory Application Publications No. SYSTEM ACCORD 2-DOOR (LX/EX L4, LX V6) AII 25749 Issue Date FEB 2004 PARTS LIST Double-sided adhesive tape XM Radio Attachment Kit : P/N
INSTALLATION INSTRUCTIONS FOR MK4 VOLKSWAGEN JETTA (BORA) /GOLF 1.8T, 2.0L, VR6, & R32 MODELS ALSO FITS ALL MODELS OF SEAT LEON & TOLEDO
 /GOLF 1.8T, 2.0L, VR6, & R32 MODELS ALSO FITS ALL MODELS OF SEAT LEON & TOLEDO") CI100001 INSTALLATION INSTRUCTIONS FOR 1999.5-2005 MK4 VOLKSWAGEN JETTA (BORA) /GOLF 1.8T, 2.0L, VR6, & R32 MODELS ALSO FITS ALL MODELS OF SEAT LEON & TOLEDO Thank you for choosing to purchase a Carbonio
CI100001 INSTALLATION INSTRUCTIONS FOR 1999.5-2005 MK4 VOLKSWAGEN JETTA (BORA) /GOLF 1.8T, 2.0L, VR6, & R32 MODELS ALSO FITS ALL MODELS OF SEAT LEON & TOLEDO Thank you for choosing to purchase a Carbonio
Thank you for purchasing the Craven Speed FlexPod Complete Gauge Pod Kit For R56, R58, R59, R60 with Refresh Engines (2011+)
") Thank you for purchasing the Craven Speed FlexPod Complete Gauge Pod Kit For R56, R58, R59, R60 with Refresh Engines (2011+) Before You Start Please read instructions completely before installing. These
Thank you for purchasing the Craven Speed FlexPod Complete Gauge Pod Kit For R56, R58, R59, R60 with Refresh Engines (2011+) Before You Start Please read instructions completely before installing. These
TOYOTA PRIUS XM SATELLITE RADIO Preparation
 Preparation Part Number: Mounting Kit PT546-4700 Tuner Assy 8680-0W03 NOTE: Part number of this accessory may not be the same as the part number shown. Tuner Assembly Kit Contents (8680-0W03) Item # Quantity
Sunroof Repair. Sunroof Repair TSB. The sunroof repair kit available for the J30 is part number Y20. See images at bottom of document.
 Sunroof Repair This document is the text/images from the TSB (technical service bulletin) issued by Infiniti concerning the repair procedure for sunroof issues. Be advised that this is a LARGE, TIME-CONSUMING
Potentiometer Replacement
 Potentiometer Replacement Tools Required: 2x 7/16 1/2 Nut Driver 1/8 Allen Wrench Small Straight Screwdriver Medium Phillips A potentiometer is a device which translates mechanical rotation into variable
GENUINE PARTS INSTALLATION INSTRUCTIONS
 GENUINE PARTS INSTALLATION INSTRUCTIONS 1. 2. 3. 4. DESCRIPTION: Illuminated Kick Plate Kit APPLICATION: Murano PART NUMBER: 999G6 C2000, 999G6 C2100, 999G6 C2200 999Q9 AY001 - Accessory Service Connector
Slave Cylinder Weep Hole Drilling Procedure
 Slave Cylinder Weep Hole Drilling Procedure Tools Required: T20 Torx Driver T25 Torx Driver T25 Torx Bit with ¼ Ratchet Wrench 4mm Hex Key (Allen wrench) 5mm Hex Key 6mm Hex Key 8mm Hex Key 12mm Hex Key
INSTALLATION INSTRUCTIONS
 INSTALLATION INSTRUCTIONS Accessory Application Publications No. P/N 08E49-S2A-100 2004 S2000 AII 26325 Issue Date OCT 2003 PARTS LIST Hood switch harness TOOLS AND SUPPLIES REQUIRED #2 Phillips screwdriver
GETTING STARTED: SOME RECOMMENDATIONS PLEASE TRY OUR WAY FIRST!
 RAINGEAR 1953/ 54 Chevrolet GETTING STARTED: SOME RECOMMENDATIONS PLEASE TRY OUR WAY FIRST! Note: This system is designed with built in adjustments to fit in your car. If, as you are installing it, you
INSTALLATION INSTRUCTIONS
 INSTALLATION INSTRUCTIONS Accessory S P/N 08V67-SJC-101 Application 2012 RIDGELINE Publications No. AII 12006 Issue Date NOV 2011 PARTS LIST Back-up sensor harness 3 Wire ties with small clips (2 Not used)
A selection of phillips head screwdrivers 15mm socket 10mm socket Modeler s knife Solder Electrical tape A selection of flat head screwdrivers
 Read entire instructions thoroughly before starting. References to the service manual wiring diagrams and operation sections will be required for adjustments, fastener torques, and troubleshooting. TOOLS
INSTALLATION INSTRUCTIONS
 INSTALLATION INSTRUCTIONS Accessory Application Publications No. in- ENTERTAINMENT SYSTEM 2004 TSX BII 24811 Issue Date APRIL 2003 PARTS LIST Attachment Kit P/N 08B23-SDA-101A Monitor bracket harness FM
If you study the Mercedes Documents (pictured below) for several minutes before you start, you will understand them as you proceed.
 for several minutes before you start, you will understand them as you proceed.") Removing the C32 center dash panel and radio These are not my instructions, they were garnered from the web, I merely pasted them onto a doc file. There is Air Bag wiring nearby. If you feel uncomfortable
Removing the C32 center dash panel and radio These are not my instructions, they were garnered from the web, I merely pasted them onto a doc file. There is Air Bag wiring nearby. If you feel uncomfortable
INSTALLATION INSTRUCTIONS
 INSTALLATION INSTRUCTIONS Accessory Application Publications No. BII 37612-38949 2008 MDX Issue Date FEB 2008 PARTS LIST Steering wheel 1. Make sure you have the anti-theft codes for the radio and navigation
850 TETHER SWITCH KIT
 850 TETHER SWITCH KIT P/N 2883823 APPLICATION Verify accessory fitment at Polaris.com. BEFORE YOU BEGIN Read these instructions and check to be sure all parts and tools are accounted for. Please retain
Tools Required. Metric Wrench Set Screwdriver Set Metric Socket Set Pliers Heavy duty hydraulic Jack and Car Stands Box knife or similar Hacksaw WD40
 Subaru 2004+ Legacy GT & Outback XT For JDM 2.0 twinscroll turbo and USDM 2.5 turbo models Front Mount Intercooler Fitting Instructions PN# LEG-1348-000 You are now the proud owner of a highly tested and
Mustang One-Touch Convertible Top Module (2005+) - Installation Instructions
 - Installation Instructions") Mustang One-Touch Convertible Top Module (2005+) - Installation Instructions The below installation instructions work for the following products: Mustang One-Touch Convertible Top Module (2005+) Please
Mustang One-Touch Convertible Top Module (2005+) - Installation Instructions The below installation instructions work for the following products: Mustang One-Touch Convertible Top Module (2005+) Please
INSTALLATION MANUAL AP60B INSTALLATION MANUAL
 INSTALLATION MANUAL 2. TOOLS REQUIRED The following is a list of tools required to properly install the cruise control. While this unit may be installed without some of the tools listed, it is recommended
DL650 Odyssey Luggage Installation Guide
 DL650 Odyssey Luggage Installation Guide Thank you for purchasing Jesse Luggage for your Motorcycle. Our Luggage, handcrafted in the USA, is designed for those with an interest in finding the most durable
INSTALLATION INSTRUCTIONS
 INSTALLATION INSTRUCTIONS Accessory S P/N 08V67-SJC-101 Application 2010 RIDGELINE Publications No. AII 42117 Issue Date AUG 2009 PARTS LIST Back-up sensor harness 3 Wire ties with small clip (2 Not used)
12 September 2012 Valve Body # , , ,
 12 September 2012 Valve Body # 1030416, 1030417, 1030418, 1030419 1 BD VALVE BODY For 1996-2004 Dodge 5.9L 12V/24V Cummins Trucks -- I n s t a l l a t i o n I n s t r u c t i o n s -- 1030416 1996-1998
P/N Deluxe Model 1200T WITH THERMOSTAT P/N Standard Model 3550 WITHOUT THERMOSTAT
 Read and Save These Instructions From MaxxAir Vent Corporation TURBO/ MaxxAir the leader in RV ventilation 215120 CSA approved. Complies with UL507 TURBO/MAXX 12 Volt Installation Instructions P/N 00-965001
Stand Alone Fog Lights Installation Instructions
 Tools Required: 1. Trim Removal tool or protected flat screwdriver 2. #2 Phillips Screwdriver 3. 10mm socket 4. 10mm wrench 5. 8mm or 5/16 socket 6. Adjustable Pliers 7. Electrical Tape WARNING!!! Disconnect
TOYOTA TUNDRA TVIP V4 REMOTE ENGINE STARTER (RES)
") Preparation Part Number: 08586-OC910 Conflicts Do not install into vehicles without RKE systems. Recommended Sequence of Application Item # Accessory 1 TVIP/RES Any TVIP or RES system 2 XM Radio NOTE:
Preparation Part Number: 08586-OC910 Conflicts Do not install into vehicles without RKE systems. Recommended Sequence of Application Item # Accessory 1 TVIP/RES Any TVIP or RES system 2 XM Radio NOTE:
Ford Ranger and Mazda Pickup Odometer Worm Gear Replacement
 www.odometergears.com Ford Ranger and Mazda Pickup Odometer Worm Gear Replacement http://www.therangerstation.com/magazine/fall2008/odometer_worm_gear.htm ****************************************************************************************************
INSTALLATION GUIDE. AV8900H Dual Multimedia Headrest Replacement System
 INSTALLATION GUIDE AV8900H Dual Multimedia Headrest Replacement System NOTICE OF INTENDED INSTALLATION AND USE AV8900H VIDEO PRODUCTS ARE NOT INTENDED FOR VIEWING BY THE DRIVER, AND ARE TO BE INSTALLED
C&L Cold Air Intake (05-09 V6) - Installation Instructions
 - Installation Instructions") C&L Cold Air Intake (05-09 V6) - Installation Instructions The below installation instructions work for the following products: C&L Cold Air Intake (05-09 V6) Please read through the instructions carefully
C&L Cold Air Intake (05-09 V6) - Installation Instructions The below installation instructions work for the following products: C&L Cold Air Intake (05-09 V6) Please read through the instructions carefully