Universal Retrofit System Installation Instructions Revised:
|
|
|
- Opal McDonald
- 6 years ago
- Views:
Transcription
1 Universal Retrofit System Installation Instructions Revised: These instructions do not purport to cover all details or variations in components nor to provide for every possible contingency to be met in connection with installation, operation, or maintenance. Should further information be desired or should a particular problem arise which is not covered sufficiently for the purchaser s purpose, the matter should be referred to Linmore LED Labs. Linmore does not claim liability for any installation not performed according to this guide or not by a qualified electrician. IMPORTANT SAFEGUARDS When using electrical equipment, basic safety precautions should always be followed including the following: READ AND FOLLOW ALL SAFETY INSTRUCTIONS 1. DANGER RISK OF SHOCK DISCONNECT POWER BEFORE INSTALLATION 2. WARNING Risk of fire or electric shock. LED Upgrade Kit installation requires knowledge of luminaires electrical systems. If not qualified, do not attempt installation. Product must be installed in accordance with NEC or your local electrical code. If you are not familiar with these codes and requirements, contact a qualified electrician. 3. WARNING Risk of fire or electric shock. Luminaire wiring and electrical parts may be damaged when drilling for installation of the LED upgrade kit. Check for enclosed wiring and components. 4. WARNING Risk of fire or electric shock. Check the existing wiring for damage before installing upgrade kit. Do not install if existing wires are damaged. 5. WARNING To prevent wiring damage or abrasion, do not expose wires to the edge of sheet metal or any other sharp objects. 6. WARNING Risk of fire or electric shock. Install this kit only in the luminaires that have the construction features and dimensions shown in the photographs and/or drawings. 7. The retrofit assembly is accepted as a component of a luminaire where the suitability of the combination shall be determined by UL or authorities having jurisdiction. 8. Only the holes indicated in the photographs or drawings may be made or altered as a result of the kit installation. Do not leave any other holes open in a wiring enclosure or electrical component.


2 SAVE THESE INSTRUCTIONS FOR FUTURE REFERENCE NOTES: 1. Upgrade Kit is for installation in a nominal 1x4 or 2x4 Listed dry or damp location fluorescent troffer, wrap or strip luminaire, with or without a diffuser. The luminaire shall have the following minimum dimensions: 2-15/16 deep pan 3 wide minimum wiring compartment 46 minimum length to accommodate 4 nominal length light bar and 22 minimum length to accommodate 2 nominal length light bar 2. Consult your local authority regarding disposal or recycling of removed ballast and lamps. LIST OF SUPPLIED COMPONENTS: URS Light Bar(s) per Chosen Kit LED Drivers(s) as Ordered Self-Tapping Screws: 2 per Bar and 2 per Driver LIST OF ITEMS INSTALLER MAY HAVE TO SUPPLY: Additional wire to extend wire length or make jumpers Wire nuts Extra self-tapping screws NOTE: The instructions below reflect the steps necessary for retrofit of a typical fluorescent troffer luminaire. These steps are functionally identical for retrofit of a typical wrap or strip luminaire. Step 1: Locate latches on the lens frame and release them allowing the lens frame to open. Carefully let the lens frame hang. Step 2: Remove the existing linear fluorescent tubes and properly dispose of them.


3 Step 3: Remove the wiring compartment by squeezing the sides in and pulling down. Set aside. Step 4: Cut the leads from the ballast to the socket housing on both ends of the luminaire and cap socket leads. When cutting the leads, leave the smallest amount of wire attached to the luminaire. Step 5: Cut the leads from the ballast to the input power ensuring to leave as much length as possible for electrical connections. Remove ballast from housing and dispose of properly. Step 6: Push exposed socket leads back into socket housing on each side of the luminaire or cap any exposed accessible leads. Step 7: Prepare input power by stripping input power leads 5/8.


4 Step 8: Bring new driver into housing using mounting holes from old ballast when possible and secure it using supplied self-tapping screws. Ensure that the existing luminaire housing is properly grounded to ensure proper driver grounding. If housing has multiple locations for power supply, new driver can be secured in any of these locations. Step 9: Make the input electrical connection per diagram on the face of the LED Driver. The White Input Wire is the Neutral. The Black or Red Input Wire is Line Voltage Input from Volts. Ensure that the driver is properly grounded to the luminaire. Step 10: The LED Driver comes standard with 0-10 Volt Dimming. The Blue, Yellow, and White wires on the output side of the driver are for dimming functions. If the dimming functions will NOT be used, tie the blue and yellow wires together with a wire nut and cap the white dimming wire.
. If not required, cap this wire. Step 11: Bring wiring compartment cover previously removed in Step 3 into the housing.")

5 If the dimming functions will be used, this is the function of the dimming wires: Yellow: 0-10V + Dimming Input White: 0-10V Dimming Input Blue: Input Power Supply for Dimmer at 9 Volts (when required by dimming system). If not required, cap this wire. Step 11: Bring wiring compartment cover previously removed in Step 3 into the housing. Carefully tuck all leads and wire connectors into the wire compartment. Reattach wire compartment by snapping into place over the driver insuring no wires are pinched. Route the driver outgoing leads through the wiring compartment allowing leads to be exposed through the end of the wiring compartment. Sometimes, the installer may want to relocate the wiring compartment cover. It can be located to a similar location in the housing and secured with self-tapping screws. Step 12: Determine where each URS Light Bar will be located in the luminaire housing. Start a self-tapping screw for one end of the URS Light Bar. Slide one end of the URS Light Bar end cap under the head of the self-tapping screw. Locate the opposite end of the URS Light Bar and set a self-tapping screw in the chosen location. Go back to the screw that was started and finish securing the screw. Step 13: Finish installing the remainder of the URS Light Bars in the manner described in Step 12.
 and printed on the LED strip is + & - indications of the")
 according to the following pictures based on the number of URS")
6 Step 14: The URS Light Bars have a press-in style connector on each end visible through the clear end caps. The press-in connectors are both marked by color (red=positive and black=negative) and printed on the LED strip is + & - indications of the same, respectively. Connect the driver output leads to the chosen end of the URS Light Bar(s) according to the following pictures based on the number of URS Light Bars driven by a single driver. There are four configurations: 1 Bar, 2 Bars, 3 Bars, or 4 Bars 1 Bar: 2 Driver Output Leads: 1 Red/+ and 1 Black/-


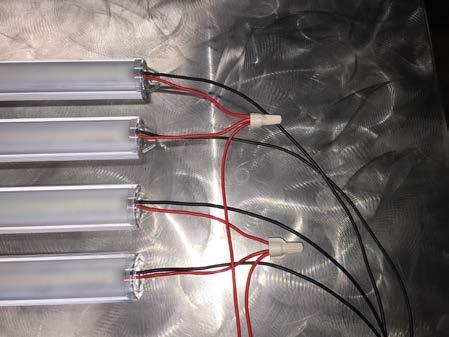
7 2 Bar: 4 Driver Output Leads: 2 Red/+ and 2 Black/- 3 Bar: 5 Driver Output Leads: 2 Red/+ and 3 Black/- 4 Bar: 6 Driver Output Leads: 2 Red/+ and 4 Black/-
8 Step 15: Compact any excess wire lengths under the wiring compartment cover. Step 16: Close the lens door and secure the latches. Step 17: Restore the power supply to the fixture and ensure proper operation.
ULTRA PERFORMANCE LED TUBE INSTALLATION INSTRUCTIONS
 Ultra Performance LED Tube Installation Instructions Page 1 of 7 ULTRA PERFORMANCE LED TUBE INSTALLATION INSTRUCTIONS These instructions do not purport to cover all details or variations in components
Strip Fixture URS Light Bar Retrofit Installation Instructions Revised:
 Strip Fixture URS Light Bar Retrofit Installation Instructions Revised: 20180126 These instructions do not purport to cover all details or variations in components nor to provide for every possible contingency
READ AND FOLLOW ALL SAFETY INSTRUCTIONS 1. DANGER RISK OF SHOCK DISCONNECT POWER BEFORE INSTALLATION
 UR Series LED Upgrade Kit Includes: 24" Linear Option IMPORTANT SAFEGUARDS When using electrical equipment, basic safety precautions should always be followed including the following: READ AND FOLLOW ALL
 www.greenelectricalsupply.com 1x4 2x2 & 2x4 Read all instructions and warnings before attempting installation. RISK OF FIRE OR ELECTRIC SHOCK. LED RETROFIT INSTALLATION REQUIRES KNOWLEDGE OF LUMINAIRES
Installation Guide. WARNINGS Read all instructions and warnings before attempting installation
 Installation Guide WARNINGS Read all instructions and warnings before attempting installation ALWAYS MAKE ABSOLUTELY SURE THE POWER IS OFF WHEN PERFORMING THE FIXTURE MODIFICATION. DURING INSTALLATION,
LED 2/3/4ft T8 Tube 120V
 E-T8-1200-YR LED 2/3/4ft T8 Tube 120 Our LED Tubes utilize the latest LED chips as the light source, whilst using the standard T8 end caps, which makes it easy to install and replace traditional fluorescent
LED IMPORTANT SAFETY INSTRUCTIONS
 READ AND FOLLOW ALL SAFETY INSTRUCTIONS! SAVE THESE INSTRUCTIONS AND DELIVER TO OWNER AFTER INSTALLATION To reduce the risk of death, personal injury or property damage from fire, electric shock, falling
Instruction/Installation Manual
 Instruction/Installation Manual Retrofit:LED Tube Lamp 4ft. Fluorescent T8/T10 Replacement 1 SECTION 1 - General Information Kit components:1-led Tube, 1-Label and 1-Set of Instructions Models were only
Installation Instructions: External-Driver SEP T8 LED Tube Lamp
 Installation Instructions: External-Driver SEP T8 LED Tube Lamp Installation Notes & Precautions: External-Driver SEP T8 LED Tube Lamp Read all precautions, warnings, instructions contained in this document.
Installation Instructions BLTR and 2BLTR Relight Assembly
 UT4540 Rev. B Installation Instructions BLTR and 2BLTR Relight Assembly This Relight assembly was engineered to upgrade most recessed fixtures mounted in T-grid ceiling installations, including most parabolic
STOP BEFORE YOU BEGIN READ THESE INSTRUCTIONS COMPLETELY AND CAREFULLY
 STOP BEFORE YOU BEGIN READ THESE INSTRUCTIONS COMPLETELY AND CAREFULLY WARNING Risk of fire or electrical shock. LED retrofit installations require knowledge of luminaire electrical systems. If not qualified,
INSTALLATION INSTRUCTIONS
 LED LIGHT ENGINE APPLICATION PROGRAM INSTALLATION INSTRUCTIONS LED Light Engine Kit Model: 9 Round Engine 120V: TRIAC DIMMING TKT120025RDxx-01 TKT120025RDxx-11 TKT120021RDxx-01 TKT120021RDxx-11 TKT120025RDxx-02
READ AND FOLLOW ALL SAFETY INSTRUCTIONS! SAVE THESE INSTRUCTIONS AND DELIVER TO OWNER AFTER INSTALLATION.
 Installation Instructions 2RTLEDR/2RTLEDRT Relight Assembly READ AND FOLLOW ALL SAFETY INSTRUCTIONS! SAVE THESE INSTRUCTIONS AND DELIVER TO OWNER AFTER INSTALLATION. IMPORTANT SAFETY INSTRUCTIONS WARNING:
INSTALLATION INSTRUCTIONS ModuSys LED Retrofit Kit 2x2, rev. D.02
 INSTALLATION INSTRUCTIONS ModuSys LED Retrofit Kit 2x2, rev. D.02 Important safety information - read all instructions before installation. WARNING Risk of fire or electric shock. Luminaire wiring and
Installation Instructions: Memory-Dimmable SEP T8 Tube Lamps
 Installation Instructions: Memory-Dimmable SEP T8 Tube Lamps Installation Notes & Precautions: Memory-Dimmable SEP T8 LED Tube Lamp Read all precautions, warnings, instructions contained in this document.
Product Installation Instruction LED Tube Lamp Retrofit Kits
 Regular T8 internal driver single end Product Installation Instruction LED Tube Lamp Retrofit Kits 1 General Description LED Tube Light adopts the new type LED as the light source, using the standard T8
TECTONIC LED CORP. ISO
 TECTONIC TECTONIC LED CORP. ISO 9001:2000 Products RoHs Compliance Instruction Menu Retrofit:LED Tube Lamps SECTION 1 - General Information Kit components: 1-LED Tube, 1-Label and 1-Set of Instructions
READ AND FOLLOW ALL SAFETY INSTRUCTIONS! SAVE THESE INSTRUCTIONS AND DELIVER TO OWNER AFTER INSTALLATION.
 Installation Instructions RT8RT/RT5RT Relight Assembly READ AND FOLLOW ALL SAFETY INSTRUCTIONS! SAVE THESE INSTRUCTIONS AND DELIVER TO OWNER AFTER INSTALLATION. IMPORTANT SAFETY INSTRUCTIONS WARNING: FAILURE
IMPORTANT SAFEGUARDS When using electrical equipment, basic safety precautions should always be followed including the following:
 ZR-RK Series LED Retrofit Troffer Kit Includes: ZR22RK and ZR24RK Standard and Emergency Luminaires IMPORTANT SAFEGUARDS When using electrical equipment, basic safety precautions should always be followed
Lumination TM LED Luminaire LUR Series
 Installation Guide Lumination TM LED Luminaire LUR Series BEFORE YOU BEGIN Read these instructions completely and carefully. WARNING/AVERTISSEMENT RISK OF FIRE OR ELECTRIC SHOCK Turn power off before inspection,
LED Recessed Troffer Retrofit Kit
 Model # TRK series LED Recessed Troffer Retrofit Kit Installation Instructions PACKAGE CONTENTS A B E Part Item Name Qty. A Retrofit assembly 1 B Bracket 2 C Sheet metal screw 4 D Wire nuts 5 E Gap channel
OPTIMAX RADIANT FIELD RETROFIT INSTRUCTIONS
 OPTIMAX RADIANT FIELD RETROFIT INSTRUCTIONS 99-24283-I001 Table of Contents 1. 24V LED Approved Drivers 5 1.1. 24V LED Driver (60-19910-0002).. 5 2. Optimax Radiant 24V LED Lighting. 6 2.1. OP30 6 2.2.
LED IMPORTANT SAFETY INSTRUCTIONS
 READ AND FOLLOW ALL SAFETY INSTRUCTIONS! SAVE THESE INSTRUCTIONS AND DELIVER TO OWNER AFTER INSTALLATION To reduce the risk of death, personal injury or property damage from fire, electric shock, falling
INSTALLATION INSTRUCTIONS LED RETROFIT ASSEMBLY (LRA) Rev F
 Rev F") SAFETY S IMPORTANT SAFETY INFORMATION SUITABLE FOR DRY OR DAMP LOCATIONS. NOT FOR USE WITH PHASE CUT DIMMERS. Risk of shock. Disconnect power before installation. DANGER CONVIENT AUX EMPLACEMENTS HUMIDES.
SAFETY S IMPORTANT SAFETY INFORMATION SUITABLE FOR DRY OR DAMP LOCATIONS. NOT FOR USE WITH PHASE CUT DIMMERS. Risk of shock. Disconnect power before installation. DANGER CONVIENT AUX EMPLACEMENTS HUMIDES.
General Installation Instructions LED
 General Installation Instructions LED To reduce the risk of death, personal injury or property damage from fire, electric shock, falling parts, cuts/abrasions and other hazards, please read all warnings
INSTALLATION INSTRUCTIONS 120V DirectAC LED Engine Kit
 10W DirectAC Engine TJT120010ACxyyB 15W DirectAC Engine TJT120015ACxyyB INSTALLATION INSTRUCTIONS 120V DirectAC LED Engine Kit TJT120010ACxyyB TJT120015ACxyyB TJT120023ACxyyB TJT120010ASxyyC TJT120010ACxyyC
IMPORTANT SAFETY INSTRUCTIONS
 IMPORTANT SAFETY INSTRUCTIONS READ AND FOLLOW ALL SAFETY INSTRUCTIONS! SAVE THESE INSTRUCTIONS AND DELIVER TO OWNER AFTER INSTALLATION To reduce the risk of death, personal injury or property damage from
KT-EMRG-1400-SL /B. 3. Please ensure the electricity connections conform to the National Electrical Code and local regulations if applicable.
 FLUORESCENT EMERGENCY BALLAST WARNING: When using this lighting device, safety precautions should be followed at all times. CAUTION: Verify that all repalcment lamp types marked on the installed luminaire
3. Please ensure the electricity connections conform to the National Electrical Code and local regulations if applicable.
 FLUORESCENT EMERGENCY BALLAST WARNING: When using this lighting device, safety precautions should be followed at all times. CAUTION: Verify that all replacement lamp types marked on the installed luminaire
Optimax Pro Retrofit Instructions
 Copyright 2011 by ALL rights reserved. Information in this document is subject to change without notice. Companies, names and data used in examples herein are fictitious unless otherwise noted. No part
INSTRUCTION MANUAL. IMPORTANT SAFEGUARDS When using electrical equipment, basic safety precautions should always be followed, including the following:
 SERIES E Emergency Lighting Equipment IMPTANT SAFEGUARDS When using electrical equipment, basic safety precautions should always be followed, including the following: READ AND FOLLOW ALL SAFETY INSTRUCTIONS.
CFP-LED Contractor Select Flat Panel. Installation Instructions
 IMPORTANT SAFETY INSTRUCTIONS To reduce the risk of death, personal injury or property damage from fire, electric shock, falling parts, cuts/abrasions, and other hazards please read all warnings and instructions
INSTRUCTION MANUAL IMPORTANT SAFEGUARDS. When using electrical equipment, basic safety precautions should always be followed, including the following:
 INSTRUCTION MANUAL IMPORTANT SAFEGUARDS SERIES D LIGHTING EQUIPMENT When using electrical equipment, basic safety precautions should always be followed, including the following: READ AND FOLLOW ALL SAFETY
SURE-LITES FBP140XLP Instruction Manual
 SURELITES Instruction Manual IMPORTANT SAFEGUARDS WHEN USING ELECTRICAL EQUIPMENT, BASIC SAFETY PRECAUTIONS SHOULD ALWAYS BE OBSERVED INCLUDING THE FOLLOWING: READ AND FOLLOW ALL SAFETY INSTRUCTIONS. CAUTION:
Solid State T8 tube is the smart alternative to a
 Solid State T8 tube Ideal for decorative and ambient lighting in retail outlets, hotels, restaurants, government buildings, and multi-unit residences L Prize Winner Solid State T8 tube Direct Replacement
MAXLITE RKT LED Retrofit Kit
 MAXLITE RKT LED Retrofit Kit Description and Intended Use The RKT LED Retrofit Kit is a high performance LED Fixture upgrade kit designed to replace the original components inside 2 x2 and 2 x4 fluorescent
MaxLite LED UTILITY WRAP FIXTURES
 General Safety Information To reduce the risk of death, personal injury or property damage from fire, electric shock, falling parts, cuts/abrasions, and other hazards read all warnings and instructions
LED IMPORTANT SAFETY INSTRUCTIONS
 LED IMPORTANT SAFETY INSTRUCTIONS READ AND FOLLOW ALL SAFETY INSTRUCTIONS! SAVE THESE INSTRUCTIONS AND DELIVER TO OWNER AFTER INSTALLATION To reduce the risk of death, personal injury or property damage
INSTRUCTION MANUAL IMPORTANT SAFEGUARDS. When using electrical equipment, basic safety precautions should always be followed, including the following:
 INSTRUCTION MANUAL IMPORTANT SAFEGUARDS SERIES D LIGHTING EQUIPMENT When using electrical equipment, basic safety precautions should always be followed, including the following: READ AND FOLLOW ALL SAFETY
Installation Instructions: Eco Linear High Bay
 Installation Instructions: Eco Linear High Bay Installation Notes & Precautions: Read all precautions, warnings, instructions contained in this document. These instructions can be used to install Eco Linear
Assembly Instructions Retrofitting
 Assembly Instructions Retrofitting These instructions are for replacing existing lighting fixtures or systems with our new, higher efficiency TLS, drivers and controls. www.tls-lumisign.com 514-858-6556
Asymmetrical Installation Instructions. Components: i2cove Asymmetrical LED Light Fixtures. 12 [305mm] [918mm] 48.
![Asymmetrical Installation Instructions. Components: i2cove Asymmetrical LED Light Fixtures. 12 [305mm] [918mm] 48.](/thumbs/77/74625192.jpg "Asymmetrical Installation Instructions. Components: i2cove Asymmetrical LED Light Fixtures. 12 [305mm] [918mm] 48.") support@i2systems.com www.i2systems.com Electrical Specifications PARAMETER Input Power VALUE 8 Watts* / Ft Input Voltage 120-277V AC, 50/60 Hz Max. Fixture Run Length LED Color (CCT) 8 Watts: 120VAC:
support@i2systems.com www.i2systems.com Electrical Specifications PARAMETER Input Power VALUE 8 Watts* / Ft Input Voltage 120-277V AC, 50/60 Hz Max. Fixture Run Length LED Color (CCT) 8 Watts: 120VAC:
WHEN USING ELECTRICAL EQUIPMENT, BASIC SAFETY PRECAUTIONS SHOULD ALWAYS BE OBSERVED INCLUDING THE FOLLOWING:
 SURE-LITES Installation Instructions For FBP-1-40X IMPTANT SAFEGUARDS WHEN USING ELECTRICAL EQUIPMENT, BASIC SAFETY PRECAUTIONS SHOULD ALWAYS BE OBSERVED INCLUDING THE FOLLOWING: 1. READ AND FOLLOW ALL
READ AND FOLLOW ALL SAFETY INSTRUCTIONS! SAVE THESE INSTRUCTIONS AND DELIVER TO OWNER AFTER INSTALLATION
 READ AND FOLLOW ALL SAFETY INSTRUCTIONS! SAVE THESE INSTRUCTIONS AND DELIVER TO OWNER AFTER INSTALLATION To reduce the risk of death, personal injury or property damage from fire, electric shock, falling
BALT5-800 LOW-PROFILE FLUORESCENT EMERGENCY BALLAST
 BALT5-800 LOW-PROFILE FLUORESCENT EMERGENCY BALLAST APPLICATION The BALT5-800 low-profile fluorescent emergency ballast works in conjunction with the AC ballast to convert new or existing fluorescent fixtures
Installation Instructions: Eco-Fit T8 LED Tube Lamp
 Installation Instructions: Eco-Fit T8 LED Tube Lamp Key Features Ballast-ready Compatible with existing fluorescent ballasts No mercury or UV Long 50,000-hour life UL, cul, RoHS Rugged, solid-state design
LED IMPORTANT SAFETY INSTRUCTIONS
 LED IMPORTANT SAFETY INSTRUCTIONS READ AND FOLLOW ALL SAFETY INSTRUCTIONS! SAVE THESE INSTRUCTIONS AND DELIVER TO OWNER AFTER INSTALLATION To reduce the risk of death, personal injury or property damage
LED IMPORTANT SAFETY INSTRUCTIONS
 READ AND FOLLOW ALL SAFETY INSTRUCTIONS! SAVE THESE INSTRUCTIONS AND DELIVER TO OWNER AFTER INSTALLATION To reduce the risk of death, personal injury or property damage from fire, electric shock, falling
INSTALLATION INSTRUCTIONS
 INDIGO-CLEAN TECHNOLOGY RETROFIT KIT INSTALLATION INSTRUCTIONS 1 IMPORTANT SAFETY INFORMATION Risk of shock. Disconnect power before installation. DANGER- RISQUE DE CHOC- COUPER L ALIMENTATION AVANT L
(L 70 ) 3000K / 4000K / 5000K 12 50,000 50, K / 4000K / 5000K 15 50, K / 4000K / 5000K 18 50,000
 3000K / 4000K / 5000K 12 50,000 50, K / 4000K / 5000K 15 50, K / 4000K / 5000K 18 50,000") Applicable Cooler Door Models: WATTS (NOMINAL) MODEL LIFE (L 70 ) DIMENSIONS (L x W x H) Nom CCT 9 36RDLxx 3ft x 1in x ¾ H 12 48RDLxx 4ft x 1in x ¾ H 15 60RDLxx 5ft x 1in x ¾ H 18 72RDLxx 6ft x 1in x ¾
Applicable Cooler Door Models: WATTS (NOMINAL) MODEL LIFE (L 70 ) DIMENSIONS (L x W x H) Nom CCT 9 36RDLxx 3ft x 1in x ¾ H 12 48RDLxx 4ft x 1in x ¾ H 15 60RDLxx 5ft x 1in x ¾ H 18 72RDLxx 6ft x 1in x ¾
LED IMPORTANT SAFETY INSTRUCTIONS
 LED IMPORTANT SAFETY INSTRUCTIONS READ AND FOLLOW ALL SAFETY INSTRUCTIONS! SAVE THESE INSTRUCTIONS AND DELIVER TO OWNER AFTER INSTALLATION To reduce the risk of death, personal injury or property damage
READ AND FOLLOW ALL SAFETY INSTRUCTIONS! SAVE THESE INSTRUCTIONS AND DELIVER TO OWNER AFTER INSTALLATION
 READ AND FOLLOW ALL SAFETY INSTRUCTIONS! SAVE THESE INSTRUCTIONS AND DELIVER TO OWNER AFTER INSTALLATION To reduce the risk of death, personal injury or property damage from fire, electric shock, falling
INSTRUCTION MANUAL. IMPORTANT SAFEGUARDS When using electrical equipment, basic safety precautions should always be followed, including the following:
 IMPORTANT SAFEGUARDS When using electrical equipment, basic safety precautions should always be followed, including the following: READ AND FOLLOW ALL SAFETY INSTRUCTIONS 1. CAUTION To prevent electrical
LUNERA T8 LED RETROFIT KITS 1/2/3/4-Lamp Replacement Kits for 2FT or 4FT T8 Fluorescent Lamps
 Gen 1 Installation Guide LUNERA T8 LED RETROFIT KITS 1/2/3/4-Lamp Replacement Kits for 2FT or 4FT T8 Fluorescent Lamps Type C - External Driver Installation Description The LUNERA T8 LED RETROFIT KITS
LED Flat Panel Installation Instructions For 1 x4, 2 x2, and 2 x4 LED Flat Panels (FP Series)
") LED Flat Panel Installation Instructions For 1 x4, 2 x2, and 2 x4 LED Flat Panels (FP Series) PLEASE READ THESE INSTRUCTIONS BEFORE INSTALLATION PLEASE READ THESE INSTRUCTIONS BEFORE INSTALLATION SAFETY
LED Flat Panel Installation Instructions For 1 x4, 2 x2, and 2 x4 LED Flat Panels (FP Series) PLEASE READ THESE INSTRUCTIONS BEFORE INSTALLATION PLEASE READ THESE INSTRUCTIONS BEFORE INSTALLATION SAFETY
LED IMPORTANT SAFETY INSTRUCTIONS
 LED IMPORTANT SAFETY INSTRUCTIONS READ AND FOLLOW ALL SAFETY INSTRUCTIONS! SAVE THESE INSTRUCTIONS AND DELIVER TO OWNER AFTER INSTALLATION To reduce the risk of death, personal injury or property damage
T8 Tube Light. UL LISTED & cul LISTED & DLC LISTED. Germany Patent: Gebrauchsmusters / Nr
 T8 Tube Light Ideal for decorative and ambient lighting in retail outlets, hotels, warehouses, government buildings, and multi- unit residences T8 Tube Light UL LISTED & cul LISTED & DLC LISTED Germany
PDX and PX Retrofit Series
 UNIQUE LIGHTING SOLUTIONS PDX and PX Retrofit Series PDX1-1-12-XX PX1-1-12-X-X-XX-65 RETROFIT INSTALLATION GUIDE PDX and PX Series Retrofit WARNING -Retrofit installation must only be performed by a licensed
LED Garage Light INSTALLATION INSTRUCTIONS. *Model number noted on carton label
 LED Garage Light *Model number noted on carton label INSTALLATION INSTRUCTIONS Model Number / Número de Modelo / Numéro des modèle SGLL 24 PIR (24 LED Garage Light) Actual Dimensions 10 W x 3-1/2 H x 24-1/2
Motion and Light Sensor Kit LHBAS51
 Motion and Light Sensor Kit LHBAS51 Installation Instructions For Linear Low and High Bay Fixtures PLEASE READ THESE INSTRUCTIONS BEFORE SAFETY INSTRUCTIONS AND WARNINGS WARNING: READ CAREFULLY BEFORE
Anthony LED Lighting System Retrofit Installation Instructions For Models 101X and 101A
 Anthony LED Lighting System Retrofit Installation Instructions For Models 101X and 101A 99-16999-0000 Table of Contents 1. Removing Fluorescent Lighting... 4 1.1. Detach the lens assembly... 4 1.2. Remove
UL AND CODE COMPLIANCE
 BAL500 FLUORESCENT EMERGENCY BALLAST 500 Lumens APPLICATION The BAL500 fluorescent emergency ballast works in conjunction with the AC ballast to convert new or existing fluorescent fixtures into emergency
General Installation Instructions LED
 General Installation Instructions LED To reduce the risk of death, personal injury or property damage from fire, electric shock, falling parts, cuts/abrasions and other hazards, please read all warnings
Redbird LED Cardinal Stripit Kit Installation Instructions
 Redbird LED Cardinal Stripit Kit Installation Instructions September 2015 Required Tools & Supplies ü Cordless drill/driver, preferably with adjustable clutch-head with ¼ magnetic hex bit on a 6 extension
FLUORESCENT EMERGENCY BALLAST Lumens. When using this lighting device safety precautions should be followed at all times
 FLUORESCENT 400 Lumens INSTALLATION INSTRUCTIONS When using this lighting device safety precautions should be followed at all times PLEASE READ CAREFULLY AND FOLLOW ALL INSTRUCTIONS FOR YOUR OWN SAFETY.
LM79 LM80 L70:5+ YEARS
 1.30.18 Want to make your shop Highly Efficient, too? Reduce install mistakes and improve efficiency by transforming your shop with our 24volt System. With our 24volt PhxNRG MODULES, our 24volt PhxNRG
Installation And Operation Instructions For FHSCP-UNV Series Emergency LED Drivers Models: FHSCP-UNV-5WL, 7.8WL, 10.7WL, 13.
 Installation And Operation Instructions For FHSCP-UNV Series Emergency LED Drivers Models: FHSCP-UNV-5WL, 7.8WL, 10.7WL, 13.7WL, 17WL IMPORTANT SAFEGUARDS When using electrical equipment, basic safety
SAVE THESE INSTRUCTIONS
 READ AND FOLLOW ALL SAFETY INSTRUCTIONS! SAVE THESE INSTRUCTIONS AND DELIVER TO OWNER AFTER INSTALLATION IMPORTANT SAFEGUARDS When using electrical equipment, basic safety precautions should always be
LED IMPORTANT SAFETY INSTRUCTIONS
 LED IMPORTANT SAFETY INSTRUCTIONS READ AND FOLLOW ALL SAFETY INSTRUCTIONS! SAVE THESE INSTRUCTIONS AND DELIVER TO OWNER AFTER INSTALLATION To reduce the risk of death, personal injury or property damage
Installation Instructions: ACCENT SYSTEM
 Installation Instructions: ACCENT SYSTEM READ THIS MANUAL BEFORE PROCEEDING WITH THE INSTALLATION. FAILURE TO FOLLOW THE INSTALLATION INSTRUCTIONS WILL VOID YOUR WARRANTY! INSTALLATION TIPS Read this entire
BAL1400 FLUORESCENT EMERGENCY BALLAST Specification-grade One or two-lamp emergency illumination
 BAL1400 FLUORESCENT EMERGENCY BALLAST Specification-grade One or two-lamp emergency illumination APPLICATION The BAL1400 fluorescent emergency ballast works in conjunction with the AC ballast to convert
LUNERA T8 LED RETROFIT KITS 2/3/4-Lamp Replacement Kits for 2FT or 4FT T8 Fluorescent Lamps
 Gen 1 Installation Guide LUNERA T8 LED RETROFIT KITS 2/3/4-Lamp Replacement Kits for 2FT or 4FT T8 Fluorescent Lamps Type C - External Driver Installation Description The LUNERA T8 LED RETROFIT KITS consist
LED REVEALS - INSTALLATION INSTRUCTIONS
 SEPTEMBER 2017 PAGE 1 Fry Reglet s Reveals are designed to be installed in conventional drywall construction and will accommodate board thickness. Standard installation is quick and easy similar to the
OSQ Series IMPORTANT SAFEGUARDS READ AND FOLLOW ALL SAFETY INSTRUCTIONS SAVE THESE INSTRUCTIONS FOR FUTURE REFERENCE. LED Area Light TO INSTALL:
 OSQ Series LED Area Light Direct Pole Mount IMPORTANT SAFEGUARDS When using electrical equipment, basic safety precautions should always be followed including the following: READ AND FOLLOW ALL SAFETY
Remove the 3-11mm nuts holding mirror on. Don t drop the nuts!
 2005-2012 Ford Mustang Puddle Lamp Kit Parts List: Quantity: Tool List: LED Lamps 2 Flat head screwdriver Seals 2 Ratchet & Socket set OR Nuts 2 Adjustable Wrench Wiring harness 1 Drill & 11/16 th bit
BAL3000 BAL3000. Fluorescent Emergency Ballast Lumens. Specification Sheet. Emergency Ballast 1/19/2012. Project: Catalog#: Approved by:
 1/19/2012 Fluorescent 1450-3000 Lumens Works in conjunction with an AC ballast to convert new or existing fluorescent fixtures into unobtrusive emergency lighting Maintains illumination of one or two lamps
INSTRUCTIONS FOR OUTDOOR WALL LANTERN, MODEL LPT-1032
 INSTRUCTIONS FOR OUTDOOR WALL LANTERN, MODEL LPT-1032 Page 1 Thank you for purchasing this Langport Lighting outdoor wall lantern. This product has been manufactured with the highest standards of safety
Installation and Operation Instructions 10/04/13
 ELI-S-100 With DIMMING CAPABILITIES Installation and Operation Instructions eli series emergency lighting inverters NRTL/C! IMPORTANT SAFEGUARDS! WHEN USING ELECTRICAL EQUIPMENT, BASIC SAFETY PRECAUTIONS
LED. High-performance streetlight. -afortable and reliable
 LED High-performance streetlight -afortable and reliable DESIGNED FOR FUNCTIONAL LIGHTING OF OUTDOOR ROADS WHERE ENERGY SAVING, LOW MAINTENANCE AND PRECISE LIGHT CONTROL CONSIDERATIONS ARE IMPORTANT FACTORS.
PIL0478 ISSUE 01/ 07/16
 ISSUE 01/ 07/16 PIL0478 ZAFIR G9 CEILING FITTING PIL0478 ISSUE 01/ 07/16 PART C PART E PART 21 SELV 1 1.B 1 3.1 3.3 3.4 3.5 3.6, 3.8 3.10 3.12 3.14 3.16 3.17 3.18 3.19 3.19 ATTENTION! THE TABLE BELOW
Installation Instructions
 When using this lighting device the safety precautions should be followed at all times. PLEASE READ CAREFULLY AND FOLLOW ALL INSTRUCTIONS F YOUR OWN SAFETY 1. This device is designed for indoor use. Do
TRUET5 EXT (DIMMABLE)
") t all products are qualified on the DLC QPL. To view our DLC qualified products, please consult the DLC Qualified Products List at www.designlights.org/qpl. TRUET5 EXT (DIMMABLE) www.trulygreensolutions.com
t all products are qualified on the DLC QPL. To view our DLC qualified products, please consult the DLC Qualified Products List at www.designlights.org/qpl. TRUET5 EXT (DIMMABLE) www.trulygreensolutions.com
INSTALLATION INSTRUCTION MANUAL
 INSTALLATION INSTRUCTION MANUAL LED FLOOD LIGHT, 100-277VAC MODELS: SL923FLF-15W; SL923FLF-30W; SL923FLF-50W; SL923FLF-80W; SL923FLF-100W; SL923FLF-150W; SL923FLF-300W Model number parameter list: Model
Installation Instructions: HYPERION R-Lite SYSTEM
 Installation Instructions: HYPERION R-Lite SYSTEM READ THIS MANUAL BEFORE PROCEEDING WITH THE INSTALLATION. FAILURE TO FOLLOW THE INSTALLATION INSTRUCTIONS WILL VOID YOUR WARRANTY! INSTALLATION TIPS Read
HIGHBAY RAIL 400W INSTALLATION INSTRUCTIONS
 TM INSTALLATION INSTRUCTIONS IMPORTANT READ CAREFULLY BEFORE INSTALLING FIXTURE. RETAIN THESE INSTRUCTIONS FOR FUTURE REFERENCE. Fixtures must be wired in accordance with the National Electrical Code and
LED Utility Wrap Fixture
 Operating Instruction Please read and save these instructions. Read through this owner s manual carefully before using product. Protect yourself and others by observing all safety information, warnings,
MaxLite LED Linear HighBay Fixtures
 Operating Instructions MaxLite LED Linear HighBay Fixtures General Safety Information To reduce the risk of death, personal injury or property damage from fire, electric shock, falling parts, cuts/abrasions,
BAL3000 FLUORESCENT EMERGENCY BALLAST Specification-grade: Up to 3500 lumens One or two-lamp emergency illumination
 BAL3000 FLUORESCENT EMERGENCY BALLAST Specification-grade: Up to 3500 lumens One or two-lamp emergency illumination APPLICATION The BAL3000 fluorescent emergency ballast works in conjunction with an AC
Installation Instructions: ACCENT HIGH OUTPUT SYSTEM
 Installation Instructions: ACCENT HIGH OUTPUT SYSTEM READ THIS MANUAL BEFORE PROCEEDING WITH THE INSTALLATION. FAILURE TO FOLLOW THE INSTALLATION INSTRUCTIONS WILL VOID YOUR WARRANTY! INSTALLATION TIPS
UFO-RP2 FLUORESCENT BATTERY PACK IMPORTANT SAFEGUARDS READ AND FOLLOW ALL SAFETY INSTRUCTIONS
 FLUORESCENT BATTERY PACK IMPORTANT SAFEGUARDS When using electrical equipment, basic safety precautions should always be followed, including the following: READ AND FOLLOW ALL SAFETY INSTRUCTIONS. - To
RLK SERIES Retrofit Lamp Kit for LED Tubes
 RLK SERIES Retrofit Lamp Kit for LED Tubes The RLK retrofit lamp kit eliminates the hassle of rewiring in the field. The kit can be used for provided lamps or LED T8 lamps that are UL classified for Retrofit
INSTALLATION INSTRUCTIONS
 INSTALLATION INSTRUCTIONS IMPORTANT Before opening your Lights.com fixture, please make sure that you carefully read through these instruction sheets. Consider having your fixture installed by a qualified
28W WORK LAMP Model: CTL28 Part No:
 28W WORK LAMP Model: CTL28 Part No: 4002905 INSTRUCTION MANUAL GC0609 INTRODUCTION Thank you for purchasing this CLARKE 28W Work Lamp. Before attempting to use the product, it is essential that you read
UFO-RP3 FLUORESCENT BATTERY PACK IMPORTANT SAFEGUARDS READ AND FOLLOW ALL SAFETY INSTRUCTIONS
 FLUORESCENT BATTERY PACK IMPORTANT SAFEGUARDS When using electrical equipment, basic safety precautions should always be followed, including the following: READ AND FOLLOW ALL SAFETY INSTRUCTIONS. - To
ProTrip Conversion Kits. For GE Types AK-15, AK-25, and AKU- 25 Low-Voltage Power Circuit Breakers INTRODUCTION. DEH Installation Instructions
 DEH 40026 Installation Instructions g ProTrip Conversion Kits For GE Types AK-15, AK-25, and AKU- 25 Low-Voltage Power Circuit Breakers INTRODUCTION GE Conversion Kits are designed for upgrading existing
SAVE THESE INSTRUCTIONS
 READ AND FOLLOW ALL SAFETY INSTRUCTIONS! SAVE THESE INSTRUCTIONS AND DELIVER TO OWNER AFTER INSTALLATION IMPORTANT SAFEGUARDS! When using electrical equipment, basic safety precautions should always be
23W Dimmable LED Bulb - 4' T8 Lamp Lumens - Double Ended- Replacement/Upgrade for Fluorescent
 23W Dimmable LED Bulb - 4' T8 Lamp - 2875 Lumens - Double Ended- Replacement/Upgrade for Fluorescent Part #: LEDT8-48-D-X2 The Larson Electronics LEDT8-48-D-X2 23 watt T-series Dimmable LED tube lamp is
Lantern Era Bollard - LE Installation Instructions
 P.O. Box 60080 16555 East Gale Ave. City of Industry, California 91716-0080 626/968-56 AX 626/330-3861 LE1 LE2 LE3 Lantern Era Bollard - LE Installation Instructions WARNING: Fixtures must be grounded
Ivalo Finiré 3 LED Recessed Lighting Installation Instructions
 IMPORTANT INFORMATION Please Read Before Installing 367-2578e 1 09.20.16 Important Notes IC fixtures must be used for installations containing insulating materials and must be mounted away from heat producing
Installation Instruction ALG Series LED Area Light Version: 3.1
 IMPORTANT SAFETY INSTRUCTIONS READ CAREFULLY BEFORE INSTALLING THE FIXTURE. RETAIN THESE INSTRUCTIONS FOR FUTURE REFERENCE. To reduce the risk of death, personal injury or property damage from fire, electric