2010 to 2013 Toyota 4runner Rear bumper installation instructions:
|
|
|
- Crystal Lester
- 5 years ago
- Views:
Transcription
1 2010 to 2013 Toyota 4runner Rear bumper installation instructions: Note: This is one of the most difficult bumpers we product to install. The installation of this bumper requires cutting of the current plastic bumper cover and reinstallation of the upper portion. Additional trimming of the mud flaps and relocation of accessories is required. Step 1: Carefully unwrap the pallet being careful not to scratch the powder coat. Please make sure that all pieces arrived in good condition. Step 2: It is much easier to assemble the accessory arms while the new bumper is off of the truck. The installation is identical on both swing arms. Included with each arm is the following. (1) 7/8 Hinge Bolt. (1) 7/8 fender washer. (1) 7/8 Nylock Nut (2) Nylon washers (1) Spring Pin (1) Rubber bumper To install the arm into the bumper you must slide it into the opening from the side. Once the arm is in place, insert the Hinge bolt from the top of the bumper using the provided fender washer. The (2) nylon washers sit stacked between the bottom of the swing arm and the bumper. Install the lock nut and tighten to 120 ft lbs. The rubber bumper slides over the pin in the bumper and the lock pin inserts into the pin to lock the swing arm in place. Note: We do not provide lug nuts due to varying wheel types. Lug nuts must be provided by the customer. Step 3: Disassembly: The rear bumper cover and mud flaps must be completely removed from the vehicle. There are several clips and screws that hold it in place. Remove and set aside.

2


3 Once the Bumper cover is removed: Remove the hitch (saving the bolts) and the brackets on the under side of the frame. Remove the bracket that holds the trailer wiring but leave it hanging. Next: Cut off the overhang (about 3 ) of the foam backer on each side

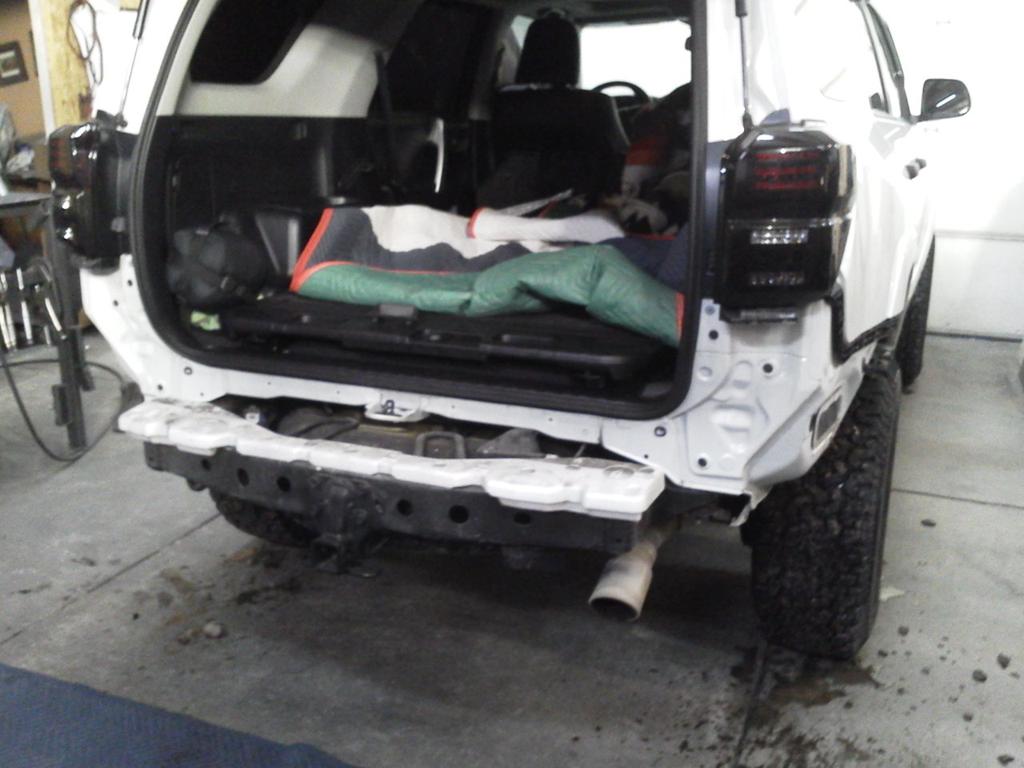
4 Step 4: Clearance. On each side of the fender there is a bracket that hangs down to attach the factory bumper cover to. Simply bend this bracket up toward the inside of the truck. Step 5: Bumper installation This typically takes about 3 guys to perform. Leave the rear hatch open to prevent damage during installation. Remove the diamond plate cover from the new bumper. This will get installed last. Holding the bumper in place: start by installing the center bolts loosely. For these we recommend reusing the hitch bolts. Adjust the bumper left to right for alignment. Using the supplied 12mm bolts, install the lower bolts into the bottom of the frame. NOTE: Due to the nature and design of the frame, this bumper is very difficult to get strait on the vehicle. It will take some time to adjust the bumper correctly. If needed use some of the supplied fender washers in between the lower mount and the frame to adjust the pitch of the bumper. Also the bumper is able to twist from side to side. The best method to positioning the bumper is to tighten the bolts slowly. Final tightening should be done once the bumper is positioned to your satisfaction.
5 Step 6: The Fun Part Once the bumper is positioned, install the diamond plate top and the plastic swing arm rest Once the bumper is in its final position it is time to cut and install the top portion of the plastic bumper. Please take your time and measure twice!! Step 7: Finishing touches NOTE: We strongly recommend using masking tape over the plastic bumper for marking and cutting Using the truck and the bumper as a guide, measure at several points between the bumper and the body line (where the plastic bumper attaches) Transfer those measurements to the bumper cover. The center of the bumper cover will be cut 1 out from the raised lip. We recommend using 1 masking tape to mark this cut line. Transfer this line up the side to meet with the cut lines on the side of the bumper cover. Verify that the measurements on each side are identical or at least very close. Now to mark your actual cut line. The actual cut will be exactly 3/8 above the marked line. The gap is necessary to allow body flex We recommend using a jigsaw or body saw with a fine tooth blade to make the cuts. In the corners where the cut lines meet. Drill a ½ or larger hole to help with the cut transition. This will greatly improve the final quality. We do not include any trim piece as we have found it to become more of an issue because of the shape of the bumper cover. Therefore a strait and clean cut is necessary. Take your time! Once the cut is made, loosely install the bumper cover to verify fit. If trimming is needed remove and trim as necessary. Lightly sand the cut edges to remove any burrs. Do not remove masking tape until the final fit is satisfactory. Do Not reattach all the hardware on the bumper cover yet. At this point the installation is about complete. Trim the mud flaps to fit and reinstall. This can be done with a utility knife. Install the trailer wiring bracket under the inside of the frame. There is a threaded hole in the frame that a single original mounting bolt will fit. Picture below shows final position.

6 Wiring the license plate light: The license plate light is a single wire hot lead. On the inside of the of the passenger side there is an access panel to get to the tail lights. Run the wire up into this compartment. We have fount that running in through the weather stripping is the best access. Its is a pain to get the wire into the compartment!! Once the wire is in. Pull the light plug and find the green wire. The single hot lead from the license plate light will get spliced into this wire. Make sure to tape up the wire and test the light before reinstalling the light into the housing. Now you can attach all the hardware for the plastic bumper cover. Install the license plate and you should be done.


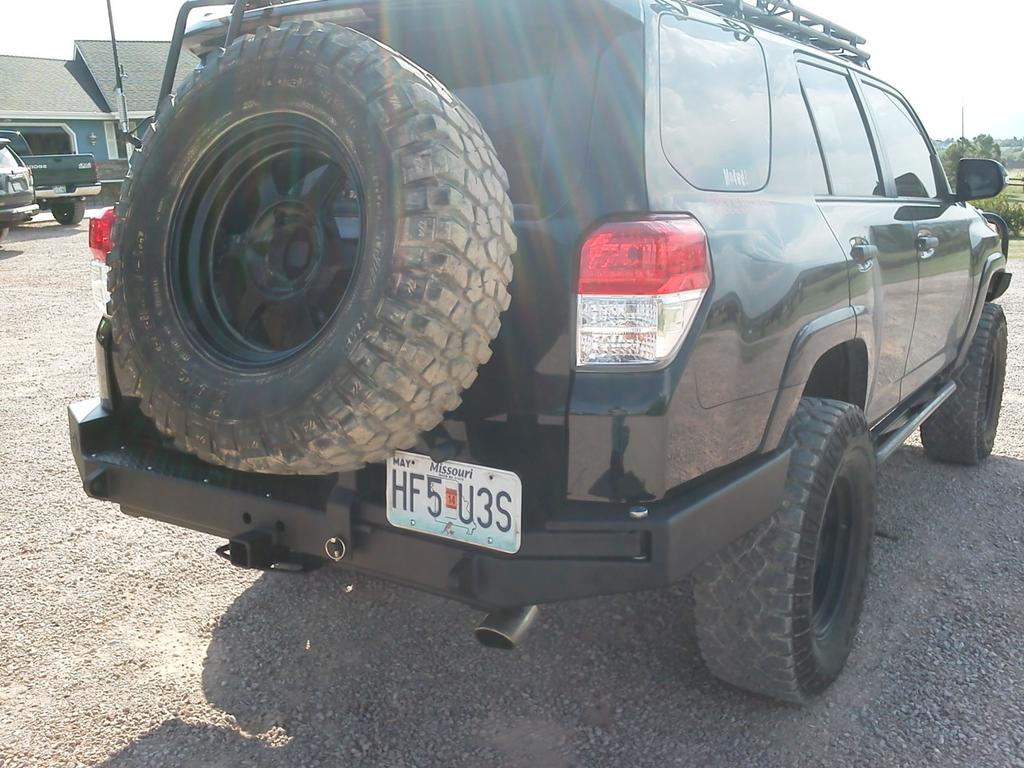
7 Final Installation should look like this: (note: License plate location has been moved due to placement issues)
8
INSTALLATION INSTRUCTIONS FORD F-150 2WD & 4WD RETAINS FACTORY TOW HOOKS PART #P3063
 INSTALLATION INSTRUCTIONS FORD F-150 2WD & 4WD RETAINS FACTORY TOW HOOKS PART #P3063 PARTS LIST: 1 Grille Guard 2 10-1.5mm Nylon Lock Nuts 1 Driver/Left Frame Mounting Bracket 4 12mm Plastic Washers 1
INSTALLATION INSTRUCTIONS GRILLE GUARD TOYOTA TUNDRA TOYOTA SEQUOIA PART # 2067/2067-2
 INSTALLATION INSTRUCTIONS 07-15 TOYOTA TUNDRA 08-15 TOYOTA SEQUOIA PART # 2067/2067-2 PARTS LIST: 1 Grille Guard 2 10mm Cam Lever Quick Release Bolts with Special Pivot Washer 1 Driver/left Frame Mounting
Roll Bar (MMRB-6.1 to -6.7)
") 3430 Sacramento Dr., Unit D San Luis Obispo, CA 93401 Telephone: 805/544-8748 Fax: 805/544-8645 www.maximummotorsports.com 1994-04 Roll Bar (MMRB-6.1 to -6.7) NOTE: These instructions cover Roll Bars with
3430 Sacramento Dr., Unit D San Luis Obispo, CA 93401 Telephone: 805/544-8748 Fax: 805/544-8645 www.maximummotorsports.com 1994-04 Roll Bar (MMRB-6.1 to -6.7) NOTE: These instructions cover Roll Bars with
2. With the rear door open remove pull-style clip from the passenger side just below the door latch.
 LoD Offroad FJ Cruiser Rear Bumper with Tire Carrier Installation Instructions 1. Begin with removing factory spare from the rear door. 2. With the rear door open remove pull-style clip from the passenger
INSTALLATION INSTRUCTIONS FORD F-150 2WD & 4WD RETAINS FACTORY TOW HOOKS PART #P3063
 INSTALLATION INSTRUCTIONS FORD F-150 2WD & 4WD RETAINS FACTORY TOW HOOKS PART #P3063 PARTS LIST: 1 Grille Guard 2 10-1.5mm Nylon Lock Nuts 1 Driver/Left Frame Mounting Bracket 4 12mm Plastic Washers 1
TrailGator REAR BUMPER INSTALLATION INSTRUCTIONS Runner
 TrailGator REAR BUMPER INSTALLATION INSTRUCTIONS 2010+ 4Runner Version 3.1.0 - December 2018 Thank you for purchasing the Southern Style OffRoad Toyota 4Runner 5 th Gen Modular Rear Plate Steel Bumper.
INSTALLATION INSTRUCTIONS GRILLE GUARD TOYOTA TUNDRA TOYOTA SEQUOIA PART # P2067
 INSTALLATION INSTRUCTIONS GRILLE GUARD 07-14 TOYOTA TUNDRA 08-14 TOYOTA SEQUOIA PART # P2067 PARTS LIST: GRILLE GUARD 1 Grille Guard 2 10mm Cam Lever Quick Release Bolts with Special Pivot Washer 1 Driver/left
2017 Current Ford Raptor HoneyBadger Rear Bumper Installation Instructions
 2017 Current Ford Raptor HoneyBadger Rear Bumper Installation Instructions PREPARATION 1. Disconnect the negative terminal on the battery. Park the vehicle on level ground and set the emergency brake.
Drag Race Roll Bar (MMRB-6, -7)
") 3430 Sacramento Dr., Unit D San Luis Obispo, CA 93401 Telephone: 805/544-8748 Fax: 805/544-8645 www.maximummotorsports.com 1994-04 Drag Race Roll Bar (MMRB-6, -7) The Maximum Motorsports 6-point Drag Race
3430 Sacramento Dr., Unit D San Luis Obispo, CA 93401 Telephone: 805/544-8748 Fax: 805/544-8645 www.maximummotorsports.com 1994-04 Drag Race Roll Bar (MMRB-6, -7) The Maximum Motorsports 6-point Drag Race
Passenger/Right Side Frame Bracket. Driver/Left Side Frame Bracket. (4) Spacer Washers. (2) Bull Bar Mounting Brackets
 Spacer Washers. (2) Bull Bar Mounting Brackets") PARTS LIST: 1 Bull Bar 12 s 1 Driver/Left Frame Mounting Bracket 1 Passenger/Right Frame Mounting Bracket 6 10mm Lock Washers 2 Bull Bar Mounting Brackets 6 10mm Hex Nuts 4 Large Spacer Washers 4 8-1.25mm
PARTS LIST: 1 Bull Bar 12 s 1 Driver/Left Frame Mounting Bracket 1 Passenger/Right Frame Mounting Bracket 6 10mm Lock Washers 2 Bull Bar Mounting Brackets 6 10mm Hex Nuts 4 Large Spacer Washers 4 8-1.25mm
(2) 10mm Quick Release Bolts with Pivot Washers (4) 10mm Flat Washers (2) 10mm Nylon Lock Nuts. (4) 10mm Plastic Washers
 10mm Quick Release Bolts with Pivot Washers (4) 10mm Flat Washers (2) 10mm Nylon Lock Nuts. (4) 10mm Plastic Washers") PARTS LIST: EXTREME GRILLE GUARD 1 Extreme Heavy Duty Grille Guard 2 10mm Cam Lever Quick Release Bolts with Special Pivot Washer 1 Driver/left Frame Mounting Bracket 4 10mm x 24mm OD x 2.2mm Flat Washers
PARTS LIST: EXTREME GRILLE GUARD 1 Extreme Heavy Duty Grille Guard 2 10mm Cam Lever Quick Release Bolts with Special Pivot Washer 1 Driver/left Frame Mounting Bracket 4 10mm x 24mm OD x 2.2mm Flat Washers
SAFETY THIS PRODUCT IS FOR OFFROAD USE ONLY. ALL LIABILITY FOR INSTALLATION AND USE RESTS WITH THE OWNER.
 SAFETY Your safety and the safety of others is very important. In order to help you make informed decisions about safety, we have provided installation instructions and other information. These instructions
REAR STEEL BUMPER INSTALLATION INSTRUCTIONS Runner
 REAR STEEL BUMPER INSTALLATION INSTRUCTIONS 2010+ 4Runner Version 2.1.0 - September 2016 Thank you for purchasing the Southern Style OffRoad Toyota 4Runner 5 th Gen Modular Rear Plate Steel Bumper. It
Wildcat System Instructions
 Wildcat System Instructions NOTE: Most steps contained in these instructions will need to be repeated on the other side of the vehicle. Prior to assembly of windshield it is necessary to establish what
(2) 12mm x 35mm Single Bolt Plates. (2) 12mm x 30mm Double Bolt Plates
 12mm x 35mm Single Bolt Plates. (2) 12mm x 30mm Double Bolt Plates") PARTS LIST: 1 Bull Bar 6 12mm x 24mm OD x 2.5mm Flat Washers 1 Driver/Left Mounting Bracket 6 12-1.75mm Nylon Lock Nuts 1 Passenger/Right Mounting Bracket 4 10-1.50mm x 30mm Hex Bolts 2 12mm x 30mm Double
PARTS LIST: 1 Bull Bar 6 12mm x 24mm OD x 2.5mm Flat Washers 1 Driver/Left Mounting Bracket 6 12-1.75mm Nylon Lock Nuts 1 Passenger/Right Mounting Bracket 4 10-1.50mm x 30mm Hex Bolts 2 12mm x 30mm Double
MITSUBISHI TRITON MQ (2015 +) AEROSTYLE 4X4 2 POST 3 POST 4 POST 5 POST
 AEROSTYLE 4X4 2 POST 3 POST 4 POST 5 POST") INSTALLATION GUIDE BULLBAR MITSUBISHI TRITON MQ (2015 +) AEROSTYLE 4X4 2 POST 3 POST 4 POST 5 POST Version 171010_1 PLEASE READ THE INSTALLATION GUIDE CAREFULLY BEFORE FITTING PRODUCT TO VEHICLE WHEN INSTALLED
INSTALLATION GUIDE BULLBAR MITSUBISHI TRITON MQ (2015 +) AEROSTYLE 4X4 2 POST 3 POST 4 POST 5 POST Version 171010_1 PLEASE READ THE INSTALLATION GUIDE CAREFULLY BEFORE FITTING PRODUCT TO VEHICLE WHEN INSTALLED
INSTALLATION INSTRUCTIONS ELEVATION FRONT BUMPER DODGE RAM
 INSTALLATION INSTRUCTIONS PARTS LIST: 1 Elevation Bumper Assembly 24 12mm x 37mm OD x 3mm Flat Washers 2 Frame Mounting Brackets 12 12mm Nylon Lock Nuts 8 12-1.75mm x 50mm Hex Bolts 2 License Plate Mounting
EVO-1162 EVO Tailgate Tire Carrier
 EVO-1162 EVO Tailgate Tire Carrier Bill of Materials EVO-1162 Tailgate Tire Carrier Part number Description Quantity EVO-12161 EVO Tailgate Tire Carrier 1 EVO-12162 Bolt Plate 1 EVO-12163 Wheel Mount 1
HAVING INSTALLATION QUESTIONS? CALL TECHNICAL SUPPORT AT
 9/23/2009 1 of 6 ITEM 1 QTY 8 Parts List PART NUMBER DESCRIPTION 3/8" CONICAL TOOTHED WASHER TOOLS REQUIRED #2 PHILLIPS SCREWDRIVER #2 STUBBY SCREWDRIVER 8mm SOCKET 13mm SOCKET RATCHET 12" EXTENSION TORQUE
Left and Right Bar Light L Brackets. Driver/Left Frame Bracket
 PARTS LIST: 1 Bumper 14 12mm Nylon Lock Nuts 1 Bull Nose Hoop 2 10mm Double Bolt Plates 1 Winch Tray 4 10-1.5mm x 25mm Hex Bolts 1 Driver/left Frame Mounting Bracket 8 10mm x 30mm x 2.5mm Flat Washers
INSTALLATION INSTRUCTIONS FRONT RUNNER GRILLE GUARD 2015 TRANSIT VAN (FULL SIZE)
") INSTALLATION INSTRUCTIONS FRONT RUNNER GRILLE GUARD PARTS LIST: 1 Runner Grille Guard Center 6 12mm Lock Washers 1 Driver/Left Modular Wing 6 12mm Hex Nuts 1 Passenger/Right Modular Wing 2 8-1.25mm x 40mm
INSTALLATION INSTRUCTIONS FRONT RUNNER GRILLE GUARD PARTS LIST: 1 Runner Grille Guard Center 6 12mm Lock Washers 1 Driver/Left Modular Wing 6 12mm Hex Nuts 1 Passenger/Right Modular Wing 2 8-1.25mm x 40mm
INSTALLATION INSTRUCTIONS LD-1 REAR BUMPER RAM 1500 PART#R R #PW017838
 INSTALLATION INSTRUCTIONS LD-1 REAR BUMPER PART#R102617 R102620 #PW017838 PARTS LIST: 1 LD1 Bumper Assembly 4 12-1.75mm x 40mm Hex Bolts 1 Push in License Plate Light 4 12mm x 37mm x 3mm Flat Washers 2
Parts List See cover Page
 Thank you for purchasing the CorkSport Front Mount Intercooler Kit for the 2010-2013 Mazdaspeed 3. Keep your BAT s under check with the CorkSport FMIC Kit with the small or large intercooler. Please let
SAFETY SENSORS FIELD OF VIEW WILL BE ALTERED WITH USE OF THE REPLACEMENT BUMPER. Injury hazard
 SAFETY Your safety and the safety of others is very important. In order to help you make informed decisions about safety, we have provided installation instructions and other information. These instructions
INTERCOOLER UPGRADE INSTALLATION INSTRUCTIONS PART NUMBER D
 INTERCOOLER UPGRADE INSTALLATION INSTRUCTIONS PART NUMBER D330-0021 APPLICATION: 2014-16 F22 228i & xdrive coupe (see restrictions below) 2015-16 F23 228i & xdrive convertible 2012-16 F30 328i & xdrive
SAFETY SENSORS FIELD OF VIEW WILL BE ALTERED WITH USE OF THE REPLACEMENT BUMPER. Injury hazard
 SAFETY Your safety and the safety of others is very important. In order to help you make informed decisions about safety, we have provided installation instructions and other information. These instructions
INSTALLATION INSTRUCTIONS
 INSTALLATION INSTRUCTIONS Document# 19-0038 2004+ Lotus Elise (Series 2) Rear Clamshell Removal Kit Safely support the vehicle. This is a two-person job. Allow 1 to 2 hours for initial disassembly. Have
PT# Must Have TC Standard Series LCA s & 1.25 Wheel Spacers Installed
 159 North Maple St. Unit J, CORONA CA 92880 P. 951-737-9682 F. 951-737-9006 WWW.CHAOSFAB.COM PT# 86612 Secondary Shock Hoop: Standard Series Stock Length Lowers: 2005-2018 Tacoma 2003-2018 4Runner 2003-2018
INTERCOOLER UPGRADE INSTALLATION INSTRUCTIONS PART NUMBER D
 INTERCOOLER UPGRADE INSTALLATION INSTRUCTIONS PART NUMBER D330-0021 APPLICATION: 2014-16 F22 228i & xdrive coupe (see restrictions below) 2012-16 F30 328i & xdrive sedan 2014-16 F31 328i xdrive wagon 2014-16
2017 Current Ford Raptor Stealth Fighter Rear Bumper Installation Instructions
 2017 Current Ford Raptor Stealth Fighter Rear Bumper Installation Instructions PREPARATION 1. Disconnect the negative terminal on the battery. Park the vehicle on level ground and set the emergency brake.
and Original Series Pickup Lift Mounting Instructions T-150-T T-150 PART#5177 T-150-T
 Fullsize Chevy & GMC Trucks- 988-999 Toyota Tundra- 2000-2006 Toyota T-00-993-999 Preparing the Gate r ve and Original Series Pickup Lift Mounting Instructions. Remove the mounting hardware which is banded
Product Packing List
 Product Packing List Product: SDHQ-55-1650-G3 Description: 2016+ Toyota Tacoma Hidden Winch Mount (1) Winch Mount SDHQ-55-1650-G3-A (2) Lower Support Brackets SDHQ-55-1650-G3-B (1) Lower Bumper Bracket
Subaru Front Mount Intercooler Kit STI Subaru Front Mount Intercooler Kit STI
 Subaru Front Mount Intercooler Kit STI 2008-2014 715500 Subaru Front Mount Intercooler Kit STI 2008-2014 Congratulations on your purchase of the Subaru Front Mount Intercooler Kit STI 2008-2014. The following
G-170. r ve Pickup Lift Mounting Instructions Fullsize Chevy & GMC Trucks- 1500, 2500 & 3500: 2007-present
 Fullsize Chevy & GMC Trucks- 1500, 2500 & 3500: 2007-present Preparing the Gate 1. Remove the mounting hardware which is banded to the liftgate. 2. Verify mounting bracket kit (Figure 1 and Table 1). 18-5/8"
and Original Series Pickup Lift Mounting Instructions Fullsize Chevy & GMC Trucks: 1500 & 2500 LD HD & 3500HD BOLT-ON GUSSET
 r ve and Original Series Pickup Lift Mounting Instructions Fullsize Chevy & GMC Trucks: 1500 & 2500 LD 1999-2007 2500HD & 3500HD 2000-2007 Preparing the Gate 1. Remove the mounting hardware which is banded
2005+ Roll Bar (Mm5RB-20.1 to -20.6) Recommended Center punch 1/8" pilot drill 1-3/4" Hole saw 2" Hole saw
 Recommended Center punch 1/8 pilot drill 1-3/4 Hole saw 2 Hole saw") 3430 Sacramento Dr., Unit D San Luis Obispo, CA 93401 Telephone: 805/544-8748 Fax: 805/544-8645 www.maximummotorsports.com 2005+ Roll Bar (Mm5RB-20.1 to -20.6) Recommended Center punch 1/8" pilot drill
3430 Sacramento Dr., Unit D San Luis Obispo, CA 93401 Telephone: 805/544-8748 Fax: 805/544-8645 www.maximummotorsports.com 2005+ Roll Bar (Mm5RB-20.1 to -20.6) Recommended Center punch 1/8" pilot drill
INSTALLATION INSTRUCTIONS 3 BULL BAR CHEVY SILVERADO1500/GMC SIERRA TAHOE/SUBURBAN/YUKON/YUKON XL
 INSTALLATION INSTRUCTIONS 3 BULL BAR 2007-16 CHEVY SILVERADO1500/GMC SIERRA1500 PART # 35-4016;B35-4016;B35-4016-3;P35-4016 Page 1 of 6 PARTS LIST: 1 Bull Bar 6 12mm x 24mm OD x 2.5mm Flat Washer 1 Driver/Left
I-Sheet Number Rev.B 3-1/2 OVAL BULL BAR DODGE RAM 1500
 PARTS LIST: 1 Bull Bar 2 10-1.5mm x 35mm Hex Bolts 2 Tube Brackets (Bull Bar) passenger or driver side 2 10mm Lock Washers 2 Upper Frame Brackets (models w/o tow hooks only) 4 10mm x 27mm OD x 3mm Flat
(1) License Plate Light (2) License Plate Plugs
 License Plate Light (2) License Plate Plugs") PARTS LIST: 1 HD Replacement Bumper 4 12mm x 40mm Hex Bolts 1 Driver/Left Bracket 4 12mm Nylon Lock Nuts 1 Passenger/Right Bracket 8 12mm x 37mm x 3mm Oversize Flat Washers 2 Thin Side Spacers 4 Rubber
PARTS LIST: 1 HD Replacement Bumper 4 12mm x 40mm Hex Bolts 1 Driver/Left Bracket 4 12mm Nylon Lock Nuts 1 Passenger/Right Bracket 8 12mm x 37mm x 3mm Oversize Flat Washers 2 Thin Side Spacers 4 Rubber
INSTALLATION INSTRUCTIONS Toyota FJ Cruiser DEMELLO-OFFROAD.
 INSTALLATION INSTRUCTIONS Item Description Vehicle 3 piece Rear Bumper 2007-2014 Toyota FJ Cruiser DEMELLO-OFFROAD www.demello-offroad.com 12785 magnolia ave Riverside ca 92503 Suite 1 phone: 1-951-735-4417
Grille Guard PART NUMBER: WCGM B
 Grille Guard PART NUMBER: WCGM-158-21-B Fits: 2015 Chevrolet Colorado 2015 GMC Canyon 60-180 min CUTTING REQUIRED DRILLING NOT REQUIRED REMOVE CONTENTS FROM BOX. VERIFY ALL PARTS ARE PRESENT. READ INSTRUCTIONS
INSTALLATION INSTRUCTIONS SEMI Hidden Kit Part Number: Application: 2017 Toyota 4Runner
 INSTALLATION INSTRUCTIONS SEMI Hidden Kit Part Number: 100022 Application: 2017 Toyota 4Runner GENERAL SAFETY PRECAUTIONS Your safety, and the safety of others, is very important. To help you make informed
11333 INSTALLATION INSTRUCTIONS
 11333 INSTALLATION INSTRUCTIONS Safety glasses should be worn at all times while installing this product. YEARS: 2011-PRESENT MAKE: MINI COOPER MODEL: COUNTRYMAN STYLE: SEDAN WARNING: NEVER EXCEED YOUR
4 th Gen 4 Runner Front Bumper - Installation Instructions:
 www.shrockworks.com info@shrockworks.com 877-474-7625 4 th Gen 4 Runner Front Bumper - Installation Instructions: Thank you for purchasing a ShrockWorks product. We are confident you will enjoy it for
2015 Ford F150 Rear Bumper w/ LED
 2015 Ford F150 Bumper w/ LED T527990 T527991 PARTS LIST: 1 Bumper Assembly 4 12mm Lock Washers 2 Mounting Brackets 6 12 mm Nylon Lock Nuts 4 Sensor Hole Plugs 8 4mm x 10mm Button Head Bolts 2 Plastic Plugs
2015 Ford F Bull Bar
 PARTS LIST: 2015 Ford F150 3.5 Bull Bar Qty Description Qty Description 1 3.5in Oval Bull Bar 2 10mm U-Bolt (for use on closed frames only) 1 Driver side Frame Bracket 4 10-1.50mm x 35mm Hex Bolts 1 Passenger
Lexus NX Fine Mesh and Dynamic Radar Cruise Control Fine Mesh Grilles
 IMPORTANT: PLEASE KEEP THIS INSTRUCTION MANUAL FOR FUTURE REFERENCE! 2015-16 Lexus NX Fine Mesh and Dynamic Radar Cruise Control Fine Mesh Grilles Upper Insert - factory chrome surround and emblem reused
Driver/Left Mounting Bracket. Passenger/Right Mounting Bracket. Bolt Plates
 PARTS LIST: 1 Bull Bar 6 12-1.75mm Nylon Lock Nut 1 Driver/Left Mounting Bracket 4 Bolt Assembly 1 Passenger/Right Mounting Bracket 1 LED Light Bar with mounting bolts 2 12x1.75mm x 30mm Double 2 12 x
SHELBY GT500
 2007-2009 SHELBY GT500 Removal of Factory Unit WARNING: 1. Radiator fluid must be handled properly. Please observe local ordinances with regards to handling and disposal. 2. Allow vehicle and components
SUT-250-S (These instructions are used for SUT-250-SCLC also)
") SUT-250-S (These instructions are used for SUT-250-SCLC also) Torque wrench, carpenters square, wire cutters, Phillips screwdriver, 7/16, 9/16, and 3/4 combination wrenches, ratchet, 9/16, 3/4, 13/16,
SUT-250-S (These instructions are used for SUT-250-SCLC also) Torque wrench, carpenters square, wire cutters, Phillips screwdriver, 7/16, 9/16, and 3/4 combination wrenches, ratchet, 9/16, 3/4, 13/16,
Installation Instructions: (Part # SB614802) Dodge Ram 1500/2500/3500 M1 Rear Bumper Kit
 Dodge Ram 1500/2500/3500 M1 Rear Bumper Kit") NOTE: Carefully read entire instructions thoroughly before attempting to install this part. Parts Included Qty Rear M1 1 93-9344 Sensor Mounting Plate 4 93-9345 Sensor Hole Cover Plate 4 93-9347 Trailer
NOTE: Carefully read entire instructions thoroughly before attempting to install this part. Parts Included Qty Rear M1 1 93-9344 Sensor Mounting Plate 4 93-9345 Sensor Hole Cover Plate 4 93-9347 Trailer
James Barone Racing Aftermarket Parts and Accessories
 Page1 James Barone Racing Aftermarket Parts and Accessories What you will need: Jack and Jack Stands Drill 1/8 and 1/4 drill bits Ratchet wrench 11mm socket Philips head screw driver Flat head screw driver
(Ford Transit Rear Bumper) INSTALLATION INSTRUCTIONS
 INSTALLATION INSTRUCTIONS") Aluminess Products Inc 9402 Wheatlands Ct. #A Santee, CA 92071 619-449-9930 (Ford Transit Rear Bumper) INSTALLATION INSTRUCTIONS Please read before beginning Stainless steel hardware may bind together
Aluminess Products Inc 9402 Wheatlands Ct. #A Santee, CA 92071 619-449-9930 (Ford Transit Rear Bumper) INSTALLATION INSTRUCTIONS Please read before beginning Stainless steel hardware may bind together
INSTALLATION INSTRUCTIONS GRILLE GUARD GMC SIERRA 1500 EXCLUDES DENALI PART # 4084/
 INSTALLATION INSTRUCTIONS GRILLE GUARD 14-15 GMC SIERRA 1500 PART # 4084/ 4084-2 PARTS LIST: GRILLE GUARD Qty Description Qty Description 1 Grille Guard Assembly 6 12-1.75mm Hex Nuts 2 Frame Brackets 4
Toyota Tacoma Winch Mount Bumper Installation Instructions Tools Required: Transmission cooler relocation brackets Torque Wrench
 2016-2017 Toyota Tacoma Winch Mount Bumper Installation Instructions Tools Required: Items Included: Small flat head screw driver Winch Mount Ratchet, 10mm, 12mm, 14mm, 17mm & Skid Plate 19mm sockets Transmission
and Original Series Pickup Lift Mounting Instructions Fullsize Nissan Titan Trucks present T-420 BOLT-ON GUSSET PART#5257
 and Original Series Pickup Lift Mounting Instructions Fullsize Nissan Titan Trucks- 2004-present Preparing the Gate 1. Remove the mounting hardware which is banded to the liftgate. 2. Verify mounting bracket
Installation Guide for Rough Country 30 in. Chrome Series LED Light Bar w/ Hood Mounting Brackets
 Installation Guide for Rough Country 30 in. Chrome Series LED Light Bar w/ Hood Mounting Brackets Installation Time: 1 Hour Tools Required Trim removal tool (plastic or wood to prevent scratches on the
»Product» Safety Warning
 D9151 Installation Instructions 2006-2008 Dodge Ram 1500 1.5" Body Lift Read and understand all instructions and warnings prior to installation of product and operation of vehicle. Zone Offroad Products
GROSS LOAD CAPACITY WHEN USED AS A WEIGHT CARRYING HITCH: 2,000 LBS. TRAILER WEIGHT & 200 LBS. TONGUE WEIGHT.
 PAGE 1 0F 6 GROSS LOAD CAPACITY WHEN USED AS A WEIGHT CARRYING HITCH: 2,000 LBS. TRAILER WEIGHT & 200 LBS. TONGUE WEIGHT. WARNING: ALL NON-TRAILER LOADS APPLIED TO THIS PRODUCT MUST BE SUPPORTED BY 18050
(W) INSTALLATION INSTRUCTIONS GRILLE GUARD TOYOTA TUNDRA / SEQUOIA PART # &
 INSTALLATION INSTRUCTIONS GRILLE GUARD TOYOTA TUNDRA / SEQUOIA PART # &") (W) INSTALLATION INSTRUCTIONS PART # 501894 & 501895 PARTS LIST: 1 Grille Guard 4 3/8" Flat Washers 1 Driver/Left Frame 2 3/8" Nylon Lock Nuts 1 Passenger/Right Frame 4 12mm Plastic Washers 1 Driver/Left
(W) INSTALLATION INSTRUCTIONS PART # 501894 & 501895 PARTS LIST: 1 Grille Guard 4 3/8" Flat Washers 1 Driver/Left Frame 2 3/8" Nylon Lock Nuts 1 Passenger/Right Frame 4 12mm Plastic Washers 1 Driver/Left
MINI COOPER COUNTRYMAN
 2/19/2013 GROSS LOAD CAPACITY WHEN USED AS A WEIGHT CARRYING HITCH: 2000 LBS. TRAILER WEIGHT & 200 LBS. TONGUE WEIGHT. ***DO NOT EXCEED VEHICLE MANUFACTURER'S RECOMMENDED TOWING CAPACITY.*** WARNING: ALL
PARTS LIST: PROCEDURE:
 PARTS LIST: EVO3 LIGHT BAR Qty Description Qty Description 1 EVO3 Light Bar 2 10mm U-Bolt (for use on "closed frames" only) 1 Light Mount Crossbar Bracket 4 10mm x 26mm OD x 3mm Flat Washers 2 Light Tab
Passenger/Right. Driver/Left. Driver/Left Side Frame. Mounting Bracket. (2) 12mm Double Nut Plates (models without tow hooks)
 12mm Double Nut Plates (models without tow hooks)") PARTS LIST: Qty Description Qty Description 1 Grille Guard 4 10-1.5mm x 30mm Hex Bolt 1 Driver/left Frame Bracket 8 10mm x 24mm OD x 2.2mm Flat Washer 1 Passenger/right Frame Bracket 4 10-1.5mm Nylon Lock
PARTS LIST: Qty Description Qty Description 1 Grille Guard 4 10-1.5mm x 30mm Hex Bolt 1 Driver/left Frame Bracket 8 10mm x 24mm OD x 2.2mm Flat Washer 1 Passenger/right Frame Bracket 4 10-1.5mm Nylon Lock
 INSTALLATION INSTRUCTIONS Accessory Application Publications No. 2009 CIVIC HYBRID All 40191 Issue Date AUG 2008 PARTS LIST Rear under spoiler 2 Step bolts 4 Self-tapping screws TOOLS REQUIRED Phillips
UT ASSEMBLY REQUIREMENTS. *Torque all T-bolt nuts to foot pounds.
 UT-1000-8-04 ASSEMBLY REQUIREMENTS *Torque all T-bolt nuts to 35-40 foot pounds. *Check all lights before towing. *Tire pressure not to exceed recommendation on serial tag. *Re-torque wheel nuts after
Patriot. Aluminum and Steel 5spring. Step #1 Tarp Spool with Gear Motor (Includes Instructions for Optional Wind Deflector)
") Aluminum and Steel 5spring Qty. Component Parts Description: LONG BOX: (1) 103 Aluminum Tarp Axle (2) 98 Upper Arms with 90 Degree Elbow (2) Lower Aluminum ( 84 ) (1) Aluminum Cross Tube SMALL HARDWARE
Aluminum and Steel 5spring Qty. Component Parts Description: LONG BOX: (1) 103 Aluminum Tarp Axle (2) 98 Upper Arms with 90 Degree Elbow (2) Lower Aluminum ( 84 ) (1) Aluminum Cross Tube SMALL HARDWARE
INSTALLATION INSTRUCTIONS
 INSTALLATION INSTRUCTIONS Accessory Application Publications No. All 30482 S 2006 PILOT Issue Date P/N 08F23-S9V-100A SEP 2005 PARTS LIST Left front trim piece Right front trim piece Left rear trim piece
PRELIMINARY INSTALLATION INSTRUCTIONS. PARTS LIST Left front trim piece
 INSTALLATION INSTRUCTIONS Accessory Application Publications No. All 30482 S 2006 PILOT Issue Date P/N 08F23-S9V-100A SEP 2005 PARTS LIST Left front trim piece Right front trim piece Left rear trim piece
69-74 VW Beetle IRS Rear Kit Part No
 www.airliftcompany.com 69-74 VW Beetle IRS Rear Kit Part No. 75615 MN-476 (01102) ECN 3455 Please read these instructions completely before proceeding with installation A C B E D AA F F ITEM QTY. PART
DL650 Odyssey Luggage Installation Guide
 DL650 Odyssey Luggage Installation Guide Thank you for purchasing Jesse Luggage for your Motorcycle. Our Luggage, handcrafted in the USA, is designed for those with an interest in finding the most durable
SUT-450-I ASSEMBLY REQUIREMENTS
 SUT-450-I Torque wrench, carpenters square, wire cutters, Phillips screwdriver, 7/16, 9/16, and 3/4 combination wrenches, ratchet, 9/16,3/4,13/16, and 7/8 sockets. ASSEMBLY REQUIREMENTS *Torque all T-bolt
COLD AIR INTAKE INSTALLATION INSTRUCTIONS PART NUMBER D A. APPLICATION: E36/7 M-Roadster or M-Coupe 3.
 COLD AIR INTAKE INSTALLATION INSTRUCTIONS PART NUMBER D760-0323A APPLICATION: 1998-00 E36/7 M-Roadster or M-Coupe 3.2 Liter PARTS LIST Air Filter Assembly 3 1/2" Tube Intake Shield Silicone Hose Airflow
WARNING. When installed in accordance with these instructions, the front protection bar does not affect operation of the SRS airbag.
 Part Number: 343870 F/Kit 17557 Product Deluxe Combination Winch and Non Winch Bull Bar Description: Suited to Nissan XTERRA 05ON USA Only vehicle/s: WARNING REGARDING VEHICLES EQUIPPED WITH SRS AIRBAG;
INSTALLATION INSTRUCTIONS
 Hardware: 12M x 40M hex head bolts Qty: 4 12M flat washers Qty: 8 12M lock washers Qty: 4 12M Ny-lock hex nuts Qty: 4 Extension bracket with bolt Qty: 2 8M Ny-lock hex nuts Qty: 2 8M Lock washer Qty: 2
TOYOTA COROLLA LOWERING SPRINGS Preparation
 Preparation Part Number: PTR07-02140 Kit Contents Item # Quantity Reqd. Description 1 2 Front Spring 2 2 Rear Spring 3 1 Hardware 4 1 Instruction Form Hardware Bag Contents Item # Quantity Reqd. Description
Installation Instructions
 Installation Instructions Application Fits 2013+ Subaru XV Crosstrek Including Hybrid X7203 & X7204 Must have factory knockout 2 & 1.25 EcoHitch Invisi 350 lbs. Tongue Weight/ 3,500 lbs. Towing Weight
(W) INSTALLATION INSTRUCTIONS GRILLE GUARD 2014 GMC SIERRA 1500 EXCLUDES DENALI PART # /
 INSTALLATION INSTRUCTIONS GRILLE GUARD 2014 GMC SIERRA 1500 EXCLUDES DENALI PART # /") (W) INSTALLATION INSTRUCTIONS GRILLE GUARD PART # 508514/ 508515 PARTS LIST: GRILLE GUARD Qty Description Qty Description 1 Grille Guard Assembly 6 12-1.75mm Hex Nuts 2 Frame Brackets 4 10-1.50mm x 30mm
(W) INSTALLATION INSTRUCTIONS GRILLE GUARD PART # 508514/ 508515 PARTS LIST: GRILLE GUARD Qty Description Qty Description 1 Grille Guard Assembly 6 12-1.75mm Hex Nuts 2 Frame Brackets 4 10-1.50mm x 30mm
Installation Guide Current Ford F-250 & Ford F-350 Super Duty. Product Code: 109 & 119
 Installation Guide 2008 - Current Ford F-250 & Ford F-350 Super Duty Product Code: 109 & 119 September 1, 2012 Tools Needed Components Included 3/8" Drill P2 Tip #2 Philips Screwdriver 1/2" Drill Bit Hinged
INSTALLATION INSTRUCTIONS
 INSTALLATION INSTRUCTIONS PART # BB035709A3-SP-35OV 3-1/2" OVAL BULL BAR FOR 3-1/2" OVAL BULL BAR PARTS LIST: 1 Bull Bar 6 12-1.75mm Nylon Lock Nut 1 Driver/Left Mounting Bracket 4 10-1.50mm x 30mm Hex
** DO NOT EXCEED THE RECOMMENDED VEHICLE TOWING WEIGHT RATING ** DODGE RAM 1500
 10/3/2017 DODGE RAM 1500 WARNING!! BRAKE, FUEL, AND ELECTRICAL LINES MAY NEED TO BE LOOSENED OR REPOSITIONED TO PROVIDE CLEARANCE FOR NEW HARDWARE. ON SHORT BED MODELS, CHECK FOR ADEQUATE TURNING CLEARANCE
ARMOR UP FOR YOUR NEXT ADVENTURE! 6530 Federal Blvd. Lemon Grove, CA (844) , ext
 , ext") ARMOR UP FOR YOUR NEXT ADVENTURE! 6530 Federal Blvd. Lemon Grove, CA 91945 1(844)726-3373, ext. 102 info@pelfreybilt.com www.pelfreybilt.com 2016+ Toyota Tacoma Front Plate Bumper Start by removing the
ARMOR UP FOR YOUR NEXT ADVENTURE! 6530 Federal Blvd. Lemon Grove, CA 91945 1(844)726-3373, ext. 102 info@pelfreybilt.com www.pelfreybilt.com 2016+ Toyota Tacoma Front Plate Bumper Start by removing the
INSTALLATION INSTRUCTIONS GRILLE GUARD SILVERADO 1500 PART #
 INSTALLATION INSTRUCTIONS PART # 3-5863 4-0863 PARTS LIST: Qty Description Qty Description 1 Grille Guard Assembly 6 12-1.75mm Hex Nuts 2 Frame Brackets 4 10-1.50mm x 30mm Hex Bolts 1 Driver/Left Mounting
Mustang Radiator Conversion DIY. By GearHeadPeter. January 27, 2011
 1964-1966 Mustang Radiator Conversion DIY By GearHeadPeter January 27, 2011 We all know that the radiators in our cars are not the best, especially if you have done any customization to the engine, which
(W) INSTALLATION INSTRUCTIONS 3 BULL BAR
 INSTALLATION INSTRUCTIONS 3 BULL BAR") (W) INSTALLATION INSTRUCTIONS PART # 507517/507519 Page 1 of 4 PARTS LIST: 1 3in Bull Bar Assembly 4 12mm x 32mm OD x 3mm Flat Washer 1 Driver/left Frame Bracket 4 12-1.75mm Nylon Lock Nut 1 Passenger/Right
(W) INSTALLATION INSTRUCTIONS PART # 507517/507519 Page 1 of 4 PARTS LIST: 1 3in Bull Bar Assembly 4 12mm x 32mm OD x 3mm Flat Washer 1 Driver/left Frame Bracket 4 12-1.75mm Nylon Lock Nut 1 Passenger/Right
INSTALLATION INSTRUCTIONS
 INSTALLATION INSTRUCTIONS Accessory Application Publications No. UNDER 2007 CIVIC SI All 33529 Issue Date AUG 2006 PARTS LIST Rear under spoiler Clip Rubber washer 6 Flange bolts 6 Flange nuts TOOLS REQUIRED
UNPACK AND IDENTIFY THE FOLLOWING PARTS.
 SUT-500-S ASSEMBLY REQUIREMENTS *Torque all T-bolt nuts to 35-40 foot pounds. *Check all lights before towing. *Tire pressure not to exceed recommendation on serial tag. *Re-torque wheel nuts after first
INSTALLATION INSTRUCTIONS
 INSTALLATION INSTRUCTIONS Accessory Application Publications No. BII 31129 REARVIEW CAMERA 2006 RL Issue Date OCT 2005 PARTS LIST Attachment Kit P/N: 08B21-SJA-B00 Template Rear camera trim 6-Pin connector
Air Conditioner for M915 A0/A1 Truck
 RD-2-4530-0 Air Conditioner for M915 A0/A1 Truck INSTALLATION INSTRUCTIONS Install refrigerant compressor per instructions provided with compressor mount kit. CAUTION: Edges of sheet metal can be sharp!
T-52. r ve Pickup Lift Mounting Instructions Chevy / GMC- Colorado/ Canyon: 2015-present. Preparing the Gate. Installing the Bolt-on Gussets
 Chevy / GMC- Colorado/ Canyon: 2015-present Preparing the Gate 1. Remove the mounting hardware which is banded to the liftgate. 2. Verify mounting bracket kit (Figure 1 and Table 1). LEFT BRACKET (RIGHT
(2) 12mm x 40mm Short Low Profile Bolt Plates. (2) Spacer Washers. (4) 12mm Plastic Retainers. Passenger/Right Front.
 12mm x 40mm Short Low Profile Bolt Plates. (2) Spacer Washers. (4) 12mm Plastic Retainers. Passenger/Right Front.") PARTS LIST: 1 Driver/Left Running Board with 1 Rubber Backing (use on SX & Limited models) 4 12mm Plastic Retainer 1 Passenger/Right Running Board with 1 Rubber 4 12mm Lock Washer Backing (use on SX &
PARTS LIST: 1 Driver/Left Running Board with 1 Rubber Backing (use on SX & Limited models) 4 12mm Plastic Retainer 1 Passenger/Right Running Board with 1 Rubber 4 12mm Lock Washer Backing (use on SX &
WARNING. BX Saturn Vue and Redline Chevy Captiva (All Models) Installation Instructions
 Installation Instructions") Attachment Tab Height: 21-1/2 Attachment Tab Width: 18-1/2 Please read BOTH these and the General Information sheet prior to installing or operating this equipment. 1. Blue Ox towing products and accessories
Attachment Tab Height: 21-1/2 Attachment Tab Width: 18-1/2 Please read BOTH these and the General Information sheet prior to installing or operating this equipment. 1. Blue Ox towing products and accessories
LEXUS RC 350/RC-F ILLUMINATED DOOR SILLS Preparation
 Preparation Part Number: PT944-24150 Kit Contents Item # Quantity Reqd. Description 1 2 Inner LED Scuff 2 2 Outer Scuff 3 1 Hardware Bag Hardware Bag Contents Item # Quantity Reqd. Description 1 15 20
INSTALLATION INSTRUCTIONS ELEVATION REAR BUMPER FORD F150
 INSTALLATION INSTRUCTIONS PARTS LIST: 1 Elevation Bumper Assembly 2 Plastic Plugs (license plate mount) 6 12-1.75mm x 50mm Hex Bolts 8 4mm x 10mm Socket Head Screws 12 12mm x 37mm OD x 3mm Flat Washers
GrilleGuy.com, LLC. Installation Instructions and Care Guide : Toyota Tacoma Grille UPPER GRILLE
 Installation Instructions and Care Guide : 2001 2004 Toyota Tacoma Grille Thanks again for purchasing your custom grille insert from GrilleGuy.com. The following are some general guidelines that will simplify
Installation Instructions
 Installation Instructions RedRock 4x4 3 in. Bull Bar w/ Skid Plate & 20 in. Single Row LED Light Bar Black (Polished) () Part# T531165 (T531166) PARTS LIST: 1 Bull Bar 8 12mm x 32mm OD x 3mm Flat Washers
Lexus ES Fine Mesh and Adaptive Cruise Control Fine Mesh Grilles Upper and Lower Replacements
 IMPORTANT: PLEASE KEEP THIS INSTRUCTION MANUAL FOR FUTURE REFERENCE! 2013-15 Lexus ES Fine Mesh and Adaptive Cruise Control Fine Mesh Grilles Upper and Lower Replacements Part #1372-0102-13 / Black Ice
»Product» Safety Warning
 D9151 Installation Instructions 2006-2008 Dodge Ram 1500 1.5" Body Lift Read and understand all instructions and warnings prior to installation of product and operation of vehicle. Zone Offroad Products
CHEVROLET TAHOE/DENALI/AVALANCHE/YUKON/ SILVERADO/SIERRA 2007+
 CHEVROLET TAHOE/DENALI/AVALANCHE/YUKON/ SILVERADO/SIERRA 2007+ INSTALLATION INTRODUCTION 1. REMOVING THE FENDER AND DOORS FROM THE A-PILLAR AND DISCONNECTING THE WIRE HARNESS @ THE DOOR JAM 2. REMOVING
UT ASSEMBLY REQUIREMENTS. *Torque all T-bolt nuts to foot pounds.
 UT-1200-16-04 ASSEMBLY REQUIREMENTS *Torque all T-bolt nuts to 35-40 foot pounds. *Check all lights before towing. *Tire pressure not to exceed recommendation on serial tag. *Re-torque wheel nuts after
MINI COOPER HAVING INSTALLATION QUESTIONS? CALL TECHNICAL SUPPORT AT DESIGNED FOR USE WITH BALL MOUNT # D-19 / 45519
 10/8/2012 PAGE 1 of 6 ITEM 1 QTY 8 Parts List PART NUMBER DESCRIPTION 3/8" CONICAL TOOTHED WASHER TOOLS REQUIRED RATCHET TORQUE WRENCH 12" EXTENSION 12mm SOCKET 8mm SOCKET OFFSET SCREWDRIVER FLAT BLADE