McDominator Team Kit Owner's Manual
|
|
|
- Maud McDonald
- 5 years ago
- Views:
Transcription


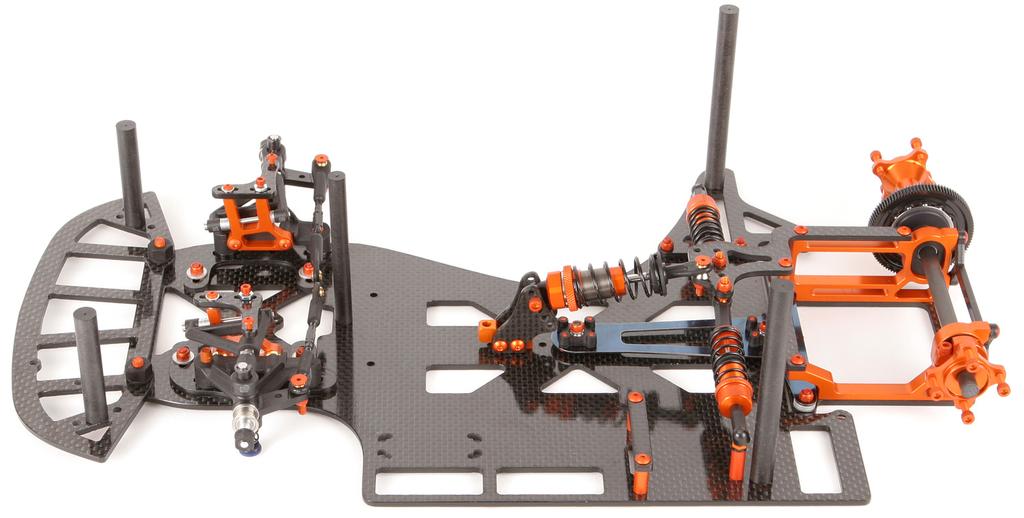
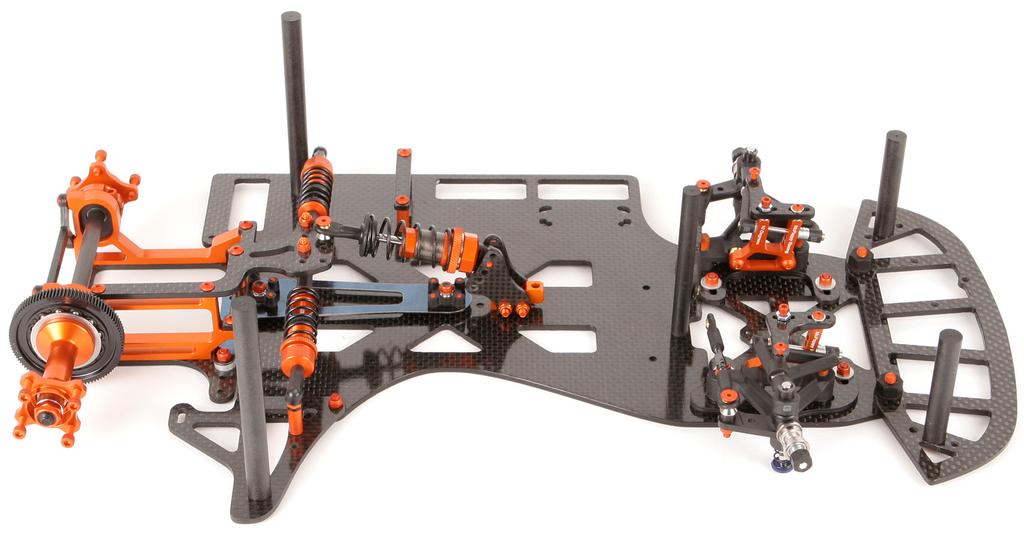
1 McDominator Team Kit Owner's Manual Thank you for purchasing the McPappy Racing McDominator Team Kit. This manual will guide you through the assembly process. It is possible to take a kit and throw it together in a couple of hours. But it's wise to take the time and do it right. This owner's manual will provide building instructions but also tips on better methods for building a smoother suspension, removing slop and binding, etc. This manual is not a step-by-step manual that shows this screw goes into that screw. The focus of this manual is the most important part: perfecting the suspension and eliminating any bind. Therefore, if you have any questions about what screws go where, please do not hesitate to call us. (Some of these pictures in this manual are of the Dart chassis.)

 to the edges will make it feel smoother and also helps to keep the carbon fiber layers together during a hard hit. Take thin CA and soak a Q-tip.")
2 Chassis Prep As a bare minimum, there are you 5 areas that you should Dremel, file, or sand off the sharp edges so that it does create unnecessary resistance by catching or cutting carpet fibers: Front edge of the chassis Right edge of the chassis Front edge of the bumper Nerf wing LiPo strap brace Where the battery tape connects to the chassis Taking time to Dremel, file, or sand all of the carbon fiber is worth the effort as well. For a smooth finish, you can finish off the perimeter with grit sandpaper. Applying superglue (CA) to the edges will make it feel smoother and also helps to keep the carbon fiber layers together during a hard hit. Take thin CA and soak a Q-tip. Shake off the excess CA and slide the Q-tip along the perimeter. It will slide easy on all sanded edges, but you may have to roll the Q-tip along the rougher edges, otherwise it will pull off the Q-tip fibers. For the ultimate glass smooth perimeter finish, you can sand the CA when it dries and repeat the process. It's also recommended to CA the countersunk 8-32 slots in the locators. This will keep the slots in better shape for a long time. Front End Attach the bumper to the chassis using /2 flathead screws and 8-32 nylon locknuts. Take a Dremel and remove some material from the outermost edge of the eyelet or install the eyelet upside down. Otherwise, when the suspension is compressed, the spacers at the top of the kingpin will bind against the inside of the eyelet. Insert the front suspension pivot balls into the eyelets and lower suspension arms. To allow your suspension to work the smoothest, it's important that these aren't too tight. Generally, a brand new eyelet and lower arm is slightly too tight with brand new pivot balls. The best way to break in the eyelet and lower arm is to use the pivot ball removal tool to insert and remove the pivot ball many times. Slowly insert the pivot ball. Let it sit in the tightest location for a while, and also screw it in past the normal point. This will open the eyelet and lower arm. To greatly speed up the process, use a slightly oversized pivot ball like the Hyperdrive Teflon coated aluminum pivot ball. The IRS pivot ball diameter is the largest available and since it's metal, you can save your plastic pivot balls from getting damaged. 2

.")

3 Both steering blocks need some material Dremeled off the inside top area, otherwise the eyelet will hit the steering block when the suspension is compressed. While you are at it, take the left steering block and Dremel off some material as well, otherwise when the left suspension is compressed, the left Dubro will bind against the left steering block. Ignore the short kingpins that come in the front end bag. Find the 1.5 kingpins, put them in a Dremel and polish them with metal polish (or toothpaste if you don't have any). The ultimate metal polish is Simichrome. Absolutely amazing how fast Simichrome works without taking anything off the diameter! Stop by a Harley dealership or pick some up online (like Amazon.com). Here s an example with the pivot balls: With single cell racing, we ve lost some left side weight percentage, so cars are rolling a little more onto the right front. If you are running 10.5 or faster, it s a nice option to be able to run more than 3 degrees of camber on the right front so that the edge of the tire doesn t dig into the carpet. Generally, the 6-32 turnbuckle will bottom out at about 3 degrees of camber. To increase this, take a little material off the eyelet and upper arm. You don t have to do this for the left side. 3


4 Insert the 6-32 turnbuckles into the eyelets and upper arms. Now is the best time to decide which direction you want the threads to run. Choose the same on both so adjusting the camber later will be consistent. Using 5/8 buttonhead screws and brass cone washers, connect the aluminum 10 degree caster block to the left lower arm. The brass cone washers are used to space out the caster block to decrease camber gain. This keeps more left tire contact patch on the ground in the corners when the suspension compresses. Using 1/ buttonhead screws, connect the 10 degree caster block to the right lower arm. The brass cone washers are not used on the right caster block to increase camber gain. This helps to keep the right tire from coning and from biting too hard on the outer edge in the corners. Static caster can be controlled by the amount of spacers between the rear of the caster block and the upper arm. No washers in the rear of the caster block is about 0 degrees. Each washer is approximately 1 additional degree of caster. For the left side, we recommended 1 degree of caster (1 washer to the rear of the caster block). For the right side, we recommended 2 degrees of caster (2 washers to the rear of the caster block, our picture only shows 1). Insert the self-locking hingepin into the uppermost holes of the left caster block. Insert the self-locking hingepin into the lowermost holes of the right caster block. Apply light forward pressure to the hinge pin take away any slop, and gently tighten the 2-56 screw down to hold the hingepin in place. This also locks the upper arm from moving forward or rearward. When you do it right, the upper arm should have no slop and should also be loose enough to flop down by it's own weight. Note: The rear upright of the 10 degree caster block is the only upright that allows the long 2-56 screw to go all the way down through to hold the hingepin. In our testing, only one 2-56 screw was needed to 4


5 secure the hingepin. For added peace of mind, you could fill the front of the hingepins with extra spacers, but technically aren t needed as long as the 2-56 holds the hingepin. Notice the single long 2-56 screw serves 2 purposes. It holds the hingepin in place and the nut holds the bumpstop in place. Also notice that we added a few spacers under the left bumpstop to give us a little more room for clearance. Use 3/ flatheads, #4 washers, and 4-40 locknuts to install the locators. There is a left and a right locator, so look at the picture to use the correct ones. Use 5/ flat heads to install the front ends onto the locators. Of course, you ll probably want to use some spacers under the lower arms to get the ride height correct. Install the aluminum axles into the steering blocks. Find the upgraded 1.5 kingpins, chuck them in your Dremel or drill and polish them with Simichrome. Make sure to remove any residual Simichrome polish with motor spray or similar before proceeding. Install an e-clip on one end, then a spring bucket, large black front spring, and another spring bucket. From the bottom, install the Kingpin up through the lower arm, steering block, front axle and upper eyelet. Use the black nylon spacers and metal spacers on top of the kingpin to take up the slack. You want just barely enough spacers to take up all of the slop. You don t want to preload the spring too much. Install the e-clip on top of the kingpin. Servo Mounting The servo holes in the chassis were drilled for the popular Futaba 9650, 9602, or BLS651 servos. If your servo has both ears intact, you can mount the servo in the forward position or regular position. Using the forward mounting position is beneficial for 2 reasons. It increases the forward weight percentage which has proven to be desirable in 1 cell racing. Secondly, it moves weight more towards the suspension mounting points which keeps the chassis settled/flatter over bumps. If your servo does not have the ears intact, you can recreate them with thick Lexan bent into a 90 angle and epoxied to the servo. 5

6 Put one of each type of Dubros (4-40 MCP3580 and 2-56 MCP3581) on each end of 1.25 black turnbuckle. They go on a little tight, so it s good to open up the Dubro plastic a little bit with a 7/64 drill bit and put a little chapstick on the turnbuckle threads before threading them. Being consistent with your choice of turnbuckle thread direction will make it easier on you later when adjusting your toe. Use the 3/ button head screw (button head goes closest to the servo) and 2-56 locknut to attach the Dubros to the servo saver. It s important to use a small servo saver (not the large one that comes in the front end bag) to get the Ackerman and bumpsteer right. (More on that later.) Mount your small servo saver onto your servo. Use 5/ flatheads, #4 thin washers (found in the front end bag) and 4-40 locknuts to secure the servo flat to the chassis. Mounting the servo in this manner saves weight and lowers the center of gravity. Move the servo so that the turnbuckles are straight across. This will provide the proper amount of Ackerman. To eliminate bumpsteer, the turnbuckles should be parallel to the upper arms when looking from the front of the car. Using a 7/16 sockethead 4-40 screw and locknut to connect the left Dubro to the left steering block. When the suspension is compressed, it will not bind since you shaved a little angle into the left steering block. Use a 3/4 flathead 4-40 screw, spacers, and an aluminum cone washer to mount the right Dubro to the right steering block. To get the right turnbuckle parallel with the right upper arm, this usually means lots of spacers to the point where the Dubro is almost touching the tire. BSR s provide the most clearance, as their rim diameter is the largest. Rear End This kit comes with a Muddslide adjustable flex spring steel T-plate. Spring steel returns back to its neutral position better than fiberglass. The T-plate is engineered so that you will only need your hex driver. The ORC McPappy HD2500 Super Soft T-plate will also work with the McDominator. It moves the rear pivot point back closer to the motor. 6
7 7
. Install the top plate onto the right bulkhead using 1/4 buttonhead 4-40 screws.")
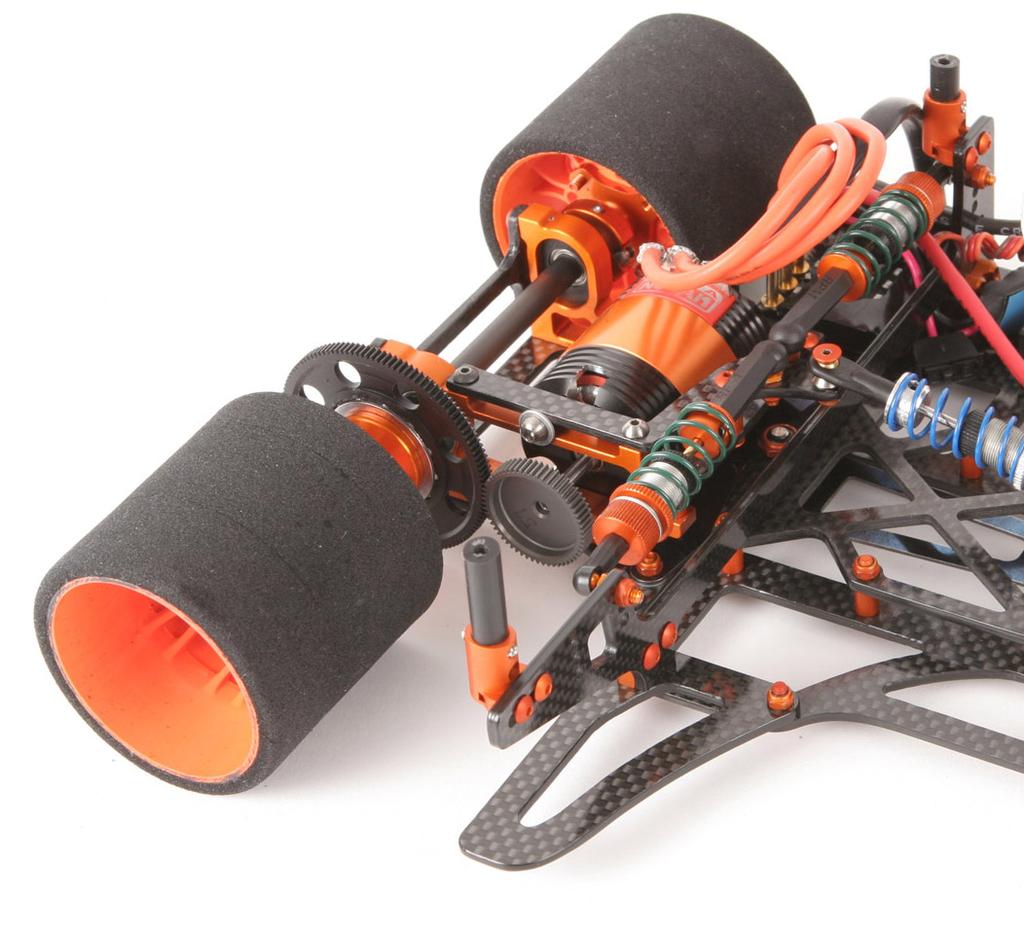
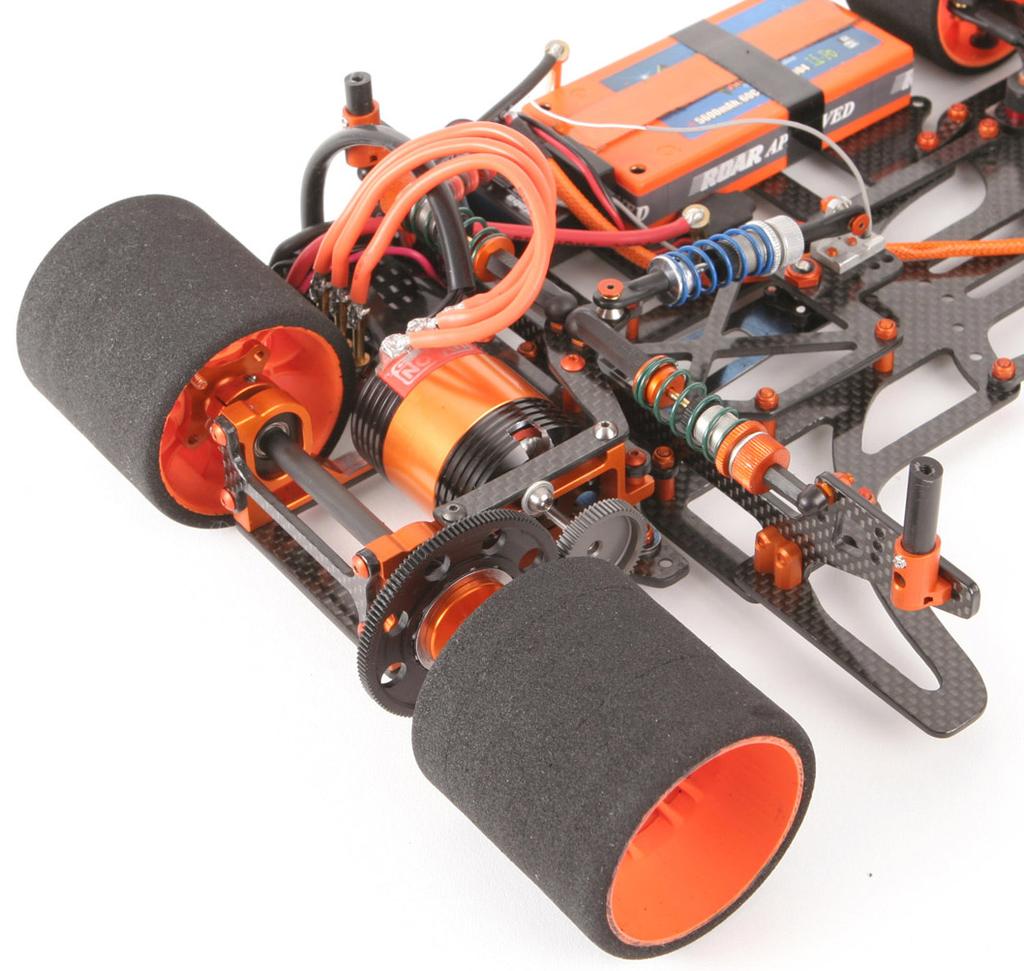
8 Polish all of you ball studs with Simichrome. If they are anodized, the Simichrome will polish that just fine. No need to take off the anodizing first. Install the short ball studs on the underside of the top plate (second holes in on both sides). Install the top plate onto the right bulkhead using 1/4 buttonhead 4-40 screws. You need to be careful if you use aluminum screws with these 2 particular screws. Over time, they tend to get very tight because of the constant heating and cooling of the bulkhead. Use steel, titanium, or lubricated aluminum screws here. Center Shock Polish your shock shafts and inside of the shock body with Simichrome. Assemble the center shock as seen below. We recommend 50 weight oil for the center shock. 8

9 Work the fuel line tubing into the head of the center shock as seen here. Use a hobby knife to shave off all excess fuel line tubing on both sides of the head. This is important, as too much fuel line tubing in between the center shock mount uprights will cause a bind. Using a 7/ socket head screw, install the shock into the center shock mount. Using a 1/ flathead screw, aluminum cone washer, and 4-40 locknut, attach the Dubro to the upper pod plate as seen below. 9

10 Side Shocks Polish your shock shafts and inside of the shock body with Simichrome. Assemble the Silva HPS2 side shocks as seen below. We recommend 35 weight oil in the side shocks. 10
11 LiPo Mounting The following pics are of the Dart, but the same technique can be used for the McDominator. The LiPo strap mounting is the lightest way to hold a battery in with 2 screws. It also holds the battery fully flush to the left of the chassis for increased left weight percentage. The tape strap is not sticky to the battery, which makes it easy to install or remove the batteries. It s important to note that the tape strap was designed to hold the battery down, while tungsten or lexan strips were designed to lock the battery in from moving side to side. Therefore you should not need the LiPo strap to be over tightened. Let the tungsten or lexan strips provide the main holding power. 11

, right hub, diff")
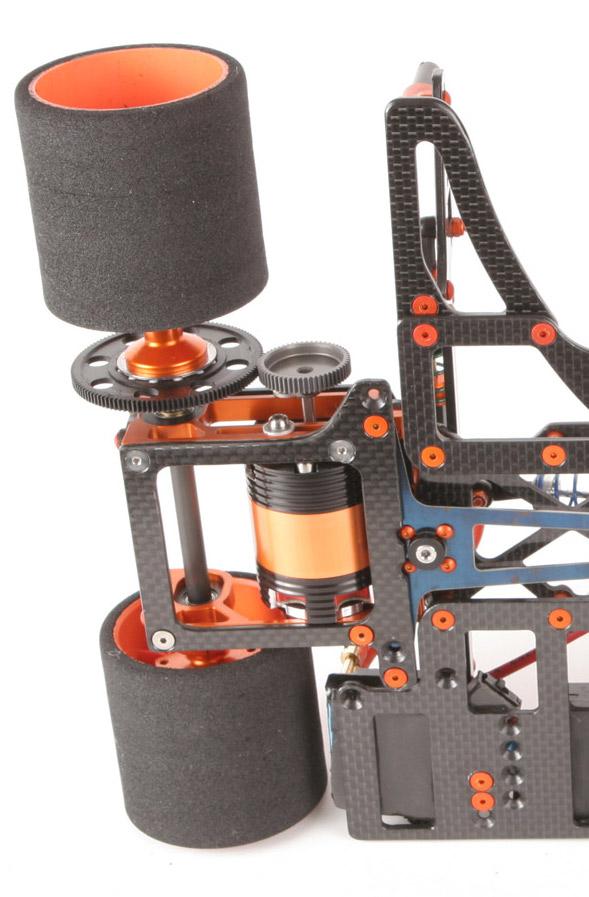
12 Rear Axle Place your flanged bearings into your desired ride height locator and insert into the bulkheads. Install the 0.15 nylon axel spacer on to the axle. Install a brass washer on next. Slide the axle into the bearings. Install the left hub onto the axle. Use 7/ socket head screws to tighten it on to the axle. On the other side, install the diff rings, spur gear (with diff balls and unflanged bearing installed), right hub, diff cone washer and 8-32 nylon locknut. 12

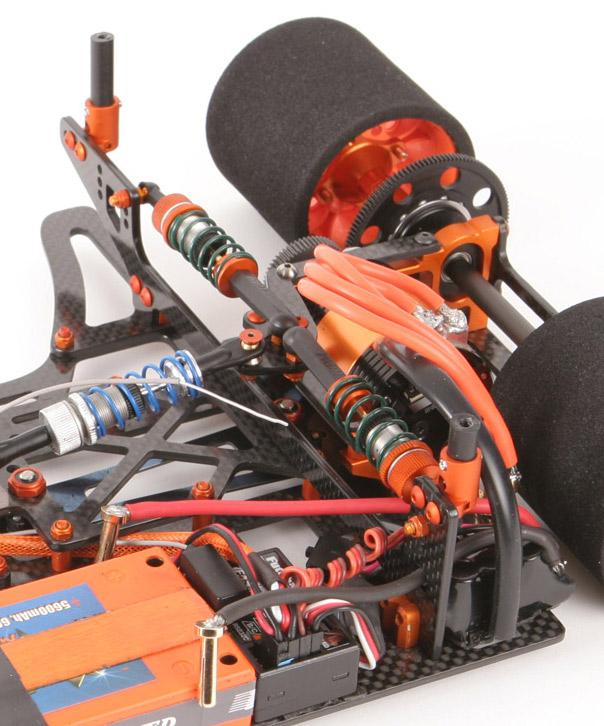
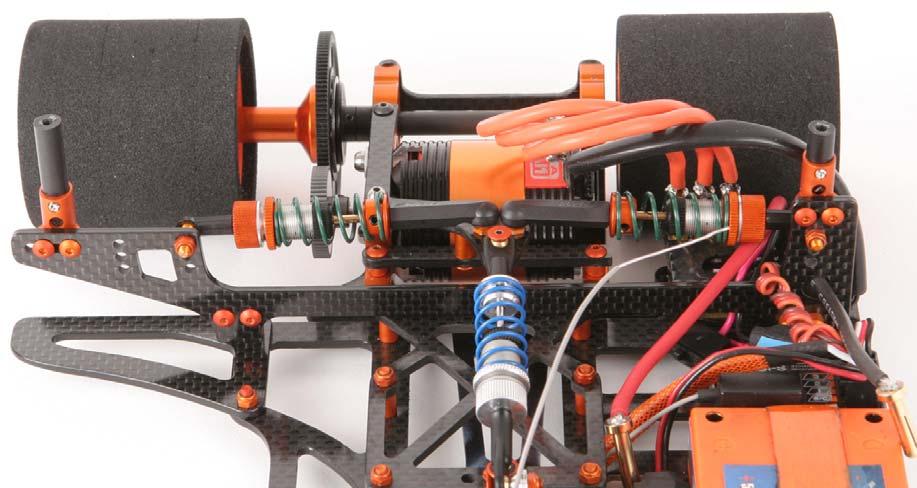
13 Body Posts There are 16 body posts locations for you to choose from! We recommend the choices shown in the pictures, but feel free to use whatever works best for you. Use a Dremel with a cutoff wheel to cut the posts the desired heights and angles. Drill a hole and use a 4-40 tap for best results. Aftermarket aluminum adjustable body posts are convenient, but are heavier. Taking the time to make all Delrin body posts will benefit you on every lap as they are lighter. We will be posting some body posts heights on our web site later. McDominator 1.1 improvements The McDominator now uses a new crossbrace, top plate, nerf wing, 90 degree aluminum supports, and adjustable body posts. The new crossbrace adds rigidity to the chassis especially near the nerf wing area where the right shock connects. This makes the car more responsive to changes and snaps in to the turn quicker. It also moves the side shocks back to the pivot point for a more accurate (progressive) motion. The chassis has been slightly altered as well. Better pictures will be taken later, but in the meantime, these pictures of my Dart 2.6 will do. I m using a side shock in place of the traditional center shock, but the traditional center shock will work fine with the included longer shock shaft. Notice you will need to dremel out 2 small notches in the bottom plate so the 2-56 screws will clear. Please ignore my prototype bottom and top plate. The picture shows ball cups and ball studs, but you ll be receiving all Dubros and cone washers which are much better for slop reduction. Cut side shock Dubros to.75 overall length. Don t let the side shock Dubros touch on the top plate: file the tips a little bit for extra clearance. 13
14 14
15 15
16 16
17 Team Updates and Communication We have an open policy for providing tips, setups, discussing future improvements, and taking suggestions from all McPappy Racing owners. Please join us on in our discussion forum. We also have downloadable setup sheets as well. If you have any questions, feel free to contact us: Sales: Toll Free (US Only) Sales: McPappy Racing. 36 Coventry Dr. Support: Spencerport, NY Fax: Fax #2: ICQ Customer Service # ICQ Technical Support # When you call, you will hear "Web Wonderland" on our answering service. You've reached the right place. (McPappy Racing is under our main company Web Wonderland, Inc.) Copyright 2011 McPappy.com. All rights reserved. "McPappy Racing" name and logo are Registered Trademarks. Product of Web Wonderland, Inc. Made in the USA 17
Dart 2.0 Owner's Manual
 Dart 2.0 Owner's Manual Thank you for purchasing the McPappy Racing Dart 2.0. This manual will guide you through the assembly process. It is possible to take a kit and throw it together in an hour. But
Dart 2.6 Team Kit Owner's Manual
 Dart 2.6 Team Kit Owner's Manual Thank you for purchasing the McPappy Racing Dart 2.6 Team Kit. (Note, many of these pictures still reflect the Dart 2.5. The very last section shows the 2.6 updates.) This
Assembly Manual. 1/10th Formula 1 Car
 Assembly Manual 1/10th Formula 1 Car Center Pivot Bag 1 3374 - Center Pivot Socket 40194 - Hard Anodized Alum Pivot ball 3254-2-56 *Note - Sometimes it is helpful to slightly over-tighten the top clamp
Bag 1. Bag 1. Center Pivot. Center Pivot
 8 00734 01901 5 Center Pivot Bag 1 3374 - Center Pivot Socket 4019 - Alum Pivot ball 3254-2-56 Button Head *Note - Sometimes it is helpful to slightly over-tighten the top clamp screws, then work the ball
KSKT RACING PRODUCTS
 KSKT RACING PRODUCTS ''KSK-B'' SPEC RACING CHASSIS ASSEMBLY INSTRUCTIONS 'The Leader in SK Racing' 1 CHASSIS KIT FEATURES Black Carbon Fiber Chassis Components 2.5 mm Thick Main Chassis Battery mounting
Assembly Manual. 1/10th World GT car
 Assembly Manual 1/10th World GT car Center Pivot Bag 1 3374 - Center Pivot Socket 40194 - Hard Anodized Alum Pivot ball 3254-2-56 Button Head *Note - Sometimes it is helpful to slightly over-tighten the
Calandra Racing Concepts
 Calandra Racing Concepts Carpet Knifeä Version 3 Assembly and Setup Manual Congratulations! You now own the best 1/12th scale car on the market today, the Carpet Knifeä Version 3. This completely new car
New Generation Rear Wheel Drive
 New Generation Rear Wheel Drive ABC HOBBY ORIGINAL RADIO CONTROL CAR Instruction Manual Study the instructions thoroughly before assembly. REAR 2 WHEEL DRIVE REAR MOUNTED MOTOR BELT DRIVE DOUBLE DECK CHASSIS
Bag 1. Bag 1. Center Pivot. 3 Center Pivot Cap. Center Pivot
 Battle Axe 2.0 1:10th Oval Weapon from Team CRC Assembly Manual 0 2. e Ax s tle Win s! t rd Ba s + bi C. ow CR T.Q Sn 0 20 servo and saver not included Part # 100 Calandra Racing Concepts 6785 Martin Street
.050 Allen key 1.5mm Allen key 1/16 Allen key 5/64 Allen key 3/32 Allen key Turnbuckle & 3/16 wrench
 1 Thank you for purchasing the Outlaw 4 Sprint Car! The Outlaw sprint car platform has been developed for loose dirt buggy tire racing. In this kit you will find the 4 th evolution of the car which features
Shown with optional GFR-1017R Body Posts. J & D Machine / Hyperdrive / MSA 3711 Moon Bend Rd. Chapel Hill, TN
 Shown with optional GFR-1017R Body Posts J & D Machine / Hyperdrive / MSA 3711 Moon Bend Rd. Chapel Hill, TN 37034 www.hyperdriveracing.com 1 You now own a state of the art 1/10 scale oval race car. The
J & D Machine / Hyperdrive / MSA 3711 Moon Bend Rd. Chapel Hill, TN 37034
 J & D Machine / Hyperdrive / MSA 3711 Moon Bend Rd. Chapel Hill, TN 37034 www.hyperdriveracing.com 1 You now own a state of the art 1/10 scale oval race car. The Hyperdrive Assault has gone through months
INSTRUCTIONS MANUAL COMPETITION GRADE HIGH PERFORMANCE RADIO CONTROL RACING CAR CHASSIS KIT 1/12 SCALE ELECTRIC COMPETITION CAR KIT
 COMPETITION GRADE HIGH PERFORMANCE RADIO CONTROL RACING CAR CHASSIS KIT 1/12 SCALE ELECTRIC COMPETITION CAR KIT INSTRUCTIONS MANUAL E Thank you for purchasing VBC Racing product. Things that we should
DIFFERENTIAL STEERING RACK
 BAG-A DIFFERENTIAL (2 Sets) +Driver Cap Screw Diff Ball Nylon Nut Thrust Washer Thrust Ball Diff Joint Cup A Allen Wrench 850 Bearing Diff Ring Diff Spring Nylon Nut 850 Bearing Diff Ring Diff Ball Ball
RJS2021 LTO SPORT OVAL RACER LESS ELECTRICS
 RJS2021 LTO SPORT OVAL RACER LESS ELECTRICS THANKS FOR BUYING THE RJ SPEED 1/10 LTO SPORT KIT FOR OVAL RACING. THE ASSEMBLY WILL NOT BE DIFFICULT IF YOU READ THE TEXT, LOOK AT THE PICTURES, AND THE EXPLODED
#4016 KIT TOOLS SUPPLIED
 #4016 4 =? A F H L A, O = E? 5 J H K J BH JIKIFA IE.=?J HO6A= + = H > B E > A H > K A = K E K I? H A M + I F I E J A + D = I I E = @ > = A @ I 9 E @ A > = J J A H O I JI.=?J HO6A= > K A J E J = E K JK
INSTRUCTIONS MANUAL COMPETITION GRADE HIGH PERFORMANCE RADIO CONTROL RACING CAR CHASSIS KIT 1/10 SCALE ELECTRIC COMPETITION CAR KIT
 COMPETITION GRADE HIGH PERFORMANCE RADIO CONTROL RACING CAR CHASSIS KIT 1/10 SCALE ELECTRIC COMPETITION CAR KIT INSTRUCTIONS MANUAL E Thank you for purchasing VBC Racing product. Things that we should
#0980 Intimidator 7 Direct Drive Racing Kit
 #0980 Intimidator 7 Direct Drive Racing Kit 1 Thank you for purchasing the Intimidator 7! Within this kit you will find a race winning car with over 30 years of Custom Works design and quality. The latest
BEFORE YOU START. XRAY Europe K Výstavisku 6992, Trenčín Slovakia EUROPE. XRAY USA RC America, 2030 Century Center Blvd #15 Irving, TX USA
 BEFORE YOU START The X12 is a high-quality, 1/12-pan car intended for persons aged 16 years and older with previous experience building and operating RC model racing cars. This is not a toy; it is a precision
RJS2020 SPORT 3.2 1/10 PAN CAR KIT LESS ELECTRICS
 RJS2020 SPORT 3.2 1/10 PAN CAR KIT LESS ELECTRICS THANKS FOR BUYING THE RJ SPEED 1/10 SPORT 3.2 KIT. THE ASSEMBLY WILL NOT BE DIFFICULT IF YOU READ THE TEXT, LOOK AT THE PICTURES, AND THE EXPLODED VIEW
Install steering rack assembly to chassis using x 3/8 stainless flat head socket screws and 2-6.4mm x 1.1mm blue aluminum spacers as shown.
 Install steering rack assembly to chassis using 2-4-40 x 3/8 stainless flat head socket screws and 2-6.4mm x 1.1mm blue aluminum spacers as Qty 2, 4-40 x 3/8 fhcs Qty 2, 6.4mm x 1.1mm blue aluminum spacer
BEFORE YOU START. XRAY USA RCAmerica, 167 Turtle Creek Boulevard Suite C Dallas, Texas 75207, USA
 BEFORE YOU START The X12 is a high-quality, 1/12-pan car intended for persons aged 16 years and older with previous experience building and operating RC model racing cars. This is not a toy; it is a precision
2030 OUTLAW SPRINTER HARDWARE I.D. BUTTON HD. CAP SCREW BAG H1 CHASSIS KIT BAG H3 HARDWARE BAG L2 REAR AXLE PARTS BAG L4 FRONT TIRES
 THANKS FOR BUYING THE RJ SPEED OUTLAW SPRINTER KIT. IT IS COMPLETE LESS ELECTRICS, AND MADE FOR CARPET OR PAVEMENT RACING. IT REQUIRES A 540 OR 550 SIZE MOTOR, 4 OR 6 CELL BATTERY PACK, TWO CHANNEL RADIO
BEFORE YOU START CUSTOMER SUPPORT
 BEFORE YOU START The X10 is a high-quality, 1/10-pan car intended for persons aged 16 years and older with previous experience building and operating RC model racing cars. This is not a toy; it is a precision
2103 NITRO RAIL DRAGSTER KIT
 203 NITRO RAIL DRAGSTER KIT THANKS FOR BUYING RJ SPEED S NITRO DRAG KIT. IT IS A LITEWEIGHT CAR MADE FOR STRAIGHT LINE DRAG RACING AND CAN BE BROKEN IF RUN INTO SOLID OBJECTS AT HIGH SPEED. YOU WILL NEED
7207 FRONT BULKHEAD, nylon FRONT BULKHEAD ALUMINUM SUPPORT HINGE PIN, inner, with clips, 1.675" pr GT RACING FRONT
 RC10GT & RTR GT MC 9 McCOY GLOW PLUG 1 3.9 2661 CLUTCH NUT CLIPS 6.7 3216 WASHER, #4 12 1.00 3719 NYLON WIRE TIES, 6" heavy duty 12 2.00 3720 NYLON TIES, 8", light duty for receiver 12 2.00 3721 SELF-TAPPING
:: Additional Features Your new TC6 comes unassembled and requires the following items for completion. (refer to catalog section for suggestions):
:") 8/10 2 :: Introduction Thank you for purchasing this Team Associated product. This assembly manual contains instructions and tips for building and maintaining your new RC10TC6. Please take a moment to
8/10 2 :: Introduction Thank you for purchasing this Team Associated product. This assembly manual contains instructions and tips for building and maintaining your new RC10TC6. Please take a moment to
RJS WB ELECTRIC T/F DRAGSTER KIT LESS ELECTRICS
 RJS2006 30 WB ELECTRIC T/F DRAGSTER KIT LESS ELECTRICS THANKS FOR BUYING THIS RJ SPEED DRAGSTER KIT. IT IS MADE FOR STRAIGHT LINE DRAG RACING AND MAY BE BROKEN IF RUN INTO SOLID OBJECTS REPEATEDLY AT HIGH
=Apply Thread lock adhesive. =Apply CA Glue =Apply Grease NOTE : BAG 01 BAG 01 BAG mm. When track High Traction or want to reduce steering
 NOTE : =Apply Thread lock adhesive R80059 One Way Cup () R8009 One Way R80 Pulley Set- R80004 Alu-Bulkhead-L BAG 0 CA GE =Apply CA Glue =Apply Grease R8000 Upper Arm Bracket Base R8004 One Way Plastic
RJS2017 SPORTSMAN RACER KIT LESS ELECTRICS
 RJS2017 SPORTSMAN RACER KIT LESS ELECTRICS THANKS FOR BUYING THE RJ SPEED 1/10 SPORTSMAN RACER KIT FOR OVAL RACING, DRAG RACING OR JUST FUN STREET BASHING. THE ASSEMBLY WILL NOT BE DIFFICULT IF YOU READ
along with standard XT2 Instruction Manual and also XT2 18 Supplementary Sheet.
 Use this XT2 Dirt Conversion Supplementary Sheet along with standard XT2 Instruction Manual and also XT2 18 Supplementary Sheet. Parts included in Bag 8: 303141 SHIM 3x5x1.0MM (10) 322111 XT2 COMPOSITE
E Thank you for purchasing VBC Racing product. COMPETITION GRADE HIGH PERFORMANCE RADIO CONTROL RACING CAR CHASSIS KIT INSTRUCTIONS MANUAL
 COMPETITION GRADE HIGH PERFORMANCE RADIO CONTROL RACING CAR CHASSIS KIT 1/10 SCALE ELECTRIC COMPETITION FORMULA CAR KIT INSTRUCTIONS MANUAL E Thank you for purchasing VBC Racing product. Things that we
$1.00 FOR THE TQIO/RCIO
 $1.00 FOR THE TQIO/RCIO m mm HDBBYSHOP Champion Jay Halsey has an impressive track record. One of Jay's advantages is a whisper smooth tranny thanks to his dad, Jim. Now you can build a Halsey transmission!
RJS2001 PRO STOCK KIT LESS ELECTRICS
 RJS2001 PRO STOCK KIT LESS ELECTRICS THANKS FOR BUYING RJ SPEED S PRO STOCK DRAG KIT. IT IS MADE FOR STRAIGHT LINE DRAG RACING AND CAN BE BROKEN IF RUN INTO SOLID OBJECTS REPEATEDLY AT HIGH SPEED. IT REQUIRES
FIRST, A WORD ABOUT THE NEW RC12LC
 FIRST, A WORD ABOUT THE NEW RC12LC CONGRATULATIONS!! You have purchased the production version of the car that Masami Hirosaka used to win the 1996/97 IFMAR 1/12 scale On Road World Championships. This
carbon fiber before assembly. Sand glue to the edges and
 chassis and carbon fiber give you a before assembly. Sand glue to the edges and 5 BAG MARKED CA BAG MARKED M3x6 Flathead 4 03 4 05 BAG MARKED 2 10 13 Installing Steering System Shock Assembly M4x28
OWNER'S MANUAL Magnolia Ave., Chino, CA phone: (909) fax: (909)
 fax: (909)") OWNER'S MANUAL Carefully read through all instructions to familiarize yourself with the parts, construction techniques, and tuning tips outlined in this manual. Being able to grasp the overall design of
OWNER'S MANUAL Carefully read through all instructions to familiarize yourself with the parts, construction techniques, and tuning tips outlined in this manual. Being able to grasp the overall design of
ABC HOBBY ORIGINAL RADIO CONTROL CAR
 ABC HOBBY ORIGINAL RADIO CONTROL CAR Instruction Manual Study the instructions thoroughly before assembly. FRONT WHEEL DRIVE NEW STYLE STRUT SUSPENSION BATHTUB CHASSIS 4 BEVEL GEAR DIFFERENTIAL FULL ADJUSTABLE
Build an electric Scoot-car
 513 Build an electric Scoot-car Designed by ROBERT W O O L S O N Here's a sidewalk special for young hot rodders that safely takes the corner on two wheels, has two forward speed and brakes that stop on
RJS2002 FUNNY CAR KIT LESS ELECTRICS
 RJS2002 FUNNY CAR KIT LESS ELECTRICS THANKS FOR BUYING RJ SPEED S FUNNY CAR DRAG KIT. IT IS MADE FOR STRAIGHT LINE DRAG RACING AND CAN BE BROKEN IF RUN INTO SOLID OBJECTS REPEATEDLY AT HIGH SPEED. IT REQUIRES
Pan Car Setup and Troubleshooting
 Pan Car Setup and Troubleshooting Problems can come up in the midst of competition. Either the car is not handling properly on the track or there are problems with equipment. Troubleshooting problems should
Turbinator-2 Build Manual
 Turbinator-2 Build Manual Thank you for your purchase of the Turbinator-2 sport jet by Boomerang RC Jets. This RC Jet IS NOT A TOY and should only be flown and operated by experienced RC Turbine Pilots.
Contents. Symbols Used. Equipment Required L=R. Page. Apply Thread Lock. Apply. Silicone Oil. 30mm Fan
 Contents Content Page Content Page Content Page 0. Tool and Accessories 1.Filing the Edges of the Chassis 2.Bulkhead Installation 3.Spur Gear Assembly 4.Front Spool Assembly 5.Gear Differential Assembly
OWNER'S MANUAL 2000 & ROAR National Champion
 2000 & 2001 ROAR National Champion OWNER'S MANUAL Carefully read through all instructions to familiarize yourself with the parts, construction techniques, and tuning tips outlined in this manual. Being
COMPETITION GRADE HIGH PERFORMANCE RADIO CONTROL RACING CAR CHASSIS KIT SUPPLEMENTARY MANUAL FOR LIGHTNING KIT
 COMPETITION GRADE HIGH PERFORMANCE RADIO CONTROL RACING CAR CHASSIS KIT SUPPLEMENTARY MANUAL FOR LIGHTNING 10 235 KIT E Thank you for purchasing VBC Racing product. Things that we should remind you. This
POWER TRUCK XGX 3 PACKING LIST INSTRUCTION MANUAL
 XGX 3 POWER TRUCK INSTRUCTION MANUAL 14 PARTS - SERVICE - REPAIRS OPEN Mon - Fri 9 am-6 pm... Sat 10 am-3 pm (EST) Distributed and serviced by: Extreme RC by RSI... Ferndale, MI 48220 Phone: (586) 757-1336
MM Rear Coil-Over Kit - Bilstein Shocks (MMCO-3)
") 3430 Sacramento Dr., Unit D San Luis Obispo, CA 93401 Telephone: 805/544-8748 Fax: 805/544-8645 www.maximummotorsports.com MM Rear Coil-Over Kit - Bilstein Shocks (MMCO-3) Read all instructions before
3430 Sacramento Dr., Unit D San Luis Obispo, CA 93401 Telephone: 805/544-8748 Fax: 805/544-8645 www.maximummotorsports.com MM Rear Coil-Over Kit - Bilstein Shocks (MMCO-3) Read all instructions before
RHINO SUSPENSION SYSTEM INSTALLATION INSTRUCTIONS
 PARTS INCLUDED: 2 FRONT UPPER A-ARMS 2 FRONT LOWER A-ARMS 2 UNI-BALL JOINTS 2 UNI-BALL JOINT STUDS 2 UNI-BALL JOINT CAPS 2 RETAINING RINGS 1 FRONT SHOCK ASSEM. 2 DELRON STEERING STOPS 2 SHOCK MOUNT SPACERS
... REQUIRED READING...
 REQUIRED READING.........UNDERSTAND THIS MANUAL! Thank You and Congratulations on purchasing the OUTLAW! Within this kit you will find a race winning car with over 21 years worth of CUSTOM WORKS design
RS-2 SINGLE ACTION REAR BUMPER WITH TIRE CARRIER INSTALL MANUAL FOR JEEP WRANGLER ALL MODELS.
 RS-2 SINGLE ACTION REAR BUMPER WITH TIRE CARRIER INSTALL MANUAL FOR 2007-2016 JEEP WRANGLER ALL MODELS. Rear Bumper Installation Instructions 1) Remove factory rear bumper, (this includes all tow hitch
MM IRS Coil-Over Kit - Bilstein/MM Shocks (MMCO-4)
") 3430 Sacramento Dr., Unit D San Luis Obispo, CA 93401 Telephone: 805/544-8748 Fax: 805/544-8645 www.maximummotorsports.com MM IRS Coil-Over Kit - Bilstein/MM Shocks (MMCO-4) The lower spring perch is drilled
3430 Sacramento Dr., Unit D San Luis Obispo, CA 93401 Telephone: 805/544-8748 Fax: 805/544-8645 www.maximummotorsports.com MM IRS Coil-Over Kit - Bilstein/MM Shocks (MMCO-4) The lower spring perch is drilled
Chevy Nova Pro-Touring Front Suspension Installation Instructions
 1962-1967 Chevy Nova Pro-Touring Front Suspension Installation Instructions 1-800-984-6259 www.totalcostinvolved.com 1 Pro-Touring Clip A-Arm Assembly Sway Bar Assembly Fender Panel Kit 8 7/16-20 * 1 ¼
RB5 MID CUSTOM SPECIAL INSTRUCTIONS MANUAL
 RB5 MID CUSTOM SPECIAL INSTRUCTIONS MANUAL INTRODUCTION This manual is intended to the few people who were lucky enough to get their hands on a Mid Custom Special conversion for the Kyosho RB5. Due to
ASSOCIATED 1:10 SCALE ELECTRIC BUGGY INSTRUCTION MANUAL FOR THE TEAM ASSOCIATED RC10B Associated Electrics, Inc. RS-1
 ASSOCIATED 1:10 SCALE ELECTRIC BUGGY INSTRUCTION MANUAL FOR THE TEAM ASSOCIATED RC10B4 TT RS-1 2003-2006 Associated Electrics, Inc. FINAL ADJUSTMENTS RADIO ADJUSTMENTS Use the following
Chrysler A-Body Tubular A-Arms Installation Instructions A-ARM INSTALLATION
 1967-1976 Dodge Demon 1112 67-72 Chrysler A-Body Tubular A-Arms Installation Instructions Thank you for your purchase of this Hotchkis Performance product. Your A-Arm set was designed with the performance
STOP---READ THIS FIRST!
 STOP---READ THIS FIRST! **Read These Entire Instructions Before Starting Anything** 2007-2013 GM 1500 TRUCK LIFT KIT INSTRUCTIONS (PART# 50700 & 50720) 5680 W. Barstow, Fresno, CA 93722 PH: (559) 226-8196
WARNING! Hard anodized, PTFE-coated shocks. Hard anodized, PTFE-coated MIP CVD's.
 200 Thank you for purchasing this Team Associated product. This manual contains steps and instructions you will use to set up your gas truck. Please read this entire manual before attempting to start your
ASSOCIATED 1:10 SCALE GT MANUAL
 ASSOCIATED 0 SCALE GT MANUAL INSTRUCTION MANUAL FOR THE RC10GT GAS TRUCKS #7060, 7061, 7067, 7068, & 7090 ASSOCIATED S RC10GT-- 3 TIMES NORRCA WORLD CUP CHAMPION! 200 Thank you for purchasing this Team
R R11 Eccentric Hub-Alu (4) R R11 Eccentric Hub-Alu (4) NOTICE. Pulley cover direction NOTICE BAG 01 NOTICE BAG 01
 R R11 Eccentric Hub-Alu (4) NOTICE. Pulley cover direction NOTICE BAG 01 NOTICE BAG 01") BAG BAG R Spool Axle Alu RA Front Spool Pulley Set 8T (4pcs) R Diff Gears (with Axle) Trim any excess flashing from the diff gear axle at the mold injection point. (pcs) (4pcs) R Spool Outdrive (pcs) R6
BAG BAG R Spool Axle Alu RA Front Spool Pulley Set 8T (4pcs) R Diff Gears (with Axle) Trim any excess flashing from the diff gear axle at the mold injection point. (pcs) (4pcs) R Spool Outdrive (pcs) R6
#0711 ROCKET PRO-COMP RACING KIT. Manufactured By: 760-B Crosspoint Drive Denver, NC
 #0711 ROCKET PRO-COMP RACING KIT Manufactured By: 760-B Crosspoint Drive Denver, NC 28037 www.customworksrc.com REQUIRED READING.........UNDERSTAND THIS MANUAL! Thank You and Congratulations on purchasing
ROLL CENTER You can adjust the front and rear roll centers of the XB8 by changing the mounting locations of various components.
 Your XRAY XB8 luxury nitro buggy is a top competition, precision racing machine that features multiple adjustments that allow you to set up for any track condition. The XB8 includes innovative set-up features
2014 GM 1500 TRUCK STOP---READ THIS FIRST! 7" Lift KIT. **Read These Entire Instructions Before Starting Anything**
 STOP---READ THIS FIRST! **Read These Entire Instructions Before Starting Anything** 2014 GM 1500 TRUCK LIFT KIT INSTRUCTIONS (PART #50768 & #50769 ) 5680 W. Barstow, Fresno, CA 93722 PH: (559) 226-8196
MM Rear Coil-Over Kit - Koni Single and Double Adjustable Shocks (MMCO-5)
") 3430 Sacramento Dr., Unit D San Luis Obispo, CA 93401 Telephone: 805/544-8748 Fax: 805/544-8645 www.maximummotorsports.com MM Rear Coil-Over Kit - Koni Single and Double Adjustable Shocks (MMCO-5) Read
3430 Sacramento Dr., Unit D San Luis Obispo, CA 93401 Telephone: 805/544-8748 Fax: 805/544-8645 www.maximummotorsports.com MM Rear Coil-Over Kit - Koni Single and Double Adjustable Shocks (MMCO-5) Read
First, check and record the camber and caster readings, they will be adjusted later.
 First, check and record the camber and caster readings, they will be adjusted later. The caliper-mounting bosses are machined perpendicular to the spindle so they are an excellent place for the level.
NOTE: Using hot modified motors exceed the capacity of the electronic speed control and voids any warranty.
 OWNER'S MANUAL NOTE: Using hot modified motors exceed the capacity of the electronic speed control and voids any warranty. Carefully read through all instructions to familiarize yourself with the parts,
KIT # CSS-C SUSPENSION LIFT KIT
 14385 Veterans Way Moreno Valley, CA 92553 Phone: (951) 571-0212 Fax: (951) 571-0215 2001-2010 CHEVROLET SILVERADO 1500 AND 2500 HD 4WD AND 2WD PICK-UP 1999-2010 CHEVY 2500 4WD PICK-UPS 2001-2010 2500
Steeda Sport Mustang Lowering Springs (2005+) - Installation Instructions
 - Installation Instructions") Steeda Sport Mustang Lowering Springs (2005+) - Installation Instructions The below installation instructions work for the following products: Steeda Sport Mustang Lowering Springs (2005+) Please read
Steeda Sport Mustang Lowering Springs (2005+) - Installation Instructions The below installation instructions work for the following products: Steeda Sport Mustang Lowering Springs (2005+) Please read
TP02C. 1:10 Scale Radio Controlled Electric Powered 2WD Racing Buggy. Dimensions. Length 410mm Width 250mm Height 150mm
 TP02C 1:10 Scale Radio Controlled Electric Powered 2WD Racing Buggy Dimensions Length 410mm Width 250mm Height 150mm Transmitter Preparation Power Switch Antenna 27MHzTransmitter Crystal T 27MHz ON Extend
Installation Instructions Mustang Level 2 Coilover. Part # Mustang Level 2 CoilOver System.
 Part # 22020-979-989 Mustang Level 2 CoilOver System Front Components: 2230 Front CoilOver Strut Recommended Tools Rear Components: 2260 Rear Coilover 225899 Rear Lower StrongArms 226699 Rear Upper StrongArms
STOP---READ THIS FIRST!
 STOP---READ THIS FIRST! **Read These Entire Instructions Before Starting Anything** 2007-2010 GM 1500 TRUCK LIFT KIT INSTRUCTIONS (PART# 50700 & 50720) 5680 W. Barstow, Fresno, CA 93722 PH: (559) 226-8196
Pinion Gear and Setscrew
 XRAY T1 Factory Kit 2005 The new XRAY T1 Factory Kit '05 (T1FK'05) is the 5th generation of XRAY's extremely successful T1 family of 1/10-scale on -road electric touring cars. The T1FK'05 is a large evolutionary
INSTALLATION INSTRUCTIONS FORD F-150 2WD & 4WD RETAINS FACTORY TOW HOOKS PART #P3063
 INSTALLATION INSTRUCTIONS FORD F-150 2WD & 4WD RETAINS FACTORY TOW HOOKS PART #P3063 PARTS LIST: 1 Grille Guard 2 10-1.5mm Nylon Lock Nuts 1 Driver/Left Frame Mounting Bracket 4 12mm Plastic Washers 1
X 6 SQUARED X 6 SQUARED KIT K 021 KIT INSTRUCTION MANUAL. Version 1.0. K021 Instructions v1.0 First Things Page 1
 X 6 SQUARED K 021 KIT INSTRUCTION MANUAL Version 1.0 X 6 SQUARED KIT K021 Instructions v1.0 First Things Page 1 CONTENTS First Things.. 3 A Front Arms & Hubs 5 B Complete The Front End. 12 C Differential.
AMT Motorsport C7 Corvette Camber Kit User s Guide. 8 Upper Control Arm Studs and hardware for rear upper control arm adjustments
 AMT Motorsport C7 Corvette Camber Kit User s Guide Thank you for purchasing the AMT Motorsport Camber Kit for the C7 Corvette. We believe this is the most versatile camber kit available on the market,
USE THE PARTS LIST BELOW TO MAKE SURE YOUR KIT IS COMPLETE BEFORE INSTALLATION. IF ANY PIECES ARE MISSING, PLEASE CONTACT:
 1962-1967 Chevy Nova Pro-Touring Front Suspension Installation Instructions Tech line: 1-855-693-1259 www.totalcostinvolved.com Read and understand these instructions before starting any work! USE THE
Next, set the bar level and tighten it down. Do this on both the driver and passenger sides.
 Next, set the bar level and tighten it down. Do this on both the driver and passenger sides. Using two tape measures, measure the outside width at the front and the rear of the tubes. The front dimension
OWNER'S MANUAL. Take your time and pay close attention to detail. Keep this manual for future reference. MADE IN THE UNITED STATES OF AMERICA
 OWNER'S MANUAL Carefully read through all instructions to familiarize yourself with the parts, construction techniques, and tuning tips outlined in this manual. Being able to grasp the overall design of
Re-Energy.ca - Solar Electricity - Build Your Own Solar Car
 Backgrounder Build Your Own Solar Car Back to Page 1 Build It! These step-by-step instructions provide you with a plan for making a basic solar car. If you can think of ways to improve the design of your
73-87 C-10 Coilover System
 Part # 11360201-73-87 C10 CoilOver System Front Components: 11362699 Front StrongArm System 11369300 Front Spindles and Caliper Brackets 11363510 Front Coilovers 11369100 Front MuscleBar Recommended Tools
1:8 SCALE CATALOG 1:8 GAS KITS RC500 FRONT END BODY ACCESSORIES
 1:8 SCALE CATALOG Stock is extremely limited. Parts listing as of 7/2001. Sale prices apply to orders direct from Associated only. Items available while supplies last. Items marked Not available or are
Installation Instructions Camaro Level 2 Coilover. Part # Camaro Level 2 CoilOver System.
 Part # 00-99-00 Camaro Level CoilOver System Front Components: 0 Front CoilOver Strut Recommended Tools Rear Components: 60 Rear Coilover Miscellaneous Components: 85000000 Spanner Wrench 99-00 Camaro
1:12 SCALE ON ROAD CAR KIT
 2 SCALE ON ROAD CAR KIT INSTRUCTION MANUAL OR KIT #4015 SAVE VE THIS MANUAL! Use with current catalog for future, hassle-free re-ordering of parts. 1998 Associated Electrics, Inc. - 9? D = I I EI @ A I
PRESEASON CHASSIS SETUP TIPS
 PRESEASON CHASSIS SETUP TIPS A Setup To-Do List to Get You Started By Bob Bolles, Circle Track Magazine When we recently set up our Project Modified for our first race, we followed a simple list of to-do
ABOUT THE RC10T2 BEFORE YOU BEGIN
 ABOUT THE RC10T2 Congratulations on your new RC10T2 model truck kit purchase. We would like to tell you a little bit about your new truck and its history. Team Associated developed the first version of
Converting a Chevy Non-positraction rear-end to a positraction rear using an Eaton posi unit.
 Converting a 56-62 Chevy Non-positraction rear-end to a positraction rear using an Eaton posi unit. Tom Parsons Non-posi unit Posi unit 1 Converting a 56-62 Chevy Non-positraction rear-end to a positraction
Global West Suspension 655 South Lincoln Ave San Bernardino Ca Phone Fax Web address globalwest.
 Global West Suspension 655 South Lincoln Ave San Bernardino Ca. 92408 Phone 877-470-2975 Fax 909-890-0703 Web address globalwest.net Mustang coilover instruction sheets for 64-66 Kit includes the following
#0710 ELECTRIC ROCKET KIT
 #0710 ELECTRIC ROCKET KIT Manufactured By: 760-B Crosspoint Drive Denver, NC 28037 www.customworksrc.com REQUIRED READING.........UNDERSTAND THIS MANUAL! Thank You and Congratulations on purchasing the
Sport S/T3 Suspension Installation Guide
 1 Sport S/T3 Suspension Installation Guide #1258250-JK 2-Door Sport S/T3 (No Shocks) #1258200-JK 2-Door Sport S/T3 (w/ Fox Shocks) #1258450-JK 4-Door Sport S/T3 (No Shocks) #1258400-JK 4-Door Sport S/T3
INSTALLATION INSTRUCTIONS CHEVY C-10 4-Link Rear End
 INSTALLATION INSTRUCTIONS 73-87 CHEVY C-10 4-Link Rear End Please read these instructions completely before starting your installation. Assemble suspension on vehicle before powder-coating to ensure proper
PREBUIL UILT ASSEMBLY AND OPERATION MANUAL
 PREBUIL UILT Length: 15.2" [385mm] Width: 13" [330mm] Height: 5.8" [147mm] Weight: 3.3 lb [1500g] Wheelbase: 11.6" [295mm] Technical Support Information For technical assistance, contact: DuraTrax Product
LG CORVETTE GT2 COIL OVERS
 LG CORVETTE GT2 COIL OVERS THE MOST POWERFUL HEADERS ON THE PLANET Brought to you by LG Motorsports 972-429-1963 Parts Inventory: 1. Assembled Front shock and spring 2. Assembled Rear shock and spring
JEEP JK 4 LONGARM. Tools Needed: Thank you for choosing Rough Country for your suspension needs.
 921786000 Thank you for choosing Rough Country for your suspension needs. JEEP JK 4 LONGARM Rough Country recommends a certified technician install this system. In addition to these instructions, professional
Our goal is to make the install a breeze. Please read the entire guide before beginning.
 www.airkewld.com Page 1 of 6 IRS Axle Kit Install IRS Axle Kit Install Our goal is to make the install a breeze. Please read the entire guide before beginning. KITS SHOULD INCLUDE 2 - Control-arm mounting
Commander SUSPENSION SYSTEM INSTALLATION INSTRUCTIONS
 PARTS INCLUDED: 2 - FRONT UPPER A-ARMS 2 - FRONT LOWER A-ARMS 4 - COTTER PINS 2-12MM JAM NUTS 2 - TIE ROD EXTENDERS 8- FLANGED DELRON BUSHINGS 4- DELRON CASTER SPACERS 6 - GREASE FITTINGS 3 - BEARING REMOVAL
1964 1/2-70 Mustang Torque Arm Rear Suspension Installation Instructions
 1964 1/2-70 Mustang Torque Arm Rear Suspension Installation Instructions 1-800-984-6259 www.totalcostinvolved.com Version 2 (c) 2008 Total Cost Involved Engineering, Inc. All Rights Reserved. Page 1 of
The Magazine For Slot Car Enthusiasts
 The Magazine For Slot Car Enthusiasts Building the Tomy Super G+ By Milt Surratt Tomy Super G+ slot cars have been around in the current form for about 12 years. Out of the package, the Tomy HO slot car
Factory Five Racing, Inc. Roadster Complete Kit Assembly manual revision 3p update
 Factory Five Racing, Inc. Roadster Complete Kit Assembly manual revision 3p update Kit Parts Prep...3 Body Removal...3 Aluminum Removal...5 Front upper control arm...7 Adjusting the upper control Arm...10
Installation Instructions
 Installation Instructions Jeep JK 2-Door (2011 Present) Mounting Bracket and Air Line System Kit for ARB On-Board Twin Air Compressor (CKMTA12) Made in the USA Kit Contents: 1 Flat Bracket 1 Formed Bracket
INSTRUCTION MANUAL AX90053-I001
 INSTRUCTION MANUAL AX90053-I001 2 3 AX80018 Hardware Parts Tree AX80006 Servo Set x3 AX31301 10mm Shock Caps Parts Tree (Blue) AX80069 AX31300 10mm Shock Parts Tree 2 (Blue) AX31114 WB8 Driveshaft AX80033
COLD AIR INTAKE INSTALLATION INSTRUCTIONS
 COLD AIR INTAKE INSTALLATION INSTRUCTIONS # D760-0030 Fits: 2007-10 135i (E82, E88; with N54 engine) 2007-08 335i/xi (E90) 2007-10 335i (E92, E93; with N54 engine) Congratulations for being selective enough