Admiral Pool Lift PART #: F-ADMRL US PATENT NUMBER: [D507,769 S] 450 LB. [204 kg] MAXIMUM WEIGHT CAPACITY
|
|
|
- Gabriella Sherman
- 5 years ago
- Views:
Transcription


![[204 kg] MAXIMUM WEIGHT CAPACITY FOR INDOOR OR OUTDOOR USE](/docs-images/96/128213656/images/1-2.jpg "MANDATORY LEAVE THIS MANUAL WITH LIFT OWNER ADA COMPLIANT READ")


1 9889 Garrymore Ln Missoula, MT Admiral Pool Lift PART #: F-ADMRL US PATENT NUMBER: [D507,769 S] 450 LB. [204 kg] MAXIMUM WEIGHT CAPACITY FOR INDOOR OR OUTDOOR USE MANDATORY LEAVE THIS MANUAL WITH LIFT OWNER ADA COMPLIANT READ CAREFULLY Check entire box and all packing materials for parts. Before beginning assembly, read the instructions and identify parts using the figures and parts listed in this document. It is critical that all parts be carefully inspected prior to installation. If any damage occurred in transit, Aqua Creek Products, LLC must be notified within three days of receipt of unit. Proper installation cannot be overstressed, as an improper installation voids Aqua Creek s warranty and may affect the safety of the user. 1
2 IMPORTANT SAFETY INSTRUCTIONS When installing and using this electrical appliance, basic precautions should always be followed, including the following: READ ALL INSTRUCTIONS BEFORE USING WARNING - To reduce the risk of injury, do not permit children to use this product unless they are closely supervised at all times. This appliance is not intended for use by persons (including children) with reduced physical, sensory or mental capabilities, or lack of experience and knowledge, unless they have been given supervision or instruction concerning use of the appliance by a person responsible for their safety. A wire connector is provided on the unit to connect a minimum 8 AWG (8.4mm 2 ) solid copper conductor between this unit and the means for local equipotential bonding. Check the unit periodically for signs of deterioration: Keep all nuts, bolts and screws tight to be sure the lift is in safe working condition. SAVE THESE INSTRUCTIONS Affix supplied ADA POOL/SPA LIFT sign in a location visible from the lift at all times. Rechargeable batteries are to be removed from the appliance before being charged. Batteries are to be inserted with the correct polarity. If the appliance is to be stored unused for a long period of time, the batteries should be removed. The supply terminals are not to be short-circuited. REDUCE THE RISK OF DROWNING! Supervise children at all times. No jumping or diving from the lift. Seat may be hot, use caution when entering. Admiral Lift Keep covered when not in use. Inspect and clean before use. INDOOR BATTERY CHARGER: AMPERAGE = 0.65 FREQUENCY = VOLT BATTERY AMPERAGE = 8 IP RATING = IPX5 2


 8.")
3 Admiral Lift Table of Contents PAGE DESCRIPTION PAGE DESCRIPTION 3 Admiral Components 11 Basic Troubleshooting 4 ADA Installation Guidelines 12 Battery Test Cable Instructions 5-6 Anchor Installation: Core-Drill Retro-Fit 13 Proper Care of Pool & Spa Lifts 7-8 Anchor Installation: Saw-Cut Retro-Fit/ New Construction 14 Admiral Parts List 9 Admiral Lift Assembly Instructions 15 Seat Assembly Parts List 10 Pinch Point Locations 16 Warranty Admiral Components 1. ADMIRAL LIFT MAIN ASSEMBLY 2. 24V VITO BATTERY VITO CHARGER 4. VITO HANDSET 6 5. SAFETY BELT 5 6. ANCHOR JIG PLATE (IF ORDERED WITH ANCHOR) 8 7. ANCHOR INSERT BAG - SET OF 4 (IF ORDERED WITH ANCHOR) 8. HARDWARE BAG (IF ORDERED WITH ANCHOR) VITO BATTERY TEST CABLE 7 3
 Lift installed")

 Anchor setbacks are based")
4 Installation: ADA Guidelines ADA REQUIREMENTS: The Admiral Pool Lift is ADA Compliant. The installation must meet the following requirements: Clear deck space dimensions (see FIGURE 1) Lift installed between inches from the pool edge Deck slope no greater than 1:48 The seat must submerge at least 18 inches into the water. The lift should be installed at a location with inches of depth (deck to pool floor) Anchor setbacks are based on straight pool/spa walls. Curved pool/ spa walls will effect the anchor setback. 50" 48" 36" ADA REQUIRED CLEAR DECK SPACE (36" X 48") 12" 1:48 DECK SLOPE MAXIMUM 30.5" 11" 16" MIN 13" **14.5" FIGURE 1 POOL WALL **NOTE: THE MAXIMUM SETBACK IS 19" 4
 Anti-seize packet *Aqua Creek recommends either Hilti Brand HIT RE-500- SD or Simpson")

5 Anchor Installation: Core-Drill Retro-Fit NOTE: FOR DECKS 6 THICK OR MORE, 2500PSI MINIMUM STRENGTH CONCRETE REQUIRED You will need: Core drill and 1½ core drill bit Tape measure Marking pen Hammer Cold chisel Torpedo level High strength 2-part construction epoxy* Masking tape Black electrical tape (optional) Anti-seize packet *Aqua Creek recommends either Hilti Brand HIT RE-500- SD or Simpson brand SET-XP or equivalent (not included) Anchor jig plate with hardware 1. Mark the 4 hole locations on your deck using the larger holes of the anchor jig plate as a template. For ADA compliance, confirm the center of the jig plate front holes are 14.5 to 19 inches from the pool s edge. SEE FIGURE 2 2. Drill the 4 hole locations to 4 1/2 inches deep using the 1 1/2 inch drill bit. Clear all debris and ensure holes are completely dry. FIGURE 2 NOTE: Create a depth marker on the drill bit with black electrical tape to make sure you drill to the right depth. NOTE: Local bonding regulations may require you to drill one hole larger than the others in order to bond at least one of the anchor inserts. You may need to saw cut a portion of your deck. See Saw Cutting Retro-Fit Instructions on page Remove the nuts and the black protective coverings from the threaded anchor inserts. 5


6 Anchor Installation: Core-Drill Retro-Fit (CONTINUED) 4. Thread the mounting hardware through the smaller anchor jig plate holes and into the anchor inserts. Be sure to use anti-seize on the threads! Confirm the tops of the inserts are flush with the bottom of the plate. NOTE: We recommend using masking tape around the holes on the bottom of the anchor jig plate to help prevent the anchor plate from being accidentally epoxied to the pool deck. 5. Bond at least one of the anchor inserts according to your local code requirements. For more information see NEC Article Test fit the anchor inserts to make sure they line up properly. Place the anchor assembly into the pre-drilled holes and use a torpedo level to ensure your anchoring system is level. 7. Remove the anchor assembly and fill each hole halfway with 2-part construction epoxy. 8. Place the anchor assembly back into the holes. Wiggle the assembly as you reinsert it. Make sure the epoxy fully coats the threads. 9. Check that the anchor assembly is level. 10. Once the epoxy has set up, remove the hardware and the anchor jig plate. Your lift is now ready to be mounted to the anchoring system. The anchor jig plate may be recycled or used to install other anchors. 6


7 Bonding Lug Anchor Installation: Saw-Cut Retro-Fit You Will Need: Concrete saw with diamond blade Tape measure 4 long straight edge or chalk line Sledge hammer Cold chisel Torpedo level String Line Concrete & concrete finishing tools #5 rebar FIGURE A 1. Remove 1 nut from each anchor insert. Place the anchor inserts through the larger hole of the anchor jig plate. Thread the removed nuts back onto the anchor inserts. The anchor plate should be sandwiched between the two nuts on each anchor insert. SEE FIGURE A 2. Mark out a section of the pool deck that you are removing. Plan on removing at least 4 feet 0 inches by 4 feet 0 inches. 3. Cut along your marks with a diamond blade concrete saw. 4. Using the sledge hammer break up the concrete within the cut area and remove the pieces. 5. Install rebar in the open area of the deck. Tie the rebar into the existing deck if possible. SEE FIGURE B 6. Set the anchor system in place. For ADA compliance and clearance, make sure the center of the large anchor jig plate hole is between 14.5 and 19 inches from the pool s edge. SEE FIGURE C, PAGE 7 FIGURE B 7. Using the string line or a straight edge, confirm the top of each anchor body is level with the FINISHED deck surface. Each anchor body can be individually adjusted by turning the nuts with a large wrench. 8. Bond the anchoring system according to your local code requirements by using the bonding lug on the anchor plate. SEE FIGURE C, PAGE 7 (See NEC Article ) 9. Pour concrete and finish the pool deck surface. SEE FIGURE A 10. Once the concrete has cured, the lift is ready to be mounted to the anchoring system. 7

8 Anchor Installation: New Construction NOTE: For installations where a new deck is being poured, or where a dedicated pad is being poured just for the pool lift, the concrete must satisfy the ADA requirements outlined on page 3 of this manual. Your pool deck must be at least 4 feet - 0 inches long by 4 feet - 0 inches wide by 6 inches thick. It must be reinforced with 5 sticks of #5 rebar each way, 2 inches clear (min) from the top and bottom of the footing. 1. Remove 1 nut from each anchor insert. Place the anchor inserts through the larger hole of the anchor jig plate. Thread the removed nuts back onto the anchor inserts. The anchor plate should be sandwiched between the two nuts on each anchor insert. SEE FIGURE A, PAGE 6 2. Install rebar in the open area of the deck. SEE FIGURE B, PAGE 6 3. Set the anchor system in place. For ADA compliance and clearance, make sure the center of the large anchor jig plate holes are between 14.5 and 19 inches from the pool s edge. SEE FIGURE C 48" 8-AWG SOLID-COPPER WIRE (ATTACH TO BONDING-GRID) #5 REBAR *[37 TO 48cm] 14.5" TO 19" SETBACK BONDING -LUG LABEL 2.5" MIN POOL WALL 4. Make sure the top of each anchor body is flush with the FINISHED deck surface. Each anchor body can be adjusted individually by turning the nuts with a large wrench. 5. Bond the anchoring system by using the bonding lug on the anchor jig plate. Bond the system according to your local code requirements. (See NEC Article ) SEE FIGURE C 6" 2500PSI MIN 48" FLUSH W-DECK #5 REBAR E-W (5 PCS) DRILL & EPOXY INTO EXISTING SLAB (4" MIN EMBED) *SETBACK DIMENSIONS ARE FOR FLAT DECK APPLICATIONS. FOR SLOPED DECKS OR OTHER FEATURES, CONTACT AQUA CREEK BEFORE INSTALLATION. FIGURE C 4" 6. Pour your concrete and finish the pool deck surface. SEE FIGURE A, PAGE 6 7. Once the concrete has cured the lift is ready to be mounted to the anchoring system. 8
 anchors using the supplied 1/2 inch x 1 1/2 inches stainless steel hex head bolts and 1/2 inch stainless steel washers.")
9 Admiral Assembly Instructions 1. Attach seat belt to the seat. SEE FIGURE D LOOP ON TOP FOR EASY ACCESS 2. Install the Admiral pool lift onto the four (4) anchors using the supplied 1/2 inch x 1 1/2 inches stainless steel hex head bolts and 1/2 inch stainless steel washers. Make sure all bolts are tight before using the lift. 3. Apply dielectric grease to the plug terminals, including the o-ring seal. Plug the handset cable into the large handset socket on the bottom of the control box. Press the cord end FIGURE D firmly into the socket until you are sure it is completely in the socket. Failure to fully push the remote cord into the socket may result in faulty or interrupted operation. THREAD THROUGH SLOTS AND PINCH TOGETHER TO HOLD 4. Before installing the battery, place it on the charging unit and let it charge for 24 hours. Make sure the orange charge light illuminates when the battery is being charged. When the orange charge light shuts off, the battery is fully charged. 5. Remove the fully charged battery from the charger and install it on top of the control box. The battery will line up with the control box, and will click when it properly locks in place. Apply dielectric grease to the plug terminals, including the o-ring seal, and then connect the battery cable to the control box cable. 6. With the lift completely assembled, run the lift fully out and back in 3-5 times, without weight, for the lifts break in cycle period. ADMIRAL POOL LIFT ATTACH FULLY CHARGED BATTERY CONTROL BOX 1/2" TOOTH WASHER (1) ANCHORS (4) INSTALLED FLUSH W/ DECK HANDSET PLUGS INTO CONTROL BOX 1/2" X 1 1/2" HEX BOLT (4) 1/2" FLAT WASHER (3) POOL WALL WHEN NOT IN USE, STORE THE BATTERY ON THE CHARGER! 9


")
 10")


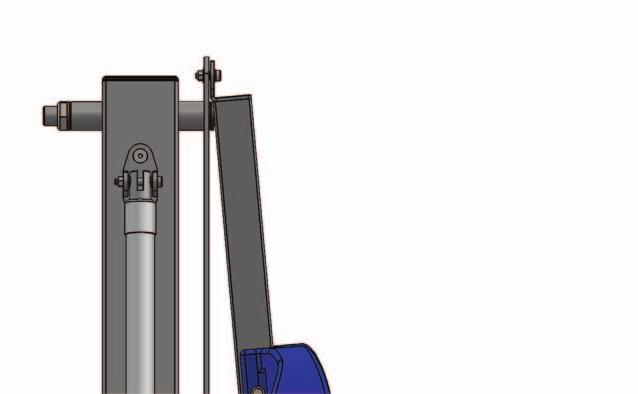
10 Pinch Point Locations CAUTION! PINCH POINT AREA! CAUTION! PINCH POINT AREA! (BEHIND ACTUATOR) CAUTION! PINCH POINT AREA! (BOTH SIDES) 10


11 Problem: The lift won t move. Solution: 1. Make sure the cords are properly plugged in: Basic Troubleshooting Check the ends of the cords for corrosion or damage. The cord plugs should be recessed into the outlet. You should feel them pop into place when they are correctly inserted. NOT Properly Inserted: The cord plug is flush with or sticking out of the outlet Properly Inserted: The cord plug is recessed into the outlet 2. Check the contact points: 3. Make sure the battery is fully charged: The Charger is ON when the green light is glowing Make sure the contact point of the control box and the battery are not damaged or corroded. If there is corrosion clean with Scotch-Brite TM pad. Put some dielectric grease on the contact points before reattaching the battery. The Battery is CHARGING when the orange light is glowing When the Battery is fully charged the orange light will stop glowing Problem: The lift stopped moving and is stuck. Solution: 1. Press the Emergency button For troubleshooting videos Visit: or scan the QR Code below using your smartphone. Press the emergency retract button on the front of the control box to retract the lift. Note: the lift will not retract if the battery is not fully charged or if the control box is not working. The emergency button only overrides the remote handset. Note: If you feel your lift is malfunctioning due to a faulty battery or connections, contact Aqua Creek Products for a testing kit. 11

12 Battery Test Cable Instructions WARNING! DO NOT ATTEMPT TO DIRECTLY PROBE THE BATTERY CONNECTOR TO TEST VOLTAGE. THIS MAY CAUSE PERMANENT DAMAGE TO THE BATTERY! USE THE SUPPLIED BATTERY TEST CABLE ONLY FOR CHECKING THE BATTERY VOLTAGE! The Aqua Creek 24V battery has a cable and connector for connecting to the control box or to the battery charger. The battery connector is not suitable to check the battery voltage, as it is very hard to probe the connector without shorting-out the battery, which will cause damage. For this reason, a separate battery test cable is provided. To safely check the battery voltage, use a voltmeter or multimeter with standard test probes, and insert the probes into the test cable as shown below. 24V BATTERY BATTERY CONNECTOR MALE CONNECTOR BATTERY TEST CABLE INSERT TEST PROBES TO CHECK VOLTAGE 12
13 PROCEDURE Check battery level indicator on control box Proper Care of Pool & Spa Lifts Run the lift through a complete test cycle (fully extend actuator) to verify it is functioning properly Wash lift with fresh water and dry with clean, soft, non-abrasive cloth Recharge battery Visually inspect lift for damage, corrosion, and loose or missing hardware Check all contact points for damage and/or corrosion Repair, clean and apply dielectric grease to all contact points Thoroughly clean lift frame and apply a liberal coat of car wax to maintain the lift s finish Check all Warning and Cautionary labels to make sure they are not faded or worn. Replace as needed. BEFORE EACH USE DAILY WEEKLY MONTHLY PROPER CARE NOTES Use only fresh water to wash your lift. Do not wash with pool water. Use only clean, soft, non-abrasive cloths on your lift. Do not store lift in pump room or near chemicals. Do not allow children to play on or around this lift. When cleaning the lift, do not spray water directly on control box or battery. The lift may need to be bonded according to local code requirements. STAIN REMOVAL TIPS: To remove stubborn stains from finish, spray affected area with mild dish soap, rub briskly with a 3M Scotch Brite pad. Use white epoxy paint to touch up the finish. Apply wax to protect when dry. For service and/or replacement parts, contact Aqua Creek Products Toll free: (888)
14 Admiral Parts List ITEM # QTY PART # DESCRIPTION 1 1 ADM BASE WELDMENT 2 1 ADM ADM MAIN FRAME ASSEMBLY CHAIR CRADLE ASSEMBLY 4 1 ADM CONTROL ARM 5 1 PF BRACKET ASSEMBLY LINAK 400MM PULL ACTUATOR 7 1 SA-0904CA-A CHAIR ASSEMBLY 8 1 F-0904FRA FOOTREST ASSEMBLY 9 1 GT10 (CONTROL BRACKET) VITO CONTROL BRACKET 10 1 VCB10 VITO CONTROL BOX 11 1 VCP V VITO BATTERY 12 2 BSH 10 X 3/ X 3/8 SHCS 13 1 BB 1/4 X 1/2 1/4-20 X 1/2 BHSCS 14 1 WF 1/4 1/4 FLAT WASHER 15 1 BH 5/16 X 4 1/2 5/16-18 X 4 1/2 HCS 16 5 WF 5/16 5/16 FLAT WASHER 17 4 NN 5/16 5/16-18 NYLOCK NUT 18 1 BS 3/8 X 9/16 3/8 X 9/16 SHOULDER BOLT ITEM # QTY PART # DESCRIPTION 19 1 BS 3/8 X BS 3/8 X 1 3/ /8 X 2 SHOULDER BOLT 3/8 X 1 3/4 SHOULDER BOLT 21 2 BC 3/8 X 3 3/8-16 X 3 FHSCS 22 2 WF 3/8 3/8 FLAT WASHER 23 2 NN 3/8 3/8 NYLOCK NUT 24 1 BH 5/8 X 5 7/ /8 X 5 7/8 HCS 25 2 WF 5/8 5/8 FLAT WASHER 26 1 NN 5/8 5/8 NYLOCK NUT 27 1 NNJ 1 1 NYLOCK JAM 28 1 BRB EP BRB SS BRB SS BRB 6391K BRB FB /8 X 1/2 X 3/16 SLEEVE BUSHING 3/8 X 1/2 X 1/4 BRONZE SLEEVE 1/2 X 3/8 X 3/8 BRONZE SLEEVE 1/2 X 3/8 X 1 BRONZE SLEEVE 3/8 X 1/2 X 3/8 X 3/32 BRONZE FLANGE 33 1 F-UBC BATTERY COVER 34 1 WL 1/4 1/4 LOCK WASHER 14


15 Seat Assembly Parts List ITEM # QTY PART # DESCRIPTION 1 1 P-901 CHAIR, PLASTIC, 18 BLUE 2 2 P-2100FLA-38 CHAIR II ARMREST TUBE 3 1 P-1208HSB BRACKET, PLASTIC, HANDSET BRACKET 4 2 RUBBER HAND GRIPS GRIP, RUBBER HAND GRIP 5 2 SFL 12 X 3/4 SCREW, 316 SS, #12 X 3/4, FHSMS 6 4 WF 1/4 WASHER, FLAT, 1/4, 316 SS 7 2 BB 1/4 X 3-1/4 BOLT, 316 SS, 1/4-20 X 3 1/4 BHSCS 8 2 NN 1/4 NUT, 316 SS, NYLOCK, 1/ COTTER PIN, 1/4 X 3 1/4 PIN, COTTERLESS PIN, 18-8 SS, 1/4 X 3 3/ LANYARD LANYARD, FOR FOOTREST PIN, SS 11 1 SPH 10 X 3/4 SCREW, 316 SS, #10 X 3/4, PHSMS 12 1 F-38SB SEAT BELT, 2 WIDE BLACK W/VELCRO 15
16 Revised_ AQUA CREEK PRODUCTS, LLC LIMITED FIVE (5) YEAR WARRANTY: ADMIRAL POOL LIFT (ITEM #: F-ADMRL, F-ADMRLDD) Aqua Creek Products, LLC (a.k.a. Aqua Creek) warrants to the original end user purchaser that products manufactured by Aqua Creek, when properly installed in accordance with assembly and installation instructions, and properly used and maintained, shall be free from defects in material and workmanship for a period of five (5) years from the date of original purchase, provided that Aqua Creek receives prompt notice in writing of any defect or failure and satisfactory proof thereof, with the following exception(s): Exceptions: All electrical components, including the linear actuator shall have the following warranty period: o Year 1-2: 100% Coverage o Year 3: 60% Coverage (Customer is responsible for 40% of replacement cost) o Year 4: 50% Coverage (Customer is responsible for 50% of replacement cost) o Year 5: 40% Coverage (Customer is responsible for 60% of replacement cost) Hydraulic actuators and mesh slings shall have a warranty period of one (1) year from the date of original purchase. Powder coat finish scratches, scrapes, corrosion, or dents from customers normal use, negligence, or abuse This warranty specifically excludes reimbursement for labor to remove, repair, or install the product and any shipping charges. These warranties do not cover any damages due to accident, misuse, abuse, negligence or failure to properly maintain any products, or normal wear and tear from day to day operations. In the event that any products are altered, repaired, or improperly installed or improperly used by anyone without the prior written approval by Aqua Creek, all warranties are void. IMPORTANT: AMOUNT OF WEIGHT PLACED ON LIFT SHALL NOT EXCEED THE RATED LIFTING CAPACITY FOR THE LIFT. NEVER OPERATE THE LIFT UNDER LOAD IN A DRY POOL (WITH NO WATER IN THE POOL). It is the responsibility of the lift owner to verify the weight of the patron for warranty claim purposes and to ensure that the lift is not overloaded. Non-payment for product to Aqua Creek may void warranty. To initiate a warranty claim, the owner of an Aqua Creek product must provide the place of purchase, in writing, with a full description of the product, its serial number, the dates of purchase and installation, and the exact nature of the defect. Within thirty (30) days after receipt of a written warranty claim by Aqua Creek, and barring any unforeseen delays, the place of purchase will be notified of Aqua Creek s decision regarding the claim. If requested by Aqua Creek, any defective product must be returned, freight prepaid by customer, to Aqua Creek s designated factory location or duly appointed distributor for inspection and/or repair. Aqua Creek will, at its option, repair or replace the failed or defective item, and deliver the repaired product or replacement to the customer. All freight charges are the responsibility of the customer. Products returned to Aqua Creek for which Aqua Creek provides replacement under this limited warranty shall become the property of Aqua Creek. A new warranty period shall NOT be established for the repaired or replaced products. Such products shall remain under warranty only for the remainder of the original warranty period on the original products purchased. This written limited warranty constitutes the final, complete and exclusive statement of warranty terms. No person or organization is authorized to make any other specific or implied warranties or representations on behalf of Aqua Creek. THE WARRANTIES SET FORTH HEREIN ARE IN LIEU OF ALL OTHER WARRANTIES, EXPRESSED OR IMPLIED, WHICH ARE HEREBY DISCLAIMED AND EXCLUDED, INCLUDING WITHOUT LIMITATION ANY WARRANTY OF MERCHANTABILITY OR FITNESS FOR A PARTICULAR PURPOSE OR USE. THE SOLE AND EXCLUSIVE REMEDIES FOR BREACH OF ANY AND ALL WARRANTIES WITH RESPECT TO THE PRODUCTS SHALL BE LIMITED TO REPAIR OR REPLACEMENT AT AQUA CREEK S DESIGNATED FACTORY LOCATION, OR DULY APPOINTED DISTRIBUTOR, OR IN PLACE AT AQUA CREEK S OPTION. IN NO EVENT SHALL AQUA CREEK S LIABILITY EXCEED THE ENTIRE AMOUNT PAID TO AQUA CREEK BY THE ORIGINAL PURCHASER FOR THE FAILED OR DEFECTIVE PRODUCT. IN NO EVENT SHALL AQUA CREEK PRODUCTS, LLC BE LIABLE FOR ANY INCIDENTAL, CONSEQUENTIAL, SPECIAL, INDIRECT, PUNITIVE OR EXEMPLARY DAMAGES OR LOST PROFITS FROM ANY BREACH OF THIS LIMITED WARRANTY OR OTHERWISE. THIS WARRANTY GIVES YOU SPECIFIC LEGAL RIGHTS AND YOU MAY ALSO HAVE OTHER RIGHTS, WHICH MAY VARY FROM STATE TO STATE. SOME STATES DO NOT ALLOW THE EXCLUSION OR LIMITATION OF INCIDENTAL, SPECIAL OR CONSEQUENTIAL DAMAGES, SO SOME OF THE ABOVE LIMITATIONS OR EXCLUSIONS MAY NOT APPLY TO YOU. Aqua Creek Products, LLC 9889 Garrymore Lane Missoula, MT Toll Free: (888) Local/Intnl: (406)


17 PRO-POOL SERIES ACCESSORIES COVER F-120PPC F-120PPC-T F-45ACB-C F-45ACB-T Pro Pool, Ranger, Ambassador, Patriot, Portable Pro Pool Lift Cover - Ranger/ Pro Pool/ Ambassador/ Patriot/ Portable Pro Pool, Blue Lift Cover - Ranger/ Pro Pool/ Ambassador/ Patriot/ Portable Pro Pool, Tan Actuator Cover - Ranger/ Pro Pool/ Patriot/ Ambassador/ Portable Pro Pool, Blue Actuator Cover - Ranger/ Pro Pool/ Patriot/ Ambassador/ Portable Pro Pool, Tan SOLAR CHARGERS F-043SCH F-044SCH Patriot Pro Pool/ Ambassador/ Ranger sales@aquacreek.com ACCESSORIES & OPTIONS F-423CS F-019CA F-422PLH-2 F105LAR F-38SB F-ASAPRL Chest Strap Cycle Attachment Headrest (all other lifts) Pull-Out Legrest Seat Belt, Standard Seat Pole Option Adjustable Height (Ranger only) TRANSPORT CARTS F-428HT Ranger/ Pro Pool F-914STC Ambassador 17
Ranger-AT Pool Lift Garrymore Ln Missoula, MT aquacreek.com
 9889 Garrymore Ln Missoula, MT 59808 888-687-3552 +1-406-549-0769 aquacreek.com Ranger-AT Pool Lift PART #: F-411RPL-AT1-02 US PATENT NUMBER: [D507,769 S] [7,249,386 B2] 350 LB. [160 kg] MAXIMUM WEIGHT
Ranger 2 Pool Lift READ CAREFULLY Garrymore Ln Missoula, MT
 9889 Garrymore Ln Missoula, MT 59808 888-687-3552 +1-406-549-0769 www.aquacreek.com Ranger 2 Pool Lift PART #: F-RNGR2 US PATENT NUMBER: [D507,769 S] 350 LB. [160 kg] MAXIMUM WEIGHT CAPACITY MANDATORY
Swim Assist Pool Lift
 Swim Assist Pool Lift PART #: ICA-SA-350-19-GY US PATENT NUMBER: [D507,769 S] 350 LB. [158 kg] MAXIMUM WEIGHT CAPACITY MANDATORY LEAVE THIS MANUAL WITH LIFT OWNER Read and follow all instructions. Lift
Ranger-AT Reverse Pool Lift
 9889 Garrymore Ln Missoula, MT 59808 888-687-3552 +1-406-549-0769 aquacreek.com Ranger-AT Reverse Pool Lift PART #: F-411RPL-R-AT1-02 US PATENT NUMBER: [D507,769 S] [7,249,386 B2] 350 LB. [160 kg] MAXIMUM
READ CAREFULLY. Copyright 2017 Aqua Creek Products All Rights Reserved Revised 2/10/17
 PART #: F-005SLU US PATENT NUMBER: [D507,769 S] 400 LB. [181 kg] MAXIMUM WEIGHT CAPACITY MANDATORY LEAVE THIS MANUAL WITH LIFT OWNER Read and follow all instructions. Lift safety can only be ensured if
READ CAREFULLY Garrymore Ln Missoula, MT
 9889 Garrymore Ln Missoula, MT 59808 888-687-355 +1-06-59-0769 www.aquacreek.com PART #: F-005SLU US PATENT NUMBER: [D507,769 S] 00 LB. [181 kg] MAXIMUM WEIGHT CAPACITY MANDATORY LEAVE THIS MANUAL WITH
Portable Pro Pool-AT READ CAREFULLY Garrymore Ln Missoula, MT
 9889 Garrymore Ln Missoula, MT 59808 888-687-3552 +1-06-59-0769 www.aquacreek.com Portable Pro Pool-AT PART #: F-00PPPB-AT1 US PATENT NUMBER: [D507,769 S] [7,29,386 B2] 00 LB. [181 kg] MAXIMUM WEIGHT CAPACITY
ADA COMPLIANT READ CAREFULLY
 9889 Garrymore Ln Missoula, MT 59808 888-687-3552 +1-406-549-0769 www.aquacreek.com Ambassador Pool Lift PART #: F-PPXRD-NA-01 US PATENT NUMBER: [D507,769 S] [7,249,386 B2] 350 LB. [160 kg] MAXIMUM WEIGHT
LIFT NAME PART NUMBER SETBACK (min) SETBACK (max)
 SETBACK (max)") Revolution 9889 Garrymore Ln Missoula, MT 59808 888-687-3552 +1-406-549-0769 www.aquacreek.com Wheelchair Attachment PART #: F-705S3 WEIGHT CAPACITY: 350 POUNDS - STANDARD REVOLUTION 300 POUNDS - DEEP
Revolution 9889 Garrymore Ln Missoula, MT 59808 888-687-3552 +1-406-549-0769 www.aquacreek.com Wheelchair Attachment PART #: F-705S3 WEIGHT CAPACITY: 350 POUNDS - STANDARD REVOLUTION 300 POUNDS - DEEP
Patriot-AT2 Portable Lift
 9889 Garrymore Ln Missoula, MT 59808 888-687-3552 +1-406-549-0769 www.aquacreek.com Patriot-AT2 Portable Lift PART #: F-12PPL-HD-AT2-04 US PATENT NUMBER: [D507,769 S] [7,249,386 B2] 375 LB. [170 kg] MAXIMUM
24V Solar Charger. Instructions READ CAREFULLY Garrymore Ln Missoula, MT
 24V Solar Charger 9889 Garrymore Ln Missoula, MT 59808 888-687-3552 +1-406-549-0769 www.aquacreek.com Instructions PART #: F-044SCH (For use with Pro Pool, Ranger, Ambassador & Pathfinder) MANDATORY LEAVE
24V Solar Charger. Instructions READ CAREFULLY Garrymore Ln Missoula, MT
 24V Solar Charger 9889 Garrymore Ln Missoula, MT 59808 888-687-3552 +1-406-549-0769 www.aquacreek.com Instructions PART #: F-045SCH (For use with Revolution, Scout, Titan, Spa Lift Ultra and Spa Lift Elite)
Scout 2 Pool Lift READ CAREFULLY Garrymore Ln Missoula, MT
 9889 Garrymore Ln Missoula, MT 59808 888-687-3552 +1-406-549-0769 www.aquacreek.com Scout 2 Pool Lift PART #: F-802SC2-01 US PATENT NUMBER: [D507,769 S] 375 LB. [170 kg] MAXIMUM WEIGHT CAPACITY FOR INDOOR
Patriot-AT1 Portable Lift
 9889 Garrymore Ln Missoula, MT 59808 888-687-3552 +1-406-549-0769 www.aquacreek.com Patriot-AT1 Portable Lift PART #: F-12PPL-HD-AT1-03 US PATENT NUMBER: [D507,769 S] [7,249,386 B2] 375 LB. [170 kg] MAXIMUM
ADA COMPLIANT READ CAREFULLY
 9889 Garrymore Ln Missoula, MT 59808 888-687-3552 +1-406-549-0769 www.aquacreek.com Scout 2 Pool Lift PART #: F-802SC2 US PATENT NUMBER: [D507,769 S] 375 LB. [170 kg] MAXIMUM WEIGHT CAPACITY MANDATORY
AQUATRAM 360 SWIMMING POOL ACCESS LIFT
 AQUATRAM 360 SWIMMING POOL ACCESS LIFT INSTALLATION AND USER S GUIDE IMPORTANT SAFETY INSTRUCTIONS READ AND FOLLOW ALL INSTRUCTIONS SAVE THESE INSTRUCTIONS AquaTram 360 Lift 500 LB. [227 kg] MAXIMUM CAPACITY
PART NUMBER: F-706RLSS REVOLUTION LIFT: SLING-SEAT OPTION
 PART NUMBER: F-706RLSS REVOLUTION LIFT: SLING-SEAT OPTION 500 LB. [227 kg] MAXIMUM CAPACITY MANDATORY LEAVE THIS MANUAL WITH LIFT OWNER - WARNING- IMPORTANT SAFETY INSTRUCTIONS 1. READ AND FOLLOW ALL INSTRUCTIONS.
INSTALLATION & OPERATING INSTRUCTIONS: REVOLUTION SPINEBOARD ATTACHMENT WARNING
 INSTALLATION & OPERATING INSTRUCTIONS: REVOLUTION SPINEBOARD ATTACHMENT LOAD CAPACITY: 500 LBS [227 kg] MANDATORY: LEAVE THIS MANUAL WITH LIFT OWNER WARNING 1. READ AND FOLLOW ALL INSTRUCTIONS. LIFT SAFETY
ADA COMPLIANT READ CAREFULLY
 9889 Garrymore Ln Missoula, MT 59808 888-687-3552 +1-406-549-0769 aquacreek.com Scout 2 Pool Lift PART #: F-800SC2 (with anchor) PART #: F-802SC2 (without anchor) US PATENT NUMBER: [D507,769 S] 375 LB.
Read and follow all instructions. Safety can only be ensured if the walker is assembled and operated according to these instructions.
 Aqua Walker 9889 Garrymore Ln Missoula, MT 59808 888-687-3552 +1-406-549-0769 www.aquacreek.com Manual PART #: F-605UW 300 LB. [136 kg] MAXIMUM WEIGHT CAPACITY MANDATORY LEAVE THIS MANUAL WITH WALKER OWNER
ABLE BATH LIFT PART NUMBER: F-25ABLE (Aquatic-Bath-Lift-Elite) 300LBS [136 kg] MAXIMUM CAPACITY MANDATORY - LEAVE THIS MANUAL WITH LIFT OWNER
![ABLE BATH LIFT PART NUMBER: F-25ABLE (Aquatic-Bath-Lift-Elite) 300LBS [136 kg] MAXIMUM CAPACITY MANDATORY - LEAVE THIS MANUAL WITH LIFT OWNER](/thumbs/71/66187850.jpg "ABLE BATH LIFT PART NUMBER: F-25ABLE (Aquatic-Bath-Lift-Elite) 300LBS [136 kg] MAXIMUM CAPACITY MANDATORY - LEAVE THIS MANUAL WITH LIFT OWNER") ABLE BATH LIFT PART NUMBER: F-25ABLE (Aquatic-Bath-Lift-Elite) 300LBS [36 kg] MAXIMUM CAPACITY MANDATORY - LEAVE THIS MANUAL WITH LIFT OWNER - WARNING- IMPORTANT SAFETY INSTRUCTIONS. READ AND FOLLOW ALL
ABLE BATH LIFT PART NUMBER: F-25ABLE (Aquatic-Bath-Lift-Elite) 300LBS [36 kg] MAXIMUM CAPACITY MANDATORY - LEAVE THIS MANUAL WITH LIFT OWNER - WARNING- IMPORTANT SAFETY INSTRUCTIONS. READ AND FOLLOW ALL
To assemble your equipment read entire manual and follow all instructions.
 Water Rider 3 PART #: F-WXF 330 LB. [150 kg] MAXIMUM WEIGHT CAPACITY MANDATORY LEAVE THIS MANUAL WITH THE BIKE OWNER To assemble your equipment read entire manual and follow all instructions. Consult your
REVOLUTION DEEP-DRAFT PART NUMBER: F-702RLNA-DD US PATENT NUMBER: D507,769 S 400 LB.
 REVOLUTION DEEP-DRAFT PART NUMBER: F-702RLNA-DD US PATENT NUMBER: D507,769 S 400 LB. [181 kg] MAXIMUM CAPACITY MANDATORY LEAVE THIS MANUAL WITH LIFT OWNER - WARNING- IMPORTANT SAFETY INSTRUCTIONS 1. READ
ABLETM BATH LIFT PART NUMBER: F-25ABLE (Aquatic-Bath-Lift-Elite) 300LBS [136 kg] MAXIMUM CAPACITY MANDATORY - LEAVE THIS MANUAL WITH LIFT OWNER
![ABLETM BATH LIFT PART NUMBER: F-25ABLE (Aquatic-Bath-Lift-Elite) 300LBS [136 kg] MAXIMUM CAPACITY MANDATORY - LEAVE THIS MANUAL WITH LIFT OWNER](/thumbs/71/66188175.jpg "ABLETM BATH LIFT PART NUMBER: F-25ABLE (Aquatic-Bath-Lift-Elite) 300LBS [136 kg] MAXIMUM CAPACITY MANDATORY - LEAVE THIS MANUAL WITH LIFT OWNER") ABLETM BATH LIFT PART NUMBER: F-25ABLE (Aquatic-Bath-Lift-Elite) 300LBS [136 kg] MAXIMUM CAPACITY MANDATORY - LEAVE THIS MANUAL WITH LIFT OWNER - WARNING- IMPORTANT SAFETY INSTRUCTIONS 1. READ AND FOLLOW
ABLETM BATH LIFT PART NUMBER: F-25ABLE (Aquatic-Bath-Lift-Elite) 300LBS [136 kg] MAXIMUM CAPACITY MANDATORY - LEAVE THIS MANUAL WITH LIFT OWNER - WARNING- IMPORTANT SAFETY INSTRUCTIONS 1. READ AND FOLLOW
TITAN 600TM LIFT. 600 LB. [272 kg] MAXIMUM CAPACITY MANDATORY LEAVE THIS MANUAL WITH LIFT OWNER
![TITAN 600TM LIFT. 600 LB. [272 kg] MAXIMUM CAPACITY MANDATORY LEAVE THIS MANUAL WITH LIFT OWNER](/thumbs/85/92576109.jpg "TITAN 600TM LIFT. 600 LB. [272 kg] MAXIMUM CAPACITY MANDATORY LEAVE THIS MANUAL WITH LIFT OWNER") TITAN 600TM LIFT 600 LB. [272 kg] MAXIMUM CAPACITY MANDATORY LEAVE THIS MANUAL WITH LIFT OWNER - WARNING- IMPORTANT SAFETY INSTRUCTIONS 1. READ AND FOLLOW ALL INSTRUCTIONS. LIFT SAFETY CAN ONLY BE ENSURED
TITAN 600TM LIFT 600 LB. [272 kg] MAXIMUM CAPACITY MANDATORY LEAVE THIS MANUAL WITH LIFT OWNER - WARNING- IMPORTANT SAFETY INSTRUCTIONS 1. READ AND FOLLOW ALL INSTRUCTIONS. LIFT SAFETY CAN ONLY BE ENSURED
LifeGuardLift. LifeGuard Power Lift Model #100287A OWNERS MANUAL. Rev: 2/14/11
 LifeGuardLift OWNERS MANUAL LifeGuard Power Lift Model #100287A Rev: 2/14/11 Table of Contents 1. ASSEMBLY INSTRUCTIONS A. Lift Assembly B. Setup C. Disassembly 2. CONTROL SYSTEM A. Batteries B. Battery
INSTALLATION AND OPERATING INSTRUCTIONS PRO POOL LIFT TM
 INSTALLATION AND OPERATING INSTRUCTIONS PRO POOL LIFT TM 450 LB. [204 kg] MAXIMUM CAPACITY (PRO POOL LIFT) MANDATORY LEAVE THIS MANUAL WITH LIFT OWNER - READ CAREFULLY- Check entire box and inside all
INSTALLATION AND OPERATING INSTRUCTIONS PRO POOL LIFT TM REVERSED BASE MODEL # F-004PLB-R
 INSTALLATION AND OPERATING INSTRUCTIONS PRO POOL LIFT TM REVERSED BASE MODEL # F-004PLB-R 450 LB. [204kg] MAXIMUM CAPACITY (PRO POOL-R LIFT) - WARNING- IMPORTANT SAFETY INSTRUCTIONS 1. READ AND FOLLOW
Owners Manual. LifeGuard Power Lift Model # Rev. 2/1/13
 Owners Manual LifeGuard Power Lift Model #100287 Rev. 2/1/13 Table of Contents 1. ASSEMBLY INSTRUCTIONS 3-5 A. Lift Assembly 3 B. Setup 3 1. Clinch Pin Location Drawings 4 2. Down Tube and Seat Assembly
AQUATRAM 90 SWIMMING POOL ACCESS LIFT
 AQUATRAM 90 SWIMMING POOL ACCESS LIFT INSTALLATION AND USER S GUIDE IMPORTANT SAFETY INSTRUCTIONS READ AND FOLLOW ALL INSTRUCTIONS SAVE THESE INSTRUCTIONS AquaTRAM 90 POOL LIFT 400 LB. [181 kg] MAXIMUM
AQUATRAM 90 SWIMMING POOL ACCESS LIFT
 AQUATRAM 90 SWIMMING POOL ACCESS LIFT INSTALLATION AND USER S GUIDE IMPORTANT SAFETY INSTRUCTIONS READ AND FOLLOW ALL INSTRUCTIONS SAVE THESE INSTRUCTIONS AquaTRAM 90 SWIMMING POOL ACCESS LIFT 300 LB.
AQUATRAM 90 SWIMMING POOL ACCESS LIFT
 AQUATRAM 90 SWIMMING POOL ACCESS LIFT INSTALLATION AND USER S GUIDE IMPORTANT SAFETY INSTRUCTIONS READ AND FOLLOW ALL INSTRUCTIONS SAVE THESE INSTRUCTIONS AquaTRAM 90 SWIMMING POOL ACCESS LIFT 300 LB.
TRITON POWER POOL LIFT
 TRITON POWER POOL LIFT Installation, Assembly and Operation Instructions 400 LBS [181 kg] MAXIMUM LIFTING CAPACITY MANDATORY ± LEAVE THIS MANUAL WITH LIFT OWNER - WARNING- IMPORTANT SAFETY INSTRUCTIONS
Titan Lift Manual. PART #: F-600TL (with anchor) PART #: F-600TLNA (without anchor) US PATENT NUMBER: [D507,769 S]
![Titan Lift Manual. PART #: F-600TL (with anchor) PART #: F-600TLNA (without anchor) US PATENT NUMBER: [D507,769 S]](/thumbs/77/76314843.jpg "Titan Lift Manual. PART #: F-600TL (with anchor) PART #: F-600TLNA (without anchor) US PATENT NUMBER: [D507,769 S]") Titan Lift Manual PART #: F-600TL (with anchor) PART #: F-600TLNA (without anchor) US PATENT NUMBER: [D507,769 S] 600 LB. [272 kg] MAX WEIGHT CAPACITY MANDATORY LEAVE THIS MANUAL WITH LIFT OWNER Read &
Titan Lift Manual PART #: F-600TL (with anchor) PART #: F-600TLNA (without anchor) US PATENT NUMBER: [D507,769 S] 600 LB. [272 kg] MAX WEIGHT CAPACITY MANDATORY LEAVE THIS MANUAL WITH LIFT OWNER Read &
SCOUT TM POOL LIFT PN: F-800SC-DER-D (WITH ANCHOR) PN: F-802SC-DER-D (WITHOUT ANCHOR) US PATENT NUMBER: D507,769 S 350 LB.
 PN: F-802SC-DER-D (WITHOUT ANCHOR) US PATENT NUMBER: D507,769 S 350 LB.") SCOUT TM POOL LIFT PN: F-800SC-DER-D (WITH ANCHOR) PN: F-802SC-DER-D (WITHOUT ANCHOR) US PATENT NUMBER: D507,769 S 350 LB. [159 kg] MAX. CAPACITY W/AQUA CREEK SCOUT ANCHOR (F-808SA) 300 LB [136 kg] MAX.
SCOUT TM POOL LIFT PN: F-800SC-DER-D (WITH ANCHOR) PN: F-802SC-DER-D (WITHOUT ANCHOR) US PATENT NUMBER: D507,769 S 350 LB. [159 kg] MAX. CAPACITY W/AQUA CREEK SCOUT ANCHOR (F-808SA) 300 LB [136 kg] MAX.
AQUATRAM TM LT POOL LIFT USER MANUAL
 AQUATRAM TM LT POOL LIFT USER MANUAL WARNING IMPORTANT SAFETY INSTRUCTIONS 1. WARNING - TO REDUCE RISK OF INJURY, DO NOT PERMIT CHILDREN TO PLAY ON THIS PRODUCT. 2. WARNING - DO NOT PERMIT CHILDREN TO
AQUATRAM 360 TM POOL LIFT USER MANUAL
 AQUATRAM 360 TM POOL LIFT USER MANUAL WARNING IMPORTANT SAFETY INSTRUCTIONS 1. WARNING- TO REDUCE RISK OF INJURY, DO NOT PERMIT CHILDREN TO PLAY ON THIS PRODUCT. 2. WARNING- DO NOT PERMIT CHILDREN TO OPERATE
Scout Hi Pool Lift PART #: F-802SCNA-HLD
 Scout Hi Pool Lift PART #: F-802SCNA-HLD US PATENT NUMBER: [D507,769 S] 350 LB. [158 kg] MAX WEIGHT CAPACITY W/AQUA CREEK SCOUT ANCHOR (F-808SA) 300 LB [136 kg] MAX WEIGHT CAPACITY W/PLASTIC-LINED ANCHOR
AQUA CREEK PRODUCTS AQUA CREEK, LLC 2011 MAY
 SCOUT TM POOL LIFT 350 LB. [159 kg] MAX. CAPACITY W/AQUA CREEK SCOUT ANCHOR (F-808SA) 300 LB [136 kg] MAX. CAPACITY W/PLASTIC-LINED ANCHOR (BY OTHERS) MANDATORY LEAVE THIS MANUAL WITH LIFT OWNER - WARNING-
SPA LIFTTM 40 PRO SPATM 40
 SPA LIFTTM 40 PRO SPATM 40 400 LB. [181 kg] MAXIMUM CAPACITY MANDATORY LEAVE THIS MANUAL WITH LIFT OWNER - WARNINGIMPORTANT SAFETY INSTRUCTIONS 1. READ AND FOLLOW ALL INSTRUCTIONS. LIFT SAFETY CAN ONLY
Motion Trek Spectrum Lane ~ Missoula MT ~ Rev A
 Motion Trek 350 153121 7100 Spectrum Lane ~ Missoula MT 59808 800.791.8056 ~ www.spectrumproducts.com 153121 Rev A You have purchased a Spectrum Products Motion Trek 350 assisted access lift. Providing
PATRIOT TM UPGRADE KIT PART NUMBER: F-12PPAP INSTALLATION INSTRUCTIONS MANDATORY LEAVE THIS MANUAL WITH LIFT OWNER
 PATRIOT TM UPGRADE KIT PART NUMBER: F-12PPAP INSTALLATION INSTRUCTIONS MANDATORY LEAVE THIS MANUAL WITH LIFT OWNER - WARNING- IMPORTANT SAFETY INSTRUCTIONS 1. READ AND FOLLOW ALL INSTRUCTIONS. LIFT SAFETY
READ AND FOLLOW ALL OF THE INSTRUCTIONS THOROUGHLY BEFORE BEGINNING INSTALLATION OR OPERATION OF THE LIFT.
 INSTALLATION & OWNER S MANUAL P-400 Pool Lift 400 lbs [8 kg] Maximum Capacity READ AND FOLLOW ALL OF THE INSTRUCTIONS THOROUGHLY BEFORE BEGINNING INSTALLATION OR OPERATION OF THE LIFT. (LEAVE THIS MANUAL
P-350 / P-350P / P-350S
 INSTALLATION & OWNER S MANUAL P-350 / P-350P / P-350S Pool Lift 350 lbs [59 kg] Maximum Capacity READ AND FOLLOW ALL OF THE INSTRUCTIONS THOROUGHLY BEFORE BEGINNING INSTALLATION OR OPERATION OF THE LIFT.
Aspen Lift Part Number Spectrum Lane ~ Missoula MT ~
 Aspen Lift Part Number 26010 7100 Spectrum Lane ~ Missoula MT 59808 800.791.8056 ~ www.spectrumproducts.com 26010 Man Rev H You have purchased a Spectrum Products Aspen II BP350 assisted access lift. Providing
Freedom Lift. Part Number 57961
 Freedom Lift Part Number 57961 You have purchased a Spectrum Products Freedom assisted access lift. Providing the unit is installed correctly and properly maintained, it will furnish you with many years
Container Fountain Kit with LED Light
 Container Fountain Kit with LED Light REMINDER CALL 1-888-755-6750 BEFORE RETURNING TO STORE. PACKAGE CONTENTS Questions, problems, missing parts? Before returning to your retailer, call our customer service
Owner s Manual. Upper Body Unit. Serial Number Here. Date of Purchase New Hope Road, Raleigh, NC Fusion -
 Revision 1 March 2012 Upper Body Unit Owner s Manual Serial Number Here Date of Purchase www.batcafitness.com 1207 New Hope Road, Raleigh, NC - 919.255.1233 Fusion - www.batcafitness.com 4 Upper Body Station
ActuLink ABS Module - ABS-MOD-400
 Installation Instructions ActuLink ABS Module - ABS-MOD-400 For more information on the installation and operation of Tuson s towable ABS system, consult the installation and operations manuals for the
3 Owner s Manual P E R S O N A L G Y M. Serial Number Here. Date of Purchase
 Revision 5 FEB 2016 P E R S O N A L G Y M Owner s Manual Serial Number Here Date of Purchase www.batcafitness.com 1207 New Hope Road, Raleigh, NC - 919.255.1233 - Fusion www.batcafitness.com 3 Owner s
3 Owner s Manual. Serial Number Here. Date of Purchase New Hope Road, Raleigh, NC Fusion
 Revision 2 Feb. 2013 Owner s Manual Serial Number Here Date of Purchase www.batcafitness.com 1207 New Hope Road, Raleigh, NC - 919.255.1233 - Fusion www.batcafitness.com 3 Owner s Manual Instructions Congratulations
User Guide IGD Series
 US User Guide IGD Series DANGER PRIOR TO USE, READ AND UNDERSTAND PRODUCT SAFETY INFORMATION. Failure to follow the instructions may result in ELECTRICAL SHOCK, EXPLOSION, or FIRE, which may result in
Owner s Manual. Upper Body Unit. Serial Number Here. Date of Purchase New Hope Road, Raleigh, NC Fusion -
 Revision 3 April 2015 Upper Body Unit Owner s Manual Serial Number Here Date of Purchase www.batcafitness.com 1207 New Hope Road, Raleigh, NC - 919.255.1233 Fusion - www.batcafitness.com 4 Upper Body Station
AXIS Kettlebell/Ball Storage Owner's Manual
 Revision 0 June 2018 Kettlebell/Ball Storage Owner s Manual Serial Number Here Date of Purchase www.batcafitness.com AXIS Kettlebell/Ball Storage Owner's Manual Page Instructions 2 Tools Required/Hardware
OWNER S MANUAL STOP. Models: Blade Master 1.5 HP 1500 Series Stationary Transfer Pump 1.5 Pump, Single Phase AC 110/220V, Non-Explosion proof
 SAVE THESE INSTRUCTIONS Models: 02-1514-GII, 02-1520-GII, 02-1521-GII, 02-1522-GII Blade Master 1.5 HP 1500 Series Stationary Transfer Pump 1.5 Pump, Single Phase AC 110/220V, Non-Explosion proof OWNER
AXIS Accessory Module Owner's Manual
 Revision 0 June 2018 Accessory Module Owner s Manual Serial Number Here Date of Purchase www.batcafitness.com AXIS Accessory Module Owner's Manual Page Instructions 2 Tools Required/Hardware Sheet 3 AXIS
Illumifalls Patio Pond
 Illumifalls Patio Pond REMINDER CALL 1-888-755-4497 BEFORE RETURNING TO STORE. Questions, problems, missing parts? Before returning to your retailer, call our customer service department at 1-888-755-4497,
Submersible Waterfall Pump 1200 Gallons Per Hour
 ITEM # LL1200 Submersible Waterfall Pump 1200 Gallons Per Hour REMINDER CALL 1-888-412-6001 EFORE RETURNING TO STORE. PACKAGE CONTENTS Questions, problems, missing parts? efore returning to your retailer,
Owner s Manual. 4 Functional Trainer. Serial Number Here. Date of Purchase
 Revision 2 June 2014 Functional Trainer Owner s Manual Serial Number Here Date of Purchase www.batcafitness.com 1207 New Hope Road, Raleigh, NC - 919.255.1233 Fusion - www.batcafitness.com 4 Functional
EBG Series Surface Preparation Machines
 Owner s Manual EBG Series Surface Preparation Machines EBG-20/Q EBG-20/C EBG-20/E EBG-28 EBG-20/R EBG-28/R EBG-28 EBG-20/C / 800.557.6822 Square Scrub EBG Series Surface Preparation Machines Owner s Manual
Premium Pond Pump 330 Gallons Per Hour
 Premium Pond 330 Gallons Per Hour REMINDER CALL 1-888-755-4497 BEFORE RETURNING TO STORE. MODEL #PDP330 Questions, problems, missing parts? Before returning to your retailer, call our customer service
Read this entire manual before operation begins.
 Read this entire manual before operation begins. Record below the following information which is located on the serial number data plate. Serial No. Model No. Date of Installation Contents Specifications.............
Read this entire manual before operation begins.
 Read this entire manual before operation begins. Record below the following information which is located on the serial number data plate. Serial No. Model No. Date of Installation Contents Specifications.............
ATD-7384W 12-Ton Bottle Jack Owner s Manual
 ATD-7384W 12-Ton Bottle Jack Owner s Manual Features: Specifications Made in China to ATD Tools, Inc. Specifications Visit us at www.atdtools.com ATD7384W_rev_0118 Product Description NOT Safety Precautions
AGRI-COVERTM SWITCH CONTROL INSTRUCTIONS
 AGRI-COVERTM SWITCH CONTROL INSTRUCTIONS Use these instructions in place of the rocker switch and solenoid sections in your roll tarp or ROLTECTM Electric Hopper Conversion instructions. Some installs
User s Manual. ClipperCreek, Inc. Innovative Infrastructure for Electric and Hybrid Vehicles. Model PCS-15
 ClipperCreek, Inc. Innovative Infrastructure for Electric and Hybrid Vehicles User s Manual ClipperCreek, Inc. 11850 Kemper Rd., Suite E Auburn, CA 95603 www.clippercreek.net Model PCS-15 THIS PAGE INTENTIONALLY
Mechanical Filter Box Kit
 Mechanical Filter Box Kit REMINDER CALL 1-888-755-4497 BEFORE RETURNING TO STORE. MODEL #MFBX500P Questions, problems, missing parts? Before returning to your retailer, call our customer service department
ASSEMBLY & OPERATION MANUAL. CDVK2 Power Tower RECORD SERIAL NUMBER HERE
 ASSEMBLY & OPERATION MANUAL CDVK2 Power Tower RECORD SERIAL NUMBER HERE www.inspirefitness.net by Health In Motion LLC Feb. 2011 TABLE OF CONTENTS Section Description.. Page Instructions.. 1 Tools Required
StormPro BA Series Sump Pump
 Page 1 of 8 Marks & Meanings DANGER: Keep the pump equipment out of the reach of children! Warns that the failure to follow the directions given could cause serious risk to individuals or objects. WARNING:
Flat/Incline/Decline Bench Owner s Manual
 Revision 0 June 2018 Flat/Incline/Decline Bench Owner s Manual Serial Number Here Date of Purchase www.batcafitness.com AXIS F.I.D. Bench Owner's Manual Page Instructions 2 Tools Required/Hardware Sheet
PATRIOT INSTRUCTION MANUAL FMGRID-16, FMGRID-24, FMGRID-30 ELECTRIC GRIDDLES
 INSTRUCTION MANUAL FMGRID-16, FMGRID-24, FMGRID-30 ELECTRIC GRIDDLES This manual contains importatant information regarding your Patriot unit. Please read this manual thoroughly prior to equipment set-up,
ASSEMBLY / OPERATION INSTRUCTIONS. Low Profile Motorcycle Dolly
 ASSEMBLY / OPERATION INSTRUCTIONS 1,500LB CAPACITY Low Profile Motorcycle Dolly Model: 03-CG1500-01(B1) WARNING BEFORE USE PLEASE READ ALL WARNINGS AND INSTRUCTIONS TO PREVENT SERIOUS INJURY Drop-Tail
Quadratec Delrin Door Hinge Pin Bushings for Jeep Wrangler JK 07- Current
 Quadratec Delrin Door Hinge Pin Bushings for Jeep Wrangler JK 07- Current Installation and Instruction Manual: Item # 55014.6104 & # 55014.6103 2 Door Kit # 55014.6104 4 Door Kit # 55014.6103 Kit Contents
Premium Waterfall Pump 1200 Gallons Per Hour
 Premium Waterfall 1200 Gallons Per Hour REMINDER CALL 1-888-755-4497 BEFORE RETURNING TO STORE. MODEL #PWP1200 Questions, problems, missing parts? Before returning to your retailer, call our customer service
Heavy Duty Four Wheeled Walker
 Heavy Duty Four Wheeled Walker Weight Capacity: 500 lbs. ITEM # W1802 Made in China 2011 ESSENTIAL MEDICAL SUPPLY, INC. Manufactured for Orlando, FL 32822 -- SAVE THESE INSTRUCTIONS -- Do not attempt to
Use/Installation Guide
 Use/Installation Guide 5 Series Outdoor Gas Grill Carts IMPORTANT: PLEASE READ AND FOLLOW 1. Before beginning, please read these instructions completely and carefully. 2. Do not remove permanently affixed
AXIS Free Trainer Owner's Manual
 Revision 0 Nov 2017 Free Trainer Owner s Manual Serial Number Here Date of Purchase www.batcafitness.com AXIS Free Trainer Owner's Manual Congratulations on the purchase of your new Batca AXIS Free Trainer.
Submersible Pond Pump with UV 800 Gallons Per Hour
 Submersible Pond Pump with UV 800 Gallons Per Hour REMINDER CALL 1-888-755-6750 BEFORE RETURNING TO STORE. PACKAGE CONTENTS ITEM #PP800UV Questions, problems, missing parts? Before returning to your retailer,
INSTALLATION INSTRUCTIONS CARE AND MAINTENANCE
 1 2 3 4 5 6 7 8 9 10 11 12 13 14 15 16 17 18 19 20 21 22 23 24 INSTALLATION INSTRUCTIONS CARE AND MAINTENANCE CURVED APRON FRONT STAINLESS STEEL SINK Flush Mount or Under Mount Sink Thank you for selecting
AXIS Smith Trainer Owner's Manual
 Revision 0 June 2018 Smith Trainer Owner s Manual Serial Number Here Date of Purchase www.batcafitness.com AXIS Smith Trainer Owner's Manual Instructions Congratulations on the purchase of your new Batca
ATTENTION: PLEASE READ AND UNDERSTAND ALL INSTRUCTIONS AND WARNINGS BEFORE ASSEMBLING, INSTALLING OR USING THIS PRODUCT.
 INSTALLATION MANUAL PROMASTER MOUNTING CHANNEL KIT (2115-0-01) ATTENTION: PLEASE READ AND UNDERSTAND ALL INSTRUCTIONS AND WARNINGS BEFORE ASSEMBLING, INSTALLING OR USING THIS PRODUCT. 1/2 in Wrench/ Socket
10 Year Limited Warranty
 Power. On Your Terms. 10 Year Limited Warranty PHI 2.7 TM PHI 3.5 TM 60A SIMPLIPHI POWER, INC. REV020618 10 Year Limited Warranty: PHI 2.7 TM PHI 3.5 TM 60A 24V 48V Limited Pro-Rated Warranty Coverage
Level One Electric Vehicle Charging Station Wall Mount Product Guide
 Level One Electric Vehicle Charging Station Wall Mount Product Guide Model # WU-120 ShorePower Technologies 2351 NW York St. Portland, OR 98664 503-892-7345 info@shorepower.com www.shorepower.com 2 Table
Sport Sway Bar Kit C-10 Truck
 Sport Sway Bar Kit 22390 67-72 C-10 Truck Thank you for your purchase from our new line of Chevy parts. Please call us at 877-4NO - ROLL if you have any questions regarding the service or installation
HP30 Slab Saw Owner s Manual and Operating Instructions
 HP30 Slab Saw Owner s Manual and Operating Instructions MADE IN USA Revision 07 09.0 Manual Part No. 67 Caution: Read all safety and operating instructions before using this equipment. This manual MUST
Complete Pond Kit REMINDER CALL BEFORE RETURNING TO STORE. PLEASE CALL BEFORE RETURNING TO THE STORE.
 Complete Pond Kit REMINDER CA 1-888-755-4497 BEFORE RETURNING TO STORE. Questions, problems, missing parts? Before returning to your retailer, call our customer service department at 1-888-755-4497, 8
Read this entire manual before operation begins.
 Read this entire manual before operation begins. Record below the following information which is located on the serial number data plate. Serial No. Model No. Date of Installation Contents Specifications.............
Low-Water Auto Shutoff Pump with Light 300 Gallons Per Hour
 Low-Water Auto Shutoff Pump with Light 300 Gallons Per Hour REMINDER ALL 1-888-755-4497 BEFORE RETURNING TO STORE. MODEL #FP300ASL Questions, problems, missing parts? Before returning to your retailer,
EZ Carrier 3. Owner s Manual. Keep instructions for future reference
 EZ Carrier vv Owner s Manual Keep instructions for future reference Introduction The EZ Carrier provides all the flexibility you may need to transport your mobility scooter. The features include: The capability
PVI 1800/PVI Residential/Commercial Grid-Tied Photovoltaic Inverter WARRANTY MANUAL. Subject to Change REV , Solectria Renewables
 PVI 1800/PVI 2500 WARRANTY MANUAL Residential/Commercial Grid-Tied Photovoltaic Inverter 2009, Solectria Renewables Subject to Change REV 10.09 1 Product Warranty & RMA Policy 1.1 Warranty Policy The Solectria
Natural Fiber Planter Fountain
 Natural iber Planter ountain REMINDER CALL 1-888-755-5641 BEORE RETURNING TO STORE. PACKAGE CONTENTS Questions, problems, missing parts? Before returning to your retailer, call our customer service department
AXIS Dip/Plyo Platform Owner's Manual
 Revision 0 June 2018 Dip/Plyo Platform Owner s Manual Serial Number Here Date of Purchase www.batcafitness.com AXIS Dip/Plyo Platform Owner's Manual Page Instructions 2 Tools Required/Hardware Sheet 3
Power. On Your Terms.
 Power. On Your Terms. 10 YEAR LIMITED WARRANTY PHI 1310 TM 1 SIMPLIPHI POWER, INC. REV102016 10 YEAR LIMITED WARRANTY: PHI 1310 TM LIMITED PRO-RATED WARRANTY COVERAGE The SimpliPhi Power PHI 1310 as supplied
ASSEMBLY / OPERATION INSTRUCTIONS. Low Profile / Stand-Up Motorcycle Dolly
 ASSEMBLY / OPERATION INSTRUCTIONS 1,500LB CAPACITY Low Profile / Stand-Up Motorcycle Dolly Model: 03-CGPR1500-01(C) WARNING BEFORE USE PLEASE READ ALL WARNINGS AND INSTRUCTIONS TO PREVENT SERIOUS INJURY
Breeder Control Installation Manual
 Breeder Control Installation Manual Patented U.S. Patent No. 7,980,129, Patent No. 8,581,122, Patent No. 8,853,566 07/10/2018 Table of Contents Installation Overview... 3 Components... 3 BinTrac Breeder
Mechanical Filter Pump Kit Up to 500 gallons
 Mechanical Filter Pump Kit Up to 500 gallons REMINDER CALL 1-888-755-6750 BEFORE RETURNING TO STORE. ITEM #FM002P Questions, problems, missing parts? Before returning to your retailer, call our customer
Read this entire manual before operation begins.
 Read this entire manual before operation begins. Record below the following information which is located on the serial number data plate. Serial No. Model No. Date of Installation Contents Specifications.............
Level One Electric Vehicle Charging Station FREE STANDING Product Guide
 Level One Electric Vehicle Charging Station FREE STANDING Product Guide Model # SC2-120 Shorepower Technologies 2351 NW York St. Portland, OR 98664 503-892-7345 info@shorepower.com www.shorepower.com 2
Read this entire manual before operation begins.
 Read this entire manual before operation begins. Record below the following information which is located on the serial number data plate. Serial No. Model No. Date of Installation Contents Specifications.............
POST LANTERN ITEM # MODEL #39487 ATTACH YOUR RECEIPT HERE. Serial Number. Purchase Date
 ITEM #356-4981 POST LANTERN MODEL #39487 ATTACH YOUR RECEIPT HERE Serial Number Purchase Date Questions, problems, missing parts? Before returning to your retailer, call our customer service department