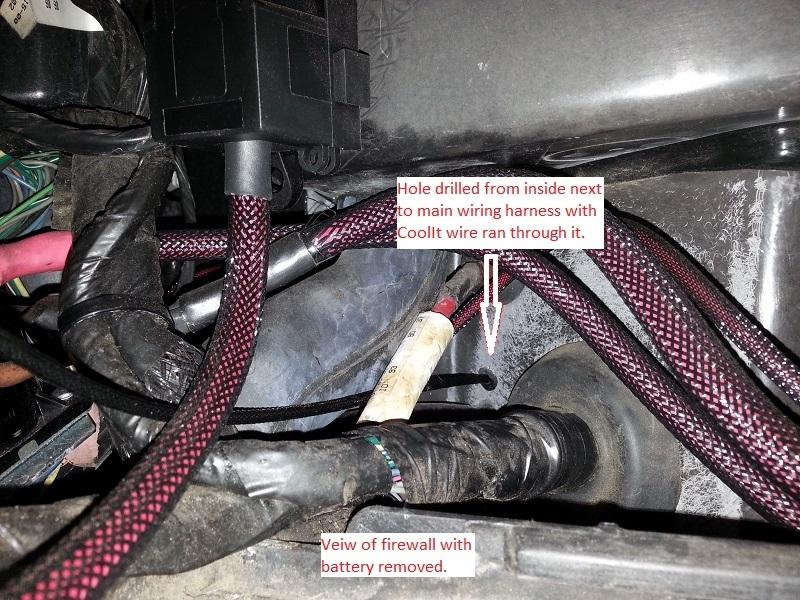
1) Remove battery so that you have access to the firewall behind the battery. Also remove the under hood fuse box cover.
|
|
|
- Allan Randolph Perkins
- 5 years ago
- Views:
Transcription

1 Thank you for purchasing SacCityCorvette s Hardwire CoolIt CoolIt H2 and H3 Installation Instructions (v10/14) IMPORTANT! We highly recommend that you test your CoolIt H2/H3 for compatibility and operation BEFORE you do the full install. Follow this quick test procedure. Full Color instructions are also at 1) Remove your relay #43 and replace it with the CoolIt relay. You can verify which one is #43 by looking under the fuse box cover. 2) We have temporarily plugged the Blue switch wire onto the CoolIt Relay for you. 3) Start your Corvette up and let it idle. 4) Touch the Black switch wire to the GROUND on the battery as shown in picture. NEVER apply power to the switch wires or CoolIt wire! It is GROUNDED only! 5) Turn switch ON/OFF, the Passenger side fan should respond. 6) If the fan turns on and off with the switch then your good to move on to the full installation on page 2. Otherwise contact us. Sale@saccitycorvette.com PAGE 1
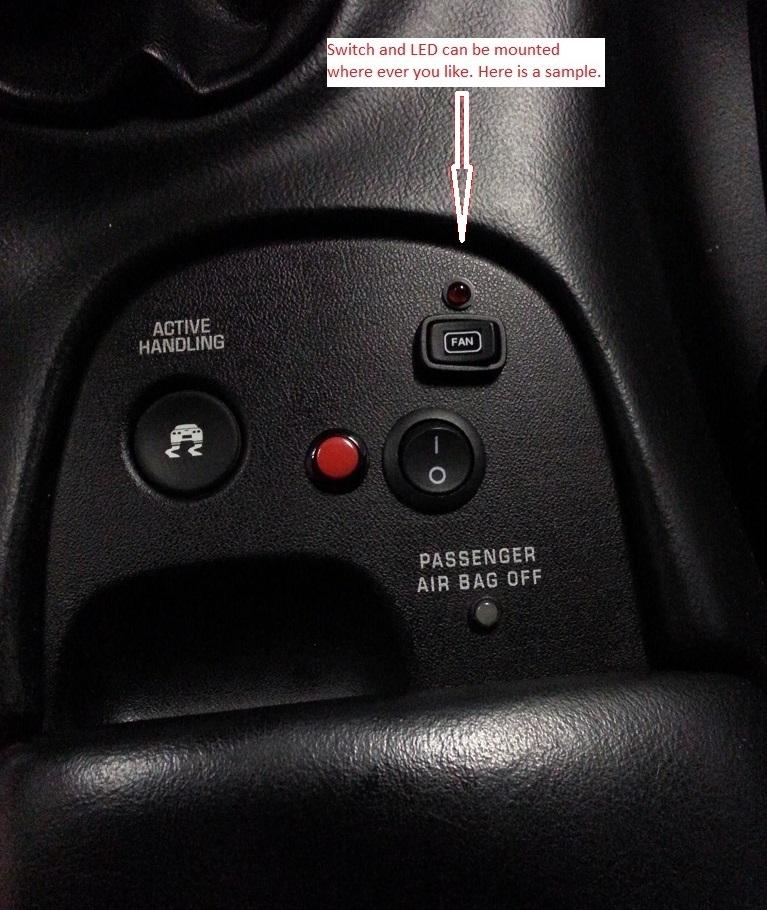
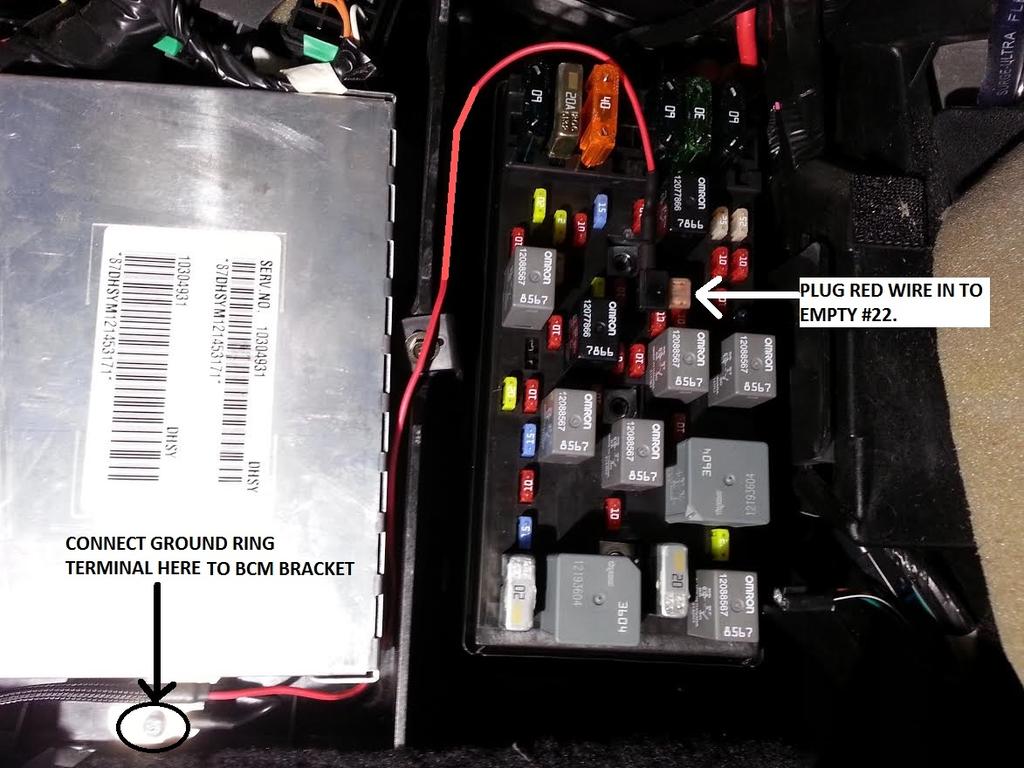
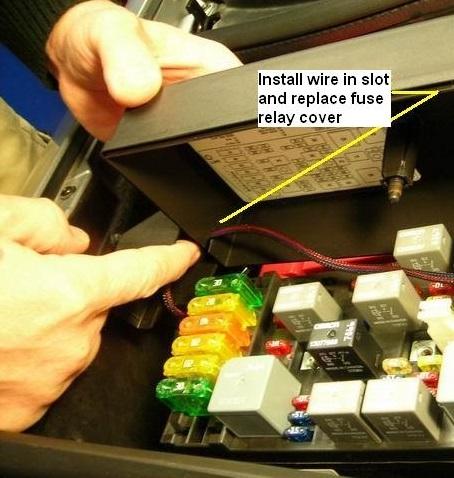
2 SacCityCorvette s Hardwire CoolIt H2/H3 Instructions Please follow instructions carefully or damage to your Corvette may occur! Not following instructions will void Warranty! Read instructions before starting! Color instructions are also at We have designed this kit to be fool proof if you follow the instructions. 1) Remove battery so that you have access to the firewall behind the battery. Also remove the under hood fuse box cover. 2) In passengers foot well area, remove the under dash shroud and panel on floor that covers fuses so you can access area to drill 5/16 hole for CoolIt Relay wire to come through into passenger compartment. Make sure the other side of firewall is clear before drilling then drill hole. See Figure 1. 3) Remove #43 fan relay from under hood Fuse/Relay box and replace it with the CoolIt relay. See #43 Relay location on Page 1. Route the wire neatly out of the way and through the hole you drilled in firewall. Be gentle with this wire, it is a small gauge. See Figure 2. 4) From inside passenger compartment slide grommet on to CoolIt wire and into firewall. See Figure 3. 5) Once you have it through the fire wall you will need to decide where you want to mount the Switch and LED. See sample switch and LED install in a Zo6. See Figure 4. 6) Decide the location of the switch and LED and drill a ½ hole for switch and ¼ hole for LED. The LED is a simple press in fit. Make sure you have enough clearance for the depth of the switch and the wires before you drill. 7) After switch and LED are installed plug the wires into the plastic connector (A) as shown in the wiring diagram. See Figure 10 8) Route the CoolIt wire that you brought through the fire wall over to the switch and leave it there for now. 9) Drill 1/8 hole through BCM bracket for ground wire. See Figure 6 10) From wire harness (B) screw the Black ground wire ring terminal to BCM Bracket with supplied screw as shown in Figure 7 11) From wire harness (B) connect Red fused wire to fuse box. Plug into slot #22 as shown in Figure 7. If your #22 is not empty follow special instructions on wiring diagram. See Figure 10 12) Route harness (B) over to harness (A) and plug the CoolIt wire that you previously routed and plug it into harness (B). Connect harness (A) from switch to harness (B). To test CoolIt, start car and turn CoolIt switch on. The right side fan should turn on in high speed mode and LED should be on. Don t forget, the fan will on every time you start the car unless switch is in the OFF position. 13) Lastly, cut small slot in under hood Fuse/Relay box and reinstall it. See Figures 8-10 If you have any questions please call Tech Support at (916) or Sales@saccitycorvette.com PAGE 2

3 FIG. 1 FIG. 2 PAGE 3

4 FIG. 3 PAGE 4 FIG. 4

5 FIG. 5 FIG.6 PAGE 5


6 FIG. 7 FIG. 8 FIG. 9 PAGE 6P
7
INSTALLATION INSTRUCTIONS 3 BULL BAR W-BUILT IN LED LIGHT TOYOTA TACOMA
 INSTALLATION INSTRUCTIONS PARTS LIST: 1 3 Bull Bar 4 12mm Hex Nuts 1 Driver/Left Frame Mounting Bracket 2 10-1.50mm x 120mm x 30mm Hex Bolts 1 Passenger/Right Frame Mounting Bracket 2 10mm x 30mm OD x
Passenger/Right Side Frame Bracket. Driver/Left Side Frame Bracket. (4) Spacer Washers. (2) Bull Bar Mounting Brackets
 Spacer Washers. (2) Bull Bar Mounting Brackets") PARTS LIST: 1 Bull Bar 12 s 1 Driver/Left Frame Mounting Bracket 1 Passenger/Right Frame Mounting Bracket 6 10mm Lock Washers 2 Bull Bar Mounting Brackets 6 10mm Hex Nuts 4 Large Spacer Washers 4 8-1.25mm
PARTS LIST: 1 Bull Bar 12 s 1 Driver/Left Frame Mounting Bracket 1 Passenger/Right Frame Mounting Bracket 6 10mm Lock Washers 2 Bull Bar Mounting Brackets 6 10mm Hex Nuts 4 Large Spacer Washers 4 8-1.25mm
2015 Ford F150 Rear Bumper w/ LED
 2015 Ford F150 Bumper w/ LED T527990 T527991 PARTS LIST: 1 Bumper Assembly 4 12mm Lock Washers 2 Mounting Brackets 6 12 mm Nylon Lock Nuts 4 Sensor Hole Plugs 8 4mm x 10mm Button Head Bolts 2 Plastic Plugs
Installation Instructions
 Installation Instructions RedRock 4x4 3 in. Bull Bar w/ Skid Plate & 20 in. Single Row LED Light Bar Black (Polished) () Part# T531165 (T531166) PARTS LIST: 1 Bull Bar 8 12mm x 32mm OD x 3mm Flat Washers
Installation Instructions
 Installation Instructions Barricade 3.5 in. Bull Bar w/ Skid Plate & 20 in. Single Row LED Light Bar Black (Polished) (210-16 JEEP WRANGLER 4 DR & 2DR) Part# J107785 J107786 Page 1 of 5 PARTS LIST: 1 Bull
Wiper motor bolt and spacer. 3. Place relays as shown in picture so you can route the wires.
 TSB Fan Relay Kit Please refer to a factory repair manual when working on your car. 1. Disconnect battery cables from the battery. 2. Remove bolt and spacer from wiper motor as shown in the picture. Wiper
Installation Instructions for Chevrolet Colorado, GMC Canyon, LT, Z71, With Factory Fog Lights
 Installation Instructions for 2015-2018 Chevrolet Colorado, GMC Canyon, LT, Z71, With Factory Fog Lights This kit is designed to allow use of your factory fog light operation along with an addition auxiliary
xpressstart Mercedes Solution Sprinter Installation Instructions
 xpressstart Mercedes Solution Sprinter 2007-2012 Installation Instructions Tools and Parts you will need -T-25 driver -EIS removal tool p/n 639 589 01 07 00 (optional, available through Mercedes dealer)
Brake and Tail Light Kit Workman 1100/2100 and Twister Utility Vehicles
 Form No. 5-90 Brake and Tail Light Kit Workman 00/00 and Twister Utility Vehicles Part No. 0 6697 Installation Instructions Important Before installing this kit, you must have Wiring kit number 99 79 installed
2015 Ford F150 Front Bumper w/ LED
 PARTS LIST: 2015 Ford F150 Bumper w/ LED 1 Bumper Assembly 4 8mm Lock Washers 1 Driver/left L Bracket (center LED light) 2 8mm Hex Nuts 1 Passenger/right L Bracket (center LED light) 2 6mm x 20mm Button
It is normal for the A/C compressor to turn off under certain conditions, such as low idle, high engine coolant temperature, or hard acceleration.
 2007 Honda Odyssey 3.5L Eng LX 1Search AC COMPRESSOR CLUTCH A/C Compressor Clutch Circuit Troubleshooting NOTE: It is normal for the A/C compressor to turn off under certain conditions, such as low idle,
Jeep JK S8/Onx6 Mount Kit
 Jeep JK S8/Onx6 Mount Kit PN: 45-7500, 45-7503 Installation Manual Baja Designs 185 Bosstick Blvd. San Marcos CA 92069 Phone 760.560.2252 Fax 760.560.0383 info@bajadesigns.com www.bajadesigns.com Bracket
ENGINE COOLING FAN Toyota Celica ELECTRIC COOLING FAN RADIATOR COOLING FAN SYSTEM TEST ENGINE COOLING Toyota Engine Cooling Fans
 ENGINE COOLING FAN 1994 Toyota Celica 1994 ENGINE COOLING Toyota Engine Cooling Fans Celica 1.8L 4-Cyl ELECTRIC COOLING FAN NOTE: Electric cooling fan may be used for radiator or condenser. To verify electric
Tusk UTV Horn & Signal Kit Installation Instructions
 Tusk UTV Horn & Signal Kit Installation Instructions The Tusk UTV signal kit is designed to be a simple way to provide front and rear turn signals, license plate mount with light, horn, and rearview mirrors
Ford Super Duty F-250, F and up
 Ford Super Duty F-250, F-350 2005 and up Installing Upfitter Switches by Richard L. Ray If you want to add a few aftermarket options to your new Ford Super Duty, Ford Motor Company makes things easy for
 Table of Contents Multiplexing Reinstallation- under hood (53618-01-M) (Prior 2017)..... 3 Multiplexing installation under hood (53618-02-M) (Prior 2017).....19 One Piece Plug MPX Undehood Harness (53470-MPX)
Jeep Wrangler TJ 4.0 LITER Installation instructions
 www.jeepair.com 2000-2001 Jeep Wrangler TJ 4.0 LITER Installation instructions Important information about your system, and warranty DO NOT ADD ANY OIL TO ANY PART OF THE SYSTEM. DO NOT USE THE SIGHT GLASS
 Table of Contents Multiplexing Reinstallation- under hood (53618-01-M) (2017 & beyond)... 3 Multiplexing installation under hood (53618-02-M) (2017 & beyond).....19 Two Piece Plug MPX Underhood Harness
TOYOTA PRIUS V LED DRL Black-Out
 TOYOTA PRIUS V 2012 - LED DRL Black-Out Part Number: 00016-47021 Accessory Code:LDBO10 Conflicts Fog Lights Kit Contents Item # Quantity Reqd. Description 1 2 DRL Housing 2 2 DRL s bezels 3 1 Driver Box
D R00. Light Kit D. (one piece harness)
") Light Kit 800076-D (one piece harness) Page 1 800076-D lights 800076-D 53624-B lights One piece harness Page 3 Light Kit 800076-D Item Part # Description Quantity 1 52018-M Light Bracket Switch Kit (includes
Light Kit 800076-D (one piece harness) Page 1 800076-D lights 800076-D 53624-B lights One piece harness Page 3 Light Kit 800076-D Item Part # Description Quantity 1 52018-M Light Bracket Switch Kit (includes
(2) 12mm x 35mm Single Bolt Plates. (2) 12mm x 30mm Double Bolt Plates
 12mm x 35mm Single Bolt Plates. (2) 12mm x 30mm Double Bolt Plates") PARTS LIST: 1 Bull Bar 6 12mm x 24mm OD x 2.5mm Flat Washers 1 Driver/Left Mounting Bracket 6 12-1.75mm Nylon Lock Nuts 1 Passenger/Right Mounting Bracket 4 10-1.50mm x 30mm Hex Bolts 2 12mm x 30mm Double
PARTS LIST: 1 Bull Bar 6 12mm x 24mm OD x 2.5mm Flat Washers 1 Driver/Left Mounting Bracket 6 12-1.75mm Nylon Lock Nuts 1 Passenger/Right Mounting Bracket 4 10-1.50mm x 30mm Hex Bolts 2 12mm x 30mm Double
Lethal Performance Dual FPDM Harness Kit Installation
 Lethal Performance Dual FPDM Harness Kit Installation The Lethal Performance Dual FPDM Harness Kit is a plug-and-play modification. Depending on whether you are using the Lethal Performance wire upgrade
INSTALLATION INSTRUCTIONS
 INSTALLATION INSTRUCTIONS Accessory Application Publications No. 2003 ELEMENT AII 24318 Issue Date DEC 2002 PARTS LIST Trailer Hitch Kit P/N 08L92-SCV-100 4 Bolts, 12 x 35 mm Trailer hitch U-bolt 2 Nuts,
Optimized Idle Aftermarket Installation Kits On-Highway Truck Applications (P/N: )
") 18SP655 Optimized Idle Aftermarket Installation Kits On-Highway Truck Applications (P/N: 23538534) KIT DESCRIPTION The Optimized Idle Aftermarket Installation Kit provides the components necessary for
18SP655 Optimized Idle Aftermarket Installation Kits On-Highway Truck Applications (P/N: 23538534) KIT DESCRIPTION The Optimized Idle Aftermarket Installation Kit provides the components necessary for
INSTALLATION INSTRUCTIONS FORD F-150 2WD & 4WD RETAINS FACTORY TOW HOOKS PART #P3063
 INSTALLATION INSTRUCTIONS FORD F-150 2WD & 4WD RETAINS FACTORY TOW HOOKS PART #P3063 PARTS LIST: 1 Grille Guard 2 10-1.5mm Nylon Lock Nuts 1 Driver/Left Frame Mounting Bracket 4 12mm Plastic Washers 1
Harnessed Bypass Module Installation Instructions
 Harnessed Bypass Module Installation Instructions The Original Secondary Air Injection System Bypass Kit Applicable for Toyota/Lexus Vehicles Introduction: A failure of any component of the Secondary Air
INSTALLATION INSTRUCTIONS
 INSTALLATION INSTRUCTIONS Accessory Application Publications No. P/N 08E49-S2A-100 2004 S2000 AII 26325 Issue Date OCT 2003 PARTS LIST Hood switch harness TOOLS AND SUPPLIES REQUIRED #2 Phillips screwdriver
Ford Mustang V6 OEM-Style Fog Light Kit Parts List: Quantity: Tool List:
 2015-2017 Ford Mustang V6 OEM-Style Fog Light Kit Parts List: Quantity: Tool List: LED Foglights/ Bezels 2 Flat head & Phillips screwdriver (if you ordered part#3600) Ratchet & Socket set OR Wiring harness
Jeep Wrangler TJ 4.0 LITER Installation instructions
 www.jeepair.com 2002-2004 Jeep Wrangler TJ 4.0 LITER Installation instructions Kit Information These directions are for 2002-2006 model Jeep Wranglers. After 1994 every vehicle was designed for R134a refrigerant.
Conflicts. TOYOTA Prius Foglights. Part Number: Accessory Code: LF1. Factory Fog Lights
 TOYOTA Prius 2011- Foglights Part Number: 00016-47401 Accessory Code: LF1 Conflicts Factory Fog Lights Item # Quantity Reqd. Description 1 2 Fog Lamps 2 2 Fog Lamp s bezels 3 1 Switch Assembly 4 1 Fog
Wolverine Turn Signal / Horn Kit 2102
 All years Yamaha Wolverine STOP - THIS KIT IS DESIGNED SPECIFICALLY FOR ALL YEAR AND MODELS YAMAHA WOLVERINE. IF YOUR MACHINE IS NOT ONE OF THESE MODELS DO NOT PROCEED. Contact Ryco Motorsports or your
Ford 6.7L Installation of the Guardian Safety System
 Ford 6.7L Installation of the Guardian Safety System Diesel Tech Industries Ltd. 14215-120 Avenue Edmonton, Alberta, Canada T5L 2R8 Phone: (780) 455-9876 info@dtiguardian.com www.dtiguardian.com DTI05-02.01/13
TOYOTA PRIUS C FOG LIGHT (Halogen & LED)
") TOYOTA PRIUS C 2012-14 FOG LIGHT (Halogen & LED) Part Number: TPC-312 / TPC-812 Kit Contents Item # Quantity Reqd. Description 1 2 Fog Lamps 2 2 Bezels 3 1 Switch Assembly 4 1 Fog Light Operation guide
TOYOTA PRIUS C 2012-14 FOG LIGHT (Halogen & LED) Part Number: TPC-312 / TPC-812 Kit Contents Item # Quantity Reqd. Description 1 2 Fog Lamps 2 2 Bezels 3 1 Switch Assembly 4 1 Fog Light Operation guide
Turn Signal / Horn Kit PN 7101 by All years Polaris RZR 1000 and RZR 900, 900-4, 900 trail, 900S and 900XC STOP - THIS KIT IS DESIGNED
 All years Polaris RZR 1000 and 1000-4 2015 RZR 900, 900-4, 900 trail, 900S and 900XC STOP - THIS KIT IS DESIGNED SPECIFICALLY FOR ALL YEAR AND MODEL POLARIS RZR 1000 AND 1000-4. ALSO THE 2015 POLARIS RZR
PRAMCQ13. Designed for Dodge Ram vehicles with base audio Not Compatible with 2018 and newer Dodge Ram vehicles
 PRAMCQ13 Designed for 2013 2017 Dodge Ram vehicles with base audio Not Compatible with 2018 and newer Dodge Ram vehicles Subwoofer Alternate Amplifier Bracket Amplifier Subwoofer Harness Subwoofer Amplifier
The gauges selected for my installation were the following: Part Application
 This write up documents the installation of Autometer Sport Comp II gauges into a 1971 Camaro with original full factory instrumentation. The Autometer gauges completely replace the original factory instrumentation,
150 PSI ILLUMINATED DASH PANEL GAUGE KIT
 150 PSI ILLUMINATED DASH PANEL GAUGE KIT PART NO. 10061 (For Use with 20/30 Amp Systems) PART NO. 20062 (For Use with 30/40 Amp Systems) IMPORTANT: It is essential that you and any other operator of this
Part Number:
 General Applicability This cruise control was tested and verified on: 2009-2010 Ford F-150 / E-150 2010 Ford Escape 2009-2010 Mazda Tribute This cruise control may not function correctly on unverified
SHELBY GT500
 2007-2009 SHELBY GT500 Removal of Factory Unit WARNING: 1. Radiator fluid must be handled properly. Please observe local ordinances with regards to handling and disposal. 2. Allow vehicle and components
Convenience Lighting
 Convenience Lighting by Flopster843 19 Dec 2011 In order to cut costs and make a larger profit, many automobile manufacturers decided to cut several minor items from the production line. Chrysler removed
LED Fog Light. Conflicts Note: 1832, 1852, 1856, 1872, General Applicability Fits Models
 LED Fog Light Year & Model Part Number 2017 Corolla TCO-817 Conflicts Note: 1832, 1852, 1856, 1872, 1874 General Applicability Fits Models 1863 1866 1864 1865 Additional Items Required For Installation
SCION FRS FOG LIGHTS. Part Number: SFR-313
 Part Number: SFR-313 Kit Contents Item # Quantity Reqd. Description 1 2 Light Housings 2 2 Fog Light bezels 3 1 Harness bag 4 1 User s card 5 1 Switch 6 1 Fuse jumper Hardware Bag Contents Item # Quantity
WOT Box Installation Instructions VW / Audi
 Connector Pinout Pin Color AWG Name WOT Box Installation Instructions VW / Audi Description 1 Yellow 18 RPM Connect to Fuel Injector Drive Signal or Ignition Control Signal (varies by car model) 2 Black
1) Remove side panels. Remove clutch cover. Remove windshield by pulling up on the three posts secured into
 Remove side panels. Remove clutch cover. Remove windshield by pulling up on the three posts secured into") UNDER HOOD HEAT ELIMINATOR A.K.A. THE BLOW HOLE by Mountain Tek Application 2013 Model Year SKIDOO XM Kit Contents 1) (1) Fan Tube Assembly 2) (1) Accessory Connect Harness 3) (1) Fan Vent Cover Plate
UNDER HOOD HEAT ELIMINATOR A.K.A. THE BLOW HOLE by Mountain Tek Application 2013 Model Year SKIDOO XM Kit Contents 1) (1) Fan Tube Assembly 2) (1) Accessory Connect Harness 3) (1) Fan Vent Cover Plate
CAMRY STRIP LED DRL TOYOTA Part Number: Accessory Code: LDRS10. PIO / DIO Rev. A 02/26/13. Doc
 Doc. 02.126.00 TOYOTA CAMRY PIO / DIO Rev. A 2013-02/26/13 STRIP LED DRL Part Number: 00016-32280 Accessory Code: LDRS10 Conflicts - Only works on Camry SE Kit Contents Item # Quantity Reqd. Description
INSTALLATION INSTRUCTIONS
 AUTOMOTIVE PRODUCTS, INSTALLATION INSTRUCTIONS ULTIMATE BULL BAR APPLICATION: 2003-2014 Ford Expedition 2007-2014 Ford Expedition EL 2003-2014 Lincoln Navigator L 2/4WD 2009-2014 Ford F-150 2015-2017 Ford
INSTALLATION INSTRUCTIONS
 AUTOMOTIVE PRODUCTS, INSTALLATION INSTRUCTIONS ULTIMATE BULL BAR APPLICATION: 2009-2018 Dodge Ram 1500 (Excl. Rebel Model) 2019 Dodge Ram 1500 Classic PART NUMBER: 32-1960, 32-1965, 32-1960L, 32-1965L
ONBOARD AIR HOOKUP KIT
 ONBOARD AIR HOOKUP KIT PART NO. 20052 (30 amp - 110PSI on, 150PSI off) PART NO. 20053 (30 amp - 85PSI on, 105 PSI off) PART NO. 20055 (30 amp - 90 PSI on, 120 PSI off) IMPORTANT: It is essential that you
One piece harness installations...2 Adapter Harness Controller for straight blade...26 Controller for wing blade.27 Controller for V blade..
 One piece harness installation Table of Contents One piece harness installations...2 Adapter Harness... 16 Controller for straight blade...26 Controller for wing blade.27 Controller for V blade..28 Page
TOYOTA TACOMA Part Number: TTA-BGB16-DRL TTA-BGP16-DRL
 TOYOTA TACOMA 2016-17 Date: 10.29.2016 Billet Grille w/led DRL Part Number: TTA-BGB16-DRL TTA-BGP16-DRL Kit Contents Item # Quantity Reqd. Description 1 2 LED DRL 2 1 Driver Box 3 1 Switch 4 1 User Card
Toyota FJ40 Compressor/OEM Alternator Bracket Kit (158217)
") 968-83 Toyota FJ40 Compressor/OEM Alternator Bracket Kit (5827) 8865 Goll St. San Antonio, TX 78266 Phone: 800-862-6658 Sales: sales@vintageair.com Tech Support: tech@vintageair.com 90344 REV C 0/3/8,
968-83 Toyota FJ40 Compressor/OEM Alternator Bracket Kit (5827) 8865 Goll St. San Antonio, TX 78266 Phone: 800-862-6658 Sales: sales@vintageair.com Tech Support: tech@vintageair.com 90344 REV C 0/3/8,
INSTALLATION INSTRUCTIONS For 2007 and newer Jeep Wrangler JK
 7 LED sealed beam headlamp with switchback Halos and DRL INSTALLATION INSTRUCTIONS For 2007 and newer Jeep Wrangler JK SB7250XX-BLK, SB7250XX-CHR, SB7050BA-BLK, SB7060XX-BLK, SB7060XX-CHR, SB7160XX-CHR,
Part Number: TAV-713 TOYOTA AVALON LED DRL
 Part Number: TAV-713 Kit Contents Item # Quantity Reqd. Description 1 2 DRL s bezels w/led DRL 2 1 Driver Box 3 1 Harness bag 4 1 User s card 5 1 Cushion pad 6 1 Switch 7 2 Drill Jigs Hardware Bag Contents
Jeep JK 6 Switch Panel
 921709590 2007-17 Jeep JK 6 Switch Panel Thank you for choosing Rough Country for all your lighting needs. Please read instructions before beginning installation. Check the kit hardware against the kit
Detroit Speed, Inc. Selecta-Speed Wiper Kit Corvette P/N:
 Detroit Speed, Inc. Selecta-Speed Wiper Kit 1963-67 Corvette P/N: 121620 A downpour of rain will no longer hinder your ability to clearly see the road. The Detroit Speed Selecta-Speed Wiper Kit provides
Addictive Desert Designs
 Preparation: Disconnect the negative battery terminal. Park the vehicle on level ground and set the emergency brake. We recommend reading through the installation instructions in whole before performing
TOYOTA TACOMA LED DRL Black-Out
 TOYOTA TACOMA 2013 - LED DRL Black-Out Part Number: 00016-35021 Accessory Code: LDBO10 Conflicts - Fog Lights Kit Contents Item # Quantity Reqd. Description 1 2 DRL Housing 2 1 Driver Box 3 1 Harness bag
58-62 Corvette Manual Rack & Pinion Kit Instructions #
 58-62 Corvette Manual Rack & Pinion Kit Instructions # 8001550 Unisteer offers a limited warranty against all manufacturer defects of their kits and supplied parts. Unisteer will not honor any warranty
Rzr Heater System Part #
 Rzr Heater System Part # 2878135 NOTE: This heater unit installs below the center of the dash. If you have a radio mount kit (Polaris Part # 2876897) you may need to cut the top front corner off the mount
Conflicts - Fog Lights
 TOYOTA CAMRY 2013 - BLACKOUT LED DRL Part Number: 00016-32270 Accessory Code: LDBO10 Conflicts - Fog Lights Kit Contents Item # Quantity Reqd. Description 1 2 DRL Housing 2 2 DRL s bezels 3 1 Driver Box
PSIEXT16I. Designed for 2016 and newer 1500 Series and Heavy Duty GM Silverado/Sierra Double Cab vehicles with 7 inch touchscreen radio
 PSIEXT16I Designed for 2016 and newer 1500 Series and Heavy Duty GM Silverado/Sierra Double Cab vehicles with 7 inch touchscreen radio Not compatible with Bose Audio Not compatible with 4.2 inch radio
Part Number: T4R-2N1. Hardware Bag Contents. General Applicability Models with factory fog light. Conflicts -
 Date: 07.30.2015 TOYOTA TUNDRA 2014-2016 LED Fog Light & DRL 2 in 1 Part Number: T4R-2N1 Kit Contents Item # Quantity Reqd. Description 1 2 DRL + Fog Light Housing 2 1 Driver Box 3 1 Harness bag 4 1 User
DOMINATOR FUEL PUMPS P/N & Installation Instructions 199R10573
 DOMINATOR FUEL PUMPS P/N 12-1400 & 12-1800 Installation Instructions 199R10573 WARNING! THESE INSTRUCTIONS MUST BE READ AND FULLY UNDERSTOOD BEFORE BEGINNING INSTALLATION. FAILURE TO FOLLOW THESE INSTRUCTIONS
TOYOTA PRIUS FOG LIGHT (Halogen or LED)
") Part Number: TPR-413 / TPR-813 Kit Contents Item # Quantity Reqd. Description 1 2 Fog Lamps 2 1 Lower Grill 3 1 Switch Assembly 4 1 Fog Light Operation guide 5 1 Harness Bag Hardware Bag Contents Item
Part Number: TPR-413 / TPR-813 Kit Contents Item # Quantity Reqd. Description 1 2 Fog Lamps 2 1 Lower Grill 3 1 Switch Assembly 4 1 Fog Light Operation guide 5 1 Harness Bag Hardware Bag Contents Item
2005 and 09 Mustang install instructions Sequential / Chase Unit Partial Plug-N-Play Kit Meter4it Eng. Updated: 3/28/09
 Updated: 3/28/09 Verify content of kit: 1- Unit with wiring harness 1- Red power wire with 15 amp fuse 1- Color instruction 2- Velcro for mounting 1-Driver taillight harness 1- Passenger taillight harness
PERFECT FIT SERIES IN-DASH HEAT/ COOL/ DEFROST MUSTANG
 specializing in AIR CONDITIONING, PARTS AND SYSTEMS for your classic vehicle PERFECT FIT SERIES IN-DASH HEAT/ COOL/ DEFROST 1969-70 MUSTANG CONTROL & OPERATING INSTRUCTIONS The controls on your new Perfect
Part Number: TTA-2N1. Hardware Bag Contents. General Applicability SR5, TRD Sport, TRD Off-Road, Limited
 Date: 2.10.2016 TOYOTA TACOMA 2016-2 in 1 LED UPGRADE KIT Part Number: TTA-2N1 Kit Contents Item # Quantity Reqd. Description 1 2 DRL + Fog Light Housing 2 1 Driver Box 3 1 Harness bag 4 1 User s card
TOYOTA TACOMA FOG LIGHT (Halogen or LED)
") Part Number: TTA-312 / TTA-812 Kit Contents Item # Quantity Reqd. Description 1 2 Fog Lamps 2 1 Switch Assembly 3 1 Fog light operation guide 4 1 Harness bag Hardware Bag Contents Item # Quantity Reqd.
Part Number: TTA-312 / TTA-812 Kit Contents Item # Quantity Reqd. Description 1 2 Fog Lamps 2 1 Switch Assembly 3 1 Fog light operation guide 4 1 Harness bag Hardware Bag Contents Item # Quantity Reqd.
Jeep Wrangler 4.0 Liter TJ Jeep Wrangler 2.5 Liter TJ Installation instructions
 TM www.jeepair.com 1999 Jeep Wrangler 4.0 Liter TJ 1999-2001 Jeep Wrangler 2.5 Liter TJ Installation instructions Kit Information After 1994 every vehicle was designed for R134a refrigerant. The Jeep kit
TOYOTA TACOMA LED DRL. Part Number: TTA-712
 Part Number: TTA-712 Kit Contents Item # Quantity Reqd. Description 1 2 DRL s bezels w/led DRL 2 1 Driver Box 3 1 Harness bag 4 1 User s card 5 1 Switch Hardware Bag Contents Item # Quantity Reqd. Description
Aux. Battery and Isolator
 Aux. Battery and Isolator ISOLATOR MOUNTING ALL YEAR VANAGONS Fig.1 1. Disconnect ground from main battery under passenger seat 2. Remove driver seat 3. Remove driver seat belt buckle from seat pedestal
It is strongly recommended that this product be installed by a professional.
 Lower bumper Ford raptor Lower Bumper 20" E-Series or SR-Series or 4" E-Series set mounting instructions For Part # s 40133 & 40134 Thank you for purchasing Rigid Industries products for your Ford. Installation
2015+ HELLCAT 6.2L HEMI System vehicle specific plate system xx
 These installation instructions will guide you through installing the Nitrous Outlet 2015+ Hellcat 6.2L Hemi Vehicle Specific Plate System on your vehicle. Before you get started, remember to never use
Wiring Harness Relocation by Flopster Mar 2012
 Wiring Harness Relocation by Flopster843 21 Mar 2012 On my 2008 Ram, there is a gigantic blob of electrical wiring that Dodge decided to put between the engine and the brake master cylinder, just behind
PARTS LIST: PROCEDURE:
 PARTS LIST: EVO3 LIGHT BAR Qty Description Qty Description 1 EVO3 Light Bar 2 10mm U-Bolt (for use on "closed frames" only) 1 Light Mount Crossbar Bracket 4 10mm x 26mm OD x 3mm Flat Washers 2 Light Tab
TOYOTA TACOMA XSP-X LED DRL. Part Number: Accessory Code: LDRL10
 TOYOTA TACOMA 2013 - XSP-X LED DRL Part Number: 00016-35230 Accessory Code: LDRL10 Conflicts -None Kit Contents Item # Quantity Reqd. Description 1 2 LED DRL 2 1 Driver Box 3 1 Harness bag 4 Hardware Bag
TOYOTA SIENNA LED DRL Black-Out
 TOYOTA SIENNA 2013 - LED DRL Black-Out Part Number: 00016-08021 Accessory Code: LDBO10 Conflicts - Fog Lights Kit Contents Item # Quantity Reqd. Description 1 2 DRL Housing 2 2 DRL s bezels 3 1 Driver
Guardian Personal Mobility Lift Interlock GRD701-AR ( Dodge Sprinter) Installation Instructions
 Installation Instructions") An ISO 9001:2000 Registered Company Guardian Personal Mobility Lift Interlock GRD701-AR (2007-2008 Dodge Sprinter) Installation Instructions GUARDIAN MODULE Remove drivers seat and step-well trim for access.
An ISO 9001:2000 Registered Company Guardian Personal Mobility Lift Interlock GRD701-AR (2007-2008 Dodge Sprinter) Installation Instructions GUARDIAN MODULE Remove drivers seat and step-well trim for access.
45-60 minutes. Intermediate
 800-643-7332 AmericanLandMaster.com ACCESSORY DISTRIBUTION BLOCK 17233 SPECIAL REQUIREMENTS: FOR USE WITH THE LS48V PLEASE CONTACT AMERICAN LANDMASTER FOR SPECIAL INSTRUCTIONS TOOLS REQUIRED 1/2 in wrench
PRXB EXHAUST BRAKE MAXIMUM EXHAUST FLOW DESIGN
 MAXIMUM EXHAUST FLOW DESIGN PRXB EXHAUST BRAKE C44072/C44073/C44074/C44075/C44076 APPLICATION: 994-2002 DODGE RAM TRUCKS W/5.9L CUMMINS DIESEL ENGINES WITH MANUAL & AUTOMATIC TRANSMISSIONS STOCK DODGE
Two screws were also located in the glove box and go up to the dash pad from upper edge of the glove box opening.
 A few months back, we had the opportunity to be involved in a 1972 Chevelle Malibu to a Super Sport conversion. The vehicle had much of the conversion completed already, but needed to have to a floor shifter
HP FUEL PUMPS P/N & Installation Instructions 199R10569
 HP FUEL PUMPS P/N 12-700 & 12-890 Installation Instructions 199R10569 WARNING! THESE INSTRUCTIONS MUST BE READ AND FULLY UNDERSTOOD BEFORE BEGINNING INSTALLATION. FAILURE TO FOLLOW THESE INSTRUCTIONS MAY
BD Dual Transmission Cooler Dodge (68RFE, 518, 47RH, 47RE & 48RE) Ford (5R110) & Chevy (Allison 1000) Transmissions
 Ford (5R110) & Chevy (Allison 1000) Transmissions") 7 March 2018 1030606-DS Dual Transmission Cooler Instruction Manual (I-00214) 1 DOWNLOAD COLOR INSTALL MANUALS AT dieselperformance.com BD Dual Transmission Cooler Dodge (68RFE, 518, 47RH, 47RE & 48RE)
7 March 2018 1030606-DS Dual Transmission Cooler Instruction Manual (I-00214) 1 DOWNLOAD COLOR INSTALL MANUALS AT dieselperformance.com BD Dual Transmission Cooler Dodge (68RFE, 518, 47RH, 47RE & 48RE)
PLEASE READ THESE INSTRUCTIONS CAREFULLY BEFORE BEGINNING INSTALLATION. FAILURE TO COMPLY MAY VOID DAVIES, CRAIG WARRANTY.
 PTY. DAVIES, CRAIG LTD. A.B.N. 71 004 918 825 A.C.N. 004 918 825 MELBOURNE AUSTRALIA 77 Taras Avenue P.O. Box 363 Altona North, Vic 3025 Australia Phone: +61(0)3 9369 1234 Fax: +61(0)3 9369 3456 E-mail:
1. Disconnect the battery. This is important! This will prevent air bag deployment.
 PARTS PACKING LIST Evaporator assembly Drain tube Plastic air plug Hardware package 11040 3601 W. Clarendon Phoenix, Arizona 85019 (602) 233-0090 800-648-4475 www.ackits.com 2003-4 Jeep Wrangler EVAPORATOR
INSTALLATION INSTRUCTIONS
 INSTALLATION INSTRUCTIONS HDX LED GRILLE APPLICATION: 2019 Ram 1500 (Excl. Classic) PART NUMBER: 34-1145 CONTENT ITEM QUANTITY DESCRIPTION TOOLS NEEDED 1 1 GRILLE 10MM WRENCH 2 2 LED LIGHT HOUSING RATCHET
Jeep Wrangler TJ. Complete Air Conditioning System. Slide Control Head. Installation instructions
 WWW.JEEPAIR.COM 1996-1998 Jeep Wrangler TJ Complete Air Conditioning System Slide Control Head Installation instructions Kit Information After 1994 every vehicle was designed for R134a refrigerant. The
Installation Instructions LamboStyleDoors (The instruction are to be used as a reference. Please repeat for both doors)
") Installation Instructions LamboStyleDoors (The instruction are to be used as a reference. Please repeat for both doors) Mercedes C-Class Sport coupé type W203 Part number 500 25 009 Pre installation check
Installation Instructions LamboStyleDoors (The instruction are to be used as a reference. Please repeat for both doors) Mercedes C-Class Sport coupé type W203 Part number 500 25 009 Pre installation check
PERFECT FIT IN-DASH HEAT/ COOL/ DEFROST FORD FAIRLANE & CROWN VICTORIA
 PERFECT FIT IN-DASH HEAT/ COOL/ DEFROST 1955-56 FORD FAIRLANE & CROWN VICTORIA CONTROL & OPERATING INSTRUCTIONS The controls on your new Perfect Fit system, offer complete comfort capabilities in virtually
Part # Description Qty Inspected By Rack & Pinion Pump Kit Remote Reservoir Line Kit Shaft Kit
 58-62 Corvette Power Rack & Pinion Kit Instructions # 8011530 Unisteer offers a limited warranty against all manufacturer defects of their kits and supplied parts. Unisteer will not honor any warranty
SNO-PRO Ford Super Duty F-250, F-350 & F Ford Super Duty F-250, F-350 (With Snow Plow Prep. Package ONLY)
") SNO-PRO 000 0 Ford Super Duty F-0, F-0 & F-0 00-00 Ford Super Duty F-0, F-0 (With Snow Plow Prep. Package ONLY) Vehicle Mounting Kit: FK Revised February 0 Curtis Industries Inc. LLC, Higgins St., Worcester,
SNO-PRO 000 0 Ford Super Duty F-0, F-0 & F-0 00-00 Ford Super Duty F-0, F-0 (With Snow Plow Prep. Package ONLY) Vehicle Mounting Kit: FK Revised February 0 Curtis Industries Inc. LLC, Higgins St., Worcester,
dually & d2 Ford raptor fog light bracket dually & d2 mounting instructions
 dually & d2 Ford raptor dually & d2 fog light bracket mounting instructions Passenger Driver Thank you for purchasing Rigid Industries products for your Ford. Installation is fairly simple with the right
INSTALLATION INSTRUCTIONS
 INSTALLATION INSTRUCTIONS HDX LED GRILLE APPLICATION: 013-017 Dodge Ram 1500 PART NUMBER: 34-1035 ITEM QUANTITY DESCRIPTION TOOLS NEEDED 1 1 HDX LED GRILLE 10MM SOCKET,3 UPPER BRACKET A, DRIVER () AND
Ford C4 and C6 Floor Mount Automatic Transmission Shifter Installation Instructions
 Ford C4 and C6 Mount Automatic Transmission Shifter Installation Instructions Building American Quality With A Lifetime Warranty! TOLL FREE 1-877-469-7440 tech@lokar.com www.lokar.com Ford C4 and C6 Mount
CONTENTS TOOLS REQUIRED:
 CONTENTS 1EA. FIVE CHANNEL AMPLIFIER P/N MPDSP033AA 1EA. AMPLIFIER BRACKET P/N RM11JK41 1EA. POWER HARNESS P/N RH41JKP 1EA. OVERLAY HARNESS P/N RH41JK 1EA. FUSE 30 AMP P/N RFUSE30 6EA. WIRE TIE P/N RFZIP6
Installation. Instructions ES416. VW MKIV Golf/Jetta/GLI 337/20AE. to activate integral fog lights in Jetta GLX, E-Code, and HID Lighting Systems
 Installation Instructions to activate integral fog lights in Jetta GLX, E-Code, and HID Lighting Systems This tutorial is provided as a courtesy by ECS Tuning. VW MKIV Golf/Jetta/GLI 337/20AE best viewed
Important information about your new a/c system. Please read the following directions prior to installing this a/c system.
 PAGE 1 Important information about your new a/c system. Please read the following directions prior to installing this a/c system. PN s: CK-7586258, CK-758642, CK-7586304, CK7586SBC, CK-7486NC Jeep CJ Series
TOYOTA SIENNA FOG LIGHT (Halogen & LED)
") (Halogen & LED) Part Number: TSI-312 / TSI-812 Kit Contents Item # Quantity Reqd. Description 1 2 Fog Lamps 2 2 Fog Light bezels 3 1 Switch Assembly 4 1 Fog Light Operation guide 5 1 Harness Bag Hardware
(Halogen & LED) Part Number: TSI-312 / TSI-812 Kit Contents Item # Quantity Reqd. Description 1 2 Fog Lamps 2 2 Fog Light bezels 3 1 Switch Assembly 4 1 Fog Light Operation guide 5 1 Harness Bag Hardware
APPROXIMATE ASSEMBLY TIME (R&R): 45 minutes -1-
: 45 minutes -1-") PLOW ANGLE CONTROL KIT P/N 2879224 Application For use with the Glacier Pro Plow System P/N 2879103 on the below listed models MY09 and newer full size Ranger 500, 700 & 800 models MY13 and newer Ranger
PLOW ANGLE CONTROL KIT P/N 2879224 Application For use with the Glacier Pro Plow System P/N 2879103 on the below listed models MY09 and newer full size Ranger 500, 700 & 800 models MY13 and newer Ranger
Installation MKIV Headlight Housings with Fog Lamps (Procedures apply to both MKIV Jetta and Golf)
") Page 1 This tutorial is provided as a courtesy by ECS Tuning. Service Procedure Installation Proper service and repair procedures are vital to the safe, reliable operation of all motor vehicles as well
Page 1 This tutorial is provided as a courtesy by ECS Tuning. Service Procedure Installation Proper service and repair procedures are vital to the safe, reliable operation of all motor vehicles as well