Custom OutLook Pod. Exhaust Systems. See More at: bullydog.com. For Free Technical Support Call: 866-bullydog ( )
|
|
|
- Beverly Clark
- 5 years ago
- Views:
Transcription
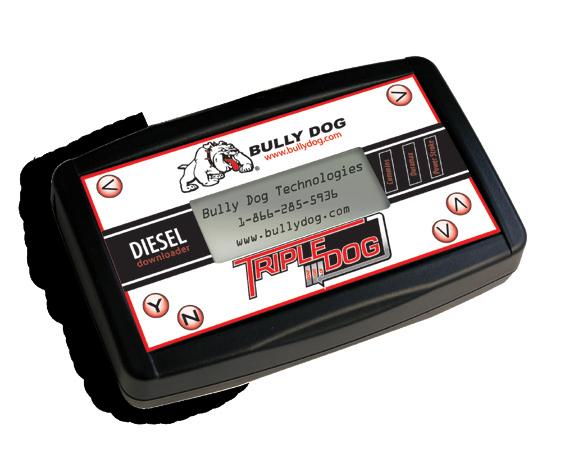


1 Downloaders Intake Systems Custom OutLook Pod Exhaust Systems See More at: bullydog.com For Free Technical Support Call: 866-bullydog ( )


2 DODGE CUMMINS 5.9L 2006 Ford POWER STROKE 6.0L GM DURAMAX 6.6L 2006 Part # v1.0.1 INSTALLATION Manual
3 Monitor REMEMBER THIS IS A PERFORMANCE PRODUCT, USE AT YOUR OWN RISK. This product is not intended to be used to break the law. Do not use this product until you have carefully read the following agreement. This agreement sets forth the terms and conditions for the use of this product. The installation of this product indicates that the buyer has read and understands this agreement and accepts the terms and conditions. Never exceed recommended vehicle or tire top speed ratings. DISCLAIMER OF LIABILITY Bully Dog Technologies, LLC. Its distributors, jobbers, and dealers (hereafter Seller) shall be in no way responsible for the product s proper use and service. THE BUYER HERBY WAIVES ALL LIABILITY CLAIMS. The Buyer acknowledges that he is not relying on the Sellers skill or judgment to select or furnish goods suitable for any particular purpose and that there are no liabilities which extend beyond the description on the face hereof, and the Buyers hereby waivers all remedies or liabilities expressed or implied, arising by law or otherwise, (including without any obligation of the Seller with respect fitness, merchantability and consequential damages) or whether or not occasioned by the Seller s negligence. The Seller disclaims any warranty and expressly disclaims any liability for personal injury or damages. The Buyer acknowledges and agrees that the disclaimer of any liability for personal injury is a material term for this agreement and the Buyer agrees to indemnify the Seller and to hold the Seller harmless from any claim related to the item of the equipment purchased. Under no circumstances will the Seller be liable for any damages or expenses by reason of use or sale of any such equipment. The Seller assumes no liability regarding the improper installation or misapplication of its products. It is the installer s responsibility to check for proper installation and if in doubt contact the manufacturer. The Buyer is solely responsible for all warranty issues from the manufacturer. LIMITATION OF WARRANTY BULLY DOG TECHNOLOGIES, LLC. (Hereafter Seller ) gives Limited Warranty as to description, quality, merchantability, and fitness for any particular purpose, productiveness, or any other matter of Seller s product sold herewith. The Seller shall be in no way responsible for the products proper use and service and the Buyer hereby waives all rights other than those expressly written herein. This warranty shall not be extended, altered or varied except be a written instrument signed by Seller and Buyer. The Warranty is Limited to one (1) year from the date of sale and limited solely to the parts contained within the products kit. All products that are in question of Warranty must be returned prepaid to the Seller and must be accompanied by a dated proof of purchase receipt. All Warranty claims are subject to approval by BULLY DOG TECHNOLOGIES, LLC. Under no circumstances will the Seller be liable for any labor charged or travel time incurred in diagnosis for defects, removal, or reinstallation of this product or any other contingent expenses. Under no circumstances will the Seller be liable for any damage or expenses incurred by reason of the use or sale of any such equipment. IN THE EVENT THAT THE BUYER DOES NOT AGREE WITH THIS AGREEMENT: THE BUYER MAY PROMPTLY RETURN THIS PRODUCT, IN A NEW AND UNUSED CONDITION, WITH A DATED PROOF OF PURCHASE TO THE PLACE OF PURCHASE WITHIN TEN (10) DAYS FROM DATE OF PURCHASE FOR A FULL REFUND. THE INSTALLATION OF THIS PRODUCT INDICATES THAT THE BUYER HAS READ AND UNDERSTANDS THIS AGREEMENT AND ACCEPTS ITS TERMS AND CONDITIONS.
4 TABLE OF CONTENTS INTRODUCTION... PAGE 3 BILL OF MATERIAL... PAGE 3 harness DESCRIPTIONS... PAGE 4 OutLook INSTALLATION... PAGES 5-10 OBD 2 Harness Install... page 5 Main Harness Install... page 6 Pyrometer Installation...page 7-9 Mounting Options... page 10 OPERATING INSTRUCTIONS... page Navigation/Joystick Operation... page 11 Using the OutLook / Selecting the Correct Vehicle... pages 11 Vehicle Selection Details... page Dodge Sequence Test... page 13 General Display... page 14 Main menu / Menu Items... page OutLook Display Options...pages 18-20

5 Monitor INTRODUCTION You have just purchased the most technologically advanced Vehicle Monitor available for diesel pickups, manufactured by Bully Dog Technologies. The OutLook Monitor comes with more user friendly features than any other vehicle monitor in the market place. The OutLook Monitor also comes with free technical support, just call: The instruction set outlines how to install and operate the OutLook Monitor on 6.0L Ford Power Stroke, L Dodge Cummins and 6.6L GM 2006 Duramax diesel pickups. BILL OF MATERIALS OutLook Monitor with Main Harness Pyrometer Probe Windshield Mount Pillar Pod Mount OBD 2 Connector & Harness Fuse Jack 90 degree connector Zip Ties TOOLS NEEDED Flat Head Screw Driver Pliers Wire Strippers Electric Drill 5/16 Drill Bit 1/8 Pipe Tap 9/16 Wrench 5/8 Wrench 3

6 HARNESS DESCRIPTIONS Notice: included with this product are three individual wiring harnesses. Read the description of each the harness below, the installation instructions will refer to the different harnesses by name. OutLook Main Harness: The OutLook Monitor sits on one end of this harness and on the other end notice it has two green plugs (one male and one female). These green plugs will connect this harness to two other harnesses. The end of this harness has two sets of Pyro wires which are labeled Pyro 1 and Pyro 2. OBD 2 Harness: On one end of this harness is a green plug (male) identical to the plug on the end of the OutLook Main Harness. From that green plug, two wires branch off: one is a yellow Power Wire, and the other is the OBD 2 cable with the OBD 2 Plug on the end (a rectangular plug-in appearance). Pyrometer Probe: The Pyrometer probe is a steel braded cable with a probe on one end and a red and yellow electronic connection on the opposite end. OBD 2 Harness OutLook Main Pyrometer Probe 4


7 Monitor Installation Instructions INSTALLING THE OBD 2 Harness In this step you will connect the OBD 2 plug, connect the power wire, and run the green connector through the fire wall Connecting the OBD 2 Plug: Plug the OBD 2 Harness into the OBD 2 plug located on the bottom side of the dash on the drivers side of the vehicle. Connecting the yellow Power wire: 1. Prepare the yellow power wire by stripping the end of the wire about.25. Connect the blue 90 degree connector to the end of the power wire using pliers. 2. Locate the fuse box: Ford fuse boxes are located under the dash inside the cab of the vehicle, Dodge & GM fuse boxes are located inside the engine bay. Once inside the fuse box, locate the appropriate fuse depicted in the vehicle-specific pictures below. Remove the fuse and place the fuse jack along with the fuse back into position. Make sure that the fuse jack is placed on the dead side of the fuse to ensure that the OutLook Monitor only turns on when the key is in the on position (may need a power tester). 3. Connect the yellow power wire to the fuse jack and close the fuse box. GM Fuse ING E Dodge: Fuse #28 Ford: Fuse #33 Green Plug through the fire wall: 1. Run the end of the OBD 2 Harness (green plug) through the fire wall. 2. Set the green male connector in the back corner of the engine bay on the driver s side of the vehicle and leave it while hooking up the other two harnesses. 5


8 INSTALLING THE OutLook Main Harness: In this step you will run the OutLook Harness plugs and wiring through the fire wall and connect the Main Harness to the Sub-Harness and the OBD 2 Harness. 1. For a clean install, first peel back the weather stripping on the driver s side door seal right next to the dash and down. See the Out- Look Mounting options available to determine how you will mount the OutLook before completing this step; this will save you the trouble of installing the OutLook twice if you are using an A-Pillar mount. 2. Set the OutLook Monitor up on the driver s side dash and run the OutLook wires down behind the dash to conceal the wiring. Remove the side dash panel to assist in running the wiring. Reinstall the side dash panel and the weather stripping. 3. Run the end of the OutLook wiring harness through the fire wall into the engine bay. Use the same hole as used with the OBD 2 Harness. Pull all of the slack from the cab through the fire wall. 4. Connect the green plug (male) on the end of the OBD 2 Harness to the green plug (female) on the OutLook Main Harness. 5. Go inside the cab of the vehicle to test the install before going any further. Turn the ignition to the run position: the OutLook at this point should light up and display a vehicle selection screen. 6. Secure all wiring to ensure that wiring is safe from extreme heat and moving parts using zip ties provided. (save two zip ties for the Pyrometer). 6

9 Installing the Pyrometer: Monitor In this installation section you will tap and mount the Pyrometer probe into the exhaust, either pre-turbo or post-turbo, and then connect the end of the Pyrometer to the OutLook Main Harness. Doing so will allow you to monitor Exhaust Gas Temperatures which is a very important diagnostic measure. Exhaust Gas Temperatures indicate how hot the motor is getting and can be used to set safety de-fueling parameters (see operating instructions Set Pyrometer de-fuel Level ). Post-turbo vs. Pre-turbo: You may decide between mounting the Pyro either post-turbo or pre-turbo. The difference in location determines what temperatures will read on your OutLook. Pre-Turbo mounting is recommended on the 6.0L Ford Power Stroke because it is easy to install and provides accurate, safe readings. The option does exist to mount both a Pre-turbo and a Post-turbo Pyrometer probe. It is recommended that two Pyrometers be used if a vehicle is running more than 50 horsepower over Stock. On the OutLook display screen, Pyro 1 temps are constantly shown in the bottom left quadrant (If you mount Pyro 1 in a post-turbo location, the numbers in that quadrant will represent post-turbo). Whether you mount post-turbo or pre-turbo you need to monitor your temperatures; know what is safe and when to back off. Use the Pyrometer calibration procedure below to figure out what your safety limits are. Pyrometer Calibration Procedure: Before this step can be completed, Completely install the OutLook and all of its components. 1. Vehicle must be set to Stock HP/TQ levels-meaning no HP/TQ modifications of any kind (downloader or plug-in modules). 2. Engine must be put under full load for as long as possible on the hottest day possible. Pull a hill or pull a trailer. 3. During a heavy load pull, record the highest reading. 4. Take that reading and add 150 degrees to the high number and that will be your new de-fuel number that you do not want to exceed. 7


10 Post-turbo mount: 1. Find a location on the exhaust pipe that is 3-6 downstream from the turbo charge output. Then drill a 5/16 hole and run a 1/8 pipe tap into the hole. Mount the Pyrometer probe in the hole, use a 9/16 wrench to tighten the probe holder or tube fitting to the down tube. Then tighten the Pyro probe cap to the holder using a 5/8 wrench. 2. Run the Pyro cable along the brim of the engine bay so the end meets the end of the OutLook Main Harness and use zip ties to secure the line. 3. Connect the Pyrometer end to the OutLook Main Harness: if you want post-turbo temperatures displayed in the bottom left quadrant on the OutLook screen, connect the post-turbo connectors to the Pyro 1 connectors on the OutLook Main Harness. Connect the shorter wire from the Pyrometer to the longer wire on the OutLook Main Harness labeled Pyro 1 using a set of pliers and a screw driver. Connect the longer wire from the Pyrometer to the shorter wire coming off the OutLook Main Harness labeled Pyro If a second Pyro is not used then connect the remaining Pyro 2 wires to the long black ground wire that is sticking out from the Main Harness using the existing hardware. This will ensure that there is no electrical interference between the Pyro connections. To further protect the connections wrap all of the Pyrometer connections in electrical tape. 8


11 Monitor Pre-turbo mount: 1. Drill a 5/16 hole into the exhaust manifold where all the exhaust runners of the manifold come together just before the turbo exhaust inlet. Then tap the hole with a 1/8 pipe tap and mount the Pyrometer probe in the hole. Use 9/16 wrench to tighten the probe holder or tube fitting to the down tube. Then tighten the Pyro probe cap to the holder using a 5/8 wrench. 2. Run the Pyro cable up to engine bay so the end meets the end of the OutLook Main Harness and use zip ties to secure the line. 3. Connect the Pyrometer to the OutLook Main Harness: if you want Pre-Turbo temperatures displayed in the bottom left quadrant on the OutLook screen connect the Pre-Turbo Pyrometer connectors to Pyro 1 connectors on the OutLook Main Harness. Connect the shorter wire from the Pyrometer to the longer wire on the OutLook Main Harness labeled Pyro 1 using a set of pliers and a screw driver. Connect the longer wire from the Pyrometer to the shorter wire coming off the OutLook Main Harness labeled Pyro 1. Ford Exhaust Manifold GM Exhaust Manifold 4. If a second Pyro is not used then connect the remaining Pyro 2 wires to the long black ground wire that is sticking out from the Main Harness using the existing hardware. This will ensure that there is no electrical interference between the Pyro connections. To further protect the connections wrap all of the Pyrometer connections in electrical tape. GM Exhaust Manifold 9


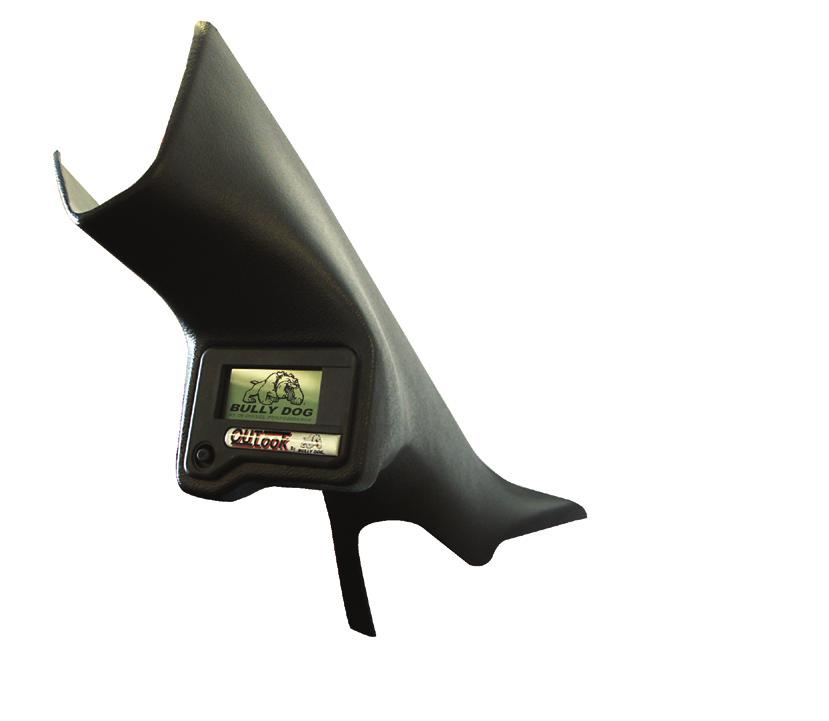
12 OutLook Monitor Mounting instructions Bully Dog offers three different options for mounting the OutLook Monitor. Each location option places the OutLook Monitor in an easily accessed viewing area for the driver. Windshield Mount: 1. Locate the windshield mount included with the OutLook Monitor. This does not come with mounting glue. Glue that will adhere metal to glass can be found at any hardware store. 2. Place glue onto the window mount piece with the OutLook Monitor holder detached from the windshield mount piece. 3. Hold the windshield mount piece on the windshield just to the left of the steering wheel for one minute. 4. Let the glue set up as instructed by glue packaging and then slide the OutLook Monitor holder onto the window mount with the Out- Look Monitor attached. Pillar Pod Mounting: 2. Follow the instructions for installing the single Pillar Pod mount that are included in the pillar mount package. 3. Run the OutLook wires down through the hole in the pillar mount system and connect the OutLook to the other harnesses. 4. Finally, slide the Pod Mount Circle with the OutLook attached 1. Locate the OutLook Pod Mount Circle that is included with the Out- Look Monitor and attach the OutLook Monitor to the Pod Mount Circle by running the OutLook wiring harness through the rectangular hole in the circle and snapping the back onto the OutLook. into the pillar mount hole. 10


13 Monitor OPERATING INSTRUCTIONS: This section of the instructions describes how to use the joystick to navigate menus and control power levels. These instructions also provide descriptions on each of the menus and sub menus, and shows how to do a performance test. NAVIGATION/JOYSTICK OPERATION The joystick moves in four directions: up, down, left, and right. The descriptions below provide an explanation of what each direction is used for in navigating menus and selecting display options. Up and Down: Scroll up and down in the general display to control the vehicle power level. Scroll between 100%, 75%, 50%, 25%, and Stock. If using the OutLook with a Triple Dog Downloader, your settings will be Extreme, Performance, Towing and Stock. Use the up and down directions to scroll between menu items while in the main menu or any of the sub menus. Right: Pressing Right will take you from the general display into the main menu. See the list of menu items on the next page. Pressing Right will also select menu items and navigate to sub-menus. Left: Pressing left will take you from the main menu back into the general display. It is also used to reset any performance test. USING THE OutLook / SELECTING THE CORRECT VEHICLE The first time you use the OutLook Monitor it will automatically display the Vehicle Selection screen. The screen example below shows what the vehicle selection screen looks like on the OutLook. It is extremely important that you select the correct vehicle application, because the OutLook will not work correctly if it does not know what the vehicle type is. Choose Your Vehicle L Ford w/ BD Mod L Ford w/ other L Ford w/tridog L Ford w/ other GM w /BD Module only GM w / other or Stock GM w /TriDog Dodge w/ BD Module Dodge w / other The different screen options describe different vehicle scenarios. Refer to the vehicle selection details on the following page for clarification on when each option should be used. The option details correspond with the screen options top to bottom. 11
14 Vehicle Selection Details: The list below provides a description of vehicle type and product compatibility. Use this list to help correctly select vehicle and product type. The OutLook will not work properly if you have selected the wrong vehicle and product combination. On-the-fly power adjustments and set de-fuel levels are activated on selections highlighted in red l Ford w/bd Mod: Used if you have a L Ford Power Stroke along with a Bully Dog Rapid Power or Dyno Dominator plug-in module, a Power Pup Downloader, or Stock l Ford w/ Tri Dog: Used if you have a L Ford Power Stroke along with Triple Dog Downloader L Ford w/other: Used if you have a L Ford Power Stroke 2006 GM Duramax w/ Tri Dog: Used if you have a 2006 Duramax with a Triple Dog Downloader GM Duramax: Used if you have a 2006 Duramax with a Power Pup Downloader or Stock GM w/bully Dog Module Only: Used if you have a 6.6L GM Duramax along with a Bully Dog Rapid Power or Dyno Dominator plug-in module GM w/ other or Stock: Used if you have a 6.6L GM Duramax along with a competitors product, a Bully Dog downloader, or Stock GM w/ Tri Dog: Used if you have a 2001 or newer 6.6L GM Duramax along with Triple Dog Downloader. 06 Dodge w/other: Used if you have a 2006 Dodge Cummins in combination with a Power Pup Downloader or Stock. 06 Dodge w/tri dog: Used if you have a 2006 Dodge Cummins in combination with a Triple Dog Downloader Dodge w/bd Module: Used if you have a Dodge Cummins with a Bully Dog Rapid Power or Dyno Dominator module Dodge w/other: Used if you have a dodge Cummins with a competitors product, a Bully Dog Downloader, a Bully Dog Torque Dog, or Stock Dodge w/ Tri Dog Downloader: Used if you have a Dodge Cummins with a Bully Dog Triple Dog Downloader Dodge w/other: Used if you have a Dodge Cummins Dodge w/other: Used if you have a Dodge Cummins. 12


15 Monitor Specific instructions for 2006 Dodge Cummins: When using the OutLook on the 2006 Cummins the first time the OutLook is installed, immediately after the vehicle is selected, the OutLook will undergo a vehicle sequence test. The screens below illustrate exactly what is seen during the test. Sequence Instructions: 1. When this first screen appears simply press right on the joystick to continue the sequence test. If you have previously completed the sequence test, then recycle the key, and if the screen appears over, and over call Bully Dog Technical Support. 2. On the second sequence test screen again simply press right on the joystick to complete the test. After the test has been completed, then the OutLook will navigate to the General Display screen. 13


16 GENERAL DISPLAY Once you have selected a vehicle upon initial use, the OutLook will then bring up the general display screen. Below is an example of the general display screen. It has four quadrants which display vehicle diagnostics and performance tests. It also has a power bar which displays the percent of power being used by the vehicle from a performance upgrade. Top Left Quadrant Displays User Preset Options Power Bar Displays the % of Power of Aftermarket Performance Product Being Used by the Vehicle Top Right Quadrant Displays User Preset Options Bottom Left Quadrant Always Displays the Pyro1 Temperature Reading, Which Correlates to Pyro 1 on the OutLook Main Harness. Bottom Right Quadrant Displays User Preset Options MAIN MENU ITEMS All of the items listed in this selection can be accessed on the OutLook Monitor by pressing right while in the general display. Adjust OutLook speedometer to tire size: Adj Speedmtr to Tire Size inches inches inches inches inches inches inches Main Menu Adj Speedmtr to Tire Size Set Top Left Display Set Bottom Right Display Set Pyro De-fuel level View Last Ten Readings View All-time Highs View Current Settings View Peak Values Clear Saved Peaks Vehicle Selection Screen Oversized aftermarket tires will throw off the OEM speedometer reading making it difficult to tell how fast you are really going. This feature will allow you to program in your exact tire size (28 up to 44 ) and view an accurate speed reading on the OutLook screen in miles per hour. 14
17 Monitor Top Left Display: Select this to enter a sub-menu with a list of OutLook Display Options that you select to view in the top left display quadrant of the OutLook Screen. All of the OutLook Display Options are listed in this instruction set with options specific to this make, model, and year of vehicle. Top Right Display: Select this to enter a sub-menu with a list of OutLook Display Options that you can select to view in the top right display quadrant of the OutLook Screen. All of the OutLook Display Options are listed in this instruction set with option specific to this make, model, and year of vehicle. Bottom Right Display: Select this to enter a sub-menu with a list of OutLook Display Options that you can select to view in the bottom right display quadrant of the OutLook screen. All of the OutLook Display Options are listed in this instruction set with options specific to this make, model, and year of vehicle. DISPLAYS FEATURES LIST: The chart below depicts the features available for display in the top left, top right, and bottom right quadrants of the OutLook general display screen. FEATURES Ford GM DODGE Boost Pressure X X X Dual Pyrometer (2) X X X Accurate Speed Display (MPH) X X X Engine RPMs X X X Throttle Position X X X Intake Temperature Barometer Battery Voltage Coolant Temperature X X Transmission Temperature X X X Injection control pressure X X X Injection pulse width Horsepower and torque X X X 0-60 times (MPH) X X X 1/4 Mile time X X X Peak boost X X X Peak Pyro X X X Peak horsepower X X X Peak torque X X X Fastest 0-60 X X X Fastest 1/4 mile X X X X X X X 15
18 Set Pyrometer De-fuelL evel: Within this menu option is a list of Fahrenheit temperatures ranging from 900 F up to 1700 F. Based upon where you have installed the Set Pyrometer De-fuel level Pyrometer probe (see installing the Pyro instructions) you will 900º 950º use this option to select the highest temperature you ever want 1000º 1050º your exhaust gas to reach. We recommend that you use our Pyrometer Calibration Procedure to find out what your Pyrometer 1150º 1100º 1200º de-fuel level will be. Once a de-fuel level is put in place if the EGT s reach a level greater than or equal to the set level the OutLook will automatically lower the horsepower and in turn bring EGT s back down to a safe level. This feature has been designed to save the integrity of an engine by preventing unsafe engine temperatures. SEE VEHICLE SELECTION DETAILS FOR VEHICLE AVAILABILITY. The default de-fuel level temperature is 1200 F. If you do not have a Pyrometer hooked up to the Out- Look it acts as though your EGT s are 73 F and this safety feature will not work. Therefore your engine is susceptible to overheating with the addition of performance upgrades. SET TRANSMISSION De-fuel LEVELS Use this feature to preset an automatic de-fuel level for your vehicle We recommend setting a de-fuel temperature level of 230ºF. Display and Erase DTC s If you see a check engine light come on or the vehicle seems to be running abnormally you will want to use this feature to see if any diagnostic trouble codes appear. Use this feature to display the codes and also to erase them from the vehicles computer. If the vehicle has recurring trouble codes research the origin of the code and consult an tech support expert on how to fix the code. View Last 10 Readings This feature lets you view the last Pyro readings taken per key cycle, the last 10 Pyro readings taken per key cycle, the last 10 boost readings per key cycle, and if the features are available to your vehicle it will show you your last 10 quarter mile runs and 0-60 runs. You can also erase the last ten readings. View Last 10 Readings Quarter Mile Times 0-60 Times Peak Boost / Start Cycle Peak Pyro / Start Cycle Clear Top Ten Values View All Time Highs Select this and then choose to see your five all time best 0-60 times and quarter mile times. You can also choose to erase your all time highs to make room for new ones. View All-time Highs Quarter Mile Times 0-60 Times Clear Top Ten Values 16
19 Monitor View Current Setting This feature allows you to see how the OutLook has been set up to work with the vehicle. It will display what truck type was selected, what the tire size was set to and what the emergency de-fuel level is set to. This makes it simple to make sure you have these standards set up correctly. CURRENT SETTINGS Truck Selected: L Dodge w / BD Mod Tire Size: 32 Inches Emergency Power Cutoff: 1250 F View Peak Values This feature will show you all of the single all time highs for your vehicle on a single screen. CURRENT PEAKS Boost: 0 PSI Pyrometer: 000 F Horsepower 0.0 HP Torque: 0.0 ft-lbs 0-60 Time: 0.00 Seconds 1/4 Mile Time: 0.00 Seconds Clear Peak Values: This will enable you to erase the peak values that are saved in the OutLook and displayed when you select the View Peak Values main menu option. Clearing the peak values will free up the OutLook to record new values lower than the previously saved peaks. Vehicle Selection Screen This is the same screen that appears when the OutLook gets installed for the first time. Use this feature if the wrong setting is set or Choose Your Vehicle L Ford w/ BD Mod if the OutLook is transferred to a different brand of vehicle L Ford w/ other L Ford w/ other GM w /BD Module only GM w / other or Stock Dodge w/ BD Module Dodge w / other 17
20 OutLook DISPLAY OPTIONS The list below is all of the OutLook display options applicable to this make, model and year of vehicle. Once you select to display one of the options below it will be displayed either in the top left, top right, or bottom right quadrant of the OutLook Monitor screen. Navigate to these items through the main menu by selecting either top right, bottom right or top left. FEATURES Ford GM DODGE Boost Pressure X X X Dual Pyrometer (2) X X X Accurate Speed Display (MPH) X X X Engine RPMs X X X Throttle Position X X X Intake Temperature X Barometer X Battery Voltage X Coolant Temperature X X Transmission Temperature X X X Injection control pressure X X X Injection pulse width X Horsepower and torque X X X 0-60 times (MPH) X X X 1/4 Mile time X X X Peak boost X X X Peak Pyro X X X Peak horsepower X X X Peak torque X X X Fastest 0-60 X X X Fastest 1/4 mile X X X Boost Pressure: A measure of air pressure generated by the turbo that is being forced into the engine cylinder. Knowing the pressure will indicate how much stress is being put on the turbo and the engine itself. On a Stock pickup at high acceleration, a turbo will generate 18 to 40 lbs. of boost depending upon year & make of vehicle. 18
21 Monitor Pyro 1: Reads the signal received from the Pyro 1 connection on the OutLook Main Harness. Use this feature to display EGT readings on the screen. Also use this to get a recommended de-fuel reading using the Pyrometer Calibration Procedure. This display option is permanently displayed in the bottom left quadrant of the OutLook Screen. Pyro 2: Reads the signal received from the Pyro 2 connection on the OutLook Main Harness. Use this feature to display EGT readings on the screen. Speed: Vehicle rate of travel in Miles Per Hour. This feature does not change the OEM speedometer. Engine RPM: Number of Crank Revolutions Per Minute. THROTTLE POSITION: Display real-time percentage between idle & full throttle. Intake Temperature: Air temperature after it has past through the air filter & before it has entered the engine. Barometer: Outside atmospheric pressure. Battery Voltage: Amount of energy leaving or entering the battery volts. Coolant temp: Temperature of Vehicle Coolant. TRANSMISSION temp: Temperature of Vehicle s transmission fluid. Injection Control Pressure: Amount of pressure used to deliver fuel to the engine through the injectors. Injection Pulse Width: Amount of microseconds that the injectors are engaged to deliver fuel to the engine. 19
22 Horse Power and Torque: Measures engine output to the ground. Due to all of the factors involved in actual driving, the number calculated by the OutLook may not match those derived from an actual dynamometer time in MPH: This is a performance test that displays and records how long it takes the vehicle to go from a stand still at zero miles per hour to 60 miles per hour. This is a standard test that automobile manufacturers often use to describe the low end performance of an automobile. To operate this function simply follow the instructions displayed on the screen in one of the three quadrants chosen to display this performance test. When bad starts occur and the test must be restarted, simply press left on the OutLook Joystick and the performance test will restart itself as well as refresh the screen instructions. 1 4 Mile Time: This performance test will display and record how long it takes the vehicle to travel.25 miles from a complete stand still and how fast the vehicle was traveling at the exact point of completion. If for some reason the test must be restarted, simply press left on the OutLook Joystick and the performance test will restart itself as well as refresh the screen instructions. Peak Boost Pressure: Highest intake pressure in PSI ever recorded in that vehicle. Peak Pyro: Highest exhaust gas temperature ever reached; with regard to the location of the Pyro, whether the Pyro is installed pre or post-turbo. Peak Horsepower: Highest horsepower ever reached. Peak Torque: Highest torque ever reached. Fastest 0-60: Best ever 0-60 time. Fastest 1 4 Mile Time: Best ever 1 4 mile time. 20
23
24
INSTALLATION Manual. DODGE cummins 5.9L. RealTruck.Com Days A Week
 INSTALLATION Manual DODGE cummins 5.9L 2 Monitor 1 REMEMBER THIS IS A PERFORMANCE PRODUCT, USE AT YOUR OWN RISK. This product is not intended to be used to break the law. Do not use this product until
UNLEASH THE POWER. See More at: bullydog.com WITH BULLY DOG PERFORMANCE PRODUCTS. Doc.# BD40009 v1.0.0
 Bully Dog Technologies, LLC is a team built on integrity that is dedicated to leading the vehicle performance industry with an uncompromising code of ethics demonstrated in the soundness of its employees,
Vehicle Application: Part Numbers
 INSTALLATION Manual Part Numbers Power Punch #40601 Power Punch (Adjustable) #40602 Vehicle Application: 7000 Tractor models 8000 Tractor models 9000 Combine models 7710 8100 9550 7810 8200 9650 8300 9750
Installation Steps. Vehicle Application
 Installation Steps INSTALLATION Manual Vehicle Application Part# Dyno Dominator 03-04 Ford Power Stroke 41065 Dyno Dominator w/outlook 03-04 Ford Power Stroke 41076 rapid power 03-04 Ford Power Stroke
FLUID DAMPER. Vehicle Applications:
 INSTALLATION Manual Vehicle Applications: Vehicle description Product Part Number 94-98 5.9L Dodge Cummins 62100 98.5-02 5.9L Dodge Cummins 62101 03-06 5.9L Dodge Cummins 62102 01-06 6.6L GM Duramax 63100
Tractor Applications Rapid Power Model Number
 INSTALLATION Manual Tractor Applications Rapid Power Model Number John Deere 8130 to 8530 40605 John Deere 8230 (T) to 8430 (T) 40605 TABLE OF CONTENTS TROUBLESHOOTING: If you have questions during the
97-03 Volkswagen 1.9L TDI Injector Nozzles
 97-03 Volkswagen 1.9L TDI Injector Nozzles Product Description Part Number.205 Injector Nozzels #44200.216 Injector Nozzels #44201 VW INJECTOR NOZZLES Introduction These instructions outline how to install
Rapid Flow Induction Dodge Cummins 5.9L 52101
 INSTALLATION Manual Rapid Flow Induction Vehicle Application Part Number 03-07 Dodge Cummins 5.9L 52101 TROUBLESHOOTING: If you have questions during the installation of this product, please visit www.bullydog.com/product_updates.php.
UNLEASH THE POWER. See More at: bullydog.com WITH BULLY DOG PERFORMANCE PRODUCTS. Doc.# BD41001 v1.0.3
 Bully Dog Technologies, LLC is a team built on integrity that is dedicated to leading the vehicle performance industry with an uncompromising code of ethics demonstrated in the soundness of its employees,
Vehicle Application. Rapid Flow 4 Aluminized Exhaust Dodge Cummins 5.9L Rapid Flow 4 T-409 SST Exhaust Dodge Cummins 5.
 INSTALLATION Manual Vehicle Application Part# Rapid Flow 4 Aluminized Exhaust Dodge Cummins 5.9L 94-02 182010 Rapid Flow 4 T-409 SST Exhaust Dodge Cummins 5.9L 94-02 182445 Troubleshooting/FAQ Warranty/Disccliamer
RACE PPE Manifolds and Up-Pipes
 RACE ONLY High-Flow Exhaust Manifolds with Up-pipes GM DURAMAX 6.6L 2001-2015 DISCLAIMER OF LIABILITY This is a performance product which increases horsepower above factory specifications. Additional horsepower
Attitude Instructions Ford 6.0 Powerstroke
 Attitude Instructions Ford 6.0 Powerstroke Attitude 2003, Edge Products Incorporated All rights reserved. Edge Products Incorporated 5875 South Adams Avenue Suite 100 Ogden, UT 84405 (801) 476-3343 www.edgeproductsinc.com
Vehicle Application Triple Dog Part # OutLook Combo# Dodge 5.9L Cummins Dodge 5.9L Cummins Ford 7.
 INSTALLATION Manual Vehicle Application Triple Dog Part # OutLook Combo# 03-05 Dodge 5.9L Cummins 40500 42500 06-07 Dodge 5.9L Cummins 40500 41500 99.5-03 Ford 7.3 L Power Stroke 40500 N/A 03-07 Ford 6.0
DODGE CUMMINS 24V ISB OEM BYPASS LIFT PUMP KIT Installation Instructions Part #
 2/15/2006 2000-2002 Dodge Cummins OEM Bypass Lift Pump Kit # 1050229-1 - 2000-02 DODGE CUMMINS 24V ISB OEM BYPASS LIFT PUMP KIT Installation Instructions Part # 1050229 PLEASE READ ALL INSTRUCTIONS CAREFULLY
Dual Fueler Kit Dodge Cummins 6.7L kit w/no pump ( ) package w/pump ( ) Installation Guide
 package w/pump ( ) Installation Guide") Pacific Performance Engineering, Inc. www.ppediesel.com Dual Fueler Kit Dodge Cummins 6.7L 2007.5-2010 kit w/no pump (2130030) 2007.5-2010 package w/pump (2130031) Installation Guide Technical Support
Pacific Performance Engineering, Inc. www.ppediesel.com Dual Fueler Kit Dodge Cummins 6.7L 2007.5-2010 kit w/no pump (2130030) 2007.5-2010 package w/pump (2130031) Installation Guide Technical Support
Power Edge Juice Module Ford 6.0 Powerstroke Diesel
 Power Edge Juice Module Ford 6.0 Powerstroke Diesel 2004, Edge Products Incorporated All rights reserved. Edge Products Incorporated 1080 South Depot Dr. Ogden, UT 84404 (801) 476-3343 www.edgeproducts.com
½ DODGE CUMMINS OEM BYPASS LIFT PUMP KIT Installation Instructions Part #
 29 July 2005 2003-04.5 Dodge Cummins OEM Bypass Lift Pump Kit # 1050227-1 - 2003-04½ DODGE CUMMINS OEM BYPASS LIFT PUMP KIT Installation Instructions Part # 1050227 PLEASE READ ALL INSTRUCTIONS CAREFULLY
Dodge Cummins 5.9L 24 Valve Edge Products EZ Module Installation Instructions & Manual
 1998.5-2002 Dodge Cummins 5.9L 24 Valve Edge Products EZ Module Installation Instructions & Manual OLD P/N s: EZD1000 / EZD1000A / EZD1000B NEW P/N s: 30200 / 30201 2007 Edge Products All rights reserved.
Dfuser T/C Lock-Un Lock
 Dfuser T/C Lock-Un Lock Performance Diesel and more! For more information visit our website at: http://www.dfuser.com Page 1 of 6 User Guide This harness overrides and monitors Torque Converter (T/C) lockup
Cummins-2004 Dodge Edge EZ Module Installation Instructions and Manual
 Cummins-2004 Dodge Edge EZ Module Installation Instructions and Manual 2004, 2005 All rights reserved. 1080 South Depot Dr. Ogden, UT 84404 (801) 476-3343 www.edgeproducts.com Manual Version 110105 Table
Dodge Ram 5.9L Cummins LOW FUEL PRESSURE ALARM LIGHT - Installation Manual -
 29 September 2005 Dodge Cummins Low Fuel Pressure Alarm Light Kit 1081130-33 1 1999-2005 Dodge Ram 5.9L Cummins LOW FUEL PRESSURE ALARM LIGHT - Installation Manual - Part Number Sequence: 1081130 Red 1081133
PMD DRIVER RELOCATION KIT For Chevy 6.5L Diesel Trucks
 - 1 - PMD DRIVER RELOCATION KIT For 1994-1999 Chevy 6.5L Diesel Trucks Part# 1036520 -- Installation Instructions -- PLEASE READ ALL INSTRUCTIONS CAREFULLY BEFORE INSTALLATION. - 2 - Kit Contents BD P/N#
THIS IS A HIGH PERFORMANCE PRODUCT - USE AT YOUR OWN RISK!!!
 9/15/08 6.6 GM Duramax Aurora 5000 Turbo Installation Guide THIS IS A HIGH PERFORMANCE PRODUCT - USE AT YOUR OWN RISK!!! Do not use this product until you have carefully read the following agreement. This
Vehicle Programming Instructions Ford Powerstroke 7.3 liter
 Vehicle Programming Instructions 1994 2003 FORD Powerstroke 7.3 liter 2003, Edge Products Incorporated All rights reserved. Edge Products Incorporated 1080 South Depot Dr. Ogden, UT 84404 (801) 476-3343
Speedometer Interface
 Pacific Performance Engineering, Inc. www.ppediesel.com Speedometer Interface Technical Support (714) 985-4825 Rev: 12/19/12 v5 DISCLAIMER OF LIABILITY This is a performance product which can be used with
Dfuser Stage I Power Module DT-466, DT-570, and HT-570
 Dfuser Stage I Power Module DT-466, DT-570, and HT-570 Copyright 2004, 2005, 2006 dfuser.com, LLC. All rights reserved. Page 1 of 6 User Guide What Gain as much as +35HP and 90ft/lbs of torque!, plus improve
Dfuser T/C Lock Override with LED
 Dfuser T/C Lock Override with LED the bug that has no cure For more information visit our website at: http://www.dfuser.com Page 1 of 7 User Guide This harness overrides and monitors Torque Converter (T/C)
DODGE CUMMINS Arctic-Heat Grid Relocation Kit
 Installation Manual P/N 07509-350-GRK 2007.5-09 DODGE CUMMINS Arctic-Heat Grid Relocation Kit Installation Instructions P/N 07509-350-GRK GDP Arctic-Heat Grid Heater Installation PLEASE READ ALL INSTRUCTIONS
Owner s Manual Ford Powerstroke 7.3 liter CAUTION: THIS IS A HIGH PERFORMANCE PRODUCT. USE AT YOUR OWN RISK.
 Owner s Manual 1994 2003 Ford Powerstroke 7.3 liter CAUTION: THIS IS A HIGH PERFORMANCE PRODUCT. USE AT YOUR OWN RISK. Edge Products Inc distributed by BD Power Evolution FORD Powerstroke 7.3 liter - 1
GDP STREET-GATE 38mm Wastegate System
 Installation Manual STREET-GATE 38mm Wastegate System P/N SG67-38MM-7510 GDP STREET-GATE 38mm Wastegate System 07.5-10 DODGE CUMMINS Installation Instructions STREET-GATE 38mm Wastegate Kit p/n SG67-38MM-7510
Air-Boss VP Intake Plenum
 Installation Manual P/N 98502-ABIP 98.5-02 DODGE CUMMINS Air-Boss VP Intake Plenum Installation Instructions P/N 98502-ABIP GDP Air-Boss VP Plenum Installation PLEASE READ ALL INSTRUCTIONS BEFORE BEGINNING
Dual Fueler CP3 Pump Kit Installation Guide for LBZ/LMM
 Dual Fueler CP3 Pump Kit Installation Guide for LBZ/LMM Supplied Parts: 19b 19c 19a 1. Control Module 2. 3/8 Inlet Fuel Line with Attached 1/2 x 1/2 x 3/8 T Connector 3. 5/16 Return Fuel Line with Attached
DODGE CUMMINS Air-Boss CR Intake Plenum
 Installation Manual P/N 0307-ABIP 2003-07 DODGE CUMMINS Air-Boss CR Intake Plenum Installation Instructions P/N 0307-ABIP GDP Air-Boss CR Plenum Installation PLEASE READ ALL INSTRUCTIONS BEFORE BEGINNING
Dual Fueler CP3 Pump Kit Installation Guide for LB7
 Pacific Performance Engineering, Inc. www.ppediesel.com Dual Fueler Installation Guide Dual Fueler CP3 Pump Kit Installation Guide for LB7 Supplied Parts: 1. Control Module Pulley 9. Oil Filler Tube 2.
ATS Diesel Performance 5293 Ward Road Arvada, CO E-Power Programmer. Toll free
 ATS Diesel Performance 5293 Ward Road Arvada, CO. 80002 www.atsdiesel.com Dodge Ram 2003-2005 2003-2006 E-Power Programmer Toll free 800.949.6002 DISCLAIMER OF LIABILITY This is a performance product which
DODGE CUMMINS GDP Big Line Kit
 Installation Manual P/N 9852BLK 1998.5-2002 DODGE CUMMINS GDP Big Line Kit Installation Instructions P/N 9852BLK GDP Big Line Kit Installation PLEASE READ ALL INSTRUCTIONS BEFORE BEGINNING INSTALLATION
Assembly Instructions
 TOOLS REQUIRED: _(2) 3/4 wrenches _7/16 wrench _3/8 wrench _5/16 allen wrench Display/work stand is for assembly procedure only. May be purchased separately. CONTENTS (PARTS & HARDWARE) _(1) Receiver tube
DODGE CUMMINS GDP Twin CP-3 Big Line Kit
 Installation Manual P/N 0306-TCP3 2003-07 DODGE CUMMINS GDP Twin CP-3 Big Line Kit Installation Instructions P/N 0306-TCP3 GDP Twin CP-3 Big Line Kit Installation PLEASE READ ALL INSTRUCTIONS BEFORE BEGINNING
DODGE CUMMINS MK-2 Micro-Kleen System
 Installation Manual P/N MK20306 2003-07 DODGE CUMMINS MK-2 Micro-Kleen System Installation Instructions P/N MK20306 2 Micron Fuel Filter Installation PLEASE READ ALL INSTRUCTIONS BEFORE BEGINNING INSTALLATION
20250 Module Installation Guide
 20250 Module Installation Guide 2013.5-2017 RAM 6.7L Cummins Up to 90HP Gain 1-3 MPG Fuel Savings AgDieselSolutions.com Adjustable switch connector Power +12 volts (Red wire) & Ground (Black wire) Injector
Dfuser Eighteen-K Plus Power Module the bug that has no cure
 Dfuser Eighteen-K Plus Power Module the bug that has no cure Copyright 2004, 2005, 2006 dfuser.com, LLC. All rights reserved. Page 1 of 6 User Guide What Known as the 18K module, this device is designed
L DODGE CUMMINS Maximizer System
 Installation Manual P/N 07509MAX 2007.5-09 6.7L DODGE CUMMINS Maximizer System Installation Instructions P/N 07509MAX GDP Big Line Kit Installation PLEASE READ ALL INSTRUCTIONS BEFORE BEGINNING INSTALLATION
Duramax LB7 / LLY / LBZ / LMM
 Pacific Performance Engineering, Inc. www.ppediesel.com 2001-2009 Duramax LB7 / LLY / LBZ / LMM Economy / Standard / Hot Installation Guide Made in the U.S.A ATTENTION: Please read instructions carefully
L DODGE CUMMINS MK-2 + BLK APPS Mount
 Installation Manual P/N MK20305-APPS 2003-05 5.9L DODGE CUMMINS MK-2 + BLK APPS Mount Installation Instructions P/N MK20305-APPS 2 Micron + Big Line Kit APPS Mount Installation PLEASE READ ALL INSTRUCTIONS
GM 6.6L Duramax. Up to 90HP Gain. AgDieselSolutions.com
 21700 Module Installation Guide 2017 GM 6.6L Duramax *L5P* Up to 90HP Gain 1-3 MPG Fuel Savings AgDieselSolutions.com Adjustable Switch Female Fuel Pressure Sensor Connector Male Fuel Pressure Sensor Connector
Dfuser Eighteen-K Plus Power Module T444E Special Edition the bug that has no cure
 Dfuser Eighteen-K Plus Power Module T444E Special Edition the bug that has no cure Copyright 2004, 2005, 2006 dfuser.com, LLC. All rights reserved. Page 1 of 7 User Guide What This device is designed for
Cummins N14 Celect & Celect Plus Engine Module. For Agricultural Applications Only. Part # 31200
 1994-2003 Cummins N14 Celect & Celect Plus Engine Module For Agricultural Applications Only Part # 31200 31200_revA Adjustable Switch Agricultural Cummins N14 Engine Module Power and Ground terminals Timing
Mercedes MBE 906/ L & 7.2L Engine Module. Part # Installation Instructions
 1999-2006 Mercedes MBE 906/926 6.4L & 7.2L Engine Module Part # 15000 Installation Instructions 15000_revC 1999-2006 Mercedes 6.4L & 7.2L Engine Module +12 volts red wire. Ground black wire Injector Terminals
6032 Jacksboro Highway, #100 Fort Worth, Tx MADE IN THE U.S.A.
 6032 Jacksboro Highway, #100 Fort Worth, Tx 76135 817-306-2444 888-842-6572 I N S T A L L A T I O N I N S T R U C T I O N S D O D G E 9 8. 5-0 2 MADE IN THE U.S.A. w w w. q u a d z i l l a p o w e r. c
Female Plug. connecting to Fuel Quantity
 **Ag Diesel Solutions recommends replacing the Transorb/Suppressor Diode before the installation of this module*** Red wire = 12V Constant power. Male Plug connecting to Fuel Quantity Valve Black wire
Mega-Rail System Installation
 Installation Manual Mega-Rail System P/N 030767-MRS 2003-2007 DODGE CUMMINS Mega-Rail System Installation Installation Instructions GDP 03-07 Mega-Rail System P/N 030767-MRS PLEASE READ ALL INSTRUCTIONS
CU6703 Module Installation Guide
 Up to 30% More Horsepower 10-20% Fuel Savings Cummins 6.7L Tier III Engines CU6703 Module Installation Guide AgDieselSolutions.com MAP sensor male and female connectors. Power and Ground wires. Module
JDCR2000 Module Installation Guide
 Up to 30% More Horsepower 10-20% Fuel Savings John Deere 4.5L, 8.1L & 9.0L Tier III Denso Common Rail Engines JDCR2000 Module Installation Guide AgDieselSolutions.com FEMALE FUEL PRESSURE CONNECTOR (FPC)
Dodge Cummins 5.9L Edge Comp Module Installation Instructions & Manual OLD P/N s: ECD2000, ECD2000A & ECD2000B NEW P/N s: 30300, 30301,
 1998.5-2002 Dodge Cummins 5.9L Edge Comp Module Installation Instructions & Manual OLD P/N s: ECD2000, ECD2000A & ECD2000B NEW P/N s: 30300, 30301, 30301 Table of Contents DISCLAIMER OF LIABILITY 3 LIMITATION
15100 Module Installation Guide Mercedes EPA07 w/dpf
 15100 Module Installation Guide 2007-2009 Mercedes EPA07 w/dpf 7.2L Engines Up to 30% HP Gain 10-20% Fuel Savings AgDieselSolutions.com 2007-2009 Mercedes 7.2L Engine Module +12 volts red wire. Ground
30100 Module Installation Guide L
 30100 Module Installation Guide 1997-2006 12.0L Mack Engines Up to 30% HP Gain 10-20% Fuel Savings AgDieselSolutions.com 1997-2006 Mack 12.0L Engine Module +12 volts red wire. Ground black wire Injector
JD2800 Module Installation Guide
 Up to 30% More Horsepower 10-20% Fuel Savings John Deere 9.0L Tier III Denso Common Rail Engines JD2800 Module Installation Guide AgDieselSolutions.com Ground Terminal Power (+12V constant) Terminal Injector
L DODGE CUMMINS MK-2 High Flow Fuel Filter Kit
 Installation Manual P/N MK21318-BLK (non-heated) P/N MK21318-BLKH (heated) 2013-2018 6.7L DODGE CUMMINS MK-2 High Flow Fuel Filter Kit Installation Instructions P/N MK21318-BLK (non-heated) P/N MK21318-BLKH
Part# Accessory Power Distribution Module
 7 February 2006 Power Pod (1038800) Page 1 BD Powe r Pod Installation Instructions Part# 1038800 Accessory Power Distribution Module Power Pod Specifications: Eliminate multiple T-taps and splices on OEM
TS PERFORMANCE WE ARE DIESEL. Re-Speed
 TS PERFORMANCE WE ARE DIESEL TS Performance Products Re-Speed 1190101 Tire Calibration and Speed Limiter Removal Operation & Installation Manual Installation of the TS Performance Re-Speed Read all instructions
TS PERFORMANCE WE ARE DIESEL
 TS PERFORMANCE WE ARE DIESEL MP-8 6.7L Cummins 4110803 Installation Manual Thank you for buying the MP-8 for the 6.7L Cummins. Here you will learn how to install this MP-8 into your tractor, and we guarantee
Banks Speed-Loader Chevy/GMC 6.6L (LMM) Duramax Turbo-Diesel Pickups THIS MANUAL IS FOR USE WITH KIT 63838
 Duramax Turbo-Diesel Pickups THIS MANUAL IS FOR USE WITH KIT 63838") Banks Speed-Loader 2007-2008 Chevy/GMC 6.6L (LMM) Duramax Turbo-Diesel Pickups THIS MANUAL IS FOR USE WITH KIT 63838 Gale Banks Engineering 546 Duggan Avenue Azusa, ca 91702 (626) 969-9600 Fax (626) 334-1743
Banks Speed-Loader 2007-2008 Chevy/GMC 6.6L (LMM) Duramax Turbo-Diesel Pickups THIS MANUAL IS FOR USE WITH KIT 63838 Gale Banks Engineering 546 Duggan Avenue Azusa, ca 91702 (626) 969-9600 Fax (626) 334-1743
Installation Instructions
 August 04 BD Camplate Installation -1- BD POWER CAMPLATE KIT Installation Instructions PLEASE READ ALL INSTRUCTIONS CAREFULLY BEFORE INSTALLATION. NOTE: Unless this product has been identified with a CARB
6 November Ford Powerstroke 6.0/7.3L X-Monitor 1 BD X-MONITOR Ford 6.0/7.3L Powerstroke
 6 November 2006 1087200-7210 Ford Powerstroke 6.0/7.3L X-Monitor 1 BD X-MONITOR 1999-2007 Ford 6.0/7.3L Powerstroke I n s t a l l a t i o n M a n u a l Date Purchased Purchased from Installed by READ THIS
Twin Turbo Installation Instructions
 Twin Turbo Installation Instructions Pacific Performance Engineering 303 N Placentia Ave. Fullerton, CA 92831 www.ppediesel.com Legal in California only for racing vehicles which may never be used on the
Table of Contents. Disclaimers Warranty... 5 Gas Tuner Instructions Diesel Tuner Instructions Fuse Removal...
 INSTALLATION Table of Contents Disclaimers... 3-4 Warranty... 5 Gas Tuner Instructions... 6-10 Diesel Tuner Instructions... 11-14 Fuse Removal... 15 2 Release The Beast Thanks for your purchase of a Quadzilla
Installation Instructions
 1 BD DODGE CUMMINS PERFORMANCE E X H A U S T M A N I F O L D Installation Instructions Application List 1994-1998 12V 1045980 1998½-2002 24V 1045985 PLEASE READ ALL INSTRUCTIONS BEFORE INSTALLATION KIT
For electronically controlled E4OD and 4R100 automatic transmissions ** READ ALL INSTRUCTIONS BEFORE INSTALLATION **
 26 August 2005 Ford PressureLoc #1060380 1 BD Ford PressureLoc Installation Manual For electronically controlled E4OD and 4R100 automatic transmissions Part#: 1060380 ** READ ALL INSTRUCTIONS BEFORE INSTALLATION
9/8/ ½-2004 Dodge 5.9L Cummins Flow-MAX Lift Pump Retro Kit # ½ L DODGE CUMMINS. Installation Instructions
 9/8/2008 1998½-2004 Dodge 5.9L Cummins Flow-MAX Lift Pump Retro Kit # 1050302-1 - 1998½-2004 5.9L DODGE CUMMINS RETRO FIT INTAKE PUMP Kit Installation Instructions P/N# 1050302 PLEASE READ ALL INSTRUCTIONS
Stage4 Installation Guide STAGE 4 TRANSMISSION KIT INSTALLATION GUIDE Allison LB7/ LLY only for 5 speed trasmissions
 STAGE 4 TRANSMISSION KIT INSTALLATION GUIDE 2001-2005 Allison LB7/ LLY only for 5 speed trasmissions DISCLAIMER OF LIABILITY This is a performance product which can be used with increased horsepower above
Installation Instructions. Application List Dodge 24V PLEASE READ ALL INSTRUCTIONS BEFORE INSTALLATION
 1 BD DODGE CUMMINS 03-055 C O O L - I T I N T E R C O O L E R Installation Instructions Application List 2003-2006 Dodge 24V 1042510 PLEASE READ ALL INSTRUCTIONS BEFORE INSTALLATION KIT CONTENTS: Please
Mechanical Lift Pump System
 Installation Manual FUEL BOSS Mechanical LP P/N FB-03045 2003 2004.5 DODGE CUMMINS FUEL BOSS Mechanical Lift Pump System Installation Instructions Fuel Boss LP System p/n FB-03045 PLEASE READ ALL INSTRUCTIONS
2004½-2007 Dodge 5.9L Cummins 24v ISBe (600 motors only)
") 31 October 2006 Part # 1045235-1 - BD Supe r B Single 2004½-2007 Dodge 5.9L Cummins 24v ISBe (600 motors only) Part # 1045235 PLEASE READ ALL INSTRUCTIONS BEFORE INSTALLATION. Note: This turbo system is
31 October 2006 Part # 1045235-1 - BD Supe r B Single 2004½-2007 Dodge 5.9L Cummins 24v ISBe (600 motors only) Part # 1045235 PLEASE READ ALL INSTRUCTIONS BEFORE INSTALLATION. Note: This turbo system is
BD SUPER B SPECIAL Dodge 5.9L Cummins 24v ISB
 1 This turbo is intended for high performance applications and is not to be used for towing applications BD SUPER B SPECIAL 1994-2002 Dodge 5.9L Cummins 24v ISB Part# 1045120 PLEASE READ ALL INSTRUCTIONS
BD Torq/Un-Loc. Torque Converter Control System Part# ENSURE YOU READ ALL INSTRUCTIONS BEFORE INSTALLING THIS PRODUCT
 6 December 2005 Torq/UnLoc #1030398 1 BD Torq/Un-Loc Torque Converter Control System Part# 1030398 ENSURE YOU READ ALL INSTRUCTIONS BEFORE INSTALLING THIS PRODUCT 6 December 2005 Torq/UnLoc #1030398 2
Warning! 2 Mini Maxx Installation Manual
 1-888-628-1730 Mini Maxx Installation Manual 1 Warning! THIS IS A HIGH PERFORMANCE PRODUCT TO BE USED AT YOUR OWN RISK! Do not install this product until you have read and fully understand the following
FAST-FLASH Programmer Ford 6.0L Powerstroke Turbo Diesel (2003 and Newer)
") INSTRUCTIONS FAST-FLASH Programmer Ford 6.0L Powerstroke Turbo Diesel (2003 and Newer) Thank you for your purchase of electronic tuning products; we are proud to be your manufacturer of choice! The FAST-FLASH
INSTRUCTIONS FAST-FLASH Programmer Ford 6.0L Powerstroke Turbo Diesel (2003 and Newer) Thank you for your purchase of electronic tuning products; we are proud to be your manufacturer of choice! The FAST-FLASH
, TABLE OF CONTENTS. Contents... PG.2 Installa9on. PG.3-6 Troubleshoo9ng...PG.7 Updates PG.8. Introduc9on
 Introduc9on TABLE OF CONTENTS Contents...... PG.2 Installa9on. PG.3-6 Troubleshoo9ng...PG.7 Updates PG.8 8210202, 8210203 TS Performance looks forward to serving the technical needs you may run into, however,
Rev: Mini Maxx Installation Manual 1 Mini Maxx
 Rev: 10.17.13 1-888-628-1730 Mini Maxx Installation Manual 1 Revision Date These instructions are current as of 10/17/13. Revisions may apply, and are available at www.hsperformance.com Warning! THIS IS
DODGE CUMMINS 24V ISB
 6 November 2009 2000-2002 Dodge Cummins FlowMAX Lift Pump Kit # 1050301B - 1-2000-02 DODGE CUMMINS 24V ISB FLOWMAX LIFT PUMP KIT Installation Instructions Part# 1050301B PLEASE READ ALL INSTRUCTIONS CAREFULLY
Warning! 2 Black Maxx Installation Manual
 1-888-628-1730 Black Maxx Installation Manual 1 Warning! THIS IS A HIGH PERFORMANCE PRODUCT TO BE USED AT YOUR OWN RISK! Do not install this product until you have read and fully understand the following
Pro RMK Install
 PHANTOM TETH-AIR TM 2013-15 Pro RMK Install : 1 1. Using 2 sided adhesive foam tape; stick the Upper Control Unit to the front of the throttle block as shown. 2. Use the long plastic cable ties to secure
2017 FIAT 124 Spider 1.4L MultiAir Turbo MADNESS Autoworks MAXPower ECM Module Installation Instructions & Manual Part Numbers
 2017 FIAT 124 Spider 1.4L MultiAir Turbo MADNESS Autoworks MAXPower ECM Module Installation Instructions & Manual Part Numbers 1 SAFETY INFORMATION The MADNESS product you have purchased is a high performance
Installation Manual. PMT Parts In cab installation Pyrometers Power Wires. Operating Instructions Online Updates Bill of Materials
 Manual PMT Parts In cab installation Pyrometers Power Wires Online Updates Table of Contents Introduction 1 Online Updates Online Updates Remeber to Update!!! Always update your product before installing
Owner smanual. Banks Big Hoss Diesel Tuner. (Does Not Connect to Pump Wire) Dodge 5.9L Cummins (24-valve) ISB Pickup Trucks
 Dodge 5.9L Cummins (24-valve) ISB Pickup Trucks") Owner smanual with Installation Instructions Banks Big Hoss Diesel Tuner (Does Not Connect to Pump Wire) 1998-2002 Dodge 5.9L Cummins (24-valve) ISB Pickup Trucks THIS MANUAL IS FOR USE WITH SYSTEMS 62781-62783
Owner smanual with Installation Instructions Banks Big Hoss Diesel Tuner (Does Not Connect to Pump Wire) 1998-2002 Dodge 5.9L Cummins (24-valve) ISB Pickup Trucks THIS MANUAL IS FOR USE WITH SYSTEMS 62781-62783
Owner smanual. Banks Big Hoss Intake Manifold System Chevy/GMC Duramax Turbo-Diesel Engines. with Installation Instructions
 Owner smanual with Installation Instructions Banks Big Hoss Intake Manifold System 2001-2007 Chevy/GMC Duramax Turbo-Diesel Engines THIS MANUAL IS FOR USE WITH KITS 42733 Gale Banks Engineering 546 Duggan
Dodge 24v ISBe
 BD SUPER B 2003-2004 Dodge 24v ISBe (Non 600 motors) Part # 1045230 PLEASE READ ALL INSTRUCTIONS BEFORE INSTALLATION This turbo system is not compatible with an AFE intake system WITHOUT MODIFICATIONS.
Rev: Mini Maxx Installation Manual 1 Mini Maxx
 Rev: 08.21.13 1-888-628-1730 Mini Maxx Installation Manual 1 Revision Date These instructions are current as of 08/21/13. Revisions may apply, and are available at www.hsperformance.com Warning! THIS IS
LB7/ LLY Allison 5 speed transmissions
 PPEdiesel.com STAGE 4 TRANSMISSION KIT INSTALLATION GUIDE 2001-2005 LB7/ LLY Allison 5 speed transmissions Technical Support (714) 985-4825 Rev: 01/31/18 v7 DISCLAIMER OF LIABILITY This is a performance
Chevy/GM Duramax Diesel LBZ Edge Juice and Attitude Installation Instructions and Manual
 Chevy/GM Duramax Diesel LBZ Edge Juice and Installation Instructions and Manual GM Juice/ Manual 2005, All rights reserved. 1080 South Depot Dr. Ogden, UT 84404 (801) 476-3343 www.edgeproducts.com Manual
31 January / Universal Dash-Top X-Monitor 1 BD X-MONITOR. Universal Top Button Dash-Mount Gauge System
 31 January 2006 1080000 / 1080200 Universal Dash-Top X-Monitor 1 BD X-MONITOR Universal Top Button Dash-Mount Gauge System I n s t a l l a t i o n M a n u a l Part # Application 1080000 Universal Pyro
Owner smanual. Banks Speed-Loader Upgrade Module to Banks Six-Gun Diesel Tuner Ford Power Stroke 6.0L Turbo-Diesel
 with Installation Instructions Owner smanual Banks Speed-Loader Upgrade Module to Banks Six-Gun Diesel Tuner 2003-07 Ford Power Stroke 6.0L Turbo-Diesel THIS MANUAL IS FOR USE WITH SYSTEMS 62988 Gale Banks
17 August Cool Down Timer Page 1. Part# Application Chart --
 17 August 2005 1081150 Cool Down Timer Page 1 BD Cool Down Timer Part# 1081150 Application Chart -- Dodge Cummins 1996-2005 Ford F Series (7.3L) 1994-2003 Ford F Series (6.0L) 2003-2005 GMC/Chevy Duramax
Duramax GM 6.6L Duramax Diesel LB7/LLY/LBZ/LMM ( )
") PPEdiesel.com Duramax GM 6.6L Duramax Diesel 2001-2010 LB7/LLY/LBZ/LMM (111001800) User Guide Maximum performance designed for closed course racing applications. Technical Support (714) 985-4825 Rev: 06/06/18
PPEdiesel.com Duramax GM 6.6L Duramax Diesel 2001-2010 LB7/LLY/LBZ/LMM (111001800) User Guide Maximum performance designed for closed course racing applications. Technical Support (714) 985-4825 Rev: 06/06/18
Owner smanual. Banks Bullet Diesel Tuner Ford Power Stroke 6.0L Turbo-Diesel. with Installation Instructions
 with Installation Instructions Owner smanual Banks Bullet Diesel Tuner 2003-2007 Ford Power Stroke 6.0L Turbo-Diesel THIS MANUAL IS FOR USE WITH KITS 66524-66525 Gale Banks Engineering 546 Duggan Avenue
InstallationManual. Banks SpeedBrake Chevy/GMC 6.6L (LLY) Turbo-Diesel Pickup. For use with Palm Tungsten E2
 Turbo-Diesel Pickup. For use with Palm Tungsten E2") InstallationManual Banks SpeedBrake For use with Palm Tungsten E2 2004-2005 Chevy/GMC 6.6L (LLY) Turbo-Diesel Pickup THIS MANUAL IS FOR USE WITH KITS 55419 & 55421 Gale Banks Engineering 546 Duggan Avenue
InstallationManual Banks SpeedBrake For use with Palm Tungsten E2 2004-2005 Chevy/GMC 6.6L (LLY) Turbo-Diesel Pickup THIS MANUAL IS FOR USE WITH KITS 55419 & 55421 Gale Banks Engineering 546 Duggan Avenue
INSTALLATION MANUAL DURAMAX DIESEL POWERED PICKUP TRUCKS MODEL RP-100 & RP-150. With New Quick Connect Components!
 INSTALLATION MANUAL 2001-2009 DURAMAX DIESEL POWERED PICKUP TRUCKS MODEL RP-100 & RP-150 With New Quick Connect Components! PLEASE READ THESE INSTRUCTIONS THOROUGHLY BEFORE BEGINNING INSTALLATION! 705
7.3L Ford PowerStroke
 INSTALLATION MANUAL #31 7.3L Ford PowerStroke 1999-2003 MODEL RP-100 & RP-150 Supplemental Lift Pump With New Quick Connect Components! PLEASE READ THESE INSTRUCTIONS THOROUGHLY BEFORE BEGINNING INSTALLATION!
6.0L Ford Powerstroke 2003 THROUGH 2007
 INSTALLATION MANUAL #32 6.0L Ford Powerstroke 2003 THROUGH 2007 MODEL RP-100 & RP-150 Supplemental Lift Pump With New Quick Connect Components! PLEASE READ THESE INSTRUCTIONS THOROUGHLY BEFORE BEGINNING
HIGH PERFORMANCE FUEL PUMP
 MODEL NO. FASS-HPFP-95-1003 & FASS-HPFP-150-1003 HIGH PERFORMANCE FUEL PUMP A MUST READ FROM: SUBJECT: TO: Diesel Performance Products, Inc. Welcome/Thank You Valued Customer We at Diesel Performance Products,