INSTALLATION INSTRUCTIONS
|
|
|
- Jasmin Bryan
- 5 years ago
- Views:
Transcription


1 Dodge SRT 6.4L Charger/Hellcat Header-Back 3 Race Exhaust RHKR w/ Muffler w/ AEV delete and 4 Tips RHKR w/o Muffler w/ AEV delete and 4 Tips INSTALLATION INSTRUCTIONS Thank you for making HOOKER HEADERS your choice in a high-performance exhaust system. Extensive dyno/track testing has enabled HOOKER to offer the most advanced design in exhaust systems. The installation, while not complex, will take a certain amount of time. However, the additional horsepower and improved performance will more than justify your efforts. Proper installation and maintenance will ensure long life and maximum performance from your HOOKER BLACKHEART exhaust system. BEFORE STARTING: Your vehicle must be raised a minimum of 18 inches. A floor hoist is ideal. If no hoist is available, we strongly urge the use of axle stands as a safety measure. Please read and understand these instructions and disclaimer in their entirety before attempting installation. CAUTION! WORK ONLY ON A LEVEL SURFACE. USE JACKS /JACK STANDS OF SUFFICIENT CAPACITY TO LIFT AND SUPPORT YOUR VEHICLE. NEVER WORK UNDER A VEHICLE SUPPORTED BY A FLOOR OR BUMPER JACK. INCLUDED HARDWARE: INSTALLATION: Accessory Pack Contents P/N Qty. Description 556R TORCA Coupler 556R Band Clamps 199R Instruction Sheet 539R x 3/4 Coupling nut 505R x 3/4 Flange bolt 505R x 1/4 Flange bolt 546R21 6 5mm x 10mm Flat washer 599R94 2 Blackheart Decal Parts List Tools Needed: Qty. Description Description 1 Left Link Pipe 3/8 Drive Metric Socket set 1 Right Link Pipe 10 3/8 Drive Extension 1 H-Pipe Assembly 15mm Deep Socket 2 Muffler Assembly or Muffler Delete Pipe Spray Lube (WD-40 ) 1 Left - Tailpipe Assembly 13mm Wrench 1 Right - Tailpipe Assembly 8mm Wrench 2 Tailpipe Adapters 2 Tip Assemblies Inspect your accessory pack: BEFORE YOU START! 1. Place the vehicle on flat a surface, set the parking brake, and block the front wheels. 2. Disconnect the negative terminal of the battery.
 and assumes the headers")
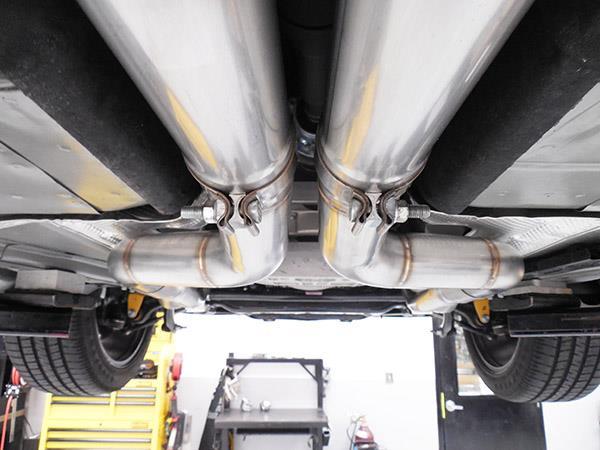
2 3. Lift the vehicle and support with jack stands. CAUTION! Never support a vehicle with a floor or bumper jack. REMOVING THE OEM EXHAUST: NOTE: This exhaust system is intended to be used with Hooker Blackheart Headers P/N RHKR, RHKR, or RHKR (Hellcat only) and assumes the headers have already been installed. 1. Support the exhaust at both ends. 2. Support the left and right muffler assembly. Remove the bolts at the isolator brackets on the left and right tailpipes. Remove the bolts at the isolator brackets on the left and right differential hangers (Figure 1). Figure 1 3. Loosen the clamps on the H-pipe where it connects to the catalytic converter down pipes and spray the connection with WD-40 (Figure 1). 4. Remove the (x2) transmission tunnel cross braces. 5. Unplug the connectors from the left and right Active Exhaust Valve actuator, remove the 8mm nuts on each actuator, and carefully remove the actuator from the tailpipe. Do not lose the drive spring, as it will be reused. 6. Lower the mufflers to clear the bumper. Remove the H-pipe and exhaust from the catalyst down pipes. NOTE: Cutting the tailpipes at the resonator will make removal much less difficult, but is not necessary (Figure 1). 7. Take a picture of the tailpipe isolator assemblies before they are removed from the tailpipes for reference later. Remove the isolator assemblies from the factory exhaust. Keep the isolator assemblies separated (left and right) as they are different. 2
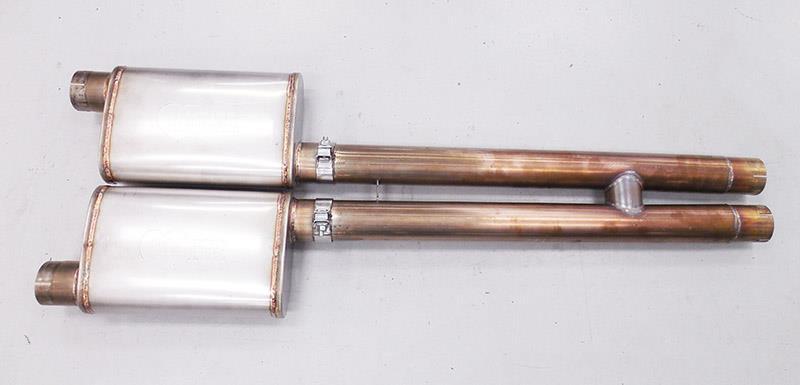
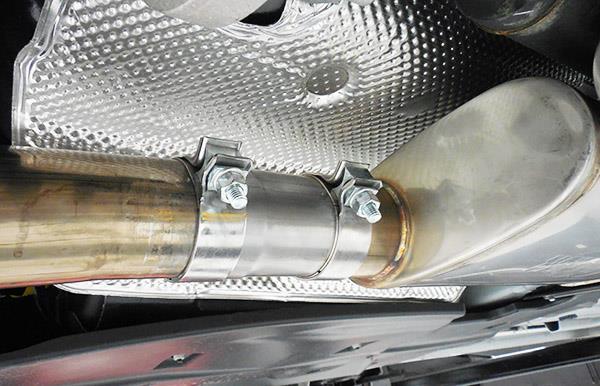
3 INSTALLATION OF YOUR HOOKER BLACKHEART HEADER-BACK EXHAUST: Installing the AEV actuator on to the Blackheart tailpipe: 1. Place the Right tailpipe on the work bench with the AEV mounting bracket facing up (Figure 2). 2. Install the 2 coupling nuts and washers onto the AEV actuator positions B and C with the x ¾ flange bolts (Figure 2). Be sure to install the washer between the actuator and the coupling nut. Do not over tighten the bolts, as the actuator case is plastic. 3. Install the third coupling nut onto the actuator mounting plate position A using a x ¼ flange bolt. Install the bolt from the back side of the bracket as shown in (Figure 2). 4. Install the coupler spring on to the actuator, making sure the drive spring is centered and firmly locked into the drive on the actuator (Figure 2). 5. Apply a liberal amount of anti-seize or waterproof grease between the mounting plate and drive spring. 6. Place a washer on to the top of the coupling nut installed on the mounting plate (Figure 3). 7. Place the actuator on to the mounting plate and align positions A, B, and C. Make sure the drive spring wire is located between the raised tabs on the mounting plate as shown in Figure 2 reference line D. Install the x 3/4 flange bolt into position A on the actuator and into the washer and coupler nut previously installed on to the mounting plate. Be sure the washer is installed. 8. Align positions B and C by rotating the actuator clockwise and install the 2 remaining x1/4 flange bolts from the back side of the plate. NOTE: There will be a small amount of preload on the spring as you rotate the actuator into position when the spring contacts the raised tabs on the mounting plate. Do not force the actuator into position or you will damage the drive on the actuator. If more than a slight preload is required to align the bolt holes, re-check the spring coupler assembly for correct alignment. 9. Check the alignment of the spring coupler after all the bolts have been installed, the drive spring needs to be positioned correctly between the raised tabs allowing 90 degrees of actuator rotation. This will simulate the amount of valve action on the factory AEV assembly. If the drive spring is positioned incorrectly (or missing) the actuator will not rotate through its correct range of motion and the CHECK ENGINE light will illuminate. Reference (Figure 4) for correct drive spring positioning. 10. Repeat the actuator installation procedure for the Left tailpipe. 11. Reference (Figure 5) for installed AEV actuator. Exhaust Installation: 1. Inspect the exhaust hanger isolators and any OEM hardware to be reused. Replace, if necessary. 2. Install the 3 Torca couplers on to each header collector, position the couplers with the bolts on the outside of the collector and the nuts facing down (Figure 6). 3. Install the header link pipes with the long leg to the header collector, position the coupler for a 50/50 split between the collector and the link pipe (Figure 6) and tighten the coupler to allow for adjustment of the link pipe. Position the link pipes with the short end evenly aligned inside the transmission tunnel (Figure 7). 4. Pre-install the mufflers or muffler delete pipes (depending on the kit you have) on to the H-pipe with the clamps on top of the pipe and the bolts facing out, align the mufflers or muffler delete pipes flat to the floor and even with each other (Figure 8). 5. Install a 3 band clamp over each link pipe outlet and position the clamp with the bolt at the bottom of the pipe and the nut facing the outside of the car (Figure 7). Install the H-PIPE expanded end on to the link pipes. Spray the pipes with WD-40 to ease installation. Align the clamps as shown in Figure 7, tighten the clamps to allow for adjustment. Support the H-pipe to prevent damage to the catalytic converter down pipes. 6. Install the transmission tunnel braces. 7. Install a supplied 3 band clamp over each muffler or muffler delete outlet tube (bolt inside and nut down) install the tailpipe adapter tube in to each muffler and tighten the clamp to allow for adjustment (Figure 9). 8. Install a 3 band clamp on to the expanded end of the tail pipe adaptor, bolt to the inside and nut facing down (Figure 9). 3

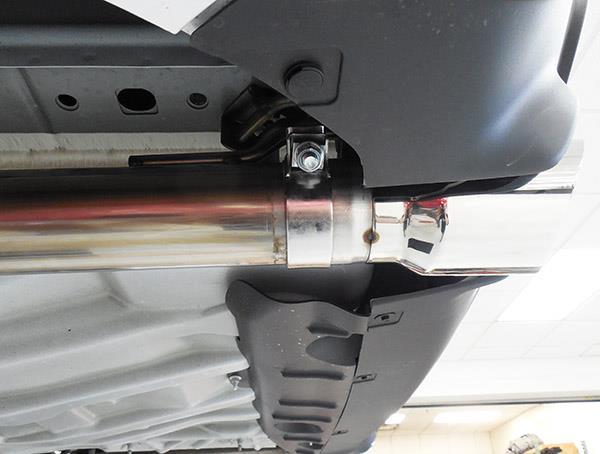
4 9. Spray the Right isolators with WD-40 and install the isolators on the tailpipe. Refer to your pictures for proper orientation of the isolator assemblies before installation. Install the right side tailpipe into the adaptor at the muffler or muffler delete pipe. Rotate the tailpipe up and Install the bolts for the tailpipe hangers and tighten to specification. Install the differential tail pipe hanger. Tighten the clamps at the muffler to allow for adjustment. 10. Spray the Left isolators with WD-40 and install the isolators on the tailpipe. Refer to pictures for proper orientation of the isolator assemblies before installation. Install the Left side tailpipe into the adaptor at the muffler or muffler delete pipe. Rotate the tailpipe up and Install the bolts for the tailpipe hangers and tighten to specification. Install the differential tail pipe hanger. Tighten the clamps at the muffler to allow for adjustment. 11. Set the actuator to CV boot clearance by measuring the distance from the AEV bracket top edge straight across to the CV boot and verify there is a minimum of 11/2 in clearance. This will prevent the actuator from contacting the boot when the exhaust grows as it gets hot (Figure 11). 12. Install a supplied 3 band clamp over each tip assembly with the bolt outside and nut down (Figure 10). 13. Install the tip assembly on to each tailpipe. Align and tighten the clamp to allow for adjustment. 14. Plug in the connector on each AEV actuator and slide the lock forward. 15. Install a supplied 3 band clamp over each tip assembly with the bolt outside and nut down (Figure 10). 16. Install the tip assembly on to each tailpipe. Align and tighten the clamp to allow for adjustment. 17. Check all the hardware and the connection points for proper installation. Adjust and tighten all clamps starting at the front and working towards the tailpipes. 18. Remove the jack stands and lower the car. Connect the battery and remove the wheel blocks. 19. Start the vehicle and check for leaks and loose hardware. 20. Check all hardware again after the first 150 miles of driving. NOTE: It is normal for the Blackheart Header-Back Exhaust System to emit smoke for the first few minutes during break-in period. Enjoy your Blackheart Exhaust! Figure 2 4


5 Figure 3 Figure 4 Figure 5 Figure 6 Figure 7 Figure 8 Figure 9 Figure 10 5

6 Figure Hooker Headers, Inc. All rights reserved. 199R11264 Revision Date: Technical Support:
SRT Challenger/Hellcat Header-Back RACE ONLY Exhaust (w/ mufflers, w/ resonators, no/cats, no/tips AES valve delete) RHKR
 RHKR") 2014-16 SRT Challenger/Hellcat Header-Back RACE ONLY Exhaust (w/ mufflers, w/ resonators, no/cats, no/tips AES valve delete) 70502339-RHKR INSTALLATION INSTRUCTION WARNING! This product is not street legal
2014-16 SRT Challenger/Hellcat Header-Back RACE ONLY Exhaust (w/ mufflers, w/ resonators, no/cats, no/tips AES valve delete) 70502339-RHKR INSTALLATION INSTRUCTION WARNING! This product is not street legal
Installation Instructions
 2014-2015 C7 Corvette Blackheart 3 304SS Exhaust System w/ AFM Valves 70501345-RHKR w/ Mufflers, w/ Cats Race Only 70501346-RHKR w/o Mufflers, w/ Cats Race Only Installation Instructions Thank you for
C7 Corvette Blackheart 3 304SS Cat-Back Exhaust System w/ AFM Valves RHKR w/ NPP Mufflers
 2014-2015 C7 Corvette Blackheart 3 304SS Cat-Back Exhaust System w/ AFM Valves 70501349-RHKR w/ NPP Mufflers Installation Instructions Thank you for making HOOKER HEADERS your choice in a high-performance
2016 Chevrolet Camaro SS V8, 6.2L Blackheart 1 7/8 Tri-Y Shorty Headers RHKR Installation Instructions
 2016 Chevrolet Camaro SS V8, 6.2L Blackheart 1 7/8 Tri-Y Shorty Headers 70301304-RHKR Installation Instructions Thank you for making HOOKER HEADERS your choice in a high-performance exhaust system. Extensive
2015 Ford Mustang GT V8-5.0L Axle-Back Exhaust System w/ Mufflers 52017FLT Installation Instructions
 2015 Ford Mustang GT V8-5.0L Axle-Back Exhaust System w/ Mufflers 52017FLT Installation Instructions Thank you for making FLOWTECH your choice in a high-performance exhaust system. Extensive dyno/track
Installation Instructions for: SYSTEM # DODGE CHALLENGER R/T SCAT PACK, SRT 392 & SRT HELLCAT 6.2L / 6.4L V8 HEMI ENGINE.
 Installation Instructions for: SYSTEM #6350014 2015-201 DODGE CHALLENGER R/T SCAT PACK, SRT 392 & SRT HELLCAT 6.2L / 6.4L V8 HEMI ENGINE 0 /1 /17 Removal: 1) Raise the vehicle and support securely with
409S Stainless Steel. Removal:
 Installation Instructions for: SYSTEM #817760 2015-2017 DODGE CHALLENGER R/T SCAT PACK, SRT 392 & SRT HELLCAT 6.2L / 6.4L V8 HEMI ENGINE 409S Stainless Steel Removal: 01/16/17 1) Raise the vehicle and
Chevrolet Camaro Exhaust System Installation PN s , , , , , , , , , , ,
 Chevrolet Camaro Exhaust System Installation PN s -140280, 140281, 140282, 140348, 140356, 140493, 140494, 140495, 140526, 140530, 140528, 140532 Thank you for purchasing a Borla Performance Cat-Back Exhaust
Exhaust System Installation for Audi S4, S5 & S5 Sportback PNs ,
 Exhaust System Installation for Audi S4, S5 & S5 Sportback PNs 140740, 140749 ***** Please compare the parts in the box with the bill of materials provided ***** to assure that you have all the parts necessary
Installation Instructions for: SYSTEM # DODGE CHALLENGER R/T SCAT PACK, SRT 392 & SRT HELLCAT 6.2L / 6.4L V8 HEMI ENGINE.
 Installation Instructions for: SYSTEM #6350028 2015-2017 DODGE CHALLENGER R/T SCAT PACK, SRT 392 & SRT HELLCAT 6.2L / 6.4L V8 HEMI ENGINE 05/18/17 Removal: 1) Raise the vehicle and support securely with
Installation for Chevrolet Silverado/GMC Sierra PN s ,
 Installation for Chevrolet Silverado/GMC Sierra PN s-140550, 140551 ***** Please compare the parts in the box with the bill of materials provided ***** to assure that you have all the parts necessary for
Installation for Chevrolet Malibu 2.0L Turbo PN-11936
 Installation for Chevrolet Malibu 2.0L Turbo PN-11936 BORLA PERFORMANCE INDUSTRIES ***** Please compare the parts in the box with the bill of materials provided ***** to assure that you have all the parts
Exhaust System Installation for Corvette, C6 or Z06 PN s , 11811, 11812, 11814, 11815, 11816, 11917
 Exhaust System Installation for Corvette, C6 or Z06 PN s - 11810, 11811, 11812, 11814, 11815, 11816, 11917 ***** Please compare the parts in the box with the bill of materials provided ***** to assure
Exhaust System Installation Corvette C6
 CORVETTE C6 Exhaust System Installation 2009+ Corvette C6 Recommended Tools: 13 mm Socket 15 mm Socket 18 mm Socket 15 mm Open End Wrench Torque Wrench (20-100 ft.-lb.) Drive extensions for Ratchet (MINIMUM
IMPORTANT WARRANTY & INSTALLATION INSTRUCTIONS ATTACHED
 IMPORTANT WARRANTY & INSTALLATION INSTRUCTIONS ATTACHED Please Forward All Attached Information to Consumer Warranty Not Valid Unless Returned to CORSA Exhaust STOP Please take time to read and understand
STOP IMPORTANT WARRANTY & INSTALLATION INSTRUCTIONS ATTACHED TO ACTIVATE YOUR LIMITED LIFETIME WARRANTY GO TO: CORSAPERFORMANCE.
 IMPORTANT WARRANTY & INSTALLATION INSTRUCTIONS ATTACHED Please Forward All Attached Information to Consumer Warranty Not Valid Unless Returned to CORSA Exhaust We ask that you take a few moments to complete
Installation for Dodge Challenger & Charger HellCat PN s , , , , , , ,
 Installation for PN s-140642, 140646, 140647, 140648, 140666, 140667, 140668, 140669 ***** Please compare the parts in the box with the bill of materials provided ***** to assure that you have all the
2010 Camaro Long Tube Headers, Coated w/high Flow Cats Use w/#30220
 PART #30212 2010 Camaro Long Tube Headers, Coated w/high Flow Cats Use w/#30220 PACKING LIST Before installation, use this checklist to make sure all necessary parts have been included. ITEM CHECK PART
Chevrolet Camaro (Gen6) Installation Guide PN 11920, 11921, 11924, 11925, 11926, 11927, 11930, 11931
 Installation Guide PN 11920, 11921, 11924, 11925, 11926, 11927, 11930, 11931") Installation Guide PN 11920, 11921, 11924, 11925, 11926, 11927, 11930, 11931 ***** Please compare the parts in the box with the bill of materials provided ***** (view the following pages) to assure that
Installation Guide PN 11920, 11921, 11924, 11925, 11926, 11927, 11930, 11931 ***** Please compare the parts in the box with the bill of materials provided ***** (view the following pages) to assure that
2010 Camaro Long Tube Headers, Coated w/high Flow Cats/ Powerflo-X Crossover Assembly
 PART #30213/30214 2010 Camaro Long Tube Headers, Coated w/high Flow Cats/ Powerflo-X Crossover Assembly PACKING LIST Before installation, use this checklist to make sure all necessary parts have been included.
Ford Mustang GT Long Tube Header Installation
 2005-2006 Ford Mustang GT Long Tube Header Installation Precision manufactured using aircraft quality T-304 stainless steel; this system is designed to endure years of heavy use. Installing a Borla Performance
Recommended Tools: 3/8 drive ratchet 3/8 drive 13mm socket 3/8 drive 15mm deep socket 10 3/8 ratchet extension Grommet pullers
 Please take time to read and understand these installation instructions. CORSA recommends that the installation of this system be performed by a qualified service center or professional muffler installer
Installation for Jeep Grand Cherokee SRT8 PN s , and 60634, 60635
 Installation for Jeep Grand Cherokee SRT8 PN s-140632, 140633 and 60634, 60635 BORLA PERFORMANCE INDUSTRIES ***** Please compare the parts in the box with the bill of materials provided ***** to assure
Installation for Honda Civic Type R PN
 Installation for PN-140738 BORLA PERFORMANCE INDUSTRIES ***** Please compare the parts in the box with the bill of materials provided ***** to assure that you have all the parts necessary for this installation.
Installation for Chevrolet Silverado & GMC Sierra PN s , , ,
 Installation for Chevrolet Silverado & GMC Sierra PN s-140717, 140718, 140719, 140720 BORLA PERFORMANCE INDUSTRIES ***** Please compare the parts in the box with the bill of materials provided ***** to
Installation Guide for Chevrolet Camaro ZL1 PNs ,
 Installation Guide for Chevrolet Camaro ZL1 PNs -140726, 140727 ***** Please compare the parts in the box with the bill of materials provided ***** (view the following pages) to assure that you have all
Exhaust System Installation for Chevrolet Silverado and GMC Sierra PN , , , , ,
 Exhaust System Installation for Chevrolet Silverado and GMC Sierra PN-140535, 140536, 140537, 140538, 140539, 140540 ***** Please compare the parts in the box with the bill of materials provided *****
Long Tube Header Installation For Dodge Challenger SRT-8 & R/T, Charger SRT-8 & R/T, Magnum SRT-8 & R/T & Chrysler 300 SRT-8 & 300C
 Long Tube Header Installation For 2005-2008 Dodge Challenger SRT-8 & R/T, Charger SRT-8 & R/T, Magnum SRT-8 & R/T & Chrysler 300 SRT-8 & 300C Precision manufactured using high quality austenitic stainless
Long Tube Header Installation For Ford Mustang GT
 Long Tube Header Installation For 2005-2008 Ford Mustang GT Precision manufactured using aircraft quality T-304 stainless steel; this system is designed to endure years of heavy use. Installing a Borla
Exhaust System Installation for the Ford F-150 PNs , , , , , ,
 Exhaust System Installation for the Ford F-150 PNs 140693, 140694, 140695, 140696 140697, 140698, 140699, 140700 BORLA PERFORMANCE INDUSTRIES ***** Please compare the parts in the box with the bill of
Installation for Honda Accord PN s 11840, 11853, 11949
 Installation for Honda Accord PN s 11840, 11853, 11949 BORLA PERFORMANCE INDUSTRIES ***** Please compare the parts in the box with the bill of materials provided ***** to assure that you have all the parts
Installation for Ford F-150 Raptor (V6 Ecoboost) PN s , 60638, 60650*
 PN s , 60638, 60650*") Installation for (V6 Ecoboost) PN s- 60637, 60638, 60650* ***** Please compare the parts in the box with the bill of materials provided ***** to assure that you have all the parts necessary for this installation.
Installation for (V6 Ecoboost) PN s- 60637, 60638, 60650* ***** Please compare the parts in the box with the bill of materials provided ***** to assure that you have all the parts necessary for this installation.
Exhaust System Installation For Dodge Challenger 3.5L
 Exhaust System Installation For Dodge Challenger 3.5L BORLA PERFORMANCE INDUSTRIES These instructions have been written to help you with the installation of your Borla Performance Exhaust System. Please
2007 Shelby GT500 Long Tube Headers Installation
 2007 Shelby GT500 Long Tube Headers Installation Precision manufactured using aircraft quality T-304 stainless steel; this system is designed to endure years of heavy use. Installing a Borla Performance
Exhaust System Installation PN s , , , , ,
 Exhaust System Installation PN s - 140557, 140558, 140559, 140560, 140652, 140653 ***** Please compare the parts in the box with the bill of materials provided ***** to assure that you have all the parts
Installation Instructions for Challenger R/T: , , , Charger R/T: , , ,
 Installation Instructions for Challenger R/T: 140713, 140714, 140715, 140716 Charger R/T: 140722, 140723, 140724, 140725 ***** Please compare the parts in the box with the bill of materials provided *****
Thank you for purchasing a Borla Performance Cat-Back Exhaust System.
 Thank you for purchasing a Borla Performance Cat-Back Exhaust System. Precision manufactured using aircraft quality T-304 stainless steel; this system is designed to endure years of heavy use. Installing
Tuned Length Headers. Special Tools Required: Install Time: Difficulty: Follow these instructions carefully to ensure correct fitment and operation.
 Special Tools Required: welder / saws all Install Time: Approximately 4 Hours Difficulty: 4 out of 5 Follow these instructions carefully to ensure correct fitment and operation. STEP 1 Disconnect the negative
Exhaust System Installation for Chevrolet Corvette C6 PN and
 Exhaust System Installation for Chevrolet Corvette C6 PN-140128 and 140131 These instructions have been written to help you with the installation of your Borla Performance Exhaust System. Please read this
Exhaust System Installation for Audi S5, S4, and S6 PNs , ,
 Exhaust System Installation for Audi S5, S4, and S6 PNs-140391, 140403, 140704 ***** Please compare the parts in the box with the bill of materials provided ***** to assure that you have all the parts
GM Duramax Diesel
 Please confirm that all parts are present before beginning the factory exhaust system removal and CORSA exhaust system installation. 2001-05 BILL OF MATERIALS: PN 15201, 15203, 15204 & 15210: (1) Muffler,
STOP IMPORTANT WARRANTY & INSTALLATION INSTRUCTIONS ATTACHED TO ACTIVATE YOUR LIMITED LIFETIME WARRANTY GO TO: CORSAPERFORMANCE.
 IMPORTANT WARRANTY & INSTALLATION INSTRUCTIONS ATTACHED Please Forward All Attached Information to Consumer Warranty Not Valid Unless Returned to CORSA Exhaust We ask that you take a few moments to complete
Please compare the parts in the box with the bill of materials provided to assure that you have all the parts necessary for this installation.
 Exhaust System Installation for Ford Mustang GT, Shelby GT500, & Mustang V6 PN s 11789, 11790, 11791, 11792, 11793, 11796, 11797, 11798, 11799, 11836, 11837, & 11838 These instructions have been written
3 Turbo Downpipe Installation Audi A3 / Volkswagen GTI / Volkswagen Jetta 2.0L FSI/TSI Turbo CD100013
 Please take time to read and understand these installation instructions. APR recommends that installation of this system be performed by a qualified service center or professional muffler installer who
IMPORTANT WARRANTY & INSTALLATION INSTRUCTIONS ATTACHED
 IMPORTANT WARRANTY & INSTALLATION INSTRUCTIONS ATTACHED Please Forward All Attached Information to Consumer Warranty Not Valid Unless Returned to CORSA Exhaust We ask that you take a few moments to complete
Exhaust System Installation for Dodge Challenger PN s , , , &
 Exhaust System Installation for Dodge Challenger PN s 140297, 140306, 140384, & 140482 ***** Please compare the parts in the box with the bill of materials provided ***** to assure that you have all the
Exhaust System Installation For Dodge Ram 1500 PN ,140552,140553
 Exhaust System Installation For Dodge Ram 1500 PN-140308,140552,140553 BORLA PERFORMANCE INDUSTRIES Precision manufactured using high quality austenitic stainless steel; this system is designed to endure
GM F-BODY DUAL EXHAUST SYSTEM RHKR (304SS) & RHKR (409SS) RHKR (304SS) & RHKR (409SS)
 & RHKR (409SS) RHKR (304SS) & RHKR (409SS)") 1982-92 GM F-BODY DUAL EXHAUST SYSTEM 70501326-RHKR (304SS) & 70501426-RHKR (409SS) 70501339-RHKR (304SS) & 70501439-RHKR (409SS) Installation Instructions NOTE: Does not fit 1991-92 Pontiac Trans Am/GTA
1982-92 GM F-BODY DUAL EXHAUST SYSTEM 70501326-RHKR (304SS) & 70501426-RHKR (409SS) 70501339-RHKR (304SS) & 70501439-RHKR (409SS) Installation Instructions NOTE: Does not fit 1991-92 Pontiac Trans Am/GTA
Exhaust System Installation for the Mustang GT & Shelby GT500 PN , , , , ,
 Exhaust System Installation for the Mustang GT & Shelby GT500 PN 140370, 140371, 140372, 140410, 140411, 140412 These instructions have been written to help you with the installation of your Borla Performance
2015+ Ford F-150 Off-Road Exhaust Kit
 2015+ Ford F-150 Off-Road Exhaust Kit Installation Instructions P/N: 421985 (1115-5E292ORR) Application: 2015+ Ford F-150 OFF-ROAD USE ONLY Important Note: Before installing the ROUSH Performance Product,
IMPORTANT WARRANTY & INSTALLATION INSTRUCTIONS ATTACHED
 IMPORTANT WARRANTY & INSTALLATION INSTRUCTIONS ATTACHED Please Forward All Attached Information to Consumer Warranty Not Valid Unless Returned to CORSA Performance We ask that you take a few moments to
What s in your new header system kit?
 !"#$% "#$%& ' "())' **+ Congratulations on your purchase of the Dynatech / SuperMaXX system for the Dodge Magnum / Chrysler 300C. We believe, and think you will agree that this system is second to none
STOP IMPORTANT WARRANTY & INSTALLATION INSTRUCTIONS ATTACHED TO ACTIVATE YOUR LIMITED LIFETIME WARRANTY GO TO: CORSAPERFORMANCE.
 IMPORTANT WARRANTY & INSTALLATION INSTRUCTIONS ATTACHED Please Forward All Attached Information to Consumer Warranty Not Valid Unless Returned to CORSA Exhaust We ask that you take a few moments to complete
Please take time to read and understand these installation instructions.
 Please take time to read and understand these installation instructions. CORSA recommends that installation of this system be performed by a qualified service center or professional muffler installer who
To ensure this part number fits your specific model year, please visit our website for the latest model year listings at
 Exhaust System Installation for Ford Mustang GT, Shelby GT500, & Mustang V6 PN s 11789, 11790, 11791, 11792, 11793, 11796, 11797, 11798, 11799, 11836, 11837, & 11838 ***** Please compare the parts in the
M-5230-MGTCA Mustang GT, Mustang GT500 INSTALLATION INSTRUCTIONS
 Please visit www.fordracingparts.com for the most current instruction information!!! PLEASE READ ALL OF THE FOLLOWING INSTRUCTIONS CAREFULLY PRIOR TO INSTALLATION. AT ANY TIME YOU DO NOT UNDERSTAND THE
Magnaflow MF Series Cat-Back Exhaust Dual Side Exit - Before Rear Tire p/n: F150 Extended Cab
 Magnaflow MF Series Cat-Back Exhaust Dual Side Exit - Before Rear Tire p/n: 19054 2015-2017 F150 Extended Cab Time Necessary: Approximately 1 hour Please Note: I ran into an issue with my install. This
By installing your Borla Performance Exhaust System, you indicate that you have read this document and you agree with the terms stated below.
 Thank you for purchasing a Borla Performance Cat-back Exhaust System. Precision manufactured using aircraft quality T-304 stainless steel; this system is designed to endure years of heavy use. Installing
Installation for Dodge Challenger R/T PN s ,
 Installation for PN s-140707, 140708 ***** Please compare the parts in the box with the bill of materials provided ***** (view the following pages) to assure that you have all the parts necessary for this
Installation Instructions BILLET/PLUS PISTOL-GRIP SHIFTER Fits: 2016 Camaro V6 with Manual Transmission Catalog #
 Installation Instructions BILLET/PLUS PISTOL-GRIP SHIFTER Fits: 2016 Camaro V6 with Manual Transmission Catalog # 3916034 WORK SAFELY! For maximum safety, perform this installation on a clean, level surface
STOP IMPORTANT WARRANTY & INSTALLATION INSTRUCTIONS ATTACHED TO ACTIVATE YOUR LIMITED LIFETIME WARRANTY GO TO: CORSAPERFORMANCE.
 IMPORTANT WARRANTY & INSTALLATION INSTRUCTIONS ATTACHED Please Forward All Attached Information to Consumer Warranty Not Valid Unless Returned to CORSA Exhaust We ask that you take a few moments to complete
Chevy Monte Carlo / Chevy Impala / Pontiac Grand Prix 2000 & newer - All models Dual Rear Exit Exhaust System Installation Instructions
 Chevy Monte Carlo / Chevy Impala / Pontiac Grand Prix 2000 & newer - All models Dual Rear Exit Exhaust System Installation Instructions TOOLS/SUPPLIES NEEDED: Safety glasses, 15mm deep socket, 15mm wrench,
Exhaust System Installation for the Ford Mustang PN s , , , , , , , ,
 Exhaust System Installation for the PN s-140583, 140584,1 40585, 140586, 140587, 140588, 140589, 140590, 140591 ***** Please compare the parts in the box with the bill of materials provided ***** to assure
Installation Instructions for Scion FR-S, Toyota FT86, or Subaru BRZ PN-11839, 11937
 Installation Instructions for Scion FR-S, Toyota FT86, or Subaru BRZ PN-11839, 11937 ***** Please compare the parts in the box with the bill of materials provided ***** to assure that you have all the
IMPORTANT WARRANTY & INSTALLATION INSTRUCTIONS ATTACHED
 IMPORTANT WARRANTY & INSTALLATION INSTRUCTIONS ATTACHED Please Forward All Attached Information to Consumer Warranty Not Valid Unless Returned to CORSA Exhaust We ask that you take a few moments to complete
Suggested Installation Instructions for: , , Corvette C6 - Corsa Performance Exhaust System
 Page 1 Suggested Installation Instructions for: 648-176, 648-178, 648-180 2009 Corvette C6 - Corsa Performance Exhaust System Count on Mid America Motorworks for all your Corvette Parts and Corvette Accessories
IMPORTANT WARRANTY & INSTALLATION INSTRUCTIONS ATTACHED
 IMPORTANT WARRANTY & INSTALLATION INSTRUCTIONS ATTACHED Please Forward All Attached Information to Consumer Warranty Not Valid Unless Returned to CORSA Performance STOP Please take time to read and understand
Installation for Dodge Charger R/T PN s , ,
 Installation for Dodge Charger R/T PN s 140635, 140636, 140637 These instructions have been written to help you with the installation of your Borla Performance Exhaust System. Please read this document
TOYOTA. Tundra Split Rear Dual Exhaust. Part Number: ; Base Kit Fit Kit: ; 4.6 & 5.7L D-Cab Standard Bed & Crew Max
 TOYOTA Tundra 010 - Split Rear Dual Exhaust Part Number: 00016-34731; Base Kit Fit Kit: 00016-34734-03; 4.6 &.7L D-Cab Standard Bed & Crew Max Acc. Code: DE1 Section I Installation Preparation Kit Contents
Mid-Pipe & Rear Section Installation for KIA Soul
 Mid-Pipe & Rear Section Installation for KIA Soul These instructions have been written to help you with the installation of your Borla Performance Exhaust Please read this document completely before beginning
Long Tube Header Installation For Charger R/T, Magnum R/T, Chrysler 300C, Challenger R/T & Charger R/T PN , 17275,17256, 17275
 Long Tube Header Installation For Charger R/T, Magnum R/T, Chrysler 300C, Challenger R/T & Charger R/T PN - 17252, 17275,17256, 17275 These instructions have been written to help you with the installation
Exhaust System Installation for Nissan GT-R PN 12658
 Exhaust System Installation for Nissan GT-R PN 12658 ***** Please compare the parts in the box with the bill of materials provided ***** to assure that you have all the parts necessary for this installation.
Thank you for purchasing the AWE SwitchPath Exhaust System for the Audi B9 S5 Sportback.
 Thank you for purchasing the AWE SwitchPath Exhaust System for the 2017+ Audi B9 S5 Sportback. Let s go! Switchpath Exhaust Parts: 1 Driver downpipe upper section (part A10) 1 Driver downpipe lower section
Owner smanual. Banks Monster Exhaust System Ford F L V8, 3.5L & 2.7L EcoBoost ECMB, CCSB & CCMB
 Owner smanual with Installation Instructions Banks Monster Exhaust System 2015 Ford F-150 5.0L V8, 3.5L & 2.7L EcoBoost ECMB, CCSB & CCMB THIS MANUAL IS FOR USE WITH SYSTEMS 48762 & 48762-B Gale Banks
IMPORTANT WARRANTY & INSTALLATION INSTRUCTIONS ATTACHED
 IMPORTANT WARRANTY & INSTALLATION INSTRUCTIONS ATTACHED Please Forward All Attached Information to Consumer Warranty Not Valid Unless Returned to CORSA Exhaust STOP Please take time to read and understand
Exhaust System Installation PN , , , , &
 Exhaust System Installation PN-140415, 140416, 140417, 140438, & 140466 BORLA PERFORMANCE INDUSTRIES These instructions have been written to help you with the installation of your Borla Performance Exhaust
Installation Guide Turbo Competition X-Pipe Exhaust System
 Installation Guide 997.1 Turbo Competition X-Pipe Exhaust System Disclaimer: This installation guide is intended to clarify the installation process of your new Soul Performance Products exhaust. Please
Owner smanual. Banks Monster Exhaust System Volkswagen Golf 4 Door TDI 2.0L Clean Diesel. with Installation Instructions
 with Installation Instructions Owner smanual Banks Monster Exhaust System 2010-2012 Volkswagen Golf 4 Door TDI 2.0L Clean Diesel THIS MANUAL IS FOR USE WITH SYSTEMs 46170 Gale Banks Engineering 546 Duggan
IMPORTANT WARRANTY & INSTALLATION INSTRUCTIONS ATTACHED
 IMPORTANT WARRANTY & INSTALLATION INSTRUCTIONS ATTACHED Please Forward All Attached Information to Consumer Warranty Not Valid Unless Returned to CORSA Exhaust STOP Please take time to read and understand
15-17 FORD MUSTANG GT
 15-17 FORD MUSTANG GT IMPORTANT! WARRANTY AND Please Forward All Information to Consumer Be sure to review the enclosed instructions prior to beginning the installation process. If you have any questions
Please confirm that all parts are present before beginning the factory exhaust system removal and CORSA exhaust system installation.
 Please take time to read and understand these installation instructions. CORSA recommends that installation of this system be performed by a qualified service center or professional muffler installer who
Exhaust System Installation for Subaru Impreza WRX + STI PNs ,140381,140418, &
 Exhaust System Installation for Subaru Impreza WRX + STI PNs-140264,140381,140418, & 140595 ***** Please compare the parts in the box with the bill of materials provided ***** (view the following pages)
IMPORTANT WARRANTY & INSTALLATION INSTRUCTIONS ATTACHED
 IMPORTANT WARRANTY & INSTALLATION INSTRUCTIONS ATTACHED Please Forward All Attached Information to Consumer Warranty Not Valid Unless Returned to CORSA Performance We ask that you take a few moments to
1501 Industrial Way N., Toms River, NJ Fax: PACKING LIST MUSTANG LONG TUBE HEADERS (M30000)
") 2/18/04 1501 Industrial Way N., Toms River, NJ 08755 732-349-2109 Fax:732-244-0867 ADVANCED - Installation requires professional-type tools and advanced automotive-service skills. If you lack experience
2/18/04 1501 Industrial Way N., Toms River, NJ 08755 732-349-2109 Fax:732-244-0867 ADVANCED - Installation requires professional-type tools and advanced automotive-service skills. If you lack experience
Installation for Ford Explorer PN s , ,
 Installation for Ford Explorer PN s- 140656, 140659, 140658 These instructions have been written to help you with the installation of your Borla Performance Exhaust System. Please read this document completely
STOP IMPORTANT WARRANTY & INSTALLATION INSTRUCTIONS ATTACHED TO ACTIVATE YOUR LIMITED LIFETIME WARRANTY GO TO: CORSAPERFORMANCE.
 IMPORTANT WARRANTY & INSTALLATION INSTRUCTIONS ATTACHED Please Forward All Attached Information to Consumer Warranty Not Valid Unless Returned to CORSA Exhaust We ask that you take a few moments to complete
1501 Industrial Way N., Toms River, NJ Fax: PACKING LIST MUSTANG GT LONG TUBE HEADERS (M30000)
") ADVANCED - Installation requires professional-type tools and advanced automotive-service skills. If you lack experience with internal engine modifications, an Advanced installation is probably beyond your
ADVANCED - Installation requires professional-type tools and advanced automotive-service skills. If you lack experience with internal engine modifications, an Advanced installation is probably beyond your
IMPORTANT WARRANTY & INSTALLATION INSTRUCTIONS ATTACHED
 IMPORTANT WARRANTY & INSTALLATION INSTRUCTIONS ATTACHED Please Forward All Attached Information to Consumer Warranty Not Valid Unless Returned to CORSA Performance We ask that you take a few moments to
Ford F-150 Off Road Exhaust Kit
 2011-14 Ford F-150 Off Road Exhaust Kit P/N: 620092 (SLP1111-5E292) Application: 2011-14 Ford F-150 equipped with the following engine options: 3.5L Eco-Boost Engine with automatic transmission. 5.0L 4V
Thank you for purchasing a Borla Performance Cat-Back Exhaust System.
 Thank you for purchasing a Borla Performance Cat-Back Exhaust System. Precision manufactured using aircraft quality T-304 stainless steel; this system is designed to endure years of heavy use. Installing
Exhaust System Installation for Infiniti G ,
 Exhaust System Installation for Infiniti G37-140260, 140510 ***** Please compare the parts in the box with the bill of materials provided ***** (view the following pages) to assure that you have all the
15-17 FORD MUSTANG GT
 15-17 FORD MUSTANG GT IMPORTANT! WARRANTY AND Please Forward All Information to Consumer Be sure to review the enclosed instructions prior to beginning the installation process. If you have any questions
OVERVIEW: KIT INCLUDES:
 Please visit www.fordracingparts.com for the most current instruction information!!! PLEASE READ ALL OF THE FOLLOWING INSTRUCTIONS CAREFULLY PRIOR TO INSTALLATION. AT ANY TIME YOU DO NOT UNDERSTAND THE
Please take time to read and understand these installation instructions.
 2014- Current C7 Corvette Please take time to read and understand these installation instructions. CORSA recommends that the installation of this system be performed by a qualified service center or professional
Banks Monster Exhaust System
 Banks Monster Exhaust System 2007-2008 Chevy/GMC 1500 Silverado 4.8L, 5.3L, 6.0L V-8 Gas, New Body Style THIS MANUAL IS FOR USE WITH MONSTER EXHAUST SYSTEMS 48344, 48345 Gale Banks Engineering 546 Duggan
Instructions for Porsche PN s * and
 Instructions for Porsche 997.2 PN s-140711* and 140712 ***** Please compare the parts in the box with the bill of materials provided ***** to assure that you have all the parts necessary for this installation.
2007 Chevy Silverado 1500 & GMC Sierra 1500 Exhaust System Installation
 2007 Chevy Silverado 1500 & GMC Sierra 1500 Exhaust System Installation Precision manufactured using aircraft quality T-304 stainless steel; this system is designed to endure years of heavy use. Installing
Please take time to read and understand the following
 Thank you for purchasing a Borla Performance Down Pipe. This Down Pipe has been designed for use only with a Borla Performance Cat-Back exhaust system. Replacement down-pipes are designed exclusively for
Banks Monster Exhaust Rear Quads System
 Banks Monster Exhaust Rear Quads System 2007-2008 Chevy/GMC 1500 Silverado, 6.0L V-8 Gas, Vortex Max THIS MANUAL IS FOR USE WITH MONSTER EXHAUST SYSTEMS 48347 Gale Banks Engineering 546 Duggan Avenue Azusa,
VW & Audi TDI CR140 ECO KIT Installation Guide
 VW & Audi TDI CR140 ECO KIT Installation Guide This guide is to help you install your new Rawtek DPF, EGR & Adblue Delete Exhaust ECO Kit on your (2009-2014) VW / Audi with 2.0l CR140 Diesel Engine. Note: