After installation please observe the following points: Before installation please observe the following points:
|
|
|
- Roger Palmer
- 5 years ago
- Views:
Transcription
1 Before installation please observe the following points: Read all information in this manual carefully. All suspension components are fitted and removed acc. to the manufacturer s specifications for installing and removal, if not otherwise required in these instructions. Check that your vehicle type is listed in the certificate as being specified for this kit. Check the product for all components before - starting installation! Check that dimensions and fastening points are - comparable between the original and BILSTEIN shock absorbers. Directional references (left, right, front, rear) are - always with reference to the driving direction. Remove the negative battery pole. - The tested vehicles are left- hand drive vehicles After installation please observe the following points: Set the vehicle height by adjusting spring plates and lock nuts on the new dampers. Only use the supplied spanner wrenches. All rubber- mounted strut/ damper attachments must not be fully tightened until AFTER the suspension system is loaded (wheels on the ground). Other mounting fasteners (for example brackets) must be securely tightened BEFORE load is placed on the suspension system. Because the vehicle has been lowered, - freedom of movement for all wheel-/ tire- combinations must be checked. Connect the negative battery pole. - After installing the suspension system, caster - and camber must be checked and adjusted according to manufacturer s specifications. Check and reset load- dependent brake compensator and ABS system according to manufacturer s specifications. Check and adjust headlight setting All diagrams are generalized and not to scale! brackets, etc. specific to strut are not shown!


2 instruction for force adjustment position 1 = comfort position 10 = sport During the adjustment you will hear a positive click at each position of the adjustment. Instruction for the front axle The adjusting element of the front struts is located at the bottom end of the strut. Adjusting position must aligned with the red mark on outer tube. Status of delivery is position 1. Instruction for the rear axle Adjusting position must aligned with the red mark below adjusting knob. Status of delivery is position 1. list of torques M8 M 10 M 12 M 14 M 16 Thread Torque Nm Torque ft lb Do not use an impact tool to loosen or tighten fasteners due to possible damage to the product. Self- locking nuts must only be used once!
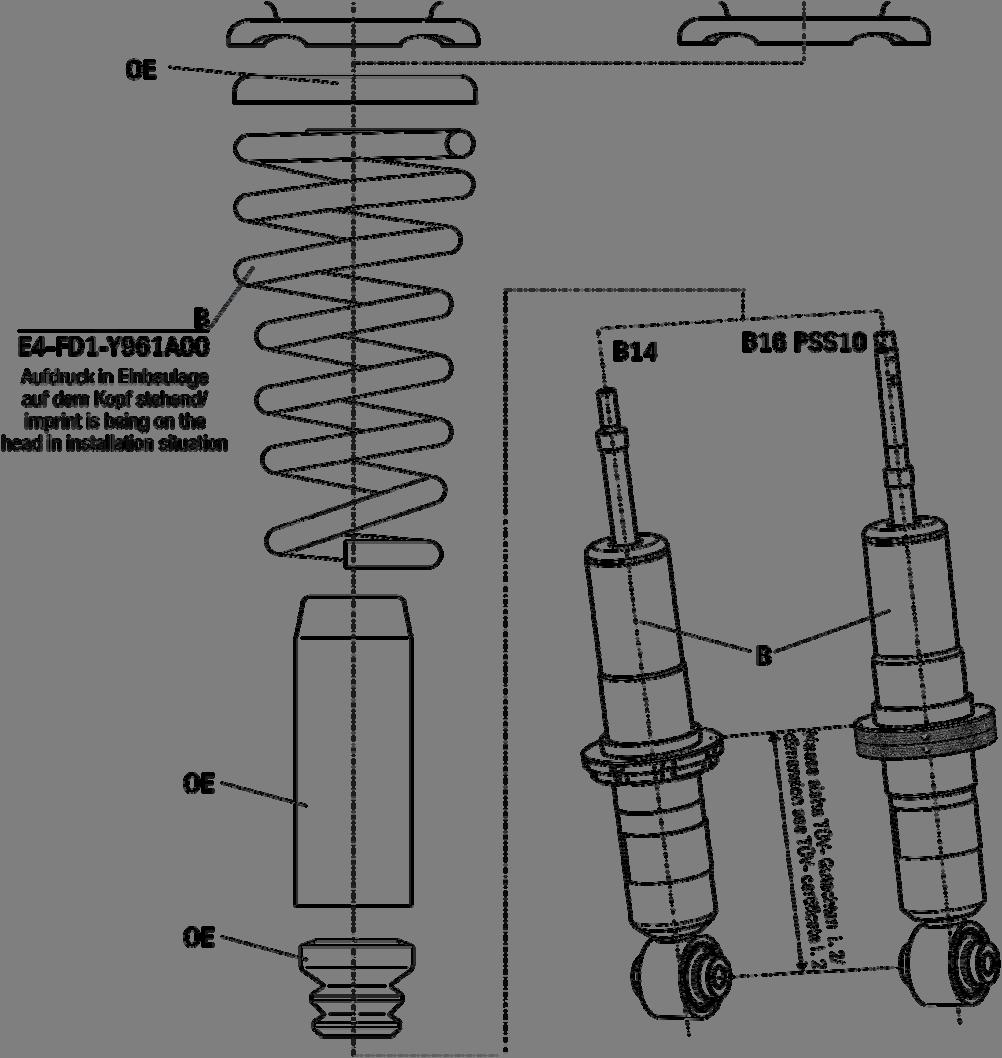
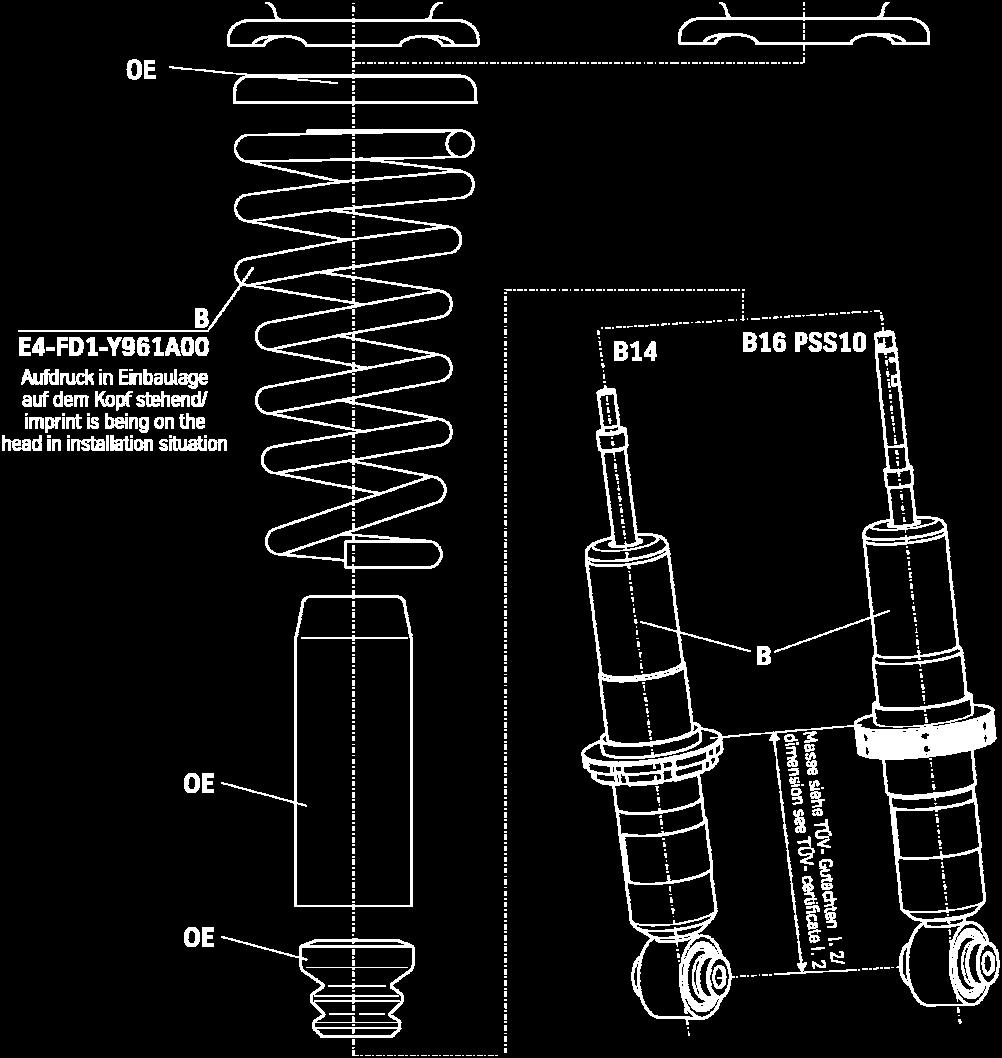
3 mounting instruction for front axle Removal Place vehicle on a wheel- free car hoist, lift it and remove wheels. Vehicles equipped with xenon headlight the movable element of sensor for the headlamp levelling controller must removed before. The lower control arm must be supported by suitable means! Remove bottom mount. Remove top fixing nuts from support bearing. Do not remove central nut at this time! Remove complete strut and clamp it in an appropriate strut vice. Using a suitable spring compressor, compress suspension spring until tension on support bearing is free to move. Installation Assemble BILSTEIN and/ or original mounting parts, as well as the new BILSTEIN spring on the BILSTEIN strut in reverse order to removal. IMPORTANT! Spring plates must not be adjusted outside the ranges specified in the certificate! The correct mounting position of the suspension springs can be determined by the printing on the springs; install them with the print upright. Do not reuse original- bumper, since BILSTEIN- strut has built in bump stop. Fit assembled BILSTEIN strut to the vehicle in reverse order to removal. Release central nut and remove original mounting parts and coil spring. Please refer to diagram to identify which parts will be replaced with BILSTEIN- supplied components.


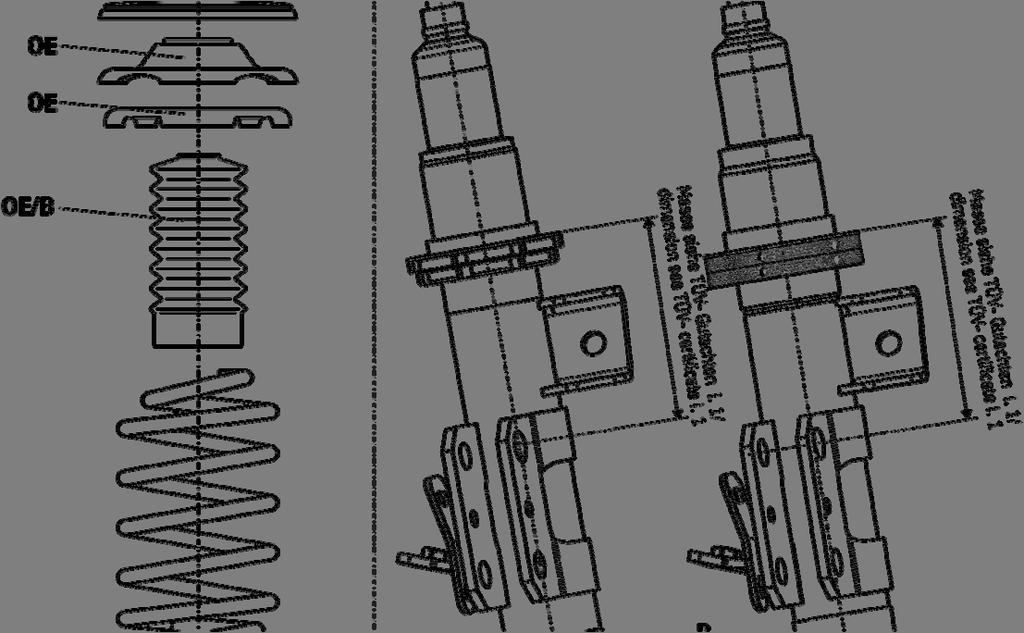
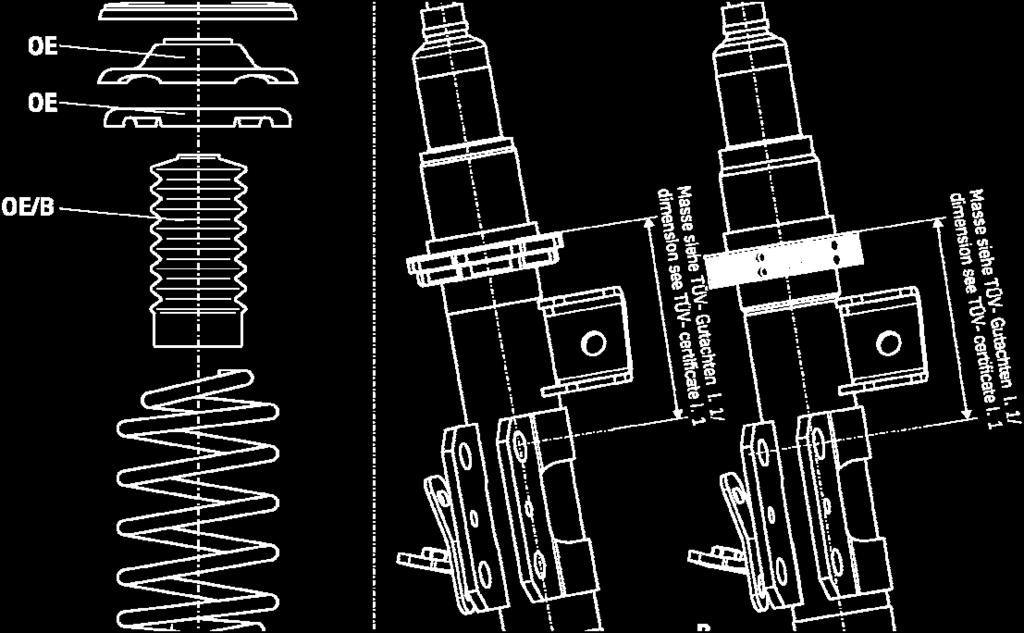


4 front axles left/right
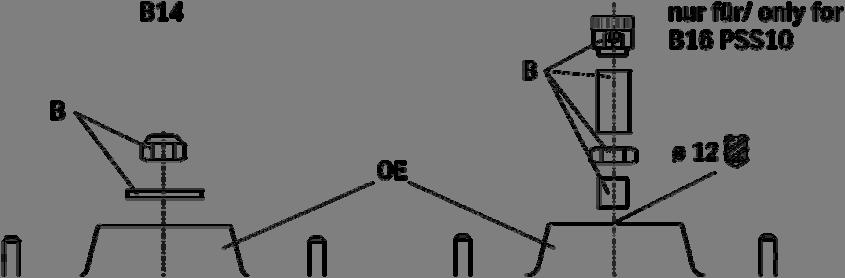
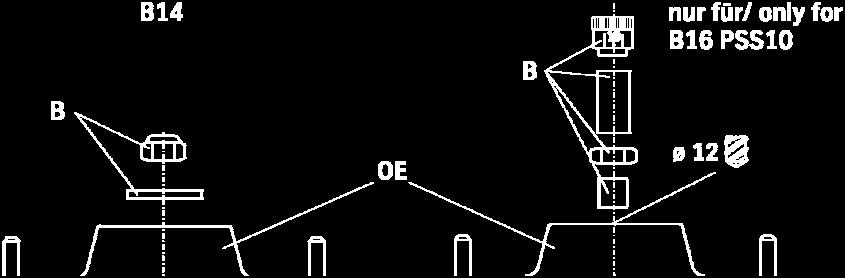
5 mounting instruction for rear axle Removal shock absorber Place vehicle on a wheel-free car hoist, lift it and remove wheels. The lower control arm must be supported by suitable means! Remove bottom mount. Remove top fixing nuts from support bearing. Do not remove centre nut at this time! Remove complete shock absorber and clamp it in an appropriate strut vice. Compress suspension spring until tension on support bearing is free to move. Release centre nut and remove original mounting parts and coil spring. Please refer to diagram to identify which parts will be replaced with BILSTEIN- supplied components. Notes for installation B16 PSS10 Drill a hole of ø 12 mm into original support bearing ( see sketch on page 22). Cut the side carpeting inside baggage compartment near wheelhouse like shown on pic. 1 and 2. The correct mounting position of the suspension springs can be determined by the printing on the springs; install them with the print upside down.


6 Bild_1 Bild_2 PSS10-10 step- pin adjustment The adjustment unit must be deinstalling before the shock absorber installation can be completed in reverse order to BILSTEIN and/ or original mounting parts.

 Instruction for the rear axle Status of delivery")
7 A- Set screw B- Adjusting head C- lock nut M12x 1 D- End stop disc E- Nut M12x1 F- sleeve G Set screw H End stop pin I Adjusting screw position 1 = comfort (counter-clockwise direction) position 10 = sport (clockwise direction) Instruction for the rear axle Status of delivery is position 10.
8 Removal Adjustment Unit PSS10 To remove the adjusting head ( B) the set screw must loose. Remove the lock nut ( C) together with end stop disc (D). Now remove all original mounting parts and fit BILSTEIN and/ or original mounting parts in reverse order to removal Installing Adjustment Unit PSS10 Tighten ( E) to block and fit lock nut ( C) together with end stop disc (D). Getting an optimal fitting position for the adjustment unit you can also loose the set screw (G) and turn the end stop disc ( D) in a position to a saliently mark at the chassis you have selected before. Fix the set screw again. Pins ( H) are end stops. Place the adjusting knob ( A) flat on the adjusting screw ( I) and turn it clockwise to end stop. Fix the adjusting head (B) with set screw ( A). The adjusting head should move easily and with distinct clicks at each adjustment position. If not, disassemble the adjustment unit and reassemble acc. to the instruction. Installation shock absorber Assemble BILSTEIN and/ or original mounting parts on BILSTEIN shock absorber in reverse order to removal. IMPORTANT! Spring plates must not be adjusted outside the ranges specified in the certificate! Fit assembled shock absorber to the vehicle in reverse order to removal.
9 rear axle
Before installation please observe the following points: After installation, please observe the following points:
 Before installation please observe the following points: Read all information in this manual carefully. All suspension components are fitted and removed acc. to the manufacturer s specifications for fitting
Contents: - certificate BILSTEIN ridecontrol for multilink rear axle only:
 Contents: - certificate BILSTEIN ridecontrol for multilink rear axle only: AUDI A3,S3,RS3, 3-doors, 4- doors, incl. Sportback and Quattro - SEAT Leon, 2WD und 4WD, incl.st - SKODA Oktavia, sedan and station
E4-WM5-Y530A00 MOUNTING INSTRUCTION
 IMPORTANT! READ THIS FIRST! Installation of shock absorbers requires special tools and expert knowledge. Accordingly, installation of all BILSTEIN products must be performed by a qualified suspension specialist.
518A00 MOUNTING INSTRUCTION
 IMPORTANT! READ THIS FIRST! Installation of shock absorbers requires special tools and expert knowledge. Accordingly, installation of all BILSTEIN products must be performed by a qualified suspension specialist.
IMPORTANT! READ THIS FIRST!
 IMPORTANT! READ THIS FIRST! Installation of shock absorbers requires special tools and expert knowledge. Accordingly, installation of all BILSTEIN products must be performed by a qualified suspension specialist.
E4-WM5-Y556A00 MOUNTING INSTRUCTION
 IMPORTANT! READ THIS FIRST! Installation of shock absorbers requires special tools and expert knowledge. Accordingly, installation of all BILSTEIN products must be performed by a qualified suspension specialist.
B8 5112/5162 LEVELING KIT (FRONT) RAM x4 GAS
 RAM x4 GAS") B8 5112/5162 LEVELING KIT (FRONT) 2014+ RAM 2500 4x4 GAS IMPORTANT! READ THIS FIRST! Installation of shock absorbers requires special tools and expert knowledge. Accordingly, installation of all BILSTEIN
B8 5112/5162 LEVELING KIT (FRONT) 2014+ RAM 2500 4x4 GAS IMPORTANT! READ THIS FIRST! Installation of shock absorbers requires special tools and expert knowledge. Accordingly, installation of all BILSTEIN
IMPORTANT! READ THIS FIRST!
 MPORTANT! READ THS FRST! nstallation of shock absorbers requires special tools and expert knowledge. Accordingly, installation of all BLSTEN products must be performed by a qualified suspension specialist.
IMPORTANT! READ THIS FIRST!
 MPORTANT! READ THS FRST! nstallation of shock absorbers requires special tools and expert knowledge. Accordingly, installation of all BLSTEN products must be performed by a qualified suspension specialist.
PRO STREET-S INSTALLATION INSTRUCTIONS
 PARTS & HARDWARE LIST Part Number Description Qty Part Number Description Qty A 1534.8100 DAMPER ASSY FRONT 2 B 1534.8200 DAMPER ASSY REAR 2 C PDK4.TOOL 4mm ADJUSTMENT TOOL 1 D PDK6.TOOL 6mm ADJUSTMENT
Saab 9-3 CV M04-, 4D/5D M06-
 SCdefault 900 Installation instructions SITdefault MONTERINGSANVISNING INSTALLATION INSTRUCTIONS MONTAGEANLEITUNG INSTRUCTIONS DE MONTAGE Sports chassis Accessories Part No. Group Date Instruction Part
E4-WM5-Y366A00 MOUNTING INSTRUCTION
 E4-WM5-Y366A00 MOUNTINGINSTRUCTION IMPORTANT! PLEASE READ ALL INSTRUCTIONS FIRST! If in doubt, please contact your local BILSTEIN dealer or our sales department before installation. When replacing other
SCdefault. 900 Installation instructions
 SCdefault 900 Installation instructions SITdefault Sports chassis MONTERINGSANVISNING INSTALLATION INSTRUCTIONS MONTAGEANLEITUNG INSTRUCTIONS DE MONTAGE Accessories Part No. Group Date Instruction Part
FRONT SUSPENSION GROUP 33A 33A-1 CONTENTS GENERAL DESCRIPTION... 33A-2 FRONT SUSPENSION DIAGNOSIS. 33A-3 LOWER ARM... 33A-13 SPECIAL TOOLS...
 33A-1 GROUP 33A FRONT SUSPENSION CONTENTS GENERAL DESCRIPTION......... 33A-2 DIAGNOSIS. 33A-3 INTRODUCTION TO DIAGNOSIS........................ 33A-3 DIAGNOSIS TROUBLESHOOTING STRATEGY...... 33A-3 SYMPTOM
Installation Instructions
 Installation Instructions Eibach Springs, Inc. 264 Mariah Circle Corona, California 92879-1751 USA Tech Support 800-222-8811 Ext 114 Eibach Multi-Pro R1 Coilovers - #2085.712 2006-2008 BMW, 325i, 328i,
GROUP 33A 33A-1 CONTENTS GENERAL DESCRIPTION... 33A-2 FRONT SUSPENSION DIAGNOSIS. 33A-3 LOWER ARM... 33A-13 SPECIAL TOOLS... 33A-5
 33A-1 GROUP 33A CONTENTS GENERAL DESCRIPTION 33A-2 DIAGNOSIS 33A-3 INTRODUCTION TO FRONT SUSPENSION DIAGNOSIS 33A-3 DIAGNOSIS TROUBLESHOOTING STRATEGY 33A-3 SYMPTOM CHART 33A-3 SYMPTOM PROCEDURES 33A-3
IMPORTANT! PLEASE READ ALL INSTRUCTIONS FIRST!
 IMPORTANT! PLEASE READ ALL INSTRUCTIONS FIRST! If in doubt, please contact your local BILSTEIN dealer or our sales department before installation. When replacing other brands, BILSTEIN shock absorbers
E4-WM5-Y371A00 MOUNTING INSTRUCTION
 E4-WM5-Y371A00 MOUNTINGINSTRUCTION IMPORTANT! PLEASE READ ALL INSTRUCTIONS FIRST! If in doubt, please contact your local BILSTEIN dealer or our sales department before installation. When replacing other
IMPORTANT! PLEASE READ ALL INSTRUCTIONS FIRST!
 A00 MOUNTINGINSTRUCTION IMPORTANT! PLEASE READ ALL INSTRUCTIONS FIRST! If in doubt, please contact your local BILSTEIN dealer or our sales department before installation. When replacing other brands, BILSTEIN
2016 & Up Miata MX-5 Coilover Installation Instructions
 Page1 2016 & Up Miata MX-5 Coilover Installation Instructions Tooling: Jack, jack stands or lift Socket wrench Torque wrench 10mm, 12mm, 14mm and 17mm sockets 14mm and 17mm wrenches Flat head screwdriver
INSTALLATION INSTRUCTIONS SOLO WERKS S1 Coilover Suspension BMW F22 /F30/F31/F32/F33/F34 Platform Part Number: S1BW010 / S1BW020 Rev.1.
 Thank you for purchasing your new SOLO WERKS S1 Coilover suspension. IMPORTANT PLEASE READ BEFORE BEGINNING INSTALLATION: Please take a moment to review this installation process and verify that your kit
COBB SPORT SPRINGS
 915760 - COBB SPORT SPRINGS 2008-2013 Subaru WRX/STi Congratulations on your purchase of the COBB Sport Springs for your 2008-2013 Subaru WRX/STi. The following instructions will assist you through your
COBB WRX Sports Springs West 1820 South Salt Lake City, UT USA (801)
") COBB 3362 West 1820 South Salt Lake City, UT 84104 USA (801) 713-0035 2008 WRX Sports Springs Congratulations on your purchase of the COBB Sports Springs. The following instructions should assist you through
COBB 3362 West 1820 South Salt Lake City, UT 84104 USA (801) 713-0035 2008 WRX Sports Springs Congratulations on your purchase of the COBB Sports Springs. The following instructions should assist you through
Installation Instructions
 Installation Instructions Eibach Springs, Inc. 264 Mariah Circle Corona, California 92879-1751 USA Tech Support 800-222-8811 Ext 114 Eibach Multi-Pro R1 Coilovers - #6049.712 2008-2009 Mitsubishi Lancer,
2004 Dodge Stratus ES. Access for the nuts attaching the rear shock assembly upper mount to the vehicle is through the inside of the trunk.
 REMOVAL - SHOCK ASSEMBLY NOTE: Access for the nuts attaching the rear shock assembly upper mount to the vehicle is through the inside of the trunk. 1. Roll back carpeting on top of the rear shock tower
Spring strut and spring front, replacing
 "VCC128825 EN 20090329" 1(7) Spring strut and spring front, replacing Special tools: 951 2911, 951 2914, 951 2915, 951 2564, 999 5500, 999 5576, 999 5758 Removing the spring strut Note! From model year
Installation Instructions
 Installation Instructions Eibach Springs, Inc. 264 Mariah Circle Corona, California 92879-1751 USA Tech Support 800-222-8811 Ext 114 Eibach-Callaway Multi-Pro Coil-Overs 1997-2007 Chevrolet Corvette All
2015 up Mustang Front HQ CoilOver Strut
 Part # 70-05 up Mustang Recommended Tools 05 up Mustang Front HQ CoilOver Strut Installation Table of contents Page... Included components Page... Disassembly and Getting Started Page... Strut Assembly
This file is available for free download at
 This file is available for free download at http://www.iluvmyrx7.com This file is fully text-searchable select Edit and Find and type in what you re looking for. This file is intended more for online viewing
Installation Instructions
 Installation Instructions Eibach Springs, Inc. 264 Mariah Circle Corona, California 92879-1751 USA Tech Support 800-222-8811 Ext 114 Eibach Pro Street-S Coilovers - #2895.711 2009 Dodge Challenger, R/T,
IMPORTANT! PLEASE READ ALL INSTRUCTIONS FIRST!
 MOUNTNG NSTRUCTON MPORTANT! PLEASE READ ALL NSTRUCTONS FRST! f in doubt, please contact your local BLSTEN dealer or our sales department before installation. When replacing other brands, BLSTEN shock absorbers
Eibach Pro-Damper Shocks & Struts (05-09 All):
:") Eibach Pro-Damper Shocks & Struts (05-09 All): Required tools: 3/8 and 1/2 drive ratchets 7, 8, 10, 15, 16, 17, 18, 21 & 22 mm open ended wrenches 8 & 10 mm box end wrenches 10mm socket 13, 15 & 18 mm
Eibach Pro-Damper Shocks & Struts (05-09 All): Required tools: 3/8 and 1/2 drive ratchets 7, 8, 10, 15, 16, 17, 18, 21 & 22 mm open ended wrenches 8 & 10 mm box end wrenches 10mm socket 13, 15 & 18 mm
INSTALLATION INSTRUCTIONS
 INSTALLATION INSTRUCTIONS TY-530-N13 1. DESCRIPTION: NISMO SUSPENSION KIT 2. APPLICATION: 370Z 3. PART NUMBER: E3110-1EA00-US 4. KIT CONTENTS: Item No. Qty Service Part Number Description 1 1 E6110-1EA25
Suspension System RS6582B
 Suspension System RS6582B Tahoe/Yukon READ ALL INSTRUCTIONS THOROUGHLY FROM START TO FINISH BEFORE BEGINNING INSTALLATION IMPORTANT NOTES! WARNING: This suspension system will enhance the off-road performance
INSTALLATION INSTRUCTIONS 88029
 INSTALLATION INSTRUCTIONS 88029 FOR SUSPENSION SYSTEMS RS6503: JEEP WRANGLER (TJ) READ ALL INSTRUCTIONS THOROUGHLY FROM START TO FINISH BEFORE BEGINNING INSTALLATION REV F IMPORTANT NOTES! WARNING: This
SCdefault. 900 Installation instructions
 SCdefault 900 Installation instructions SITdefault Sports chassis MONTERINGSANVISNING INSTALLATION INSTRUCTIONS MONTAGEANLEITUNG INSTRUCTIONS DE MONTAGE Accessories Part No. Group Date Instruction Part
SCION tc LOWERING SPRINGS Preparation
 Preparation Part Number: PTR11-21100 PTR11-21100-50 Kit Contents Item # Quantity Reqd. Description 1 2 Front Spring 2 2 Rear Spring 3 2 Locking Nut 4 2 Spring Bumper, Front 5 1 Instruction Form Hardware
SUSPENSION - FRONT Toyota Celica DESCRIPTION ADJUSTMENTS & INSPECTION WHEEL ALIGNMENT SPECIFICATIONS & PROCEDURES WHEEL BEARING
 SUSPENSION - FRONT 1988 Toyota Celica FRONT SUSPENSION Toyota DESCRIPTION Vehicles are equipped with front wheel drive and independent MacPherson strut front suspension. Suspension consists of vertically
FRONT SUSPENSION GROUP CONTENTS GENERAL INFORMATION FASTENER TIGHTENING SPECIFICATIONS GENERAL SPECIFICATIONS...
 33-1 GROUP 33 FRONT SUSPENSION CONTENTS GENERAL INFORMATION 33-2 FASTENER TIGHTENING SPECIFICATIONS 33-2 GENERAL SPECIFICATIONS 33-3 SERVICE SPECIFICATIONS 33-3 DIAGNOSIS 33-4 INTRODUCTION TO DIAGNOSIS
Installation Instructions
 Installation Instructions Eibach Springs, Inc. 264 Mariah Circle Corona, California 92879-1751 USA Tech Support 800-222-8811 Ext 114 Eibach Pro Lift System - #2897.940 2007-14 Jeep Wrangler, 4 dr., 3.8L
REAR SUSPENSION GROUP CONTENTS GENERAL DESCRIPTION TRAILING ARM REAR SUSPENSION DIAGNOSIS TOE CONTROL ARM...
 34-1 GROUP 34 CONTENTS GENERAL DESCRIPTION 34-2 DIAGNOSIS 34-3 INTRODUCTION TO DIAGNOSIS 34-3 DIAGNOSTIC TROUBLESHOOTING STRATEGY 34-3 SYMPTOM CHART 34-3 SYMPTOM PROCEDURES 34-3 SPECIAL TOOLS 34-5 ON-VEHICLE
INSTALLATION INSTRUCTIONS SOLO WERKS S1 Coilover Suspension VW Passat B5 / 5.5 2WD Platform Part Number: S1VW009 R1.1
 Thank you for purchasing your new SOLO WERKS S1 Coilover suspension. IMPORTANT PLEASE READ BEFORE BEGINNING INSTALLATION: Please take a moment to review this installation process and verify that your kit
Front and Rear Suspension Modification Kit Installation
 Page 1 of 12 2014 Chevrolet Sonic (US/Canada) Sonic US/Canada Accessory Installation Manual Accessories Performance Accessories Accessories Document ID: 3471343 Front and Rear Suspension Modification Kit
Date No ST Suspensions is a brand of KW automotive North America, Inc. - KW automotive North America, Inc.
 No. 14430010 - ST Suspensions is a brand of KW automotive North merica, Inc. - KW automotive North merica, Inc. - Page 1 INSTLLTION INSTRUCTIONS Before you start to install, please read the following instructions
INSTALLATION INSTRUCTIONS SOLO WERKS S1 Coilover Suspension VAG MK4 Platform Part Number: S1VW003/04 R1.2
 Thank you for purchasing your new SOLO WERKS S1 Coilover suspension. IMPORTANT PLEASE READ BEFORE BEGINNING INSTALLATION: Please take a moment to review this installation process and verify that your kit
2001 S Front Damper/Spring Removal and Installation
 2001 S2000 - Front Damper/Spring Removal and Installation Special Tools Required Ball joint thread protector, 14 mm 071AF-S3VA000 Ball joint remover, 28 mm 07MAC-SL0A202 Removal 1. Raise the front of the
COBB SPORT SPRINGS
 913760 - COBB SPORT SPRINGS 2004-2007 Subaru WRX/STi Congratulations on your purchase of the COBB Sport Springs for your 2004-2007 Subaru WRX/STi. The following instructions will assist you through your
Installation Instructions
 Installation Instructions Eibach Springs, Inc. 264 Mariah Circle Corona, California 92879-1751 USA Tech Support 800-222-8811 Ext 114 Eibach Pro Street-S Coilovers - #28110.711 2011-13 Dodge Challenger
Installation Instructions
 Installation Instructions Eibach Springs, Inc. 264 Mariah Circle Corona, California 92879-1751 USA Tech Support 800-222-8811 Ext 114 Eibach Multi-Pro R1 Coilovers - #8598.712 2006-2011 Volkswagen, GTi,
Installation Instructions
 Installation Instructions Eibach Springs, Inc. 264 Mariah Circle Corona, California 92879-1751 USA Tech Support 800-222-8811 Ext 114 Eibach Multi-Pro R1 Coil-Overs 2006-08 Mazda MX5 2003-08 Mazda RX8 Kit
INSTALLATION INSTRUCTION 88581
 INSTALLATION INSTRUCTION 88581 FOR RANCHO SUSPENSION SYSTEM RS6581B: DODGE RAM READ ALL INSTRUCTIONS THOROUGHLY FROM START TO FINISH BEFORE BEGINNING INSTALLATION Rev C IMPORTANT NOTES! WARNING: This suspension
INSTALLATION INSTRUCTION Rev A
 INSTALLATION INSTRUCTION 88587 Rev A FOR RANCHO SUSPENSION SYSTEM RS6587B: 2009 DODGE RAM 1500 READ ALL INSTRUCTIONS THOROUGHLY FROM START TO FINISH BEFORE BEGINNING INSTALLATION IMPORTANT NOTES! WARNING:
1998 Buick Century Limited
 STABILIZER SHAFT LINK Removal 1. Raise and support the vehicle. 2. Disconnect the rear stabilizer shaft link from the strut. 3. Remove the rear stabilizer shaft link nut. 4. Remove the stabilizer shaft
SUSPENSION 2-1 SUSPENSION TABLE OF CONTENTS
 DN SUSPENSION 2-1 SUSPENSION TABLE OF CONTENTS page ALIGNMENT... 1 FRONT SUSPENSION - 4x2... 6 page FRONT SUSPENSION - 4x4... 14 REAR SUSPENSION... 23 ALIGNMENT TABLE OF CONTENTS page AND OPERATION WHEEL
M-FR3-FA Fiesta Handling Pack INSTALLATION INSTRUCTIONS
 Please visit www.fordracingparts.com for the most current instruction information!!! PLEASE READ ALL OF THE FOLLOWING INSTRUCTIONS CAREFULLY PRIOR TO INSTALLATION. AT ANY TIME YOU DO NOT UNDERSTAND THE
INSTALLATION INSTRUCTIONS
 INSTLLTION INSTRUCTIONS Before you begin installation, please read the following carefully: - Ensure that the TUEV certificate matches the vehicle specifications (front vehicle identification number (VIN))
INSTALLATION INSTRUCTIONS
 INSTLLTION INSTRUCTIONS Before you begin installation, please read the following carefully: - The suspension components must match the suspensions application specifications (springs and shock/struts identification
1. General Description
 General Description 1. General Description A: SPECIFICATION Front Rear Model Wheel arch height (Tolerance: +12 mm 24 mm ( +0.47 in 0.94 in)) mm (in) 376 (14.8) Camber (Tolerance: 0 45 Differences between
Installation Instructions
 Installation Instructions Eibach Springs, Inc. 264 Mariah Circle Corona, California 92879-1751 USA Tech Support 800-222-8811 Ext 114 Eibach Pro Street Coilovers - #8598.711 2006-2008 Volkswagen, GTi, 2.0L
SECTION 3A WHEEL ALIGNMENT
 SECTION 3A WHEEL ALIGNMENT NOTICE: All wheel alignment fasteners are important attaching parts in that they could affect the performance of vital components and systems, and/or could result in major repair
2015 up Mustang Front HQ CoilOver Strut
 Part # 13110-015 up Mustang Recommended Tools 015 up Mustang Front HQ CoilOver Strut Installation Table of contents Page... Included components Page 3... Disassembly and Getting Started Page... Strut Assembly
INSTALLATION INSTRUCTIONS SOLO WERKS S1 Coilover Suspension Mini R50 / R52 / R53 Platform Part Number: S1MN001 Rev.1.0
 Thank you for purchasing your new SOLO WERKS S1 Coilover suspension. IMPORTANT PLEASE READ BEFORE BEGINNING INSTALLATION: Please take a moment to review this installation process and verify that your kit
BRZ/FRS Tarmac 2 Coilover Installation Guide
 BRZ/FRS Tarmac 2 Coilover Installation Guide DISCLAIMER: PLEASE READ We (Racecomp Engineering) are not responsible for any issues resulting from improper installation. Removal and installation of suspension
INSTALLATION INSTRUCTIONS SOLO WERKS S1 Coilover Suspension Audi MLB Platform Part Number: S1AU005/06/07 Rev.2.0
 Thank you for purchasing your new SOLO WERKS S1 Coilover suspension. IMPORTANT PLEASE READ BEFORE BEGINNING INSTALLATION: Please take a moment to review this installation process and verify that your kit
REAR SUSPENSION GROUP CONTENTS GENERAL INFORMATION FASTENER TIGHTENING SPECIFICATIONS TRAILING ARM...
 34-1 GROUP 34 CONTENTS GENERAL INFORMATION 34-2 FASTENER TIGHTENING SPECIFICATIONS 34-4 GENERAL SPECIFICATIONS 34-4 SERVICE SPECIFICATIONS 34-5 LUBRICANTS 34-5 DIAGNOSIS 34-6 INTRODUCTION TO DIAGNOSIS
Installation Instructions
 Installation Instructions Eibach Springs, Inc. 264 Mariah Circle Corona, California 92879-1751 USA Tech Support 800-222-8811 Ext 114 Eibach Pro Street-S Coilovers - #38144.711 2010 Chevrolet Camaro, Camaro
FRONT SUSPENSION GROUP CONTENTS GENERAL INFORMATION ON-VEHICLE SERVICE FASTENER TIGHTENING SPECIFICATIONS...
 33-1 GROUP 33 FRONT SUSPENSION CONTENTS GENERAL INFORMATION 33-2 FASTENER TIGHTENING SPECIFICATIONS 33-2 GENERAL SPECIFICATIONS 33-3 SERVICE SPECIFICATIONS 33-3 LUBRICANTS 33-3 DIAGNOSIS 33-4 INTRODUCTION
Jeep Wrangler (JK)
") 89109 Rev B Suspension Systems RS66109BR5 and RS66109BR9 2007 2013 Jeep Wrangler 4 Door Sport and Rubicon Models (2 SPORT SYSTEM) Jeep Wrangler (JK) 2007-2013 89109 Rev B READ ALL INSTRUCTIONS THOROUGHLY
89109 Rev B Suspension Systems RS66109BR5 and RS66109BR9 2007 2013 Jeep Wrangler 4 Door Sport and Rubicon Models (2 SPORT SYSTEM) Jeep Wrangler (JK) 2007-2013 89109 Rev B READ ALL INSTRUCTIONS THOROUGHLY
INSTALLATION INSTRUCTIONS SOLO WERKS S1 Coilover Suspension VAG MK5/6 Platform Part Number: S1VW006/7/8/9 R1
 Thank you for purchasing your new SOLO WERKS S1 Coilover suspension. IMPORTANT: SOLO WERKS recommends that you have this kit installed by a qualified professional. Solo Werks or its authorized agents are
SUS MI10 front front. Shock Absorber Kit for Subaru Impreza (GRB)
") Before installing this product, check the contents of the kit. If anything is missing, please contact an Öhlins dealer. Kit Contents Shock absorber Upper spring seat Dust boot Top mount Bearing spacer
Before installing this product, check the contents of the kit. If anything is missing, please contact an Öhlins dealer. Kit Contents Shock absorber Upper spring seat Dust boot Top mount Bearing spacer
INSTALLATION INSTRUCTION 88088
 INSTALLATION INSTRUCTION 88088 For Rancho Suspension Systems RS6588 & RS6589: FORD F-150 READ ALL INSTRUCTIONS THOROUGHLY FROM START TO FINISH BEFORE BEGINNING INSTALLATION Rev B IMPORTANT NOTES! WARNING:
Air Lift. Kit Ford Mustang SN95 PERFORMANCE INSTALLATION GUIDE. Rear Application
 Air Lift PERFORMANCE Kit 78619 Ford Mustang SN95 Rear Application INSTALLATION GUIDE PERFORMANCE SUSPENSION PARTS For maximum effectiveness and safety, please read these instructions completely before
FRONT SUSPENSION SYSTEM
 SYSTEM PROBLEM SYMPTOMS TABLE SYSTEM Use the table below to help you find the cause of the problem. The numbers indicate the priority of the likely cause of the problem. Check each part in order. If necessary,
Detroit Speed, Inc. DSE/JRi Front Strut Kit Camaro/Firebird P/N: & D
 Detroit Speed, Inc. DSE/JRi Front Strut Kit 1982-92 Camaro/Firebird P/N: 030332 & 030332D The DSE/JRi Front Strut Kit is a high-performance aluminum body strut body with Detroit Tuned valving. The kit
ALLDATA Online Toyota Camry L4-2.4L (2AZ-FE) - Rear Strut Assembly. Rear Strut Assembly
 - Rear Strut Assembly. Rear Strut Assembly") Page 1 of 11 Home Account Contact ALLDATA Log Out Help PAUL REDEHOFT Select Vehicle New TSBs Technician's Reference Component Search: OK 2004 Toyota Camry L4-2.4L (2AZ-FE) Conversion Calculator Vehicle
Page 1 of 11 Home Account Contact ALLDATA Log Out Help PAUL REDEHOFT Select Vehicle New TSBs Technician's Reference Component Search: OK 2004 Toyota Camry L4-2.4L (2AZ-FE) Conversion Calculator Vehicle
INSTALLATION INSTRUCTIONS SOLO WERKS S1 Coilover Suspension VAG MK5/6 Platform Part Number: S1VW006/7/8/10 R2.2
 Thank you for purchasing your new SOLO WERKS S1 Coilover suspension. IMPORTANT PLEASE READ BEFORE BEGINNING INSTALLATION: Please take a moment to review this installation process and verify that your kit
Sachs shock manual. ( ) 2 & 4 Stroke RR Enduro. ( ) RS Dual Sport
 2 & 4 Stroke RR Enduro. ( ) RS Dual Sport") Sachs shock manual (2013 2015) 2 & 4 Stroke RR Enduro (2014-2015) RS Dual Sport 1 Introduction The procedures in this manual must take place in a clean environment using professional tools and some specific,
Sachs shock manual (2013 2015) 2 & 4 Stroke RR Enduro (2014-2015) RS Dual Sport 1 Introduction The procedures in this manual must take place in a clean environment using professional tools and some specific,
PERFORMANCE SUSPENSION PARTS
 PERFORMANCE SUSPENSION PARTS Introduction Air Lift Performance The purpose of this publication is to assist with the installation, maintenance and troubleshooting of this Audi A4 B8 Performance kit. It
»Product» Safety Warning
 C2402, C2602 Installation Instructions 2007-2013 Chevy 1/2 Ton 2wd Pickup 4.5", 6.5" Suspension System Read and understand all instructions and warnings prior to installation of product and operation of
This file is available for free download at
 This file is available for free download at http://www.iluvmyrx7.com This file is fully text-searchable select Edit and Find and type in what you re looking for. This file is intended more for online viewing
1990 SUSPENSION Front ES250, LS400
 SUSPENSION - FRONT Article Text 1990 Lexus LS 400 For Lextreme Copyright 1998 Mitchell Repair Information Company, LLC Thursday, January 29, 2004 04:56PM ARTICLE BEGINNING 1990 SUSPENSION Front ES250,
Detroit Speed, Inc. Detroit Speed/JRi Front Strut Kit Camaro/Firebird P/N: & D
 Detroit Speed, Inc. Detroit Speed/JRi Front Strut Kit 1982-92 Camaro/Firebird P/N: 030332 & 030332D The Detroit Speed/JRi Front Strut Kit is a high-performance aluminum body strut body with Detroit Tuned
IMPORTANT! PLEASE READ ALL INSTRUCTIONS FIRST!
 MOUNTNG NSTRUCT MPORTANT! PLEASE READ ALL NS FRST! f in doubt, please contact your local BLSTEN dealer or our sales department before installation. When replacing other brands, BLSTEN shock absorbers should
Installation Instructions
 Part # 115110-005 up Mustang Recommended Tools 005-up Mustang Front HQ CoilOver Strut Installation Table of contents Page... Included components Page... Disassembly and Getting Started Page... Strut Assembly
PERFORMANCE SUSPENSION PARTS
 PERFORMANCE SUSPENSION PARTS Introduction Air Lift Performance The purpose of this publication is to assist with the installation, maintenance and troubleshooting of this Chrysler LX, LD, LC Platform 300C,
INSTALLATION INSTRUCTIONS
 INSTALLATION INSTRUCTIONS --1075 North Ave. Sanger, CA 93657-3539 local: 559-875-8883 fax: 559-875-9883 toll free: 800-595-7016-- 90821 ST COILOVER VW Golf IV, Audi TT, Beetle Congratulations! You were
PERFORMANCE SUSPENSION PARTS
 PERFORMANCE SUSPENSION PARTS Introduction Air Lift Performance The purpose of this publication is to assist with the installation, maintenance and troubleshooting of this Lexus XE10 Performance kit. It
RZR 900 spring/shock installation
 RZR 900 spring/shock installation Thank you for purchasing the Shock Therapy Dual Rate Spring Kit for your RZR 900. Your item list: 2 Front upper coil springs, 2 Front lower coil springs, 2 Rear upper
Date No ST Suspensions is a brand of KW automotive North America, Inc. - KW automotive North America, Inc.
 No. 14430045 - ST Suspensions is a brand of KW automotive North merica, Inc. - KW automotive North merica, Inc. - Page 1 INSTLLTION INSTRUCTIONS Before you start to install, please read the following instructions
Installation Instructions Mustang Level 2 Coilover. Part # Mustang Level 2 CoilOver System.
 Part # 22020-979-989 Mustang Level 2 CoilOver System Front Components: 2230 Front CoilOver Strut Recommended Tools Rear Components: 2260 Rear Coilover 225899 Rear Lower StrongArms 226699 Rear Upper StrongArms
SUSPENSION SYSTEM PROBLEM SYMPTOMS TABLE SP 1
 SUENSION SUENSION SYSTEM 1 SUENSION SYSTEM Suspension system Vehicle is unstable Bottoming Sways/pitches Wheels shimmy Abnormal tire wear Vehice pull PROBLEM SYMPTOMS TABLE Use the table below to help
1. Remove the front struts by first disconnecting the ABS wire and brake line(retain hardware) from the factory strut.
 from the factory strut.") Part # 12153111-2005 up Mustang Recommended Tools 2005-up Mustang Front TQ CoilOver Strut Installation Table of contents Page 2... Included components Page 3... Disassembly and Getting Started Page 4...
Part # 12153111-2005 up Mustang Recommended Tools 2005-up Mustang Front TQ CoilOver Strut Installation Table of contents Page 2... Included components Page 3... Disassembly and Getting Started Page 4...
SUSPENSION SYSTEM PROBLEM SYMPTOMS TABLE SP 1
 SUENSION SUENSION SYSTEM 1 Vehicle/pulls Bottoming Sway/pitches Wheel shimmy Abnormal tire wear SUENSION SYSTEM PROBLEM SYMPTOMS TABLE Use the table below to help determine the cause of the problem. The
MITSUBISHI MQ L200 AND FIAT FULLBACK Suspension Installation Instructions
 INSTALLATION GUIDE MITSUBISHI MQ L200 AND FIAT FULLBACK 2015+ Suspension Installation Instructions NOTE: Occupational Health & Safety procedures must be observed at all times. IMPORTANT: Installations
1 M-3000-H4 F150 4X4 Lowering Kit
 READ INSTRUCTIONS COMPLETELY THROUGH BEFORE STARTING. IT IS RECOMMENDED THAT INSTALLATION BE DONE BY A QUALIFIED MECHANIC. REPLACE ALL STOCK PARTS THAT ARE DAMAGED OR WORN. ALWAYS WEAR EYE PROTECTION.
2003 FORESTER SERVICE MANUAL QUICK REFERENCE INDEX
 2003 FORESTER SERVICE MANUAL QUICK REFERENCE INDEX CHASSIS SECTION FRONT SUSPENSION FS REAR SUSPENSION RS WHEEL AND TIRE SYSTEM WT This service manual has been prepared to provide SUBARU service personnel
SUSPENSION - REAR Toyota Celica DESCRIPTION ADJUSTMENTS & INSPECTION WHEEL ALIGNMENT SPECIFICATIONS & PROCEDURES WHEEL BEARING
 SUSPENSION - REAR 1988 Toyota Celica REAR SUSPENSION Toyota IRS DESCRIPTION The Toyota Independent Rear Suspension (IRS) system utilizes MacPherson struts, which fasten to axle carrier and wheel housing.
INSTALLATION INSTRUCTION 88094
 INSTALLATION INSTRUCTION 88094 FOR RANCHO SUSPENSION SYSTEM RS6594B 4WD & 2WD NISSAN TITAN READ ALL INSTRUCTIONS THOROUGHLY FROM START TO FINISH BEFORE BEGINNING INSTALLATION Rev D IMPORTANT NOTES! WARNING:
GROUP 33 FRONT SUSPENSION CONTENTS WANINGS REGARDING SERVICING OF SUPPLEMENTAL RESTRAINT SYSTEM (SRS) EQUIPPED VEHICLES
 EQUIPPED VEHICLES") GROUP 33 FRONT SUSPENSION CONTENTS GENERAL INFORMATION........ 33-2 SERVICE SPECIFICATIONS....... 33-3 LUBRICANT.................... 33-4 SPECIAL TOOLS................ 33-4 ON-VEHICLE SERVICE...........
GROUP 33 FRONT SUSPENSION CONTENTS GENERAL INFORMATION........ 33-2 SERVICE SPECIFICATIONS....... 33-3 LUBRICANT.................... 33-4 SPECIAL TOOLS................ 33-4 ON-VEHICLE SERVICE...........
05-07 F /2 SUSPENSION KIT
 92147900 05-07 F250 4 1/2 SUSPENSION KIT Thank you for choosing Rough Country for your suspension needs. Rough Country recommends a certified technician installs this system. In addition to these instructions,