Installation Manual. Model Chassis Code Engine Code Year
|
|
|
- Ethelbert Benson
- 5 years ago
- Views:
Transcription
1 INTERCOOLER KIT NISSAN GT-R R35 (VR38 38DETT) SPEC-R HG TYPE29 Full KIT Installation Manual Please read the Installation Manual before installing. Keep this manual for future reference. Model Chassis Code Engine Code Year GT-R CBA-R35 VR38DETT 07.12~ Specs : Cross-fl flow Type Designed for the Greddy Turbo Kit(TD 06 SH-20 G) If used with the OEM Turbo, GReddy Airinx Kit required. Not compatible with the stock air box. Stock windshield washer tank not compatible with GReddy Intercooler Kit. GReddy Windshield Washer Tank sold separately. Stock Intercooler Air Duct is not compatible with GReddy Intercooler Kit. Designed to be used on the Nissan R35 GTR. Please do not attempt to use on other model vehicles. Using this product may void your warranty from Nissan Motor M Co., Ltd. Corporation
2 1.Parts List 1.Intercooler TYPE Intake tube I-1 (70φ aluminum elbow) 1 3. I-2 (70φ aluminum) 1 4. I-3 (70φ aluminum) 1 5. I-4 (70φ aluminum) 1 6. I-5 (70φ aluminum elbow) 1 7. I-6 (70φ aluminum) 1 8. I-7 (70φ aluminum) 1 9. I-8 (70φ aluminum) 1 10.Silicone hose 70φ 70mm Hose clamp # Intake tube bracket RH 1 13.Intake tube bracket LH 1 14.Wire Harness (1000mm) 8 15.Bolt M6 15mm P Bolt M8 20mm P Collar nut M8 P Nut M8 P F/W M Blow Off Valve Type RZ (page 3 parts lists) 1 set


3 Parts List Diagram


4 14 15~19 20 Blow Off Valve Parts List 1. Blow off valve 2 6. Hose Clamp size # Hose attachment 29φ 2 7. Blow off valve gasket 2 3. Rubber cap 30φ 2 8. Emblem 2 4. Vacuum hose 6φ 300mm 2 9. Bolt and washer 4 5. Power band 6φ 4 Parts List Diagram

5 Piping Layout Throttle RH Throttle LH 9 I-8 20 Blow Off Valve 20 Blow Off Valve 5 I-4 Turbo LH 8 I-7 Turbo RH 2 I-1 6 I-5 7 I-6 4 I-3 3 I-2


 Remove the one-piece lip spoiler/ undercarriage cover.")

6 2.Removal of Stock Parts 2-1 Front Bumper Removal (1) Disconnect the negative terminal of the battery. If the car was recently shut off, please wait 3 minutes before disconnecting the battery. (2) Remove the front, the inner, the left and the right inner fender protectors. (3) Remove the one-piece lip spoiler/ undercarriage cover. Remove the rubber plugs to expose the bolts and screws. Slide the one-piece lip spoiler/ undercarriage cover forward (away from the car) to remove. (4) Remove the radiator cover. (5) Remove the front bumper/ fascia screws. (6) Remove the wire connector from the turn signal lamp. Both sides have two screws.


 Remove the engine oil")
7 (7) Remove the connector from the pedestrian impact sensor. If the battery is reconnected while the pedestrian impact sensor is disconnected, a popup hood warning light will appear on your instrument panel. (8) Remove the bumper/ fascia. Be aware of the bumper fasteners, some adjustment required to remove the bumper/ fascia. 2-2 Air Intake Duct Removal (1) Remove the engine oil cooler duct. Allow the oil cooler to hang freely. (2) Remove the left and right intake duct.
 Remove the front bumper reinforcement.")

 Disconnect the couplers.")


8 (3) Remove the impact foam. (4) Remove the front bumper reinforcement. アーマチュア取り付けボルト 8 バンパーブラケット取り付けボルト 4 Air duct mounting bolts are attached to the front bumper reinforcement, please remove. (5) Disconnect the couplers. Horn (6) Remove the hood latch cable and cable fastener. Electrical Couplers A/C Liquid Tank, Outside Temp. Sensor Hood Latch, Horn Cable fastener Hood :Lock Cable Fastener A/C Liquid Tank Temp Sensor Hood Latch (7) Remove the front bumper retainer (upper side).


 Disconnect the windshield washer pump and washer")

 Remove the washer tank.")
9 (8) Remove the P/S Oil Cooler mounting bolts, and let the cooler hang freely. Removal of oil line is not necessary. Be careful not to damage the oil cooler and A/C condenser. (9) Disconnect the windshield washer pump and washer liquid level switch connectors. Remove the front Washer Tube from the Pump. Remove the washer liquid level switch fastener Tube Pump Clip Liquid Switch (10) Remove the washer tank. (11) Intake Pipe Hose Removal Remove the pressure sensor coupler and the vacuum line from the top of the recirculation valve. Then remove the stock charge piping
")
.")


10 (12) Remove the radiator air guide bolts. Once removed, uninstall the Intercooler(s) and radiator core support. Remove the driver side (U.S.). Then remove completely. Make sure not to hit or damage the oil cooler. 2-3 Intercooler Removal (1) The arrows show the rivets that will need to be drilled out. Once the rivets are drilled out, please remove the Intercooler Intake Duct. Slightly move the radiator core support frame. Once moved, disconnect the Hood Latch Cable Fastener. (2) Separate the intercooler(s) from the radiator core support.
")


 Install the intercooler on to")


11 3.Intercooler Install 3-1 Intercooler Core Installation (1) Temporarily install the intercooler on to the radiator core support and mark the areas where the intercooler hits the support. 1 (2) Drill out the areas where the radiator core support hits the intercooler. (3) Install the intercooler on to the radiator core support using part # 1, 18, & 19. (4) Verify that the radiator core support has been drilled out in order to achieve proper clearance. OEM Bolts 1 Verify 19 OEM Bolt mm F/W 18 M8 Nut 3-2 Radiator Core Support & Intercooler Installation Reinstall the radiator core support in reverse order of removal.. Removal of the Air Intake Duct, please refer to page Verify 19 18
 Remove the rubber and")


 Temporarily")


12 3-3 Intercooler Side Intake Tube Installation (1) Remove the rubber and steel insulated grommets from the stock intake piping, and install them onto the intercooler mounting brackets part # 12 & 13. No.12 No.13 Grommets (2) Arrange the intercooler piping in the as shown in the diagram. Follow the arrows on the intercooler piping for proper orientation. Temporarily attach the piping loosely. Carefully make adjustments as needed. Part 2,3,8,10,11 Part 4,5,6,10,11 RH LH I-7 I-3 I-5 I-1 I-2 I-4 (3) Temporarily tighten the Intercooler Piping Brackets to the chassis. Tapered side of the bracket should be facing upwards. Part 12,16,17 Part 13,16,17 RH LH 12 I-7 I-3 13 OEM Bolts 16 M8 20 mm Bolt 17 M8 Flange Nut OEM Bolts

 Disconnect the pressure sensors from the stock piping and install them onto")


13 3-4 Throttle Side Intake Tube Installation (1) Install the RZ Blow Off Valves onto intake tubes I-4 & I-8 Make sure to arrange the Blow Off Valve outlets in the direction towards the pressure sensors. I-8 I-4 (2) Disconnect the pressure sensors from the stock piping and install them onto Intercooler Pipes I-4 & I-8. We recommend applying silicone grease to the pressure sensor O-rings. M6 15 M6 15 (3) Blow Off Valve Attachment Selection. Recirculated Install the Hose Attachment. Atmospheric Install the Funnel. For Blow Off Valve Attachment installation, please refer to the Blow Off Valve manual. Funnel Hose Attachment Attachment Recirculated Blow Off (1) Install the OEM recirculation hoses to the Blow Off Valves.
 to the Hose Attachment.")
 Temporarily attach intake tube I-4 assembly between the driver side throttle body and I-3 using the 70mm hose #10 and hose clamps #11.")
 In both left and right side turbo inlet intake tubes block off the 28mm tubes with the Rubber Caps part #3 using the hose")
14 (2) Temporarily attach intake tube I-8 assembly between the passenger side throttle body and I-7 using the 70mm hose #10 and hose clamps #11. Connect the OEM recirculation hose to the 28mm tube of the turbo inlet intake tube using the hose clamp #6 (BOV parts list) to the Hose Attachment. RH No.10 No.11 (3) Temporarily attach intake tube I-4 assembly between the driver side throttle body and I-3 using the 70mm hose #10 and hose clamps #11. Connect the OEM recirculation hose to the 28mm tube of the turbo inlet intake tube using the hose clamp #6 (BOV parts list) to the Hose Attachment. When using the recirculated method, part #3 (BOV manual) the rubber cap will not be used. LH No.10 No.11 Atmospheric Blow Off (1) In both left and right side turbo inlet intake tubes block off the 28mm tubes with the Rubber Caps part #3 using the hose clamps #6 (BOV manual). RH Rubber Cap LH Rubber Cap


15 (2) Temporarily attach intake tube I-8 assembly between the passenger side throttle body and I-7 using the 70mm hose #10 and hose clamps #11. RH No.10 No.11 (3) Temporarily attach intake tube I-4 assembly between the driver side throttle body and I-3 using the 70mm hose #10 and hose clamps #11. LH No.10 No Vacuum Line Attachment (1) Connect the 6mm vacuum lines from the vacuum source to the tops of the RZ Blow Off Valves. Connect the pressure sensor couplers to the pressure sensors. RH LH Coupler Coupler Vacuum Line Vacuum Line (2) Once you have adjusted the piping to the correct location and orientation, tighten all bolts and hose clamps. (3) Place the emblems on top of the Blow Off Valves.


 The left and right Air Flow Sensor Harnesses will have to redirected to the")

 We recommend that you secure any loose wires, preferably with zip ties.")

16 3-6 Air Flow Sensor Extension Harness (1) Remove the coupler and the wiring clip of the Air Flow Sensors. (2) Cut the Air Flow Sensor Harnesses 2 inches from the Coupler. The Air Flow Sensor Harnesses will have to crossed and hardwired via solder. Please use the supplied wiring Part #14. (3) The left and right Air Flow Sensor Harnesses will have to redirected to the opposite sides. Be sure to properly solder the connections. Make sure the connections are properly insulated with heat shrink tubing or electrical tape. (4) We recommend that you secure any loose wires, preferably with zip ties. 3-7 Engine Start Up (1) Check that all wiring has been completed/ connected, and make sure all tubing and hosing have been tightened. Once these have been inspected, connect the battery terminals. Make sure the Pedestrian Impact Sensor Harness is attached prior to reinstalling the battery. Otherwise a popup hood warning light will appear on your instrument panel. (2) Check the vehicle for any leaks or noises at idle.
")


 Refer to")
")


17 3-8 Front Bumper/ Fascia Installation (1) Remove the front bumper bracket from the intake duct. (2) Reinstall the bumper reinforcement and reuse the front bumper brackets. (3) Washer Tank (sold separately) Refer to washer tank installation manual (4) Front bumper/ fascia reinstallation. 2-1 Follow pages 5-65 in reverse order. This completes the installation of the Intercooler
Installation Manual. Model Chassis Code Engine Code Year
 INTERCOOLER KIT NISSAN GT-R R35 (VR38 38DETT) SPEC-R HG TYPE29 Full KIT Installation Manual Please read the Installation Manual before installing. Keep this manual for future reference. Model Chassis Code
GReddy Intercooler Kit Nissan 240SX (KA24DE) Front mount Type 24
 Front mount Type 24") GReddy Intercooler Kit 96-98 Nissan 240SX (KA24DE) Front mount Type 24 96-98 Nissan 240SX (KA24DE) Front mount Type 24 Installation Manual Please read the entire manual before installing this kit. Application:
GReddy Intercooler Kit 96-98 Nissan 240SX (KA24DE) Front mount Type 24 96-98 Nissan 240SX (KA24DE) Front mount Type 24 Installation Manual Please read the entire manual before installing this kit. Application:
Scion FR-S ZN6. GTX2867R Gen2 (Internal Wastegate) Installation Instructions GPP P/N #
 Installation Instructions GPP P/N #") TURBO KIT Scion FR-S ZN6 Subaru BRZ ZC6 GTX2867R Gen2 (Internal Wastegate) Installation Instructions GPP P/N # 11518000 Vehicle Type Chassis Code Engine Code Transmission Model Year Scion FR-S DBA-ZN6
TURBO KIT Scion FR-S ZN6 Subaru BRZ ZC6 GTX2867R Gen2 (Internal Wastegate) Installation Instructions GPP P/N # 11518000 Vehicle Type Chassis Code Engine Code Transmission Model Year Scion FR-S DBA-ZN6
GReddy Intercooler Kit Nissan 350Z (VQ35DE) Front mount Type 23
 Front mount Type 23") GReddy Intercooler Kit 2003 Nissan 350Z (VQ35DE) Front mount Type 23 2003 Nissan 350Z (VQ35DE) Front Mount Type 23 Installation Manual Please read the entire manual before installing this kit. Application:
GReddy Intercooler Kit 2003 Nissan 350Z (VQ35DE) Front mount Type 23 2003 Nissan 350Z (VQ35DE) Front Mount Type 23 Installation Manual Please read the entire manual before installing this kit. Application:
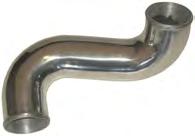
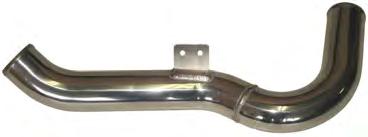
Nissan R35 GTR Intercooler Pipe Kit w/ Cold Air Intake Installation Instructions
 Nissan R35 GTR Intercooler Pipe Kit w/ Cold Air Intake Installation Instructions 1. Disconnect the negative terminal on the battery that is located at the passenger firewall side. 2. Remove both front
SHELBY GT500
 2007-2009 SHELBY GT500 Removal of Factory Unit WARNING: 1. Radiator fluid must be handled properly. Please observe local ordinances with regards to handling and disposal. 2. Allow vehicle and components
CHALLENGER TWIN TURBO SYSTEM INSTALLATION INSTRUCTIONS
 CHALLENGER TWIN TURBO SYSTEM INSTALLATION INSTRUCTIONS 1 Verify contents of kits with supplied packing list 1) Unhook the battery. 2) Remove wheel wells & front fascia of vehicle. 3) Remove the catalytic
Part number SP Mitsubishi Evo VIII, MR,IX 2.0L 4 cyl.
 Part number SP1898 2003-06 Mitsubishi Evo VIII, MR,IX 2.0L 4 cyl. 1- Dyno-proven aluminum cast intake 1- Three piece intercooler pipes A (T/B), B (intercooler) C (turbo) 1-4 1/2 Injen filter (#1018) 1-1890
7C1550 COBB Tuning R35 GT-R Silicone Hose Kit Install Instructions
 7C1550 COBB Tuning R35 GT-R Silicone Hose Kit Install Instructions Nissan GT-R (R35) Silicone Hose Kit Congratulations on your purchase of the COBB GT-R Silicone Hose Kit for your Nissan GT-R. The following
Installation instruction do88 Intercooler for SAAB 9-3SS/SC 2,8 V6 Turbo
 Installation instruction do88 Intercooler for SAAB 9-3SS/SC 2,8 V6 Turbo This instruction shows how to replace the OEM intercooler with this performance intercooler. At this type of installation we always
Installation instruction do88 Intercooler for SAAB 9-3SS/SC 4-cyl Turbo
 Installation instruction do88 Intercooler for SAAB 9-3SS/SC 4-cyl Turbo This instruction shows how to replace the OEM intercooler with this performance intercooler. 1. 4. 5. At this type of installation
Part number SP Mitsubishi Evo VIII, MR,IX 2.0L 4 cyl.
 Part number SP1898 2003-06 Mitsubishi Evo VIII, MR,IX 2.0L 4 cyl. 1- Dyno-proven aluminum cast intake 1- Three piece intercooler pipes A (T/B), B (intercooler) C (turbo) 1-4 1/2 Injen filter (#1018) 1-1890
Application List L Cummins
 1 Discharging & Recharging of the A/C System is required for this install. INTERCOOLER INSTALLATION FOR 2010+ DODGE 6.7L CUMMINS Application List 2010+ 6.7L Cummins 1042530 PLEASE READ ALL INSTRUCTIONS
MAZDASPEED3 Intercooler Instructions
 MAZDASPEED3 Intercooler Instructions Congratulations on your purchase of the COBB Tuning Front Mount Intercooler System for your 2007-2009 Mazdaspeed3. The following instructions should assist you through
2015+ SUBARU STI FRONT-MOUNT INTERCOOLER PARTS LIST AND INSTALLATION GUIDE INSTALL DIFFICULTY DISCLAIMER CAUTION INSTALL PROCEDURE TOOLS NEEDED
 PARTS LIST AND PARTS INCLUDED 1PC ALUMINUM INTAKE PIPE 1PC BAR-AND-PLATE INTERCOOLER 1PC STEEL CRASH BAR W/ MOUNTING HARDWARE 2PC HOT-SIDE INTERCOOLER PIPES 2PC COLD-SIDE INTERCOOLER PIPES 1PC BPV FLANGE
Always wear safety glasses when working on your vehicle.
 90-93 MAZDA MIATA SUPERCHARGER KIT The KraftWerks 90-93 Mazda Miata Supercharger Kit was designed for easy installation. Competent mechanics with the appropriate tools will find the process to be relatively
05-08 GT. Hellion Power Systems Mustang Kit Instructions
 Hellion Power Systems 05-08 Mustang Kit Instructions 1. Disconnect Battery 2. Drain Radiator, keep fluid for re-installation. 3. Remove air box and inlethoses. 6. Next, underneath, punch oil pan for turbo
4. Remove (4) 10mm and (1) 7mm bolt that holds fascia at front corners, on each side
 10mm and (1) 7mm bolt that holds fascia at front corners, on each side") 2010 Camaro LS3 1. Disconnect battery ground 2. Remove front wheels 3. Remove (5) push pins and (5) #20 torx screws on inner front wheel well liners and remove liners on each side 4. Remove (4) 10mm and
2010 Camaro LS3 1. Disconnect battery ground 2. Remove front wheels 3. Remove (5) push pins and (5) #20 torx screws on inner front wheel well liners and remove liners on each side 4. Remove (4) 10mm and
Instant Chat off the main page of Or simply call our tech team at
 FRONT MOUNT INTERCOOLER 2015+ WRX 2017-07-07 Thank you for purchasing this PERRIN product for your car! Installation of this product should only be performed by persons experienced with installation of
GPP Oil Cooler Kit HONDA Civic Type-R (FK8)
") GReddy Performance Products, Inc. GPP Oil Cooler Kit 2017-2018 HONDA Civic Type-R (FK8) Installation Manual Please read the entire manual before installing this kit. Parts List 1. GReddy/Trust NS1010G
GReddy Performance Products, Inc. GPP Oil Cooler Kit 2017-2018 HONDA Civic Type-R (FK8) Installation Manual Please read the entire manual before installing this kit. Parts List 1. GReddy/Trust NS1010G
INSTALLATION INSTRUCTIONS PART NUMBER:21-729
 Equipped with AEM Dryflow Filter No Oil Required! INSTALLATION INSTRUCTIONS PART NUMBER:21-729 2010-2013 MAZDA MX-5 MIATA 2.0L I-4 PARTS LIST Description Qty. Part Number A Tube, Lower Intake, 2006-13
99-04 GT. Hellion Power Systems Mustang GT Kit Instructions
 Hellion Power Systems 99-04 Mustang GT Kit Instructions Part 1 Hellion recommends that the front suspension system be installed either by trained professionals or by 5.Remove rack bolts K-Member Installation
96-04 tt. Hellion Power Systems Mustang Twin Turbo Kit Instructions
 96-04 tt Hellion Power Systems 1996-2004 Mustang Twin Turbo Kit Instructions 1. Disconnect battery and elevate front end of car on either Jack stands or a lift if available 2.Lock steering wheel and remove
350Z GT Aero Front Bumper
 GReddy AERO KIT 350Z GT Aero Front Bumper Installation Manual About this Instruction Manual IMPORTANT Please read these instructions before installation. This is for installation on a stock vehicle. Please
Installation Instructions for C & R Heat Exchanger Removal of Factory Unit
 Installation Instructions for C & R Heat Exchanger Removal of Factory Unit Remove the 8 clips that retain the upper radiator shroud. Remove the shroud. Remove the coolant tank cap from the heat exchanger
Installation instruction do88 Intercooler for SAAB 9-3 1,9 TTiD
 Installation instruction do88 Intercooler for SAAB 9-3 1,9 TTiD This instruction shows how to replace the OEM intercooler with this performance intercooler. At this type of installation we always recommend
Bill of Materials for
 Bill of Materials for 77060012 1 2-P5153572 Inlet Pipe 1 21-202M 2.75" Filter 1 103-BLO-4820N Filter Hose Clamp 1 559999 Washer, Fender M6x25 1 1-3028 Washer, 1/4 SAE Flat 1 1-2072 Bolt, 1/4-20-UNC x 1
03-04 Mach 1. Hellion Power Systems Mach 1 Kit Instructions
 Hellion Power Systems 03-04 Mach 1 Kit Instructions Part 1 Hellion recommends that the front suspension system be installed either by trained professionals or by 5.Remove rack bolts K-Member Installation
BLACKBIRD INSTALLATION SUPPLEMENT
 BLACKBIRD INSTALLATION SUPPLEMENT FOR 2003-7 FORD 6.0 LITER DIESEL F-SERIES DUAL ALTERNATOR VERSION 10/07 Blackbird Installation Supplement for Ford 6.0. Liter Dual Alternator Parts included in the 6.0
Equipped with AEM Dryflow Filter No Oil Required! INSTALLATION INSTRUCTIONS PART NUMBER: C
 Equipped with AEM Dryflow Filter No Oil Required! INSTALLATION INSTRUCTIONS PART NUMBER: 21-721C 2011-2013 MINI Cooper S L4-1.6L SEE NOTE* 2011-2013 MINI Clubman S L4-1.6L SEE NOTE* 2011-2013 MINI Cooper
2017+ L5P Duramax 3 ½ Down Pipe & EGR Fix Kit
 2017+ L5P Duramax 3 ½ Down Pipe & EGR Fix Kit Covers installation of PN s: WCF100630, WCF100829 Note: This Kit is for off road competition use only! Off Road Competition Use Tuning & Exhaust System is
Part number SP Acura RSX Type-S
 Part number SP1477 02-06 Acura RSX Type-S 1- cold air intake system 1-3 Injen filter (#1014) 1-2 7/8 x 3 60 deg. elbow (#3007) 1-1525 sensor grommet (#6014) 1-20 - 8mm vacuum hose (#3091) 1-18 - 17mm vacuum
COLD AIR INTAKE SYSTEM. Installation Instructions for: Part Number MazdaSpeed Protégé 2.0L Turbo
 COLD AIR INTAKE SYSTEM Installation Instructions for: Part Number 21-486 2003-2003.5 MazdaSpeed Protégé 2.0L Turbo ADVANCED ENGINE MANAGEMENT INC. 2205 126 TH Street, Unit A Hawthorne, CA. 90250 Phone:
V1 Truck Manifold Turbo Kit for F-body
 V1 Truck Manifold Turbo Kit for 98-02 F-body Prep: -Remove all A/C Components, Alternator and brackets, tensioner, front bumper, front bumper foam, and front bumper support. Remove radiator and cooling
Equipped with AEM Dryflow Filter No Oil Required! INSTALLATION INSTRUCTIONS PART NUMBER C (Gun Metal Grey Finish) 2015 Ford Mustang 2.
 2015 Ford Mustang 2.") Equipped with AEM Dryflow Filter No Oil Required! INSTALLATION INSTRUCTIONS PART NUMBER 26-3001C (Gun Metal Grey Finish) 2015 Ford Mustang 2.3 Turbo ITEM NO. PART NUMBER DESCRIPTION QTY. 1 2-1523C TUBE;
Equipped with AEM Dryflow Filter No Oil Required! INSTALLATION INSTRUCTIONS PART NUMBER 26-3001C (Gun Metal Grey Finish) 2015 Ford Mustang 2.3 Turbo ITEM NO. PART NUMBER DESCRIPTION QTY. 1 2-1523C TUBE;
Installation Instructions
 2011-2013 LML DURAMAX COMPOUND-ADD 2011-2015 LML A Duramax TURBO KIT Add INSTALL A Turbo INSTRUCTIONS Compound Kit Installation Instructions 1-800-955-0476 - www.industrialinjection.com - info@industrialinjection.com
Instant Chat off the main page of Or simply call our tech team at
 FRONT MOUNT INTERCOOLER 2008-13 STI 2014-04- 08 Thank you for purchasing this PERRIN product for your car! Installation of this product should only be performed by persons experienced with installation
Subaru Front Mount Intercooler Kit STI Subaru Front Mount Intercooler Kit STI
 Subaru Front Mount Intercooler Kit STI 2008-2014 715500 Subaru Front Mount Intercooler Kit STI 2008-2014 Congratulations on your purchase of the Subaru Front Mount Intercooler Kit STI 2008-2014. The following
INSTALLATION INSTRUCTIONS PART NUMBER AEM C (GUN METAL GRAY FINISH)
") Equipped with AEM Dryflow Filter No Oil Required! INSTALLATION INSTRUCTIONS PART NUMBER AEM-21-805C (GUN METAL GRAY FINISH) 2016.5-17 CHEVROLET CRUZE 1.4T ITEM NO. PART NUMBER DESCRIPTION QTY. 1 21-2038DK
Equipped with AEM Dryflow Filter No Oil Required! INSTALLATION INSTRUCTIONS PART NUMBER AEM-21-805C (GUN METAL GRAY FINISH) 2016.5-17 CHEVROLET CRUZE 1.4T ITEM NO. PART NUMBER DESCRIPTION QTY. 1 21-2038DK
Z1 Motorsports 300zx 2.5 Upgraded piping & BA SMIC Install Guide
 Z1 Motorsports 300zx 2.5 Upgraded piping & BA SMIC Install Guide Congratulations on your new upgraded piping and intercooler kit, this kit has proven to provide the lowest intake air temps to date on our
JBR MAZDASPEED
 Page1 james Barone Racing Aftermarket Parts and Accessories JBR 2007 2009 MAZDASPEED 3 Front Mount Intercooler Piping Kit Installation Instructions for TR8 Intercooler Tooling: o Jack, Jack Stands, Ramps
Difficulty Level: 3-4. This is very intensive for an intercooler installation. Experienced mechanical skills recommended. Wrenches Sockets Specialty
 Nissan GT-R FMIC The goal of AMS is to provide the highest quality, best performing products available. By utilizing research and development, and rigorous testing programs AMS will never compromise the
Procharger Stage II Intercooled Supercharger System (11-14 GT)
") Procharger Stage II Intercooled Supercharger System (11-14 GT) Installation Time: Approximately one day. Installed on 2012 Mustang GT 5.0/Manual Required Tools 3/8 Socket Set (Standard and Metric) 1/2
Procharger Stage II Intercooled Supercharger System (11-14 GT) Installation Time: Approximately one day. Installed on 2012 Mustang GT 5.0/Manual Required Tools 3/8 Socket Set (Standard and Metric) 1/2
Z1 Motorsports 350Z / G35 Oil Cooler Kit Installation Manual
 Z1 Motorsports 2877 Carrollton Villa Rica Hwy Carrollton GA 30116 770.838.7777 Z1 Motorsports 350Z / G35 Oil Cooler Kit Installation Manual For 19, 25 and 34 Row Oil Cooler Kits Parts Included: 1 Aluminum
Equipped with AEM Dryflow Filter No Oil Required! INSTALLATION INSTRUCTIONS PART NUMBER C (GUN METAL GRAY FINISH) NISSAN SENTRA 1.
 NISSAN SENTRA 1.") Equipped with AEM Dryflow Filter No Oil Required! INSTALLATION INSTRUCTIONS PART NUMBER 21-799C (GUN METAL GRAY FINISH) 2014-16 NISSAN SENTRA 1.8L 1 ITEM NO. PART NUMBER DESCRIPTION QTY. 1 21-2157D AIR
Equipped with AEM Dryflow Filter No Oil Required! INSTALLATION INSTRUCTIONS PART NUMBER 21-799C (GUN METAL GRAY FINISH) 2014-16 NISSAN SENTRA 1.8L 1 ITEM NO. PART NUMBER DESCRIPTION QTY. 1 21-2157D AIR
2015+ EcoBoost F150 & Raptor Intercooler Install
 2015+ EcoBoost F150 & 2017+ Raptor Intercooler Install Note: This entire job can be performed with the truck on the ground - No need to raise the vehicle. The most difficult part is removing the grille
INTERCOOLER PIPE KIT CHEVY CAMARO 2.0T PARTS LIST AND INSTALLATION GUIDE PARTS INCLUDED CAUTION INSTALL PROCEDURE TOOLS NEEDED
 PARTS LIST AND PARTS INCLUDED 2PC ALUMINUM PIPES W/ CNC-MACHINED QUICK-DISCONNECTS 1PC ALUMINUM PIPE W/ CNC-MACHINED 2-BOLT FLANGE 2PC QUICK-DISCONNECT SPRING CLIPS 1PC 2.75" 90 SILICONE COUPLER 1PC 2.25"
Kit Part Number:
 10-677 Equipped with AEM DRYFLOW Filter No oil required! Kit Part Number: 21-677 Nissan 350Z 3.5L V6 2007-2008 CARB EO # D-392-30 Short Ram Intake Systems that are pending an Executive Order number (EO#)
INSTALLATION INSTRUCTIONS. PART NUMBER C (Gun Metal Gray Finish) 2016 HYUNDAI TUCSON 1.6 Turbo
 2016 HYUNDAI TUCSON 1.6 Turbo") INSTALLATION INSTRUCTIONS PART NUMBER 26-3002C (Gun Metal Gray Finish) 2016 HYUNDAI TUCSON 1.6 Turbo 1 ITEM NO. PART NUMBER DESCRIPTION QTY. 1 08483K HOSE CLAMP #28, BLACK ZINC PLATED 2 2 5-1070 COUPLER;1.75-2.50X3.25"
INSTALLATION INSTRUCTIONS PART NUMBER 26-3002C (Gun Metal Gray Finish) 2016 HYUNDAI TUCSON 1.6 Turbo 1 ITEM NO. PART NUMBER DESCRIPTION QTY. 1 08483K HOSE CLAMP #28, BLACK ZINC PLATED 2 2 5-1070 COUPLER;1.75-2.50X3.25"
Factory safe air/fuel ratio s for Optimum performance Patent# 7,359,795
 Part Number SP1125 2007-09 BMW 335i 2008-09 BMW135i 3.0L Twin Turbo L6 This kit is equipped with the Injen/AMSOIL Ea nanofiber dry filters, Ea nanofiber filters do not require oil. 1-2 piece air intake
Installation Manual v1.0: MST Turbo Kit ( ) 5.9L Dodge. Please read all instructions before installation.
 5.9L Dodge. Please read all instructions before installation.") Installation Manual v1.0: MST Turbo Kit (2003-2007) 5.9L Dodge Please read all instructions before installation. Figure 1: MST Kit Contents Figure 2: MST Hardware Kit Please make sure all of the components
Installation Manual v1.0: MST Turbo Kit (2003-2007) 5.9L Dodge Please read all instructions before installation. Figure 1: MST Kit Contents Figure 2: MST Hardware Kit Please make sure all of the components
Parts List See cover Page
 Thank you for purchasing the CorkSport Front Mount Intercooler Kit for the 2010-2013 Mazdaspeed 3. Keep your BAT s under check with the CorkSport FMIC Kit with the small or large intercooler. Please let
Note: Hydro-shields, filter charger kits and replacement parts are sold on-line at injenonline.com
 Part number SES1202FMGT 2005 1/2-07 Subaru Impreza STi 2006-07 Subaru Impreza WRX 2.5L, 4 cyl. Turbo 1- Six piece mandrel bent piping 1- Giant size front mount (#11028) intercooler core and tanks 23 3/4
PART NUMBER: MAZDA MX-5 L4-2.0L C.A.R.B. E.O. # D MAZDA MX-5 Miata L4-2.0L C.A.R.B. E.O. # D-670-6
 Equipped with AEM Dryflow Filter No Oil Required! INSTALLATION INSTRUCTIONS PART NUMBER:21-640 2006-2008 MAZDA MX-5 L4-2.0L C.A.R.B. E.O. # D-670-6 2006-2009 MAZDA MX-5 Miata L4-2.0L C.A.R.B. E.O. # D-670-6
Mitsubishi Evolution X Intercooler Pipe Kit Installation Instructions
 Mitsubishi Evolution X Intercooler Pipe Kit Installation Instructions Disclamer: This product is intented for off road use only. Driving on public roads and highways with this product installed on vehicle
Audi A4 2.0T Front Mount Intercooler INSTALLATION GUIDE
 INSTALLATION GUIDE Congratulations on your purchase of the AWE Tuning Front Mount Intercooler for the 2005.5-08 B7 chassis A4 2.0T. 2005.5-08 Audi A4 2.0T Front Mount Intercooler FOR RACING USE ONLY Exquisite
IE MK5/MK6 2.0T FSI & TSI FDS INTERCOOLER INSTALL GUIDE PART NUMBER: IETPCB1
 IE MK5/MK6 2.0T FSI & TSI FDS INTERCOOLER INSTALL GUIDE PART NUMBER: IETPCB1 Thank you for purchasing another high quality Integrated Engineering product! This instruction sheet is used for installation
BRUTE FORCE AIR INTAKE SYSTEM
 BRUTE FORCE AIR INTAKE SYSTEM Equipped with AEM DRYFLOW Filter. No oil required! Installation Instructions for: Part Number 21-8306 2005 Jeep Grand Cherokee 2006 Jeep Commander 5.7L V8 HEMI ADVANCED ENGINE
LML 3 Y-Bridge Kit or High Flow Intake Bundle Package
 2011-2016 LML 3 Y-Bridge Kit or High Flow Intake Bundle Package Covers installation of PN s: WCF100607, WCF100691, WCF100716, & WCF100353 Note: This Kit is for off road competition use only! Overview-
Equipped with AEM Dryflow Filter No Oil Required! INSTALLATION INSTRUCTIONS
 Equipped with AEM Dryflow Filter No Oil Required! INSTALLATION INSTRUCTIONS PART NUMBER: 21-8223DC (Gun Metal Grey Finish) 21-8223DP (Vacuum Metalized Chrome - VMC) 2008-2010 DODGE Challenger V8-6.1L C.A.R.B.
Note: Injen strongly recommends that this system be installed by a professional mechanic. MR Technology, The World s First Tuned air Intake System!
 Part number SP6080 04-08 Mazda RX8 Rotary 1.3L 1-1 pc. cold air intake equipped with MR Tech and Air Fusion Power-Flow box- contents (PB375C-8) 1-8 inverted top filter (A) (#1022) 1-main body,top screen
INSTALLATION INSTRUCTIONS
 Equipped with AEM Dryflow Filter No Oil Required! INSTALLATION INSTRUCTIONS PART NUMBER 21-818C (GUN METAL GRAY FINISH) 2017 Nissan Sentra SR Turbo 1.6T 1 ITEM NO. PART NUMBER DESCRIPTION QTY. 1 21-2157DK
Nissan GT-R Intercooler Pipe Kit
 Nissan GT-R Intercooler Pipe Kit The goal of AMS is to provide the highest quality, best performing products available. By utilizing research and development, and rigorous testing programs AMS will never
Phone Fax
 Directions for Installation of ECS Paxton Supercharger Kit Disconnect battery Remove stock serpentine belt Remove stock belt tensioner, save the 2 bolts for later use on supercharger bracket Remove alternator
Part Number SP BMW 335i BMW135i 3.0L Twin Turbo L6
 This kit is equipped with the Injen/AMSOIL Ea nanofiber dry filters, Ea nanofiber filters do not require oil. Part Number SP1125 2007-09 BMW 335i 2008-09 BMW 3.0L Twin Turbo L6 1-2 piece air intake system
AIR INTAKE EMERGENCY SHUT-OFF VALVE PH2 C50204 AIR INTAKE SHUT-OFF VALVE DODGE 6.7L CUMMINS.
 AIR INTAKE EMERGENCY SHUT-OFF VALVE PH2 C50204 AIR INTAKE SHUT-OFF VALVE 2013-2017 DODGE 6.7L CUMMINS www.powerhalt.com Thank you for your purchase of a PowerHalt Air Intake Emergency Shut-Off Valve by
Installation Manual v1.0: Aurora Plus Turbo Kit ( ) 5.9L Dodge. Please read all instructions before installation.
 5.9L Dodge. Please read all instructions before installation.") Installation Manual v1.0: Aurora Plus - 4000 Turbo Kit (2003-2007) 5.9L Dodge Please read all instructions before installation. Figure 1: Aurora Plus - 4000 Kit Contents 1 Figure 2: Aurora Plus Hardware
Installation Manual v1.0: Aurora Plus - 4000 Turbo Kit (2003-2007) 5.9L Dodge Please read all instructions before installation. Figure 1: Aurora Plus - 4000 Kit Contents 1 Figure 2: Aurora Plus Hardware
INSTALLATION INSTRUCTIONS
 INSTALLATION INSTRUCTIONS PART NUMBER: 21-426B (Blue Finish) 21-426P (Vacuum Metalized Chrome-VMC) 21-426R (Red Finish) 2003-2005 DODGE Neon SRT-4 L4-2.4L Turbo C.A.R.B. E.O. # D-670-15 Part Number 21-426
Polaris Axys Sidekick Installation Instructions
 2016-2017 Polaris Axys Sidekick Installation Instructions 1. Remove hood and side panels. 2. Remove fasteners and slide console back. 3. Remove belt and driven clutch. 4. Remove clutch cover/ oil-tank
SHORT RAM SYSTEM. Installation Instructions for: Part Number Toyota Corolla & 2003 Toyota Matrix XR
 SHORT RAM SYSTEM Installation Instructions for: Part Number 22-469 2003-2004 Toyota Corolla & 2003 Toyota Matrix XR ADVANCED ENGINE MANAGEMENT INC. 2205 126 TH Street, Unit A Hawthorne, CA. 90250 Phone:
Tools Required. Metric Wrench Set Screwdriver Set Metric Socket Set Pliers Heavy duty hydraulic Jack and Car Stands Box knife or similar Hacksaw WD40
 Subaru 2004+ Legacy GT & Outback XT For JDM 2.0 twinscroll turbo and USDM 2.5 turbo models Front Mount Intercooler Fitting Instructions PN# LEG-1348-000 You are now the proud owner of a highly tested and
PART NUMBER: C (Gun Metal Grey Finish) P (Vacuum Metalized Chrome - VMC)
 P (Vacuum Metalized Chrome - VMC)") Equipped with AEM Dryflow Filter No Oil Required! INSTALLATION INSTRUCTIONS PART NUMBER: 21-729C (Gun Metal Grey Finish) 21-729P (Vacuum Metalized Chrome - VMC) 2010 MAZDA MX-5 MIATA 2.0L L-4 C.A.R.B.
Equipped with AEM Dryflow Filter No Oil Required! INSTALLATION INSTRUCTIONS PART NUMBER: 21-729C (Gun Metal Grey Finish) 21-729P (Vacuum Metalized Chrome - VMC) 2010 MAZDA MX-5 MIATA 2.0L L-4 C.A.R.B.
PART NUMBER: MINI Cooper S L4-1.6L SEE * NOTE
 Equipped with AEM Dryflow Filter No Oil Required! INSTALLATION INSTRUCTIONS PART NUMBER: 21-699 2007-2010 MINI Cooper S L4-1.6L SEE * NOTE * NOTE: Legal in California only for racing vehicles which may
Part number SP Mitsubishi EVO X 2.0L 4 cyl. 1 pc. air intake system equipped
 Part number SP1899 2008 Mitsubishi EVO X 2.0L 4 cyl. 1 pc. air intake system equipped with MR Tech and Air Fusion 2 pc. upper intercooler piping 1- EVO X heat shield (#11020) 1-3 1/2 Power-Flow filter
COLD AIR INTAKE INSTALLATION INSTRUCTIONS. # D Fits: i (4.8L)
") COLD AIR INTAKE INSTALLATION INSTRUCTIONS # D760-0012 Fits: 2006-10 550i (4.8L) PARTS LIST Air Box Assembly Left tube Center tube Right tube Outer Tube AFM housing AFM/TB tube Hardware Kit Congratulations
COLD AIR INTAKE INSTALLATION INSTRUCTIONS # D760-0012 Fits: 2006-10 550i (4.8L) PARTS LIST Air Box Assembly Left tube Center tube Right tube Outer Tube AFM housing AFM/TB tube Hardware Kit Congratulations
Part number RD1306. Maintaining your Cold air intake system: Tools required:
 Part number RD1306 06-07 Honda S2000 4 cyl. 2.2L 1-2 piece cold air intake 1-3 Injen filter (#1014) 1-2 3/4 x 3 silicone step hose (#3040) 1-3 straight hose (#3044) 4- Power-bands.362.048 (#4004) 1-1525
IAG Street Series Air / Oil Separator (AOS) For WRX
 For WRX") P IAG Street Series Air / Oil Separator (AOS) For 2015-16 WRX Part# IAG-ENG-7152 Tools Required: Ratchet, torque wrench, extensions, needle nose pliers, hose cutter, snips/scissors, flat head screw driver,
P IAG Street Series Air / Oil Separator (AOS) For 2015-16 WRX Part# IAG-ENG-7152 Tools Required: Ratchet, torque wrench, extensions, needle nose pliers, hose cutter, snips/scissors, flat head screw driver,
Buy products from authorized and licensed manufacturers using any of our patented processes, beware of cheap knock-offs, look for our licensing logo.
 Part number SP2096 2008-10 Lexus IS-F 5.0L V8 1- Air intake system equipped with MR Tech and Air Fusion 1-5 Injen/AMSOIL (#1046) dry filter w/f1 styleinverted top 1-4 straight hose (#3129) 1-3 1/4 x 3
2015 Ford F150 Front Bumper w/ LED
 PARTS LIST: 2015 Ford F150 Bumper w/ LED 1 Bumper Assembly 4 8mm Lock Washers 1 Driver/left L Bracket (center LED light) 2 8mm Hex Nuts 1 Passenger/right L Bracket (center LED light) 2 6mm x 20mm Button
INSTALLATION INSTRUCTIONS
 Equipped with AEM Dryflow Filter No Oil Required! INSTALLATION INSTRUCTIONS PART NUMBER: 21-696 2009-2010 DODGE Challenger V6-3.5L SEE * NOTE * NOTE: Legal in California only for racing vehicles which
03-04 Cobra. Hellion Power Systems Mustang Cobra Kit Instructions
 Hellion Power Systems 03-04 Mustang Cobra Kit Instructions NECESSARY PARTS REQUIRED FOR INSTALLATION Necessary: 03-04 Cobra hellion Kit ONLY 99-01 Alternator #YR3210346AA Alternator Bracket #XR3Z-10153-AB
Mercedes E63/CLS AMG Carbon Turbo Intake System Instructions
 Mercedes E63/CLS AMG Carbon Turbo Intake System Instructions The goal of Alpha Performance is to provide the highest quality, best performing products available. By utilizing research and development,
Injen strongly recommends that this system be installed by a professional mechanic. MR Technology, The World s First Tuned air Intake System!
 Part number SP2078 2009 Toyota Corolla XRS 2.4L 4 cyl. 2- piece cold air intake 1-3 1/2 Power-flow filter (#1015) 1- secondary silicone hose (#3157) 1-2 1/2 straight hose (#3048) 2- Power Bands.040/.312
OIL COOLER KIT CHEVY CAMARO 2.0T PARTS LIST AND INSTALLATION GUIDE INSTALL DIFFICULTY DISCLAIMER CAUTION TOOLS NEEDED NOTE INSTALL PROCEDURE
 PARTS LIST AND PARTS INCLUDED 3PC APPLICATION-SPECIFIC MOUNTING BRACKETS 1PC HORN RELOCATION MOUNTING BRACKET 1PC 25-ROW OIL COOLER (SLEEK SILVER OR STEALTH BLACK) 1PC 4'4" STAINLESS STEEL BRAIDED HOSE
SHORT RAM SYSTEM. Installation Instructions for: Part Number Toyota Matrix XRS
 SHORT RAM SYSTEM Installation Instructions for: Part Number 22-466 2003 Toyota Matrix XRS ADVANCED ENGINE MANAGEMENT INC. 2205 126 TH Street, Unit A Hawthorne, CA. 90250 Phone: (310) 484-2322 Fax: (310)
Factory safe air/fuel ratio s for Optimum performance Patent# 7,359,795 Now equipped with Air Fusion
 Part number PF7010 2010 Chevy Camaro 3.6L V6 1-4 diameter intake system equipped with MR Tech and Air Fusion 1-3 1/2 neck Injen/AMSOIL (#1021) Performance dry filter w/f1 style inverted top 1-3 1/8 x 3
COLD AIR SYSTEM. Installation Instructions for: Part Number Volkswagen Golf/GTI 1.8L Turbo Volkswagen Jetta 1.
 COLD AIR SYSTEM Installation Instructions for: Part Number 21-493 1999.5-2004 Volkswagen Golf/GTI 1.8L Turbo 1999.5-2004 Volkswagen Jetta 1.8L Turbo ADVANCED ENGINE MANAGEMENT INC. 2205 126 TH Street,
HYBRID DEVELOPMENT INTERNATIONAL RACING INTERCOOLER KIT INSTALLATION MENU SUBARU LEGACY B4 BL5 SUBARU LIBERTY GT BL5
 HYBRID DEVELOPMENT INTERNATIONAL RACING INTERCOOLER KIT INSTALLATION MENU SUBARU LEGACY B4 BL5 SUBARU LIBERTY GT BL5 Please read before continue Please read through all the instruction and practice all
BRUTE FORCE INTAKE SYSTEM Equipped with AEM DRYFLOW Filter. No oil required!
 BRUTE FORCE INTAKE SYSTEM Equipped with AEM DRYFLOW Filter. No oil required! Installation Instructions for: Part Number 21-8103 96-04 Ford Mustang GT Excluding Bullet ADVANCED ENGINE MANAGEMENT INC. 2205
INSTALLATION INSTRUCTIONS
 Bill of Materials for 77070045AB A 1 9-0398 MOPAR Air Box B 1 MP-M-1011 Air Filter Assembly C 1 102507 Rubber Edge Trim 30-1/2 D 1 27368M Air Filter Adaptor Tube E 1 8-184 Elbow; Reducer 3/4-5/8 F 5 08373
V2 INTAKE SYSTEM. Installation Instructions for: Part Number Acura RSX
 V2 INTAKE SYSTEM Installation Instructions for: Part Number 24-6105 2002-2003 Acura RSX ADVANCED ENGINE MANAGEMENT INC. 2205 126 TH Street, Unit A Hawthorne, CA. 90250 Phone: (310) 484-2322 Fax: (310)
IAG Air / Oil Separator (AOS) For STi
 For STi") IAG Air / Oil Separator (AOS) For 2008-14 STi Part# IAG-ENG-7000 Tools Required: Ratchet, torque wrench, extensions, needle nose pliers, hose cutter, snips/scissors Sockets: 10mm, 12mm 13mm Wrenches: 10mm,
IAG Air / Oil Separator (AOS) For 2008-14 STi Part# IAG-ENG-7000 Tools Required: Ratchet, torque wrench, extensions, needle nose pliers, hose cutter, snips/scissors Sockets: 10mm, 12mm 13mm Wrenches: 10mm,
Equipped with AEM Dryflow Filter No Oil Required! INSTALLATION INSTRUCTIONS PART NUMBER DS (GUN METAL GRAY FINISH)
") Equipped with AEM Dryflow Filter No Oil Required! INSTALLATION INSTRUCTIONS PART NUMBER 21-823DS (GUN METAL GRAY FINISH) 1 ITEM NO. PART NUMBER DESCRIPTION QTY. 1 21-202DOSK AIR FILTER; OFFSET 2.75" X
Equipped with AEM Dryflow Filter No Oil Required! INSTALLATION INSTRUCTIONS PART NUMBER 21-823DS (GUN METAL GRAY FINISH) 1 ITEM NO. PART NUMBER DESCRIPTION QTY. 1 21-202DOSK AIR FILTER; OFFSET 2.75" X
Z1 Motorsports 370Z/G37 Oil Cooler Kit Installation Manual
 Z1 Motorsports 2877 Carrollton Villa Rica Hwy Carrollton GA 30116 770.838.7777 Z1 Motorsports 370Z/G37 Oil Cooler Kit Installation Manual For 19, 25 and 34 Row Oil Cooler Kits Parts Included: 1 SETRAB
IAG Competition Series Air / Oil Separator (AOS) For WRX
 For WRX") P IAG Competition Series Air / Oil Separator (AOS) For 2015-16 WRX Part# IAG-ENG-7252 Tools Required: Ratchet, torque wrench, extensions, needle nose pliers, hose cutter, snips/scissors, flat head screw
P IAG Competition Series Air / Oil Separator (AOS) For 2015-16 WRX Part# IAG-ENG-7252 Tools Required: Ratchet, torque wrench, extensions, needle nose pliers, hose cutter, snips/scissors, flat head screw
INSTALLATION INSTRUCTIONS
 Equipped with AEM Dryflow Filter No Oil Required! INSTALLATION INSTRUCTIONS PART NUMBER: 21-507B (Blue Finish) 21-507C (Gun Metal Grey Finish) 21-507R (Red Finish) 2002-2006 ACURA RSX L4-2.0L Auto Trans.
Synchronic Blow-Off Valve TUNING MANUAL
 Synchronic Blow-Off Valve TUNING MANUAL INDEX I. SB001 Diagram II. Installing and Removing the Recirculation Fitting III. Installing and Removing Mounting Flanges IV. Filtering the Inlet V. Connecting
INSTALLATION INSTRUCTIONS
 Equipped with AEM Dryflow Filter No Oil Required! INSTALLATION INSTRUCTIONS PART NUMBER: 24-6105 2002-2006 ACURA RSX - Excludes Type S L4-2.0L C.A.R.B. E.O. # D-670 * NOTE: Legal in California only for
INSTALLATION INSTRUCTIONS
 Equipped with AEM Dryflow Filter No Oil Required! INSTALLATION INSTRUCTIONS PART NUMBER: 21-448B (Blue Finish) 21-448C (Gun Metal Grey Finish) 21-448P (Vauum Metalized Chrome-VMC) 21-448R (Red Finish)
Installation Instructions Camaro ZL1 ( Z) ( ZB)
 ( ZB)") Installation Instructions Camaro ZL1 (501-1099-10-Z) (501-1099-10-ZB) Parts List 1 Insulated Air Box \ Lid 1 Thermal Coated Intake Tube / MAF Housing with (2) M4 x.7 thread 8mm long Stainless Screws; 1
Installation Instructions Camaro ZL1 (501-1099-10-Z) (501-1099-10-ZB) Parts List 1 Insulated Air Box \ Lid 1 Thermal Coated Intake Tube / MAF Housing with (2) M4 x.7 thread 8mm long Stainless Screws; 1