P/N : 1110 Tubular Upper A-Arm Chrysler B-Body, Charger, Super Bee, Road Runner, GTX Chrysler E-Body, Cuda, Challenger
|
|
|
- Brooke Hall
- 5 years ago
- Views:
Transcription
 4NO - ROLL if you have any questions regarding the service or installation of your Hotchkis products.")
1 B-Body, E-Body P/N : 1110 Tubular Upper A-Arm Chrysler B-Body, Charger, Super Bee, Road Runner, GTX Chrysler E-Body, Cuda, Challenger Thank you for your purchase from our new line of B & E-Body parts. Please call us at (877) 4NO - ROLL if you have any questions regarding the service or installation of your Hotchkis products. Hotchkis Performance LLC. 1


2 B-Body, E-Body Before You Start: Please read the entire manual before starting. Most pictures shown are of the driver side a-arm. Please perform the same procedure for the passenger side. 1. Raise Vehicle Raise the vehicle and put it up on jack stands. You may also use a 2-post or 4- post lift. 2. Remove Stock Arms Remove the front wheels and uninstall the stock upper A-Arms. 3. A-Arm Relocater Place the A-Arm Relocator into place as shown below. The Relocators are only installed on the forward mounting point. (NOTE: Picture is showing Passenger side) Hotchkis Performance LLC. 2

 5.")
3 B-Body, E-Body 4. Check for Bolt Clearance In some instances, we seen clearance issues for the Relocator bolt. Check to see if the hole that is used to connect the A-Arm is clear. (NOTE: Pictures below shows the Driver side) 5. Grind if Necessary If anything is in the way, grind it down and recheck clearance. Repeat until bolt fits. Hotchkis Performance LLC. 3

4 B-Body, E-Body 6. Install A-Arm Relocators Slide the stock camber bolt w/washer through the top hole of the A-Arm Relocator. The other end will end up inside the engine bay. Install the washer and nut snugly, but do not fully tighten. You will need to induce some preload to position the Relocator properly. You can do this by rotating the camber bolt clock wise until you feel resistance. The Relocator should position itself snugly onto the frame. Fully tighten the camber bolt by tightening the nut side keeping the bolt static. Hotchkis Performance LLC. 4


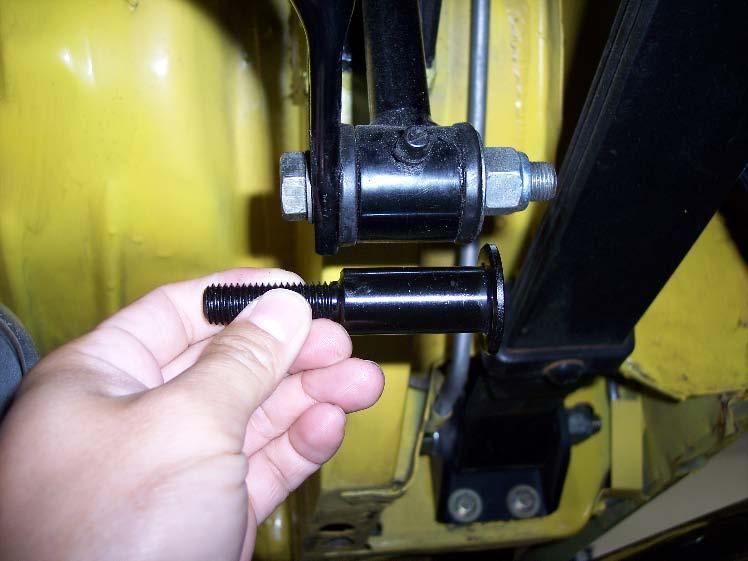
5 B-Body, E-Body 7. Install A-Arm Front Mount Use hardware kit and install the split lock washer & AN washer onto each ½ socket-head bolt. Included in you re A-Arm kit will be an assortment of aluminum spacers with varying thicknesses. Grab one spacer for each Relocator. Insert the socket-head bolt slightly into the bottom hole of the A-Arm Relocator just enough so you can rest the spacer on the tip of it on the inside of the Relocator as shown below. Next, slide the A-Arm into place, slide bolt all the way through, then fully tighten. See bottom picture for full detail. Stack Up: 3/8 bolt---split Lock washer---an Washer---Relocator Spacer---Misalignment Spacer---Heim Joint Hotchkis Performance LLC. 5

6 B-Body, E-Body 8. Install Other Side of A-Arm The trailing end of the A-Arm will be bolted into the stock mounting hole. Install 2 misalignment spacers. Position the A-Arm so that the other heim joint is lined up with the mounting hole. You will notice there will be gaps on each side of the joint. You will need to add spacers (included in your kit) to take up the gaps. These gaps are not consistent from car to car so you will have to use the appropriate thickness spacers on each gap. You may have to use combinations of varying thicknesses to achieve proper gaping. See below as an example. Hotchkis Performance LLC. 6


7 B-Body, E-Body Once the proper spacer arrangement is achieved, insert the camber bolt through the stock mount hole and the other end will end up in the engine bay. Install the camber washer and nut. Adjust the bolt so that the bolt is in the center of its adjustment. Fully tighten nut for now. This will be adjusted once you get an alignment. 9. Connect A-Arm to Spindle Lift the A-Arm and lineup the ball joint stud to the hole in the spindle and slide the stud in. Hotchkis Performance LLC. 7


8 B-Body, E-Body 10. Install Castle Nut Install the castle nut to the other end of the ball joint stud and tighten until there is clearance for the cotter pin to be inserted into the ball joint stud. 11. Install Cotter Pin Install the cotter pin. Twist and cut as needed to ensure it stays in place. Hotchkis Performance LLC. 8


9 B-Body, E-Body 12. Install Bumpstops and Droopstops Remove the stock droop stop and install the included Hotchkis bullet Shaped version. Remove the stock bump stop and install the included Hotchkis Rectangle Shaped version. Hotchkis Performance LLC. 9


10 B-Body, E-Body 13. Repeat the steps for the other side and you re done! Have an alignment shop align the front end. Recommended performance specs: Camber = 1 negative Caster = As much positive caster as possible, as long as both sides have the same spec. Hotchkis Performance LLC. 10
11 B-Body, E-Body Hotchkis Performance LLC Return Policy & Limited Warranty Effective September 1, This return policy and limited warranty supersedes all previous policy and warranty statements. Policies and warranties are subject to change without notice. Hotchkis Performance is not responsible for printing errors. Return Policy We want you to be completely satisfied with your Hotchkis Performance product. In case you're not, you can exchange or return it within 30 days of the purchase date. To obtain a full refund on unused products, excluding freight, please contact our Customer Service Department at (562) You will be assigned a Returned Goods Authorization Number (RGA). The package you return must show the RGA on the outside of the package, include the original invoice and be shipped prepaid to our facility. The product has to be unused and in its original packaging materials and be in sellable condition. For products presenting signs of use or damage, only warranty claims will be accepted. Exchanges or refunds made after 30 days will be subject to a 20% restocking charge. If you purchased your Hotchkis Performance product from an authorized dealer, you are still covered by this return policy. All returns however, should be made to your dealer, not to Hotchkis Performance directly. Limited Warranty Hotchkis Performance warrants its products against defects in materials and workmanship for the term of 36 months (3 years) from the date of purchase. This Warranty only applies to the original retail purchaser who retains ownership of the vehicle on which the product was originally installed. If the product is determined to be defective, Hotchkis Performance will repair, replace or refund the purchase price of the defective product at Hotchkis Performance's sole discretion, which shall fully satisfy and discharge any and all warranty claims. Any repaired or replaced product will be returned to the sender freight prepaid. Exclusions from Warranty Items offered but not manufactured by Hotchkis Performance are warranted according to the manufacturer's terms and are not covered by this limited warranty. Hotchkis Performance shall not be responsible for any labor, removal, installation, re-installation or maintenance costs. This warranty does not cover the cosmetic finish or plating of any product or any normal wear and tear to any product. In addition, this warranty does not apply to any products that have been: Improperly installed or installed by someone other than a qualified, licensed auto mechanic experienced in the installation and removal of suspension products; Improperly serviced, misused, or modified, altered or subjected to abuse, negligence, accident or collision; Installed in any vehicle that has been modified; Installed on any vehicle that has carried loads in excess of automobile manufacturer suggested weight limits; or Installed on any vehicle that has been subject to abnormal or excessive use, including rallying, racing or racing-type activities or off-road use. Limitation of Warranty This limited warranty is the entire and only warranty for the products and may not be modified or supplemented by any other person or company in any form. Any description of the products, by anyone, is for the sole purpose of identifying them and is not part of the basis of the bargain, and does not constitute a warranty that the products will conform to that description. The statements of any salesperson do not constitute part of this limited warranty and cannot be relied upon as a warranty. Hotchkis Performance LLC. 11
12 B-Body, E-Body THERE ARE NO WARRANTIES, EXPRESSED OR IMPLIED, INCLUDING ANY IMPLIED WARRANTIES OF MERCHANTABILITY OR FITNESS FOR A PARTICULAR PURPOSE, WHICH EXTEND BEYOND THE DESCRIPTION ON THE FACE HEREOF. ANY IMPLIED WARRANTIES ARE DISCLAIMED TO THE FULLEST EXTENT PERMITTED BY LAW. THIS WARRANTY DOES NOT COVER CONSEQUENTIAL DAMAGES, LOSS OF TIME OR REVENUES, INCONVENIENCE, LOSS OF USE OF THE VEHICLE, DAMAGE TO THE VEHICLE OR COMPONENTS OF THE VEHICLE, ANY OTHER TYPE OF CONSEQUENTIAL DAMAGES, OR OTHER INCIDENTAL OR INDIRECT DAMAGES. HOTCHKIS MAXIMUM LIABILITY UNDER THIS WARRANTY SHALL IN NO EVENT EXCEED THE PURCHASE PRICE OF THE PRODUCT. Some states do not allow limitations on how long an implied warranty lasts or the exclusion or limitation of incidental or consequential damages and in such states the above limitations or exclusions may not apply. This limited warranty gives the purchaser specific legal rights and the purchaser may have other rights that may vary from state to state. Technical Information Hotchkis Performance makes every effort to ensure that you are provided with the most accurate and up-to-date technical information. However, all technical information is approximate and may vary upon application. Additional suspension components may be needed in some applications, depending upon the make, model, engine and chassis of the vehicle. Hotchkis Performance is not responsible for any consequences resulting from manufacturer s technical mid-year changes. Hotchkis Performance products should only be installed by a qualified, licensed auto mechanic experienced in the installation of such products. Warranty Claim Procedure: The answer to ALL the following questions should be YES before making a warranty claim: Is the product appropriate to your application? Did you carefully and thoroughly read the instructions provided along with the product? Do you have the original invoice or sales receipt? Is the return date within 36 months from the purchase date? Are you the original purchaser? Was the product properly installed by a qualified, licensed auto mechanic? Has the product been installed on the original vehicle on which it was installed at all times? Is the product unmodified and clean? Is the reason for return a legitimate product defect? If the answer to all these questions is YES, please contact our Customer Service Department at (562) You will be given a Returned Goods Authorization Number (RGA) valid for 60 days. You will also be asked to ship the product prepaid to our facility. All shipments MUST be (i) prepaid, (ii) include the original invoice or sales receipt, (iii) show the RGA on the outside of the package and (iv) include your name, address, make and model of the vehicle, and a brief description of the claimed defect, including the circumstances under which the defect occurred. Warranty related inquires should be sent to the following address: HOTCHKIS PERFORMANCE, LLC C/O CUSTOMER SERVICE BURKE ST. SUITE 13 SANTA FE SPRINGS, CA Hotchkis Performance will not accept product returns without the RGA number, receipt and the information described above. C.O.D. or collect shipments will be refused. Once the returns are received at Hotchkis Performance, we will evaluate the products, verify the sales receipt, and investigate the warranty claim. Hotchkis Performance LLC. 12
13 14385 A-Body, B-Body, E-Body 14366, Adjustable Strut Rods Chrysler A-Body Chrysler B-Body Chrysler E-Body Thank you for your purchase from our new line of B & E-Body parts. Please call us at (877) 4NO - ROLL if you have any questions regarding the service or installation of your Hotchkis products. Hotchkis Performance LLC. 1
14 14385 A-Body, B-Body, E-Body Before You Start: Please read the entire manual before starting. Most pictures shown are of the passenger side strut rod. Please perform the same procedure for the driver side. 1. Raise Vehicle Raise the vehicle and put it up on jack stands. You may also use a 2-post or 4- post lift. 2. Disconnect the Front Sway Bar If your car has a front sway bar, disconnect the front sway bar ends that attach to the lower control arms. 3. Disconnect the Strut Rod From the K-Member Undo the strut rod nut accessible from the front of the K-member. You may discard this hardware. 4. Disconnect Strut Rod From Lower Control Arm In order to get the stock strut rod out, you will need to shift the lower control arm toward the rear of the car to gain more room. First undo the nut securing the strut rod to the lower control arm. Retain this nut for reinstallation. Loosen the torsion bar tensioner bolt located on the bottom of the lower control arm to relieve the load from the torsion bar. Next, loosen and remove the main nut securing the lower control arm to the k- member. There is a snap ring at the rear end of the torsion bar that keeps it from moving back. Remove the snap ring and shift the torsion bar 3-4 towards the back. You should be able to shift the lower control arm slightly towards the back allowing you to pop out the strut rod end out of the lower control arm hole. The stock strut rod should be free from the vehicle. Hotchkis Performance LLC. 2
15 14385 A-Body, B-Body, E-Body 5. Install Clevis Assembly onto Strut Rod Install 2 misalignment spacers onto the heim joint. Insert the ½ bolt, washers and nuts onto the clevis assembly attaching the clevis to the heim joint. Fully tighten the ½ bolt Hotchkis Performance LLC. 3
16 14385 A-Body, B-Body, E-Body 6. Install the Strut Rod We ll start by bolting in the front end first. Following the diagram below to see the order of parts. Install the large flat-cut washer onto the clevis stud and insert the front mount into the k-member hole. If needed, rotate the flat-cut washer to alleviate any clearance issues with the sheet metal. You will notice that the k-member hole is much larger than the clevis stud. This is ok, since you will be inserting 2 spacer washers from the front side of the k-member to take up the gap. The spacer washers will fit inside the k-member sheet metal. Once the spacers are in place, install the large round washer and 5/8 nylock nut. Moving on to the rear mount, insert the rear stud into the lower control arm hole. Do not install the stud nut at this time. Hotchkis Performance LLC. 4

. Fully tighten the rear strut rod nut.")

17 14385 A-Body, B-Body, E-Body Reinstall the lower control arm back onto the k-member. Push the torsion bar forward and insert it into the lower control arm pin hex. Next rotate/thread the strut rod body in or out to a desired length. You can dial in more positive caster by shortening the strut rod. Do not over extend the strut rod past the recommended length (see diagram below). Fully tighten the rear strut rod nut. Center the heim joint so that it is not twisted one way or another. Tighten the heim joint jam nut. Fully tighten the front strut rod 5/8 nut you installed earlier. To avoid spinning the clevis while tightening, use a pry bar to hold the clevis. Restore torsion bar snap ring. Adjust the torsion bar tensioner back to where it was for proper pre-load. Hotchkis Performance LLC. 5


18 14385 A-Body, B-Body, E-Body 7. Repeat on Drivers Side Repeat the steps on the driver s side and you re done! Hotchkis Performance LLC Return Policy & Limited Warranty Effective December 1, 2010 all Hotchkis products must be registered to qualify for warranty at or via the mail-in warranty card, included with the product, within 30 days of the original purchase date. IMPORTANT: This warranty supersedes all other warranties included with this product. Return Policy We want you to be completely satisfied with your Hotchkis Performance product. For products, presenting signs of shipping damage please contact the freight carrier immediately. All our products are guaranteed to be free from manufacturer s defects. If your order arrives with a manufacture defect, please contact our Customer Service Department at (562) You will be assigned a Returned Goods Authorization Number (RGA). The package you return must show the RGA on the outside of the package, include the original invoice and be shipped prepaid to our facility. The product has to be unused and in its original packaging materials. Exchanges or refunds made after 30 days will be subject to a 20% restocking charge. If you purchased your Hotchkis Performance product from an authorized dealer, you are still covered by this return policy. All returns however, should be made to your dealer, not to Hotchkis Performance directly. Limited Warranty Hotchkis Performance LLC. 6
19 14385 A-Body, B-Body, E-Body Hotchkis Performance offers a Limited Warranty against defects in materials and workmanship for the term of 36 months (3 years) from the date of purchase of this product. This Warranty only applies to the original retail purchaser who retains ownership of the vehicle on which the product was originally installed. If the product is determined to be defective, Hotchkis Performance will repair, replace or refund the purchase price of the defective product at Hotchkis Performance's sole discretion, which shall fully satisfy and discharge any and all warranty claims. Any repaired or replaced product will be returned to the sender excluding the cost of freight. Products must be registered to qualify for warranty at or via the mail-in warranty card, included with the product, within 30 days of the original purchase date. Exclusions from Warranty Items offered but not manufactured by Hotchkis Performance are warranted according to the manufacturer's terms and are not covered by this limited warranty. Hotchkis Performance shall not be responsible for any labor, removal, installation, re-installation or maintenance costs. This warranty does not cover the cosmetic finish or plating of any product or any normal wear and tear to any product including, but not limited to bushings, brackets, end-links, hardware, steering components, shocks or springs. In addition, this warranty does not apply to any products that have been: Improperly installed or installed by someone other than a qualified, licensed auto mechanic experienced in the installation and removal of suspension products; Improperly serviced, misused, or modified, altered or subjected to abuse, negligence, accident or collision; Installed in any vehicle that has been modified; Installed on any vehicle that has carried loads in excess of automobile manufacturer suggested weight limits; or Installed on any vehicle that has been subject to abnormal or excessive use, including rallying, racing, or racing-type activities or off-road use. Limitation of Warranty This limited warranty is the entire and only warranty for the products and may not be modified or supplemented by any other person or company in any form. Any description of the products, by anyone, is for the sole purpose of identifying them and is not part of the basis of the bargain, and does not constitute a warranty that the products will conform to that description. The statements of any salesperson do not constitute part of this limited warranty and cannot be relied upon as a warranty. THERE ARE NO WARRANTIES, EXPRESSED OR IMPLIED, INCLUDING ANY IMPLIED WARRANTIES OF MERCHANTABILITY OR FITNESS FOR A PARTICULAR PURPOSE, WHICH EXTEND BEYOND THE DESCRIPTION ON THE FACE HEREOF. ANY IMPLIED WARRANTIES ARE DISCLAIMED TO THE FULLEST EXTENT PERMITTED BY LAW. THIS WARRANTY DOES NOT COVER CONSEQUENTIAL DAMAGES, LOSS OF TIME OR REVENUES, INCONVENIENCE, LOSS OF USE OF THE VEHICLE, DAMAGE TO THE VEHICLE OR COMPONENTS OF THE VEHICLE, ANY OTHER TYPE OF CONSEQUENTIAL DAMAGES, OR OTHER INCIDENTAL OR INDIRECT DAMAGES. HOTCHKIS MAXIMUM LIABILITY UNDER THIS WARRANTY SHALL IN NO EVENT EXCEED THE PURCHASE PRICE OF THE PRODUCT. Some states do not allow limitations on how long an implied warranty lasts or the exclusion or limitation of incidental or consequential damages and in such states the above limitations or exclusions may not apply. This limited warranty gives the purchaser specific legal rights and the purchaser may have other rights that may vary from state to state. Technical Information Hotchkis Performance makes every effort to ensure that you are provided with the most accurate and up-to-date technical information. However, all technical information is approximate and may vary upon application. Additional suspension components may be needed in some applications, depending upon the make, model, engine and chassis of the vehicle. Hotchkis Performance is not responsible for any consequences resulting from manufacturer s technical mid-year changes. Hotchkis Performance products should only be installed by a qualified, licensed auto mechanic experienced in the installation of such products. Warranty Claim Procedure: The answer to ALL the following questions should be YES before making a warranty claim: Hotchkis Performance LLC. 7
20 14385 A-Body, B-Body, E-Body Did you register the product at or via the mail-in warranty card within 30 days of purchase? Is the product appropriate to your application? Did you carefully and thoroughly read the instructions provided along with the product? Do you have the original invoice or sales receipt? Is the return date within 36 months from the purchase date? Are you the original purchaser? Was the product properly installed by a qualified, licensed auto mechanic? Has the product been installed on the original vehicle on which it was installed at all times? Is the product unmodified and clean? Is the reason for return a legitimate product defect? If the answer to all these questions is YES, please contact our Customer Service Department at (562) You will be given a Returned Goods Authorization Number (RGA) valid for 60 days. You will also be asked to ship the product prepaid to our facility. All shipments MUST be (i) prepaid, (ii) include the original invoice or sales receipt, (iii) show the RGA on the outside of the package and (iv) include your name, address, make and model of the vehicle, and a brief description of the claimed defect, including the circumstances under which the defect occurred. If the warranty claim is deemed valid then Hotchkis will estimate shipping costs to return the repaired or replacement part and contact you for payment. Hotchkis s Limited warranty requires that any repaired or replaced product will be returned to the sender excluding the cost of freight. Warranty related inquires should be sent to the following address: HOTCHKIS PERFORMANCE, LLC C/O CUSTOMER SERVICE 8633 Sorensen Avenue SANTA FE SPRINGS, CA Hotchkis Performance will not accept product returns without the RGA number, receipt and the information described above. C.O.D. or collect shipments will be refused. Once the returns are received at Hotchkis Performance, we will evaluate the products, verify the sales receipt, and investigate the warranty claim. Any repaired or replaced product will be returned to the sender. Effective December 1, This return policy and limited warranty supersedes all previous policy and warranty statements. Policies and warranties are subject to change without notice. Hotchkis Performance is not responsible for printing errors. Hotchkis Performance LLC. 8
21 P B-Body, E-Body Steering Tie Rods Chrysler B-Body, Charger, Super Bee, Road Runner, GTX Chrysler E-Body, Cuda, Challenger Thank you for your purchase from our new line of B & E-Body parts. Please call us at (877) 4NO - ROLL if you have any questions regarding the service or installation of your Hotchkis products. Hotchkis Performance LLC. 1
22 B-Body, E-Body Before You Start: Please read the entire manual before starting. These steering tie rods were designed to reduce weight, provide rigid steering feel, and allow for shimming for reducing bump steer. We highly recommend using our (P/N:1110) Upper A- Arms in conjunction with your Hotchkis steering tie rods for maximum suspension geometry and performance. 1. Raise Vehicle Raise the vehicle and put it up on jack stands. You may also use a 2-post or 4- post lift. 2. Remove Stock Steering Tie Rods Remove the left and right stock steering tie rods from the vehicle. A big hammer is your friend in removing the ball joint studs from center link and spindle. A pickle fork may be needed if they are really tight. 3. Set Initial lengths for the Hotchkis Tie Rods With the stock tie rods off, measure the center to center dimension of each link. Spin the hotchkis turnbuckle so that the center to center dimension matches the stock part. This will be an initial setting. A front end toe alignment will be needed once the tie rods are in place. Hotchkis Performance LLC. 2
23 B-Body, E-Body 4. Install Hotchkis Steering Tie Rods The diagram below shows the order of the parts. The generic pieces labeled X and Y represents the vehicle s center link and spindle consecutively. They are shown for assembly purposes and are not included in the kit. Please refer to the suggested diagram that suits your model. (Note: The spacer suggestions are optimum for use with cars equipped with Hotchkis Upper A-Arms (P/N:1110) with camber setting of Spacer combinations may vary with stock or other suspension geometries. Check Bump steer for these configurations.) E-Body Cars & B-Body Cars A) ½ x 3 hex bolt B) ½ SAE washer C) Misalignment Spacers D) Taper Adapter (note direction: tapered section inserts into tapered hole) E) ½ Nylock Nut F) ½ x 3-1/2 hex bolt G) E-Body Spacers Thick (P/N: ) X) Center Link Y) Spindle Hotchkis Performance LLC. 3
24 B-Body, E-Body 1970 B-Body Cars A) ½ x 3 hex bolt B) ½ SAE washer C) Misalignment Spacers D) Taper Adapter (note direction: tapered section inserts into tapered hole) E) ½ Nylock Nut F) ½ x 3-1/2 hex bolt H) E-Body Spacer Thick (P/N: ) X) Center Link Y) Spindle 5. Finishing Steps Once the tie rods are bolted up, please have an alignment shop set your front toe setting. Hotchkis suggests 1/16 of TOE-IN. If you do not have the Hotchkis 1110 upper A-Arms installed, you may want to check for bump steer. Add or remove the spacers on the outer tie rod end to fine tune the bump steer. We also offer spacers with varying thicknesses directly. Please call P/N: = spacers P/N: = spacers Hotchkis Performance LLC. 4
25 Hotchkis Performance LLC Return Policy & Limited Warranty B-Body, E-Body Effective December 1, 2010 all Hotchkis products must be registered to qualify for warranty at or via the mail-in warranty card, included with the product, within 30 days of the original purchase date. IMPORTANT: This warranty supersedes all other warranties included with this product. Return Policy We want you to be completely satisfied with your Hotchkis Performance product. For products, presenting signs of shipping damage please contact the freight carrier immediately. All our products are guaranteed to be free from manufacturer s defects. If your order arrives with a manufacture defect, please contact our Customer Service Department at (562) You will be assigned a Returned Goods Authorization Number (RGA). The package you return must show the RGA on the outside of the package, include the original invoice and be shipped prepaid to our facility. The product has to be unused and in its original packaging materials. Exchanges or refunds made after 30 days will be subject to a 20% restocking charge. If you purchased your Hotchkis Performance product from an authorized dealer, you are still covered by this return policy. All returns however, should be made to your dealer, not to Hotchkis Performance directly. Limited Warranty Hotchkis Performance offers a Limited Warranty against defects in materials and workmanship for the term of 36 months (3 years) from the date of purchase of this product. This Warranty only applies to the original retail purchaser who retains ownership of the vehicle on which the product was originally installed. If the product is determined to be defective, Hotchkis Performance will repair, replace or refund the purchase price of the defective product at Hotchkis Performance's sole discretion, which shall fully satisfy and discharge any and all warranty claims. Any repaired or replaced product will be returned to the sender excluding the cost of freight. Products must be registered to qualify for warranty at or via the mail-in warranty card, included with the product, within 30 days of the original purchase date. Exclusions from Warranty Items offered but not manufactured by Hotchkis Performance are warranted according to the manufacturer's terms and are not covered by this limited warranty. Hotchkis Performance shall not be responsible for any labor, removal, installation, re-installation or maintenance costs. This warranty does not cover the cosmetic finish or plating of any product or any normal wear and tear to any product including, but not limited to bushings, brackets, end-links, hardware, steering components, shocks or springs. In addition, this warranty does not apply to any products that have been: Improperly installed or installed by someone other than a qualified, licensed auto mechanic experienced in the installation and removal of suspension products; Improperly serviced, misused, or modified, altered or subjected to abuse, negligence, accident or collision; Installed in any vehicle that has been modified; Installed on any vehicle that has carried loads in excess of automobile manufacturer suggested weight limits; or Installed on any vehicle that has been subject to abnormal or excessive use, including rallying, racing, or racing-type activities or off-road use. Limitation of Warranty This limited warranty is the entire and only warranty for the products and may not be modified or supplemented by any other person or company in any form. Any description of the products, by anyone, is for the sole purpose of identifying them and is not part of the basis of the bargain, and does not constitute a warranty that the products will conform to that description. The statements of any salesperson do not constitute part of this limited warranty and cannot be relied upon as a warranty. Hotchkis Performance LLC. 5
26 B-Body, E-Body THERE ARE NO WARRANTIES, EXPRESSED OR IMPLIED, INCLUDING ANY IMPLIED WARRANTIES OF MERCHANTABILITY OR FITNESS FOR A PARTICULAR PURPOSE, WHICH EXTEND BEYOND THE DESCRIPTION ON THE FACE HEREOF. ANY IMPLIED WARRANTIES ARE DISCLAIMED TO THE FULLEST EXTENT PERMITTED BY LAW. THIS WARRANTY DOES NOT COVER CONSEQUENTIAL DAMAGES, LOSS OF TIME OR REVENUES, INCONVENIENCE, LOSS OF USE OF THE VEHICLE, DAMAGE TO THE VEHICLE OR COMPONENTS OF THE VEHICLE, ANY OTHER TYPE OF CONSEQUENTIAL DAMAGES, OR OTHER INCIDENTAL OR INDIRECT DAMAGES. HOTCHKIS MAXIMUM LIABILITY UNDER THIS WARRANTY SHALL IN NO EVENT EXCEED THE PURCHASE PRICE OF THE PRODUCT. Some states do not allow limitations on how long an implied warranty lasts or the exclusion or limitation of incidental or consequential damages and in such states the above limitations or exclusions may not apply. This limited warranty gives the purchaser specific legal rights and the purchaser may have other rights that may vary from state to state. Technical Information Hotchkis Performance makes every effort to ensure that you are provided with the most accurate and up-to-date technical information. However, all technical information is approximate and may vary upon application. Additional suspension components may be needed in some applications, depending upon the make, model, engine and chassis of the vehicle. Hotchkis Performance is not responsible for any consequences resulting from manufacturer s technical mid-year changes. Hotchkis Performance products should only be installed by a qualified, licensed auto mechanic experienced in the installation of such products. Warranty Claim Procedure: The answer to ALL the following questions should be YES before making a warranty claim: Did you register the product at or via the mail-in warranty card within 30 days of purchase? Is the product appropriate to your application? Did you carefully and thoroughly read the instructions provided along with the product? Do you have the original invoice or sales receipt? Is the return date within 36 months from the purchase date? Are you the original purchaser? Was the product properly installed by a qualified, licensed auto mechanic? Has the product been installed on the original vehicle on which it was installed at all times? Is the product unmodified and clean? Is the reason for return a legitimate product defect? If the answer to all these questions is YES, please contact our Customer Service Department at (562) You will be given a Returned Goods Authorization Number (RGA) valid for 60 days. You will also be asked to ship the product prepaid to our facility. All shipments MUST be (i) prepaid, (ii) include the original invoice or sales receipt, (iii) show the RGA on the outside of the package and (iv) include your name, address, make and model of the vehicle, and a brief description of the claimed defect, including the circumstances under which the defect occurred. If the warranty claim is deemed valid then Hotchkis will estimate shipping costs to return the repaired or replacement part and contact you for payment. Hotchkis s Limited warranty requires that any repaired or replaced product will be returned to the sender excluding the cost of freight. Warranty related inquires should be sent to the following address: HOTCHKIS PERFORMANCE, LLC C/O CUSTOMER SERVICE 8633 Sorensen Avenue SANTA FE SPRINGS, CA Hotchkis Performance will not accept product returns without the RGA number, receipt and the information described above. C.O.D. or collect shipments will be refused. Once the returns are received at Hotchkis Hotchkis Performance LLC. 6
27 B-Body, E-Body Performance, we will evaluate the products, verify the sales receipt, and investigate the warranty claim. Any repaired or replaced product will be returned to the sender. Effective December 1, This return policy and limited warranty supersedes all previous policy and warranty statements. Policies and warranties are subject to change without notice. Hotchkis Performance is not responsible for printing errors. Hotchkis Performance LLC. 7

28 Sport Sway Bar Kit Chrylser E-Body Cuda, Challenger Thank you for your purchase from our new line of Mopar parts. Please call us at 877-4NO - ROLL if you have any questions regarding the service or installation of your Hotchkis Performance products. IMPORTANT: PLEASE READ THE ENTIRE INSTRUCTION MANUAL BEFORE STARTING THIS INSTALLATION. THERE S SOME HOLE DRILLING INVOLVED AND IT WOULD BE A SHAME TO MAKE ANY UNNECESSARY HOLES DUE TO INSTALLER ERROR. METAL GRINDING IS ALSO NECESSARY. Installation of Hotchkis Front Sway Bar 1F Raise the Vehicle Raise the vehicle and safely secure it on jack stands. Remove either the driver or passenger side wheel. 2F. Disconnect End Lniks Disconnect the stock sway bar end links form the lower control arm and the sway bar 3F. Disconnect Bushing Brackets Disconnect the bushing bracket from the subframe bushing mounts. 4F. Remove Subframe Bushing Mounts. Unbolt the 2 nuts and remove the subframe bushing mounts.


29 5F. Remove the Front Stock Sway Bar Fish the stock bar towards the side that the wheel was taken off. The stock sway bar should be able to be completely removed from the vehicle. 6F. Disconnect the Radiator Bracket There is a radiator bracket directly in front of the k-frame. Disconnect the rearward bolt and loosen the front bolt to swing the bracket out of the way.

30 7F. Cut Skid Plate If your k-frame has a skid plate you will need to cut the front welds that attach the plate to the k-frame. This will allow you to carefully bend the skid plate downward to allow the new bar to go in. Use a cut-off wheel or grinder to cut the welds. You will be re-bending and rewelding the plate back to it s original position later in this installation. 8F. Install Hotchkis Sway Bar Insert the Hotchkis front sway bar through the middle of the k-frame like the stock bar use to. 9F. Install New Subframe Bushing Mounts Install the Hotchkis subframe bushing mounts with the included hardware. Use the fine thread 3/8 hex bolts for this mount. Make sure to use a washer for the bolt head and the nut side.


31 10F Install the Bushings & Brackets Lube the inside surface of the new bushings with the provided grease. Install the bushings on to the bar. Install the bushing bracket onto the bushing. Due tolerances in subframes, you may need to install one or two 1/8 spacers between the bushing and the subframe bushing mounts. Please check the clearance the bar has inside the k-member. If it needs to move up or down, use add or remove the spacers to achieve proper clearance. Use the provided 3/8 socket head bolts and nuts. These are course thread. Use the flat cut washers on the socket head side and insert the bolts from the bottom 11F. Install End Links


32 Install the new end links in the same fashion as the stock removal. 12F 13F Re-Weld Skid Plate Use a jack to push the skid plate back to it s original position. Sand or grind down the area near the cut. Disconnect the car battery and re-weld the plate. Sway Bar Stiffness This bar is 220% stiffer than stock.

33 Installation of Hotchkis Rear Sway Bar 1R. Raise the Vehicle, Remove Rear Bar Installation must be done at ride height. Drive vehicle on to ramps, or use a 4-post alignment style rack. If your vehicle has a factory sway bar, jack up the vehicle and support with jack stands, remove one wheel, remove end links and bushing brackets, and slide bar out side of vehicle. Install wheel, and lower vehicle back down to ride height. 2R. Install Axle Brackets Hang the bushing bracket u-bolts over the axle tubes. 3R. Install Bushings & Brackets Apply grease to the new bushings with the supplied grease, install onto sway bar, and press bushing brackets over bushings. 4R. Attach bar to Axle


34 Lift the sway bar into position, and attach to u-bolts with the axle brackets. Install the nuts onto the u-bolts, but do not completely tighten yet. Align the axle brackets so they are level with the ground. 5R. Install End Link Dog Bones & Frame Bracket for Mock Fit Install dog-bones and triangle frame brackets onto sway bar with the supplied hardware in the center hole of the sway bar.


35 We ve noticed on some E-bodies that the distance between the left and right frame rails were ½ wider. If the frame bracket does not line up in the center of each frame rail due to the frames having a wider span, then please install the optional spacer between the sway bar and the end link. 6R. Mock Up Reinforcement Frame Brackets Since the vehicles frame rails are made out of thin steel, it is necessary to reinforce the frame rails in the area that the sway bar mounts to. There are 2 brackets that are included in your kit (one per side).

36 Place the reinforcement bracket onto the frame rail and position the sway bar triangle frame bracket up against the reinforcement bracket. Mark the frame rails outlining the entire bracket including the side holes. Do this for both sides. With the brackets in position, mark the hole position of the triangle bracket onto the reinforcement bracket.


37 7R. Clean Area for Welding Raise the rear of the vehicle and remove the rear wheels. This will allow you go access the outer section of the frame rails easier. Sand the paint off the frame rails near the outline of the bracket. Sand the frame triangle bracket in the sections showed below. 8R. Weld Triangle Bracket to the Reinforcement Bracket C-Clamp the triangle frame bracket to the reinforcement bracket and rosette weld the 2 holes you marked at the end of step 6R. Once the brackets are together, weld a bead along the
38 side edges of the triangle bracket and the reinforcement bracket. Do this for both driver and passenger sides. 9R. Weld Reinforcement Brackets to Frame Rails With the triangle bracket and reinforcement brackets welded together, slide the reinforcement bracket onto the frame rail. C-clamp it into place. Use the positioning line made in step 7R to get the assembly into the correct position.

39 Weld the bracket to the frame rail as shown below. 10R Paint & Reassemble End Links Once the brackets are welded in place, paint the exposed metal with your choice of color. Reinstall the end links onto the triangle brackets and fully tighten all hardware. You are finished!


40 11R Offset Leaf Springs Owners! If you have installed a offset leaf spring kit prior or after the installation of the Hotchkis sway bar set, you may have an interference issue between the leaf spring and the dog bone attachment at the sway bar end. You can gain more clearance by installing our studded dog bone conversion kit

41
42 Hotchkis Performance LLC Return Policy & Limited Warranty Effective December 1, 2010 all Hotchkis products must be registered to qualify for warranty at or via the mail-in warranty card, included with the product, within 30 days of the original purchase date. IMPORTANT: This warranty supersedes all other warranties included with this product. Return Policy We want you to be completely satisfied with your Hotchkis Performance product. For products, presenting signs of shipping damage please contact the freight carrier immediately. All our products are guaranteed to be free from manufacturer s defects. If your order arrives with a manufacture defect, please contact our Customer Service Department at (562) You will be assigned a Returned Goods Authorization Number (RGA). The package you return must show the RGA on the outside of the package, include the original invoice and be shipped prepaid to our facility. The product has to be unused and in its original packaging materials. Exchanges or refunds made after 30 days will be subject to a 20% restocking charge. If you purchased your Hotchkis Performance product from an authorized dealer, you are still covered by this return policy. All returns however, should be made to your dealer, not to Hotchkis Performance directly. Limited Warranty Hotchkis Performance offers a Limited Warranty against defects in materials and workmanship for the term of 36 months (3 years) from the date of purchase of this product. This Warranty only applies to the original retail purchaser who retains ownership of the vehicle on which the product was originally installed. If the product is determined to be defective, Hotchkis Performance will repair, replace or refund the purchase price of the defective product at Hotchkis Performance's sole discretion, which shall fully satisfy and discharge any and all warranty claims. Any repaired or replaced product will be returned to the sender excluding the cost of freight. Products must be registered to qualify for warranty at or via the mail-in warranty card, included with the product, within 30 days of the original purchase date. Exclusions from Warranty Items offered but not manufactured by Hotchkis Performance are warranted according to the manufacturer's terms and are not covered by this limited warranty. Hotchkis Performance shall not be responsible for any labor, removal, installation, re-installation or maintenance costs. This warranty does not cover the cosmetic finish or plating of any product or any normal wear and tear to any product including, but not limited to bushings, brackets, end-links, hardware, steering components, shocks or springs. In addition, this warranty does not apply to any products that have been: Improperly installed or installed by someone other than a qualified, licensed auto mechanic experienced in the installation and removal of suspension products; Improperly serviced, misused, or modified, altered or subjected to abuse, negligence, accident or collision; Installed in any vehicle that has been modified; Installed on any vehicle that has carried loads in excess of automobile manufacturer suggested weight limits; or Installed on any vehicle that has been subject to abnormal or excessive use, including rallying, racing, or racing-type activities or off-road use. Limitation of Warranty This limited warranty is the entire and only warranty for the products and may not be modified or supplemented by any other person or company in any form. Any description of the products, by anyone, is for the sole purpose of identifying them and is not part of the basis of the bargain, and does not constitute a warranty that the products will conform to that description. The statements of any salesperson do not constitute part of this limited warranty and cannot be relied upon as a warranty. THERE ARE NO WARRANTIES, EXPRESSED OR IMPLIED, INCLUDING ANY IMPLIED WARRANTIES OF MERCHANTABILITY OR FITNESS FOR A PARTICULAR PURPOSE, WHICH EXTEND BEYOND THE DESCRIPTION ON THE FACE HEREOF. ANY IMPLIED WARRANTIES ARE DISCLAIMED TO THE FULLEST EXTENT PERMITTED BY LAW. THIS WARRANTY DOES NOT COVER CONSEQUENTIAL DAMAGES, LOSS OF TIME OR REVENUES, INCONVENIENCE, LOSS OF USE OF THE VEHICLE, DAMAGE TO THE VEHICLE OR COMPONENTS OF THE VEHICLE, ANY OTHER TYPE OF
43 CONSEQUENTIAL DAMAGES, OR OTHER INCIDENTAL OR INDIRECT DAMAGES. HOTCHKIS MAXIMUM LIABILITY UNDER THIS WARRANTY SHALL IN NO EVENT EXCEED THE PURCHASE PRICE OF THE PRODUCT. Some states do not allow limitations on how long an implied warranty lasts or the exclusion or limitation of incidental or consequential damages and in such states the above limitations or exclusions may not apply. This limited warranty gives the purchaser specific legal rights and the purchaser may have other rights that may vary from state to state. Technical Information Hotchkis Performance makes every effort to ensure that you are provided with the most accurate and up-to-date technical information. However, all technical information is approximate and may vary upon application. Additional suspension components may be needed in some applications, depending upon the make, model, engine and chassis of the vehicle. Hotchkis Performance is not responsible for any consequences resulting from manufacturer s technical mid-year changes. Hotchkis Performance products should only be installed by a qualified, licensed auto mechanic experienced in the installation of such products. Warranty Claim Procedure: The answer to ALL the following questions should be YES before making a warranty claim: Did you register the product at or via the mail-in warranty card within 30 days of purchase? Is the product appropriate to your application? Did you carefully and thoroughly read the instructions provided along with the product? Do you have the original invoice or sales receipt? Is the return date within 36 months from the purchase date? Are you the original purchaser? Was the product properly installed by a qualified, licensed auto mechanic? Has the product been installed on the original vehicle on which it was installed at all times? Is the product unmodified and clean? Is the reason for return a legitimate product defect? If the answer to all these questions is YES, please contact our Customer Service Department at (562) You will be given a Returned Goods Authorization Number (RGA) valid for 60 days. You will also be asked to ship the product prepaid to our facility. All shipments MUST be (i) prepaid, (ii) include the original invoice or sales receipt, (iii) show the RGA on the outside of the package and (iv) include your name, address, make and model of the vehicle, and a brief description of the claimed defect, including the circumstances under which the defect occurred. If the warranty claim is deemed valid then Hotchkis will estimate shipping costs to return the repaired or replacement part and contact you for payment. Hotchkis s Limited warranty requires that any repaired or replaced product will be returned to the sender excluding the cost of freight. Warranty related inquires should be sent to the following address: HOTCHKIS PERFORMANCE, LLC C/O CUSTOMER SERVICE 8633 Sorensen Avenue SANTA FE SPRINGS, CA Hotchkis Performance will not accept product returns without the RGA number, receipt and the information described above. C.O.D. or collect shipments will be refused. Once the returns are received at Hotchkis Performance, we will evaluate the products, verify the sales receipt, and investigate the warranty claim. Any repaired or replaced product will be returned to the sender. Effective December 1, This return policy and limited warranty supersedes all previous policy and warranty statements. Policies and warranties are subject to change without notice. Hotchkis Performance is not responsible for printing errors.

44 Rear Leaf Spring Kit 24366, Chrysler B-body, Chrysler E-Body Thank you for your purchase from our new line of Mopar parts. Please call us at 877-4NO - ROLL if you have any questions regarding the service or installation of your Hotchkis Performance products. IMPORTANT: PLEASE READ THE ENTIRE INSTRUCTION MANUAL BEFORE STARTING THIS INSTALLATION. 1. Raise the Vehicle Raise the vehicle and safely secure it on jack stands. 2. Disconnect Rear Shock Disconnect the lower shock mount nut for each rear shock. You do not have to disconnect the upper mounts 3. Disconnect Stock U-Bolts Disconnect the stock U-bolts that secure the differential tubes to the leaf springs. It is very common for these u-bolts to be difficult to unfasten. In many cases it is necessary to cut the u-bolts with a cut-off wheel in order for removal. You Hotchkis kit comes with replacement u- bolts.
45 4. Support the Pumpkin Slide a floor jack underneath the rear end to relieve the differential/wheel weight off of the leaf springs. 5. Unfasten Rear Shackles Unfasten the rear leaf spring shackles, but do not disconnect. 6. Disconnect the Front Leaf Mount The front leaf spring mount has 4 studs and mounts to the chassis. Undo the 4 nuts for each mount to detach it from the chassis. It helps if someone can help with holding up the leaf spring at this time. 7. Remove Leaf Springs With the front mount disconnected, shift the leaf spring inboard to unhook the rear leaf eye from the shackle bolt. The leaf should be free from the car. 8. Assemble the Hotchkis Leaf Springs Your new Hotchkis Leaf Spring kit comes with new front mounts, u-bolts, and hardware. If you would like to replace your old rusty shackles you can purchase our new shackle kit which includes new powdercoated shackles, hardware and polyurethane bushings. Assemble the front mount and leaf spring together using the large 5/8 bolt and hardware. Snug the 5/8 nuts, but do not fully tighten yet. See diagram below:
46 Diagram shows Driver Side with the 5/8 bolt pointing outboard. 9. Install Rear Bushings Your new Hotchkis Leaf Spring kit comes with new rear bushings. Insert the bushings into the rear eye of the leaf spring and grease the side surfaces and the inner hole with the supplied lube.
47 10. ReInstall Hotchkis Leaf Springs Your new leafs are ready to be installed. Reinstall the leaf spring in the same manner as stock removal. Position the leaf spring in place by hooking the rear eye onto the shackle bolt and then mating the front bracket mount to the chassis. Insert the included 3/8 hardware to secure the front mount to the chassis. See diagram below: 10. Tighten hardware Fully tighten all of the 3/8 hardware for the front mount and rear shackles bolts. Lower the floor jack and align the leaf spring center bolt with the rear end mount. Reassemble the u-bolts in the same manner as removal. Tighten each u-bolt nut little at a time to ensure even load on each nut. A heavy duty ½ impact gun works well for this application. Use your floor jack to jack up the rear end so that the rear of the vehicle just lifts of the rear jack stands. This allows the leaf springs to be loaded at normal ride height. You can now fully tighten the 5/8 hardware in the front mount. Reattach the shocks to the lower mounts and you are finished. Lower the vehicle back onto the ground and enjoy your new leaf springs.
48 Hotchkis Performance LLC Return Policy & Limited Warranty Effective December 1, 2010 all Hotchkis products must be registered to qualify for warranty at or via the mail-in warranty card, included with the product, within 30 days of the original purchase date. IMPORTANT: This warranty supersedes all other warranties included with this product. Return Policy We want you to be completely satisfied with your Hotchkis Performance product. For products, presenting signs of shipping damage please contact the freight carrier immediately. All our products are guaranteed to be free from manufacturer s defects. If your order arrives with a manufacture defect, please contact our Customer Service Department at (562) You will be assigned a Returned Goods Authorization Number (RGA). The package you return must show the RGA on the outside of the package, include the original invoice and be shipped prepaid to our facility. The product has to be unused and in its original packaging materials. Exchanges or refunds made after 30 days will be subject to a 20% restocking charge. If you purchased your Hotchkis Performance product from an authorized dealer, you are still covered by this return policy. All returns however, should be made to your dealer, not to Hotchkis Performance directly. Limited Warranty Hotchkis Performance offers a Limited Warranty against defects in materials and workmanship for the term of 36 months (3 years) from the date of purchase of this product. This Warranty only applies to the original retail purchaser who retains ownership of the vehicle on which the product was originally installed. If the product is determined to be defective, Hotchkis Performance will repair, replace or refund the purchase price of the defective product at Hotchkis Performance's sole discretion, which shall fully satisfy and discharge any and all warranty claims. Any repaired or replaced product will be returned to the sender excluding the cost of freight. Products must be registered to qualify for warranty at or via the mail-in warranty card, included with the product, within 30 days of the original purchase date. Exclusions from Warranty Items offered but not manufactured by Hotchkis Performance are warranted according to the manufacturer's terms and are not covered by this limited warranty. Hotchkis Performance shall not be responsible for any labor, removal, installation, re-installation or maintenance costs. This warranty does not cover the cosmetic finish or plating of any product or any normal wear and tear to any product including, but not limited to bushings, brackets, end-links, hardware, steering components, shocks or springs. In addition, this warranty does not apply to any products that have been: Improperly installed or installed by someone other than a qualified, licensed auto mechanic experienced in the installation and removal of suspension products; Improperly serviced, misused, or modified, altered or subjected to abuse, negligence, accident or collision; Installed in any vehicle that has been modified; Installed on any vehicle that has carried loads in excess of automobile manufacturer suggested weight limits; or Installed on any vehicle that has been subject to abnormal or excessive use, including rallying, racing, or racing-type activities or off-road use. Limitation of Warranty This limited warranty is the entire and only warranty for the products and may not be modified or supplemented by any other person or company in any form. Any description of the products, by anyone, is for the sole purpose of identifying them and is not part of the basis of the bargain, and does not constitute a warranty that the products will conform to that description. The statements of any salesperson do not constitute part of this limited warranty and cannot be relied upon as a warranty. THERE ARE NO WARRANTIES, EXPRESSED OR IMPLIED, INCLUDING ANY IMPLIED WARRANTIES OF MERCHANTABILITY OR FITNESS FOR A PARTICULAR PURPOSE, WHICH EXTEND BEYOND THE DESCRIPTION ON THE FACE HEREOF. ANY IMPLIED WARRANTIES ARE DISCLAIMED TO THE FULLEST EXTENT PERMITTED BY LAW. THIS WARRANTY DOES NOT COVER CONSEQUENTIAL
49 DAMAGES, LOSS OF TIME OR REVENUES, INCONVENIENCE, LOSS OF USE OF THE VEHICLE, DAMAGE TO THE VEHICLE OR COMPONENTS OF THE VEHICLE, ANY OTHER TYPE OF CONSEQUENTIAL DAMAGES, OR OTHER INCIDENTAL OR INDIRECT DAMAGES. HOTCHKIS MAXIMUM LIABILITY UNDER THIS WARRANTY SHALL IN NO EVENT EXCEED THE PURCHASE PRICE OF THE PRODUCT. Some states do not allow limitations on how long an implied warranty lasts or the exclusion or limitation of incidental or consequential damages and in such states the above limitations or exclusions may not apply. This limited warranty gives the purchaser specific legal rights and the purchaser may have other rights that may vary from state to state. Technical Information Hotchkis Performance makes every effort to ensure that you are provided with the most accurate and up-to-date technical information. However, all technical information is approximate and may vary upon application. Additional suspension components may be needed in some applications, depending upon the make, model, engine and chassis of the vehicle. Hotchkis Performance is not responsible for any consequences resulting from manufacturer s technical mid-year changes. Hotchkis Performance products should only be installed by a qualified, licensed auto mechanic experienced in the installation of such products. Warranty Claim Procedure: The answer to ALL the following questions should be YES before making a warranty claim: Did you register the product at or via the mail-in warranty card within 30 days of purchase? Is the product appropriate to your application? Did you carefully and thoroughly read the instructions provided along with the product? Do you have the original invoice or sales receipt? Is the return date within 36 months from the purchase date? Are you the original purchaser? Was the product properly installed by a qualified, licensed auto mechanic? Has the product been installed on the original vehicle on which it was installed at all times? Is the product unmodified and clean? Is the reason for return a legitimate product defect? If the answer to all these questions is YES, please contact our Customer Service Department at (562) You will be given a Returned Goods Authorization Number (RGA) valid for 60 days. You will also be asked to ship the product prepaid to our facility. All shipments MUST be (i) prepaid, (ii) include the original invoice or sales receipt, (iii) show the RGA on the outside of the package and (iv) include your name, address, make and model of the vehicle, and a brief description of the claimed defect, including the circumstances under which the defect occurred. If the warranty claim is deemed valid then Hotchkis will estimate shipping costs to return the repaired or replacement part and contact you for payment. Hotchkis s Limited warranty requires that any repaired or replaced product will be returned to the sender excluding the cost of freight. Warranty related inquires should be sent to the following address: HOTCHKIS PERFORMANCE, LLC C/O CUSTOMER SERVICE 8633 Sorensen Avenue SANTA FE SPRINGS, CA Hotchkis Performance will not accept product returns without the RGA number, receipt and the information described above. C.O.D. or collect shipments will be refused. Once the returns are received at Hotchkis Performance, we will evaluate the products, verify the sales receipt, and investigate the warranty claim. Any repaired or replaced product will be returned to the sender. Effective December 1, This return policy and limited warranty supersedes all previous policy and warranty statements. Policies and warranties are subject to change without notice. Hotchkis Performance is not responsible for printing errors.

50 4010 & 4011S/L Please read the following key points before installing this kit. 1 Before performing the subframe connector installation, the vehicle must be completely assembled with all body and component parts installed (e.g. fenders, hood, quarterpanels, trunk, full interior, engine, glass, etc.). Basically, the subframe connectors should be one of the last components installed on your vehicle. Reason being is you want the vehicle settled with all of it s own final weight. The car s body is always in constant tension, with forces pushing or pulling within the chassis & body. You want to make sure these forces don t change after you install the subframe connectors. For example, if you installed subframe connectors before installing the engine and body panels this may result in having misaligned fenders, door panels and/or hood later on. The car must be in it s final state before the subframe connectors are installed. 2 The subframe connectors must be installed on an alignment rack or floor ramps (all 4 wheels). The vehicle must be sitting on it s wheels at ride height in order to install the subframe connectors. Do not use a two-post lift, as this will load the chassis/body in the wrong points causing the chassis to tweak. 3 If you your vehicle is equipped with torque boxes, please pay attention to step 3b of this manual. You may be required to purchase extra hardware in this case. Hotchkis Performance LLC. 1
 4NO - ROLL if you have any questions regarding the service or installation of your Hotchkis products.")

51 4010 & 4011S/L 4010 Subframe Connectors Chrysler B-Body 4011S & 4011L Subframe Connectors Chrysler E-Body Thank you for your purchase from our new line of Chrysler parts. Please call us at (877) 4NO - ROLL if you have any questions regarding the service or installation of your Hotchkis products. Subframe Connectors: Your new subframe connectors will increase the overall rigidity of your chassis and improve handling and response. These engineered components connect the rear frame rails with the front subframe to simulate a complete full frame chassis. Notes: The subframe connector is essentially a Weld-In component, effectively connecting the front subframe and rear frame rails. Before You Start: The installation of these subframe connectors will require you to grind and weld. It is recommended that a trained professional install this product. Always wear eye protection when grinding or welding. Please read the entire manual before starting. All images will depict the driver side installation. Hotchkis Performance LLC. 2

.")
52 4010 & 4011S/L 1. Raise Vehicle It is best to install the subframe connectors at ride height. To do this properly, please use a 4- Post lift or alignment rack. Disconnect the negative battery cable. 2. Prepare Subframe Pieces for Welding Subframe pieces come fully powder coated so you will want to first prep them for the welding process. Sand the ends that do not have the bolt connectors (front side). Hotchkis Performance LLC. 3
53 4010 & 4011S/L B-Body Connector E-Body Connector Hotchkis Performance LLC. 4


54 4010 & 4011S/L 3. Remove Nuts from Frame Temporarily support the rear subframe with jacks to relieve the load on the leaf springs. Do not jack up the car too much or else the weight of the rear end and wheels will hang in the air and cause the front mount to pull downward. Remove the 4 nuts on the front leaf spring mounts. 3b. Torque Box Vehicles ONLY! Some vehicles have torque boxes which may cover the path of the subframe connectors. If you car does not have torque boxes, then you can proceed to step 4. You will need to cut the forward section of the torque box so the subframe connector can mount flush to the floor pan. Hotchkis Performance LLC. 5

 - Mock up the leaf spring bracket and the subframe connectors to get proper bolt")
 - Grade 8-3/8-24 nylock nuts (qty.")
55 4010 & 4011S/L In addition, you will notice it will be extremely difficult to access the leaf spring mount nuts once the subframe connector is in place. To alleviate this problem, you will need to weld bolts onto the subframe connectors so you can fasten everything from the rearward side of the mount. Procedure to follow Steps: - Remove the front leaf spring mounts from each leaf spring - Remove the 4 studs that are pressed in the mount (If you are installing Hotchkis leaf springs, then you will be able to use the Hotchkis mount instead) - Mock up the leaf spring bracket and the subframe connectors to get proper bolt locations. This will require the following from your local hardware store: - Grade 8-3/8-24 x 1.5 hex bolts (qty.8) - Grade 8-3/8 SAE washers (qty. 16) - Grade 8-3/8-24 nylock nuts (qty.8) Mock-up shown with Hotchkis leaf spring mount - FYI--The aforementioned hardware is included with the Hotchkis leaf spring kit. Hotchkis Performance LLC. 6


56 4010 & 4011S/L - Weld the bolt and washer to the subframe connectors. Disassemble the mock-up. - Reinstall the leaf spring mount and continue with the subframe connector installation. 4. Connect Subframe Slide the rear of the subframe connector onto the 4 bolts that you just removed the nuts from. Once subframe is on, replace the nuts and snugly tighten, but not fully tighten. Hotchkis Performance LLC. 7


57 4010 & 4011S/L 5. Position the Subframe Using a screw jack to hold the subframe up and in place, mark the area where you will be attaching the front mounting bracket and then remove both the mounting bracket and subframe. 6. Seat Mounting Bolts Be sure the seat mounting bolts line up with the seat mounting bolts access holes that are on the subframe before moving on. Hotchkis Performance LLC. 8


58 4010 & 4011S/L 7. Prepare Frame for Welding After you remove the mounting bracket and subframe connector, sand down the area of the frame where you will be welding. 8. Spot Weld Mounting Bracket Install the subframe connector again with the mounting bracket resting in place on top. Be sure to use the screw jack to hold the subframe in place. Spot weld the mounting bracket and then once again, remove the subframe connector. Hotchkis Performance LLC. 9
59 4010 & 4011S/L 9. Clean Surface / Weld Mounting Bracket / Install Subframe / Weld Subframe Before welding, be sure that all of the surfaces that you will be welding is clean. Weld the front mounting bracket to the frame. When you re done welding the front mounting bracket, reinstall the subframe connector. Fully tighten the 4 rear mount nuts. You may now remove the jacks supporting the rear subframe. The full weight of the car should be on all four tires from now on. Use the screw jack once again to hold the subframe in place if need be. Now weld the subframe connector to the front mounting bracket. Hotchkis Performance LLC. 10

60 4010 & 4011S/L Hotchkis Performance LLC. 11


61 4010 & 4011S/L 10. Paint After the metal has cooled down, paint all exposed raw surfaces with a rust resistant paint. 11. Repeat & Finished Repeat steps 1-10 to install the passenger side subframe and you re all set. Hotchkis Performance LLC. 12

62 4010 & 4011S/L Hotchkis Performance LLC Return Policy & Limited Warranty Effective December 1, 2010 all Hotchkis products must be registered to qualify for warranty at or via the mail-in warranty card, included with the product, within 30 days of the original purchase date. IMPORTANT: This warranty supersedes all other warranties included with this product. Return Policy We want you to be completely satisfied with your Hotchkis Performance product. For products, presenting signs of shipping damage please contact the freight carrier immediately. All our products are guaranteed to be free from manufacturer s defects. If your order arrives with a manufacture defect, please contact our Customer Service Department at (562) You will be assigned a Returned Goods Authorization Number (RGA). The package you return must show the RGA on the outside of the package, include the original invoice and be shipped prepaid to our facility. The product has to be unused and in its original packaging materials. Exchanges or refunds made after 30 days will be subject to a 20% restocking charge. If you purchased your Hotchkis Performance product from an authorized dealer, you are still covered by this return policy. All returns however, should be made to your dealer, not to Hotchkis Performance directly. Limited Warranty Hotchkis Performance offers a Limited Warranty against defects in materials and workmanship for the term of 36 months (3 years) from the date of purchase of this product. This Warranty only applies to the original retail purchaser who retains ownership of the vehicle on which the product was originally installed. If the product is determined to be defective, Hotchkis Performance will repair, replace or refund the purchase price of the defective product at Hotchkis Performance's sole discretion, which shall fully satisfy and discharge any and all warranty claims. Any repaired or replaced product will be returned to the sender excluding the cost of freight. Products Hotchkis Performance LLC. 13
16366 Steering Tie Rods Chrysler B-Body, Charger, Super Bee, Road Runner, GTX Chrysler E-Body, Cuda, Challenger
 P 16366 66-70 B-Body, 70-74 E-Body 16366 Steering Tie Rods 1966-1970 Chrysler B-Body, Charger, Super Bee, Road Runner, GTX 1970-1974 Chrysler E-Body, Cuda, Challenger Thank you for your purchase from our
14366, Adjustable Strut Rods Chrysler A-Body Chrysler B-Body Chrysler E-Body
 14366, 14385 Adjustable Strut Rods 67-76 Chrysler A-Body 1966-1970 Chrysler B-Body 1970-1974 Chrysler E-Body Thank you for your purchase from our new line of B & E-Body parts. Please call us at (877) 4NO
16385 Steering Tie Rods Chrysler A-Body
 16385 Steering Tie Rods 1967-76 Chrysler A-Body Before You Start: Thank you for your purchase from our new line of B & E-Body parts. Please call us at (877) 4NO - ROLL if you have any questions regarding
Sport Sway Bar Kit Chrylser E-Body Cuda, Challenger
 Sport Sway Bar Kit 2254 70-74 Chrylser E-Body Cuda, Challenger Thank you for your purchase from our new line of Mopar parts. Please call us at 877-4NO - ROLL if you have any questions regarding the service
Chrysler A-Body Tubular A-Arms Installation Instructions A-ARM INSTALLATION
 1967-1976 Dodge Demon 1112 67-72 Chrysler A-Body Tubular A-Arms Installation Instructions Thank you for your purchase of this Hotchkis Performance product. Your A-Arm set was designed with the performance
Sport Sway Bar Kit Chevy Camaro
 Sport Sway Bar Kit 22109 2010 Chevy Camaro Thank you for your purchase from our new line of Chevy parts. Please call us at 877-4NO - ROLL if you have any questions regarding the service or installation
Rear Suspension System C-10 Pickup Truck
 Rear Suspension System 18390 67-72 C-10 Pickup Truck Thank you for your purchase from our new line of Chevy parts. Please call us at 877-4NO - ROLL if you have any questions regarding the service or installation
Sport Sway Bar Kit UP SCION xb
 Sport Sway Bar Kit 22429 08-UP SCION xb Thank you for your purchase from our new line of Scion parts. Please call us at 877-4NO - ROLL if you have any questions regarding the service or installation of
1109 Tubular Lower A-Arms Camaro/Firebird
 1109 Tubular Lower A-Arms 67-69 Camaro/Firebird Tubular Lower A-Arms: Thank you for your purchase from our new line of F-Body parts. Please call us at (877) 4NO - ROLL if you have any questions regarding
INSTALLATION INSTRUCTIONS
 INSTALLATION INSTRUCTIONS 1301 / 1302 / 1305 / 1306 THANK YOU FOR CHOOSING HOTCHKIS PERFORMANCE PRODUCTS Removal of Stock Lower Trailing Arms 1) Place car on level surface. 2) Support rear of the car on
Rear Upper Camber Link (12425) Scion tc
 Scion tc") Rear Upper Camber Link (12425) Scion tc Thank you for your purchase from our new line of Scion tc parts. Please call us at (877) 4NO-ROLL if you have any questions regarding the service or installation
Rear Upper Camber Link (12425) Scion tc Thank you for your purchase from our new line of Scion tc parts. Please call us at (877) 4NO-ROLL if you have any questions regarding the service or installation
1107 Tubular Upper A-Arms Camaro/Firebird
 1107 Tubular Upper A-Arms 67-69 Camaro/Firebird Thank you for your purchase from our new line of F-Body parts. Please call us at (877) 4NO - ROLL if you have any questions regarding the service or installation
PIVOT BUSHING KIT GM F-BODY
 PIVOT BUSHING KIT 21016 67-69 GM F-BODY 67-69 GM F-Body Pivot Bushing Kit Thank you for your purchase. Please call us at 877-4NO - ROLL if you have any questions regarding the service or installation of
P/N# Performance Lowering Springs Installation Instructions
 P/N# 19391 Performance Lowering Springs Installation Instructions Thank you for your purchase of this Hotchkis Performance product. Your Lowering Spring set was designed with the performance and durability
BMW E46 M3 SPORT SWAY BAR SET # 22826
 BMW E46 M3 SPORT SWAY BAR SET # 22826 Thank you for your purchase from our new line of BMW E46 parts. Please call us at (877) 4NO - ROLL if you have any questions regarding the service or installation
Tubular Lower A-Arms GM A-Body Tubular Lower A-Arms GM F-Body
 1104 - Tubular Lower A-Arms 64-72 GM A-Body 1108 - Tubular Lower A-Arms 70-81 GM F-Body Tubular Lower A-Arms: Thank you for your purchase from our new line of A-Body parts. Please call us at (877) 4NO
Sport Sway Bar Kit C-10 Truck
 Sport Sway Bar Kit 22390 67-72 C-10 Truck Thank you for your purchase from our new line of Chevy parts. Please call us at 877-4NO - ROLL if you have any questions regarding the service or installation
Sport Sway Bar Kit VW MKV & MKVI Jetta, GTI, GLI Audi A3
 Sport Sway Bar Kit 22833 06-09 VW MKV & MKVI Jetta, GTI, GLI 06-07 Audi A3 Thank you for your purchase from our new line of Audi/VW parts. Please call us at 877-4NO - ROLL if you have any questions regarding
Rear Leaf Spring Kit 24366, Chrysler B-body, Chrysler E-Body
 P Rear Leaf Spring Kit 24366, 24367 66-70 Chrysler B-body, 70-74 Chrysler E-Body Thank you for your purchase from our new line of Mopar parts. Please call us at 877-4NO - ROLL if you have any questions
2015 & 2018 Fender Brace Installation Instructions
 2015 & 2018 Fender Brace Installation Instructions Thank you for your purchase of this Hotchkis Performance product. Your Fender Brace set was designed with the performance and durability you ve come to
Rear Sway Bar Kit 22390R C-10 Truck
 Rear Sway Bar Kit 22390R 67-72 C-10 Truck Thank you for your purchase from our new line of Chevy parts. Please call us at 877-4NO - ROLL if you have any questions regarding the service or installation
22421 SPORT SWAY BAR SET TOYOTA COROLLA
 22421 SPORT SWAY BAR SET 98-01 TOYOTA COROLLA Thank you for your purchase from our line of Corolla parts. Please call us at (877) 4NO-ROLL if you have any questions regarding the service or installation
Anti-Roll Bar Set # 2279, Cadillac CTS V6 & CTS-V
 Anti-Roll Bar Set # 2279, 2280 2003+ Cadillac CTS V6 & CTS-V Thank you for your purchase from our new line of CTS parts. Please call us at (877) 4NO-ROLL if you have any questions regarding the service
Please read the following key points before installing this kit.
 Please read the following key points before installing this kit. 1 Before performing the subframe connector installation, the vehicle must be completely assembled with all body and component parts installed
2236 Sway Bar Installation Instructions
 2236 Sway Bar Installation Instructions Thank you for your purchase of this Hotchkis Performance product. Your stabilizer bar set was designed with the performance and durability you ve come to expect
1313 LOWER TRAILING ARMS CHEVROLET B-BODY
 1313 LOWER TRAILING ARMS 59-64 CHEVROLET B-BODY Thank you for your purchase from our line of classic Chevrolet B-body suspension parts.. Please call us at (877) 4NO-ROLL if you have any questions regarding
2282R GM A Body Extreme Rear Sway Bar
 2282R 1964-1972 GM A Body Extreme Rear Sway Bar Thank you for your purchase from our new line of GM parts. Please call us at (877) 4NO - ROLL if you have any questions regarding the service or installation
Camaro / Firebird. Please read the following key points before installing this kit.
 Please read the following key points before installing this kit. 1 Before performing the subframe connector installation, the vehicle must be completely assembled with all body and component parts installed
Sport Sway Bar Kit C-10 Truck
 Sport Sway Bar Kit 22108 67-72 C-10 Truck Thank you for your purchase from our new line of Chevy parts. Please call us at 877-4NO - ROLL if you have any questions regarding the service or installation
IMPORTANT NOTICE Stock Height OEM Spindle
 IMPORTANT NOTICE Ball Joint Info: Before you install this product, please verify which front spindles you have. We have designed the upper a arms to utilize the 73 87 style spindles. This type of spindle
5) The trailing arm should then pivot smoothly on the chassis. 6) Install the rear bolt. 7) Place one drop of blue Loctite
 The trailing arm should then pivot smoothly on the chassis. 6) Install the rear bolt. 7) Place one drop of blue Loctite") INSTALLATION INSTRUCTIONS 1301 / 1302 / 1305 / 1306 THANK YOU FOR CHOOSING HOTCHKIS PERFORMANCE PRODUCTS Removal of Stock Lower Trailing Arms 1) Place car on level surface. 2) Support rear of the car on
INSTALLATION INSTRUCTIONS 1301 / 1302 / 1305 / 1306 THANK YOU FOR CHOOSING HOTCHKIS PERFORMANCE PRODUCTS Removal of Stock Lower Trailing Arms 1) Place car on level surface. 2) Support rear of the car on
Sport Sway Bar Kit (22431 ) Subaru Forester INSTALLATION OF HOTCHKIS FRONT SWAY BAR
 Subaru Forester INSTALLATION OF HOTCHKIS FRONT SWAY BAR") Sport Sway Bar Kit (22431 ) Subaru Forester Thank you for your purchase from our new line of Forester parts. Please call us at (877) 4NO - ROLL if you have any questions regarding the service or installation
Sport Sway Bar Kit (22431 ) Subaru Forester Thank you for your purchase from our new line of Forester parts. Please call us at (877) 4NO - ROLL if you have any questions regarding the service or installation
P/N# Performance Lowering Springs Installation Instructions
 P/N# 19110 Performance Lowering Springs Installation Instructions Thank you for your purchase of this Hotchkis Performance product. Your Lowering Spring set was designed with the performance and durability
4/6 Coil Spring Kit C-10 Truck
 4/6 Coil Spring Kit 19390 67-72 C-10 Truck Thank you for your purchase from our new line of Chevy parts. Please call us at 877-4NO - ROLL if you have any questions regarding the service or installation
1401 / 1402 / 1403 ADJUSTABLE TRAILING ARM MOUNT BRACES INSTALLATION OF HOTCHKIS PERFORMANCE ADJUSTABLE TRAILING ARM MOUNT BRACES
 1401 / 1402 / 1403 ADJUSTABLE TRAILING ARM MOUNT BRACES 1401 78-88 GM A/G-BODY / 1402 68-72 GM A-BODY / 1403 64-67 GM A-BODY Thank you for your purchase. Please call us at (562) 907-7757 if you have any
2006 SHOCK TOWER BRACE 93-UP F-BODY CAMARO/FIREBIRD
 2006 SHOCK TOWER BRACE 93-UP F-BODY CAMARO/FIREBIRD Thank you for your purchase of this Hotchkis Performance product. Please call us at (800) 4NO-ROLL if you have any questions regarding this product.
MOVE ON TO THE REAR BAR INSTALLATION
 22410 STREET SWAY BAR SET 2001-UP LEXUS IS300 Thank you for your purchase from our line of Lexus parts. Please call us at (877) 4NO-ROLL if you have any questions regarding the service or installation
REAR SWAY BAR 2207R GM CAMARO/FIREBIRD
 REAR SWAY BAR 2207R 67-69 GM CAMARO/FIREBIRD Thank you for your purchase of this Hotchkis Performance product. Your stabilizer bar set was designed with the performance and durability you ve come to expect
22427 SWAY BAR SET 2002-UP SUBARU WRX WAGON
 22427 SWAY BAR SET 2002-UP SUBARU WRX WAGON Thank you for your purchase from our line of Subaru WRX parts. Please call us at (877) 4NO-ROLL if you have any questions regarding the service or installation
Anti-roll bar set (pn 2278) Pontiac GTO
 Pontiac GTO") Anti-roll bar set (pn 2278) Pontiac GTO Thank you for your purchase from our new line of GTO parts. Please call us at (877) 4NO-ROLL if you have any questions regarding the service or installation of your
Anti-roll bar set (pn 2278) Pontiac GTO Thank you for your purchase from our new line of GTO parts. Please call us at (877) 4NO-ROLL if you have any questions regarding the service or installation of your
Anti-roll bar set Chrysler Magnum, Charger, 300C, SRT Dodge Challenger
 Anti-roll bar set 22101 Chrysler Magnum, Charger, 300C, SRT-8 22107 Dodge Challenger Thank you for your purchase from our new line of Chrysler parts. Please call us at (877) 4NO-ROLL if you have any questions
Sport Sway Bar Kit (22425) Scion tc
 Scion tc") Sport Sway Bar Kit (22425) Scion tc Thank you for your purchase from our new line of Scion tc parts. Please call us at (877) 4NO - ROLL if you have any questions regarding the service or installation of
Sport Sway Bar Kit (22425) Scion tc Thank you for your purchase from our new line of Scion tc parts. Please call us at (877) 4NO - ROLL if you have any questions regarding the service or installation of
SPORT COIL SPRINGS Scion xa & xb Part #19412 INSTALLATION OF HOTCHKIS FRONT COIL SPRINGS
 SPORT COIL SPRINGS 2004+ Scion xa & xb Part #19412 Thank you for your purchase from our new line of Scion xa / xb parts. Please call us at (877) 4NO-ROLL if you have any questions regarding the service
UPPER TRAILING ARM REMOVAL
 #1204 MUSTANG UPPER TRAILING ARMS Thank you for your purchase. Please call us at (562) 907-7757 if you have any questions regarding your Hotchkis Performance products. Visit us online @ www.hotchkis.net
INSTALLATION OF HOTCHKIS FRONT STABILIZER BAR
 22441 FRONT AND REAR SPORT SWAY BAR SET Infiniti G37/S Coupe & G35/S Sedan Thank you for your purchase from our Hotchkis line of suspension parts. Please call us at (877) 4NO-ROLL if you have any questions
Sport Coil Springs Dodge Magnum, Chrysler 300C Dodge Challenger SRT Dodge Challenger R/T
 Sport Coil Springs 19101 - Dodge Magnum, Chrysler 300C 19107 - Dodge Challenger SRT-8 19108 - Dodge Challenger R/T Thank you for your purchase from our new line of Magnum/300C parts. Please call us at
2253 FRONT AND REAR SPORT SWAY BAR SET CHEVROLET B-BODY
 2253 FRONT AND REAR SPORT SWAY BAR SET 65-66 CHEVROLET B-BODY Thank you for your purchase from our line of classic Chevrolet B-body suspension parts. Please call us at (877) 4NO-ROLL if you have any questions
1204AA Ford Mustang Double Adjustable Trailing Arms
 1204AA 79-04 Ford Mustang Double Adjustable Trailing Arms Thank you for your purchase from our new line of Ford parts. Please call us at (877) 4NO-ROLL if you have any questions regarding the service or
25405 COMPETITION END LINK KIT 2002-UP ACURA RSX, 2004 Subaru STi INSTALLATION OF HOTCHKIS FRONT ENDLINKS
 25405 COMPETITION END LINK KIT 2002-UP ACURA RSX, 2004 Subaru STi Thank you for your purchase from our line of competition parts. Please call us at (877) 4NO-ROLL if you have any questions regarding the
4007/4008/ Camaro/Firebird. Please read the following key points before installing this kit.
 Please read the following key points before installing this kit. 1 Before performing the subframe connector installation, the vehicle must be completely assembled with all body and component parts installed
INSTALLATION OF HOTCHKIS PERFORMANCE FRONT SWAY BAR
 2268 FRONT AND REAR SPORT SWAY BAR SET 59-64 CHEVROLET B-BODY Thank you for your purchase from our line of classic Chevrolet B-body suspension parts. Please call us at (877) 4NO-ROLL if you have any questions
1202AA GM A-BODY Double Adjustable Trailing Arms
 1202AA 68-72 GM A-BODY Double Adjustable Trailing Arms Thank you for your purchase from our new line of GM parts. Please call us at (877) 4NO-ROLL if you have any questions regarding the service or installation
Chrysler A-Body Tubular A-Arms Installation Instructions A-ARM INSTALLATION
 1967-1976 Dodge Demon 1112 67-72 Chrysler A-Body Tubular A-Arms Installation Instructions Thank you for your purchase of this Hotchkis Performance product. Your A-Arm set was designed with the performance
22400 STREET SWAY BAR SET 00-UP TOYOTA CELICA INSTALLATION OF HOTCHKIS FRONT SWAY BAR
 22400 STREET SWAY BAR SET 00-UP TOYOTA CELICA Thank you for your purchase from our line of Toyota Celica parts. Please call us at (877) 4NO-ROLL if you have any questions regarding the service or installation
Rear Upper Camber Link (12425) Scion tc
 Scion tc") Rear Upper Camber Link (12425) Scion tc Thank you for your purchase from our new line of Scion tc parts. Please call us at (877) 4NO-ROLL if you have any questions regarding the service or installation
Rear Upper Camber Link (12425) Scion tc Thank you for your purchase from our new line of Scion tc parts. Please call us at (877) 4NO-ROLL if you have any questions regarding the service or installation
Sport Sway Bar Kit VW Golf (GTI ), Jetta
, Jetta") Sport Sway Bar Kit 22813 VW Golf (GTI ), Jetta Thank you for your purchase from our new line of VW parts. Please call us at (877) 4NO - ROLL if you have any questions regarding the service or installation
Sport Sway Bar Kit 22813 VW Golf (GTI ), Jetta Thank you for your purchase from our new line of VW parts. Please call us at (877) 4NO - ROLL if you have any questions regarding the service or installation
4007 (Coupe) / 4008 (Convertible) Subframe Connectors Camaro/Firebird
 / 4008 (Convertible) Subframe Connectors Camaro/Firebird") 4007 (Coupe) / 4008 (Convertible) Subframe Connectors 67-69 Camaro/Firebird Thank you for your purchase from our new line of F-Body parts. Please call us at (877) 4NO - ROLL if you have any questions regarding
4007 (Coupe) / 4008 (Convertible) Subframe Connectors 67-69 Camaro/Firebird Thank you for your purchase from our new line of F-Body parts. Please call us at (877) 4NO - ROLL if you have any questions regarding
1401 / 1402 / 1403 ADJUSTABLE TRAILING ARM MOUNT BRACES INSTALLATION OF HOTCHKIS PERFORMANCE ADJUSTABLE TRAILING ARM MOUNT BRACES
 1401 / 1402 / 1403 ADJUSTABLE TRAILING ARM MOUNT BRACES 1401 78-88 GM A/G-BODY / 1402 68-72 GM A-BODY / 1403 64-67 GM A-BODY Thank you for your purchase. Please call us at (562) 907-7757 if you have any
INSTALLATION INSTRUCTIONS
 INSTALLATION INSTRUCTIONS SWAY BAR KITS # 2205 & 2206 Thank you for your purchase. Please call us at (562) 907-7757 if you have any questions about your Hotchkis Performance product. HOTCHKIS PERFORMANCE
2000+ Silverado x4 P/N 2230
 2000+ Silverado 1500 4x4 P/N 2230 Thank you for your purchase of this Hotchkis product. Your Hotchkis Sway Bars were designed with the performance and durability you ve come to expect from Hotchkis Performance.
Sport Coil Springs set # Cadillac CTS
 Sport Coil Springs set # 1979 2003+ Cadillac CTS Thank you for your purchase from our new line of CTS parts. Please call us at (877) 4NO-ROLL if you have any questions regarding the service or installation
2003-Up Mitsubishi EVO 8. Installation of the Rear Coil Springs
 2003-Up Mitsubishi EVO 8 Thank you for your purchase from our line of Mitsubishi Evo 8 parts. Please call us at (877) 4NO-ROLL if you have any questions regarding the service or installation of your Hotchkis
SPORT COIL SPRINGS Scion xa & xb Part #19412 INSTALLATION OF HOTCHKIS FRONT COIL SPRINGS
 SPORT COIL SPRINGS 2004+ Scion xa & xb Part #19412 Thank you for your purchase from our new line of Scion xa / xb parts. Please call us at (877) 4NO-ROLL if you have any questions regarding the service
1912F/ 1913F FRONT COIL SPRINGS 97-UP DODGE DAKOTA / DURANGO
 1912F/ 1913F FRONT COIL SPRINGS 97-UP DODGE DAKOTA / DURANGO Thank you for purchasing from our fine line of Dodge Dakota/Durango suspension parts. If you have any questions regarding the service and installation
FRONT BAR INSTRUCTIONS
 2228, 2229, 2230, 2231 & 2232 Sway Bar Installation Instructions. 99+ Chevrolet Silverado/GMC Seirra Pickups FRONT BAR INSTRUCTIONS *NOTICE HOW THE STOCK SWAY BAR LOOKS i.e. BRACKET PLACEMENT, BENDS, etc.
2406 SPORT LEAF SPRINGS 2WD EXT/QUAD CAB 97-UP DODGE DAKOTA
 2406 SPORT LEAF SPRINGS 2WD EXT/QUAD CAB 97-UP DODGE DAKOTA Thank you for your purchase from our line of Dodge Dakota & Durango suspension parts. Please call us at (877) 4NO-ROLL if you have any questions
Installation Instructions
 Nov 25, 2013 Upper Control Arms Installation Instructions The following instructions are intended for professional installers and are guidelines only. Speedtech Performance assumes NO responsibility for
Sport Coil Springs (19425) Scion tc
 Scion tc") Sport Coil Springs (19425) Scion tc Thank you for your purchase from our new line of Scion tc parts. Please call us at (877) 4NO-ROLL if you have any questions regarding the service or installation of
Sport Coil Springs (19425) Scion tc Thank you for your purchase from our new line of Scion tc parts. Please call us at (877) 4NO-ROLL if you have any questions regarding the service or installation of
Feb 22, 2018 '67-69 Camaro & '68-74 Nova Bumpsteer Adjustment Kit
 Feb 22, 2018 '67-69 Camaro & '68-74 Nova Bumpsteer Adjustment Kit 10552 The following instructions are intended for professional installers. Speedtech Performance assumes NO responsibility for the installation
'64-72 Chevelle/ A Body Rear Coilover Conversion Kit
 Nov 3, 2017 '64-72 Chevelle/ A Body Rear Coilover Conversion Kit Includes instructions for Currie Brand Axles The following instructions are intended for professional installers and are guidelines only.
Dec 1, 2017 ATS AFX Spindle Installation Instructions
 Dec 1, 2017 ATS AFX Spindle Installation Instructions 1 P a g e The following instructions are intended for professional installers and are guidelines only. Speedtech Performance assumes NO responsibility
Installation Instructions
 Nov 3, 2017 G-Body Rear Coilover Conversion Kit 1 P a g e Installation Instructions The following instructions are intended for professional installers and are guidelines only. Speedtech Performance assumes
'64-72 Chevelle/ A Body Rear Coilover Conversion Kit
 February 3, 2014 '64-72 Chevelle/ A Body Rear Coilover Conversion Kit Includes instructions for Currie Brand Axles The following instructions are intended for professional installers and are guidelines
Aug 24, 2017 ATS AFX Spindle Installation Instructions
 Aug 24, 2017 ATS AFX Spindle Installation Instructions 1 P a g e The following instructions are intended for professional installers and are guidelines only. Speedtech Performance assumes NO responsibility
SPECIAL TOOLS REQUIRED:
 INSTALLATION INSTRUCTIONS FOR 2010-15 TOYOTA 4RUNNER WITH XREAS SUSPENSION 3 SUSPENSION LIFT KIT PART NUMBER 432X WARNING!!! READ AND UNDERSTAND ALL INSTRUCTIONS BEFORE PROCEEDING. MAKE SURE THAT YOU HAVE
INSTALLATION INSTRUCTIONS FOR 2016 TOYOTA TACOMA 4 X 4 AND PRE RUNNER 3 SUSPENSION LIFT KIT PART NUMBER
 INSTALLATION INSTRUCTIONS FOR 2016 TOYOTA TACOMA 4 X 4 AND PRE RUNNER 3 SUSPENSION LIFT KIT PART NUMBER 427 WARNING!!! READ AND UNDERSTAND ALL INSTRUCTIONS BEFORE PROCEEDING. MAKE SURE THAT YOU HAVE ALL
PARTS LIST INCLUDED IN KIT TORQUE SPECIFICATIONS PRODUCT SAFETY LABEL MUST BE INSTALLED INSIDE CAB IN PLAIN VIEW OF ALL OCCUPANTS.
 INSTALLATION INSTRUCTIONS FOR 2010-15 TOYOTA 4RUNNER SR5 AND SPORT (Non-Air Leveling & Non-X-REAS) AND FOR 2010-14 TOYOTA FJ CRUISER 2WD & 4WD 3 SUSPENSION LIFT KIT PART NUMBER 432 WARNING!!! READ AND
78-88 G Body Rear Trailing Arm Kit
 May 14, 2014 78-88 G Body Rear Trailing Arm Kit Parts in this kit may vary slightly from photo. The following instructions are intended for professional installers and are guidelines only. Speedtech Performance
94-96 Impala SS/ B-Body Rear Coilover Conversion Kit
 January 29, 2014 94-96 Impala SS/ B-Body Rear Coilover Conversion Kit The following instructions are intended for professional installers and are guidelines only. Speedtech Performance assumes NO responsibility
Chicane Coilover Kit For '64 to '72 Chevelle/ A Body. Installation Instructions
 Nov 3, 2017 Chicane Coilover Kit For '64 to '72 Chevelle/ A Body Installation Instructions Actual parts may vary from photo depending on application. 1 P a g e The following instructions are intended for
Instruction set # 7068 Cognito Motorsports, Inc. Upper Control Arm Leveling Kit for GM 8-Lug #UCAK (Boxed Style)
") Cognito Motorsports, Inc. Upper Control Arm Leveling Kit for 2001-2010 GM 8-Lug #UCAK100010 (Boxed Style) Introduction - These control arms will not affect the height of the truck, the height is determined
Cognito Motorsports, Inc. Upper Control Arm Leveling Kit for 2001-2010 GM 8-Lug #UCAK100010 (Boxed Style) Introduction - These control arms will not affect the height of the truck, the height is determined
(WILL NOT FIT VEHICLES WITH X-REAS SUSPENSION)
") 2003-2016 TOYOTA 4RUNNER/2007-2014 FJ CRUISER 4WD INSTRUCTIONS 3 SUSPENSION LIFT KIT P/N 40021 (WILL NOT FIT VEHICLES WITH X-REAS SUSPENSION) WARNING!!!! PRODUCT SAFETY LABEL MUST BE INSTALLED INSIDE THE
2003-2016 TOYOTA 4RUNNER/2007-2014 FJ CRUISER 4WD INSTRUCTIONS 3 SUSPENSION LIFT KIT P/N 40021 (WILL NOT FIT VEHICLES WITH X-REAS SUSPENSION) WARNING!!!! PRODUCT SAFETY LABEL MUST BE INSTALLED INSIDE THE
WARNING!!! READ AND UNDERSTAND ALL INSTRUCTIONS BEFORE PROCEEDING. MAKE SURE THAT YOU HAVE ALL TOOLS AND PARTS BEFORE BEGINNING THE INSTALLATION.
 INSTALLATION INSTRUCTIONS FOR 2005-2015 TOYOTA TACOMA 4 X 4 AND PRERUNNER, 2003-2015 4RUNNER, 2007-2014 FJ CRUISER 1.5" FRONT LEVELING KIT PART NUMBER 415 WARNING!!! READ AND UNDERSTAND ALL INSTRUCTIONS
Cognito Motorsports, Inc., GM 2011-present 8-Lug truck Pitman/Idler Arm Support Kit SKU# PISK3008 **UTILITY PATENT US 7,475,891 B2**
 Cognito Motorsports, Inc., GM 2011-present 8-Lug truck Pitman/Idler Arm Support Kit SKU# PISK3008 **UTILITY PATENT US 7,475,891 B2** Introduction - This application is for stock and lifted applications
PARTS LIST FOR SKU: (UCAK100051)
") INSTALL INSTRUCTIONS: Cognito Upper Control Arm Kit for 2011-2018 GM 2500HD / 3500HD 2WD / 4WD trucks. (Ball Joint Style Boxed) New SKU: 110-90298 PARTS LIST FOR SKU: 110-90298 (UCAK100051) QUANTITY PART
INSTALL INSTRUCTIONS: Cognito Upper Control Arm Kit for 2011-2018 GM 2500HD / 3500HD 2WD / 4WD trucks. (Ball Joint Style Boxed) New SKU: 110-90298 PARTS LIST FOR SKU: 110-90298 (UCAK100051) QUANTITY PART
Cognito Motorsports, Inc. Upper Control Arm Kit for 2011-Present GM 8-Lug #UCAK100051
 Cognito Motorsports, Inc. Upper Control Arm Kit for 2011-Present GM 8-Lug #UCAK100051 Introduction - Installation requires a qualified mechanic. - Read instructions carefully and study the pictures (if
SPORT COIL SPRINGS (STREET) 00-UP TOYOTA CELICA INSTALLATION OF HOTCHKIS FRONT COIL SPRINGS
 00-UP TOYOTA CELICA INSTALLATION OF HOTCHKIS FRONT COIL SPRINGS") SPORT COIL SPRINGS (STREET) 00-UP TOYOTA CELICA -19400 Thank you for your purchase from our new line of Toyota Celica parts. Please call us at (877) 4NO-ROLL if you have any questions regarding the service
SPORT COIL SPRINGS (STREET) 00-UP TOYOTA CELICA -19400 Thank you for your purchase from our new line of Toyota Celica parts. Please call us at (877) 4NO-ROLL if you have any questions regarding the service
(800) MON-FRI 7AM-5PM PST OR WEBSITE: ReadyLIFT.COM **Please retain this document in your vehicle at all times**
 MON-FRI 7AM-5PM PST OR WEBSITE: ReadyLIFT.COM **Please retain this document in your vehicle at all times**") IF your ReadyLIFT product has a damaged or missing part, please contact customer service directly. For warranty issues please return to the place of installation and contact ReadyLIFT. A NEW REPLACEMENT
IF your ReadyLIFT product has a damaged or missing part, please contact customer service directly. For warranty issues please return to the place of installation and contact ReadyLIFT. A NEW REPLACEMENT
INSTALLATION INSTRUCTIONS FOR 2008 TOYOTA TUNDRA 4WD 2 1/2" SUSPENSION LIFT KIT PART NUMBER 437 (Patent Pending)
") INSTALLATION INSTRUCTIONS FOR 008 TOYOTA TUNDRA 4WD 1/" SUSPENSION LIFT KIT PART NUMBER 437 (Patent Pending) WARNING!!! READ AND UNDERSTAND ALL INSTRUCTIONS BEFORE PROCEEDING. MAKE SURE THAT YOU HAVE ALL
INSTALLATION INSTRUCTIONS FOR 008 TOYOTA TUNDRA 4WD 1/" SUSPENSION LIFT KIT PART NUMBER 437 (Patent Pending) WARNING!!! READ AND UNDERSTAND ALL INSTRUCTIONS BEFORE PROCEEDING. MAKE SURE THAT YOU HAVE ALL
04 & 14 F FRONT 1.0 REAR LEVELING KIT INSTALLATION
 INSTRUCTION PART NO 15312 KIT NO 3836 04 & 14 F-150 2.0 FRONT 1.0 REAR LEVELING KIT INSTALLATION READ INSTRUCTIONS COMPLETELY THROUGH BEFORE STARTING. FAILURE TO ADHERE TO THE INSTRUCTIONS WILL VOID ANY
WARNING!!! READ AND UNDERSTAND ALL INSTRUCTIONS BEFORE PROCEEDING. MAKE SURE THAT YOU HAVE ALL TOOLS AND PARTS BEFORE BEGINNING THE INSTALLATION.
 INSTALLATION INSTRUCTIONS FOR 2007-2015 JEEP JK 3 SUSPENSION LIFT SYSTEM PART NUMBER 587 WARNING!!! READ AND UNDERSTAND ALL INSTRUCTIONS BEFORE PROCEEDING. MAKE SURE THAT YOU HAVE ALL TOOLS AND PARTS BEFORE
FRONT DRIVELINE MODIFICATION MAY BE NECESSARY!!!!
 INSTALLATION INSTRUCTIONS FOR 2009 DODGE 2500/3500 4WD & 1500 Mega Cab 6 SUSPENSION SYSTEM PART NUMBER 7206 Requires the following parts (sold separately) for a complete installation: Front Coil Spring
22402 SPORT SWAY BAR SET 02-UP TOYOTA MATRIX 2WD / COROLLA / PONTIAC VIBE INSTALLATION OF HOTCHKIS FRONT SWAY BAR
 22402 SPORT SWAY BAR SET 02-UP TOYOTA MATRIX 2WD / COROLLA / PONTIAC VIBE Thank you for your purchase from our line of Toyota Matrix, Corolla & Pontiac Vibe parts. Please call us at (877) 4NO-ROLL if you
CHEVY / GMC 1500HD / 2500HD 2WD 8 LUG 7 BASIC KIT
 85101 2000-2010 CHEVY / GMC 1500HD / 2500HD 2WD 8 LUG 7 BASIC KIT C8510-4 MAIN BOX KIT W/ HARDWARE 1) FRONT X MEMBER 1) REAR X MEMBER 2) TORSION BAR DROPS 1) LEFT BUMP STOP 1) RIGHT BUMP STOP 2) SWAY BAR
Chicane Coilover Kit For '70 to '81 Camaro/Firebird
 Nov 25, 2013 Chicane Coilover Kit For '70 to '81 Camaro/Firebird 1 P a g e Installation Instructions The following instructions are intended for professional installers and are guidelines only. Speedtech
2017-Present Can-Am Maverick X3 XRS Front Upper A-Arm Kit *Installation Instructions*
 2017-Present Can-Am Maverick X3 XRS Front Upper A-Arm Kit *Installation Instructions* PART# 370-90350 Introduction - Installation requires a qualified mechanic. - Read instructions carefully and study
WARNING!!! READ AND UNDERSTAND ALL INSTRUCTIONS BEFORE PROCEEDING. MAKE SURE THAT YOU HAVE ALL TOOLS AND PARTS BEFORE BEGINNING THE INSTALLATION.
 INSTALLATION INSTRUCTIONS FOR 2001-2006 TOYOTA SEQUOIA 2-1/2" SUSPENSION LIFT KIT PART NUMBER 440 WARNING!!! READ AND UNDERSTAND ALL INSTRUCTIONS BEFORE PROCEEDING. MAKE SURE THAT YOU HAVE ALL TOOLS AND
" CHEVY / GMC WD BASIC KIT
 84302 2007-2013 6" CHEVY / GMC 1500 4WD BASIC KIT 100% Bolt On 6 Spindle Kit Front Differential Is Dropped A Full 6 To Maintain Proper CV Axle Angles Impact Struts To Distribute Front Suspension Impact
2007 AND UP GM 4 LIFT 2WD/4WD TRUCK/SUV
 IF your ReadyLIFT product has a damaged or missing part, please contact customer service directly. For warranty issues please return to the place of installation and contact ReadyLIFT. A NEW REPLACEMENT