INSTALL/REMOVAL INSTRUCTIONS: WINDOW REGULATOR
|
|
|
- Helena Flynn
- 5 years ago
- Views:
Transcription

1 REMOVAL/INSTALL OF WINDOW REGULATOR ( ) Ford F-Series Pickup & Bronco General Tech Tips: Use painter s tape rather than duct tape to secure window. It will not damage paint or leave sticky residue. A plastic pry tool is useful. It will not easily damage delicate trim like a screwdriver or metal pry bar. The replacement regulator should have a liberal amount of grease on slide area. If there is not much grease present, white lithium grease works well to lubricate the slide area. Aftermarket window tinting can cause the window to travel slower and put additional strain on the window regulator assembly. Window run channels should be cleaned and lubricated before installation of a new window regulator assembly. Silicone spray works well. Tools required for removal and installation of window regulator and motor assembly: Silicone spray lubricant Trim panel removal tool Pick Saddle cup assembly, tape, or wedge to hold window in place Flat-blade screwdriver or plastic pry tool 10mm socket or driver Phillips screwdriver Grease pencil or marker 1/2 drill bit Power drill Large pop rivet gun capable of doing ¼ pop rivets Possible materials needed are ¼ x 20 x 1 bolts, ¼ washers, and ¼ x 20 nylon lock nuts PLEASE WEAR SAFETY GLASSES!
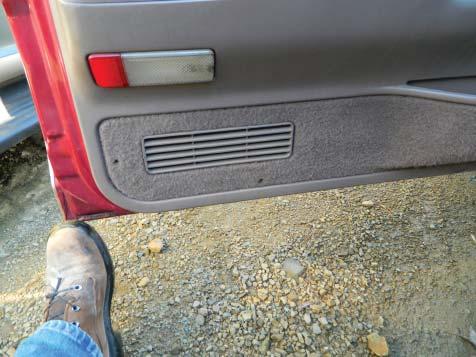
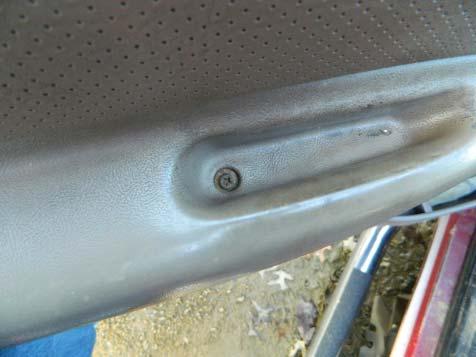
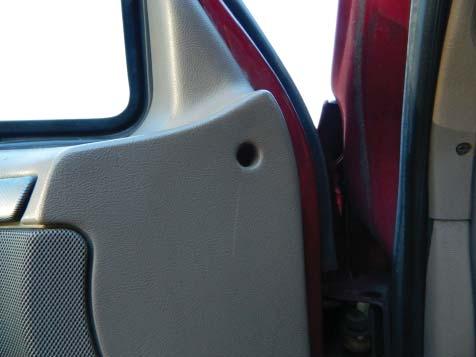
2 Removal Instructions STEP 1: Remove the interior door trim panel retaining screws.
3 STEP 2: With a trim panel removal tool, remove the interior door trim panel. NOTE: The interior door trim panel retaining clips are roughly six (6) inches away from each other. STEP 2a: Disconnect the connector on the backside of the master power switch assembly. STEP 2b: If your vehicle came equipped with a courtesy lamp built into the interior door trim panel, please disconnect. NOTE: Not all vehicles came equipped with courtesy lamps built into the interior door trim panel. Some vehicles were equipped with a reflector. STEP 3: Once the interior door trim panel has been removed from the door, remove the master power switch assembly by lifting from the door trim panel and placing the master power switch assembly through the hole in the interior door trim panel. Be sure to disconnect from switch
 rivets holding the door brace onto the door.")
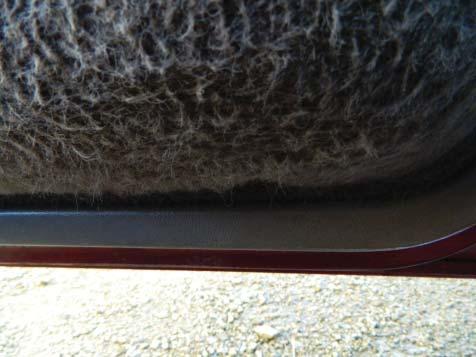
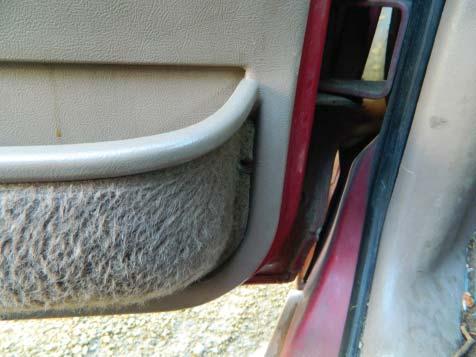
4 STEP 4: Remove the water vapor barrier. STEP 5: Disconnect the door speaker. STEP 6: Using a ½ drill bit and a power drill, drill out the two (2) rivets holding the door brace onto the door. NOTE: You are using the drill and drill bit to remove the head of the rivet. DO NOT DRILL ALL THE WAY THROUGH. YOU WILL DAMAGE THE DOOR AS WELL AS THE BRACE.
5 STEP 7: Turn the vehicle ignition to the accessory position to lower the door glass so that you can disconnect the glass from the window regulator. NOTE: Once the door glass has been disconnected from the window regulator, manually slide the door glass into the up position and hold in place with either a saddle cup assembly, painter s tape, or a wedge. STEP 8: Using your ½ drill bit and power drill, remove only the heads of the rivet holding the window regulator on the door. If you drill all the way through the rivet with your ½ drill bit, you will damage the door. STEP 9: Remove the window regulator through the access hole. STEP 10: Remove the three (3) window lift motor attaching screws and remove the window lift motor from the window regulator.


6 Installation Instructions STEP 1: Attach the window lift motor to the window regulator. STEP 1a: Install the window regulator through the access hole. STEP 2: Install the window regulator onto the door and connect the window lift motor connector. NOTE: If you do not have access to a large rivet gun capable of handling ¼ x ¾ rivets, it is okay if you use ¼ x 20 x up to 1 bolts washers and the corresponding nylon locking nuts when installing the window regulator onto the door. STEP 3: Once the window regulator has been installed, manually lower the window glass into position to attach onto the window regulator.
7 STEP 4: Once the window glass is in position and you have verified that the glass is operating smoothly, install the door brace. NOTE: If you do not have access to a large rivet gun capable of handling ¼ x ¾ rivets, it is okay if you use ¼ x 20 x up to 1 bolts washers and the corresponding nylon locking nuts when installing the window regulator onto the door. STEP 5: Attach the water vapor barrier. STEP 6: Place the master power switch assembly through the opening of the interior door trim panel.

8 STEP 7: Connect the master power switch. STEP 8: Connect the door mounted courtesy lamp. NOTE: Not all vehicles came equipped with a courtesy lamp. Some vehicles were equipped with a reflector. STEP 9: Attach the interior door trim panel to the door.
9 STEP 10: Attach the interior door trim panel retaining screws.
10 STEP 11: Attach the master power window switch to the interior door trim panel. STEP 12: Verify that all of the interior door trim panel attaching screws are mounted securely and that the window is operating properly. DORMAN WINDOW REGULATOR WINDOW REGULATOR PARTS
INSTALL/REMOVAL INSTRUCTIONS: WINDOW REGULATOR
 REMOVAL/INSTALL OF WINDOW REGULATOR (665-2542) Ford F-Series Pickup & Bronco 1980 96 General Tech Tips: Use painter s tape rather than duct tape to secure window. It will not damage paint or leave sticky
INSTALL/REMOVAL INSTRUCTIONS: WINDOW REGULATOR
 REMOVAL/INSTALL OF WINDOW REGULATOR (665-3606) Pontiac Grand Am 1999 2005, Oldsmobile Alero Sedan 1999 2004 General Tech Tips: Use painter s tape rather than duct tape to secure window. It will not damage
INSTALL/REMOVAL INSTRUCTIONS: WINDOW REGULATOR
 REMOVAL/INSTALL OF WINDOW REGULATOR (741-813) Ford Explorer 4-Door Except Sport Trac, Mercury Mountaineer 2002 05 General Tech Tips: Use painter s tape rather than duct tape to secure window. It will not
INSTALL/REMOVAL INSTRUCTIONS: WINDOW REGULATOR
 REMOVAL/INSTALL OF WINDOW REGULATOR (748-507) Lincoln Aviator 2003 05, Ford Explorer except Sport Trac 2003 05, Ford Explorer 2006 08, Mercury Mountaineer 2003 08 General Tech Tips: Use painter s tape
INSTALL/REMOVAL INSTRUCTIONS: WINDOW LIFT MOTOR
 REMOVAL/INSTALL OF WINDOW REGULATOR (742-269) Ford Mustang 1996 2004 General Tech Tips: Use painter s tape rather than duct tape to secure window. It will not damage paint or leave sticky residue. A plastic
INSTALL/REMOVAL INSTRUCTIONS: WINDOW REGULATOR
 REMOVAL/INSTALL OF WINDOW REGULATOR (741-809) Pontiac Grand Prix Coupe 1997 2002, Chevrolet Monte Carlo 2000 05 General Tech Tips: Use painter s tape rather than duct tape to secure window. It will not
INSTALL/REMOVAL INSTRUCTIONS: WINDOW REGULATOR
 REMOVAL/INSTALL OF WINDOW REGULATOR (740-692) Chevrolet Venture 1997 2005, Chevrolet Montana 1999 2005, Oldsmobile Silhouette 1997 2004, Pontiac Trans Sport 1997 98 General Tech Tips: Use painter s tape
INSTALL/REMOVAL INSTRUCTIONS: WINDOW REGULATOR
 REMOVAL/INSTALL OF WINDOW REGULATOR (741-649) Dodge Durango 1998 2003, Dakota Quad Cab 2000 2003 General Tech Tips: Use painter s tape rather than duct tape to secure window. It will not damage paint or
MOUNT BRACKET PARTS and HARDWARE: Installation parts with * come loose in hardware kit bag. Other parts are preassembled
 INSTALL INSTRUCTIONS C-DMM-2006 Dash Monitor Mount 2017-2019 F-250, 350, 450 Pickup, F-450 and 550 Cab Chassis, 2015-2019 Ford F-150 and 2018-2019 Expedition Notes: 1. The C-DMM-2000 series Dash Monitor
1464. Interior Installation. Cover Rear Seat Support Cut the vinyl to approximately the size of the rear seat support.
 Chapter 37 (Video Clip 37) - Interior Installation 1464. Interior Installation Cover Rear Seat Support 1465. Cut the vinyl to approximately the size of the rear seat support. 1466. Make a dry fit of the
Rear Vision System Liftgate Emblem Camera for Aftermarket Display Ford Flex (Kit part number )
") Rear Vision System Liftgate Emblem Camera for Aftermarket Display 2009-2012 Ford Flex (Kit part number 1008-6509) Kit Contents: Liftgate Emblem Mount with Camera Chassis Harness with RCA (Note: In some
Rear Vision System Liftgate Emblem Camera for Aftermarket Display 2009-2012 Ford Flex (Kit part number 1008-6509) Kit Contents: Liftgate Emblem Mount with Camera Chassis Harness with RCA (Note: In some
Lingenfelter Signature Series Camaro SS Rear Valance
 Lingenfelter Signature Series 2010-2012 Camaro SS Rear Valance PN: L850161410 Lingenfelter Performance Engineering 1557 Winchester Road Decatur, IN 46733 (260) 724-2552 (260) 724-0422 fax www.lingenfelter.com
Installation For Technicians Only Toyota Tundra Extended Cab By Gilbert Gutierrez. Vehicle information
 2007-08 Toyota Tundra Extended Cab By Gilbert Gutierrez Vehicle information Vehicle type: Four-door extended cab pickup truck NAGS numbers*: Windshield part numbers FW02724, FW02723, FW02722 or FW02721;
YARIS 4-DOOR 2007 INTERIOR LIGHT UPGRADE
 Document # 3999 4/26/06 4-DOOR 2007 INTERIOR LIGHT UPGRADE Preparation Part Number: 00016-52060 Code: IL1 Kit Contents Item # Quantity Reqd. Description 1 1 12 Light Guide 2 1 7 Light Guide 3 1 Hardware
THE SERIES-E POWR Slider
 C.R. LAURENCE CO., INC. PATENT NO. 4,920,698 THE SERIES-E POWR Slider MODEL: EPC814S 2014+ CHEVY/GMC SILVERADO/SIERRA 1500 NAGS: DY90122PK5 ELECTRIC SLIDING REAR WINDOW 2014 + CHEVY/GMC SILVERADO/SIERRA
INSTALLATION INSTRUCTIONS
 Rear Vision System Tailgate Emblem Camera Aftermarket Display 2009-Current Ford F-150 and 2010-Current Super Duty (Kit part number 1008-6509) Kit Contents: Tailgate Emblem Mount with Camera Chassis Harness
K9-F17 INSTALLATION INSTRUCTIONS K9 Kit for FORD INTERCEPTOR SEDAN
 K9-F17 INSTALLATION INSTRUCTIONS K9 Kit for 2013-2018 FORD INTERCEPTOR SEDAN TOOLS Needed: Phillips Screw Driver Trim panel removal tools Caulk Gun Standard Socket set Metric Socket set Wire Cutters /Crimpers
INSTALLATION INSTRUCTIONS
 Rear Vision System Aftermarket Display 2007-Current Chevrolet Silverado, Silverado HD; GMC Sierra, Sierra HD (Kit part number 9002-9560) Kit Contents: Chassis Harness with RCA (Note: In some cases a RCA
VELAR HITCH INSTALLATION INSTRUCTIONS TOW RANGE ROVER MODEL/ TRIM YEARS: WEIGHT CAPACITY to Present PARTS & SUPPLIES: TOOLS REQUIRES:
 HITCH INSTALLATION INSTRUCTIONS MAKE: RANGE ROVER YEARS: 2018 to Present MODEL/ TRIM VELAR PACKAGE: TOW WEIGHT CAPACITY TRAILER TONGUE 5300 LBS. 300 LBS. INSTALLATION TIME: 2 HOURS NO YES YES PARTS & SUPPLIES:
INSTALLATION INSTRUCTIONS JEEP 2011-UP JK SECURITY FULL CONSOLE #274
 INSTALLATION INSTRUCTIONS JEEP 2011-UP JK SECURITY FULL CONSOLE #274 PARTS CHECKLIST Tuffy Console #9 Left Front Mounting Bracket #10 Right Front Mounting Bracket #11 Electronics mounting bracket #12 Divider
Part No. 8865, 8866, 8885, Rear Fender Flares Stepdown Design Jeep JK, 2/4 Dr.
 Part No. 8865, 8866, 8885, 8886 Rear Fender Flares Stepdown Design 2007-12 Jeep JK, 2/4 Dr. PLEASE READ INSTRUCTIONS THOROUGHLY BEFORE PR0CEEDING We have provided complete instructions and specific hardware,
Rear Vision System Tailgate Emblem Camera Aftermarket Display 2009-Current Ford F-150 and 2010-Current Super Duty (Kit part number )
") Rear Vision System Tailgate Emblem Camera Aftermarket Display 2009-Current Ford F-150 and 2010-Current Super Duty (Kit part number 1008-6509) Kit Contents: Tailgate Emblem Mount with Camera Chassis Harness
Rear Vision System Tailgate Emblem Camera Aftermarket Display 2009-Current Ford F-150 and 2010-Current Super Duty (Kit part number 1008-6509) Kit Contents: Tailgate Emblem Mount with Camera Chassis Harness
KK-K9-F16-K INSTALLATION INSTRUCTIONS K9 Kit for FORD EXPLORER (Retail Model Vehicle with OEM Center Shifter Console)
") KK-K9-F16-K INSTALLATION INSTRUCTIONS K9 Kit for 2011-2016 FORD EXPLORER (Retail Model Vehicle with OEM Center Shifter Console) TOOLS Needed: Phillips Screw Driver Power Drill with Drill Bits Trim panel
KK-K9-F16-K INSTALLATION INSTRUCTIONS K9 Kit for 2011-2016 FORD EXPLORER (Retail Model Vehicle with OEM Center Shifter Console) TOOLS Needed: Phillips Screw Driver Power Drill with Drill Bits Trim panel
2007 Toyota FJ Cruiser By Gilbert R. Gutierrez
 2007 Toyota FJ Cruiser By Gilbert R. Gutierrez Vehicle information Vehicle type: Four-door utility vehicle NAGS numbers*: Windshield part number FW02652GTY; front door glass FD23053-54GTY R-L; rear door
2 Rubber Bumper GSM MM nut GSM30201 K9-F18-PT_INST_4-16
 K9-F18-PT INSTALLATION INSTRUCTIONS K9 Kit for 2013-2019 FORD INTERCEPTOR UTILITY Vehicle Notes: 1. For K9 applications, it is recommended to order the Interceptor Utility with the OEM optional Aux Rear
INSTALLATION INSTRUCTIONS
 Rear Vision System Tailgate Handle Camera Mirror Display 2004-2014 Ford F-150 and 2008-2015 Ford Super Duty (Kit part numbers 9002-9521) Kit Contents: Mirror Tailgate Handle with camera and harness Interior
Window Glass Front Door
 SECTION 501-11: Glass, Frames and Mechanisms 2000 Expedition/Navigator Workshop Manual REMOVAL AND INSTALLATION Procedure revision date: 06/17/1999 Window Glass Front Door Removal 1. Remove the front door
23-34 BODY COMPONENTS XJ VEHICLES J DOORS INDEX
 23-34 BODY COMPONENTS XJ VEHICLES J DOORS INDEX page Door Alignment Adjustment Major... 47 Door Alignment Adjustment Minor... 46 Door Edge Guard/Edge Protector Strip... 61 Door External Handle... 55 Door
Tesla Model S Rear Lighted T
 Tesla Model S Rear Lighted T Installation Instructions The rear lighted T makes your Tesla Model S distinctive if not unique from other cars on the road and other Model S s. This LED powered device is
Fog Lamp Instructions
 Fog Lamp Instructions 2011+ Ford Super Duty Congratulations on your purchase of a high quality PUTCO product. Should you need any application or technical assistance feel free to call us at: 1-800-247-3974
SCION xd INTERIOR LIGHTING UPGRADE Preparation
 Preparation Part Number: PTS21-52085 Light Guide Kit Contents Item # Quantity Reqd. Description 1 1 Controller Board, 4 color programmed w/ Bracket 2 1 RGB, LED Engine wire harness 3 2 14mm Light Rod,
STREET SCENE EQUIPMENT,INC.
 STREET SCENE EQUIPMENT,INC. 950-76570 BLACK CHROME 365 McCormick Avenue 950-77570 SATIN FINISH Costa Mesa, Ca. 92626 950-78570 CHROME FINISH Phone (714) 426-0590 Fax (714) 426-0591 2007-2008 TOYOTA TUNDRA
TOYOTA YARIS HATCHBACK INTERIOR LIGHT UPGRADE Preparation
 Preparation Part Number PTS21-52062-08 NOTE: Part number of this accessory may not be the same as the part number show Kit Contents Item # Quantity Reqd. Description 1 1 12 Light Guide 2 1 7 Light Guide
Rev TOOLS & MATERIALS REQUIRED QTY 3D PART NO. DESCRIPTION
 Rev. 04-10 QTY 3D PART NO. DESCRIPTION 1 691609 FRONT BUMPER REPLACEMENT 1 691610 RIGHT SIDE SKIRT 1 691611 LEFT SIDE SKIRT 1 691612 REAR LOWER SKIRT 4 3M 94 3M ADHESION PROMOTER 16 #8 X ¾ SELF DRILLING
CHANGING REAR SHOCKS/REAR SHOCK MOUNTS on an E36/8 Z3 M Coupe
 CHANGING REAR SHOCKS/REAR SHOCK MOUNTS on an E36/8 Z3 M Coupe Remove the rear luggage compartment floor trim. Remove the right (passenger side) rear compartment cover, and the M Mobility System. Remove
2011 Cadillac CTS Coupe EGX Exhaust Tip & Rear Valance Mesh Accent Kit Part #: Complete E
 BILLET GRILLS IMPORTANT: PLEASE KEEP THIS INSTRUCTION MANUAL FOR FUTURE REFERENCE! 2011 Cadillac CTS Coupe EGX Exhaust Tip & Rear Valance Mesh Accent Kit Part #: Complete 5122-1900-11E TOOLS REQUIRED Automotive
INSTALLATION INSTRUCTIONS
 INSTALLATION INSTRUCTIONS PARTS LIST Accessory Application Publications No. MII 13038 GL1800 P/N 08E75-MCA-100K Issue Date November 2009 Honda Dealer: Please give a copy of these instructions to your customer.
INSTALL INSTRUCTIONS C-VS-1400-EQX-1 14 VEHICLE SPECIFIC CONSOLE for 2014 Chevy Equinox with OEM Center console
 INSTALL INSTRUCTIONS C-VS-1400-EQX-1 14 VEHICLE SPECIFIC CONSOLE for 2014 Chevy Equinox with OEM Center console TOOLS NEEDED: Phillips Screw Driver Standard Socket set Metric Socket set Thin Tape T-20
IPSCO STS (Short Throw Shifter) Installation Instructions (GEN II) Dodge Viper WARNING
 Installation Instructions (GEN II) Dodge Viper WARNING") WARNING Modification of your vehicle with the parts identified above may alter its stock performance; the buyer hereby expressly assumes all risks associated with any such modification. DISCLAIMER OF WARRANTY
WARNING Modification of your vehicle with the parts identified above may alter its stock performance; the buyer hereby expressly assumes all risks associated with any such modification. DISCLAIMER OF WARRANTY
Toyota Sienna. Installation Manual: Toyota Sienna. Power Lift Gate System. Page 1 of 12
 Toyota Sienna Installation Manual: Toyota Sienna Power Lift Gate System Page 1 of 12 NOTE: Installation Precaution 1. It is recommended to have this product installed by a professional to avoid damage
2015+ dodge charger dedicated fuel system
 This Nitrous Outlet Dedicated Fuel System is designed specifically for the 2015+ Dodge Charger. If you need any assistance during installation or if you have questions about this item, call our Tech Help
INSTALLATION INSTRUCTIONS
 OEM Tailgate Camera/Bezel Assembly with Chassis Harness 2014-current Chevrolet Silverado and GMC Sierra (Kit part number 9002-1005) Kit Contents: Chassis Harness 1 bubble bag containing: Tailgate Handle
EVANNEX Rear Lighted T for Tesla Model X
 EVANNEX Rear Lighted T for Tesla Model X Installation Instructions The Evannex Rear Lighted T gives your Tesla Model X a distinctive look. This LED lighted device is mounted under Tesla s OEM chrome T
2004 Ford Taurus By Gilbert R. Gutierrez
 2004 Ford Taurus By Gilbert R. Gutierrez Vehicle Information: Vehicle type: Four-door sedan. NAGS number*: Windshield part number is DW01528GBYN or TYN. The door glass is DD08853-54GTNN R-L. Rear-door
Setting the World s Performance Standards
 Setting the World s Performance Standards 743 East Iona Road, Idaho Falls, ID 83401, (208) 529-0244 Fax (208) 529-9000 Forced Air Hot Air Elimination Kit (Bed Fan Kit) For 800 RZR-4 P/N 67-165 Kit Contents:
Polaris Slingshot 2015-up* *Visit MetraOnline.com for up-to-date vehicle specific applications.
 99-9721 INSTALLATION INSTRUCTIONS Polaris Slingshot 2015-up* *Visit MetraOnline.com for up-to-date vehicle specific applications. KIT FEATURES ISO DIN radio provision with pocket ISO DDIN radio provision
TOYOTA RAV4/HV INTERIOR LIGHT KIT Preparation
 Preparation Part Number: PT413-42130 Kit Contents Item # Quantity Reqd. Description 1 1 Wire Harness 2 3 Hardware Bag Contents Item # Quantity Reqd. Description 1 20 Cable Tie 2 2 Scotchlok 3 2 Foam Pad
RIM Hood For Aeromaster Bodies
 RIM Hood For Aeromaster Bodies Service Guide WARNING: Hood should be opened by releasing the hold-down straps, lifting the hood, and engaging the prop rod. Be sure prop rod is properly engaged before working
Wildcat System Instructions
 Wildcat System Instructions NOTE: Most steps contained in these instructions will need to be repeated on the other side of the vehicle. Prior to assembly of windshield it is necessary to establish what
LOCKN LOAD FIRST TIME INSTALLATION
 LOCKN LOAD TM TRACK MOUNTING KIT FORD RANGER PX / MAZDA BT-50 DUAL CAB 2011 + 2 BAR TRACK HEAVY DUTY ROOF RACK SYSTEM MAX VEHICLE ROOF LOAD RATING: 100KG TOTAL LOAD EQUALS WEIGHT OF ROOF RACKS + ACCESSORIES
Illuminated Cup Holders Hyundai Elantra (GLS, Limited, Coupe)
") Illuminated Cup Holders 2011-2015 Hyundai Elantra (GLS, Limited, Coupe) Thanks for purchasing this Cup Holder Illumination Install Kit! If you have any questions or feedback please email me direct at info@accentglowled.com
Illuminated Cup Holders 2011-2015 Hyundai Elantra (GLS, Limited, Coupe) Thanks for purchasing this Cup Holder Illumination Install Kit! If you have any questions or feedback please email me direct at info@accentglowled.com
Installation Instructions Ford F Ford Expedition
 Installation Instructions 2015-2019 Ford F-150 2018 2019 Ford Expedition Notice This product is an aftermarket accessory and not designed by the vehicle s manufacturer for use on this vehicle. As such,
If technical support is required, please contact Advent Technical Support at
 Document 128-9015A Created 12/12/11 Kit Contents: Item # Qty. Component Description 1 2 Headrest Assembly 2 2 Cables # 3 3 1 Power Cord # 9 4 1 FM Antenna 5 1 Control Box 6 2 IR Headphones 7 2 Remote Control
MacBook Unibody Model A1278 LVDS Display Cable Replacement
 MacBook Unibody Model A1278 LVDS Display Cable Replacement Replace the LVDS display cable in your MacBook Unibody Model A1278. Written By: Walter Galan ifixit CC BY-NC-SA www.ifixit.com Page 1 of 28 INTRODUCTION
California Pony Cars Full Length Radiator Cover (07-09 GT500)
") California Pony Cars Full Length Radiator Cover (07-09 GT500) Installation Time: 15-30 Minutes Required Tools: Flathead Screwdriver or Pick 10mm Wrench or Ratchet & 10mm Socket Optional Tools CSM Badge
California Pony Cars Full Length Radiator Cover (07-09 GT500) Installation Time: 15-30 Minutes Required Tools: Flathead Screwdriver or Pick 10mm Wrench or Ratchet & 10mm Socket Optional Tools CSM Badge
Conflicts: Vehicles with a sunroof
 Toyota 4Runner Non/MR 2010-10.2 Overhead Video Part Number: 00016-00110; Fit Kit -00110-15, Beige 00016-00120; Fit Kit -00120-15, Gray Accessory Code: ED6 Conflicts: Vehicles with a sunroof Kit Contents:
BMW X3 UNDERBODY PANEL TRIM DIAGRAM in
 13107 10/5/2012 BMW X3 PAGE 1 OF 2 GROSS LOAD CAPACITY WHEN USED AS A WEIGHT CARRYING HITCH: 3,500 LBS. TRAILER WEIGHT & 350 LBS. TONGUE WEIGHT. GROSS LOAD CAPACITY WHEN USED AS A WEIGHT DISTRIBUTION HITCH:
Here I Will Explain How To Install Recon Cab Lights In A 3rd Gen Dodge Ram.
 1 P age Here I Will Explain How To Install Recon Cab Lights In A 3rd Gen Dodge Ram. *Now, There Are Many Ways of Installing Them, Including Wiring Methods, Wiring Connectors, And Other Variables - In This
Difficulty Level: 3-4. This is very intensive for an intercooler installation. Experienced mechanical skills recommended. Wrenches Sockets Specialty
 Nissan GT-R FMIC The goal of AMS is to provide the highest quality, best performing products available. By utilizing research and development, and rigorous testing programs AMS will never compromise the
INSTALLATION INSTRUCTIONS
 Rear Vision System Liftgate Emblem Camera Mirror Display 2009-2012 Ford Flex (Kit part number 1008-9527) Kit Contents: Mirror Liftgate Emblem Mount with Camera Interior (shorter) Harness Chassis (longer)
Mercedes E63/CLS AMG Carbon Turbo Intake System Instructions
 Mercedes E63/CLS AMG Carbon Turbo Intake System Instructions The goal of Alpha Performance is to provide the highest quality, best performing products available. By utilizing research and development,
Expedition Front Bumper Instructions
 Expedition Front Bumper Instructions QTY 3D PN. FCS PART NUMBER DESCRIPTION 1 691256 A 8 E X D - 1 7 B 635-AAPLN FRONT BUMPER REPLACEMENT HARDWARE SUPPLIED 10 SELF TAPING SCREWS -10 for Front Bumper PLASTIC
2003 CR-V - A/T Shift Cable Replacement-Print Preview
 Page 1 of 7 2003 CR-V - A/T Shift Cable Replacement 1. Raise the front of the vehicle, or lift the vehicle up, and make sure it is securely supported. 2. Remove the driver's dashboard lower cover, and
FRONT MOUNT INTERCOOLER GOLF / JETTA IV 1.8T PART # & P INSTALATION INSTRUCTIONS
 FRONT MOUNT INTERCOOLER GOLF / JETTA IV 1.8T PART # 48.10.90 & 48.10.90P INSTALATION INSTRUCTIONS PART LIST: 1 INTERCOOLER CORE 1 U-BENT TUBE 1 L-SHAPED TUBE 1 INTERCOOLER INLET TUBE 4 M6 NYLOC NUT 3 M6
MacBook Unibody Model A1278 LCD Panel Replacement
 MacBook Unibody Model A1278 LCD Panel Replacement Escrito por: Walter Galan ifixit CC BY-NC-SA es.ifixit.com Página 1 de 27 INTRODUCCIÓN Save money by replacing just the LCD rather than the whole display
Toyota 4RUNNER With/MR Overhead Video
 Toyota 4RUNNER With/MR 2010-10.2 Overhead Video Part Number: 00016-00110; Fit Kit-00110-14, Beige 00016-00120; Fit Kit-00120-14, Gray Accessory Code: ED7 Conflicts: Vehicles without a sunroof Kit Contents:
INSTALLATION INSTRUCTIONS INFINITI CELLPORT UNIVERSAL HANDS FREE SYSTEM
 INSTALLATION INSTRUCTIONS 1. DESCRIPTION: INFINITI CELLPORT UNIVERSAL HANDS FREE SYSTEM 2. APPLICATION: 2002 Q45 3. PART NUMBER: 948T3CELLR95 (VPC) or 999Q2TN000 (PDC) 4. TOOLS REQUIRED: a. Loctite 242
Ferrari 355 Challenge Grill Installation
 Ferrari 355 Challenge Grill Installation By: Dave Lelonek (Dave Rocks) August 12, 2014 Created based on model year 1998 (355 F1 GTS), other model years may apply. Disclaimer: This document was created
HUMMER H A. 3-5 Hours INSTALLATION GUIDE INSTALLATION TIME SKILL LEVEL. 4= Experienced TOOLS REQUIRED APPLICATION MODEL YR PART #
 INSTALLATION GUIDE APPLICATION MODEL YR PART # HUMMER H2 2003-2009 75107-01A INSTALLATION TIME 3-5 Hours Professional installation recommended SKILL LEVEL 1 2 3 = Experienced TOOLS REQUIRED Safety goggles
Please reference the attached document for information regarding the installation of Utility Side Skirts (USS-160) on Dry Freight Trailers.
 on Dry Freight Trailers.") SERVICE BULLETIN NO. SB-19-004 Issue date: March 9, 2011 SUBJECT: Installing Dry Freight Side Skirts Please reference the attached document for information regarding the installation of Utility Side Skirts
SERVICE BULLETIN NO. SB-19-004 Issue date: March 9, 2011 SUBJECT: Installing Dry Freight Side Skirts Please reference the attached document for information regarding the installation of Utility Side Skirts
13316 INSTALLATION INSTRUCTIONS
 13316 INSTALLATION INSTRUCTIONS Safety glasses should be worn at all times while installing this product. YEARS: 2011-PRESENT 2016-PRESENT MAKE: BMW MODEL: X3 X4 STYLE: WARNING: NEVER EXCEED YOUR VEHICLE
FOG LAMPS INSTALL KIT
 FOG LAMPS INSTALL KIT PT CRUISER INSTALLATION INSTRUCTIONS Read entire instructions thoroughly before starting. For proper aiming of fog lamps, follow procedures in the service manual. NOTES: Left and
M-5230-V6 Mustang V6 Dual Exhaust Kit INSTRUCTION SHEET
 Please contact the Techline for the most current instruction information (800) FORD788.!!! PLEASE READ THE FOLLOWING INSTRUCTIONS CAREFULLY PRIOR TO INSTALLATION!!! OVERVIEW: The use of a floor hoist is
INSTRUMENT PANEL WARPAGE REPAIR
 PAGE 1 OF 15 AFFECTED VEHICLES: INSTRUMENT PANEL WARPAGE REPAIR ALL 1999-2000 MODEL YEAR CONTOUR AND MYSTIQUE OVERVIEW NOTE! Revisions to the technical instructions are indicated in RED text. This document
QTY 3D PART NO. FORD SERVICE PN DESCRIPTION VAA6Z A FIESTA 5 DOOR (4) PC. KIT
 PC. KIT") Rev. 08-4 - 2010 QTY 3D PART NO. FORD SERVICE PN DESCRIPTION 1 691620 VAA6Z-5820049-A 2011- FIESTA 5 DOOR (4) PC. KIT HARDWARE SUPPLIED 12 #8 X ¾ SELF DRILLING SCREWS 220 / 18.5 3M VHB DOUBLE FACE TAPE
Rev. 08-4 - 2010 QTY 3D PART NO. FORD SERVICE PN DESCRIPTION 1 691620 VAA6Z-5820049-A 2011- FIESTA 5 DOOR (4) PC. KIT HARDWARE SUPPLIED 12 #8 X ¾ SELF DRILLING SCREWS 220 / 18.5 3M VHB DOUBLE FACE TAPE
INVISIHITCH. Hidden Hitch Receiver for. BMW X5 [F15] 2014 Current (all engines/suspension pkgs/trimlines, including M Sport line and Aero kit)
![INVISIHITCH. Hidden Hitch Receiver for. BMW X5 [F15] 2014 Current (all engines/suspension pkgs/trimlines, including M Sport line and Aero kit)](/thumbs/85/92794256.jpg "INVISIHITCH. Hidden Hitch Receiver for. BMW X5 [F15] 2014 Current (all engines/suspension pkgs/trimlines, including M Sport line and Aero kit)") INVISIHITCH Hidden Hitch Receiver for BMW X5 [F15] 2014 Current (all engines/suspension pkgs/trimlines, including M Sport line and Aero kit) Capacity: 7,700 lbs. Towed Weight / 600 lbs Tongue Weight* *
INVISIHITCH Hidden Hitch Receiver for BMW X5 [F15] 2014 Current (all engines/suspension pkgs/trimlines, including M Sport line and Aero kit) Capacity: 7,700 lbs. Towed Weight / 600 lbs Tongue Weight* *
2018+ Mustang Lower Grill and Chin Spoiler Kits Installation Instructions P/N: (R K945) P/N: (R F775)
 P/N: (R F775)") 2018+ Mustang Lower Grill and Chin Spoiler Kits Installation Instructions P/N: 422081 (R1318-17K945) P/N: 422082 (R1318-17F775) 39555 Schoolcraft Rd, Plymouth MI, 48170 800.59.ROUSH 2018+ Mustang Lower
2018+ Mustang Lower Grill and Chin Spoiler Kits Installation Instructions P/N: 422081 (R1318-17K945) P/N: 422082 (R1318-17F775) 39555 Schoolcraft Rd, Plymouth MI, 48170 800.59.ROUSH 2018+ Mustang Lower
INSTALLATION INSTRUCTIONS
 Rear Vision System Tailgate Emblem Camera Mirror Display 2009-Current Ford F-150 and 2010-Current Super Duty (Kit part number 1008-9527) Kit Contents: Mirror Tailgate Emblem Mount with Camera Interior
* * Ford Mustang. Tools Required. Inside...
 evision 07/09/07 IMPOTANT Before starting, compare items on your invoice with items received. Carefully check through packaging material. If any item is missing, please call Crutchfield at. Inside... TM
3. Cover the hood with padding and fold the stock windshield frame down onto the hood.
 640 North El Dorado Street Stockton, CA 95202 Phone (209)943-0991 Fax (209)943-7923 www.wildhorses4x4.com Stainless steel windshield frame #5722 Date 10/30/07 Parts list: 1-10 ¾ long 1/4 NF threaded rod.
2011 Honda Accord Coupe Fine Mesh Grille
 IMPORTANT: PLEASE KEEP THIS INSTRUCTION MANUAL FOR FUTURE REFERENCE! TOOLS REQUIRED 2011 Honda Accord Coupe Fine Mesh Grille Replacement Upper / Lower Overlay Part #: Complete #1124-0102-11 / Black Ice
INSTALLATION INSTRUCTIONS
 Rear Vision System Mirror Display 2004 onwards Ford F-150 and 2008 onwards Ford Super Duty (Kit part numbers 1008-9520 and 1008-9525) Kit Contents: RVS Interior (shorter) Harness RVS Chassis (longer) Harness
General Applicability: KIA Sorento. Issues Current Kit does not allow for CAN DATA remote access
 Document #730135 Created ACH 08/02/2018 Revised ACH 08/20/18 A2 General Applicability: 2018-19 KIA Sorento Issues Current Kit does not allow for CAN DATA remote access Kit Contents: Item# Component Description
LANCER EVOLUTION (2008 ) MUD FLAP MZ531356EX (Black with aluminum plate) MZ531357EX (Black standard) INSTALLATION AND HANDLING INSTRUCTIONS
 MUD FLAP MZ531356EX (Black with aluminum plate) MZ531357EX (Black standard) INSTALLATION AND HANDLING INSTRUCTIONS") LANCER EVOLUTION (2008 ) MUD FLAP MZ531356EX (Black with aluminum plate) MZ531357EX (Black standard) INSTALLATION AND HANDLING INSTRUCTIONS Black with aluminum plate -MZ531356EX Black standard -MZ531357EX
LANCER EVOLUTION (2008 ) MUD FLAP MZ531356EX (Black with aluminum plate) MZ531357EX (Black standard) INSTALLATION AND HANDLING INSTRUCTIONS Black with aluminum plate -MZ531356EX Black standard -MZ531357EX
* * Inside Toyota Avalon. Tools Required IMPORTANT
 Revision 08/02/16 2013- Toyota Avalon IMPORTANT Before starting, compare items on your invoice with items received. Carefully check through packaging material. If any item is missing, please call Crutchfield
Factory Five Racing, Inc. 818 Kit Assembly manual revision 1J update
 Factory Five Racing, Inc. 818 Kit Assembly manual revision 1J update Turbo coolant overflow tank...1 Shifter handle...4 Install...4 Door skin...7 Door Liner... 10 Side mirrors... 14 Door handles and pulls...
#TL T EA888 GEN 3 FUELING SYSTEM/ INSTALLATION INSTRUCTIONS
 #TL100069 2.0T EA888 GEN 3 FUELING SYSTEM/ INSTALLATION INSTRUCTIONS Notes: These instructions were written for a North American specification MkVII GTI. Other models, like the Golf R, are similar. When
GMC Yukon
 Torch Series LED Grille TOOLS REQUIRED: Flat Head Screwdriver Long Flat Head Screwdriver Phillips Screwdriver 7mm Socket 10mm Socket Ratchet & Extensions 3/16 Drill Bit Power Drill Cutting Wheel or Saw
Chevrolet Cobalt Short Shifter Installation Manual
 Chevrolet Cobalt Short Shifter Installation Manual Pull shift boot down on the shifter shaft. Pull up on the shift knob to remove it. It requires some force. Remove the ebrake console, shifter console
57-1. Front door. Tools. Special tools and equipment. T Socket 3320/2 Bit insert for Socket T Assembly tool
 57-1 Front door Tools Special tools and equipment T 10011 Socket 3320/2 Bit insert for 3320 3410 Socket T 10034 Assembly tool 57-2 Front door, assembly overview Note: The instrument panel must be removed
2015 Ford F150 Rear Bumper w/ LED
 2015 Ford F150 Bumper w/ LED T527990 T527991 PARTS LIST: 1 Bumper Assembly 4 12mm Lock Washers 2 Mounting Brackets 6 12 mm Nylon Lock Nuts 4 Sensor Hole Plugs 8 4mm x 10mm Button Head Bolts 2 Plastic Plugs
Ram 1500 Crew Cab A Ram 2500/3500 Crew Cab A
 I N S T A L L A T I O N G U I D E APPLICATION AMP Part # Ram 1500 Crew Cab 2013-2015 77138-01A Ram 2500/3500 Crew Cab 2013-2015 77138-01A Note:The application works only on the Crew Cab model Vehicles.
ISNORKEL034XLT FORD PX RANGER XLT 9/2011-7/ & 3.2L DIESEL FORD PX RANGER Mk II XLT 7/ & 3.2L DIESEL
 INSTALLATION GUIDE ISNORKEL034XLT FORD PX RANGER XLT 9/2011-7/2015 2.2 & 3.2L DIESEL FORD PX RANGER Mk II XLT 7/2015+ 2.2 & 3.2L DIESEL Ironman 4x4 Snorkel fits to the right hand side of the Ford PX Ranger
1998 Dodge Grand Caravan. ANTI-THEFT SYSTEM' '1998 ACCESSORIES/SAFETY EQUIPMENT Chrysler Corp. - Anti-Theft System - FWD Vans ANTI-THEFT SYSTEM
 ANTI-THEFT SYSTEM 1998 ACCESSORIES/SAFETY EQUIPMENT Chrysler Corp. - Anti-Theft System - FWD Vans DESCRIPTION On vehicles equipped with the Vehicle Theft Security System (VTSS), doors (liftgate), hood
TOYOTA PRIUS 2004 TVIP V2 (GBS ADD ON) Section I Installation Preparation
 Section I Installation Preparation") Section I Installation Preparation Part Number: 08586 47840 Section I Installation Preparation Kit Contents Item # Quantity Reqd. Description 1 1 Wire Harness 2 1 3 1 ECU Mounting Bracket Hardware Bag
Section I Installation Preparation Part Number: 08586 47840 Section I Installation Preparation Kit Contents Item # Quantity Reqd. Description 1 1 Wire Harness 2 1 3 1 ECU Mounting Bracket Hardware Bag
M-5230-V6 Mustang V6 Dual Exhaust Kit INSTRUCTION SHEET
 Please visit www.fordracingparts.com for the most current instruction information.!!! PLEASE READ ALL OF THE FOLLOWING INSTRUCTIONS CAREFULLY PRIOR TO INSTALLATION. AT ANY TIME YOU DO NOT UNDERSTAND THE
IPSCO STS (Short Throw Shifter) Installation Instructions Dodge Viper WARNING
 Installation Instructions Dodge Viper WARNING") WARNING Modification of your vehicle with the parts identified above may alter its stock performance; the buyer hereby expressly assumes all risks associated with any such modification. DISCLAIMER OF WARRANTY
WARNING Modification of your vehicle with the parts identified above may alter its stock performance; the buyer hereby expressly assumes all risks associated with any such modification. DISCLAIMER OF WARRANTY
Wiper arm and wiper motor, headlamp, replacing
 "VCC137971 EN 20110112" file://c:\info\vv132007\ie\en\31\vcc137971.htm Page 1 of 2 Wiper arm and wiper motor, headlamp, replacing Removal Preparations Switch off the ignition. Headlamp wiper arm Lift up
Ford Ranger and Mazda Pickup Odometer Worm Gear Replacement
 www.odometergears.com Ford Ranger and Mazda Pickup Odometer Worm Gear Replacement http://www.therangerstation.com/magazine/fall2008/odometer_worm_gear.htm ****************************************************************************************************
Mustang Classic LightBar Instructions
 1994-2004 Mustang Classic LightBar Instructions Note: Read installation instructions before starting. Component List: 1 LightBar 4 Poly Plugs 4 LightBar Bolts 4 LightBar Washers 2 LightBar Rivets 2 Light