INSTALLATION MANUAL GB
|
|
|
- Victoria Riley
- 5 years ago
- Views:
Transcription
1 GB INSTALLATION MANUAL
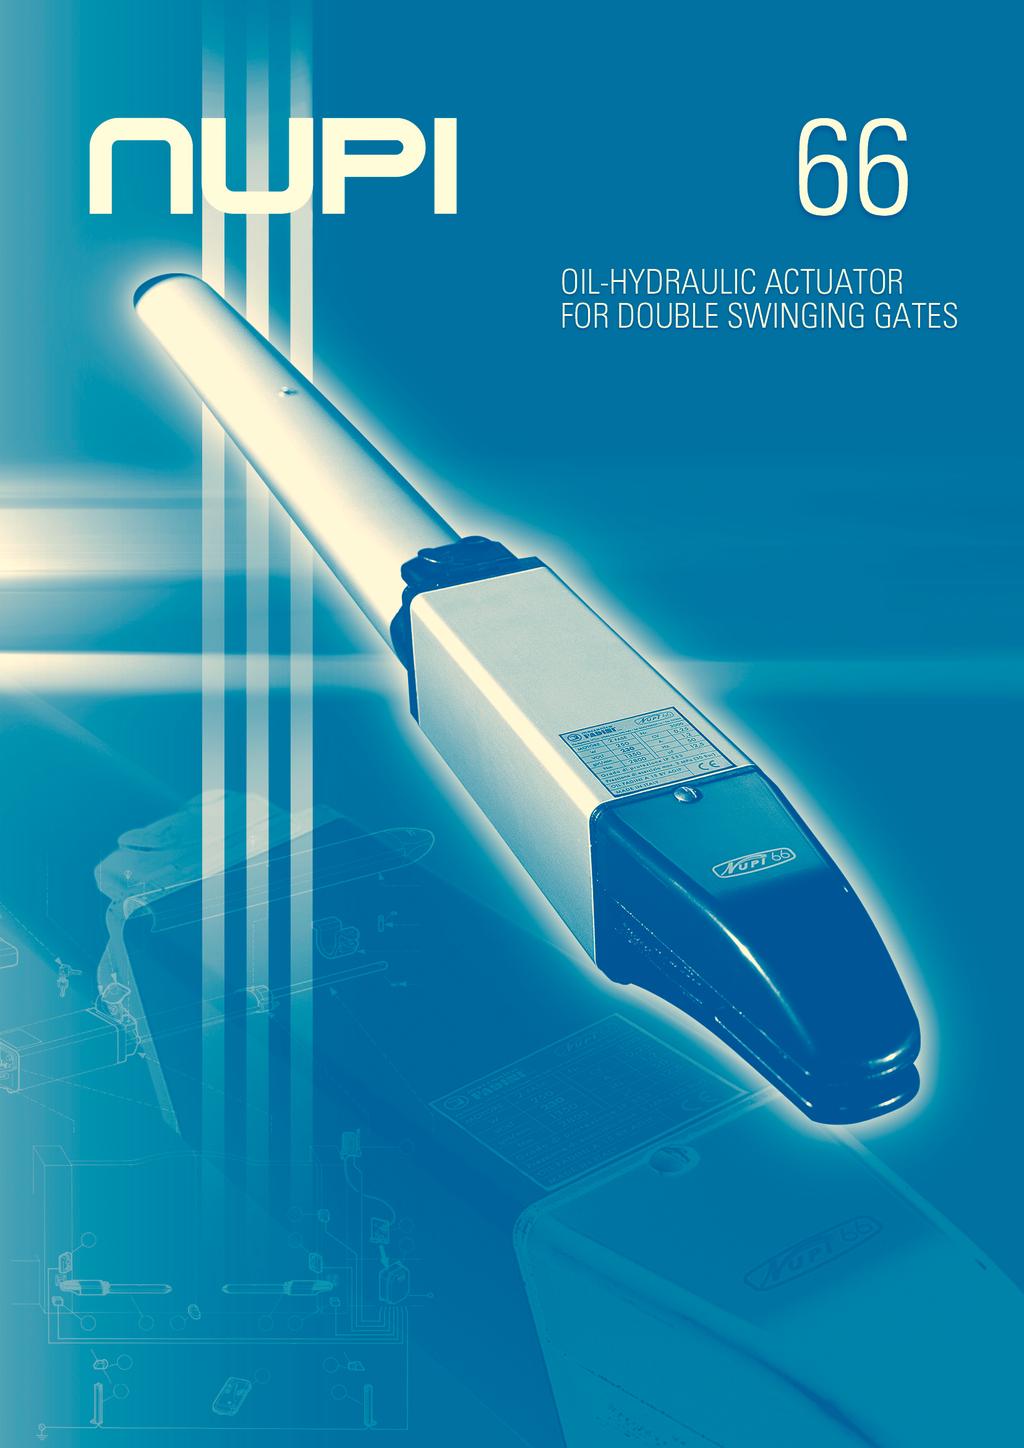
2 @GB; 66 FITTING INSTRUCTIONS Important: Keep to the instructions outlined in the pages and diagrams that follow to achieve a perfect installation. NUPI 66 is an oil-hydraulic actuator locking in the closed gate position to operate gates that are not wider than 2.0 m. Fìxing to the gate and gate posts is by specially designed brackets. Peculiar with this operator is the absence of the high/low pressure valves, power is set and controlled by the electronic control box ELPRO 7 RP (See the description on page 4, Elpro 7 RP wiring diagram). RELEASE KEY RELEASE DEVICE RELEASE FLAP COVER COVER WITH CAP END COVER HEXAGONAL HEAD PIN 12,5 µf CAPACITOR FIXING PIN FRONT FIXING BENZING RING REAR PLATE WITH HOLES FOR FIXING ADJUSTMENT REAR BRACKET BLOCK CABLE FASTENER TERMINALS RELEASE VALVE BLOCK CYLINDER HEAD PISTON SHAFT PIC. 1 FITTING NUPI 66 This explains how to remove the operator cover and fix the actuator. The first operation is to unlock the operator: push the lock flap to one side, insert the key and turn it 90 clockwise. The locking barrel can be tilted open and the operator is now released (pic. 2). Unscrew the two screws that fix the operator cover and remove it. Unscrew the screw that fixes the rear end cover and remove it. The actuator is so ready for fixing operations. LOCKED GATE CLOSED UNLOCKED GATE OPEN PIC. 2 - Releasing system. Details. Special fitting There can be cases where special fitting requirements are needed to meet (gate hinges on the post edge line, brickwork to be indented, special opening,...). NUPI 66 is supplied complete with an adjustable rear fixing piate: a pattern of fixing holes makes the rear fixing extremely versatile to suit any gate. Refer to the diagram on the right for fixing geometry (pic. 3). GATE POST 150x150mm A B α CLOSED GATE B GATE MOVEMENT CENTRES A α ELECTRIC LOCK CLOSED GATE An electric lock is recommended in installations 200 where each gate leaf exceeds 1.8 meters and is subjected to high winds or are close boarded gates. 200 PIC
3 IMPORTANT: It is important to temporarily fix the operator rear casting using the center hole in the fixing plate and, once the installation is completed, move the rear fixing to the inner hole. IMPORTANT: it is necessary to firmly fix the gate stops to the ground in the open and closed gate positions (See pic. 5 on page 3 and pic. 7 on page 4, parts 5 and 15) before installing the operator. - A reinforcement plate is recommended for the rear fixing, either to be embedded in the gate post, anchoring plates to be welded to improve holding, or bolted to it so that the operator rear fixing can be welded to it in full respect of the geometry indicated below. See distances A and B in pic.5 (distances are strictly referred to the center lines of the gate hinge and operator rear fixing) Temporary installation axis to coincide with center hole A=130 Ground stop in closed gate position final installation axis to coincide with inner hole Closed gate Pierced fixing plate B= D=80 Rear casting Reinforcement plate Ground stop in open gate position 95 PIC. 4 PIC. 5 - By means of a spirit level, make sure that the fixing plates are perfectly levelled, respect distance D for the front fixing, the gate in closed position, ie. operator shaft driven 260 mm out. B=130 A=130 Spirit level Spirit level Never weld the front fixing bracket directly to the gate. Use a reinforcement plate. Remove the operator before welding Spirit level This distance to allow 1cm clearance between the cover and the gate in open position D=80 PIC. 6 - At this stage NUPI 66 is fixed to the gate leaf. Note that it is locking when the release lid is closed; with the lid in the open position the locking device is overridden and the gate can be pushed open by hand (pic.2 on page 2). The electrical connections of the power supply cable to the terminal board are the next step. Remove the cable fastener. Connect the neutral to the central terminal and the two live wires to the lateral terminals (pic. 9 on page 4) in parallel with the capacitor. Put back the cable fastener. On connecting the electronic control panel Elpro 7 RP, it is advised to set the torque control switch to position 3 (pic. 10 on page 5 and pic. 11 on page 6). 3

4 ELECTRICAL WIRING DIAGRAM The diagram here below shows the electrical connections of all the accessories that are available for the system: cable RG58 n 4x1 n 4x1 n 2x1 n 2x1 n 3x1, n 4x1, n 4x1,5 15 n 4x1 n 2x IMPORTANT: All the system must be properly earthed PIC PHOTOCELL RECEIVER TRIFO JUNCTION BOX 3 - POST WITH PHOTOCELL PROJECTOR TRIFO OIL-HYDRAULIC ACTUATORS NUPI CLOSED GATE STOP REQUIRED 6 - RADIO TRANSMITTER ASTRO 43/2 TR SMALL 7 - POST WITH PHOTOCELL RECEIVER TRIFO PHOTOCELL PROJECTOR TRIFO KEYSWITCH PRIT FLASHING LAMP MIRI PLUG-IN RADIO RECEIVER CARD ASTRO 43/2 R 12 - ELECTRONIC CONTROL PANEL ELPRO 7 RP 13 - AERIAL BIRIO A A MAGNETIC-THERMAL CIRCUIT BREAKER (BEYOND 100m 2.5mm Ø CABLE TO BE USED ) 15 - OPEN GATE STOP REQUIRED N.W: CARRY OUT A RISK ANALYSIS IN COMPLIANCE WITH EN AND EN NORMS AND FIT ANY SAFETY DEVICE WHERE REQUIRED. LIVE 1 TERMINALS FITTED ON TO THE OPERATOR BRACKET BLOCK 12,5 µf CAPACITOR THE NEUTRAL BLUE WIRE TO BE CONNECTED TO THE CENTRAL TERMINAL NEUTRAL - BLUE LIVE 2 NOTE: BY EXCHANGING THE POSITION OF L1 WITH L2 THE ELECTRIC MOTOR IS REVERSED. PIC. 8 4 SUPPLY CABLE 230V - 50 Hz FLEXIBLE FLAME-PROOF NPI 450/750-4x1,5 mm 2 CEI STANDARD THE TWO LIVE WIRES TO BE CONNECTED TO THE LATERAL TERMINALS PARALLEL TO THE CAPACITOR IT IS IMPORTANT TO AVOID ANY SHARP BENDS WITH THE CABLE. IT MUST DANGLE IN A WIDE LOOP PIC. 9
5 230V 50Hz SINGLE-PHASE POWER SUPPLY PHASE NEUTRAL WIRING DIAGRAM CONTROL PANEL ELPRO 7 RP IMPORTANT: Elpro 7 RP is specifically designed to suit NUPI 66 only. The manufacturers decline any responsibility for damages caused by incorrect use, or applications with accessories that are not FADINI. For the electrical connections to the motor of NUPI 66, mains and flashing lamp use 1,5 mm 2 cables. For the photo cells, keyswitches and other accessories you can use 1 mm 2 wires. Make sure that all the electrical connections are done in compliance with this diagram. Once the terminals are supplied with 230V - 50Hz power, the neutral and live properly connected, the red led No. 1 (L1) illuminates to confirm that the board has voltage. Read the instructions contained in the ELPRO 7 RP box. Elpro 7 RP ELECTRONIC CONTROL PANEL FOR NUPI 66 WITH PROGRAMMABLE RADIO TECHNOLOGY PLUG-IN RADIO CARD SUPPORT 2A 24V low voltage fuse DIP-SWITCH ON TRANSFORMER Elpro 7 RP L7 PROGRAMMING "P" BUTTON L1 L2 L3 L4 L5 L OFF ELECTRONIC TORQUE CONTROL 5 A line fuse 5 A line fuse COMMON COMMON PHOTOCELLS NC COMMON OPEN CLOSE STOP NC RADIO INDICATOR 24V max 3W 24 V OUTPUT max load: 2 Nos. photocells 1 No. Radio receiver ELECTRIC LOCK OR 12V AC RELAY FOR COURTESY LIGHT SINGLE-PHASE MOTOR (actuator and electric lock if required) SINGLE- PHASE MOTOR FLASHING LAMP 230V 25W max GB Drwg. No LEARNING TIMES BY REMOTE CONTROL - AUTOMATIC/SEMI-AUTOMATIC OPERATING MODES - STEP BY STEP MODE INTERMIDIATE STOP - PARTIAL PEDESTRIAN OPENING - DIP-SWITCH SETTING PIC. 10 Elpro 7 RP is an electronic control panel developed for Nupi 66. The main feature of this unit is the capability to learn the required working times during operation (gate delay in open and close cycles, dwell time). It is recommended to carry out the installation in strict compliance with the rules of good technique and fit the system with ground stops in the Open and Closed positions. Elpro 7RP is to be powered with 230 V single-phase voltage. It is manufactured in conformity to 93/68/EC Low Voltage Safety Norms and EMC 93/68//EC Norms for the Electro Magnetic Compatibility. Installation is to be carried out by qualified technicians in compliance with the existing safety regulations. The manufacturer is not liable for incorrect use of the equipment and reserves the right to do changes to the unit and this manual any time. 5
6 Elpro 7 RP DESCRIPTION OF FUNCTIONS OF THE CONTROL PANEL FOR SWINGING GATES ELECTRICAL CONNECTIONS: - The control panel must be installed in a sheltered, dry place, inside the box provided with it. - Fit the mains to the control panel with a 0.03A high performance circuit breaker. - Use 1.5mm 2 section wires for voltage supply, electric motor and flashing lamp. Maximum recommended distance 50m. - Use 1mm 2 section wires for limit switches, photocells, push-buttons/key-switch and accessories. - Bridge terminals 1 and 2 if no photocells are required. - Bridge terminals 3 and 6 if no key- or push-button switches are required. N.W.: To fit extra accessories such as lights, CCTV etc. use only solid state relays to prevent damages to the microprocessor WORKING LOGIC: Elpro 7 RP is supplied with pre-set working times so that to allow the first installation: - Working time is about 20 s - Gate Delay Times: - Opening=2 s - Closing=6 s - Dwell on automatic Mode=15 s Once satisfied that the system is working all right, new working times can be programmed to meet the user's needs or the installation requirements. Elpro 7RP functions can be set by Dip-switches, both before and after the times have been stored by the unit. LEARNING THE TIMES: ELPRO 7 RP learning operation is quite easy and can be achieved either by the P button on the PCB or by the remote control after entering setting mode, see point 1). Starting the unit to learn the required times: with the gate in closed position pulse the equipment to one complete cycle, ie. open-stop/dwell-close Important: 1) In order to avoid setting times which are not suitable with the correct gate functioning, some time limits were pre-set. Beyond these values the automation will start with the maximum pre-set time: and Motor Run time: max.55s Dwell time on Automatic Mode: maximum 90s 2) During the learning operation, no other functions can be activated, the Photocells and the Stop button are out of service 3) If the new setting operation is interrupted (for example: mains cut off), the times in the previous setting are memorized. 4) Normally, not on programming mode, the P button has the same function as a remote control button and it is possible to test the system by pulsing it; the Led 7 becomes a simple indicator, the same as the indicator to terminal 8. Led Status Indication: L1=230V 50Hz power supply. Alight L2=Photocells, if obstructed light goes off L3=Open. Alight whenever an Open pulse is given L4=Close. Alight whenever a Close pulse is given L5=Stop. It goes off on pulsing Stop L6=Radio. It goes on by pressing a transmitter button L7=Gate Status; and programming led Dip-Switch: 1= ON Photocells, Stop during opening 2= ON Radio no reversing during Opening 3= ON Automatic Closing 4= ON Pre-flashing in service 5= ON Radio step by step 6= ON No delay on opening 7= ON Additional pushing on the gate leaf after closing 8= ON Pedestrian opening by Open button DIP-SWITCH ON OFF 24V 3W Indicator: COMMON 3 8 Led On = the Gate is Open Led Off = the Gate is Closed Fast Flash = closing movement Slow Flash = opening movement Pedestrian Opening ( Motor by Open pulse): Partial opening for pedestrians is only allowed in closed gate position by pulsing to Open (the gate closes after the dwell time if set to Automatic Dip-Switch 3=ON) -the first pulse operates 1 gate leaf () -the second pulse operates the second gate leaf 8 ON: 1 gate leaf for pedestrian opening OFF: Standard operation IMPORTANT: The Elpro 7 RP control panel is supplied with open/close time memory. TORQUE CONTROL SETTING: Adjust torque from lower level (step 1) up to the required amount of power step by step to achieve a correct performance of the system so that the gates are operated as required and any injuring hazard is prevented. Please note, torque is to be adjusted by a technician ELECTRONIC TORQUE CONTROL _ LESS POWER MORE POWER + PIC. 11 TORQUE ADJUSTING WHEN LIGHT GATES ARE INVOLVED: (made of timbers, PVC or aluminium etc....) replace the existing capacitor with a 8 µf one and adjust torque accordingly starting from step one (lowest setting). 6
7 Elpro 7 RP DESCRIPTION OF FUNCTIONS OF THE CONTROL PANEL FOR SWINGING GATES Preliminary notes to Learning Mode: - Make sure that the gate is closed - Make sure that the gate stops in the respective open and closed gate positions are firmly fixed to the ground th Operation: A pulse stops motor (second gate wide open on open gate stop) 1 st Operation: Cut off power supply to Elpro 7 RP by removing the 2A 24V Low Voltage white Fuse, which is on the right upper side of the PCB 2 L7 2 2 nd Operation: Hold the button "P" pressed and re-power the PCB by inserting the 24V Low Voltage Fuse back into its holder. 3 3 rd Operation: When the Led L7 illuminates, release button "P": Led L7 will flash 5 times and the flashing lamp will illuminate: the program "learning working times" has been entered.! L7 IMPORTANT: at this stage two options are allowed to go on with setting ie. learning the required operating times: by the "P" button or by remote control. The last option allows the installation agent to have direct visual control of the operation being performed by the gates. L7 L7! 8 The time passing from 7th to 8th operation is stored by the system as "Dwell Time", in service on AUTOMATIC MODE (Dip No.3=ON) or out of service (Dip No.3=OFF, dwell time still in the system memory but not applicable ). 8 th Operation: A Pulse to close starts motor ( gate starts closing)! 9 The time between the 8 th and 9 th operations is stored by the system as "Gate Delay Time on Closing Cycle" 9 th Operation: A pulse to close starts motor ( gate starts closing) th Operation: A pulse to open starts motor (the first gate starts opening)! 5 The time passing from 4th to 5th operations is stored by the system as the Gate Delay Time in Open Cycle, with the options in service (Dip No.6 =ON) or out of service (Dip No. 6=OFF, the time is stored but no delay will occur). 10 th Operation: A pulse stops motor ( gate on closed gate position) In order to ensure that the gate is securely held in stop position, it is advised to pulse the actuator ie. gate to stop approx. 3-4 seconds after the gate has reached the end of the permitted stroke on the closed gate stop position th Operation: A pulse to open starts motor (second gate starts opening) 6 11 th Operation: A pulse stops motor ( gate on closed gate position) In order to ensure that the gate is securely held in stop position, it is advised to pulse the actuator ie. gate to stop approx. 3-4 seconds after the gate has reached the end of the permitted stroke on the closed gate stop position. 6 th Operation: A pulse stops motor (first gate wide open on open gate stop) The 11 th operation concludes the procedure for the control panel to learn the required working times. After the learning procedure it is possible to set the operating modes either ON/OFF as required by means the Dip-switches on the PCB Drwg. No
8 NUPI 66 TECHNICAL SPECIFICATIONS ,5 COVER OIL-HYDRAULIC ACTUATOR PIC STROKE 280 OIL-HYDRAULIC ACTUATOR Pump flow rate - P l /min. Working pressure...2 MPa (20 Bars) Working temperature C +80 C Shaft travelling time...21 sec. Power oil...fadini A15 by Agip Piston stroke mm Piston diametre...45 mm Shaft diametre...16 mm Pushing power open N Pulling power close N Weight of NUPI 66 complete...8 Kg Protection standards...ip 553 Overall dimensions (LxWxH) x86x86 mm ELECTRIC MOTOR Power output KW (0.25 HP) Supply voltage V Frequency...50 Hz Absorbed current A Absorbed power W Capacitor µf Motor rotation speed rpm Intermittent service...s 3 Flexible electric cable...cei FROR V Class...H Gate height and width (mm)...h 1 200, W Static weight per gate leaf...70/100 Kg SERVICE Duty cycle...19 sec. Opening - 30 sec. Stop - 21 sec. Closing Time of one complete cycle...70 s No. of complete cycles Opening - Stop - Closing...51/h No. of cycles a year, 8 hours service a day DECLARATION OF CONFORMITY GENERAL WARNINGS EN 12453, EN STANDARDS CEI EN STANDARDS WARRANTY CERTIFICATE ON THE CUSTOMER S REQUEST EUROPEAN MARK CERTIFYING CONFORMITY TO THE ESSENTIAL REQUIREMENTS OF THE STANDARDS 98/37/EC WARNINGS - Before installing the equipment carry out a Risk Analysis and fit any required device in compliance with EN and EN Safety Norms. - It is recommended to keep to the instructions here outlined - check the specifications on the motor sticker with your mains supply. - Dispose properly of the packaging: cardboard, nylon, polystyrene, through specialized companies. - Should the operator be removed, do not cut the electric cables. These must be properly removed from the terminal board in the junction box. - Switch off the mains switch before removing the junction box cover where the electric cables are terminated. - All the system must be earthed by using the yellow/green wire. - It is recommended to read the regulations, suggestions and remarks quoted in the booklet Safety norms. CHECKING AND MAINTENANCE: To achieve an optimum performance and longer life of the equipment and in observance of the safety regulations, it is recommended that inspections and proper maintenance are made by qualified technicians to the whole installation ie. both the mechanical and electronic parts, as well as wiring. - Mechanical parts: maintenance every 6 months approx. - Electronic apparatus and safety equipment: maintenance inspection monthly. The growth of MECCANICA FADINI has always been based on the development of guaranteed products thanks to our TOTAL QUALITY CONTROL system which ensures constant quality standards, updated knowledge of the European Standards and compliance with their requirements, in view of an ever increasing process of improvement. The CE mark certifies that the operator conforms to the essential requirements of the European Directive art. 10 EEC 73/23, in relation to the manufacturer s declaration for the supplied items, in compliance with the body of the regulations ISO 9000= UNI EN Automation in conformity to EN 12453, EN safety standard. s.n.c. Distributor s box AUTOMATIC GATE MANUFACTURERS The manufacturers reserve the right to change the products without any previous notice Via Mantova, 177/A Cerea (Verona) Italy - Tel r.a. - Fax info@fadini.net -
BAYT 980. Oil-hydraulic OIL-HYDRAULIC BARRIER FOR TRAFFIC CONTROL INSTALLATION MANUAL. code 4425 Post with fixing base. POLO 44 - optional -
 Oleodinamica BAYT 980 Oil-hydraulic OIL-HYDRAULIC BARRIER FOR TRAFFIC CONTROL POLO 44 - optional - BAYT 980 560 code 4425 Post with fixing base the gate opener Made in Italy INSTALLATION MANUAL GB INSTRUCTIONS
CHECKING AND MAINTENANCE:
 GB INSTALLATION MANUAL APROLI 480 OIL-HYDRAULIC OPERATOR FOR GARAGE DOORS SECTION VIEW OF THE OIL-HYDRAULIC OPERATOR WITH LAMP AND COVER UPPER SECTION SUPPORT LAMP REFLECTOR LIGHT DIFFUSION COVER 230 V-25
NYOTA 115. Electro-mechanical sliding gate operator. Instruction manual
 NYOTA 115 Electro-mechanical sliding gate operator Instruction manual GB INSTRUCTIONS FOR THE INSTALLATION OF THE AUTOMATION NYOTA 115 FOR A CORRECT INSTALLATION AND GOOD PERFORMANCE OF NYOTA 115 READ
Oil-hydraulic operator for swinging gates
 COMBI 740 Oil-hydraulic operator for swinging gates Below ground Version with two-way locking device Version with brake in open/close cycles Version with 110 and 175 shaft rotation Instruction manual GB
INSPECTIONS AND MAINTENANCE
 GB INSTRUCTIONS MANUAL STRABUC 930 ARMOURED OIL-HYDRAULIC RISING BOLLARD COMPONENTS strabuc 930 RELEASE KEY PROTECTION PLUG TO ACCESS RELEASE HOLE BOLLARD COVER 12V WARNING LIGHTS REFLECTORS RISING POST
TECHNICAL DATA HYDRAULIC UNIT
 GB INSTRUCTIONS MANUAL RISING BOLLARD OIL-HYDRAULIC AUTOMATION COMPONENTS strabuc 918 RELEASE KEY PLUG FOR RELEASE HOLE BOLLARD COVER 12 V WARNING LIGHTS REFLECTORS COMPLETELY RETRACTABLE POST WITH ELECTROPHORESIS
DRIVE 700 OVERALL DIMENSIONS
 GB INSTALLATION MANUAL DRIVE 700 INSTRUCTIONS TO INSTALL THE SYSTEM FOR A PERFECT APPLICATION AND PERFORMANCE OF DRIVE 700 SYSTEM IT IS RECOMMENDED TO KEEP TO THE INSTRUCTIONS AND THE DIAGRAMS IN THIS
GB INSTALLATION MANUAL
 GB INSTALLATION MANUAL MEC 800 SPECIAL OIL-HYDRAULIC OPERATOR FOR SWINGING GATES. EXTERNAL APPLICATION. ESSENTIAL COMPONENTS TO FIT THE OPERATOR TO A GATE LEAF FIXING BOLT FLEXIBLE TUBE 0.5 meter STRAIGHT
Instructions manual. Below ground oil-hydraulic operator for swinging gates. pages 17-32
 Below ground oil-hydraulic operator for swinging gates STANDARD VERSION: 110 or 17 Leaf Rotation Compact, internal drive unit and hydraulic jack Normal version or version with two-way Locking device Models
GB Instructions Manual
 GB Instructions Manual pages - 8 CMYK- 0 0 KYMC- 0 0 KYMC- 0 0 0 KYMC- 8 KYMC- 0 KYMC- 0 0 0 KYMC- 0 0 0 0 Underground oil-hydraulic operator for swinging gates or 7 shaft rotation Compact all-in-one oil-hydraulic
BAYT 980. Oil-hydraulic Road Traffic Barrier. BAYT 980 painted version BAYT 980 stainless steel version inox
 BAYT 980 Oil-hydraulic Road Traffic Barrier BAYT 980 painted version BAYT 980 stainless steel version inox GB Oil-hydraulic road traffic barrier BAYT 980 The Bayt 980 operator is a road barrier used to
1-24. Oil-hydraulic. Oil-hydraulic road barrier for traffic control from 3 to 8 metres
 GB Instructions manual pages 1-24 Oil-hydraulic Oil-hydraulic road barrier for traffic control from 3 to 8 metres Stainless steel and painted versions Version with aluminium fence Version with articulated
I - Libretto di istruzioni GB - Instructions manual F - Notices de montage
 I - Libretto di istruzioni GB - Instructions manual F - Notices de montage GB Instructions manual pages 1-20 BOLLARD WITH RETRACTABLE CYLINDRICAL POST OIL-HYDRAULICALLY OPERATED the gate opener made in
EC MACHINE DIRECTIVE COMPLIANCE DECLARATION
 770 EC MACHINE DIRECTIVE COMPLIANCE DECLARATION (DIRECTIVE 89/392 EEC, APPENDIX II, PART B) Manufacturer: FAAC S.p.A. Address: Via Benini, 1 40069 - Zola Predosa BOLOGNA - ITALY Hereby declares that: the
EC MACHINE DIRECTIVE COMPLIANCE DECLARATION
 EC MACHINE DIRECTIVE COMPLIANCE DECLARATION (DIRECTIVE 89/392 EEC, APPENDIX II, PART B) Manufacturer: FAAC S.p.A. Address: Via Benini, 1 40069 - Zola Predosa BOLOGNA - ITALY Hereby declares that: the 770
TITANO 400V SLIDING GATE OPENER
 TITANO 400V SLIDING GATE OPENER USE AND MAINTENANCE MANUAL V07 /2018 TECHNICAL FEATURES א א א א QK-T3000 QK-T4000 QK-T6000 (VAC) 400 Three Phase א א א א (W) 700 750 1500 א א א א (A) 1,7 2,2 3,7 א א C -30/+70
V200 USER MANUAL SWING GATE OPENER. 100kg 1.5m. 100kg 1.5m
 V200 USER MANUAL SWING GATE OPENER 100kg 1.m 100kg 1.m Content Important Safety Advice... Content of the Kit... Connection Diagram... Installation Guide... Actuator... Control box... AC cable wiring...
D Vers. 03 ELECTROMECHANICAL AUTOMATION FOR SWING GATES
 E5 D811007 15-09-99 Vers. 03 ELECTROMECHANICAL AUTOMATION FOR SWING GATES 122 This product complies with recognised technical standards and safety regulations. We declare that this product is in conformity
IRREVERSIBLE OPERATOR FOR SWING GATES AND DOORS
 VH IRREVERSIBLE OPERATOR FOR SWING GATES AND DOORS WARNING!! Before installing, thoroughly read this manual that is an integral part of the pack Our products if installed by qualified personnel capable
Automation Swing Gate Opener
 Automation Swing Gate Opener Operating and installation instructions SP EIFFEL 400 V1.0 Rev 08/01 CONTENTS 0) GENERAL SAFETY REGULATIONS...Page 0 1) DESCRIPTION...Page 03 ) TECHNICAL SPECIFICATIONS 3)
a p prove d ELECTROMECHANICAL SLIDING GATE OPENER
 EN 25 EN 25 ELETROMEHNIL SLIING GTE OPENER G The Junior gear box is built completely of die cast aluminium, and the coupling is supported by shielded roller bearings. ll of the internal operational components
BARRY BARRIER GATE AUTOMATION
 BARRY BARRIER GATE AUTOMATION Installation Manual 1. WARNINGS AND GENERAL SAFETY INSTUCTIONS This manual contains important safety information. An incorrect installation or an improper use may cause serious
DESIGNED FOR RESIDENTIAL APPLICATION KIT PL600/PL1000 SLIDING GATE OPENERS
 SLIDING GATE OPENER DESIGNED FOR RESIDENTIAL APPLICATION KIT PL600/PL1000 SLIDING GATE OPENERS The strongest solution for sliding gates PL600/PL1000 electro-mechanical sliding gate openers are designed
UNDERGROUND OPERATOR FOR SWINGING GATES. WARNING!! Before installing, thoroughly read this manual that is an integral part of the pack
 UNDERGROUND OPERATOR FOR SWINGING GATES COMPAS 2 WARNING!! Before installing, thoroughly read this manual that is an integral part of the pack Our products if installed by qualified personnel capable to
PW320/PW330 USER MANUAL SWING GATE OPENERS 24V DC GEAR MOTOR FOR RESIDENTIAL. Flashing Light. Push Button. Control box. Gate 2.
 PW320/PW330 USER MANUAL SWING GATE OPENERS 24V DC GEAR MOTOR FOR RESIDENTIAL Flashing Light Push Button Control box Gate 2 Gate 1 Declaration of Conformity Applicant: Powertech Electronics Inc. Manufacturer:
MEKO OPENER FOR RACK-DRIVEN SLIDING MOTOR
 Installation Manual MEKO OPENER FOR RACK-DRIVEN SLIDING MOTOR 02_2016 1. WARNINGS AND GENERAL SAFETY INSTUCTIONS This manual contains important safety information. An incorrect installation or an improper
HATO 120 / 200 SECTIONAL DOOR OPERATOR USER S MANUAL HATO 120/200 SECTIONAL DOOR OPERATOR USER S MANUAL
 HATO 120/200 SECTIONAL DOOR OPERATOR USER S 2 OUTLINE 1. Safety instructions...4 2. Description and features... 4 3. Technical specifications... 4 4. Check... 5 5. Installation and adjustment... 5 6. Programming...
Contents. EC DECLARATION OF CONFORMITY FOR MACHINES... p. 10. WARNINGS FOR THE INSTALLER... p. 10
 Contents EC DECLARATION OF CONFORMITY FOR MACHINES... p. 10 WARNINGS FOR THE INSTALLER... p. 10 1. DESCRIPTION AND TECHNICAL SPECIFICATIONS... p. 11 1.1. DIMENSIONS... p. 11 2. ELECTRIC DEVICES (standard
Installation manual. English. mystrike OPENER FOR RACK-DRIVEN SLIDING MOTOR
 Installation manual English mystrike OPENER FOR RACK-DRIVEN SLIDING MOTOR 1. WARNINGS AND GENERAL SAFETY INSTRUCTIONS This manual contains important safety information. An incorrect installation or an
AUTOMATION SYSTEM FOR SWING GATES FROG SERIES INSTALLATION MANUAL SUPERFROG
 AUTOMATION SYSTEM FOR SWING GATES FROG SERIES INSTALLATION MANUAL SUPERFROG IMPORTANT SAFETY INSTRUCTIONS FOR INSTALLATION CAUTION: IMPROPER INSTALLATION MAY CAUSE SERIOUS DAMAGE, FOLLOW ALL INSTALLATION
Installation manual ASTER AUTOMATION FOR SWING GATES 11_16
 Installation manual ASTER AUTOMATION FOR SWING GATES 11_16 Contents 1. GENERAL SAFETY PRECAUTIONS... page 01 2. INTENDED USE AND APPLICATION... page 01 2.1 Kit contents... page 01 2.2 Technical features...
FROG KIT. Installation Instructions for a Pair of gates... TECHNICAL HELPLINE THE FROG-P KIT CONSISTS OF:
 CAME UNITED KINGDOM LTD UNIT 3 ORCHARD PARK INDUSTRIAL ESTATE, TOWN STREET, SANDIACRE, NOTTINGHAM NG10 5BP TEL: 0115 921 0430 FAX: 0115 921 0431 TECHNICAL HELPLINE 0115 921 0430 INTERNET - www.cameuk.com
SARGON S - M - L. All rights reserved INSTALLATION MANUAL
 INSTALLATION MANUAL Our compliments for your excellent choice. SARGON LINE S (300mm) M (400mm) and L (600mm) electro-mechanical gear motor has been produced for reliability and high quality. This Manual
EC DECLARATION OF CONFORMITY FOR MACHINES (DIRECTIVE 98/37/EC) WARNINGS FOR THE INSTALLER
 WARNINGS FOR THE INSTALLER") EC DECLARATION OF CONFORMITY FOR MACHINES (DIRECTIVE 98/37/EC) Manufacturer: Address: Declares that: FAAC S.p.A. Via Benini, 1-40069 Zola Predosa BOLOGNA - ITALY 740-24V mod. operator is built to be integrated
EC DECLARATION OF CONFORMITY FOR MACHINES (DIRECTIVE 98/37/EC) Manufacturer: Address: Declares that: FAAC S.p.A. Via Benini, 1-40069 Zola Predosa BOLOGNA - ITALY 740-24V mod. operator is built to be integrated
FEATURES AND SPECIFICATIONS
 FEATURES AND SPECIFICATIONS The is a high quality hydraulic operator for residential and condominium use with leaf length up to 3 m. Available in the following versions: AC (with lock in opening and closing)
PW150/PW200 USER MANUAL SWING GATE OPENERS 24V DC GEAR MOTOR
 PW150/PW200 USER MANUAL SWING GATE OPENERS 24V DC GEAR MOTOR FOR RESIDENTIAL Flashing Light Push Button Control box Declaration of Conformity Applicant: Powertech Electronics Inc. Manufacturer: Timotion
SWING GATE OPENERS 24V DC GEAR MOTOR
 SWING GATE OPENERS 24V DC GEAR MOTOR FOR RESIDENTIAL USER MANUAL Flashing Light Push Button Control box Gate 2 Gate 1 Index Warnings 2 5. Technical Characteristics 21 1. Product Description and Applications
ARACHNE 230V 24V- 12V
 SWING GATES OPERATOR SERIE ARACHNE 12V-24V-220V INSTRUCTIONS MANUAL SAFETY Our compliments for your excellent choice. Your new electromechanical gear motor has been produced according to a high quality
Instruction Manual for the. E-SL 450 Series
 Instruction Manual for the E-SL 450 Series Estate Slide Summary of Functions The Estate Slide is only to be used for vehicular Slide gates in a Class I setting. Class I: A vehicular gate opener (or system)
EC DECLARATION OF CONFORMITY
 EC DECLARATION OF CONFORMITY Manufacturer : Address: Declares that: FAAC S.p.A. Via Benini, 1-40069 Zola Predosa BOLOGNA - ITALY 844 T control board, conforms to the essential safety requirements of the
INSTRUCTIONS FOR INSTALLATION
 HYDRAULIC OPERATOR MODO 110-110/L FOR SINGLE- OR DOUBLE-WING SWING GATES INSTRUCTIONS FOR INSTALLATION GENERAL WARNINGS These warnings constitute an integral and essential part of the product and must
Installation Manual. Swing Gate System. Leading the way...
 Installation Manual 402 Swing Gate System Leading the way... Contents EC DECLARATION OF CONFORMITY FOR MACHINES... p. 2 WARNINGS FOR THE INSTALLER... p. 2 1. DESCRIPTION AND TECHNICAL SPECIFICATIONS...
F ERNI K I T THE FERNI-S KIT CONSISTS OF:
 CAME UNITED KINGDOM LTD ORCHARD PARK INDUSTRIAL ESTATE TOWN STREET, SANDIACRE, NOTTINGHAM, NG10 5BP TEL: 0115 921 0430 FAX: 0115 921 0431 INTERNET - www.cameuk.com E-MAIL - enquiries@cameuk.com TECHNICAL
HÖRMANN DSA 100 DSA 100 L DSA 200 DSA 200L. page 1
 HÖRMNN Spindle drive operator for hinged gates DS 100 DS 100 L DS 200 DS 200L Installation Instructions page 1 1 Overview of spindle drive operator for hinged gates E F a e f C b c D d g Table 1: Drive
SWING GATE OPENERS 24V DC GEAR MOTOR
 SWING GATE OPENERS 24V DC GEAR MOTOR FOR RESIDENTIAL USER MANUAL Flashing Light Push Button Control box Gate 2 Gate 1 Index 1. Warnings 2 4. Technical Characteristics 16 2. Product Description 2.1 Applications
L /2012 rev 0 BISON 45 OTI UNIONE NAZIONALE COSTRUTTORI AUTOMATISMI PER CANCELLI, PORTE SERRANDE ED AFFINI
 L8542965 03/2012 rev 0 BISON 45 OTI UNIONE NAZIONALE COSTRUTTORI AUTOMATISMI PER CANCELLI, PORTE SERRANDE ED AFFINI 1 470 327 F A 500 825 B 243.5 2 C 445 210 15 ±5 205 92 50 2 3 4 I D2 D2 D1 5 T 6 D A
Installing the gate post bracket with the cardboard arm template
 ......... Installing the gate post bracket with the cardboard arm template... Installing gate posts brackets and arms for Push-to-Open or Pull-to-Open gates... Connection of Power Source 240Vac or Solar...
Typical Installation Schematic
 The 760 Gate Automation System The FAAC 760 automation system consists of a monoblock hydraulic unit and foundation box assembly. The system is designed for underground installation, and will not alter
Automatic concealed bollards 275 H600 and 275 H800 with pit
 Automatic concealed bollards 275 H600 and 275 H800 with pit Technical installation manual CE Declaration of conformity Warnings for the installer Bollard technical data Preparing and installing the bollard
Control panel installation manual for 230 V~ automation with one or two motors D5 S5 JT RF ON TC RP TR R1 OM J7. Electric lock. Flashing light.
 FUSE Ditec LOGIC M Control panel installation manual for 230 V~ automation with one or two motors IP1854EN LOGICM F2 FUSE JR4 JR10 SO D5 S5 JT NIO CT 1 2 3 4 5 RF ON AUX AUX F1 POWER SA IN 11 12 TM JR6
contents Installation Maintenance DOOR OPERATOR SLIDING-1300/2100 Installation and Operating Manual DoorHan, 2012
 DOOR OPERATOR contents general information SAFETY INSTRUCTIONS operator unit Installation Electrical Connections Programming of Remote Controls Release Operation Maintenance Troubleshooting Warranty Card
Installing the gate post bracket with the cardboard arm template
 ......... Installing the gate post bracket with the cardboard arm template... Installing gate posts brackets and arms for Push-to-Open or Pull-to-Open gates... Connection of Power Source 240Vac or Solar...
DKC400Y AC Sliding Gate Installation Manual. Sliding Gate Opener. Model: DKC400Y. Installation Manual WARNING
 Sliding Gate Opener Model: DKC400Y Installation Manual WARNING Read and thoroughly understand all instructions before installing or operating this automatic gate opener. Failure to do so may cause serious
kinggates collection
 kinggates collection En kinggates is a dynamic company that keeps up with ever-changing market demands. Supported by a network of partners in over 45 different countries, KINGgates is able to fully satisfy
SLIDE NEW CONTROL BOARD
 GB SLIDE NEW CONTROL BOARD CN1 CN2 3 4 5 FUSE 2 RL2 RL1 FUSE 1 TR2 TR1 TR3 TR4 U 1 JP1 Ld2 CMR 3 4 CN E Ld7 Ld6 Ld5Ld4Ld3 CN3 3 4 5 6 7 8 9 10 11 SW 12 13 14 Ld1 P2 P1 FUSE 1 FUSE 2 TR1 TR2 TR3 TR4 SW.1
E R A I GATE AUTOMATION DIVISION
 S E R A I GATE AUTOMATION DIVISION INSTALLATION MANUAL MC/5C - 03.5C UNDERGROUND MOTOR 230 Vac FOR WING GATES UP TO 3,00m AND 300 Kg EACH WING + FOUNDATION BOX IN HOT-GALVANISED STEEL Thank you for choosing
Owner s Manual. For SOLAR BOOM GATE. Model: CA-5000 SOLAR
 ECA Electronic Engineering Pty. LTD. Australia Tel: 03-95720 535 Fax: 95 720 536 Owner s Manual For SOLAR BOOM GATE Model: CA-5000 SOLAR ( 2009 / Version 1 ) 1 1 Introduction 1.0 Control PCB Wiring INSTALLATION
TEL: G&C Electronics CC E. T.
 TEL: +27 21 448 6774 G&C Electronics CC FAX: +27 21 447 7794 E. T. CK 89/31531/23 E-mail : etsystems@icon.co.za Internet: www.et.co.za 15 Nelson Road P.O. Box 34524 Observatory Groote Schuur Cape Town
BISON 20 OM BISON 25 OTI
 L8542939 11/2011 rev 0 BISON 20 OM BISON 25 OTI UNIONE NAZIONALE COSTRUTTORI AUTOMATISMI PER CANCELLI, PORTE SERRANDE ED AFFINI 2 x 1,5 GND 13 8 7 5 RG 58 4 3 4 x 0,35 6 1 2 4 3 x 1,5 min 230V 2 x 0,35
Istruzioni, instructions. Motoriduttore a braccio snodato per cancelli battenti Gear motor with articulated arm for swing gates ALPHEO
 Istruzioni, instructions Motoriduttore a braccio snodato per cancelli battenti Gear motor with articulated arm for swing gates ALPHEO 1 Istruzioni, instructions Attention! This manual is for qualified
Type of installation. external motor. underground motor. Leaf max length (m) Leaf max length (m) Max leaf weight (kg) V V V
 Leaf max length (m) Max leaf weight (kg) V V V") Type of installation external motor Residential 391 24V 390 230V 390 24V 412 230V 413 230V 415 415 24V S418 402 422 422 PED. S450H Condominium 415 L 415 L 24V 422 422 PED. 400 S450H Industrial 400 Leaf
Type of installation external motor Residential 391 24V 390 230V 390 24V 412 230V 413 230V 415 415 24V S418 402 422 422 PED. S450H Condominium 415 L 415 L 24V 422 422 PED. 400 S450H Industrial 400 Leaf
Assembly instructions Rev. 10/08 ENG
 Assembly instructions Rev. 10/08 ENG 8500 SF 24V belt driven garage door opener Kg Max traction: 70 kg max. 8 m 2 Power; 230 V / 50 Hz UK HELP-LINE: 0845 136 2012 Mo-Fri: 0900-1900 Sat: 0900-1700 Sun:1000-1600
12V DC MOTORISED OPENER FOR SWING GATES Section Table of Contents Page
 12V DC MOTORISED OPENER FOR SWING GATES Section Table of Contents Page 1 Introduction 2 2 Warnings 4 3 Technical Specifications 5 4 Positioning 6 5 Wiring Diagram 7 6 Standard Installation Kit 8 7 Installation
Table of Contents. General Safety Preparation for Installation Parts List Optional Accessories Part List... 5
 REV 12a Table of Contents General Safety....... 2 Preparation for Installation....... 3 Parts List....... 4 Optional Accessories Part List...... 5 Technical Specifications & Feature...... 5 Installation
L /2012 rev 0 BISON 30 OTI UNIONE NAZIONALE COSTRUTTORI AUTOMATISMI PER CANCELLI, PORTE SERRANDE ED AFFINI
 L8542968 07/2012 rev 0 BISON 30 OTI UNIONE NAZIONALE COSTRUTTORI AUTOMATISMI PER CANCELLI, PORTE SERRANDE ED AFFINI 1 458 250 A F 645 477 B 195 470 270 2 C 13 ±5 156 70 2 3 4 D2 R D2 I D1 T 5 W D H G R
Sectional And Tilting Door Opener
 Sectional And Tilting Door Opener Installation Instructions and User Guide FS 600 FS 1000 FS 1200 600N 1000N 1200N FS 600-Speed FS 1000-Speed 600N 1000N S/N WARNING Please read the manual carefully before
Automations for garage doors and rolling shutters
 Automations for garage doors and rolling shutters Technology Versatility Low consumption BLINKO Flashing LED Technological solutions for safe operation All V2 operators for garage doors allow: - Precise
Single or Double 240VAC motor control for domestic and industrial gates and doors.
 COBO30 Double 240V Motor Drive Controller Features For 240Volt Motors Auto Closing Open Only Security Closing and Extended Lock Pulse (user selectable) Travel Timer Push Button Input Photo Cell Input Option
Hunter Automatics HA-8. Installation Manual
 Hunter Automatics HA-8 Installation Manual WARNING TO REDUCE RISK OF INJURY 1. READ AND FOLLOW ALL INSTALLATION INSTRUCTIONS CAREFULLY. FAILURE TO DO SO MAY RESULT IN PERSONAL INJURY OR PROPERTY DAMAGE
Junior Junior V
 - Instructions Manual pag. 17-32 TESTED O K Junior 633 - Junior 650 230 V EN 13241 EN 12453 EN 12445 17 the gate opener Junior 633 - Junior 650 GENERAL WARNINGS FOR PEOPLE SAFETY INTRODUCTION This operator
PY600AC Sliding Gate Opener User Manual
 PY600AC Sliding Gate Opener User Manual 2017 Dear users, Thank you for choosing this product. Please read the manual carefully before assembling and using it. Please do not leave out the manual if you
Compact System NRGS 11-2 NRGS Original Installation Instructions English
 Compact System NRGS 11-2 NRGS 16-2 EN English Original Installation Instructions 810366-05 1 Contents Important Notes Page Usage for the intended purpose...4 Safety note...4 LV (Low Voltage) Directive
Corso Principi di Piemonte, 65/ RACCONIGI (CN) ITALY tel fax
 ITALY tel fax") V2 S.p.A. Corso Principi di Piemonte, 65/67 12035 RACCONIGI (CN) ITALY tel. +39 01 72 81 24 11 - fax +39 01 72 84 050 info@v2home.com - www.v2home.com IL n.131 EDIZ. 28/08/2012 Bingo I GB F E P D NL ATTUATORE
V2 S.p.A. Corso Principi di Piemonte, 65/67 12035 RACCONIGI (CN) ITALY tel. +39 01 72 81 24 11 - fax +39 01 72 84 050 info@v2home.com - www.v2home.com IL n.131 EDIZ. 28/08/2012 Bingo I GB F E P D NL ATTUATORE
Sliding Gate Operator User's Manual
 Sliding Gate Operator User's Manual SL600AC. Products introduction Please read the instructions carefully before proceeding. MCU is supplied to control the gate operator. Keypad / single button interface.
UNDERGROUND OPERATOR FOR SWING GATES 119AS45EN. Installation manual FROG-A / FROG-AV / FROG-AE. English
 119AS45EN UNDERGROUND OPERATOR FOR SWING GATES Installation manual FROG-A / FROG-AV / FROG-AE English EN WARNING! important safety instructions: READ CAREFULLY! NECESSARY AND IN A VISIBLE PLACE SPECIAL
Sliding Gate Operator User's Manual
 Sliding Gate Operator User's Manual PY800AC/PY00AC. Products introduction Please read the instructions carefully before proceeding. MCU is supplied to control the gate operator. Keypad / single button
SUBWING 700 USER S AND INSTALLER S MANUAL V1.0 REV. 04/2017
 SUBWING 700 USER S AND INSTALLER S MANUAL V1.0 REV. 04/2017 00. CONTT 01. SAFETY INSTRUCTIONS INDEX 01. SAFETY INSTRUCTIONS STANDARDS TO FOLLOW 02. OPERATOR CONNECTION SCHEME INSTALLATION MAP TECHNICAL
Ditec LUXO Swing gates automation (Original instruction)
") Ditec LUXO Swing gates automation (Original instruction) IP2128EN Technical manual www.ditecentrematic.com Index Subject Page 1. General safety precautions 21 2. Declaration of incorporation of partly
Ditec LUXO Swing gates automation (Original instruction) IP2128EN Technical manual www.ditecentrematic.com Index Subject Page 1. General safety precautions 21 2. Declaration of incorporation of partly
BULL 5M - BULL 5M.S BULL 8M - BULL 8 M.S BULL 8 OM - BULL 8 OM.S
 L8542676 04/2012 rev. 2 BULL 5M - BULL 5M.S BULL 8M - BULL 8 M.S BULL 8 OM - BULL 8 OM.S UNIONE NAZIONALE COSTRUTTORI AUTOMATISMI PER CANCELLI, PORTE SERRANDE ED AFFINI 1 140 260 100 91 330 330 210 326
EC DECLARATION OF CONFORMITY FOR MACHINES WARNINGS FOR THE INSTALLER
 EC DECLARATION OF CONFORMITY FOR MACHINES (DIRECTIVE 2006/42/EC) Manufacturer: Address: Declares that: FAAC S.p.A. Via Benini, 1-40069 Zola Predosa BOLOGNA - ITALY 740 / 741 mod. operator is built to be
IMPORTANT NOTICE FOR THE INSTALLER
 EC MACHINE DIRECTIVE COMPLIANCE DECLARATION (DIRECTIVE 89/392 EEC, APPENDIX II, PART B) Manufacturer: FAAC S.p.A. Address: Via Benini, 1 40069 - Zola Predosa BOLOGNA - ITALY Hereby declares that: the 6
Film-Tech. The information contained in this Adobe Acrobat pdf file is provided at your own risk and good judgment.
 Film-Tech The information contained in this Adobe Acrobat pdf file is provided at your own risk and good judgment. These manuals are designed to facilitate the exchange of information related to cinema
SKC400U SLIDING GATE OPENER OWNER S MANUAL
 SKC400U SLIDING GATE OPENER OWNER S MANUAL IMPORTANT SAFTEY INFORMATION Installing the SKC400U Gate Opener requires wiring of standard 110V electrical lines. This should only be performed by a trained
FORCE SPD 800/1500/2000
 English AUTOMATION SYSTEMS FOR SLIDING GATES Operating and installation instructions FORCE SPD 800/1500/2000 v1.0 Rev 11/2012 INDEX 1) General Safety Regulations... pág. 01 2) Description... pág. 02 3)
SWING GATE OPENER SW300 SERIES
 USER'S MANUAL SWING GATE OPENER SW300 SERIES 2.50m max. 250kg max. 2.50m max. 250kg max. Important Safety Advice: 1. Knowledge of the relevant electro-technical regulations is required. 2. Training in
DTS SECURITY P.O.BOX 3399 EDENVALE 1610 Base plate-mounting instructions TELEPHONE
 DTS ECO 500 SLIDING GATE MOTOR INSTALLATION MANUAL DTS SECURITY P.O.BOX 3399 EDENVALE 1610 Base plate-mounting instructions TELEPHONE 086 1000 387 Spartan +2711 392 5540 (H/O) Pretoria +2712 361 5528 Alberton
L /2013 rev 0 BISON 35 OTI UNIONE NAZIONALE COSTRUTTORI AUTOMATISMI PER CANCELLI, PORTE SERRANDE ED AFFINI
 L8543019 04/2013 rev 0 BISON 35 OTI UNIONE NAZIONALE COSTRUTTORI AUTOMATISMI PER CANCELLI, PORTE SERRANDE ED AFFINI 1 458 250 A F 645 477 B 195 470 270 2 C 13 ±5 156 70 2 3 4 D2 R D2 I D1 T 5 W D H G R
SLIDE & OL USER'S AND INSTALLER'S MANUAL V1.0 REV. 06/2017
 SLIDE & OL USER'S AND INSTALLER'S MANUAL V1.0 REV. 06/2017 00. CONTT 01. SAFETY INSTRUCTIONS INDEX 01. SAFETY INSTRUCTIONS STANDARDS TO FOLLOW 02. OPERATOR TECHNICAL SPECIFICATIONS DESCRIPTION DIMSIONS
Operating Instructions Type MPT 53
 Operating Instructions www.turnstiles.us Type MPT 53 Contents 1. Delivery... 2 2. Safety...3-4 3 Description and operation... 5 4. Technical Data 6 5. oundation...6-9 6. Assembly and installation...10-13
VIS IRREVERSIBLE ELECTROMECHANICAL MOTOR FOR SECTIONAL DOORS. Rev /2011 RT
 VIS GB IRREVERSIBLE ELECTROMECHANICAL MOTOR FOR SECTIONAL DOORS. Rev. 01-07/2011 RT TECHNICAL DATA LIFE home integration reserves the right to change the specifications at any time without notice, maintaining
INSTALLATION MANUAL (cod )
") is a bollard designed for the management of traffic areas, parkings and protection of public and private accesses. It has an hydraulic system is engineered in our factory to achieve minimum noise and maximum
is a bollard designed for the management of traffic areas, parkings and protection of public and private accesses. It has an hydraulic system is engineered in our factory to achieve minimum noise and maximum
contents OPERATOR Maintenance SHAFT-120 Installation and Operating Manual DoorHan, 2012
 OPERATOR contents General Information Safety instructions Operator unit operator Installation Electrical Connections adjustment of extreme positions operator programming Release operation Maintenance Trouble
OPERATOR SHAFT-120. Installation and Operating Manual CONTENTS GENERAL INFORMATION SAFETY INSTRUCTIONS OPERATOR UNIT OPERATOR INSTALLATION
 OPERATOR CONTENTS GENERAL INFORMATION SAFETY INSTRUCTIONS OPERATOR UNIT OPERATOR INSTALLATION ELECTRICAL CONNECTIONS ADJUSTMENT OF EXTREME POSITIONS OPERATOR PROGRAMMING RELEASE OPERATION MAINTENANCE TROUBLE
QUOTATION BLADE 7 LX. Product code GEAL6S2BAA
 1 of 10 Mattei rotary vane compressors are the result of 90 years of investments in research and development to improve performance and lessen the impact on the environment. Designed for industrial continuous
Swing Gate Kits AUTOMATIC GATE KITS & ACCESSORIES SECURING GATES SINCE Control Cards. Accessories 2017 / Gate & Door Controls Catalogue
 Sliding Gate Kits 3G Gate Opener Swing Gate Kits AUTOMATIC GATE KITS & ACCESSORIES SECURING GATES SINCE 1978 Control Cards Accessories 2017 / 2018 Gate & Door Controls Catalogue Gate and Door Technology
Datasheet PDCSY-MW-CHM. Technical Overview. Features. Product warranty and total quality commitment. General Information.
 Datasheet Compact Heat Meters Technical Overview Heat energy is calculated by using a matched pair of high accuracy sensors to measure the difference between the forward and flow temperatures. The amount
BULL 424 ESA BULL 624 ESA
 L8542677 01/2012 rev 1 BULL 424 ESA BULL 624 ESA UNIONE NAZIONALE COSTRUTTORI AUTOMATISMI PER CANCELLI, PORTE SERRANDE ED AFFINI 1 140 260 92 83 330 330 210 326 2 X BULL.P3 34 mm = = 3 3 4 P P D 102 mm
Compact Heat Meters. Features. -A Pulsed output. -B M-Bus output. Accessories. UK Sales Tel: International Tel:
 Compact Heat Meters Features Compact design Simple operation Pulsed output Measures heating or cooling Specification Product Codes Water Meter Temp. range 10 to 90 C Nominal pressure 16bar Installation
Automatic concealed bollards 275 H600 and 275 H800 Control station
 Automatic concealed bollards 275 H600 and 275 H800 Control station Technical installation manual CE Declaration Warnings for the installer Bollard electrical connection Technical specifications for control
EC DECLARATION OF CONFORMITY FOR MACHINES (DIRECTIVE 98/37/EC)
") EC DECLARATION OF CONFORMITY FOR MACHINES (DIRECTIVE 98/37/EC) Manufacturer: Address: Declares that: FAAC S.p.A. Via Benini, 1-40069 Zola Predosa BOLOGNA - ITALY The operator mod. 844 R Reversible is built
EC DECLARATION OF CONFORMITY FOR MACHINES (DIRECTIVE 98/37/EC) Manufacturer: Address: Declares that: FAAC S.p.A. Via Benini, 1-40069 Zola Predosa BOLOGNA - ITALY The operator mod. 844 R Reversible is built