Service manual Be-Ge 3000
|
|
|
- Marjory Nicholson
- 5 years ago
- Views:
Transcription
1 (11) 30-/31 series 34- series This service manual is a complement to your user manual and guidance for daily inspection and easier repairs, note that some technical knowledge will be necessary to carry out these repairs. Be extra carefully when you are working with repairs in the suspensions scissor system, this can cause injuries by incorrect handling, for more information see safety instruction at page 3.
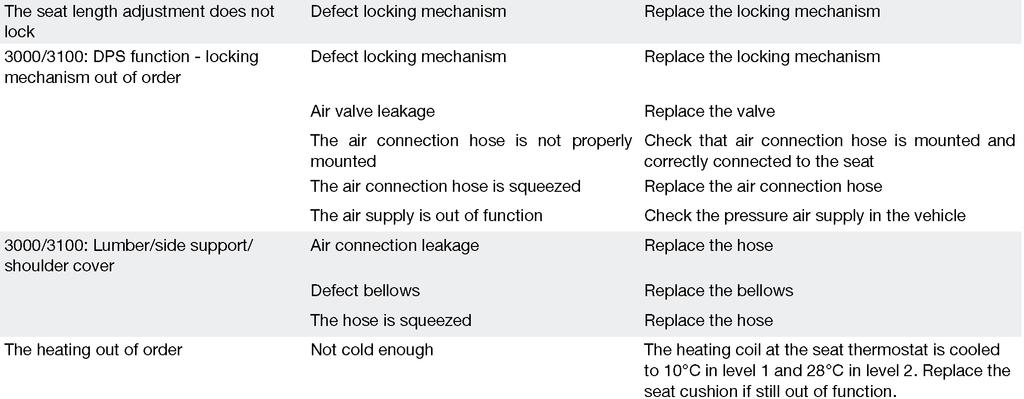
2 (11) Instruction Contents Page Safety instruction Read this 3 1. Inspection & service interval 1.1 Daily inspection hour service hour service 3. Control devices.1 Height adjustment 4. Length adjustment 4.3 Attachment 4.4 Backrest adjustment 4.5 Tilting function 4.6 Shock absorber 4.7 Connections 4 3. Service & repair instructions 3.1 Lubricate of slide rails 5 3. Dismount of seat cushion Dismount of side cover Replacement of slide rails Replacement of gas springs for tilt Replacement of shock absorber Replacement of air spring Replacement of controls Replacement of air valve in controls Replacemant of seat trim Replacemant of back trim 8 4. Assembly of accessories 4.1 Assembly of armrests 9 5. Technical data 5.1 Tolerances in scissor system 9 5. Moment table Trouble shooting 11


3 (11) Safety instruction Read this Be extra carefully when you are working with repairs in the suspensions scissor system, this can cause injuries by incorrect handling. When working in scissor system always secure the system by adjust the seat to it s highest position and place a robust object in one of the bottom frame rails in front of the scissors bearing to block the scissors, this to make the seat keep it s position in case of air drop out or failure in gas spring, see red dot in picture marked x. X 1.1 Daily inspection Make sure that no seat functions are blocked by foreign objects. Check that all belt components are undamaged. Replace the whole belt kit in case of: cut or frayed strap worn or damaged hardware including anchor points buckle or retractor (if fitted) malfunction loose strap stitchings If the seat does not retain in the adjusted height position, check that there is no leakage in the air system. 1. Every 15th hour: Check all seat functions with respect to satisfactory function of: Length adjustment, height adjustment, tilting adjustment, backrest adjustment, air valve and safety belt (see chapter, control devices). 1.3 Every 1000th hour: Check the sliding rail clearance; max. 1 mm lengthways and max. 1 mm sideways. Replace the sliding rails if these values are exceeded, see point 3.4. Lubricate the sliding rails, see point 3.1. Make sure that no oil leaks from the shock absorber. In such case, replace the absorber. Check the safety belt (see point 1.1). Check the floor attachment and that there are no loose bolts.
4 (11).1 Height adjustment Check the function of raising and lowering the seat. Also check that the seat remains in the height setting and that the suspension is satisfactory. If the raising and lowering functions do not work properly or if the suspension is not satisfactory, check that the inlet air is in function and does not leak. In case of defective function, contact a service technician.. Length adjustment Push the seat into its end positions and make sure that it runs freely. Lubricate the sliding rails regularly, e.g. with Texando 0 or similar. First clean with a lint free cloth. If the sliding rails have a clearance exceeding 1 mm lengthways or sideways, they shall be replaced. Check that the inlet air is in function and does not leak. In case of damage or leakage, contact a service technician..3 Attachment Make sure that no bolts are loose. Check the attachment of the seat against floor or frame..4 Backrest adjustment Check that the back rest controls are undamaged and not defect. In case of damage, replace the control device or contact a service technician..5 Tilting function Check that the tilting function works properly, i.e. the seat can be tilted forwards and backwards. Check that the inlet air is in function and does not leak. In case of damage or leakage contact a service technician..6 Shock absorber Check that the seat suspension is in function, i.e. that the suspension is harder when moving the console button upwards and softer when moving it downwards. In case of defective function, contact a service technician..7 Connections Check that no connections (air/electricity), hoses and cables are defect. In case of visual damage, contact a service technician.


5 (11) 3.1 Lubrication of slide rails Lubricate the sliding rails regularly, e.g. with Texando 0 or similar. First clean with a lint free cloth. If the sliding rails have a clearance exceeding 1 mm lengthways or sideways, they shall be replaced.. See point Dismount of seat cushion Losen vecro tape between the seat cushions back and the backrest, this is easiest done from behind. Adjust the seat cushion to it s front position. Locate the lock under the seat cushion on it s left side in driving direction, see the arrow, and push the lock up against the seat cushion. Pull the cushion one bit more to the front and lift it up. Note that it in the right position is easy to lift the cushion, if there is friction the seat plate will risk to be damaged. 3.3 Dismount side cover Dismount seat cushion as in point 3.. Dismount the release handle for the backrest adjustment by carefully remove the centre cap with for example a small screwdriver and pull out the handle. Dismount the torx screw at the covers backside. Dismount plastic rivet by removing the rivets centre locking (early version) or dismount the screws (later version), pcs at the covers upper side, and pcs under the cover. Remove the cover. Handles centre cap 3.4 Replacement of slide rails Detach the seat from floor or seat base. Dismount protection bellow by sliding the fastenings against the oblong holes openings. Secure the bottom frame by mounting 4 screws in the open holes as shown in the picture, otherwise the frame risk to separate. Dismount the release handle by stretch it together. Dismount the screws to the slide rails, 3 at each side. Reassemble the slide rails, release handle and protection bellow in reversed order.

6 (11) 3.5 Replacement of gas springs for tilt Dismount seat cushion as in point 3.. Adjust the seat to it s highest position and tilt the seat maximum backwards. Loosen the protection bellow as in point 3.4, so you can reach the lower fastening taps. Only change one gas spring at the time so the seat is keeping it s position. Dismount the upper locking tap by removing the locking washer. Release the wire from it s bracket or the air hose by pushing in the plastic ring at the connector. For later versions; loosen lower assembly screw and replace gas spring. For earlier wire released gas spring; remove the starloc washer at the lower fastening tap and replace gas spring. For earlier air controlled gas spring; thread the gas springs piston stem out of the release head and replace gas spring, when reassembling, thread in the piston stem until you feel friction, then tread out one half turn again. If the gas springs release head has to be replaced, please contact Be-Ge for replacing. Reassemble in reversed order. Upper lock tap Lower fastening tap Early versions Lower bracket Late versions 3.6 Replacement of shock absorber Dismount seat cushion as in point 3. For main shock absorber; loosen the wire cover from the bracket at the absorber by carefully bending up the notch until you can slide the wire out, then loosen the the wire end from the adjustment lever. For DPS absorber; dismount the air hose by pushing in the plastic ring at the connector and pull out the hose. When wire / air hose is removed, dismount the upper and lower fastening bolt and replace the absorber. Montering sker i omvänd ordning. Reassemble in reversed order. 3.7 Replacement of air spring Detach the seat from floor or seat base. Dismount seat cushion as in point 3.. If the seat is equipped with DPS function, disassemble the main shock absorber by dismounting the upper and lower fastening bolts and put the absorber aside to get some free space. Tilt the seat maximum backwards. Adjust the seat to it s highest position and place a robust object in one of the bottom frame rails in front of the scissors bearing to block the scissors, this to make the seat keep it s position when the air is released. Continuation on next page Air spring Air connector


7 (11) Continuation. 3.7 Replacement of air spring Release the air out of the spring by activating the quick evacuation, or for the Push-Pull system, press the button for lowering the seat. Check so the scissors are stable locked in it s position. Dismount the air hose by pushing in the plastic ring at the connector and pull out the hose, then screw out the connector of the air spring. Dismount the upper and lower fastening screw of the air spring and pull out the air spring in front of the transverse tube in the upper scissor. Reassemble in reversed order, note that it s required to apply blue Loctite 43 at the connectors treads before reassembling it. Air spring Air connector 3.8 Replacement of controls Dismount seat cushion as in point 3.. Dismount the side cover as in point 3.3. Dismount the two upper screws and angle the panel out, when the brackets upper part has passed the seat frame, press the down the panel so the lower attachments are released. Loosen the air hoses from the valves dismount the wires. Wire for mechanical tilting is dismounted by loosen the wire from the handle and pressing together the covers plastic lockers. Other wires are dismounted by loosen the wire from the handle and sliding the covers fastening against the oblong holes openings. 3.9 Replacement of valve in controls Dismount seat cushion as in point 3.. Dismount the side cover as in point 3.3. Dismount the controls as in point 3.8, loosen wires and air hoses is normally not required. Loosen the air hose to the valve that is to be replaced and disassemble by dismounting fastening screws. (Picture shows the panel from behind). Valve Fastening screw


. Fig 1 Fig Fig 3 3.")

8 (11) 3.10 Replacement of seat trim Dismount seat cushion as in point 3.. Drill rivets at the front handles cover and remove the cover. The trim is assembled by the sewed plastic ledge around the seat plates underside. Start in the back at the ledges ends, see arrow fig 1,to bend out the ledge from the groove. As the ledge is locked by barbs in the seat plates outside, see arrow fig 3, press the ledge inward to avoid destructing the barbs. When the whole ledge is released, pull the trim off the foam. The trim also has a sewed in ledge in the seams at the seat area, this has to be carefully pulled out off the plastic clips in the foam. Before you start reassembling the trim, check so the barbs have the correct shape, see arrow fig 3, otherwise adjust carefully with pliers or a screw driver. Reassemble in reversed order. After reassembling of trim, check so the barbs are locking the ledge. Rivet the handle cover with two new rivets 3,*6mm (art.no ). Fig 1 Fig Fig Replacement of back trim Dismount seat cushion as in point 3.. Dismount any armrests and d-loop for seat belt. For low back; Disassemble any headrest and headrest socket. Lean the backrest maximum forward and unzip the trim at the back. Separate the locking ledge at the trims underside, see black arrow. For backrest with shoulder support; Loosen the schoulder supports two elastic ribbons by dismounting the metal hooks in the back of the frame. Lean out the shoulder support manually and lift it up as soon as it has passed the ambient foam and trim. Loosen the metal thread from the plastic clips, see blue arrows. Pull up the metal thread from the holes in the backframe, note how the upper thread is locking the lower. Dismount the trim and pull out the ledges that is sewed into the seems from it s plastic clips in the foams front side. Reassemble in reversed order.

 5.")

9 4.1 Assembly of armrests The backrest is always prepared for assembling armrests with three holes and welded nuts at each side of the backrest. The lowest hole is placed about 50mm from the side covers upper edge. Locate the holes by feeling trough the trim. Armrests will be assembled by three screws that are screwed trough the trim, it simplifies to make some small holes in the trim with, for an example, small screwdriver to not loose the positions (11) 5.1 Tolerances in scissor system Tolerance Max play Instruction for measure Gas spring tilt 0,4mm Measure is to be taken between lower fastening for gas spring and transversal tube at the upper fastening. Scissor system vertically 0,4mm Measure is to be taken between transversal tube for upper bearing in the front and seat frames upper edge. Scissor system horizontal 0,3mm Measure is to be taken between upper fastening for gas spring and for tilting and seat frames inner edge.
")
10 (11)
")
11 (11)
Recommended Scheduled Maintenance
 (2) Illustrated seat Be-Ge 930 Recommended Scheduled Maintenance Daily Inspection: Inspections every,000 working hours: Inspect and perform, if necessary, the required maintenance according to service
Recommended Scheduled Maintenance
 005-08-9 () Illustrerad stol Be-Ge 900 Recommended Scheduled Maintenance Daily Inspection: Inspections every,000 working hours: Inspect and perform, if necessary, the required maintenance according to
Be-Ge 7130 C4 Basic Be-Ge 7130 C4 Airvent
 Establ. 934 Maintenance Manual Be-Ge 730 C4 Basic / Airvent 05059 Maintenance Underhållsmanual Manual Be-Ge 730 C4 Basic Be-Ge 730 C4 Airvent Recommended Skötsel maintenance och rekommendationer Inspection
Mustang Classic LightBar Instructions
 1994-2004 Mustang Classic LightBar Instructions Note: Read installation instructions before starting. Component List: 1 LightBar 4 Poly Plugs 4 LightBar Bolts 4 LightBar Washers 2 LightBar Rivets 2 Light
Side panel, replacing
 "VCC147307 EN 20110211" 1(23) Side panel, replacing As the illustrations in this service information are used for different model years and / or models, some variation may occur. However, the essential
Front seats. j a t CAUTION! Before beginning repairs on the electrical system: Obtain the anti-theft radio security code. Switch the ignition off.
 j a t Front seats 72-1 CAUTION! Before beginning repairs on the electrical system: Obtain the anti-theft radio security code. Switch the ignition off. Search Advanced Search Disconnect the battery Ground
CENTER BELT SYSTEM INSTALLATION INSTRUCTIONS CARCG121220
 CENTER BELT SYSTEM INSTALLATION INSTRUCTIONS 2013+ DODGE CHARGER Distributed by CARCG121220 Important Notice: Read all instructions before starting the installation of the seat. Before drilling or installing
Recommended Scheduled Maintenance
 2004-0-22 (4) Illustrated seat Be-Ge 86-52 incl Rotolift 3 Recommended Scheduled Maintenance Daily Inspection: Inspections every,000 working hours: Inspect and perform, if necessary, the required maintenance
How to remove and replace the Foonf/Fllo fabric
 How to remove and replace the Foonf/Fllo fabric Remove Headrest Locate the Troubleshooting Tool behind the manual on the back of the car seat, as shown in Figure 1. Raise Headrest to highest position by
1. General Description
 General Description 1. General Description A: COMPONENT (1) (2) (3) (4) (5) (6) (7) (8) (9) (10) (24) (23) (22) (21) (20) (19) (18) (17) (16) (15) (14) (13) (12) (11) AB-02007 (1) Curtain airbag module
Installation instruction do88 performance Intercooler for Volvo S60/V60 T6 MY10-
 Installation instruction do88 performance Intercooler for Volvo S60/V60 T6 MY10-1. This instruction shows how to replace the OEM intercoolers with do88 performance intercoolers. At this type of installation
1989 Jeep Cherokee. STEERING COLUMN' '1989 STEERING Jeep Steering Columns STEERING COLUMN STEERING Jeep Steering Columns
 STEERING COLUMN 1989 STEERING Jeep Steering Columns DESCRIPTION All models use collapsible steering columns. All columns have integral ignition switch and locking device. Optional tilt wheel is available
Slave Cylinder Weep Hole Drilling Procedure
 Slave Cylinder Weep Hole Drilling Procedure Tools Required: T20 Torx Driver T25 Torx Driver T25 Torx Bit with ¼ Ratchet Wrench 4mm Hex Key (Allen wrench) 5mm Hex Key 6mm Hex Key 8mm Hex Key 12mm Hex Key
Removing fixtures and fittings. Work description. Seats. BeGe. Seat assembly. Seat base, G and P cabs Remove the parts as follows:
 Seats BeGe Seat assembly 1. Tap down the lock tabs on the seat base and turn the pins 90 degrees, pull out the pins. 2. Remove the electrical connections to the seat base and backrest heaters. 1 3. Lift
2005+ Roll Bar (Mm5RB-20.1 to -20.6) Recommended Center punch 1/8" pilot drill 1-3/4" Hole saw 2" Hole saw
 Recommended Center punch 1/8 pilot drill 1-3/4 Hole saw 2 Hole saw") 3430 Sacramento Dr., Unit D San Luis Obispo, CA 93401 Telephone: 805/544-8748 Fax: 805/544-8645 www.maximummotorsports.com 2005+ Roll Bar (Mm5RB-20.1 to -20.6) Recommended Center punch 1/8" pilot drill
3430 Sacramento Dr., Unit D San Luis Obispo, CA 93401 Telephone: 805/544-8748 Fax: 805/544-8645 www.maximummotorsports.com 2005+ Roll Bar (Mm5RB-20.1 to -20.6) Recommended Center punch 1/8" pilot drill
Installation instruction do88 Intercooler for SAAB 9-3SS/SC 4-cyl Turbo
 Installation instruction do88 Intercooler for SAAB 9-3SS/SC 4-cyl Turbo This instruction shows how to replace the OEM intercooler with this performance intercooler. 1. 4. 5. At this type of installation
SERVICE MANUAL. Stander. Seat Assembly for Permobil Power Wheelchair
 SERVICE MANUAL US Stander Seat Assembly for Permobil Power Wheelchair How to contact Permobil Permobil Inc. USA 6961 Eastgate Blvd. Lebanon, TN 37090 USA Phone: 800-736-0925 Fax: 800-231-3256 Email: info@permobilusa.com
Service manual. English. F5 Corpus
 Service manual English F5 Corpus Introduction The Service Manual is intended for technical personnel who maintain and repair power wheelchairs. It is important that anyone who performs maintenance and
SERVICE MANUAL. Hollandia 300 Large
 SERVICE MANUAL Hollandia 300 Large 1 BEFORE BEGINNING THE SERVICE PROCEDURE 1. Determine which model of the Hollandia 300 Large is installed in the vehicle. 2. Diagnose the problem by using the Trouble
Edition Manual Chapter Page Workshop Manual, Stiga Park 5 Belts 11
 2008-05-19 Workshop Manual, Stiga Park 5 Belts 11 Pro 20 1. Dismantle the belts A and B as described above. 2. Block up the rear frame and remove the right rear wheel. Clean carefully the insex hole in
Rear seat. Rear seat, removing and installing. - Using screwdriver -2-, carefully lift headrest guides -3- out of rear backrest -1-.
 Page 1 of 19 72-57 Rear seat Rear seat, removing and installing - Using screwdriver -2-, carefully lift headrest guides -3- out of rear backrest -1-. - Detach rear seat -2- upward out of mounting -3-.
Front seats. Special tools and equipment. VAS 5094 airbag adapter. Connecting page 72-9.
 Page 1 of 23 72-1 Front seats Special tools and equipment VAS 5094 airbag adapter Connecting page 72-9. Page 2 of 23 72-2 Front seats, removing and installing WARNING! Before starting work on seats, connect
READ AND UNDERSTAND ALL INSTRUCTIONS AND WARNINGS PRIOR TO INSTALLATION OF SYSTEM AND OPERATION OF VEHICLE.
 #9378 Installation Instructions 3 Body Lift Kit 1998-2000 Ranger READ AND UNDERSTAND ALL INSTRUCTIONS AND WARNINGS PRIOR TO INSTALLATION OF SYSTEM AND OPERATION OF VEHICLE. SAFETY WARNING BDS Suspension
SafeGuard Flex Seat Maintenance Guide
 SafeGuard Flex Seat Maintenance Guide 1) Preparation For Removal And Replacement Of Seat Back Covers And Retractor Assemblies a) Unlatch seat cushion and pivot cushion up and forward. b) Separate seat
Trim (general) Lower A-pillar trim, removing and installing
 Lower A-pillar trim, removing and installing") Page 1 of 16 70-72 Trim (general) Lower A-pillar trim, removing and installing - To remove, remove A-pillar bolts 4 (2x). Tightening torque: 1.5 Nm (13 in. lb) - Remove door seal -2- in area of A-pillar
Page 1 of 16 70-72 Trim (general) Lower A-pillar trim, removing and installing - To remove, remove A-pillar bolts 4 (2x). Tightening torque: 1.5 Nm (13 in. lb) - Remove door seal -2- in area of A-pillar
M-5230-V6 Mustang V6 Dual Exhaust Kit INSTRUCTION SHEET
 Please contact the Techline for the most current instruction information (800) FORD788.!!! PLEASE READ THE FOLLOWING INSTRUCTIONS CAREFULLY PRIOR TO INSTALLATION!!! OVERVIEW: The use of a floor hoist is
ZE ZE ZE. Simplex expanding wedge brake Assembly and Maintenance Instructions
 Simplex expanding wedge brake Assembly and Maintenance Instructions Simplex expanding wedge brake Assembly and Maintenance Instructions Edition 1 This publication is not subject to any update service.
In area - A -, a proper seal must be made against the top of the window glass.
 Door window, adjusting Page 1 of 3 Audi > B3 > 1994-1998 Body Exterior, Interior 61 - Convertible top, checking and adjusting Door window, adjusting Sections C-C and D-D. Adjust door window so that window
Installation instruction do88 Intercooler for SAAB 9-3 1,9 TTiD
 Installation instruction do88 Intercooler for SAAB 9-3 1,9 TTiD This instruction shows how to replace the OEM intercooler with this performance intercooler. At this type of installation we always recommend
393: Multimedia system for the rear seat Multimedia system for the rear seat
 393: Multimedia system for the rear seat S80 (07-), 2008, B8444S, TF-80SC AWD, L.H.D, YV1AH852881073834, 073834 4/1/2013 PRINT 393: Multimedia system for the rear seat Multimedia system for the rear seat
Sisu S-Cam Drum Brakes
 Sisu S-Cam Drum Brakes (For hub reduction rear axles since 1992) Maintenance Manual Sisu Axles, Inc. Autotehtaantie 1 P.O. Box 189 FIN-13101 Hämeenlinna Finland Phone int + 358 204 55 2999 Fax int + 358
INSTRUCTIONS FOR USE Suitable for children weighing 15kg to 36kg
 2-in-1 BOOSTER CAR SEAT INSTRUCTIONS FOR USE Suitable for children weighing 15kg to 36kg Notice 1. This is a Universal child restraint. It is approved to the EU Regulation No. 44, 04 series of amendments,
57-1. Front door. Tools. Special tools and equipment. T Socket 3320/2 Bit insert for Socket T Assembly tool
 57-1 Front door Tools Special tools and equipment T 10011 Socket 3320/2 Bit insert for 3320 3410 Socket T 10034 Assembly tool 57-2 Front door, assembly overview Note: The instrument panel must be removed
M-5230-V6 Mustang V6 Dual Exhaust Kit INSTRUCTION SHEET
 Please visit www.fordracingparts.com for the most current instruction information.!!! PLEASE READ ALL OF THE FOLLOWING INSTRUCTIONS CAREFULLY PRIOR TO INSTALLATION. AT ANY TIME YOU DO NOT UNDERSTAND THE
Installation instruction do88 Intercooler for SAAB 9-3SS/SC 2,8 V6 Turbo
 Installation instruction do88 Intercooler for SAAB 9-3SS/SC 2,8 V6 Turbo This instruction shows how to replace the OEM intercooler with this performance intercooler. At this type of installation we always
INSTALLATION INSTRUCTIONS
 INSTALLATION INSTRUCTIONS REAR DISC BRAKE CONVERSION KIT A126-1 1973-87 CHEVROLET 1/2 TON 2WD Thank you for choosing STAINLESS STEEL BRAKES CORPORATION for your braking needs. Pleases take the time to
COLD AIR INTAKE INSTALLATION INSTRUCTIONS. # D Fits: F10 M5 # D Fits: F06/F12/F13 M6 PARTS LIST
 COLD AIR INTAKE INSTALLATION INSTRUCTIONS # D760-0035 Fits: 2013-15 F10 M5 # D760-0037 Fits: 2012-15 F06/F12/F13 M6 PARTS LIST (1) Left Carbon Airbox Lid (1) Right Carbon Airbox Lid (1) Left Carbon Snorkel
Roll Bar (MMRB-6.1 to -6.7)
") 3430 Sacramento Dr., Unit D San Luis Obispo, CA 93401 Telephone: 805/544-8748 Fax: 805/544-8645 www.maximummotorsports.com 1994-04 Roll Bar (MMRB-6.1 to -6.7) NOTE: These instructions cover Roll Bars with
3430 Sacramento Dr., Unit D San Luis Obispo, CA 93401 Telephone: 805/544-8748 Fax: 805/544-8645 www.maximummotorsports.com 1994-04 Roll Bar (MMRB-6.1 to -6.7) NOTE: These instructions cover Roll Bars with
Front Bucket Seat Upholstery
 Specter Off-Road, Inc. 21600 Nordhoff St. Chatsworth, CA 91311 USA www.sor.com, (818)882-1238, Fax: (818) 882-7144 sor@sor.com Luxury Seat Upholstery Installation Instructions Front Bucket Seat Upholstery
Subaru Front Mount Intercooler Kit STI Subaru Front Mount Intercooler Kit STI
 Subaru Front Mount Intercooler Kit STI 2008-2014 715500 Subaru Front Mount Intercooler Kit STI 2008-2014 Congratulations on your purchase of the Subaru Front Mount Intercooler Kit STI 2008-2014. The following
6th generation (2015+) Mustang Harness Mount Bar Installation Instructions
 Mustang Harness Mount Bar Installation Instructions") R-1180 6th generation (2015+) Mustang Harness Mount Bar Installation Instructions A. Install harness bar 1. Remove front seats. First remove the plastic bolt covers front and rear using a small flat head
R-1180 6th generation (2015+) Mustang Harness Mount Bar Installation Instructions A. Install harness bar 1. Remove front seats. First remove the plastic bolt covers front and rear using a small flat head
Drag Race Roll Bar (MMRB-6, -7)
") 3430 Sacramento Dr., Unit D San Luis Obispo, CA 93401 Telephone: 805/544-8748 Fax: 805/544-8645 www.maximummotorsports.com 1994-04 Drag Race Roll Bar (MMRB-6, -7) The Maximum Motorsports 6-point Drag Race
3430 Sacramento Dr., Unit D San Luis Obispo, CA 93401 Telephone: 805/544-8748 Fax: 805/544-8645 www.maximummotorsports.com 1994-04 Drag Race Roll Bar (MMRB-6, -7) The Maximum Motorsports 6-point Drag Race
Split Body Valves with Bellows Seal Series Globe Valves Series Angle Valves Series Way-Valves
 Installation, Operation, Maintenance Instructions Split Body Valves with Bellows Seal Series 025 300 Globe Valves Series 027 300 Angle Valves Series 028 300 3-Way-Valves 1 GENERAL INFORMATION These instructions
HiBoy Maverick/Commander Doors Part # HiBoy4 Maverick/Commander Doors Black
 Racing 3191 N Washington St. Suite 2 Chandler, AZ 85225 1 (800) 708-9803 http://www.racing.com HiBoy Maverick/Commander Doors Part # 07-2001 HiBoy4 Maverick/Commander Doors Black Congratulations on your
INSTALLATION INSTRUCTIONS
 INSTALLATION INSTRUCTIONS Accessory Application Publications No. SYSTEM S2000 AII 26324 Issue Date OCT 2004 PARTS LIST Headrest Speaker System P/N 08A54-S2A-100 3 Small wire ties 2 Headrest speakers 9
Seat belts. Safety precautions for handling pyrotechnic seat belt tensioners WARNING!
 Page 1 of 41 69-1 Seat belts Safety precautions for handling pyrotechnic seat belt tensioners WARNING! Testing, removing, installing and repair work must only be carried out by properly qualified personnel.
SEAT BELT SECTION SB CONTENTS RESTRAINTS SB-1 PRECAUTION... 2 ON-VEHICLE REPAIR... 3
 RESTRAINTS SECTION SB A SEAT BELT B C D CONTENTS E PRECAUTION... 2 PRECAUTIONS... 2 Precaution for Supplemental Restraint System (SRS) "AIR BAG" and "SEAT BELT PRE-TEN- SIONER"...2 Precaution for Seat
BMW E61 Hydraulic Pump replacement instructions
 BMW E61 Hydraulic Pump replacement instructions This DIY will guide you through the tasks needed to successfully replace your defective tailgate hydraulic pump Difficulty 3 of 10. The most difficult part
BRAKE SYSTEM Toyota Celica DESCRIPTION DRUM BRAKES ADJUSTMENTS BRAKE PEDAL HEIGHT ADJUSTMENTS BRAKE PEDAL FREE PLAY ADJUSTMENTS
 BRAKE SYSTEM 1988 Toyota Celica 1988-89 BRAKES Toyota Celica, Corolla, MR2, Tercel DESCRIPTION The hydraulic brake system uses a tandem master cylinder with a vacuum power assist servo. MR2 and some Celica
CHASSIS CONTENTS FRONT WHEEL 6-1 FRONT BRAKE 6-6 FRONT FORK 6-14 STEERING STEM 6-20 REAR WHEEL AND REAR BRAKE 6-25 SUSPENSION 6-31 REAR SWING ARM 6-36
 CHASSIS CONTENTS FRONT WHEEL 6-1 FRONT BRAKE 6-6 FRONT FORK 6-14 STEERING STEM 6-20 REAR WHEEL AND REAR BRAKE 6-25 SUSPENSION 6-31 REAR SWING ARM 6-36 6 6-1 CHASSIS FRONT WHEEL REMOVAL Support the machine
920 Remote Control Switches
 920 Remote Control Switches REMOTE CONTROL SWITCHES Service Bulletin This service bulletin for ASCO 920 Remote Control Switches explains how to replace the main s, operator coil, control s, and how to
Acura NSX Harness Bar Parts List and Installation Instructions
 Acura NSX Harness Bar Parts List and Installation Instructions DISCLAIMER Harness bars are not intended for roll over protection. This harness bar is intended to facilitate the installation of four-, five-
Twin Power. Manual. Pneumatic Multiturn actuator in Standard and ATEX design WARNING! WARNING! Mounting. Assembly example
 Top Quality Valve Actuators Made in Sweden Twin Power Manual Pneumatic Multiturn actuator in Standard and ATEX design Mounting The Twin Power actuator works beyond reproach in all positions. Valves with
SERVICE MANUAL. Permobil C400. Power wheelchair
 SERVICE MANUAL US Permobil C400 Power wheelchair How to contact Permobil Permobil Inc. USA 6961 Eastgate Blvd. Lebanon, TN 37090 USA Phone: 800-736-0925 Fax: 800-231-3256 Email: info@permobilusa.com Head
PRO RATCHET UNIVERSAL SHIFTER
 Installation Instructions PRO RATCHET UNIVERSAL SHIFTER Fits: GM, Ford and Chryslers w/automatic Transmission See Application Guide for Specific Vehicles Catalog # 80842 WORK SAFELY! For maximum safety,
2005+ Drag Race Roll Bar (Mm5RB-20)
") 3430 Sacramento Dr., Unit D San Luis Obispo, CA 93401 Telephone: 805/544-8748 Fax: 805/544-8645 www.maximummotorsports.com 2005+ Drag Race Roll Bar (Mm5RB-20) Note that the NHRA DOES allow the door bars
3430 Sacramento Dr., Unit D San Luis Obispo, CA 93401 Telephone: 805/544-8748 Fax: 805/544-8645 www.maximummotorsports.com 2005+ Drag Race Roll Bar (Mm5RB-20) Note that the NHRA DOES allow the door bars
GENUINE PARTS INSTALLATION INSTRUCTIONS
 GENUINE PARTS INSTALLATION INSTRUCTIONS 1. 2. 3. 4. DESCRIPTION: Accent light Kit APPLICATION: R42H (2011) PART NUMBER: 999F3 AW000 - Universal Accent Lighting Kit. KIT CONTENTS: Item QTY Description Service
Read and understand all instructions and warnings prior to installation of product and operation of vehicle.
 #F9378 Installation Instructions 1998-2000 Ford Ranger 3" Body Lift Kit Read and understand all instructions and warnings prior to installation of product and operation of vehicle. Zone Offroad Products
REMOVAL & INSTALLATION
 REMOVAL & INSTALLATION Removal 1. Center steering wheel. Disconnect negative battery cable. Remove steering coupling shield (if equipped). Disconnect steering shaft at flexible coupling or pot joint. Note
Repair Instructions BMW ALPINA B5 BMW ALPINA B6
 Dwg.-No. Page of 0 BMW ALPINA B5 BMW ALPINA B6 Expert automotive knowledge is required. These are based on the BMW 545i/550i/650i TIS. If Nm torque settings are not shown, please see the BMW 545i/550i/650i
RMK HANDLEBAR KIT P/N ; ; APPLICATION BEFORE YOU BEGIN KIT CONTENTS. Verify accessory fitment at Polaris.com.
 RMK HANDLEBAR KIT P/N 2883835; 2883836; 2883837 APPLICATION Verify accessory fitment at Polaris.com. BEFORE YOU BEGIN Read these instructions and check to be sure all parts and tools are accounted for.
RPM Rollbar Installation Instructions Ford Mustang 05-11
 RPM Rollbar Installation Instructions Ford Mustang 05-11 IMPORTANT READ BEFORE STARTING INSTALLATION Check for backing plate clearance between the undercarriage and fuel lines directly below area where
Torqueflite Manual/Automatic Valve Body
 TCI 122400 Torqueflite Manual/Automatic Valve Body This valve body can be installed in a few hours by carefully following directions. Read all instructions first to familiarize yourself with the parts
Audi A8 ( ) MMI swivelling unit repair manual
 MMI swivelling unit repair manual") Audi A8 (2003-2007) MMI swivelling unit repair manual Tools which you will need: two pcs screwdriver (any kind, for vent removing ) (you can cover the metal part with any tape to prevent making scratches
Audi A8 (2003-2007) MMI swivelling unit repair manual Tools which you will need: two pcs screwdriver (any kind, for vent removing ) (you can cover the metal part with any tape to prevent making scratches
Installation instructions, accessories RTI S80
 Installation instructions, accessories Instruction No 8685714 Version 1.0 5 Part. No. RTI S80 Volvo Car Corporation RTI S80-8685714 - V1.0 Page 1 / 25 Equipment A0000161 A0000162 A0801178 D8802049 Page
IE Audi 3.0T Crank Pulley Upgrade Install Guide IEBAVJ3
 IE Audi 3.0T Crank Pulley Upgrade Install Guide IEBAVJ3 Thank you for purchasing your IE 3.0T crankshaft pulley upgrade! This instruction guide is used for installation of IE s lower overdrive pulley for
LJ20 Distributor - Disassembly Inspection Repair
 LJ20 Distributor - Disassembly Inspection Repair Old Codger New To Old Suzuki Jeeps The odometer on this 1972 LJ20 indicated the distributor had less than 10,000 miles of wear but during that time it had
FORWARD-FACING USER MANUAL ECE R GROUP WEIGHT AGE kg 4-12 y
 FORWARD-FACING USER MANUAL ECE R44 04 GROUP WEIGHT AGE 2-3 15-36 kg 4-12 y 1 ! Thank you for choosing BeSafe izi Up BeSafe have developed this seat with great care to protect your child during the next
Lingenfelter Pontiac GTO High Flow Air Intake Installation Instructions
 Lingenfelter 2005-2006 Pontiac GTO High Flow Air Intake Installation Instructions L650060505 1557 Winchester Road Decatur, IN 46733 260-724-2552 260-724-8761 FAX www.lingenfelter.com Parts List # Part
GENUINE PARTS INSTALLATION INSTRUCTIONS
 GENUINE PARTS INSTALLATION INSTRUCTIONS 1. 2. 3. 4. DESCRIPTION: Accent light Kit APPLICATION: Infiniti JX (2013) PART NUMBER: 999F3 YY000 - Universal Accent Lighting Kit. KIT CONTENTS: Item QTY Description
»Product» Safety Warning
 #C9315 Installation Instructions 2000-2005 Suburban/Tahoe/Yukon 1500 2/4wd 3" Body Lift Read and understand all instructions and warnings prior to installation of product and operation of vehicle. Zone
EVAC Commercial Marine Equipment TOILET TECHNICAL DATA EVAC 90, STAINLESS STEEL, FLOOR MODEL, *SHOCK TESTED. Fresh water.
 16 Apr 2009 Doc. 1:141J TECHNICAL DATA 5327002 EVAC 90, STAINLESS STEEL, FLOOR MODEL, *SHOCK TESTED Fresh water connection Shut-off valve Strainer Vacuum breaker 390 Gasket Seat and cover Pneumatic push
INSTRUCTION BULLETIN
 INSTRUCTION BULLETIN No. 328288 Machine: M20/T20/M30/ S30 Published: 05-2011 Rev. 00 NOTE: DO NOT DISCARD the Parts List from the Instruction Bulletin. Place the Parts List in the appropriate place in
Disassembly. 1 Pull off the QUIK-LOK cable from the machine.
 Special Tools Require Important! Torx TX0 bit 0 0 Screwdriver Torx 0 0 0 Forcing Discs 0 Before beginning the maintenance work, perform an initial check with a high voltage test according to VDE (see chapter
Installation instructions, accessories - Rear Seat Entertainment
 XC90 Section Group Weight(Kg/Pounds) Year Month 3 39 2004 10 XC90 2003, XC90 2004, XC90 2005, XC90 2006, XC90 2007, XC90 2008 Replaces issue: 2003 12 J3904620 Page 1 of 18 Required tools A0000162 A0000163
Parts List See cover Page
 Thank you for purchasing the CorkSport Front Mount Intercooler Kit for the 2010-2013 Mazdaspeed 3. Keep your BAT s under check with the CorkSport FMIC Kit with the small or large intercooler. Please let
SERVICE MANUAL. Permobil C500. Power wheelchair
 SERVICE MANUAL US Permobil C500 Power wheelchair How to contact Permobil Permobil Inc. 300 Duke Drive Lebanon, TN 37090 PH: 800.736.0925 FAX: 800.231.3256 info@permobil.com Head Office of the Permobil
Manual for the Dragonfly tattoo machine rev.2
 Manual for the Dragonfly tattoo machine rev.2 1 Introduction We are proud to present the Dragonfly tattoo machine. Designed with the tattoo artist in focus and manufactured with the highest quality materials
EZ LITE CRUISER. Service & Maintenance Manual
 EZ LITE CRUISER Service & Maintenance Manual Table Of Contents Introduction to the EZ Lite Cruiser 3 Identification of Components 4 Controller System Component Diagram 6 Controller System I/O Ports Detail
DESCRIPTION & OPERATION
 SEATS - POWER 1998 ACCESSORIES & EQUIPMENT General Motors Corp. - Power Seats DESCRIPTION & OPERATION Power seats operate using toggle switches located on seat side. Seat adjusters are powered by a 12-volt,
INSTRUCTION MANUAL MAGNA RAIL
 R ENGLISH NR. 148293 00 INSTRUCTION MANUAL MAGNA RAIL 1999-05-01 List of contents Declaration of conformity, CE Delivery check Mounting instruction (rail, trolley units) Mounting instruction (exhaust pipe,
GENUINE PARTS INSTALLATION INSTRUCTIONS
 GENUINE PARTS INSTALLATION INSTRUCTIONS 1. 2. 3. 4. DESCRIPTION: Accent light Kit APPLICATION: Versa (2012) PART NUMBER: 999F3 AW008 - Universal Accent Lighting Kit. KIT CONTENTS: Item QTY Description
* * APPLICABLE MODELS: 2014 > Mazda 3
 PART NUMBER: 0000 8C L48 (DIO) / 0000 89 L84 (PIO) GENUINE ACCESSORIES INSTALLATION INSTRUCTIONS Rev. AAA *550-0700-000* APPLICABLE MODELS: 2014 > Mazda 3 REQUIRED COMPONENTS: ITEM QTY DESCRIPTION Usage
OWNER S MANUAL LIFETIME WARRANTY. Truxedo TonneauTraX
 OWNER S MANUAL Truxedo TonneauTraX Premium Soft Roll-Up cargo rail Tonneau Cover combination LIFETIME WARRANTY TruXedo warrants that all new, unused products are free from defects in material and workmanship.
FRP Ball Valves INSTALLATION & MAINTENANCE MANUAL
 FRP Ball Valves INSTALLATION & MAINTENANCE MANUAL FRP BALL VALVES TABLE OF CONTENTS MAINTENANCE AND INSTALLATION INSTRUCTIONS 1. 2. 2.1 2.2 2.3 2.4 GENERAL...Page 1 HANDLING...1 Receiving and Storing...1
Installation instruction do88 Performance Radiator for Volvo S60 V70 XC70 S
 Installation instruction do88 Performance Radiator for Volvo S60 V70 XC70 S80 00-09 1. This instruction shows how to replace the OEM radiator with do88 performance radiator. At this type of installation
Part Number: PT
 Preparation Part Number: PT374-02090 Kit Contents Item # Quantity Reqd. Description 1 1 Auto Dimming Mirror Assembly w/ shift area light 2 1 Hardware bag Hardware Bag Contents Item # Quantity Reqd. Description
AIRGO MISTING SYSTEM MAINTENANCE
 AIRGO MISTING SYSTEM MAINTENANCE WARNING: Disconnect the fan and misting pump from power before servicing. Service schedule Schedule Procedure 50 hours of operation Initial oil change 300 hours of operation,500
* * APPLICABLE MODELS: 2014 > Mazda 6
 PART NUMBER: 0000 8C H02(DIO) / 0000 89 H18(PIO) GENUINE ACCESSORIES INSTALLATION INSTRUCTIONS Rev. AAA *550-0694-000* APPLICABLE MODELS: 2014 > Mazda 6 REQUIRED COMPONENTS: ITEM QTY DESCRIPTION Usage
2. Front Seat FRONT SEAT
 SEATS 2. Front Seat A: REMOVAL 1) Disconnect the ground cable from battery. CAUTION: The airbag system is fitted with a backup power source. If the airbag system is serviced within 20 seconds after the
Quick Manual Inward Gliding Door
 Quick Manual Inward Gliding Door Index 1. System Description/Components... 3 1.1 Product diagram... 3 1.2 Overview Door Mechanism... 4 1.3 Components... 4 2. Fitting the door System... 5 2.1 Mounting the
SCION FR-S CENTER ARMREST Preparation
 Preparation Part Number: PT478 18130 Kit Contents Item # Quantity Reqd. Description 1 1 LH Bracket 2 1 RH Bracket 3 1 LH Extrusion 4 1 RH Extrusion 5 1 Slide Assembly 6 4 4.0mm PT (Torx) Screws 7 1 Armrest
GENUINE PARTS INSTALLATION INSTRUCTIONS
 GENUINE PARTS INSTALLATION INSTRUCTIONS 1. 2. 3. 4. DESCRIPTION: APPLICATION: PART NUMBER: KIT CONTENTS: Accent light Kit Versa Note 999F3 4Z000 - Accent Lighting Kit. 999Q9 AY000 - Accessory Service Connector
REARWARD-FACING USER MANUAL ECE R GROUP WEIGHT AGE 0+/ kg 6m-4y
 REARWARD-FACING USER MANUAL ECE R44 04 GROUP WEIGHT AGE 0+/1 0-18 kg 6m-4y 1 Thank you for choosing BeSafe izi Kid ISOfix. BeSafe has developed this seat with much care, to protect your child during the
Installation Manual TWM Performance Short Shifter Subaru Forester up to 2005
 - 1 - Installation Manual TWM Performance Short Shifter Subaru Forester up to 2005 Please Note: It is preferable to park on a flat surface, as you will have to engage and disengage the hand brake and shift
Wood Grain Warrior Line Incognito hidden winch bumper installation instructions Lexus GX470
 Wood Grain Warrior Line Incognito hidden winch bumper installation instructions 2003-2009 Lexus GX470 Version 1.0-2016 Thank you for purchasing the Southern Style OffRoad Wood Grain Warrior Line Lexus
TABLE OF CONTENTS CHAPTER 1: SAFETY PRECAUTIONS. 2.3 COMPONENTS in the Hardwars Kit COMPONENTS on the Product SETP SETP2...
 TABLE OF CONTENTS CHAPTER : SAFETY PRECAUTIONS. SAFETY PRECAUTIONS... CHAPTER 2: INSTRUCTIONS 2. DIMENSIONS... 2.2 LIST OF PARTS... 2.3 COMPONENTS in the Hardwars Kit.... 2.4 COMPONENTS on the Product...
SEAT COVER INSTALLATION MANUAL
 SEAT COVER INSTALLATION MANUAL for Bucket Seats Step 1 Headrest Removal Headrests need to be removed prior to installation of the seat cover. Most headrests remove by pressing the adjustment button located
INSTALLATION INSTRUCTIONS
 INSTALLATION INSTRUCTIONS REAR DISC CONVERSION KIT A126-2 1988-98 C1500 2WD 10" REAR DRUM Thank you for choosing STAINLESS STEEL BRAKES CORPORATION for your braking needs. Pleases take the time to read
Airbags, servicing. Airbag system, safety precautions WARNING!
 Page 1 of 75 69-40 Airbags, servicing Airbag system, safety precautions Checking, removing, installing and servicing may ONLY be performed by qualified personnel. Never perform tests using a test light