Suspension System RS66105
|
|
|
- Wilfred Booker
- 5 years ago
- Views:
Transcription
.")

1 89105 Rev D Requires the following for a complete installation: OE frame bracket removal Transmission Crossmember Kit (see below) and later models equipped with 3.6l V6 engine need exhaust modification kit RS720003, or replacement front driveshaft (driveshaft / exhaust clearance issue). Optional front coil spring spacer kit RS70082 (for vehicles equipped with front accessories) Optional Rancho transmission skid plate adapter Kit RS6204 for models Optional quick disconnect end link kit RS6756B optional for non-rubicon models Suspension System RS66105 Requires Transmission Crossmember Kit: RS Fits RS Fits 2012-Later Fits Present Jeep Wrangler (JK) Rev D
2 READ ALL INSTRUCTIONS THOROUGHLY FROM START TO FINISH BEFORE BEGINNING INSTALLATION IMPORTANT NOTES! WARNING: This suspension system will enhance the offroad performance of your vehicle. It will handle differently, both on and off-road, from a factory equipped passenger car or truck. Extreme care must be used to prevent loss of control or vehicle rollover during abrupt maneuvers. Failure to drive this vehicle safely may result in serious injury or death to the driver and passengers. ALWAYS WEAR your seat belts, REDUCE your speed, and AVOID sharp turns and other abrupt maneuvers. A. Before installing this system, have the vehicle's alignment and frame checked at a state approved facility. The alignment must be within factory specifications and the frame must be sound (no cracks, damage, or corrosion). B. Do not install a body lift kit with Rancho s suspension system or interchange parts from this system with components from another manufacturer. Use the following Rancho shock absorbers with this system: RS5000 / RS9000XL Front RS5331 RS RS7331 Rear RS5332 RS RS7330 C. Compare the contents of this system with the parts list in these instructions. If any parts are missing, including fasteners, contact the Rancho Technical Department at Each hardware kit in this system contains fasteners of high strength and specific size. Do not substitute a fastener of lesser strength or mix one hardware kit with another. D. Apply THREAD LOCKING COMPOUND to all bolts during installation. One drop on the exposed threads of each bolt before installing the nut is sufficient to provide an adequate bond. CAUTION: Thread locking compound may irritate sensitive skin. Read warning label on container before use. E. Install all nuts and bolts with a flat washer. When both SAE (small OD) and USS (large OD) washers are used in a fastener assembly, place the USS washer against the slotted hole and the SAE washer against the round hole. F. Unless otherwise specified, tighten all bolts to the standard torque specifications listed at the end of the note's section. USE A TORQUE WRENCH for accurate measurements. G. Rancho parts come with a protective coating. Do not powder coat, chrome, cadmium, or zinc plate any of the components in this system. If you wish to change the appearance of components enamel paint can be applied over the original coating. Actual color of components may differ from illustrations. H. If any component breaks or bends, contact your local Rancho dealer or Rancho for replacement parts. I. Some of the service procedures require the use of special tools designed for specific procedures. The following tools and supplies are recommended for proper installation of this kit. Jeep Service Manual Pitman Arm Puller C-4150-A Steering Linkage Puller C-3894-A Torque Wrench (250 FT-LB capacity) Hammer 1/2 Drive Ratchet and Sockets Combination Wrenches 3/8-16 Tap Reciprocating Saw Die Grinder Right Angle Drill Motor File Hydraulic Floor Jack Heavy Duty Jack stands Lithium Grease (synthetic) Black Enamel Paint Silicon Lubricant Wheel Chocks (Wooden Blocks) Safety Glasses--Wear safety glasses at all times J. It is extremely important to replace torsion bars, CV flanges, and front drive shaft/pinion relationships as original. Be sure to mark left/right, front/rear, and indexing of mating parts before disassembly. A paint marker or light colored nail polish is handy for this. K. Suspension components that use rubber or urethane bushings should be tightened with the vehicle at normal ride height. This will prevent premature failure of the bushing and maintain ride comfort. L. This suspension system was developed using the following tire and wheel combination: BFG Mud Terrain 35x12.50R18/D tire on an 18" x 9" wheel with 4.5 inches of backspacing. Trimming for the rear tires is required. Before installing any other combination, consult your local tire and wheel specialist. Actual tire size varies by manufacturer. Total backspacing is 5.9 inches. OE tires will not fit this system. 2
3 P. The RS66105 suspension system can only be installed on vehicles equipped with a Dana 44 rear axle in the JK factory configuration. Q. Important information for the end user is contained in the consumer/installer information pack. If you are installing this system for someone else, place the information pack on the driver s seat. Please include the installation instructions when you finish. R. During high articulation events, the front driveshaft may contact exhaust or transmission oil pan. A smaller diameter drive shaft is suggested for optimal performance. M. The required installation time for this system is approximately 8 hours. Check off the box ( ) at the beginning of each step when you finish it. Then when you stop during the installation, it will be easier to find where you need to continue from. N. When jack stands or a frame-contact type hoist is used, verify that the lifting pads are positioned properly to allow removal of the suspension arm frame brackets. If necessary provide additional support to keep the vehicle from tipping. O. Welding on a vehicle creates an electrical charge throughout the body and frame. Disconnect the vehicle s battery prior to any welding. Place welding ground clamps as near as possible to the weld. Never use a vehicle suspension component as a welding ground point. Rancho recommends Powertrain Industries drives shafts: Models: Front drive shaft 2dr / 4dr Part Number Rear drive shaft 4dr Part Number Rear drive shaft 2dr Part Number Newer Models Front drive shaft 2dr / 4dr Part Number: Rear drive shaft 2dr Part Number: Rear drive shaft 4dr Part Number: Powertrain Industries, Garden Grove, CA S. Thank you for purchasing the best suspension system available. For the best installed system, follow these instructions. If you do not have the tools or are unsure of your abilities, have this system installed by a certified technician. RANCHO IS NOT RESPONSIBLE FOR DAMAGE OR FAILURE RESULTING FROM AN IMPROPER INSTALLATION. STANDARD BOLT TORQUE SPECIFICATIONS INCH SYSTEM METRIC SYSTEM Bolt Size Grade 5 Grade 8 Bolt Size Class 9.8 Class 10.9 Class /16 15 FT-LB 20 FT-LB M6 5 FT-LB 9 FT-LB 12 FT-LB 3/8 30 FT-LB 35 FT-LB M8 18 FT-LB 23 FT-LB 27 FT-LB 7/16 45 FT-LB 60 FT-LB M10 32 FT-LB 45 FT-LB 50 FT-LB 1/2 65 FT-LB 90 FT-LB M12 55 FT-LB 75 FT-LB 90 FT-LB 9/16 95 FT-LB 130 FT-LB M14 85 FT-LB 120 FT-LB 145 FT-LB 5/8 135 FT-LB 175 FT-LB M FT-LB 165FT-LB 210 FT-LB 3/4 185 FT-LB 280 FT-LB M FT-LB 240FT-LB 290 FT-LB BOLT IDENTIFICATION 3


4 RS66105 BOX 1 OF 3 RS66105 BOX 2 OF 3 RS RS66105 BOX 3 OF 3 RS
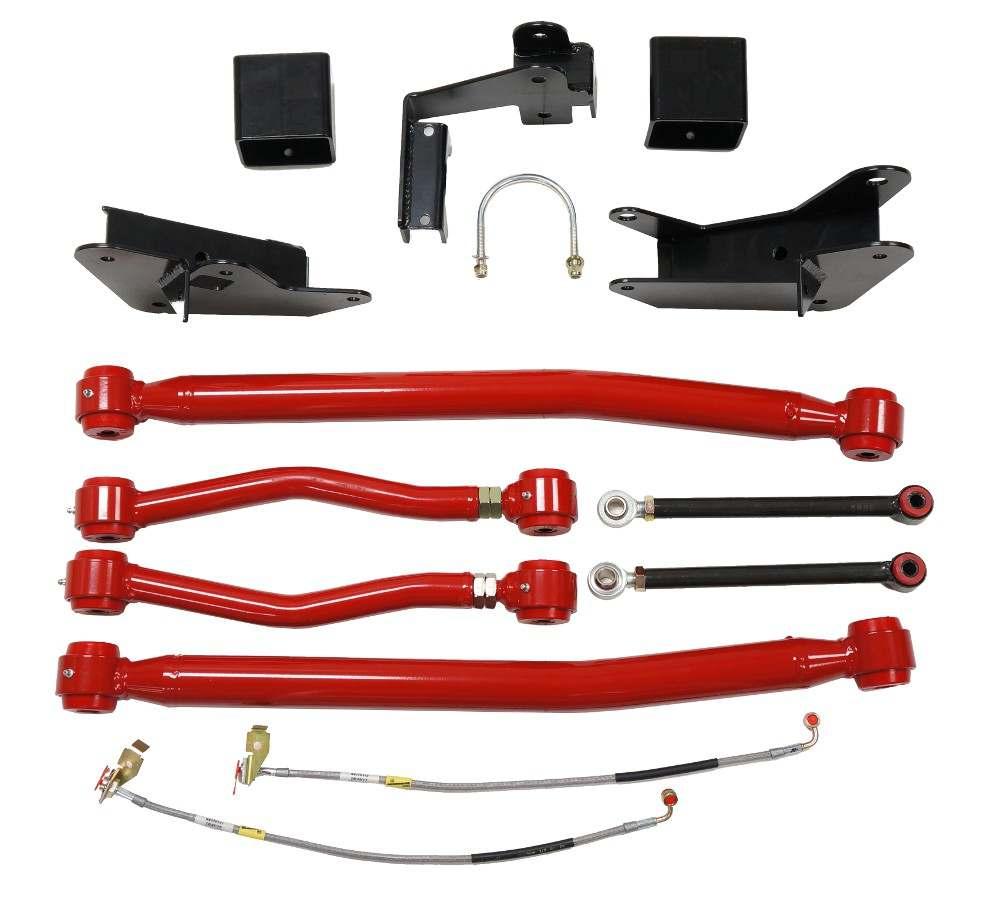
5 PARTS LIST P/N DESCRIPTION QTY Box 1 Of 3 1 RS Left Front Arm 1 RS Right Front Arm 1 RS Suspension Arm Hardware Kit 1 Washer, 9/16" Lock 1 HHCS, M X 90 1 HHCS, M X 10 4 Nut, M Top Lock 4 Washer, M14 8 RS Caster Link 2 RS Caster Link Hardware Kit 1 RS602618* Rod End* 2 Washer, M14 4 HHCS, M X 80 2 Jam Nut, 3/ Nut, M Top Lock 2 HHCS, M X 25 2 Nut, M Top Lock 2 Washer, M10 4 RS176650B Front Track Bar Axle Bracket 1 RS Front Track Bar Hardware Kit 1 RS Sleeve 1 P00932 Steering Stabilizer Hardware Kit 1 HHCS, M X 80 1 Washer, M14 2 Nut, M Top Lock 1 U-Bolt, 3/8-16X3.0 2 HHCS, 3/8-16 X Nut, 3/8-16 Nylock 6 Washer, 3/8 SAE 8 HHTS, 3/8-16 X HHCS, M X 65 1 Nut, M Top Lock 1 Washer, M12 2 U-Bolt/5/16-18 X Nut, 5/16-18 Nylock 4 Washer, 5/16 SAE 4 RS7789 Pitman Arm 1 RS170110* Brake Line, Front Left* 1 RS170113* Brake Line, Front Right* 1 RS Front Bumpstop 2 RS Front Bumpstop Hardware Kit 1 HHTS, 3/8-16 X RS176088B Front Sway Bar End Link 2 RS Front End Link Hardware Kit 1 RS448 Sleeve 4 RS545* End Link Bushing* 4 HHCS, M X 70 2 Nut, M Nylock 2 Washer, 1/2 SAE 2 Washer, 1/2 USS 4 RS89105 Instructions RS RS94180 Information Pack 1 RS860275* Articulation Bushing Kit* 1 RS Articulation Bushing 16 RS Sleeve, 2.5" 8 RS Articulation Bushing 8 RS Sleeve, 2.25" 4 RS Shim Kit 2 RS7852 Shim 12 Box 2 Of 3 1 RS170111* Brakeline Left Rear* 1 RS170112* Brakeline Right Rear* 1 RS Left Lower Rear Arm 1 RS Right Lower Rear Arm 1 RS Suspension Arm Hardware Kit 1 Washer, 9/16" Lock 1 HHCS, M X 90 1 HHCS, M X 10 4 Nut, M Top Lock 4 Washer, M14 8 RS Rear Upper Arm 2 RS Articulation Bushing Rod End 2 RS Rod End Hardware Kit 2 RS Jam Nut, 7/ RS176466B Left Rear Arm Bracket 1 RS176467B Right Rear Arm Bracket 1 RS Lower Arm Bracket Hardware Kit 1 RS Sleeve, 2.65" 1 RS Sleeve, 2.9" 1 HHCS, M X 25 2 Nut Top Lock 2 Washer, M10 4 HHCS, M X 10 2 Nut, M Top Lock 3 Washer, M12 3 HHCS, M X 30 1 Washer, 1/2 USS 2 RS Nut Bracket Kit 1 RS /2-13 X 5.5 Nut Bracket 1 RS /2-13 X 4.0 Nut Bracket 1 HHCS, 1/2-13 X Washer, 1/2 SAE 2 RS176655B Rear Track Bar Axle Bracket 1 RS Rear Track Bar Hardware Kit 1 RS481 Sleeve 1 U-Bolt 3/8-16 X Nut, 3/8-16 Nylock 2 Washer, 3/8 SAE 2 HHCS, M X 25 2 Nut, M Top Lock 2 Washer, M10 4 HHCS, M X 80 1 Nut, M Nylock 2 Washer, M14 3 RS176449B Rear Swaybar End Link 2 RS176478B Rear Bump Stop 2 RS Rear End Link Hardware Kit 1 RS602611* Spherical Rod End* 2 RS Jam Nut, 5/ RS545* End Link Bushing* 2 RS448 Sleeve 2 RS1755 Tube 2 HHCS, M X 25 4 Nut, M Top Lock 4 Washer, M10 8 BHCS, M X 70 2 Washer, M12 8 BHCS X 45 2 HHCS, M X 20 4 Washer, M8 8 Nut, M Nylock 4 Washer, 1/2 USS 2 Nut, M Top Lock 4 Box 3 Of 3 1 RS822* Front Coil Spring* 2 RS817* Rear Coil Spring* 2 Transmission Crossmember Kit RS Fits RS176460B Transmission Cross Member Transmission Crossmember Kit RS Fits 2012-Later RS176648B Transmission Cross Member 2012-Later 1 *Service Part may be purchased separately to replace worn components. Contact the Rancho Technical Department at for replacement. 5
 Remove the end link to axle bracket nut and bolt. Remove the ball stud nut at the sway bar. Remove the end link. Repeat for other side.")
6 OE Front Suspension FRONT SUSPENSION TRANSMISSION CROSS MEMBER REPLACEMENT 1) Park vehicle on a level surface. Set the parking brake and chock rear wheels. Disconnect the negative ground cable from the battery. 2) Remove the end link to axle bracket nut and bolt. Remove the ball stud nut at the sway bar. Remove the end link. Repeat for other side. 3) Remove the track bar to axle bracket nut and bolt. 4) Raise the front of the vehicle and support the frame with jack stands. See Important Note N on page 3. Remove the front wheels and set them aside. 5) Support the transmission with a jack. If equipped, remove the transmission and transfer case skid plates. See illustration 1. Illus. 1 6) Cut 2 1/4 inches off the front of the fuel tank skid plate. Refer to illustration 1. 6
 Attach transmission mount to cross member with the original nuts.")
 Carefully lower the front axle and remove the coil springs. Push down on axle if necessary.")
 Remove the driver side upper suspension arm from the frame and axle brackets. Remove the driver side lower suspension arm from the frame and axle brackets. See Illustration 3. Illus. 3 Illus.")
7 7) Remove nuts holding transmission mount to cross member. 8) Remove the cross member to frame bolts. Remove the cross member. 9) Insert new cross member RS176460B or RS176648B into frame brackets. Attach cross member to frame with the original hardware. See illustration 2. 10) Attach transmission mount to cross member with the original nuts. Attach fuel tank skid plate to cross member with the 10mm hardware from kit RS ) Attach transfer case skid plate with the original hardware. See illustration 2. Do not reinstall transmission skid plate. 7) Carefully lower the front axle and remove the coil springs. Push down on axle if necessary. CAUTION: Do not allow the front axle to hang by any hoses or cables. SUSPENSION ARM REPLACEMENT 1) Support the front axle with a jack. 2) Remove the driver side upper suspension arm from the frame and axle brackets. Remove the driver side lower suspension arm from the frame and axle brackets. See Illustration 3. Illus. 3 Illus. 2 SHOCK ABSORBER & COIL SPRING REMOVAL 3) Using a reciprocating saw and die grinder, cut off the lower suspension arm frame bracket even with the frame. See illustration 4. File or grind sharp edges and paint exposed metal. 1) Remove the nut from the drag link at the pitman arm. Separate the drag link ball stud from the pitman arm with a puller tool. Do not use a pickle fork. 2) Reference mark front driveshaft. Disconnect front driveshaft from front axle. 3) Support the front axle with a jack. Remove the shock absorber upper nut, retainer, and bushing. 4) Remove the shock absorber lower nut and bolt. Remove the front shock absorber. 5) Repeat steps 7 and 8 for the other side. DO NOT REUSE ORIGINAL SHOCK ABSORBERS. 6) If necessary, disconnect any vent hoses and electrical wiring from the axle. Separate the brake hoses from the frame rails and axle by removing the bracket bolts. Illus. 4 4) Lubricate two bushings and a sleeve from kit RS with synthetic lithium grease. Insert bushings and sleeve into the front and rear barrels of left suspension arm RS176446B. See illustration 5. 7
 Apply a film of grease to the outside of the installed bushings. Place a shim from kit RS860275 against each bushing.")


8 3) Attach caster link assembly to the axle with the original hardware and to the new suspension arm with the 14mm hardware from kit RS See illustration 7. Tighten nuts and bolts to 75 ft. lbs. Illus. 5 5) Apply a film of grease to the outside of the installed bushings. Place a shim from kit RS against each bushing. 6) Attach the front barrel assembly (of the left suspension arm) to the driver side axle bracket with the original hardware. Attach the rear barrel assembly to the transmission cross member with the hardware from kit RS See illustration 6. Tighten nuts and bolts to 130 ft. lbs. 7) Repeat steps 2 through 6 to install right suspension arm B on the passenger side. NOTE: To disconnect the upper suspension arm from the passenger side frame bracket, the mounting bolt may need to be cutoff or the exhaust removed. CASTER LINK INSTALLATION Illus. 6 Illus. 7 4) Center rod end and tighten jam nut. 5) Repeat steps 1 through 4 for the other side. BUMP STOP SPACER, COIL SPRING & SHOCK ABSORBER INSTALLATION 1) Drill a 5/16" hole through the center of the coil spring axle pad. For ease of installation, tap the hole (3/8-16). 2) Install original insulator on top of coil spring RS822B. Place bump stop spacer RS inside the coil spring. NOTE: If you have a winch mounted to the front bumper, add spring spacer RS70082 (purchased separately) to compensate for the additional weight. 3) Insert the spring assembly into the upper pocket and onto the axle pad. See illustration 8. Align pig tail with groove in axle pad. 4) Attach the bump stop spacer to the axle pad with the self-tapping screw from kit RS ) Repeat steps 2 through 4 for the other side. 6) Install retaining washer and bushing on NEW shock absorber, insert shock into upper mounting hole. Install bushing, washer and nut. Tighten nut to 17 ft. lbs. Repeat for other side. 1) Thread jam nut (from hardware kit RS860589) completely onto rod end RS ) Thread rod end into caster link RS176448B. Adjust rod end until the mounting holes are 20.4 inches apart (center to center). 8
 Raise front axle and attach shock lower mounts to axle brackets with the original hardware. Tighten nuts and bolts to manufacturer s specifications.")
 Remove the pitman arm from the steering gear with pitman arm puller C-4150-A.")
 To reposition the front wheels, turn the drag link adjustment sleeve six to eight turns in (shorten). Adjustment sleeve bolts must face forward.")
9 FRONT TRACK BAR AXLE BRACKET INSTALLATION RS822B 1) Insert track bar bracket RS176650B over the original track bar axle mount bracket. See illustration 10. Illus. 8 7) Raise front axle and attach shock lower mounts to axle brackets with the original hardware. Tighten nuts and bolts to manufacturer s specifications. 8) Reattach vent hose and electrical wiring if necessary. PITMAN ARM INSTALLATION 1) Center the steering wheel and mark the position of the original pitman arm. Remove the nut and washer from the steering gear shaft. 2) Remove the pitman arm from the steering gear with pitman arm puller C-4150-A. 3) Align and install new pitman arm 7789 on the steering gear shaft. Install the washer and nut. Tighten the nut to 185 ft. lbs. 4) Install the drag link ball stud to the pitman arm. Install the nut and tighten to 60 ft. lbs. 5) To reposition the front wheels, turn the drag link adjustment sleeve six to eight turns in (shorten). Adjustment sleeve bolts must face forward. See illustration 9. Illus. 10 2) Using the two existing holes, loosely attach the front edge of bracket RS176650B with the 3/8 hardware from kit RS ) Using the two U-Bolts, loosely attach the outside edge of bracket RS176650B with the hardware from kit RS ) Insert sleeve RS into the bracket at the original track bar location. Install the original hardware. 5) Attach track bar to bracket RS176650B with the 14mm hardware from kit RS Insert bolt from front and do not tighten until vehicle is at normal ride height. 6) Tighten OE bolt to 125 ft. lbs. Tighten the 3/8 bolts to 40 ft. lbs. and the two U-bolt nuts to 30 ft. lbs. If unable to insert track bar bolt, install when on ground at ride height. NOTE: Welding track bar bracket RS176650B to the axle bracket is recommended for extreme off-road use. Refer to Important Note N on page 3. Welding should be performed by a trained professional. Clean area of all paint/coating. Repaint cleaned area after welding. SWAY BAR END LINK INSTALLATION Illus. 9 1) Apply silicone lubricant and press the supplied bushings into the upper and lower end links (RS176461B and RS176462B) or end link (RS176088B). 9
 Attach end link assembly to sway bar and axle bracket with the supplied hardware. See illustration 11.")
 Attach left brake hose to the frame rail with the original bolt. Attach brake tube to hose. Tighten brake tube fitting to 18 ft. lbs. See illustration 12. Illus.")
10 2) Apply silicone lubricant and press a supplied sleeve into each bushing. 3) For RS6756B, install a rubber washer from kit RS on the lower end link. Connect upper and lower end links with the lynch pin from kit RS ) Attach end link assembly to sway bar and axle bracket with the supplied hardware. See illustration 11. Tighten nuts and bolts to 70 ft. lbs. 3) Remove the brake hose from the caliper. Discard copper washers. 4) Attach left brake hose RS to the caliper with the supplied banjo bolt and washers. 5) Attach left brake hose to the frame rail with the original bolt. Attach brake tube to hose. Tighten brake tube fitting to 18 ft. lbs. See illustration 12. Illus. 11 5) Repeat steps 1 through 4 for the other side. BRAKE HOSE REPLACEMENT NOTE: To keep the brake bleeding process to just the front brakes, do not allow the brake fluid to drain completely from the master cylinder reservoir. 1) Separate the driver side ABS line from the brake hose. 2) Separate the driver side brake hose form the brake tube and frame rail. Plug tube to prevent brake fluid leakage. Illus. 12 6) Adjust the length and attach ABS wire to new brake hose with tie wraps. 7) Repeat steps 1 through 6 to install right brake hose RS on the passenger side. 8) Bleed front brakes. 9) Install front wheels and lower vehicle to the ground. Tighten lug nuts to ft. lbs. 10) Tighten the Track bar nut and bolt to 125 ft. lbs. 10


11 Installed Front Suspension Front View Rear View 11

12 Rear Suspension REAR SUSPENSION SHOCK ABSORBER & COIL SPRING REMOVAL 1) Disconnect track bar from axle bracket. 2) Chock front wheels. Raise the rear of the vehicle and support the frame with jack stands. See Important Note N on page 3. Remove the rear wheels. 3) Fully support the rear axle and drive shaft with adjustable jack stands. Remove the sway bar end links. 4) Remove bolts and separate the brake hoses from the frame rails. If necessary, disconnect any vent hoses and electrical wiring from the axle. 5) Remove the bolts from the brake cable hanger above the rear axle. Remove the hanger from the cables. 6) Remove the shock absorber upper mounting bolts. Remove the lower nut and bolt from the axle bracket. Remove the shock absorber. 7) Carefully lower the rear axle until the coil springs are free from the upper mount seat. Remove the coil 12 springs. CAUTION: Do not allow the axle to hang by any hoses or cables. SUSPENSION ARM REMOVAL 1) Remove the lower suspension arm nut and bolt from the axle bracket. 2) Remove the flag nut at the frame rail bracket. See illustration 13. Remove the lower suspension arm.
 Insert right suspension arm bracket RS176467B between the frame and skid plate bracket. Push bracket against frame and body mount.")
 Drill two 1/2 holes into the frame, one 10mm hole through the body mount, and one 3/4 hole into the skid plate at the marked locations. See illustration 14.")

13 Illus. 13 3) Remove the upper suspension arm flag nut and bolt from the axle bracket. 4) Remove the flag nut and bolt at the frame rail bracket. Remove the upper suspension arm. 5) Repeat for other side. 4) Insert right suspension arm bracket RS176467B between the frame and skid plate bracket. Push bracket against frame and body mount. 5) Using bracket RS176476B as a template, mark the mounting hole locations on the frame and body mount. Mark the relief hole location on the skid plate for the suspension arm bolt. Remove bracket. 6) Drill two 1/2 holes into the frame, one 10mm hole through the body mount, and one 3/4 hole into the skid plate at the marked locations. See illustration 14. Do not drill completely through the frame or skid plate. 7) Attach right bracket RS176467B to the passenger side frame rail and body mount with the hardware from kits RS and RS See illustration 15. Use the longer nut bracket for the front hole and the shorter nut bracket for the rear hole. SUSPENSION ARM BRACKET INSTALLATION 1) Using a die grinder and reciprocating saw, cut off the passenger side frame bracket as shown in illustration 14. File sharp edges and paint exposed metal. CAUTION: The fuel tank is located next to the passenger side frame rail. Protect the tank by inserting a metal plate while cutting. Do not use a torch or plasma cutter. 2) Cut off the entire driver side frame bracket even with the bottom of the frame rail. NOTE: Additional bracket removal may be required on the inside of the frame for proper fitment of left bracket RS176466B. 3) Loosen all fuel tank skid plate bolts. Push skid plate inward. Remove the bolts from the skid plate bracket and body mount. See illustration 14. Illus Illus. 15 8) Reinstall bolts for body mount and skid plate. Tighten all nuts and bolts to specifications. 9) Place left suspension arm bracket RS176466B on the driver side frame rail. Push bracket against frame and body mount. 10) Using the bracket as a template, mark the mounting hole locations on the frame (front hole only) and body mount. Remove the bracket. 11) Drill a 10mm hole through the body mount and a 12mm hole through the inside and outside of the frame rail. Enlarge the inside hole to 18mm. 12) Attach left suspension arm bracket RS176466B to the driver side frame rail with the sleeves and hardware from kit RS See illustration 16. Insert the shorter crush sleeve in the front hole. Install the larger washers on the inside. Tighten nuts and bolts to specifications.
 Apply a film of grease to the outside of the installed bushings.")
 Attach lower suspension arm RS176680 to left bracket RS176466B with bend closest to front, and grease fitting facing upward, using the14mm hardware from kit RS860588. See illustration 17.")
 Lubricate bushings (RS520090) and shorter sleeves (RS420090) from kit RS860275 with synthetic lithium grease. Insert bushings and sleeves into upper suspension arm RS176649 and rod end RS176647.")
14 Jam Nuts FRONT Shims Illus. 16 SUSPENSION ARM INSTALLATION 1) Lubricate bushings (RS520080) and longer sleeves (RS420080) from kit RS with lithium grease. Insert bushings and sleeves into the barrels of lower rear suspension arms RS and RS See illustration 5. 2) Apply a film of grease to the outside of the installed bushings. Place a shim from kit RS against each bushing. 3) Attach lower suspension arm RS to left bracket RS176466B with bend closest to front, and grease fitting facing upward, using the14mm hardware from kit RS See illustration 17. 4) Attach lower suspension arm to axle bracket with the original hardware plus two greased shims. Grease fitting should face down. 5) Lubricate bushings (RS520090) and shorter sleeves (RS420090) from kit RS with synthetic lithium grease. Insert bushings and sleeves into upper suspension arm RS and rod end RS See illustration 5. 6) Install two jam nuts from kit RS on rod end RS Thread completely onto stud. Use red Loctite on threads. 7) Apply anti-seize compound and thread rod end fully into upper suspension arm RS ) Insert two greased shims and attach the adjustable end of the upper suspension arm assembly to the frame bracket with the original hardware. See illustration 17. 9) Attach the bushing end to the axle bracket with the original hardware plus two greased shims. Shims Illus ) Tighten the suspension arm bolts to 125 ft. lbs. Tighten jam nuts to 150 ft. lbs. 11) Repeat steps 1 through 9 for the driver side, using lower arm RS Bending the fuel tank skid plate bracket may be necessary to provide clearance. REAR TRACK BAR AXLE BRACKET INSTALLATION 1) Place track bar bracket RS176655B over the original rear axle bracket. The new bracket should fit on top over the original bracket. Illus. 18 2) Insert the sleeve RS from kit RS and attach track bar bracket RS176655B to the rear axle bracket with the M X 80mm hardware through bottom OE hole. See illustration
 Using a clamp to hold bracket RS176655B snug to axle bracket. Punch center mark for the two driller holes using bracket as template.")
 Insert OE track bar and reuse OE hardware in both ends, replace OE nut plate with lock nut on axle end. NOTE: Do not tighten the original track bar bolt until the vehicle is at normal ride height.")
15 3) Using the U-Bolt from hardware kit RS860713, attach the top of bracket RS176655B to the rear axle tube using 3/8 washer and Nylock nuts. At this time just snug down attached hardware. Do not torque down. 4) Using a clamp to hold bracket RS176655B snug to axle bracket. Punch center mark for the two driller holes using bracket as template. 5) Drill both holes with 10mm drill (3/8 drill), and apply the 2 supplied M X 25mm bolts from hardware kit RS Torque down all hardware at this time. 6) Insert OE track bar and reuse OE hardware in both ends, replace OE nut plate with lock nut on axle end. NOTE: Do not tighten the original track bar bolt until the vehicle is at normal ride height. If unable to insert track bar bolt, install when on ground at ride height. COIL SPRING & SHOCK ABSORBER INSTALLATION 1) Place the new coil springs (RS817B) onto the axle pads. Align upper pigtails towards the front of the vehicle. Raise the axle until the coil springs seat on the upper isolators. See illustration 19. NOTE: When installing coil springs, make sure that the rubber isolator is positioned in the upper mount and the small egg-shaped coil end is at the bottom. BUMP STOP BRACKET INSTALLATION 1) Using the original holes on the axle pad, attach bump stop bracket RS176478B to the axle with the 8mm hardware from kit RS See illustration 19. Tighten nuts and bolts to 23 ft. lbs. 2) Repeat for other side. SWAY BAR LINK INSTALLATION 1) Install jam nut from kit RS on spherical rod end RS Insert rod end into end link RS176449B. 2) Lubricate a bushing and sleeve from kit RS with silicone spray. Insert bushing then sleeve into end link assembly. 3) Attach end link assembly to axle bracket and sway bar with the 12mm hardware from kit RS See illustration 20. Insert the button head bolt from the outside. Use the longer bolt and large washer on the axle bracket. 4) Tighten jam nut. 5) Repeat steps 1 through 4 for the other side. RS817B RS176449B RS176478B Illus. 19 2) Attach new Rancho rear shocks to the upper mounting brackets with the original bolts. Tighten bolts to 23 FT-LBS. 3) Attach shocks to the axle brackets with the original hardware Tighten the shock absorber lower mounting bolts to 74 ft. lbs. 15 BRAKE HOSE REPLACEMENT Illus. 20 NOTE: To keep the brake bleeding process to just the rear brakes, do not allow the brake fluid to drain completely from the master cylinder reservoir.
 Attach left brake hose RS170111 to the caliper with the supplied banjo bolt and washers. Banjo fitting must direct brake hose forward and up. Refer to illustrations 20 & 21. Tighten bolt to 23 ft.")
 With the suspension at maximum extension (full droop), inspect and rotate all axles and drive shafts. Check for binding and proper slip yoke insertion.")
16 1) Separate the driver side brake hose form the brake tube and frame rail. Plug tube to prevent brake fluid leakage. 2) Remove the brake hose from the caliper. Discard copper washers. 3) Attach left brake hose RS to the caliper with the supplied banjo bolt and washers. Banjo fitting must direct brake hose forward and up. Refer to illustrations 20 & 21. Tighten bolt to 23 ft. lbs. 4) Attach left brake hose RS to the frame rail with the original bolt. Attach brake tube to hose. See illustration 21. Tighten brake tube fitting to 18 ft. lbs. RS ) With the suspension at maximum extension (full droop), inspect and rotate all axles and drive shafts. Check for binding and proper slip yoke insertion. The slip yoke should be inserted a minimum of one inch into the transfer case and/or transmission. 3) Ensure that the vehicle brake system operates correctly. If new brake hoses were installed, verify that each hose allows for full suspension movement. 4) Readjust headlamps. Have vehicle Aligned to manufacturer s specifications. ADJUSTMENT PREFERRED RANGE CASTER 5.0 ±1.0 CAMBER (FIXED ANGLE) ±0.63 TOE-IN (EACH WHEEL) 0.15 ±0.15 THRUST ANGLE 0 ±0.25 Please retain this publication for future reference. Important Note Q. See FRONT END LINK DISCONNECT PROCEDURE (FOR ROCK CRAWLING ONLY) 1) Remove lynch pins from front sway bar end links. Separate upper links from lower links. Reinstall pins in lower links. For increased clearance, remove the upper links from the sway bar. Illus. 21 5) Repeat steps 1 through 4 to install right brake hose RS on the passenger side. 6) Bleed rear brakes. 7) Install rear wheels and lower vehicle to the ground. Tighten lug nuts to FT-LBS. 8) Reconnect the battery ground cable. Caliper 2) Rotate sway bar and end link upward. Insert upper link RS176461B into fender well opening. See illustration 22. IMPORTANT NOTICE WARNING: DO NOT OPERATE THIS VEHICLE ON PUBLIC ROADS OR AT SPEEDS GREATER THAN 15 MPH WITH THE SWAY BAR END LINKS DISCONNECTED. FINAL CHECKS & ADJUSTMENTS 1) Turn the front wheels completely left then right. Verify adequate tire, wheel, brake hose and ABS wire clearance. Inspect steering and suspension for tightness and proper operation. 16 Illus. 22


17 Installed Rear Suspension Front view Rear View 17
Suspension System RS6507B (Rubicon models require end link kit RS6753B for a complete installation)
") 88507 Rev G Suspension System RS6507B (Rubicon models require end link kit RS6753B for a complete installation) Jeep Wrangler (JK) 88507 Rev G READ ALL INSTRUCTIONS THOROUGHLY FROM START TO FINISH BEFORE
88507 Rev G Suspension System RS6507B (Rubicon models require end link kit RS6753B for a complete installation) Jeep Wrangler (JK) 88507 Rev G READ ALL INSTRUCTIONS THOROUGHLY FROM START TO FINISH BEFORE
Suspension System RS66104 & RS66104B (4 Crawler System)
") 89104 Rev B Suspension System RS66104 & RS66104B (4 Crawler System) 2012 JEEP MODELS EQUIPED WITH 3.6L V6 ENGINE NEED EXHAUST MODIFICATION KIT RS720003. OR REPLACEMENT FRONT DRIVESHAFT (DRIVESHAFT / EXHAUST
89104 Rev B Suspension System RS66104 & RS66104B (4 Crawler System) 2012 JEEP MODELS EQUIPED WITH 3.6L V6 ENGINE NEED EXHAUST MODIFICATION KIT RS720003. OR REPLACEMENT FRONT DRIVESHAFT (DRIVESHAFT / EXHAUST
Suspension System RS6509B
 88509 Rev D Requires the following for a complete installation: Quick disconnect end link kit RS6756B or solid end link kit RS6753B (for the Rubicon) Rancho exhaust kit RS720001 or RS720002 (or equivalent)
Suspension System RS66102B
 890 Rev A Suspension System RS660B ( SPORT SYSTEM) 0 JEEP MODELS EQUIPED WITH 3.6L V6 ENGINE NEED EXHAUST MODIFYCATION KIT RS70003. OR REPLACEMENT FRONT DRIVESHAFT (DRIVESHAFT / EXHAUST CLERANCE ISSUE).
Suspension System RS6509B
 88509 Rev H Requires the following for a complete installation: Quick disconnect end link kit RS6756B or solid end link kit RS6753B (for the Rubicon) Rancho exhaust kit RS720001 or RS720002 (or equivalent)
Jeep Wrangler (JK) Present
 Present") Suspension System RS66110B (3 SPORT SYSTEM w/ Progressive Coil Springs Front & Rear) 2012 NEWER JEEP MODELS EQUIPPED WITH 3.6L V6 ENGINE NEED EXHAUST MODIFICATION KIT RS720003. OR REPLACEMENT FRONT DRIVESHAFT
Suspension System RS66110B (3 SPORT SYSTEM w/ Progressive Coil Springs Front & Rear) 2012 NEWER JEEP MODELS EQUIPPED WITH 3.6L V6 ENGINE NEED EXHAUST MODIFICATION KIT RS720003. OR REPLACEMENT FRONT DRIVESHAFT
Jeep Wrangler (JK) Present
 Present") 89107 Rev H Suspension System RS66107 / RS66107B (3 TRAIL SYSTEM) 2012 NEWER JEEP MODELS EQUIPPED WITH 3.6L V6 ENGINE NEED EXHAUST MODIFICATION KIT RS720003. OR REPLACEMENT FRONT DRIVESHAFT (DRIVESHAFT
89107 Rev H Suspension System RS66107 / RS66107B (3 TRAIL SYSTEM) 2012 NEWER JEEP MODELS EQUIPPED WITH 3.6L V6 ENGINE NEED EXHAUST MODIFICATION KIT RS720003. OR REPLACEMENT FRONT DRIVESHAFT (DRIVESHAFT
Suspension System RS66107 / RS66107B
 89107 Rev D Suspension System RS66107 / RS66107B (3 TRAIL SYSTEM) 2012 JEEP MODELS EQUIPPED WITH 3.6L V6 ENGINE NEED EXHAUST MODIFICATION KIT RS720003. OR REPLACEMENT FRONT DRIVESHAFT (DRIVESHAFT / EXHAUST
Jeep Wrangler (JK)
") 89109 Rev B Suspension Systems RS66109BR5 and RS66109BR9 2007 2013 Jeep Wrangler 4 Door Sport and Rubicon Models (2 SPORT SYSTEM) Jeep Wrangler (JK) 2007-2013 89109 Rev B READ ALL INSTRUCTIONS THOROUGHLY
89109 Rev B Suspension Systems RS66109BR5 and RS66109BR9 2007 2013 Jeep Wrangler 4 Door Sport and Rubicon Models (2 SPORT SYSTEM) Jeep Wrangler (JK) 2007-2013 89109 Rev B READ ALL INSTRUCTIONS THOROUGHLY
Suspension Upgrade System RS66152 (Upper Adjustable Control Arms)
") 89152 Rev B Suspension Upgrade System RS66152 (Upper Adjustable Control Arms) Fits 1997-2006 Jeep Wrangler (TJ / LJ). 89152 Rev B READ ALL INSTRUCTIONS THOROUGHLY FROM START TO FINISH BEFORE BEGINNING
89152 Rev B Suspension Upgrade System RS66152 (Upper Adjustable Control Arms) Fits 1997-2006 Jeep Wrangler (TJ / LJ). 89152 Rev B READ ALL INSTRUCTIONS THOROUGHLY FROM START TO FINISH BEFORE BEGINNING
INSTALLATION INSTRUCTION 88578
 INSTALLATION INSTRUCTION 88578 For Rancho Suspension System RS6579B: 4WD Dodge 1500 & 2500 READ ALL INSTRUCTIONS THOROUGHLY FROM START TO FINISH BEFORE BEGINNING INSTALLATION Rev E IMPORTANT NOTES! WARNING:
Suspension System RS6582B
 Suspension System RS6582B Tahoe/Yukon READ ALL INSTRUCTIONS THOROUGHLY FROM START TO FINISH BEFORE BEGINNING INSTALLATION IMPORTANT NOTES! WARNING: This suspension system will enhance the off-road performance
INSTALLATION INSTRUCTION Rev A
 INSTALLATION INSTRUCTION 88587 Rev A FOR RANCHO SUSPENSION SYSTEM RS6587B: 2009 DODGE RAM 1500 READ ALL INSTRUCTIONS THOROUGHLY FROM START TO FINISH BEFORE BEGINNING INSTALLATION IMPORTANT NOTES! WARNING:
INSTALLATION INSTRUCTION 88094
 INSTALLATION INSTRUCTION 88094 FOR RANCHO SUSPENSION SYSTEM RS6594B 4WD & 2WD NISSAN TITAN READ ALL INSTRUCTIONS THOROUGHLY FROM START TO FINISH BEFORE BEGINNING INSTALLATION Rev D IMPORTANT NOTES! WARNING:
INSTALLATION INSTRUCTIONS 88029
 INSTALLATION INSTRUCTIONS 88029 FOR SUSPENSION SYSTEMS RS6503: JEEP WRANGLER (TJ) READ ALL INSTRUCTIONS THOROUGHLY FROM START TO FINISH BEFORE BEGINNING INSTALLATION REV F IMPORTANT NOTES! WARNING: This
INSTALLATION INSTRUCTION 88581
 INSTALLATION INSTRUCTION 88581 FOR RANCHO SUSPENSION SYSTEM RS6581B: DODGE RAM READ ALL INSTRUCTIONS THOROUGHLY FROM START TO FINISH BEFORE BEGINNING INSTALLATION Rev C IMPORTANT NOTES! WARNING: This suspension
INSTALLATION INSTRUCTION 88088
 INSTALLATION INSTRUCTION 88088 For Rancho Suspension Systems RS6588 & RS6589: FORD F-150 READ ALL INSTRUCTIONS THOROUGHLY FROM START TO FINISH BEFORE BEGINNING INSTALLATION Rev B IMPORTANT NOTES! WARNING:
INSTALLATION INSTRUCTIONS 88518
 INSTALLATION INSTRUCTIONS 88518 For Rancho Suspension Systems RS6518: 2009 FORD F-150 4WD READ ALL INSTRUCTIONS THOROUGHLY FROM START TO FINISH BEFORE BEGINNING INSTALLATION Rev A IMPORTANT NOTES! WARNING:
INSTALLATION INSTRUCTION 89400
 INSTALLATION INSTRUCTION 89400 FOR RANCHO SUSPENSION SYSTEM RS66400B: 2012 RAM 1500 4WD. READ ALL INSTRUCTIONS THOROUGHLY FROM START TO FINISH BEFORE BEGINNING INSTALLATION Rev B IMPORTANT NOTES! WARNING:
INSTALLATION INSTRUCTION 89450
 INSTALLATION INSTRUCTION 89450 Rancho Suspension System RS66450R7: Fits 2003 2013 4WD Dodge Ram 2500 / 3500 DIESEL MODELS ONLY. READ ALL INSTRUCTIONS THOROUGHLY FROM START TO FINISH BEFORE BEGINNING INSTALLATION
INSTALLATION INSTRUCTION 88148
 INSTALLATION INSTRUCTION 88148 Rev C For Rancho Suspension Systems RS6548, RS6549 & RS6550: GM 2500HD, 2500, and 1500HD Trucks READ ALL INSTRUCTIONS THOROUGHLY FROM START TO FINISH BEFORE BEGINNING INSTALLATION
INSTALLATION INSTRUCTION 88146
 INSTALLATION INSTRUCTION 88146 Rev H FOR RANCHO SUSPENSION SYSTEM RS6547: 4WD SUBURBAN/YUKON XL, 4WD TAHOE/YUKON, & 4WD AVALANCHE READ ALL INSTRUCTIONS THOROUGHLY FROM START TO FINISH BEFORE BEGINNING
INSTALLATION INSTRUCTION 88073
 INSTALLATION INSTRUCTION 88073 Rev C FOR RANCHO SUSPENSION SYSTEMS RS6572 & RS6573: DODGE RAM READ ALL INSTRUCTIONS THOROUGHLY FROM START TO FINISH BEFORE BEGINNING INSTALLATION IMPORTANT NOTES! WARNING:
INSTALLATION INSTRUCTION 88051
 INSTALLATION INSTRUCTION 88051 For Rancho Suspension System RS6551: Chevrolet 2500 Suburban & 2500 Avalanche READ ALL INSTRUCTIONS THOROUGHLY FROM START TO FINISH BEFORE BEGINNING INSTALLATION Rev C IMPORTANT
INSTALLATION INSTRUCTIONS
 INSTALLATION INSTRUCTIONS FOR RANCHO SPORT KIT SUSPENSION SYSTEMS RS6501: JEEP WRANGLER (TJ) READ ALL INSTRUCTIONS THOROUGHLY FROM START TO FINISH BEFORE BEGINNING INSTALLATION IMPORTANT NOTES! WARNING:
INSTALLATION INSTRUCTION 88092
 INSTALLATION INSTRUCTION 88092 FOR RANCHO SUSPENSION SYSTEM RS6592: NISSAN XTERRA & 2WD FRONTIER READ ALL INSTRUCTIONS THOROUGHLY FROM START TO FINISH BEFORE BEGINNING INSTALLATION Rev C IMPORTANT NOTES!
INSTALLATION INSTRUCTION 88581
 INSTALLATION INSTRUCTION 88581 FOR RANCHO SUSPENSION SYSTEM RS6581B: DODGE RAM READ ALL INSTRUCTIONS THOROUGHLY FROM START TO FINISH BEFORE BEGINNING INSTALLATION Rev D IMPORTANT NOTES! WARNING: This suspension
INSTALLATION INSTRUCTIONS 88511
 INSTALLATION INSTRUCTIONS 88511 For Suspension System RS6511: Ford Super Duty Requires coil spring kit RS80117 or RS80119 for a complete installation READ ALL INSTRUCTIONS THOROUGHLY FROM START TO FINISH
Suspension System RS6525 (B)
") 88525 Rev A Suspension System RS6525 (B) Requires coil spring kit RS80116 (B) or RS80118 (B) for a complete installation Ford Super Duty READ ALL INSTRUCTIONS THOROUGHLY FROM START TO FINISH BEFORE BEGINNING
88525 Rev A Suspension System RS6525 (B) Requires coil spring kit RS80116 (B) or RS80118 (B) for a complete installation Ford Super Duty READ ALL INSTRUCTIONS THOROUGHLY FROM START TO FINISH BEFORE BEGINNING
INSTALLATION INSTRUCTIONS 89551
 INSTALLATION INSTRUCTIONS 89551 For Rancho Suspension System RS66551B: Ford F250, F350 Super Duty 4x4 DIESEL ONLY (Single Rear Wheels Only With or Without Auxiliary Spring). (WILL NOT WORK ON GAS ENGINES
INSTALLATION INSTRUCTIONS
 88553 Rev A INSTALLATION INSTRUCTIONS For Rancho Suspension System RS66553B: 2017-2011 Ford F250 / F350 Super Duty 4x4 2.5 Leveling Kit (Available in black only. Component in illustrations may be red for
INSTALLATION INSTRUCTION 88554
 INSTALLATION INSTRUCTION 88554 Rev B For Rancho Non-Torsion Bar Drop Suspension System RS6554B: GM 2500HD. READ ALL INSTRUCTIONS THOROUGHLY FROM START TO FINISH BEFORE BEGINNING INSTALLATION Ultra Wheels
INSTALLATION INSTRUCTIONS 88043
 INSTALLATION INSTRUCTIONS 88043 FOR RANCHO SUSPENSION SYSTEM RS6543: CHEVROLET K1500 READ ALL INSTRUCTIONS THOROUGHLY FROM START TO FINISH BEFORE BEGINNING INSTALLATION Rev E IMPORTANT NOTES! WARNING:
INSTALLATION INSTRUCTIONS 88056
 INSTALLATION INSTRUCTIONS 88056 FOR RANCHO ROCK CRAWLER SUSPENSION SYSTEM RS6506: JEEP WRANGLER (TJ) Rev B READ ALL INSTRUCTIONS THOROUGHLY FROM START TO FINISH BEFORE BEGINNING INSTALLATION IMPORTANT
INSTALLATION INSTRUCTIONS 8827
 INSTALLATION INSTRUCTIONS 8827 FOR SUSPENSION SYSTEM RS6427: CHEVEROLET K1500 READ ALL INSTRUCTIONS THOROUGHLY FROM START TO FINISH BEFORE BEGINNING INSTALLATION Rev A IMPORTANT NOTES! A. Before installing
INSTALLATION INSTRUCTION 88045
 INSTALLATION INSTRUCTION 88045 Rev B FOR RANCHO SUSPENSION SYSTEM RS6545: CHEVROLET SILVERADO READ ALL INSTRUCTIONS THOROUGHLY FROM START TO FINISH BEFORE BEGINNING INSTALLATION IMPORTANT NOTES! WARNING:
INSTALLATION INSTRUCTION Rev B Rancho Suspension System RS66114B
 INSTALLATION INSTRUCTION 89114 Rev B Rancho Suspension System RS66114B 4 Crawler Progressive Coil Short Arm System Black Fits 2017-2007 Jeep Wrangler JK 2012 - Newer models equipped with 3.6L V6 engine
These instructions should remain in the vehicle glove box for future reference.
 INSTALLATION INSTRUCTION 89118 Rev B Rancho Suspension System RS66118BR5 and RS66118BR9 2 Progressive Sport System Fits 2017-2007 Jeep Wrangler JK 2-Door This suspension system was developed using 255/80R17
'99-03 CHEVROLET/GMC IFS 4WD 6" SUSPENSION SYSTEM P/N INSTALLATION INSTRUCTIONS
 1/16/04 '99-03 CHEVROLET/GMC IFS 4WD 6" SUSPENSION SYSTEM P/N. 10-41099 INSTALLATION INSTRUCTIONS NOTE: Each Lift Kit and options to Lift Kits are packaged separately. Therefore, installation procedures
INSTALLATION INSTRUCTION 89455
 INSTALLATION INSTRUCTION 89455 Rev A Rancho Suspension Systems RS66455B 2013 2009 4WD Dodge RAM 2500 READ ALL INSTRUCTIONS THOROUGHLY FROM START TO FINISH BEFORE BEGINNING INSTALLATION WARNING Carefully
INSTALLATION INSTRUCTIONS 88043
 INSTALLATION INSTRUCTIONS 88043 FOR SUSPENSION SYSTEM RS6543: CHEVROLET K1500 Rev B READ ALL INSTRUCTIONS THOROUGHLY FROM START TO FINISH BEFORE BEGINNING INSTALLATION IMPORTANT NOTES! A. The vehicle s
2.5" & 3.5" SUSPENSION SYSTEM JEEP JK WRANGLER 2 & 4 DOOR MODELS
 2.5" & 3.5" SUSPENSION SYSTEM 2007-2018 JEEP JK WRANGLER 2 & 4 DOOR MODELS JSPEC2352 www.jksmfg.com jks@ridefox.com 517-278-1226 RV. 100818 GETTING STARTED Read all warnings, instructions, notes and cautions
Tools Needed: Class 8.8 Class MM 55ft/lbs 75ft/lbs 14MM 85ft/lbs 120ft/lbs 16MM 130ft/lbs 165ft/lbs 18MM 170ft/lbs 240ft/lbs
 921788000 JEEP JK 6 LONGARM Rough Country recommends a certified technician install this system. In addition to these instructions, professional knowledge of disassemble/reassembly procedures as well as
97-06 JEEP TJ/LJ LONG ARM UPGRADE KIT
 921663U00 97-06 JEEP TJ/LJ LONG ARM UPGRADE KIT Thank you for choosing Rough Country for your suspension needs. This kit is an upgrade kit only. This kit includes frame mounting points and adjustable long
INSTALLATION INSTRUCTION 88267
 INSTALLATION INSTRUCTION 88267 FOR RANCHO SUSPENSION SYSTEM RS6267: 2WD CHEVROLET SUBURBAN & TAHOE READ ALL INSTRUCTIONS THOROUGHLY FROM START TO FINISH BEFORE BEGINNING INSTALLATION Rev B IMPORTANT NOTES!
Installation Instructions
 Installation Instructions Jeep TJ Long Arm Suspension System 1997-2002 JEEP TJ 4WD 6 1997-2002 JEEP TJ 4WD FTS24002 & BK / FTS24003 & BK / FTS44002 & BK PARTS LIST FTS24002BK Jeep TJ 6' Box Kit 1 FTS24003BK
INSTALLATION INSTRUCTION Rancho 2 Rubicon Progressive Coil System
 INSTALLATION INSTRUCTION 89122 Rancho 2 Rubicon Progressive Coil System RS66122BR5 Includes RS5000X Shocks RS66122BR9 Includes RS9000XL Shocks Fits 2018 Jeep Wrangler JLU 4-Door Rubicon Models Rev D This
2.5" & 3.5" SUSPENSION SYSTEM
 2.5" & 3.5" SUSPENSION SYSTEM 2007-2014 JEEP JK WRANGLER 2 & 4 DOOR MODELS JSPEC2352 www.jksmfg.com jks@sporttruckusainc.com 517-278-1226 Rv. 071814 Getting Started Read all warnings, instructions, notes
'88-'00 CHEVROLET/GMC IFS 4WD(8LUG) OLD BODY STYLE 6" SUSPENSION SYSTEM P/N
 OLD BODY STYLE 6 SUSPENSION SYSTEM P/N") 4/10/13 '88-'00 CHEVROLET/GMC IFS 4WD(8LUG) OLD BODY STYLE 6" SUSPENSION SYSTEM P/N. 10-41888 INSTALLATION INSTRUCTIONS APPLICATION WARNING: Applicable for hub mounted ABS sensor models only. Not for 1992-94
4/10/13 '88-'00 CHEVROLET/GMC IFS 4WD(8LUG) OLD BODY STYLE 6" SUSPENSION SYSTEM P/N. 10-41888 INSTALLATION INSTRUCTIONS APPLICATION WARNING: Applicable for hub mounted ABS sensor models only. Not for 1992-94
JEEP JK 4 LONGARM. Tools Needed: Thank you for choosing Rough Country for your suspension needs.
 921786000 Thank you for choosing Rough Country for your suspension needs. JEEP JK 4 LONGARM Rough Country recommends a certified technician install this system. In addition to these instructions, professional
2.5" & 3.5" SUSPENSION SYSTEM 2018 JEEP JL WRANGLER 4 DOOR MODELS
 2.5" & 3.5" SUSPENSION SYSTEM 2018 JEEP JL WRANGLER 4 DOOR MODELS JSPEC1202/JSPEC1203 www.jksmfg.com jks@sporttruckusainc.com 517-278-1226 RV. 050318 GETTING STARTED Read all warnings, instructions, notes
JEEP JK 6 2 DR X-SERIES SUSPENSION KIT
 921684X00 Thank you for choosing Rough Country for your suspension needs. JEEP JK 6 2 DR X-SERIES SUSPENSION KIT Rough Country recommends a certified technician install this system. In addition to these
4 & 6 4-Link Suspension Systems. Ford Super Duty 4WD Part#: ,
 Part#: 013013, 013014 4 & 6 4-Link Suspension Systems Ford Super Duty 4WD 2011-2016 Rev. 051817 491 W. Garfield Ave., Coldwater, MI 49036. Phone: 517-279-2135 E-mail: tech-bds@sporttruckusainc.com Read
8" 4-LINK SUSPENSION SYSTEM. Ford Super Duty 4WD Part#:
 Part#: 013813 8" 4-LINK SUSPENSION SYSTEM Ford Super Duty 4WD 2011-2016 Rev. 051817 491 W. Garfield Ave., Coldwater, MI 49036. Phone: 517-279-2135 E-mail: tech-bds@sporttruckusainc.com Read And Understand
INSTALLATION INSTRUCTIONS
 INSTALLATION INSTRUCTIONS For Rancho Suspension System RS6524B: 2011-2013 Ford F250, F350 Super Duty 4x4 DIESEL ONLY (Single Rear Wheels Only With or Without Auxiliary Spring). (WILL NOT WORK ON GAS ENGINES
INSTALLATION INSTRUCTIONS
 INSTALLATION INSTRUCTIONS 89552 Rev A For Rancho Suspension System RS66552B: 2017-2011 Ford F250 / F350 Super Duty 4x4* *F350 requires additional rear kit RS886503 or RS886502 to be purchased separately.
INSTALLATION INSTRUCTIONS
 INSTALLATION INSTRUCTIONS 89452 Rev E For Rancho Suspension Systems: RS66452B 4.5 Radius Arm Drop Bracket Kit - DIESEL MODELS ONLY 2016-2014 Dodge Ram 2500 4WD FMVSS 126 Certified Fits OE 17 and up rims
2 SUSPENSION SYSTEM JEEP WRANGLER TJ
 2 SUSPENSION SYSTEM 997-2006 JEEP WRANGLER TJ JSPEC320 www.jksmfg.com jks@sporttruckusainc.com 57-278-226 RV. 09225 GETTING STARTED Read all warnings, instructions, notes and cautions before you begin
INSTALLATION INSTRUCTIONS WD JEEP WRANGLER TJ 4 SUSPENSION SYSTEM P/N
 1/18/10 INSTALLATION INSTRUCTIONS 97-06 4WD JEEP WRANGLER TJ 4 SUSPENSION SYSTEM P/N 10-45497 NOTE: Each lift kit, and options to lift kits, are packaged separately. Therefore installation procedures are
INSTALLATION INSTRUCTION Rev A
 INSTALLATION INSTRUCTION RS82100 Rev A Rancho High-Steer Knuckle RS62100 Fits 2016-2007 Jeep Wrangler JK Left and Right Hand Drive Models Requires use of flipped drag link, and 3 or higher lift with a
EVO-1085 JK DoubleD Long Arm Upgrade. EVO /37 JK DoubleD LongArm Kit
 EVO-1085 JK DoubleD Long Arm Upgrade EVO-1084-35/37 JK DoubleD LongArm Kit (EVO-1084 pictured above with Bilstein 5100 Shocks and optional EVO HD Swaybar Endlinks) NOTES: Cutting and grinding is required
Read and understand all instructions and warnings prior to installation of system and operation of vehicle.
 491 W. Garfield Ave., Coldwater, MI 49036 Phone: 517-279-2135 Web/live chat: www.bds-suspension.com E-mail: tech@bds-suspension.com Part#: 014444 Product: 4.5" Suspension System Application: Jeep Cherokee
INSTALLATION INSTRUCTIONS 88025
 INSTALLATION INSTRUCTIONS 88025 REV. A FOR 6469 CHEVROLET K-2500 & 3500 4x4 8-LUG SUSPENSION SYSTEM DO NOT USE A BODY LIFT KIT WITH THIS SUSPENSION SYSTEM READ ALL INSTRUCTIONS THOROUGHLY FROM START TO
INSTALLATION INSTRUCTIONS
 89451 Rev B INSTALLATION INSTRUCTIONS For Rancho Suspension Systems: RS66451R9 2.5 Leveling Kit - DIESEL MODELS ONLY 2014 Dodge Ram 2500 4WD FMVSS 126 Certified Fits OE rims and spare Fits up to: BFG KM2
4, 6 Suspension System. Ford Super Duty 4WD Part#: ,
 Part#: 013413, 013610 4, 6 Suspension System Ford Super Duty 4WD 2011-2016 Rev. 012518 491 W. Garfield Ave., Coldwater, MI 49036. Phone: 517-279-2135 E-mail: tech-bds@sporttruckusainc.com Read And Understand
INSTALLATION INSTRUCTIONS
 INSTALLATION INSTRUCTIONS 89401 Rev D For Rancho Suspension System RS66401B: 2013-2016 RAM 1500 4WD ATTENTION: DOES NOT FIT V6 DIESEL OR VEHICLES EQUIPPED WITH AIR RIDE. Fits OE 17 and up rims ONLY WITH
»Product» Safety Warning
 Zone C2350 Installation Instructions 2007-2013 Chevy 1500 3.5" Lift Read and understand all instructions and warnings prior to installation of product and operation of vehicle. Zone Offroad Products recommends
»Product» Safety Warning
 J1300, J1301 Installation Instructions 1997-2006 Jeep TJ 3 Suspension Lift Read and understand all instructions and warnings prior to installation of product and operation of vehicle. Zone Offroad Products
AEV30213AH Last Updated: 04/28/17. jk wrangler dualsport sc suspension INSTALLATION GUIDE
 AEV30213AH Last Updated: 04/28/17 jk wrangler 3.5 4.5 dualsport sc suspension INSTALLATION GUIDE PLEASE READ BEFORE YOU START TO GUARANTEE A QUALITY INSTALLATION, WE RECOMMEND READING THESE INSTRUCTIONS
INSTALLATION INSTRUCTIONS FOR FORD SUSPENSION SYSTEMS 6470, 6471, 6480, 6486
 INSTALLATION INSTRUCTIONS 88023 FOR FORD SUSPENSION SYSTEMS 6470, 6471, 6480, 6486 REV. A READ ALL INSTRUCTIONS THOROUGHLY FROM START TO FINISH BEFORE BEGINNING INSTALLATION TABLE OF CONTENTS: DESCRIPTION
JEEP JK 4 X-SERIES SUSPENSION KIT Thank you for choosing Rough Country for your suspension needs.
 921673X00A *1673XBAG4* 1673XBAG4 JEEP JK 4 X-SERIES SUSPENSION KIT Thank you for choosing Rough Country for your suspension needs. Rough Country recommends a certified technician install this system. In
»Product» Safety Warning
 #F2402 & F2602 Installation Instructions 2004-2008 Ford F-150 4wd 4-6" Lift System Read and understand all instructions and warnings prior to installation of product and operation of vehicle. Zone Offroad
»Product» Safety Warning
 RBP-LK410-40, RBP-LK410-60 RBP-LK411-60, RBP-LK411-40 Installation Instructions 2005-2015 / 2016+ Toyota Tacoma 4" and 6" Lift Systems Read and understand all instructions and warnings prior to installation
»Product» Safety Warning
 D1401 Installation Instructions 2013 Ram 3500, 2014 Ram 2500 4.5" Radius Arm Suspension Lift Read and understand all instructions and warnings prior to installation of product and operation of vehicle.
JEEP JK 4 SUSPENSION KIT
 92168100 Thank you for choosing Rough Country for your suspension needs. JEEP JK 4 SUSPENSION KIT Rough Country recommends a certified technician install this system. In addition to these instructions,
*1609BAG8* 1609BAG8 JEEP JK 3 1/2 SUSPENSION KIT A
 JEEP JK 3 1/2 SUSPENSION KIT 92160900A *1609BAG8* 1609BAG8 Thank you for choosing Rough Country for your suspension needs. Please read instructions before beginning installation. Check the kit hardware
4WD RANGER/BRONCO II WD EXPLORER CLASS II INSTALLATION INSTRUCTIONS
 4WD RANGER/BRONCO II 8-97 4WD EXPLORER 90-94 CLASS II INSTALLATION INSTRUCTIONS Before beginning the installation, read these instructions and the enclosed driver s WARNING NOTICE thoroughly and completely.
»Product» Safety Warning
 J1400, J1401 Installation Instructions 1997-2006 Jeep TJ 4 Suspension Lift Read and understand all instructions and warnings prior to installation of product and operation of vehicle. Zone Offroad Products
4.5 Suspension System. Jeep TJ BDS PART # Ultimate; # Standard
 BDS PART #014460 Ultimate; #014440 Standard 491 W. Garfield Ave., Coldwater, MI 49036. Phone: 517-279-2135 Web/live chat: www.bds-suspension.com. E-mail: tech-bds@sporttruckusainc.com 4.5 Suspension System
05-07 F250 6 SUSPENSION KIT
 92159300 Stabilizer Drop Brackets Track Bar Bracket Control Arm Bracket Brake Line Drop Bracket Sway Bar Link Ext. Hardware Bags Pitman Arm 6111 Add-a-leaf 6578 3 Block and U-Bolt Kit 05-07 F250 6 SUSPENSION
»Product» Safety Warning
 D1402 Installation Instructions 2013-14 Ram 3500, 2014 Ram 2500 4.5" Replacement Radius Arm Suspension Lift Read and understand all instructions and warnings prior to installation of product and operation
04-08 FORD F150 4 KIT
 9257700 04-08 FORD F50 4 KIT THANK YOU FOR CHOOSING ROUGH COUNTRY FOR YOUR SUSPENSION NEEDS. Rough Country recommends a certified technician install this system. In addition to these instructions, professional
Vehicle ride height chart
 Please read Instructions thoroughly and completely before beginning installation. Installation by a certified mechanic is recommended. ReadyLIFT Suspension Inc. is NOT responsible for any damage or failure
80-96 Ford F150 / Bronco 4WD Class II 4"- 6" Suspension Lift Installation Instructions
 www.skyjacker.com Required Tool List: 80-96 Ford F150 / Bronco 4WD Class II 4"- 6" Suspension Lift Installation Instructions Safety Glasses Metric / Standard Wrenches & Sockets Floor Jack Jack Stands Measuring
4.5 Suspension System. Jeep Wrangler JK Part#:
 Part#: 014454-014456 4.5 Suspension System Jeep Wrangler JK 2007-2018 Rev. 011018 491 W. Garfield Ave., Coldwater, MI 49036. Phone: 517-279-2135 E-mail: tech-bds@sporttruckusainc.com Read And Understand
EVO EVO Enforcer PRO Stage 1
 EVO-201-1 EVO Enforcer PRO Stage 1 QTY PART # DESCRIPTION 1 EVO-11022B EVO Front Lower Control Arm, Driver 1 EVO-11023B EVO Front Lower Control Arm, Pass 1 EVO-11042B REARWARD BRACKET JK FRONT TRACKBAR
AEV30213AF Last Updated: 05/24/18. jk wrangler dualsport sc suspension right hand drive INSTALLATION GUIDE
 AEV30213AF Last Updated: 05/24/18 jk wrangler 3.5 4.5 dualsport sc suspension right hand drive INSTALLATION GUIDE PLEASE READ BEFORE YOU START TO GUARANTEE A QUALITY INSTALLATION, WE RECOMMEND READING
# " Suspension System Jeep Wrangler TJ. 102 S. Michigan Avenue Coldwater, MI
 #014452 4.5" Suspension System Jeep Wrangler TJ Read and understand all instructions and warnings prior to installation of system and operation of vehicle. SAFETY WARNING BDS Suspension Co. recommends
EVO-1063 JK Enforcer System
 EVO-1063 JK Enforcer System NOTES: Cutting and grinding is required to complete the installation of the rear roll center correction trackbar bracket. Wheel spacers or aftermarket wheels with a smaller
INSTALLATION INSTRUCTIONS FOR: RE DOOR JK WRANGLER RE DOOR JK WRANGLER 3.5 STANDARD SUSPENSION SYSTEM
 RUBICON MANUFACTURING INC. 3290 MONIER CIR., RANCHO CORDOVA, CA. 95742 916-473-4600 INSTALLATION INSTRUCTIONS FOR: RE7122 2 DOOR JK WRANGLER RE7142 4 DOOR JK WRANGLER 3.5 STANDARD SUSPENSION SYSTEM Safety
»Product» Safety Warning
 D1402 Installation Instructions 2013-14 Ram 3500, 2014 Ram 2500 4.5" Replacement Radius Arm Suspension Lift Read and understand all instructions and warnings prior to installation of product and operation
3 Suspension System. Jeep Wrangler JK Part#:
 Part#: 014310-014311 3 Suspension System Jeep Wrangler JK 2007-2018 Rev. 062818 491 W. Garfield Ave., Coldwater, MI 49036. Phone: 517-279-2135 Web: www.bds-suspension.com. E-mail: tech-bds@ridefox.com
»Product» Safety Warning
 J1455, J1456 Installation Instructions 1984-2001 Jeep Cherokee XJ 4.5 Suspension Lift Read and understand all instructions and warnings prior to installation of product and operation of vehicle. Zone Offroad
»Product» Safety Warning
 D1602 Installation Instructions 2013-14 Ram 3500, 2014 Ram 2500 5.5" Gas Replacement Radius Arm Susp. Lift 6.5" Diesel Replacement Radius Arm Susp. Lift Read and understand all instructions and warnings
PRE-INSTALLATION. INSTALLATION INSTRUCTIONS STEP 1: Park vehicle on level surface and chock rear wheels.
 2007-2013 7.5" GMC/Chevrolet 1500 4WD Suspension Lift kit PRE-INSTALLATION 15004 2 - Cross-member (Fr/Rr) 2 - Sway Bar Drop Bracket 2 - Knuckle (Dr/Pass) 1 - Driver Diff. Bracket 1 - Passenger Diff. Bracket
»Product» Safety Warning
 #J1453 Installation Instructions 1993-1998 Jeep ZJ 4 Suspension Lift Read and understand all instructions and warnings prior to installation of product and operation of vehicle. Zone Offroad Products recommends
07-UP AVALANCHE 7.5 KIT
 92120900R1 07-UP AVALANCHE 7.5 KIT Thank you for choosing Rough Country for your suspension needs. We appreciate your business!! This kit will not fit vehicles equipped with electric steering or trucks
»Product» Safety Warning
 #F1420 Installation Instructions 2011 Ford Super Duty F250/350 4wd 4" Suspension Lift Read and understand all instructions and warnings prior to installation of product and operation of vehicle. Zone Offroad
EVO-1063 JK Enforcer System
 EVO-1063 JK Enforcer System QTY PART# DESCRIPTION 1 EVO-760008 BOX#1 32x10x6.5 1 EVO-11022B EVO Front Lower Control Arm, Driver 1 EVO-11023B EVO Front Lower Control Arm, Pass 1 EVO-10080B Rear Trackbar
Part # WD Jeep Wrangler TJ Stage I 3 to 4 Lift Now Manufactured With Chromolly Arms PRO COMP SUSPENSION. Suspension Systems that Work!
 PRO COMP SUSPENSION Suspension Systems that Work! Part # 55495 97-2002 4WD Jeep Wrangler TJ Stage I 3 to 4 Lift Now Manufactured With Chromolly Arms This document contains very important information that