INSTALLATION INSTRUCTIONS FOR PLEASE READ AND UNDERSTAND TERMS/POLICIES BEFORE YOU INSTALL THIS SYSTEM
|
|
|
- Elvin Hunter
- 5 years ago
- Views:
Transcription
1 MOUNTAIN OFF ROAD ENTERPRISES. LLC. P.O. BOX 690 DELTA, COLORADO INSTALLATION INSTRUCTIONS FOR PLEASE READ AND UNDERSTAND TERMS/POLICIES BEFORE YOU INSTALL THIS SYSTEM M.O.R.E. Shackle Reversal System (S.R.S. ) # contains the following items: ITEM DESCRIPTION QUANTITY PART NUMBER A Pivot Bracket-Drivers Side DS B Pivot Bracket-Pass Side PS C Bushing-Aluminum D Bracket-Shackle Hanger 2 SR104 E Bolt-Shackle Hanger 3/8 x F Washers-Lock & Flat 3/ /33622 G Tube Spacer 3/4 x2-3/4 1 S H Tube Spacer 3/4 x2-3/8 4 S I Bolt-Spring Pivot 9/16 X4-1/ J Bolt-Pivot Bracket to Frame 1/2 x4-1/ K Bolt-Pivot Bracket to Frame 1/2 x1-1/ L Bolt-Shackle Hanger to Frame 1/2 x M Nut-Crimp Lock 9/ N Nut-Crimp Lock 1/ O Washer-Flat 1/ P Washer-Flat 9/ Instruction Sheet IS Photo of items on page 2 of these instructions. Please familiarize yourself with all components in the system. These instructions will refer to items by letter, not description. Read all instructions carefully before work is started on your vehicle. In addition to basic hand tools, the following specialty tools are needed to perform this installation: Angle head drill (electric or air), 3/4 diameter drill bit, 1/2 diameter drill bit, 21/64 drill bit, 3/8-24 (fine thread) tap, floor jack, jack stands (4), torque wrench, grinder and or cutting torch. FIT and TOLERANCES: All parts in this system are the results of countless hours of research, testing, fitting and refining. Jeep frames have a wide tolerance on bolt hole centers from frame to frame. This is why M.O.R.E. has installed several slots in which to mount our bracketry. In addition to the factory tolerances, most people install other then factory equipment such as bumpers, winch mounts, springs etc. M.O.R.E. has done the best job we can to insure that our parts fit with the different possibilities. However, you may find it necessary to grind, elongate, bend, or force the parts in this system to fit on your rig. Please use common sense when installing these parts, and understand that if you modify them in any way, they are not returnable!! PAGE 1

2 S.R.S. Contents B A J G K C P I O N M D H L E F Notes: PAGE 2
3 S.R.S. - GENERAL INFORMATION: This system will fit Jeep YJ Wrangler vehicles with any engine. This system will lift the front of the Jeep one inch (1 ) over where it sits now. Before starting this installation, check the frame to make sure it is in good condition, is straight and has no excessive rust. Only install it on vehicles in good sound condition. This system will work with stock or most aftermarket bumpers, with or without a winch. No welding is required for installation. There will be some drilling and grinding, however. LEAF SPRINGS: This system has been designed to work with stock and aftermarket leaf springs. It has been tested with several different manufactures springs up to 3.5 lift and works fine. It will work with stock springs that have been placed on top of the YJ s axle housings (spring over axle). PITMAN ARM: You may need to use a stock pitman arm. If a dropped arm is used there is a possibility that the tie rod could contact the drag link upon suspension compression. DRIVE SHAFT: The front drive shaft will need to be modified. A longer travel slip-yoke needs to be installed. Due to the suspension movement the stock slip-yoke will not have enough travel and the fact that this system will push the axle forward aprox. one inch, the stock shaft length will not be enough. M.O.R.E. recommends calling Tom Wood s Custom Drive Shafts at: BRAKE HOSES: The stock brake hoses will work if you are using stock leaf springs, under the axle. If you have any lift in your springs, or a spring over axle conversion, the stock hoses will have to be replaced with longer ones. M.O.R.E. Has Extended Stainless Braided Brake Lines available if needed. TERMS/POLICIES DAMAGE CLAIMS: All orders are carefully packed, however, mishandling by the carrier can result in damage. The carrier has the responsibility for the shipment from the time it leaves our warehouse until it is delivered to you. All claims for lost or damaged goods should be reported to the carrier, not to M.O.R.E. LLC. RETURNS: No returns will be accepted without prior permission from M.O.R.E. LLC. After you receive a Return Goods Authorization (RGA) number, merchandise must be returned prepaid and insured. A claim must be made with in 30 days from receipt of merchandise. The original invoice or a copy with the RGA number written on must accompany all returns. A 20% restocking fee will be charged on all parts returned for credit or refund unless merchandise is proven to be defective or was shipped wrong by M.O.R.E. LLC. No merchandise will be issued credit or refund if it has been installed, modified, used in any way or is in unsalable condition. WARRANTY: All merchandise is warranted to be free from defects in materials and workmanship prior to installation. Any alteration or improper use will void this warranty. Because all parts we sell are intended for use in heavy-duty applications it is not possible to warrantee or guarantee the performance of any items. M.O.R.E. LLC. products and the products manufactured by others, which we sell may be subject to an infinite variety of conditions due to the manner in which they are used, serviced and/or installed. Purchasers and users of such products rely upon their own judgment as to the suitable use selection, service and installation of such products. PRODUCT DISCLAIMER: Modification of your vehicle to enhance performance with parts sold by M.O.R.E. LLC. may create a dangerous condition which could cause serious bodily injury, and the buyer hereby expressly assumes all risks associated with any such modifications. All parts sold by M.O.R.E. LLC. are for racing or off road use only. Mountain Off Road Enterprises LLC. will not accept responsibility for personal injury or property damage arising from the failure of any parts manufactured or sold by M.O.R.E. LLC. Specifications are subject to change without notice. Jeep, AMC, CJ, YJ, TJ Wrangler, are registered trademarks of DaimlerChrysler. M.O.R.E. is not affiliated with DaimlerChrysler. M.0.R.E, BombProof, S.R.S., SlipLoc, DoubleJointed, RockProof, are trademarks used by Mountain Off Road Enterprises, LLC. These instructions, our catalog, web site, and logo are copyright, PAGE 3
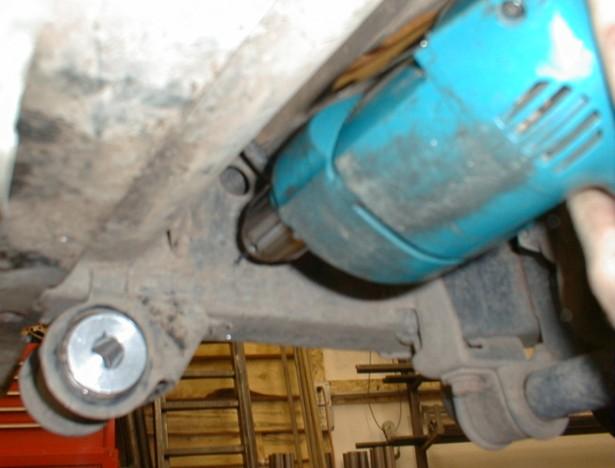
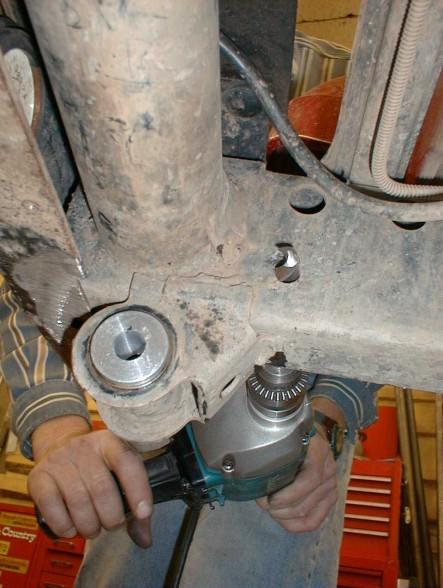
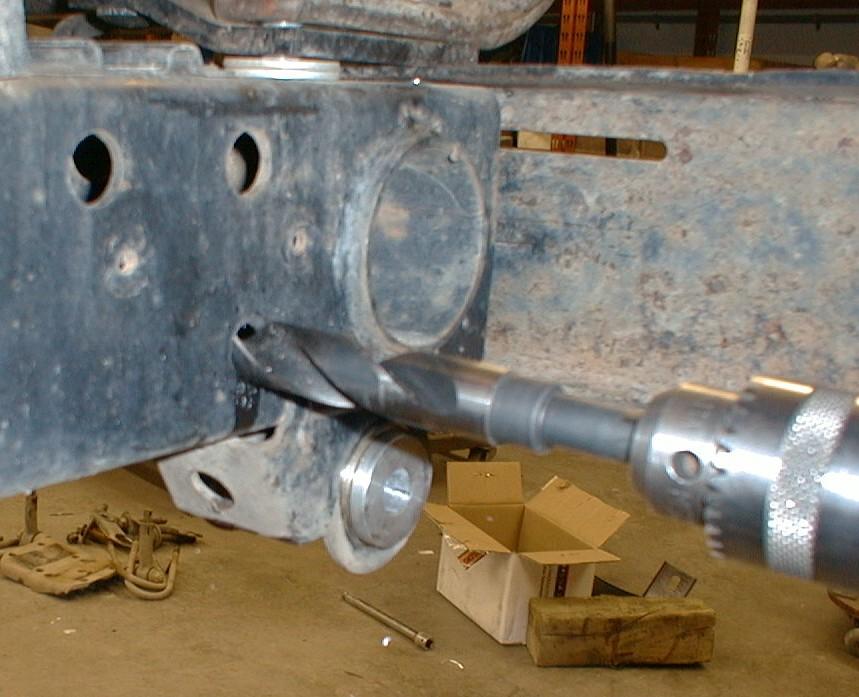
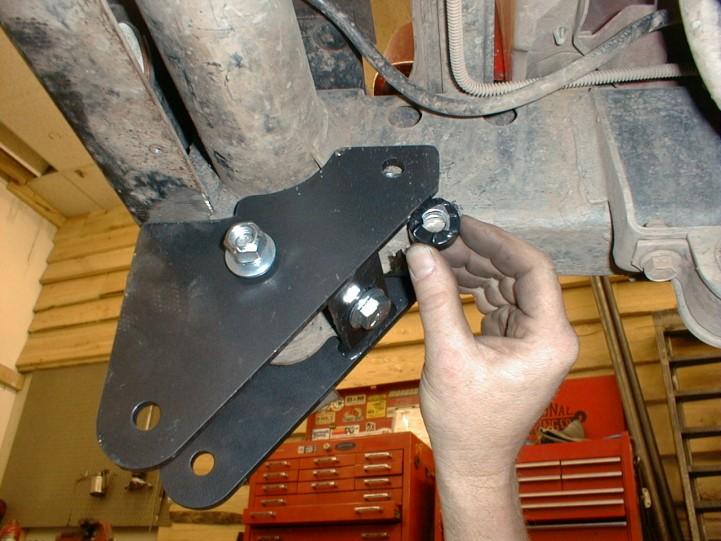
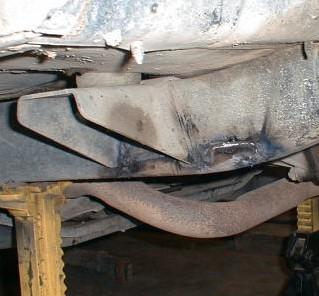
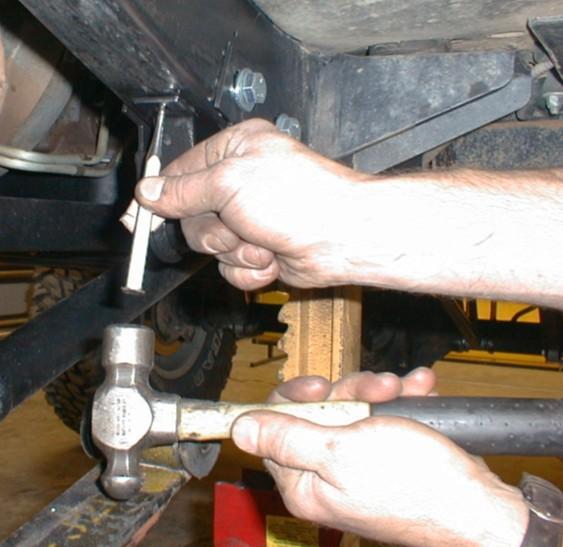
4 STEP BY STEP INSTALLATION INSTRUCTIONS: STEP 1: On a flat, level, hard surface (concrete) floor, jack up the Jeep and support the frame with jack stands six inches behind the stock spring hanger (pivot end of spring). Remove the wheels. Remove the plastic front frame cover. SEE FIGURE 1. STEP 2: Using a second set of jack stands, support the front axle under the rotor/hub area. There should be a slight bit of weight on the stands. SEE FIGURE 2. STEP 3: Remove the front drive shaft. Remove the front bumper. Remove the shackles, bushings and sleeves from the frame. Set them aside, they will be reused. Remove the pivot bolts from the back of the leaf springs. Remove the springs. SEE FIGURE 3. STEP 4: On the drivers side remove the front upper bolt (OEM*) that retains the steering box to the frame. Install two of item C into the stock shackle bracket. SEE FIGURE 4. Install item A onto the frame and into place, lining up the holes. Install one of item O on one of item J and install it thru item A and item C. Install one item O and one item N on item J you just installed. Do not tighten at this time. Install the OEM bolt removed from the frame thru item A. Do not tighten at this time. SEE FIGURE 5. Install one item O on one of item K and install it thru the back side of item A, and the stock shackle hanger. Install one item O and one item N on item K. Tighten item J and K to 75 lb. ft. torque. Tighten the OEM bolt to 50 lb. ft. torque. *OEM-original equipment manufacture. STEP 5: On the passenger side install two of item C into the stock shackle bracket. Install item B into place, lining up the holes. Install one item O over one of item J and install it thru item B and item C. Install one item O and one item N on item J. Do not tighten yet. Install one item O on one of item K and install it thru the back side of item B and the stock shackle hanger. Install one item O and one item N on item K. Tighten items J & K SLIGHTLY! This is to hold item B in place for the next step only. STEP 6: With a 1/2 diameter bit in a power drill, use item B as a guide to mark or dimple the frame at the upper back part of item B. This should be done inside and outside the frame rail. SEE FIGURE 6. DRILL JUST ENOUGH TO DIMPLE THE FRAME. DO NOT GO ALL THE WAY THRU. Remove item B from the frame and set it aside for now. With a 1/8 bit in the drill, drill the dimpled marks in the frame, inside and out as pilot holes. SEE FIGURE 7. Re-install the 1/2 bit and drill the pilot holes from the outside all the way thru both holes. SEE FIGURE 8. Install a 3/4 bit in the drill and drill the OUTSIDE FRAME ONLY to 3/4. SEE FIGURE 9. Install item G into the 3/4 hole (careful, do not drop the spacer tube into the boxed frame!). SEE FIGURE 10. Re-install item B onto the frame as you did above. Install one item O over the last of item J and start it thru item B and item G. Install two items O between the inside frame and the inside of item B, as you insert item J thru them and the inside of item B. SEE FIGURE 11. Install one item O on item J and one item N. Tighten both items J and item K to 75 lb. ft. torque. STEP 7: Install the front bumper and start the upper bolts. Install the factory lower bolts thru items A & B up thru the bumper and into the frame. SEE FIGURE 12A & 12B. After all four bolts are started, tighten them to 65 lb. ft. torque. STEP 8: Remove the spring pivot hangers from the frame rails (behind the axle). This can be done with a hand grinder and cut-off wheel, torch or saw-zall. SEE FIGURES 13A, 13B, & 13C. Be very careful and do not cut into the frame. Just grind the welds. A chisel and hammer comes in handy for knocking loose the brackets. After the stock brackets are removed from the frame, grind the welds flush and paint the bare frame with some black paint. STEP 9: The next steps (10-14) works for most springs but we have found that there are a few springs that the measurement given in step 10 will not work for. Once you have the shackle hangers placed on the frame at the given measurement, clamp them tight and install the springs with shackles. The shackle angle with weight on the springs should be 90 degrees ( straight up and down ) or the bottom of the shackle can be slightly back ( no more than 5 degrees to the rear of the Jeep ) This is very important and if not set correct could damage the leaf springs. If you have any questions regarding this, then give us a call PAGE 4
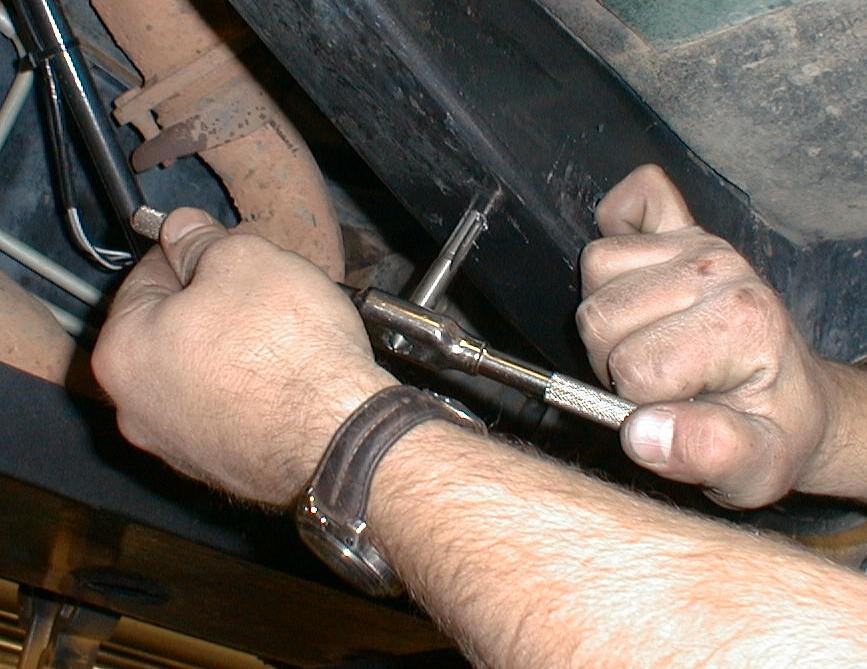
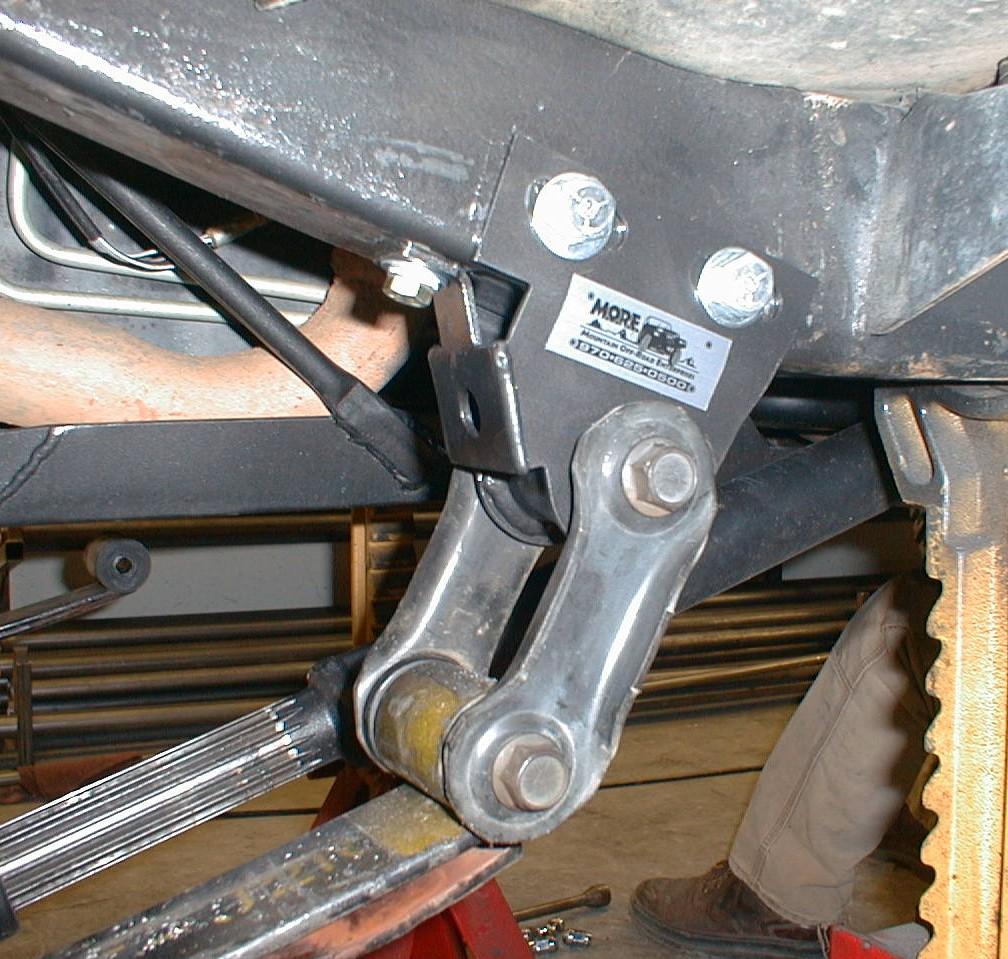
5 STEP 10: Find items D and install the bushings and sleeves that you removed from the stock shackle hangers in step 3 above. SEE FIGURE 14. With a mallet, tap items D on the frame where you just removed the stock spring pivot hangers. The tab on the under side (for the locking bolt item E ) faces forward. On the passenger side frame, have a friend hold the dumb end of a tape measure up to the center of item J that goes through the center of items C at the new M.O.R.E. pivot bracket. SEE FIGURE 15. Now measure back 43 inches, until the center of the bushing sleeve and the 43 inch measurement on the tape line up. Tap item D forward or back until this measurement is achieved. SEE FIGURE 16. This must be done as accurately as possible. Repeat this procedure on the drivers side frame. Now, tap item D up against the frame until you are happy with it s fit. STEP 11: Find the exact center of the slotted holes, and punch a mark. SEE FIGURE 17 & 18. This must be done as accurately as possible, in the inside and outside of the frame rails, drivers and passenger side. Center punch the lower lock mounting bolt hole at this time as well. SEE FIGURE 19. Remove items D from the frame. With a 1/8 drill bit in a angle head drill, bore a pilot hole through the center punched marks, all locations. SEE FIG- URES 20 & 21. Now, with a 1/2 bit in a power drill, enlarge the pilot holes ON THE SIDES OF THE FRAME ONLY to 1/2. Do not drill the underside lock mounting bolt holes at this time!!! Drill from the outside toward the inside using the inside pilot hole to keep the bit lined up. Enlarge the OUTSIDE HOLES ONLY to 3/4. SEE FIGURE 22. Chamfer any burrs that maybe present. STEP 12: Now, enlarge the underside lock mounting bolt holes to 21/64. Tap these drilled holes with a 3/8 x 24 (fine thread) tap. Use cutting oil and tap slowly and carefully. Make sure the tap is straight and true when going up through the hole. SEE FIGURE 23. STEP 13: Insert items H into the 3/4 holes you just drilled. SEE FIGURE 24. Be care full not to drop them into the boxed frame! They should press in with a slight amount of pressure. STEP 14: Re-install items D on the frame over items H. Grab all four items L and install one item O over each, and install L through item D and H. Then in the inside of the frame install another item O over the threads of item L and one item N on each. Re-check the 43 inch measurement, and if correct, tighten items L & N to 55 Lb. Ft. torque. STEP 15: Install items F over items E and thread items E into the tapped holes. Tighten them to 10 Lb. Ft. torque. Reinstall the leaf springs. Switch the springs from end to end (the large eye or pivot end now installs up front in the S.R.S. bracket). Use items I with items P under the heads to secure the pivot ends of the leaf springs to items A & B. Install items P on the threads of items I, and items M as well. Do not tighten them at this time. Install your shackles to your springs and to items D. SEE FIGURE 25. Use thread locking compound on the threads or, new locking nuts on your bolts. Do not tighten at this time. Install the U-bolts and plates and torque them to factory specs. Install the plastic front frame cover. Install the wheels and tighten the lug nuts to factory specs. Remove the jack stands. Jump up and down several times on the front bumper to seat the springs. Tighten items I & M to 30 lb. ft. torque. Tighten your stock shackle bolts to 10 Lb. Ft. torque. STEP 16: Test drive the Jeep. Chances are the steering wheel may not be centered. You can adjust the drag link to center it. Installing this shackle reversal system will not affect the alignment (camber or toe-in), so having the Jeep aligned is not necessary. The caster will increase slightly, however it is a non-tire wearing angle. Go back and check all of your work and make sure everything is done properly. Check the brake lines and make sure that they are not being stretched to far. STEP 17: Your drive shaft will need to have a long travel slip yoke installed to work properly with this system. Call Tom Wood s Custom Drive Shafts at: DO NOT TRY TO SHORT CUT THIS STEP OR DAM- AGE COULD OCCUR TO YOUR DRIVE TRAIN!!! You are finished! Be sure to re-check all hardware for tightness after 100 miles. If you have any questions, please call. Thank you for purchasing this product from M.O.R.E. Keep on Jeepin PAGE 5


6 Figure 1 Figure 2 Figure 3 OEM Item J Figure 4 Figure 5 Figure 6 Figure 7 Figure 8 Figure PAGE 6


7 Figure 10 Figure 11 Figure 12A Figure 12B Figure 13A Figure 13B Figure 13C PAGE 7


8 Figure 14 Drivers Side-Forward Figure 15 Figure 16 Inside Frame Rail Drivers Side-Forward Figure 17 Figure PAGE 8


9 Figure 19 Figure 22 Figure 20 Figure 23 Figure PAGE 9 Figure 21 Figure 24
INSTALLATION INSTRUCTIONS FOR PLEASE READ AND UNDERSTAND TERMS/POLICIES BEFORE YOU INSTALL THIS SYSTEM
 MOUNTAIN OFF ROAD ENTERPRISES. INC. P.O. BOX 690 DELTA, COLORADO 81416 970-625-0500 E-mail: info@mountainoffroad.com www.mountainoffroad.com INSTALLATION INSTRUCTIONS FOR 8795-3 PLEASE READ AND UNDERSTAND
INSTALLATION INSTRUCTIONS FOR M.O.R.E. SHACKLE REVERSAL SYSTEM (S.R.S. ) PART # THIS SYSTEM FITS Jeep CJ-5, CJ-7, CJ-8 VEHICLES.
 PART # THIS SYSTEM FITS Jeep CJ-5, CJ-7, CJ-8 VEHICLES.") INSTALLATION INSTRUCTIONS FOR M.O.R.E. SHACKLE REVERSAL SYSTEM (S.R.S. ) PART # 7686-6 THIS SYSTEM FITS 1976-1986 Jeep CJ-5, CJ-7, CJ-8 VEHICLES. Please read all instructions carefully (including terms-policies)
INSTALLATION INSTRUCTIONS FOR M.O.R.E. SHACKLE REVERSAL SYSTEM (S.R.S. ) PART # 7686-6 THIS SYSTEM FITS 1976-1986 Jeep CJ-5, CJ-7, CJ-8 VEHICLES. Please read all instructions carefully (including terms-policies)
INSTALLATION INSTRUCTIONS FOR M.OR.E. SHACKLE SYSTEM (S.R.S. ) Please read terms and Policies page 5.
 Please read terms and Policies page 5.") MOUNTAIN OFF ROAD ENTERPRISES INC. P.O. BOX 690, DELTA CO. 81416 970-625-0500 970-625-3747 fax E-mail: info@mountainoffroad.com www.mountainoffroad.com INSTALLATION INSTRUCTIONS FOR M.OR.E. SHACKLE SYSTEM
MOUNTAIN OFF ROAD ENTERPRISES INC. P.O. BOX 690, DELTA CO. 81416 970-625-0500 970-625-3747 fax E-mail: info@mountainoffroad.com www.mountainoffroad.com INSTALLATION INSTRUCTIONS FOR M.OR.E. SHACKLE SYSTEM
INSTALLATION INSTRUCTIONS FOR M.O.R.E. SHACKLE REVERSAL SYSTEM (S.R.S. ) PART # THIS SYSTEM FITS Jeep CJ-5, CJ-7, CJ-8 VEHICLES.
 PART # THIS SYSTEM FITS Jeep CJ-5, CJ-7, CJ-8 VEHICLES.") MOUNTAIN OFF ROAD ENTERPRISES LLC. P O BOX 690, DELTA, COLORADO 81416 970-625-0500 www.mountainoffroad.com INSTALLATION INSTRUCTIONS FOR M.O.R.E. SHACKLE REVERSAL SYSTEM (S.R.S. ) PART # 7686-5 THIS SYSTEM
MOUNTAIN OFF ROAD ENTERPRISES LLC. P O BOX 690, DELTA, COLORADO 81416 970-625-0500 www.mountainoffroad.com INSTALLATION INSTRUCTIONS FOR M.O.R.E. SHACKLE REVERSAL SYSTEM (S.R.S. ) PART # 7686-5 THIS SYSTEM
Remove Air filter box by loosening hose clamp, pull intake tube off of box,remove vent hose from side of box and pull straight up.
 MOUNTAIN OFF ROAD ENTERPRISES, LLC. P.O. BOX 690 DELTA COLORADO 81416 970-625-0500 970-625-3747 FAX E-mail: info@mountainoffroad.com www.mountainoffroad.com INSTALLATION INSTRUCTIONS for JKDBT0709 DUAL
INSTRUCTIONS FOR M.O.R.E STEERING CORRECTION KIT PLEASE READ TERMS AND POLICIES ON PAGE 3 OF THESE INSTRUCTIONS
 MOUNTAIN OFF ROAD ENTERPRISES LLC. P.O. BOX 690, DELTA, COLORADO, 81416 970-625-0500 970-625-3747 Fax EMAIL: info@mountainoffroad.com www.mountainoffroad.com INSTRUCTIONS FOR M.O.R.E. 9930 STEERING CORRECTION
Suzuki Samurai to Toyota Front Spring Swap Kit, with Missing Link Shackles (SKU#SSP-TSFM) Installation Instructions
 Installation Instructions") Suzuki Samurai to Toyota Front Spring Swap Kit, with Missing Link Shackles (SKU#SSP-TSFM) Installation Instructions CAUTION: Safety glasses should be worn at all times when working with vehicles and related
Suzuki Samurai to Toyota Front Spring Swap Kit, with Missing Link Shackles (SKU#SSP-TSFM) Installation Instructions CAUTION: Safety glasses should be worn at all times when working with vehicles and related
JK HD Skid Plate for Rear Falcon Shocks
 1 JK HD Skid Plate for Rear Falcon Shocks Kit # 36-07-01-300 Important Notes: Prior to beginning this or any installation read these instructions to familiarize yourself with the required steps and evaluate
JK AXLE SLEEVE KIT Part #
 PRODUCT INSTALLATION GUIDE TeraFlex, Inc. 5241 South Commerce Dr. Murray, Utah 84107 Phone/801.288.2585 Fax/801.713.2313 www.teraflex.biz JK AXLE SLEEVE KIT Part # 4990700 Important Notes: Make sure your
TJ Rear Trail Bar Part # Part #
 PRODUCT INSTALLATION GUIDE TeraFlex, Inc. TeraFlex, Inc. 5680 W Dannon Way Dr. 5241 South Commerce West Jordan, UT84107 84081 Murray, Utah Phone/801.288.2585 Phone/801.288.2585 Fax/801.713.2313 Fax/801.713.2313
TJ SPEED BUMPS Part # Part #
 PRODUCT INSTALLATION GUIDE TeraFlex, Inc. Inc. TeraFlex, 5241 South Commerce 5680 W Dannon Way Dr. West Jordan, UT84107 84081 Murray, Utah Phone/801.288.2585 Phone/801.288.2585 Fax/801.713.2313 Fax/801.713.2313
JK HD Skid Plate for Rear Falcon Shocks
 1 JK HD Skid Plate for Rear Falcon Shocks Kit # 36-07-01-300 Tools needed: Important Notes: Prior to beginning this or any installation read these instructions to familiarize yourself with the required
JK 2-Door 2 Stretch Kit Instructions
 1 JK 2-Door 2 Stretch Kit Instructions www.teraflex.com Kit #1257100 Important Notes: Prior to beginning this or any installation read these instructions to familiarize yourself with the required steps
JK Rear Trail Bar Part # Part #
 PRODUCT INSTALLATION GUIDE TeraFlex, Inc. TeraFlex, Inc. 5680 W Dannon Way 5241 South Commerce Dr. West Jordan, UT 84081 Murray, Utah 84107 Phone/801.288.2585 Phone/801.288.2585 Fax/801.713.2313 Fax/801.713.2313
Universal Mud Flaps PRODUCT INSTALLATION GUIDE. Part # Important Notes: These instructions are for two methods of installation.
 PRODUCT INSTALLATION GUIDE Universal Mud Flaps Important Notes: These instructions are for two methods of installation. Prior to beginning this or any installation read these instructions to familiarize
Installation Guide for the TJ LCG PRO Suspension System (Low Center of Gravity) Available 4" or 5"
 Available 4 or 5") INSTALLATION GUIDE Installation Guide for the TJ LCG PRO Suspension System (Low Center of Gravity) Available 4" or 5" 4" Pro Part #001249474 4" Pro - Unlimited Part #001249484 5" Pro Part #001249575 5"
INSTALLATION GUIDE Installation Guide for the TJ LCG PRO Suspension System (Low Center of Gravity) Available 4" or 5" 4" Pro Part #001249474 4" Pro - Unlimited Part #001249484 5" Pro Part #001249575 5"
TeraFlex TJ Dual Rate S/T Sway Bar
 1 Kit #1743620 (0-3 Lift) #1743625 (4-6 Lift) TeraFlex TJ Dual Rate S/T Sway Bar Important Notes: Prior to beginning this or any installation read these instructions to familiarize yourself with the required
TeraFlex JK Trail Rate Sway Bar
 1 Kit #1753700 (0-3 Lift) #1753705 (4-6 Lift) TeraFlex JK Trail Rate Sway Bar www.teraflex.com Important Notes: Prior to beginning this or any installation read these instructions to familiarize yourself
FRONT DRIVELINE MODIFICATION MAY BE NECESSARY!!!!
 INSTALLATION INSTRUCTIONS FOR 2009 DODGE 2500/3500 4WD & 1500 Mega Cab 6 SUSPENSION SYSTEM PART NUMBER 7206 Requires the following parts (sold separately) for a complete installation: Front Coil Spring
'64-72 Chevelle/ A Body Rear Coilover Conversion Kit
 Nov 3, 2017 '64-72 Chevelle/ A Body Rear Coilover Conversion Kit Includes instructions for Currie Brand Axles The following instructions are intended for professional installers and are guidelines only.
INSTALLATION INSTRUCTIONS FOR FORD 4WD SUPER DUTY 6 SUSPENSION SYSTEM
 INSTALLATION INSTRUCTIONS FOR 1999-2004 FORD 4WD SUPER DUTY 6 SUSPENSION SYSTEM Requires the following parts for a complete installation: Front Leaf Springs P/N 60SD6 Hardware Kit P/N 6000H Vehicle specific
JK 1.5 Spring Lift Part #
 PRODUCT INSTALLATION GUIDE TeraFlex, Inc. 5241 South Commerce Dr. Murray, Utah 84107 Phone/801.288.2585 Fax/801.713.2313 www.teraflex.biz Important Notes: JK 1.5 Spring Lift Part # 1351500 Prior to beginning
PRODUCT INSTALLATION GUIDE. Mud Flap Kit W/Flaps
 PRODUCT INSTALLATION GUIDE TeraFlex, Inc. Inc. TeraFlex, 541 South Commerce 560 W Dannon Way Dr. Murray, Utah West Jordan, UT4107 401 Phone/01..55 Phone/01..55 Fax/01.713.313 Fax/01.713.313 www.teraflex.com
JK Front SpeedBump Kit
 1 JK Front SpeedBump Kit #1958251 Front Prerunner & 2.5-3 #1958401 Front 4 #1958601 Front 6 Important Notes: Prior to beginning this or any installation read these instructions to familiarize yourself
TJ SPEED BUMPS Part # Part #
 PRODUCT INSTALLATION GUIDE THIS KIT IS DESIGNED TO WORK ON A TJ WITH 4+ OF LIFT Important Notes: TJ SPEED BUMPS Part # 1958700 Part # 1958720 Prior to beginning this or any installation read these instructions
Extreme Short Shaft Kit Part #
 TeraFlex, Inc. 5241 South Commerce Dr. Murray, Utah 84107 Phone/801.288.2585 Fax/801.713.2313 www.teraflex.biz Rev. 24 January 2011 TT PRODUCT INSTALLATION GUIDE Important Notes: Extreme Short Shaft Kit
JK 2.5 Spring Lift Part # # #
 PRODUCT INSTALLATION GUIDE TeraFlex, Inc. TeraFlex, Inc. 5680 W Dannon Way Dr. 5241 South Commerce West Jordan, UT84107 84081 Murray, Utah Phone/801.288.2585 Phone/801.288.2585 Fax/801.713.2313 Fax/801.713.2313
DODGE DIESEL KIT DODGE DIESEL KIT
 69120 2009-2013 DODGE 2500 8 DIESEL KIT 2009-2012 DODGE 3500 8 DIESEL KIT Heavy Duty Long Arm Construction For Superior Ride Quality And Travel Lower Arms Constructed Of 1.75 DOM Tubing W/ Urethane Bushing
TeraFlex TJ Single Rate S/T Sway Bar
 1 Kit #1743610 (0-3 Lift) #1743615 (4-6 Lift) TeraFlex TJ Single Rate S/T Sway Bar www.teraflex.com Important Notes: Prior to beginning this or any installation read these instructions to familiarize yourself
Front Axle Assembly: Hairpin Radius Rods
 INSTRUCTIONS 916-395 *916-395* August 2011, Speedway Motors, Inc. Front Axle Assembly: Hairpin Radius Rods This radius rod front end kit is used with OEM or aftermarket tube or I-beam axles that use a
Installation Guide for the JK Wrangler 4-Inch Suspension System with FlexArms
 INSTALLATION GUIDE Installation Guide for the JK Wrangler 4-Inch Suspension System with FlexArms TeraFlex, Inc. Tera5680 Manufacturing, Inc. W Dannon Way 5251 South Commerce West Jordan, UT 84081 Dr. Phone/801.288.2585
PARTS LIST: 8581 DODGE LONG ARM BRACKETS 03-13
 SYNERGY MFG. 870 INDUSTRIAL WAY, SAN LUIS OBISPO, CA (805) 242-0397 8580 03-12 DODGE 2500/3500 4X4, 06-08 1500 MEGACAB 4X4 LONG ARM SUSPENSION KIT V3.0 GENERAL NOTES: These instructions are also available
4331 EUCALYPTUS AVE. CHINO, CA
 www.fabtechmotorsports.com 4331 EUCALYPTUS AVE. CHINO, CA. 91710 PHONE 909-597-7800 FAX 909-597-7185 2000-2001 DODGE RAM 1500 4 WHEEL DRIVE 1994-2001 DODGE RAM 2500 4 WHEEL DRIVE FTS3420 5 1/2 LIFT BOX
Technical Support Line: (952) Hanover Ave. Lakeville, MN
 Hanover Ave. Lakeville, MN") Technical Support Line: (952) 985-5675 Email: Sales@QA1.net 21730 Hanover Ave. Lakeville, MN 55044 www.qa1.net INSTALLATION INSTRUCTIONS QA1 1967-1979 Mopar A-Body Rear 6 link Conversion System QA1 p/n
Technical Support Line: (952) 985-5675 Email: Sales@QA1.net 21730 Hanover Ave. Lakeville, MN 55044 www.qa1.net INSTALLATION INSTRUCTIONS QA1 1967-1979 Mopar A-Body Rear 6 link Conversion System QA1 p/n
JK MP TAILGATE TABLE
 1 Kit #80180 (with cutting board) Kit #80181 (without cutting board) JK MP TAILGATE TABLE www.teraflex.com Important Notes: Prior to beginning this or any installation read these instructions to familiarize
Installation Manual Clayton Off Road Suspension: XJ 6.5 Coil Conversion Long Arm Lift Kit Jeep Cherokee Last Revision No.: 3/1/11 PN
 Thank you for purchasing a Clayton Off Road suspension. Please check to make sure you have all necessary parts before you start your install. XJ 8.0 Coil 1100107 3 Link Bridge W/mount 1100108 Front Spring
Dodge 5 Lift Kit Thank you for choosing Rough Country Suspension for your Off Road needs.
 *1368BAG4* 1368BAG4 921368200 2014-16 2500 Dodge 5 Lift Kit Thank you for choosing Rough Country Suspension for your Off Road needs. Rough Country recommends a certified technician installs this system.
INSTALLATION INSTRUCTIONS FOR FORD 4WD SUPER DUTY 2-1/2 SUSPENSION SYSTEM
 INSTALLATION INSTRUCTIONS FOR 1999-2004 FORD 4WD SUPER DUTY 2-1/2 SUSPENSION SYSTEM Requires the following parts for a complete installation: Front Leaf Springs P/N 60SD25 Vehicle specific Box Kit depending
/3500 Dodge 5 Long Arm Kit
 92137900A 11-12 2500/3500 Dodge 5 Long Arm Kit Thank you for choosing Rough Country Suspension for your Off Road needs. Rough Country recommends a certified technician installs this system. In addition
JEEP WRANGLER (YJ) 4 LEAF SPRING KIT TM w/ Power Steering & TM w/ Manual Steering
 4 LEAF SPRING KIT TM w/ Power Steering & TM w/ Manual Steering") 400 W. Artesia Blvd. Fax: (310) 747-3912 Compton, CA 90220 Ph: (877) 695-7812 www.trailmastersuspension.com JEEP WRANGLER (YJ) 4 LEAF SPRING KIT 87-96 TM3540-20013 w/ Power Steering & TM3540-20023 w/ Manual
400 W. Artesia Blvd. Fax: (310) 747-3912 Compton, CA 90220 Ph: (877) 695-7812 www.trailmastersuspension.com JEEP WRANGLER (YJ) 4 LEAF SPRING KIT 87-96 TM3540-20013 w/ Power Steering & TM3540-20023 w/ Manual
JK HD HINGED CARRIER
 1 JK HD HINGED CARRIER www.teraflex.com #4838100 Important Notes: Prior to beginning this or any installation read these instructions to familiarize yourself with the required steps and evaluate if you
Installation Guide for the TJ lift kits
 Tera Manufacturing, Inc. 5251 South Commerce Dr. Murray, Utah 84107 Phone/801.288.2585 Fax/801.713.2313 www.teraflex.biz INSTALLATION GUIDE Installation Guide for the TJ lift kits 3-inch 4-inch 5-inch
IFS Eliminator Kit,
 IFS Eliminator Kit, 110001-1 IFS Eliminator Kit Contents: Front Leaf Springs (choice 3", 4", or 5") 1.0 High Steer Crossover Steering Kit 1.0 Frame Tube Jig Kit 1.0 Steering Stabilizer Kit 1.0 U-bolt Flip
JK HD ADJUSTABLE SPARE TIRE MOUNTING KIT
 JK HD ADJUSTABLE SPARE TIRE MOUNTING KIT #838130 Kit for 5 on 5 Wheels #83835 Kit for 5 on 5.5 Wheels #838188 Kit for 8 on 6.5 Wheels 1 IMPORTANT NOTES: Prior to beginning this install, or any installation,
/3500 Dodge 5 Long Arm Kit
 92138800A 03-07 2500/3500 Dodge 5 Long Arm Kit Thank you for choosing Rough Country Suspension for your Off Road needs. Rough Country recommends a certified technician installs this system. In addition
INSTRUCTIONS FOR FRONT AND REAR SPEEDBUMPS (3-6 LIFTS)
") INSTRUCTIONS FOR FRONT AND REAR SPEEDBUMPS (3-6 LIFTS) www.teraflex.com #95850 JK Front/Rear 3"-3.5" Lift 3" Travel SpeedBump Kit w/ Bumpstops, Spacers, Rear Microcellular Front Rear Important Notes: Prior
INSTRUCTIONS FOR FRONT AND REAR SPEEDBUMPS (3-6 LIFTS) www.teraflex.com #95850 JK Front/Rear 3"-3.5" Lift 3" Travel SpeedBump Kit w/ Bumpstops, Spacers, Rear Microcellular Front Rear Important Notes: Prior
JK Limiting Straps. Important Notes: Tools needed: This installation guide Basic mechanics tool set.
 1 JK Limiting Straps www.teraflex.com Kit #4853100 Front and Back Kit #4853155 Front Only Kit #4854145 Rear Only Important Notes: Prior to beginning this or any installation read these instructions to
DISCLAIMER FOR OFF ROAD USE ONLY
 DISCLAIMER FOR OFF ROAD USE ONLY THE PURCHASER IS RESPONSIBLE FOR DETERMINING THE SUITABILITY OF ANY AND ALL PRODUCTS PURCHASED Purchaser understands and recognizes that off road and racing equipment and
Installation Instructions
 Instructions Created by an: 2007-Present Toyota Tundra LRT Leveling Lift Kit - 4WD by Low Range Off-Road (SKU# LR-LRTundra) Instructions also apply to 2WD Kits. Installation Instructions Revised 7-11-17
JK Steering Stabilizer Relocation Kit (for Stock Tie Rod)
") JK Steering Stabilizer Relocation Kit (for Stock Tie Rod) www.teraflex.com Kit #230 Important Notes: Prior to beginning this or any installation read these instructions to familiarize yourself with the
JK Steering Stabilizer Relocation Kit (for Stock Tie Rod) www.teraflex.com Kit #230 Important Notes: Prior to beginning this or any installation read these instructions to familiarize yourself with the
JK Steering Stabilizer Relocation Kit (for 1-5/8 Tie Rod)
") JK Steering Stabilizer Relocation Kit (for -5/8 Tie Rod) www.teraflex.com Kit #2360 Important Notes: Prior to beginning this or any installation read these instructions to familiarize yourself with the
JK Steering Stabilizer Relocation Kit (for -5/8 Tie Rod) www.teraflex.com Kit #2360 Important Notes: Prior to beginning this or any installation read these instructions to familiarize yourself with the
JK HD ADJUSTABLE SPARE TIRE MOUNTING KIT
 1 JK HD ADJUSTABLE SPARE TIRE MOUNTING KIT www.teraflex.com #4838130 #4838135 Important Notes: Prior to beginning this or any installation read these instructions to familiarize yourself with the required
Installation Instructions
 Nov 3, 2017 G-Body Rear Coilover Conversion Kit 1 P a g e Installation Instructions The following instructions are intended for professional installers and are guidelines only. Speedtech Performance assumes
/3500 Dodge 5 Lift Kit Drop Brackets
 923913000A 2003-07 2500/3500 Dodge 5 Lift Kit Drop Brackets Thank you for choosing Rough Country Suspension for your Off Road needs. Rough Country recommends a certified technician installs this system.
JK Rear Performance Big Rotor Kit
 1 Kit #050 non-slotted Rotors Kit #060 Slotted Rotors JK Rear Performance Big Rotor Kit www.teraflex.com Important Notes: This kit will only fit vehicles with 17 or larger wheels. Prior to beginning this
INSTALLATION INSTRUCTIONS FOR FORD 4WD SUPER DUTY F COIL SPRING SUSPENSION SYSTEM
 INSTALLATION INSTRUCTIONS FOR 2008-10 FORD 4WD SUPER DUTY F250-350 6 COIL SPRING SUSPENSION SYSTEM Requires the following parts (sold separately) for a complete installation: KIT PART NUMBER (6860) REQUIRES
JL Adjustable Spare Tire Mounting Kit
 1 JL Adjustable Spare Tire Mounting Kit # 4838910 Important Notes: Prior to beginning this install, or any installation, read the instructions thoroughly to familiarize yourself with the required steps.
Renegade Budget Boost Instructions
 1 Renegade Budget Boost Instructions www.teraflex.com #1351200 Important Notes: Prior to beginning this or any installation read these instructions to familiarize yourself with the required steps and evaluate
JL 2 Shock Extensions
 1 JL 2 Shock Extensions # 198200 - Jeep JL Wrangler, 2 Shock Extensions www.teraflex.com Important Notes: Prior to beginning this install, or any installation, read the instructions thoroughly to familiarize
INSTALLATION INSTRUCTIONS FOR FORD 4WD SUPER DUTY F /2 COIL SPRING SUSPENSION SYSTEM
 INSTALLATION INSTRUCTIONS FOR 2005-07 FORD 4WD SUPER DUTY F250-350 4 1/2 COIL SPRING SUSPENSION SYSTEM Requires the following parts (sold separately) for a complete installation: KIT PART NUMBER (6345
INSTALLATION INSTRUCTIONS QA1 P/N x400, x500, x600, x400, x500, x F100 Front Coil-over Suspension System
 INSTALLATION INSTRUCTIONS QA1 P/N 52620-x400, 52620-x500, 52620-x600, 52621-x400, 52621-x500, 52621-x600 65-72 F100 Front Coil-over Suspension System TOOLS AND SUPPLIES REQUIRED Floor Jack Two (2) Jack
Installation Manual ZJ Long Arm Upgrade kit Jeep Grand Cherokee Last Revision No.: 1/30/12 PN
 Thank you for purchasing a Clayton Off Road suspension. Please check to make sure you have all necessary parts before you start your install. 4804010 ZJ 93-95 Long Arm Upgrade Kit 1200010 4 Link Axle Truss
JK CRD60 Front Fixed Spindle Conversion Kit
 1 JK CRD60 Front Fixed Spindle Conversion Kit www.teraflex.com Kit # 3060000 JK CRD60 Front Fixed Spindle Conversion Kit Important Notes: Prior to beginning this or any installation read these instructions
INSTALLATION GUIDE. High Steer Kit
 AEV30212AE Last Updated: 12/09/16 High Steer Kit Designed for 2007 current Jeep JK Wrangler and Wrangler Unlimited models in all trim levels, including Rubicon, with at least 3.0 of suspension lift. INSTALLATION
GM P/U, Blazer, Suburban, 1 Ton 4WD 4-6 Kits
 92114500 1973-87 GM P/U, 1973-91 Blazer, Suburban, 1 Ton 4WD 4-6 Kits Thank you for choosing Rough Country for all of your suspension needs. Rough Country recommends a certified technician installs this
JK Third Brake Light Mount with Integrated CB Mount
 JK Third Brake Light Mount with Integrated CB Mount 999172 Part #4997220 *Factory Third Brake Light is not included. Important Notes: Prior to beginning this or any installation read these instructions
2. Remove front wheels.
 1 PARTS DIAGRAM 2 Installation Instructions: (PASSENGER SIDE) 1. Place jack under center of RUV front end and lift until front wheels clear the ground. Be careful to support the RUV properly so that it
Installation Guide for the JK Wrangler 2.5 Inch spring lift
 Tera Manufacturing, Inc. 5251 South Commerce Dr. Murray, Utah 84107 Phone/801.288.2585 Fax/801.713.2313 www.teraflex.biz INSTALLATION GUIDE Installation Guide for the JK Wrangler 2.5 Inch spring lift Read
For CJ ( ) installation, please refer to instructions starting on page 3.
 installation, please refer to instructions starting on page 3.") 976-006 Jeep CJ, Wrangler XHD Bumper 56.0 Contents:. M x 60 HHCS. M Washer 3. D-Ring. Side Frame Bracket 5. Nut Plate 6. Sub-Frame 7. Bumper 8. M x 35 HHCS 9. M0 Self-Tapping Bolt* Quantity: 8 3 5 6 7
976-006 Jeep CJ, Wrangler XHD Bumper 56.0 Contents:. M x 60 HHCS. M Washer 3. D-Ring. Side Frame Bracket 5. Nut Plate 6. Sub-Frame 7. Bumper 8. M x 35 HHCS 9. M0 Self-Tapping Bolt* Quantity: 8 3 5 6 7
XJ CHEROKEE LIFT KIT
 92169600 84-01 6.5 XJ CHEROKEE LIFT KIT Thank you for choosing Rough Country for your suspension needs. Rough Country recommends a certified technician installs this system. In addition to these instructions,
INSTALLATION INSTRUCTIONS
 INSTALLATION INSTRUCTIONS 2005-2012 Nissan Xterra/Frontier / Pathfinder PART NUMBERS: NP17500, NP17525, NP17550 FRONTIER PARTS & CORRESPONDING HARDWARE LIST XTERRA PATHFINDER ABOVE LISTED 1/2 Metal Lock
JK Rear PreRunner SpeedBump Part #
 PRODUCT INSTALLATION GUIDE TeraFlex, Inc. TeraFlex, Inc. 5680 W Dannon Way Dr. 541 South Commerce West Jordan, UT84107 84081 Murray, Utah Phone/801.88.585 Phone/801.88.585 Fax/801.713.313 Fax/801.713.313
Tools Needed: Class 8.8 Class MM 55ft/lbs 75ft/lbs 14MM 85ft/lbs 120ft/lbs 16MM 130ft/lbs 165ft/lbs 18MM 170ft/lbs 240ft/lbs
 921788000 JEEP JK 6 LONGARM Rough Country recommends a certified technician install this system. In addition to these instructions, professional knowledge of disassemble/reassembly procedures as well as
Jeep JL 1.5 Spacer Lift
 Jeep JL 1.5 Spacer Lift Kit #1165100 - Jeep JL Wrangler, DR 1.5" Spacer Lift Kit Kit #116500 - Jeep JL Wrangler, DR ST1, No Shocks Kit #116511 - Jeep JL Wrangler, DR S/T1 Kit,.1 Falcon Shocks Kit #116500
JL 2 Bumpstop Kit. Important Notes:
 1 JL 2 Bumpstop Kit Important Notes: Prior to beginning this install, or any installation, read the instructions thoroughly to familiarize yourself with the required steps. Evaluate if you are experienced
94-96 Impala SS/ B-Body Rear Coilover Conversion Kit
 January 29, 2014 94-96 Impala SS/ B-Body Rear Coilover Conversion Kit The following instructions are intended for professional installers and are guidelines only. Speedtech Performance assumes NO responsibility
Installation Instructions
 Installation Instructions 4 Ultimate Suspension System 1997-2006 JEEP TJ 4WD Non-Rubicon Models Fabtech Motorsports 4331 Eucalyptus Ave. Chino, CA 91710 Tech Line 909-597-7800 Fax 909-597-7185 Web www.fabtechmotorsports.com
4331 EUCALYPTUS AVE. ~~ CHINO, CA Fax FORD F-250/350 SUPER DUTY 4 WHEEL DRIVE FTS
 4331 EUCALYPTUS AVE. ~~ CHINO, CA 91710 909-597-7800 Fax 909-597-7185 2000-2003 FORD F-250/350 SUPER DUTY 4 WHEEL DRIVE FTS421-1 5.5 & 8 LIFT BOX KIT PARTS LIST: 1 EA. TRACK ARM BRKT. FT423-100 1 EA. PITMAN
'64-72 Chevelle/ A Body Rear Coilover Conversion Kit
 February 3, 2014 '64-72 Chevelle/ A Body Rear Coilover Conversion Kit Includes instructions for Currie Brand Axles The following instructions are intended for professional installers and are guidelines
Feb 22, 2018 '67-69 Camaro & '68-74 Nova Bumpsteer Adjustment Kit
 Feb 22, 2018 '67-69 Camaro & '68-74 Nova Bumpsteer Adjustment Kit 10552 The following instructions are intended for professional installers. Speedtech Performance assumes NO responsibility for the installation
FTS21031BK Rear Leaf Spring Hanger GM 2500 HD 4WD
 4331 EUCALYPTUS AVE. ~~ CHINO, CA 91710 909-597-7800 Fax 909-597-7185 FTS21031BK Rear Leaf Spring Hanger 2001-2006 GM 2500 HD 4WD PARTS LIST: Qu a Part # Description 1 FT20250BK Front Hanger Bracket Driver
DODGE RADIUS ARM KIT FITS GAS OR DIESEL
 66866 2013-2014 DODGE 3500 8 RADIUS ARM KIT FITS GAS OR DIESEL 66866-4 Component Box 1 2) 8 Coil Spacers 1) 8 Left Radius Arm 1) 8 Right Radius Arm 1) Track Bar Drop Bracket 1) Left Sway Bar Drops 1) Right
JK 8 Lug Front Locking Hub Conversion Kit
 1 JK 8 Lug Front Locking Hub Conversion Kit Kit #3034411 w/ Performance Rotors Kit #3034410 w/ Performance Slotted Rotors Kit #3034412 w/ Big Brake Kit Kit #3034413 w/ Big Brake Kit and Slotted Rotors
JK 2 and 4 Door 2.5" Lift Kit Installation Instruction
 JK 2 and 4 Door 2.5" Lift Kit Installation Instruction 1 Shock Extentions and Frame End Trackbar Bracket (Part of Kit # s 1352000 and 1352002) Axle End Trackbar Bracket (Part of Kit # s 1251000 and 1251002
80-96 Ford F150 / Bronco 4WD Class II 4"- 6" Suspension Lift Installation Instructions
 www.skyjacker.com Required Tool List: 80-96 Ford F150 / Bronco 4WD Class II 4"- 6" Suspension Lift Installation Instructions Safety Glasses Metric / Standard Wrenches & Sockets Floor Jack Jack Stands Measuring
TeraFlex JK Complete HD Steering Kit
 1 Kit: 1853900 1853905 TeraFlex JK Complete HD Steering Kit www.teraflex.com Important Notes: Prior to beginning this or any installation read these instructions to familiarize yourself with the required
78-88 G Body Rear Trailing Arm Kit
 May 14, 2014 78-88 G Body Rear Trailing Arm Kit Parts in this kit may vary slightly from photo. The following instructions are intended for professional installers and are guidelines only. Speedtech Performance
INSTALLATION INSTRUCTIONS QA1 P/N R , R , R R , R , R F100 Rear Coil-over Conversion System
 INSTALLATION INSTRUCTIONS QA1 P/N R120-170, R120-200, R120-250 R220-170, R220-200, R220-250 65-72 F100 Rear Coil-over Conversion System TOOLS AND SUPPLIES REQUIRED Floor Jack Two (2) Jack Stands Drill
2013+ DODGE RAM " Kit PART# STOP! READ THIS FIRST!
 NOTE: 2013+ DODGE RAM 3500 4" Kit PART# 54346 STOP! READ THIS FIRST! **READ THESE ENTIRE INSTRUCTIONS BEFORE STARTING ANYTHING** or chroming, which can damage the strength and structure of the metal, any
Installation Instructions
 86-95 Suzuki Samurai Front Shackle (SKU# SSP-HDS1) Note: These instructions also apply to SKU# SSP-HDS3 Installation Instructions Suggested Tools: CAUTION: Safety glasses should be worn at all times when
Jeep JL 2.5 Spacer Lift
 Jeep JL 2.5 Spacer Lift Kit #1365200 - Jeep JL Wrangler, 4DR 2.5" Spacer Lift Kit (Sport/Sahara Edition) Kit #1365300 - Jeep JL Wrangler, 2DR 2.5" Spacer Lift Kit (Sport/Sahara Edition) Kit #1365210 -
Rzeppa Factory Replacement CV Joint
 1 Rzeppa Factory Replacement CV Joint www.teraflex.com #1744014 Important Notes: Prior to beginning this or any installation read these instructions to familiarize yourself with the required steps and
WARNING!!! READ AND UNDERSTAND ALL INSTRUCTIONS BEFORE PROCEEDING. MAKE SURE THAT YOU HAVE ALL TOOLS AND PARTS BEFORE BEGINNING THE INSTALLATION.
 INSTALLATION INSTRUCTIONS FOR 2007-2015 JEEP JK 3 SUSPENSION LIFT SYSTEM PART NUMBER 587 WARNING!!! READ AND UNDERSTAND ALL INSTRUCTIONS BEFORE PROCEEDING. MAKE SURE THAT YOU HAVE ALL TOOLS AND PARTS BEFORE
2013+ DODGE RAM LIFT KIT PART# STOP! READ THIS FIRST!
 NOTE: 2013+ DODGE RAM 3500 8 LIFT KIT PART# 54324 STOP! READ THIS FIRST! **READ THESE ENTIRE INSTRUCTIONS BEFORE STARTING ANYTHING** or chroming, which can damage the strength and structure of the metal,
INSTALLATION INSTRUCTIONS FOR: RE7121 & RE JEEP WRANGLER JK COIL SPRING LIFT KIT
 RUBICON EXPRESS 3290 MONIER CIR., RANCHO CORDOVA, CA. 95742 866-533-7706, www.rubiconexpress.com INSTALLATION INSTRUCTIONS FOR: RE7121 & RE7141 2007-2013 2.5 JEEP WRANGLER JK COIL SPRING LIFT KIT Safety
FRONT DRIVELINE MODIFICATION MAY BE NECESSARY!!!!
 DODGE 2500/3500 4WD 4.5 SUSPENSION SYSTEM Requires the following parts (sold separately) for a complete installation: Front Coil Spring Box depending on Gas or Diesel/V0: Gas (Hemi) P/N 7004GS Diesel/V0
97-06 JEEP TJ/LJ LONG ARM UPGRADE KIT
 921663U00 97-06 JEEP TJ/LJ LONG ARM UPGRADE KIT Thank you for choosing Rough Country for your suspension needs. This kit is an upgrade kit only. This kit includes frame mounting points and adjustable long
INSTALLATION INSTRUCTIONS FOR: RE DOOR JK WRANGLER RE DOOR JK WRANGLER 3.5 STANDARD SUSPENSION SYSTEM
 RUBICON MANUFACTURING INC. 3290 MONIER CIR., RANCHO CORDOVA, CA. 95742 916-473-4600 INSTALLATION INSTRUCTIONS FOR: RE7122 2 DOOR JK WRANGLER RE7142 4 DOOR JK WRANGLER 3.5 STANDARD SUSPENSION SYSTEM Safety
JK High Steer Knuckles
 1 JK High Steer Knuckles www.teraflex.com Kit #4390870 Important Notes: Prior to beginning this or any installation read these instructions to familiarize yourself with the required steps and evaluate
TeraFlex Premium TJ/YJ/XJ/ZJ Dana 30/44 Ball Joints Install Instructions
 #1355100 #1355300 (Knurled) TeraFlex Premium TJ/YJ/XJ/ZJ Dana 30/44 Ball Joints Install Instructions 1 www.teraflex.com Important Notes: Prior to beginning this or any installation read these instructions