625cc Big Block Installation Instructions Club Car DS / Carryall
|
|
|
- Erik Garrett
- 5 years ago
- Views:
Transcription

1 Vegas Carts & Performance 2995 Coleman St North Las Vegas, NV VegasCarts.com 625cc Big Block Installation Instructions Club Car DS / Carryall (DOES NOT FIT INGERSOLL RAND BOBCAT) Released 6/2/2018 1
 drive clutch, you should remove and replace with the factory spring")
2 It is highly recommended to take pictures of your engine bay prior to removing the OEM engine and its components. This will save time if you ever need to revert back to the stock setup. If you currently have a Torque Spring or any spring with extra tension above the OEM specs, installed in your rear (Secondary) drive clutch, you should remove and replace with the factory spring before installing this kit. The extra tension will delay shift out and limit the top speed of your cart. In some cases, it can be as much as 10mph Please read through the entire instructions prior to starting on your installation. There are many ways to install our kit, depending on the current state of your cart, you may be able to skip some steps or move some around. NEVER START YOUR ENGINE WITHOUT THE DRIVE BELT INSTALLED! The outer clutch sheave will slam into the inner sheave and damage your clutch. If you want to test your engine or run it without a belt, you must first remove the primary drive clutch. 2
3 Tools Needed for Installation: (2) 14mm or 9/16 Wrenches (Open-End or Closed) Screwdriver Set Drill with various drill bits including ¼ Saw capable of cutting steel (Sawzall, Die Grinder, hacksaw, etc) Socket & Ratchet Set High Temp Loc-tite or nickel equivalent Anti-Seize Lubricant Ft-Lb Torque Wrench (Recently Calibrated) Measuring Tape NOTICE: Pictures are taken from multiple installs where there may be minor differences from the actual kit you received. There may be some photos showing a different air box or air filter or slightly different mounting hardware. This will not affect your kits installation or performance in any way! LIFTED CART ADVISORY: Although lifted carts are common, we develop all of our kits on un-lifted and un-modified carts. There are dozens of lift kit manufacturers and it would be impossible to develop a universal kit that fits all of them. We will do our best to assist with any clearance issues, however, we cannot and will not guarantee fitment for lifted carts. 3
4 84-96 Club Car DS / Carryall Kit Parts List: A. Club Car 3-Piece Mount (Top, Left & Right) a. 4pc - ⅜ x 16tpi x 1 Carriage Bolts b. 4pc - ⅜ x 16tpi Lock Nuts c. 12pc - Washer d. 4pc - Rubber Vibration Isolators e. 8pc - M10 x 1.5mm Locking Nuts Installed on Engine: 1. Billet Air Filter Adapter mm Long Carb Studs 3. Intake Gasket B. Box Muffler a. 2pc - Exhaust Gaskets b. 2pc - Long M8 Gold Muffler Bolts c. 4pc - M8 Crimped Lock Nut C. 780R Clutch a. 1pc - ⅜ x 24tpi x 3 Clutch Bolt b. 1pc - Aluminum Step Washer c. 1pc - 4 Straight Keyway 3/16 x ¼ D. CVTech Invance Secondary Clutch a. 5/16-18tpi x 3 Hex Clutch Bolt b. 3/16 x 5 Key, E. Throttle Box Relocation Bracket a. ¾ Aluminum Spacers (5/16 Hole) b. 2pc - 5/16-18tpi x 2 Carriage Bolts c. 2pc - Locking Nuts d. 2pc - Washer F. Throttle Bracket a. 2pc - 5/16 x 1.5 Carriage Bolts b. 2pc - 5/16 Washer c. 2pc - 5/16 Crimped Lock Nut G. (2) Dogbones a. 4pc - ⅜ x 16tpi x 2 Hex Bolts b. 4pc - ⅜ Washer H. Starter Solenoid Relocation Bracket a. 2pc - 6mm x 25mm Phillips Screw b. 2pc - 6mm Flange Nut I. Performance Angled Air Filter J. Exhaust Header K. Key Switch L. Fuel Filter M. 6ft of Fuel Line N. Extended Drive Belt O. Extended Throttle Cable ( ONLY) a. Cable Clamp w/clip 4
 you will likely have to remove the suspension (Leaf Spring & Shock) on the passenger side in order to be able to jack the cart high enough to")
5 HD Secondary Clutch Installation : Installation is as simple as removing the OEM clutch and replacing it with the larger and more robust CVTech INvance Secondary. On carts that do not have a lift kit (and some that do) you will likely have to remove the suspension (Leaf Spring & Shock) on the passenger side in order to be able to jack the cart high enough to gain sufficient clearance for the new clutch to be installed. Soaking the old clutch in PB Blaster or equivalent compound will help with removal. (We have heard of instances where carts that have been near Salt Water for long periods of time are VERY difficult to remove. Keep this in mind before starting your install.) Coating the input shaft with Anti-Seize lubricant(upon installation of the new clutch) will ensure that removal is a breeze, should you ever need to remove the new clutch. Make sure to remove the OEM retainer washer from your OEM clutch and re-use to retain your new HD Clutch with the new 5/16 x 3" bolt that comes with your kit! 5

6 Remove all original hardware and engine mounts, leaving only the main cradle in the engine bay and the shifter & brake cables in-tact. All electrical lines going to the original engines ignition coil and starter can be bundled together and tucked away or removed completely. This instructions assume that your engine bay looks something like this: (1986 Model DS Pictured - Square Throttle Box) 6

7 The engine mount will be shipped to you in 3 pieces. Use the pictures on the next page as a guide to assist with assembly, The largest U-shaped piece goes in the center, the largest L bracket fastens to the passenger side, and the smaller L bracket fastens to the drivers side. There are 4 rubber isolators that are included and used in between the main center section and the (2) L-brackets as shown. These "Vibration Isolators" considerably dampen the vibration that is unique to single cylinder engines. The engine mount is held on by (4) 3/8 x 1" carriage bolts. This allows you to adjust for side to side differences in clutches, engines, and belts without having to use 2 wrenches. (Do not tighten these bolts at this time, just get them snug enough to where you can still move the engine mount into your desired position while installing the engine.) Additionally, the belt tension can be easily adjusted by loosening the outward facing locking nuts and moving the center section of the mount forward or back. The mount is reversible so if the engine does not line up and the slots in the L brackets are maxed out, you can flip the mount around 180 degrees to get additional side to side adjustment. (Be sure to leave bolts loose to align clutches later.) 7
")

8 (Older Black Powdercoated Steel Mount Shown in 1986 Club Car DS) (Newer Machined Aluminum Mount Shown in 1992 Club Car DS w/angled Throttle Box) 8


9 Throttle Box Relocation (Lifted Carts Only!) Lifted Carts usually have clearance issues between the Air Filter and the Throttle Box. This is because lifted carts have a swing arm that sits further away from the frame which drops the motor further down. Refer to the below pictures regarding relocation bracket installation. Hardware & (2) Spacers are provided with the bracket. There are 2 slots on one side of the bracket so it will universally fit Square Throttle Boxes and Angled Throttle Boxes (shown on pages 6 & 8). 9


10 Your throttle bar will need to be bent slightly to accommodate the increased angle. Not to worry, it won t break! 10

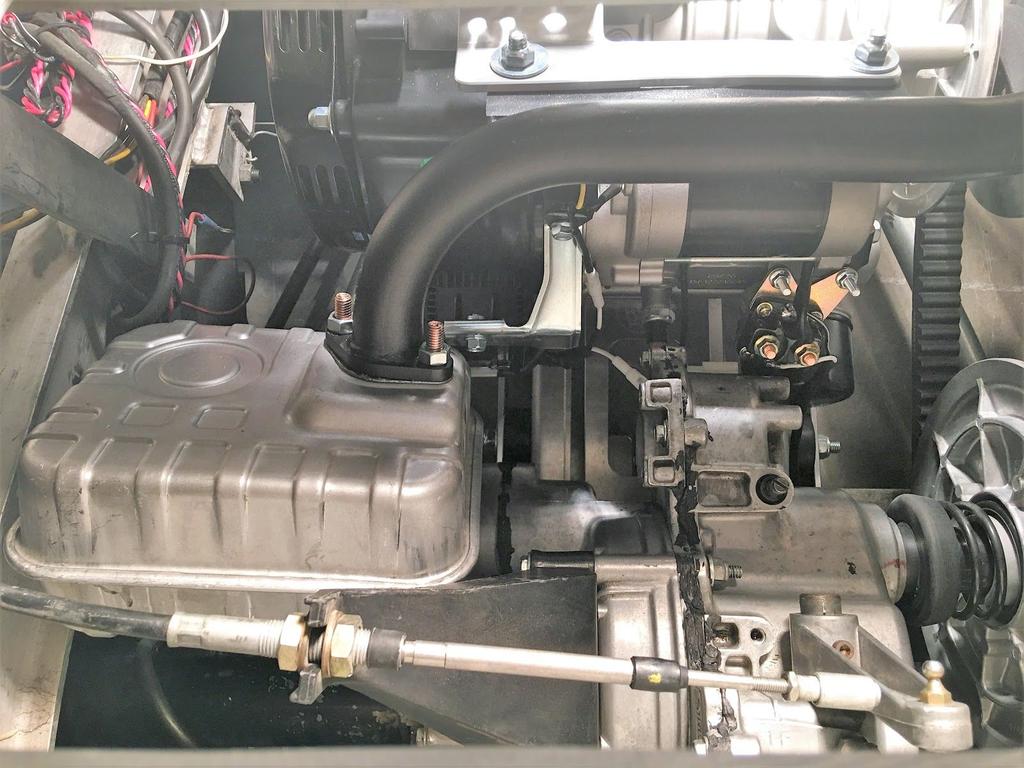
11 The engine will need to be prepared before it is put into the cart. The first step is to relocate the starter solenoid. This is due to a clearance issue with the rear transaxle. Refer to before and after pictures below to see how this is done. The starter solenoid is first removed from the starter housing by unscrewing the 2 phillips head screws. (They are tight, be careful not to strip them.) BEFORE: 11

12 The solenoid is then bolted to the Starter Solenoid Relocation Bracket using the provided hardware. The black Starter Solenoid Relocation Bracket is then bolted to the engine block using one of the side cover bolt AFTER: 12

13 Your kit came with a 4 x 1/4" x 3/16" key. It should be a relatively tight fit into the key slot on the engines crankshaft. We want it to be tight so the slot does not wear over time. Due to the tolerance between the slot and the key, you may have to gently tap the key into the slot with a hammer or dead-blow. If you cannot get the key to fit, you can lightly sand or file one side of the key until it fits. Remember, we DO NOT want a loose fitting key! 13


14 Apply a light coat of Anti-Seize lubricant onto the crankshaft to make future removal of the clutch easier. Slide your clutch onto the output shaft and secure the clutch using the provided aluminum step washer and the 3/8-24 bolt. (Older kits use a lock washer, 2 large washers, and a cup washer.) Apply blue loc-tite to the 3/8-24 x 3 clutch bolt threads and Torque to 40 ft-lbs. 14
. These are a huge improvement over the carriage bolts of years past.")

15 The engine is fastened to the engine mount using 2 specialized hold downs(front & rear), which we have nicknamed Dogbones (April 2018). These are a huge improvement over the carriage bolts of years past. These parts allow the installer to loosen the engine and adjust the belt tension...one handed. See pictures below. (If you have an older kit without these, they are cheap and turn what used to be a 10 minute job into a 30 second job. 15

16 You are now ready to put the engine into the golf cart and onto the engine mount. Unless you are The Hulk, this is probably going to be a 2 person job. You are going to have to tilt the engine up at an angle to fit through the body. After the engine has been bolted to the engine plate, slide the air filter on to the billet adapter and tighten the hose clamp. The belt slides over the primary clutch and then over the secondary. Rotate the secondary while pushing on the belt and it will pop on. The centers of both clutches need to be lined up by moving the engine mount assembly side to side. There is no scientific way to do this other than with your eyes and possibly a straight edge. 16

17 Once the drive belt is straight on both clutches, tighten all (4) carriage bolts that mount to the factory cradle to lock in the side to side adjustment. Adjust your belt tension by sliding the engine towards the front of the golf cart. You will want between 1"-1.5" of deflection when pressing on the top of the belt. Belt tension will need to be fine tuned after the install, so its not critical at this point. Double check your belt is aligned and tighten the engine bolts. Using a measuring tape, the center distance between the clutches should read between 11 to 12 17


18 The muffler needs to be installed onto the exhaust header pipe prior to being bolted to the engine. Ensure you install (1) of the provided gaskets in-between the muffler and exhaust header flange. The long M8 bolts go through the muffler, the gasket, and then the flange with the bolt heads on the muffler side. Don't forget to use the lock-washers and tighten them considerably or your muffler WILL fall off! 18

19 The header/muffler will need to be installed on the engine with the engine already in the cart. This is much more difficult on un-lifted carts as you will have to rotate the exhaust setup at different angles to get it past the engine and axle. It is much easier than trying to bolt the muffler on with the header already installed on the engine! 19

20 Slide the header flange onto the studs coming out of the engines exhaust port. Let the rear support sit on top of the engines rear angled tabs. You will now install the Throttle Linkage Bracket on top of the exhaust support bracket. The 5/16 x 1.5 carriage bolts slide in from the bottom of the engines top support arms and fasten down using washers and lock nuts as pictured. Make sure to tighten the lock nuts on the exhaust port BEFORE tightening the bolts holding in the rear support bracket and throttle linkage bracket! 20
21 21

22 Use the clear fuel line provided to plumb the rest of the fuel system as shown below. The fuel filter goes in between the clear fuel line and the black line on the engine (which goes to the carb). The fuel filter has arrows on it which show you the correct direction of fuel flow. Green Arrow represents the hose to the fuel pump from the gas tank. Blue arrow represents the hose from the fuel pump to the carburetor. Yellow Arrow represents the hose from the fuel pump to the pulse fitting at the rear of the engine, just above the starter. (NOTE: It is Important the all lines fit tightly to their respective fittings, a loose vacuum line from the pulse fitting on the engine can cause all sorts of fuel delivery gremlins.) 22
 If you have a 1992-1996 Model Cart, Skip to Page 26 The first generation Club Car DS (84-91) is factory equipped with a very short")

23 Installing the extended throttle cable (84-91 Only!) If you have a Model Cart, Skip to Page 26 The first generation Club Car DS (84-91) is factory equipped with a very short throttle cable that will not reach the engine. We provide an extended cable that is ready to replace your OEM one. Here are the steps to remove & replace it: 1.Remove the throttle cable by pulling the spherical clip off of the bellcrank, then remove the large nut shown in the picture below.(wd40 helps!) 2. Remove the nut securing the ball stud. 23

24 3. Evenly grind both sides of the bellcrank near the area where the ball stud was. You only need to remove 1/64" on both sides, just enough to clear the C-Clip. 4. Install the wire clamp through the hole where the ball stud was and fasten it using the provided C-Clip. 24

25 5. Re-Install the bellcrank assembly back into your throttle box, you can then fasten the wire from your new throttle cable to the provided cable clamp. 25
 on the throttle bracket and insert the cable end through the hole. Push on the factory C-Clip.")
26 You are now ready to connect the throttle cable. The factory cable end can now be fastened to the governor arm using your spring hook. Slide the cable through the slot labeled CC (shown) on the throttle bracket and insert the cable end through the hole. Push on the factory C-Clip. (We know these are easily lost and carry them in stock if you lose yours. ) Ensure that the throttle is opening fully when the gas pedal is depressed. Sometimes the throttle arm return spring overpowers the factory throttle cable spring and prevents the carb from opening all the way. Attach a ziptie to the throttle spring as shown below, to fix this issue. 26

27 Your completed installation should look like the picture below: Placement of fuel lines can vary. We provide enough line so you can route it any way you d like. 27

28 ****You will now need to refer to the 625cc wiring diagram to get the Electrical portion of this install completed.**** Once you have completed all of the electrical wiring and the key switch works as intended. It s time for initial startup, idle speed tuning and belt tension tuning. DON T FORGET TO FILL THE ENGINE WITH OIL... IT TAKES QUARTS OF 10W30 ENGINE OIL. If your engine is sitting level, you can rely on the dipstick to tell you when it s full. The engine can be filled from the valve cover using a flexible funnel. The Black plastic screw on the top of your carburetor is your idle speed screw (pictured). Turning the screw Counter-Clockwise will lower idle speed, Clockwise will increase idle speed! 28

29 (Jack the rear of your cart up off the ground as a safety precaution before proceeding!) A tachometer is HIGHLY recommended for fine-tuning and to keep an eye on your engine when driving. We sell a large analog tachometer for $49.99 on our website, you can also use a cheaper digital induction tachometer which can be found online for $15. First startup may take some time as the fuel pump needs to prime and fill the carburetor with fuel before the engine will fire. Turn the engine over and pulse the gas pedal until it fires. You can use the yellow manual choke if you are in very cold weather. Once you get the engine to idle, adjust the idle speed screw so your tachometer reads 2000rpm. Let the engine idle at 2000rpm for 10 minutes. During this time, pay close attention to the engine and look for oil and fuel leaks, loose bolts, exhaust leaks, etc. After 10 minutes, the engine will be at full operating temperature. At this point, you can re-adjust your idle speed screw down until the engine idles at around 1100rpm. Any lower then 1100 and the engine will die on hard stops, higher than 1300 and you will have difficulty shifting with the engine running. Turn the engine off and verify the key switch is working to kill the engine. If you are confident that everything is in good running order and the cart is safe to drive, put it back on the ground, start it back up and take it around the block! Your drive belt tension will need to be adjusted after your belt is broken-in. The belt will stretch from heat and increase in length within an hour of driving. 29
1996+ Yamaha G16 / G22 Yamaha G29/YDRA Drive
 Vegas Carts & Performance 2995 Coleman St North Las Vegas, NV 89032 702-530-7753 VegasCarts.com 625cc Big Block Installation Instructions 1996+ Yamaha G16 / G22 Yamaha G29/YDRA Drive Revised 8/6/2018 1
Big Block Installation Instructions Club Car DS / Carryall Club Car DS / Carryall
 Vegas Carts & Performance 2995 Coleman St North Las Vegas, NV 89032 702-530-7753 VegasCarts.com Big Block Installation Instructions 1984-1996 Club Car DS / Carryall 1997+ Club Car DS / Carryall For use
Big Block Installation Instructions
 Vegas Carts & Performance 2995 Coleman St North Las Vegas, NV 89032 702-530-7753 VegasCarts.com Big Block Installation Instructions 1985-1996 Yamaha G2, G9 & G14 For use with: -Honda GX390 & Clone Single
1996+ Yamaha G16 / G20 / G21 / G22 & G29
 Vegas Carts & Performance 2995 Coleman St North Las Vegas, NV 89032 702-530-7753 VegasCarts.com Big Block Installation Instructions 1996+ Yamaha G16 / G20 / G21 / G22 & G29 For use with: -Honda GX390 &
Big Block Installation Instructions
 Vegas Carts & Performance 2995 Coleman St North Las Vegas, NV 89032 702-530-7753 VegasCarts.com Big Block Installation Instructions 1994-2006 EXGO TXT / MEDALIST / CUSHMAN / WORKHORSE / ST-Series For use
ENG JL CC1 ENGINE KIT INSTALLATION INSTRUCTIONS 24 HP Honda Engine Installation Kit For Gas Powered Club Car Models
 ENG JL CC1 ENGINE KIT INSTALLATION INSTRUCTIONS 24 HP Honda Engine Installation Kit For Gas Powered Club Car Models Thank you for purchasing the this quality product from Buggies Unlimited. The engine
DrVanos.com Stage II Installation Instructions. Tool rental is available with the purchase of a vanos kit *See website for more info*
 DrVanos.com Stage II Installation Instructions Special Tools Needed: Camshaft locking tool TDC Crank pin Sprocket turning tool Tool rental is available with the purchase of a vanos kit *See website for
460cc Do-It-Yourself Assembly Guide
 2995 Coleman St North Las Vegas, NV 89032 702-530-7753 702-643-7517 FAX VegasCarts.com 460cc Do-It-Yourself Assembly Guide *DIY Engines do not come with a warranty, these kits are intended for experienced
WARNING: the engine does not come with oil in it. Please fill the oil before starting. The 200cc hardknock requires 9/10 of a quart of oil.
 WARNING: the engine does not come with oil in it. Please fill the oil before starting. The 200cc hardknock requires 9/10 of a quart of oil. Things needed for assembly. -2 tubes of blue loc-tite. I don
Page1. ISF Stainless Steel Headers // Part# HDR-004
 Congratulations on the purchase of your ISF Stainless Steel Headers and thank you for choosing Sikky Manufacturing. This installation manual is intended to guide you through the removal of the factory
 Special Tools Needed: DrVanos.com Stage I Installation Instructions Camshaft locking tool TDC Crank pin Sprocket turning tool Tool rental is available with the purchase of a vanos kit *See website for
Parts List See cover Page
 Thank you for purchasing the CorkSport Front Mount Intercooler Kit for the 2010-2013 Mazdaspeed 3. Keep your BAT s under check with the CorkSport FMIC Kit with the small or large intercooler. Please let
First, check and record the camber and caster readings, they will be adjusted later.
 First, check and record the camber and caster readings, they will be adjusted later. The caliper-mounting bosses are machined perpendicular to the spindle so they are an excellent place for the level.
M52tu-M54 VANOS Assembly & Timing Using G.A.S. Professional Cam Tool Kit
 Home BMW Solutions Porsche Solutions DIY Tech Engine Services Dyno Services Machining About Contact Store Tool Rental M52tu-M54 VANOS Assembly & Timing Using G.A.S. Professional Cam Tool Kit This procedure
Part Numbers: Complete Kits: C5 Base/Z06 Complete Header Package with Cats C5 Base/Z06 Complete Header Package without Cats
 Product: Corvette Tri-Y Headers & Mid-Pipe Part Numbers: Complete Kits: 1150042 C5 Base/Z06 Complete Header Package with Cats 1150043 C5 Base/Z06 Complete Header Package without Cats Applications: Chevrolet
Retrofit Steering Column
 Retrofit Steering Column INSTALLATION INSTRUCTIONS for 1965 Ford Falcon FOR PART NUMBER S: 1170906010, 1170906020, 1170906051, 1130906010, 1130906020, 1130906051 S INCE 1986 www.ididitinc.com 610 S. Maumee
Tools Required. Metric Wrench Set Screwdriver Set Metric Socket Set Pliers Heavy duty hydraulic Jack and Car Stands Box knife or similar Hacksaw WD40
 Subaru 2004+ Legacy GT & Outback XT For JDM 2.0 twinscroll turbo and USDM 2.5 turbo models Front Mount Intercooler Fitting Instructions PN# LEG-1348-000 You are now the proud owner of a highly tested and
Subaru Front Mount Intercooler Kit STI Subaru Front Mount Intercooler Kit STI
 Subaru Front Mount Intercooler Kit STI 2008-2014 715500 Subaru Front Mount Intercooler Kit STI 2008-2014 Congratulations on your purchase of the Subaru Front Mount Intercooler Kit STI 2008-2014. The following
Procharger Stage II Intercooled Supercharger System (11-14 GT)
") Procharger Stage II Intercooled Supercharger System (11-14 GT) Installation Time: Approximately one day. Installed on 2012 Mustang GT 5.0/Manual Required Tools 3/8 Socket Set (Standard and Metric) 1/2
Procharger Stage II Intercooled Supercharger System (11-14 GT) Installation Time: Approximately one day. Installed on 2012 Mustang GT 5.0/Manual Required Tools 3/8 Socket Set (Standard and Metric) 1/2
Installation Instructions
 2011-2013 LML DURAMAX COMPOUND-ADD 2011-2015 LML A Duramax TURBO KIT Add INSTALL A Turbo INSTRUCTIONS Compound Kit Installation Instructions 1-800-955-0476 - www.industrialinjection.com - info@industrialinjection.com
Installation Notes: #86000-R Race Series +3.5 L/T Kit
 159 North Maple St. Unit J, CORONA CA 92880 P. 951-737-9682 F. 951-737-9006 WWW.CHAOSFAB.COM Installation Notes: #86000-R Race Series +3.5 L/T Kit Factory manual is recommended for removal and re-installation
PARTS LIST: 8581 DODGE LONG ARM BRACKETS 03-13
 SYNERGY MFG. 870 INDUSTRIAL WAY, SAN LUIS OBISPO, CA (805) 242-0397 8580 03-12 DODGE 2500/3500 4X4, 06-08 1500 MEGACAB 4X4 LONG ARM SUSPENSION KIT V3.0 GENERAL NOTES: These instructions are also available
Deuce/Ace Installation Instructions
 HARDWARE KIT: Upper Mounting Plate: 2-7/16" (11mm) X 3.5" bolts 2-7/16" flange nuts 2-2" spacers 2-7/16" trim cap mounting washers 2 - plastic trim caps TOOLS NEEDED: safety glasses wrenches 16mm or 5/8"
2015+ HELLCAT 6.2L HEMI System vehicle specific plate system xx
 These installation instructions will guide you through installing the Nitrous Outlet 2015+ Hellcat 6.2L Hemi Vehicle Specific Plate System on your vehicle. Before you get started, remember to never use
OVER THE KNUCKLE 1-TON STEERING INSTALLATION INSTRUCTIONS
 OVER THE KNUCKLE 1-TON STEERING INSTALLATION INSTRUCTIONS TOOLS NEEDED Grinder with cutoff wheel, sawzall, cutting torches, or a plasma cutter Welder (for optional sway bar mounts) Hand drill with a ½
INSTALLATION INSTRUCTIONS
 INSTALLATION INSTRUCTIONS --1075 North Ave. Sanger, CA 93657-3539 local: 559-875-0222 fax: 559-876-2259 toll free: 800-445-3767-- 2505 Lowering Spindle Assembly Installation Instructions ½ TON SILVERADO
Next, set the bar level and tighten it down. Do this on both the driver and passenger sides.
 Next, set the bar level and tighten it down. Do this on both the driver and passenger sides. Using two tape measures, measure the outside width at the front and the rear of the tubes. The front dimension
Ford AOD-4R70W-AODE Cable Operated Shifter Installation Instructions
 Ford AOD-4R70W-AODE Cable Operated Shifter Installation Instructions Building American Quality With A Lifetime Warranty! TOLL FREE 1-877-469-7440 tech@lokar.com www.lokar.com Ford AOD-4R70W-AODE Cable
Ford AOD-4R70W-AODE Cable Operated Shifter Installation Instructions
 Ford AOD-4R70W-AODE Cable Operated Shifter Installation Instructions Building American Quality With A Lifetime Warranty! TOLL FREE 1-877-469-7440 tech@lokar.com www.lokar.com Ford AOD-4R70W-AODE Cable
Ford C4 and C6 Floor Mount Automatic Transmission Shifter Installation Instructions
 Ford C4 and C6 Mount Automatic Transmission Shifter Installation Instructions Building American Quality With A Lifetime Warranty! TOLL FREE 1-877-469-7440 tech@lokar.com www.lokar.com Ford C4 and C6 Mount
Mikuni RS Carburetor Conversion
 Mikuni RS Carburetor Conversion After putting your carbies on the bench or the kitchen table if the wife is out, you will see that the linkages may be in different positions depending on which brand of
CP3 Retrofit Pump Install:
 CP3 Retrofit Pump Install: 2A 4 2 5 3 6 1.) Clean this area very well. No dirt = No troubles!!!!! Lay lots of Rags under and around the pumps, alternator and belts!!!!! This will save dropped tools, parts,
2008 & Newer Ford F-350 Chassis Cab 4-Link Rear Installation Instructions
 KLM18100 2686 Highway 92 - Oskaloosa, IA 52577 phone: 641.673.0468 - fax: 641.673.4168 2008 & Newer Ford F-350 Chassis Cab 4-Link Rear Installation Instructions Installation 1. Before doing anything, measure
Our goal is to make the install a breeze. Please read the entire guide before beginning.
 www.airkewld.com Page 1 of 6 IRS Axle Kit Install IRS Axle Kit Install Our goal is to make the install a breeze. Please read the entire guide before beginning. KITS SHOULD INCLUDE 2 - Control-arm mounting
Retro it Steering Column
 Retro it Steering Column INSTALLATION INSTRUCTIONS for 1970-74 Cuda/Challenger FOR PART NUMBER S: 1620810010, 1620810020, 1620810051, 1620820010, 1620820020, 1620820051 S I NCE 1986 Instruction # 8000000005
HASPORT PERFORMANCE EFH1
 HASPORT PERFORMANCE Installation Instructions For: Part Number EFH1 1988-1991 Honda Civic/CRX Hasport Performance mounts are the result of extensive research and engineering. All mounts are designed with
Installation Instructions For: Part Number EGJ1 for J-series V6 engines into Honda Civic, Del Sol And Acura Integra
 Installation Instructions For: Part Number EGJ1 for J-series V6 engines into 1992-1995 Honda Civic, 1994-1997 Del Sol And 1994-2001 Acura Integra Hasport Performance mounts are the result of extensive
ALL AMERICAN BILLET. Front Drive System - Small Block Ford Installation Instructions
 ALL AMERICAN BILLET Front Drive System - Small Block Ford Installation Instructions Small Block Ford with AC & PS All American Billet Store (800) 764-0926 www.allamericanbilletstore.com Items needed for
2. With the rear door open remove pull-style clip from the passenger side just below the door latch.
 LoD Offroad FJ Cruiser Rear Bumper with Tire Carrier Installation Instructions 1. Begin with removing factory spare from the rear door. 2. With the rear door open remove pull-style clip from the passenger
BD Venom Dual Fuel F O R D 6. 7 L P O W E R S T R O K E Installation Instructions
 U 21 March 2017 (1050470) Venom Dual Fuel Kit (I-00390) 1 DOWNLOAD ENHANCED INSTALL MANUALS AT dieselperformance.com BD Venom Dual Fuel 2 0 1 1-2 0 1 6 F O R D 6. 7 L P O W E R S T R O K E Installation
The spacers can be made out of.750 round aluminum bar with a.3125 to.318 hole drilled in center.
 SECTION I : FRONT COVER INSTALLATION With Crankshaft, Camshaft and oil Galley plugs installed in engine, you need to verify that the front cover clears the oil galley plugs and fits on engine block. The
Installation Instructions For: Part Number EFK1 K-series Mount Kit for Civic and CR-X
 HASPORT PERFORMANCE Installation Instructions For: Part Number EFK1 K-series Mount Kit for 1988 1991 Civic and CR-X HASPORT PERFORMANCE Inc. 2849 S. 44 th St. Phoenix, AZ 85040 Phone: (602) 470-0065 Fax:
BD Venom Dual Fuel F O R D 6. 7 L P O W E R S T R O K E Installation Instructions
 U 30 January 2017 (1050470) Venom Dual Fuel Kit (I-00390) 1 DOWNLOAD ENHANCED INSTALL MANUALS AT dieselperformance.com BD Venom Dual Fuel 2 0 1 1-2 0 1 4 F O R D 6. 7 L P O W E R S T R O K E Installation
EVO Manufacturing. 2.5 /3.5 Jeep Wrangler JL Enforcer Kit Instruction Manual. for all: EVO-3011, EVO-3012, EVO-3013, EVO-3014 Kits
 EVO Manufacturing 2.5 /3.5 Jeep Wrangler JL 2018+ Enforcer Kit Instruction Manual for all: EVO-3011, EVO-3012, EVO-3013, EVO-3014 Kits READ BEFORE INSTALL: 2.5 JL Enforcer/Enforcer Overland kits with either
Slide the billet aluminum cap over the bushing and secure with the 3/8-16 x 2 1/2 socket head allen and locknuts provided.
 Slide the billet aluminum cap over the bushing and secure with the 3/8-16 x 2 1/2 socket head allen and locknuts provided. Put the urethane bushings into the upper antiroll-bar-link eyebolt. Coat the bushings
Pypes Polished Shorty Headers (05-10 V6):
:") Pypes Polished Shorty Headers (05-10 V6): Introduction: The kit comes complete with replacement hardware and gaskets and can be easily done in your driveway. The hardware supplied for install includes
Pypes Polished Shorty Headers (05-10 V6): Introduction: The kit comes complete with replacement hardware and gaskets and can be easily done in your driveway. The hardware supplied for install includes
Installation Manual TWM Performance Short Shifter Cobalt SS/SC, SS/TC, HHR SS, Ion Redline and Saab 9-3
 Page 1 Installation Manual TWM Performance Short Shifter Cobalt SS/SC, SS/TC, HHR SS, Ion Redline and Saab 9-3 Please Note: It is preferable to park on a flat surface, as you will have to engage and disengage
INSTALLATION INSTRUCTIONS
 COLD AIR INTAKE INSTALLATION INSTRUCTIONS PART NUMBER D760-0390C APPLICATION: 1999-2003 E39 M5 PARTS LIST 1 Left Aluminum Intake Tube 1 Air Pump Bracket (A) 1 Right Aluminum Intake Tube 1 Air Pump Bracket
Chevrolet Cobalt Short Shifter Installation Manual
 Chevrolet Cobalt Short Shifter Installation Manual Pull shift boot down on the shifter shaft. Pull up on the shift knob to remove it. It requires some force. Remove the ebrake console, shifter console
Holley High Performance Intake System* For Port 13B Engines (Includes B 6-Port engines converted to 4-Port)
") Holley High Performance Intake System* For 1974-1978 4-Port 13B Engines (Includes 1984-85 13B 6-Port engines converted to 4-Port) Installation Instructions I-18038 Note: These instructions assume: The
Holley High Performance Intake System* For 1974-1978 4-Port 13B Engines (Includes 1984-85 13B 6-Port engines converted to 4-Port) Installation Instructions I-18038 Note: These instructions assume: The
HP10207 KIT. Ram WD*
 HP10207 KIT Ram 1500 4WD* (For 2WD call customer service 800.663.0096 for assistance) * See application guide for proper fitment. Use the most advanced air springs on the market to eliminate your vehicle
Backwater Performance Systems Large Vanguard Mikuni Twin Carburetor Kit
 Backwater Performance Systems Large Vanguard Mikuni Twin Carburetor Kit 1. Throttle Cable Twin (CKC-41) 2. Carburetor VM30mm (CKC-40) 3. Loctite 242.5mL (A-210) 4. Air Cleaner Filter 6000 (EC-86) 5. Rev
Eurocompulsion Camshaft Installation
 Eurocompulsion Camshaft Installation Introduction, please read. The purpose of this article is too assist our customers with installation of a performance camshaft in the Fiat Multiair 1.4 Turbo. The operation
INSTALLATION INSTRUCTIONS
 HIGH FLOW AIRFLOW METER INSTALLATION INSTRUCTIONS PART NUMBER D763-1600A APPLICATION: 2001-06 E46 M3 Parts List: Hose clamp 64Z (7) Plastic Rivets Air Filter Temp Sensor & Harness (2) Button Head Screws
SUT-450-I ASSEMBLY REQUIREMENTS
 SUT-450-I Torque wrench, carpenters square, wire cutters, Phillips screwdriver, 7/16, 9/16, and 3/4 combination wrenches, ratchet, 9/16,3/4,13/16, and 7/8 sockets. ASSEMBLY REQUIREMENTS *Torque all T-bolt
Turner M50 Manifold Adapter Install. April 26, 2012
 April 26, 2012 Models: 1996-99 E36 328i/M3; 1997-98 E39 528i, 1997-98 Z3 2.8, 1998-2000 MZ3 S52 Product(s): Turner M50 Manifold Adapter Kit Subject: Installation Guidelines and Tips This guide will aid
Technical Support (707)
") Installation Instructions UNIMATIC SHIFTER Fits: GM, Powerglide, Ford and Chrysler Transmissions See Application Guide for Specific Vehicles Catalog # 80775 WORK SAFELY! For maximum safety, perform this
Installation Instructions UNIMATIC SHIFTER Fits: GM, Powerglide, Ford and Chrysler Transmissions See Application Guide for Specific Vehicles Catalog # 80775 WORK SAFELY! For maximum safety, perform this
Retro it Steering Column
 Retro it Steering Column INSTALLATION INSTRUCTIONS for 1976-86 CJ5 & CJ7 FOR PART NUMBER S: 1520800010, 1520800020, 1520800051, 1526800010, 1526800020, 1526800051 S I NCE 1986 Instruction # 8000000010
Powerglide Automatic Floor Mount Shifter Installation Instructions
 Powerglide Automatic Mount Installation Instructions Building American Quality With A Lifetime Warranty! TOLL FREE 1-877-469-7440 (865) 966-2269 FAX (865) 671-1999 tech@lokar.com www.lokar.com Powerglide
GM Floor Mount Automatic Transmission Shifter Installation Instructions
 GM Mount Automatic Transmission Shifter Installation Instructions Building American Quality With A Lifetime Warranty! TOLL FREE 1-877-469-7440 tech@lokar.com www.lokar.com GM Mount Automatic Transmission
Big Block Installation
 Factory Five Racing, Inc. Big Block Installation 427 Shown here with fuel injection. 1 These instructions are designed to supplement the assembly manual where the assembly process is different from the
1 M-3000-H4 F150 4X4 Lowering Kit
 READ INSTRUCTIONS COMPLETELY THROUGH BEFORE STARTING. IT IS RECOMMENDED THAT INSTALLATION BE DONE BY A QUALIFIED MECHANIC. REPLACE ALL STOCK PARTS THAT ARE DAMAGED OR WORN. ALWAYS WEAR EYE PROTECTION.
03-04 Mach 1. Hellion Power Systems Mach 1 Kit Instructions
 Hellion Power Systems 03-04 Mach 1 Kit Instructions Part 1 Hellion recommends that the front suspension system be installed either by trained professionals or by 5.Remove rack bolts K-Member Installation
OIL COOLER KIT INSTALLATION INSTRUCTIONS PART NUMBER D
 OIL COOLER KIT INSTALLATION INSTRUCTIONS PART NUMBER D570-0907 APPLICATION: 2011-12 E90 335i/xi (N55 engine) with BMW M-Technic bumper and without stock oil cooler Congratulations for being selective enough
IMPORTANT WARRANTY & INSTALLATION INSTRUCTIONS ATTACHED
 IMPORTANT WARRANTY & INSTALLATION INSTRUCTIONS ATTACHED Please Forward All Attached Information to Consumer Warranty Not Valid Unless Returned to CORSA Performance We ask that you take a few moments to
HASPORT PERFORMANCE EFJ1
 HASPORT PERFORMANCE Installation Instructions For: Part Number EFJ1 for J-series V6 engines into 1988-1991 Honda Civic and CR-X Hasport Performance mounts are the result of extensive research and engineering.
BBK Long Tube Header and Shorty Mid-pipe (05-10 GT):
:") Time Required: Approximately 6-8 Hours BBK Long Tube Header and Shorty Mid-pipe (05-10 GT): Tools Required: Floor Jack or Ramps Jack Stands (unless you used a ramp) 5mm, 8mm, 10mm, 12mm, 22mm sockets/open
Time Required: Approximately 6-8 Hours BBK Long Tube Header and Shorty Mid-pipe (05-10 GT): Tools Required: Floor Jack or Ramps Jack Stands (unless you used a ramp) 5mm, 8mm, 10mm, 12mm, 22mm sockets/open
Thank you for purchasing the Dezod Motorsports Return Fuel System for your Scion tc.
 Thank you for purchasing the Dezod Motorsports Return Fuel System for your Scion tc. We took much pride in putting together a fuel system that would deliver a maximum amount of fuel as simply as possible
MSD 6AL Ignition Module w/ Rev Control - Installation Instructions
 MSD 6AL Ignition Module w/ Rev Control - Installation Instructions The below installation instructions work for the following products: MSD 6AL Ignition Module w/ Rev Control Please read through the instructions
OIL COOLER KIT INSTALLATION INSTRUCTIONS PART NUMBER D
 OIL COOLER KIT INSTALLATION INSTRUCTIONS PART NUMBER D570-0904 APPLICATION: 2011-2012 E90 335i/xi (N55 engine) with BMW standard bumper and with stock oil cooler Congratulations for being selective enough
SR Performance Twin 62mm Throttle Body for GT
 Required Tools: SR Performance Twin 62mm Throttle Body for 2005-2010 GT Flat-head screwdriver Ratchet Small extension 10mm socket 8mm socket T20 Torx bit Needle nose pliers 5mm allen wrench Recommended
Installation Manual v1.0: RPM Governor Spring Installation Dodge. Please read all instructions before installation.
 Installation Manual v1.0: 705-940-2164 4000 RPM Governor Spring Installation 1994-98 Dodge Please read all instructions before installation. The stock governor springs begin to restrict fuel rack travel
Porsche 928 with 16v LH-Jetronic Fuel System
 Porsche 928 with 16v LH-Jetronic Fuel System Toll-Free Tech Hot Line: 877-FOR-928M 877-367-9286 Please do not copy this manual and give copies to your friends. Our ability to bring you this supercharger
Multistrada (MTS) Tank Installation Notes. Tools Required. Phase 1: Remove Fairings. Phase 2: Remove Fuel Tank
 Tank Installation Notes. Tools Required. Phase 1: Remove Fairings. Phase 2: Remove Fuel Tank") The California Cycleworks MTS tank provides an aftermarket alternative to the OEM nylon fuel tanks as used on aircooled Desmodue Ducati Multistrada 1100, 1000, and 620 models. This fuel tank is NOT for
The California Cycleworks MTS tank provides an aftermarket alternative to the OEM nylon fuel tanks as used on aircooled Desmodue Ducati Multistrada 1100, 1000, and 620 models. This fuel tank is NOT for
v Porsche 928
 1985-86 32v Porsche 928 Toll-Free Tech Hot Line: 877-FOR-928M 877-367-9286 Please do not copy this manual and give copies to your friends. Our ability to bring you this supercharger kit at this price relies
GP125S STAINLESS HEADER
 GP125S STAINLESS HEADER WITH EGR FITTING FORD EXCURSION 6.8L-V-10 2/4WD FORD SUPERDUTY TRUCK F250HD/F350 6.8L-V10 2/4WD GIBSON HEADERS ARE 50 STATE SMOG LEGAL 2/2 WARNING! Do not rely on bumper jacks or
3 Turbo Downpipe Installation Audi A3 / Volkswagen GTI / Volkswagen Jetta 2.0L FSI/TSI Turbo CD100013
 Please take time to read and understand these installation instructions. APR recommends that installation of this system be performed by a qualified service center or professional muffler installer who
Mustang V6 Shaker 99-04* Components Check List:
 Mustang V6 Shaker 99-04* Components Check List: *03 Model requires new hood CDC Inspected Installer Check Quantity Descriptions 1- Hood Appliqué 1- Aluminum Shaker Scoop 1- Lower Air Box w/drain tube fittings
99-03 V6 "Shaker" System Instructions. *03 Model requires new hood Contents w/ Kit. Tool List For Appliqué:
 99-03 V6 "Shaker" System Instructions *03 Model requires new hood Contents w/ Kit 1 - Hood Appliqué 1 - Aluminum Shaker Scoop 1 - Lower Air Box w/drain tube fittings (2) 1 - Upper Air Box w/cdc nameplate
Installation Instructions
 Instructions Created by an: 2007-Present Toyota Tundra LRT Leveling Lift Kit - 4WD by Low Range Off-Road (SKU# LR-LRTundra) Instructions also apply to 2WD Kits. Installation Instructions Revised 7-11-17
If you have any difficulties at all, please give us a call. Thank you and enjoy your MetalCloak Products!
 PRODUCT: TJ/LJ 3.5 Dual Rate Lift RockSport Edition READ INSTRUCTIONS IN FULL BEFORE INSTALLATION. QUESTIONS? CALL 916-631-8071 M-F 7:00 AM 5:00 PM PST The MetalCloak experience includes the ease of installation
FULL LENGTH HEADERS/ CATTED HEAD PIPES
 INSTALLATION INSTRUCTIONS INS232 2016-2018 CAMARO 6.2L V8 FULL LENGTH HEADERS/ CATTED HEAD PIPES Part #4044 and 40440 Special Tools required: 10mm, 12mm, 13mm, 15mm Socket and Wrenches, Pliers, Saw, Welder
1 Green Pressure Regulator Spring Automatic transmissions operate at temperatures between 150ºF and
 Installation Instructions for 603107 Valve Body Kit C-4 1970 & Later Tools Required Speed Handle or Ratchet 3/8 Drive 1/2 Socket 3/8 Drive 7/16 Socket 3/8 Drive 5/16 Socket 3/8 Drive Small Screwdriver
List of parts needed below. Tools needed
 1 BMW 645 Coolant leak repair (Cap with Seal Repair and Expanding Coolant Pipe Installation w Pics) By Michael R. Brown (Estimated time to complete the job is 6-8 hrs) List of parts needed below. BMW PART
99-04 GT. Hellion Power Systems Mustang GT Kit Instructions
 Hellion Power Systems 99-04 Mustang GT Kit Instructions Part 1 Hellion recommends that the front suspension system be installed either by trained professionals or by 5.Remove rack bolts K-Member Installation
Chrysler 727, 904, 518 Floor Mount Automatic Transmission Shifter Installation Instructions
 Chrysler 727, 904, 518 Mount Automatic Transmission Shifter Installation Instructions Building American Quality With A Lifetime Warranty! TOLL FREE 1-877-469-7440 tech@lokar.com www.lokar.com Release Button
Remove Air Cleaner Cover and. Filter
 Remove Air Cleaner Cover and Inspect paper filter for tears Foam pre-cleaner is washable if equipped Replace if necessary Filter Remove Trim Panel Pull throttle lever knob off Remove 3, 8mm screws Remove
Ford C6 Automatic Trans Mount Shifter Installation Instructions
 Ford C6 Automatic Trans Mount Installation Instructions Building American Quality With A Lifetime Warranty! TOLL FREE 1-877-469-7440 tech@lokar.com www.lokar.com Ford C6 Automatic Trans Mount Installation
Installation Instructions
 Preparing your vehicle to install your brake system upgrade 1. Rack the vehicle. 2. If you don t have a rack, then you must take extra safety precautions. 3. Choose a firmly packed and level ground to
GM C10 Street Grip
 Part # 11365010/11365110-1973-1987 GM C10 StreetGrip Front Components 11369590 Delrin Control Arm Bushings 11369300 Drop Spindles 11362350/11362351 Front CoilSpring Kit 11369515 Front HQ Series Shocks
What s in your new header system kit?
 !"#$% "#$%& ' "())' **+ Congratulations on your purchase of the Dynatech / SuperMaXX system for the Dodge Magnum / Chrysler 300C. We believe, and think you will agree that this system is second to none
Installation Instructions INDY SHIFTER Fits: Mustang Fastback & Convertible with MT-82 Transmission Catalog #
 Installation Instructions INDY SHIFTER Fits: 2015-2018 Mustang Fastback & Convertible with MT-82 Transmission Catalog # 3916036 Watch our installation video on YouTube WORK SAFELY! For maximum safety,
2015 Corvette Supercharger System Instructions
 2015 Corvette Supercharger System Instructions These instructions are meant to serve as a guide to the installation of the ECS 2015 Corvette Supercharging system. Please be sure to use all safety equipment
Subaru 5-Speed Double Adjustable Short Throw Shifter
 Subaru 5-Speed Double Adjustable Short Throw Shifter 1999+ Subaru Impreza 5-Speed 2004-2005 Subaru Forester XT 5-Speed Congratulations on your purchase of the COBB Tuning Double Adjustable Short Throw
RHINO SUSPENSION SYSTEM INSTALLATION INSTRUCTIONS
 PARTS INCLUDED: 2 FRONT UPPER A-ARMS 2 FRONT LOWER A-ARMS 2 UNI-BALL JOINTS 2 UNI-BALL JOINT STUDS 2 UNI-BALL JOINT CAPS 2 RETAINING RINGS 1 FRONT SHOCK ASSEM. 2 DELRON STEERING STOPS 2 SHOCK MOUNT SPACERS
55-64 Full Size Chevy
 55-64 Full Size Chevy Installation Instructions Power Disc Conversion 9 slimline booster pictured Your new disc brake conversion kit can be bolted up with standard hand tools. The only tools you may not
Improving the gearshift feel in an SW20.
 Improving the gearshift feel in an SW20. Part one In 3 parts. The SW20 gearshift can be often be greatly improved by eliminating play in the shift linkages, and this article covers three areas that need
M7 R52S & R53 Cold Air Intake Installation Guide 53-3M7301
 M7 R52S & R53 Cold Air Intake Installation Guide 53-3M7301 M7 Speed engineers and manufactures the highest quality MINI COOPER accessories and performance parts available anywhere on Planet Earth! Please
M14 AUTOMOTIVE SPARK PLUGS AND WIRES CONVERSION KIT INSTALLATION INSTRUCTIONS
 M14 AUTOMOTIVE SPARK PLUGS AND WIRES CONVERSION KIT INSTALLATION INSTRUCTIONS (It is highly recommended you read the instructions completely before beginning) 1. Be sure the magneto switches are turned
BEW engine timing belt replacement procedure from MOGolf (as demonstrated on a 2004 Jetta).
.") BEW engine timing belt replacement procedure from MOGolf (as demonstrated on a 2004 Jetta). Based on the procedure published by Volkswagen, but modified for the "average" shadetree mechanic. Some special
BEW engine timing belt replacement procedure from MOGolf (as demonstrated on a 2004 Jetta). Based on the procedure published by Volkswagen, but modified for the "average" shadetree mechanic. Some special