XEROX WORKCENTRE 4150
|
|
|
- Dominick Wright
- 5 years ago
- Views:
Transcription


1 XEROX WORKCENTRE 4150 TONER CARTRIDGE REMANUFACTURING INSTRUCTIONS 013R00623 DRUM UNIT
2 REMANUFACTURING THE XEROX WORKCENTRE 4150 DRUM UNIT By Enrique E. Estura, Daniel Reyes, and the Technical Staff at UniNet Introduced to the market in September 2008, the Xerox WorkCentre 4150 is a machine that operates with a fax motor capable of printing 45 ppm at 1200 DPI. This machine has a separate toner and drum unit for printing cycles of 20,000 and 55,000 pages respectively. The remanufacturing instructions for the toner cartridge are dealt with in a separate article written by Mike Josiah. The following remanufacturing steps relate to the OEM part number 013R00623 which, contrary to what happens with the toner cartridge, is a multi-region device chipped to that effect. Both the toner and drum unit use RF chips that require replacement each cycle. The xerographic system used in this model is known as dual components which necessarily implies conjunction of toner and carrier to perform the image development. The drum unit, which is of immediate concern, is where the machine s xerographic system centers image creation and its development all carried out in a rather complex module which require sub systems approach for disassembly, cleaning, and component replacement. To work with this drum unit all that is needed are the basic tools found in any remanufacturing shop for laser toner cartridges including a toner vacuum cleaner. There is a striking similarity in equipment between the Xerox WorkCentre 4150 and the Samsung SCX However, there are also extreme differences in the programming and functionality, which impedes interchangeability of toner and drum units including chips. To say that this drum unit is easy to remanufacture would be an understatement of the task involved mainly due to the numerous details to take into account for the work to be successful. We have created this instruction not only for disassembling sub-components in a precise order, but to also attend to each without leaving room for doubts when putting everything back as it was. Due to the fact that insertion and retrieval of this unit from the machine is performed perpendicularly we will refer to the part that goes in first as front and back for the part put into the machine last. The drum unit is divided into an image section and a development section, and as such we will proceed to disassemble and remanufacture. Once the work is completed on each will be put them together again leaving it ready for use.

 2. New OPC drum 3.")


3 REQUIRED TOOLS 1. Philips head screwdriver 2. Small common screwdriver 3. Needle nose pliers 4. Toner approved vacuum 5. Cleaning brush 1/2 REQUIRED SUPPLIES 1. Dedicated developer carrier (338 grams) 2. New OPC drum 3. New wiper blade 4. New PCR roller 5. Replacement RF chip for drum unit 013R Conductive grease 7. Q-tips 8. Lubricant powder INITIAL DISASSEMBLY 1. Remove the four Phillips screws from the back cover, and with the needle-nose pliers, remove the plastic coupling from the developer mixer shaft.


4 2. Remove the two screws holding the front of the cover and undo the plastic tab. 3. With the small screwdriver, pry the cover open and remove it from the unit. Be aware that a certain amount of toner might fall out of the orifice where the helicoid shaft turns. Be prepared to vacuum this area immediately.


 ending")
5 4. Now proceed to remove the four Phillips screws from the inside plate with contacts. 5. Removing the mentioned plate gives access to the Erasing Lamp electrical connections (red and black wires respectively) ending at the white connector. Open the connector.


6 6. Return to the opposite cover, and with the small screwdriver, pry the back cover to remove it from the unit. 7. With the above steps, the cartridge halves can now be separated into OPC and developing sections.


7 8. Begin working with the OPC section removing the OPC drive coupling, prying with the screwdriver at three separate points until it comes out completely. Note that the shaft end has a flat section to match with the coupling. 9. Remove the intermediary gear, and finally the helical shaft gear.


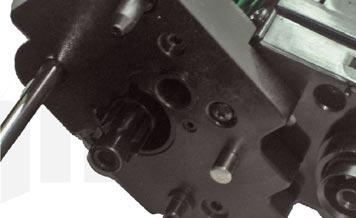
8 10. Remove the helical shaft slowly and clean any residual toner with the vacuum cleaner if need be while extracting it. REMOVAL OF THE PCR ASSEMBLY 11. Proceed next to remove the PCR assembly held by four Phillips screws. Take out the first one located in the back as shown, then the one up front and finally one on each side.


9 12. Pull out one end of the assembly and slide it out of position. 13. To remove the PCR, press it toward the gear to loosen the other end, and take it out from the assembly.


10 14. Thoroughly vacuum the foam roller and any debris accumulated beneath the roller, using for this purpose a narrow cleaning brush. The brush will help to loosen any debris that is difficult to vacuum from the small waste bin. 15. Clean the PCR roller with a soft cloth and install gear side first, and then the other end. Apply a very small amount of conductive grease on the shaft.


11 OPC DRUM UNIT DISASSEMBLY 16. Slightly push the shaft from the end where it connects to the metal grounding ring. This will create enough protrusion in the other end to grasp it, to take the metal bushing and the cross pin from the shaft. Be very careful not to lose these components. 17. Slide the shaft out and lift the OPC from where it rests.


12 18. On the contact side undo part of the strip out of the upper plastic post and leave it at an angle as shown. 19. Push the erasing lamp from the socket and take it out completely as shown.


13 20. Remove both screws securing the wiper blade, lift the front end, and slide the blade out of position. 21. Vacuum the waste bin completely including the inside of the tube where the helical shaft turns.


14 ASSEMBLY 22. Insert the proper end of the wiper blade in the support and then the other end. Tighten up with the two screws. 23. Insert the erasing lamp and firmly push the metal ground contact against the plastic post.


15 24. Take the OPC and visually align the slot in the hub with the slot in the molding where the cross pin rests. Insert the OPC shaft until reaching the hole in the shaft. Mount the cross pin before pushing the shaft all the way in. 25. Now slide the bronze bushing in and push the shaft further in until the other end touches the OPC metal grounding ring.


16 26. Insert and slide the helical shaft in its place until the shaft appears on the other end. Fit the drive gear, the intermediary, and finally the OPC gear. 27. Mount the PCR assembly pointing the rounded shaft end first and then the rest of the assembly in place. Secure the ends with proper screws first, and then the laterals.


17 28. Leave the OPC section for a moment and start working on the developer section. Remove the four screws belonging to the magnetic roller protection. 29. Displace the sliding cover enough to allow removal of the entire protection.


18 30. Rotate the magnetic roller in the opposite direction to its normal position to allow concentration of the carrier in a collecting point and to vacuum it. Slide the tip of the hose to take the entire carrier from the surface and rotating the magnetic roller until all of it is lifted. Be careful not to damage the surface of the magnetic roller. Continue cleaning of the mixer until all material is cleaned off. 31. Only in case of replacement consider taking the doctor blade out, otherwise perform cleaning without removal. The sealing that it is used with the doctor blade requires careful worktop put it right. Measuring the distance between the doctor blade working edge and the magnetic roller surface gives 0.80 mm gap that must be observed when installing the blade.


19 32. Once the cleaning process is done load the new carrier with even quantities inside the mixer cavity. 33. Install the magnetic roller protection aligning first all tabs and once all are locked, seat the opposite side to allow closing and securing with the screws.


20 34. Now take the image section and match the mounting holes with the corresponding couplers, and with one section next to the other proceed to close one against the other until the magnetic roller seats practically against the OPC. 35. Fit the inside contact plate and secure with the four screws.


21 36. Now install the external front end with the two screws and mount the plastic coupling for the mixer. 37. Install the back end.


22 38. Install a new RF chip for use in the Xerox WorkCentre BASIC REPETITIVE DEFECTS PCR roller: mm OPC drum: mm Magnetic roller: mm
XEROX PHASER 3635 MFP
 XEROX PHASER 3635 MFP TONER CARTRIDGE REMANUFACTURING INSTRUCTIONS XEROX PHASER 3635 TONER CARTRIDGE REMANUFACTURING THE XEROX PHASER 3635 MFP TONER CARTRIDGE By Mike Josiah and the Technical Staff at
TONER CARTRIDGE REMANUFACTURING INSTRUCTIONS OKIDATA B710/720/730 SERIES TONER CARTRIDGE
 OKIDATA B710/720/730 SERIES TONER CARTRIDGE REMANUFACTURING INSTRUCTIONS OKIDATA B710/720/730 SERIES TONER CARTRIDGE REMANUFACTURING THE OKIDATA B710/720/730 SERIES TONER CARTRIDGE By Mike Josiah and the
ML-3712 MLT-D205 TONER CARTRIDGE REMANUFACTURING INSTRUCTIONS
 SAMSUNG ML-3712 MLT-D205 TONER CARTRIDGE REMANUFACTURING INSTRUCTIONS SAMSUNG MLT-D205 TONER CARTRIDGE CHANGES TO THE SAMSUNG MLT-D205 DRUM & CARTRIDGE By Mike Josiah and the Technical Staff at UniNet
TONER CARTRIDGE REMANUFACTURING INSTRUCTIONS XEROX PHASER 3320 TONER CARTRIDGE
 XEROX PHASER 3320 TONER CARTRIDGE REMANUFACTURING INSTRUCTIONS XEROX PHASER 3320 TONER CARTRIDGE REMANUFACTURING THE XEROX PHASER 3320 TONER CARTRIDGE By Mike Josiah and the Technical Staff at UniNet First
THE ML-3471 TONER CARTRIDGE
 SAMSUNG ML-3471 TONER CARTRIDGE REMANUFACTURING INSTRUCTIONS THE ML-3471 TONER CARTRIDGE DOC# 0438 By Mike Josiah and the technical staff at Summit Technologies a distributor of Summit and Uninet Products.
HP ENTERPRISE 600 M651/M680 SERIES TONER CARTRIDGE REMANUFACTURING INSTRUCTIONS
 HP ENTERPRISE 600 M651/M680 SERIES TONER CARTRIDGE REMANUFACTURING INSTRUCTIONS HP 652A TONER CARTRIDGE RREMANUFACTURING THE HP COLOR ENTERPRISE 600 M651/M680 SERIES TONER CARTRIDGES By Mike Josiah and
1320 TO P2015 TONER CARTRIDGE CONVERSION INSTRUCTIONS
 HP 1320 TO P2015 TONER CARTRIDGE CONVERSION INSTRUCTIONS HP 1320 TO P2015 CONVERSION KIT (UNINET PART #1114) HP 1320 TO P2015 TONER CARTRIDGE CONVERSION INSTRUCTIONS By Javier Gonzalez and the Technical
IMAGECLASS MF7200 SERIES (EP105) TONER CARTRIDGE REMANUFACTURING INSTRUCTIONS
 TONER CARTRIDGE REMANUFACTURING INSTRUCTIONS") CANON IMAGECLASS MF7200 SERIES (EP105) TONER CARTRIDGE REMANUFACTURING INSTRUCTIONS CANON EP105 TONER CARTRIDGE REMANUFACTURING THE CANON IMAGECLASS MF7200 SERIES EP105 TONER CARTRIDGE By Mike Josiah and
CANON IMAGECLASS MF7200 SERIES (EP105) TONER CARTRIDGE REMANUFACTURING INSTRUCTIONS CANON EP105 TONER CARTRIDGE REMANUFACTURING THE CANON IMAGECLASS MF7200 SERIES EP105 TONER CARTRIDGE By Mike Josiah and
KONICA MINOLTA MAGICOLOR
 KONICA MINOLTA MAGICOLOR 5430 5440 5450 TONER CARTRIDGE REMANUFACTURING INSTRUCTIONS KONICA MINOLTA MAGICOLOR 5430 TONER CARTRIDGE REMANUFACTURING THE KONICA MINOLTA MAGICOLOR 5430/5440/5450 TONER CARTRIDGES
MINOLTA MAGICOLOR 5430/5440/5450 CARTRIDGE REMANUFACTURING INSTRUCTIONS
 MINOLTA MAGICOLOR 5430/5440/5450 CARTRIDGE REMANUFACTURING INSTRUCTIONS MINOLTA MAGICOLOR 5430 Color Laser Printer with Toner Cartridge MINOLTA MAGICOLOR 5430 TONER CARTRIDGE SIDE VIEW WITH END CAP SHOWN
TONER CARTRIDGE REMANUFACTURING INSTRUCTIONS LASERJET P1505 SERIES TONER CARTRIDGE
 HP LASERJET P1505 TONER CARTRIDGE REMANUFACTURING INSTRUCTIONS HP LASERJET P1505 SERIES TONER CARTRIDGE 2010 UniNet Imaging Inc. All trademark names and artwork are property of their respective owners.
Technical Document. Panafax UF-890 (actually revisiting the Panafax UF-550)
") Technical Document Disassembly Instructions SUMMIT Laser Products 95 Orville Drive Bohemia, New York 11716 Tel: 631-218-8376 Fax: 631-218-3275 Panafax UF-890 (actually revisiting the Panafax UF-550) Toner
Technical Document Disassembly Instructions SUMMIT Laser Products 95 Orville Drive Bohemia, New York 11716 Tel: 631-218-8376 Fax: 631-218-3275 Panafax UF-890 (actually revisiting the Panafax UF-550) Toner
LEXMARK C780 CARTRIDGE REMANUFACTURING INSTRUCTIONS LEXMARK C780 TONER CARTRIDGE
 LEXMARK C780 CARTRIDGE REMANUFACTURING INSTRUCTIONS LEXMARK C780 TONER CARTRIDGE REMANUFACTURING THE LEXMARK C780 BLACK & COLOR TONER CARTRIDGES First released in April 2008, the Lexmark C780 is based
HP LASERJET
 HP LASERJET 4200 4300 TONER CARTRIDGE REMANUFACTURING INSTRUCTIONS HP LASERJET 4200 TONER CARTRIDGE (Q1338A) HP LASERJET 4300 TONER CARTRIDGE (Q1339A) REMANUFACTURING HP LASERJET 4200/4300 TONER CARTRIDGES
HP 5500 COLOR LASER PRINTER W/TONER CARTRIDGES
 AbsoluteCOLOR AbsoluteBLACK UniDrums UniRollers UniParts UniCoatings AbsoluteCOLOR AbsoluteBLACK UniDrums UniRollers UniParts UniCoatings HP 5500 CARTRIDGE REMANUFACTURING INSTRUCTIONS HP 5500 COLOR LASER
Sharp AR-160 OPC Cartridges DOC-0270
 Home New Arrivals! Company Info Publications Special Features Contact Us Overview Tools Required Supplies Needed Disassembly Recommended Supplies Sharp AR-160 OPC Cartridges DOC-0270 OVERVIEW The Sharp
Conversion Kit for HP1200 Cartridge
 OEM HP1200 (C7115A) Cartridge Conversion Using T.P.E. CC1197 Canon EP26/EP27/X25/U Type Conversion Kit for HP1200 Cartridge OEM HP1200 (C7115A) T.P.E. CC1197 Canon EP26/EP27/X25/U Type Conversion Kit for
TPE CC1997CRS HP M252/MFP M277 X TONER HOPPER 60GRMS FILL(WITH SEAL) OEM HP M252/MFP M277 (CF400A-CF403A
 OEM HP M252/MFP M277 (CF400A-CF403A") Installation Instructions for TPE CC1997CRS HP M252/MFP M277 X TONER HOPPER 60GRMS FILL(WITH SEAL) OEM HP M252/MFP M277 (CF400A-CF403A or CF400X-CF403X) Cartridge T.P.E. CC1997CRS HP M252/MFP M277 X TONER
Installation Instructions for TPE CC1997CRS HP M252/MFP M277 X TONER HOPPER 60GRMS FILL(WITH SEAL) OEM HP M252/MFP M277 (CF400A-CF403A or CF400X-CF403X) Cartridge T.P.E. CC1997CRS HP M252/MFP M277 X TONER
INSTALLATION INSTRUCTIONS REPAIR SEAL KIT PowerSurvivor 40E
 INSTALLATION INSTRUCTIONS REPAIR SEAL KIT PowerSurvivor 40E PURPOSE OF THE KIT The Repair Seal Kit should be installed after 1000 hours of operation. It should be installed regardless of whether or not
DRUM UNIT REMANUFACTURING INSTRUCTIONS
 Absolute COLOR Absolute BLACK Unidrums Unirollers Uniparts Unicoatings EPSON ACULASER C2600 DRUM UNIT REMANUFACTURING INSTRUCTIONS EPSON ACULASER C2600 COLOUR LASER PRINTER EPSON ACULASER C2600 DRUM UNIT
DELL C 5100 TONER CARTRIDGE REMANUFACTURING INSTRUCTIONS
 DELL C 5100 REMANUFACTURING INSTRUCTIONS DELL C 5100 LASER PRINTER DELL C 5100 REMOVING THE GEARLESS END CAP 1. Remove the gearless end cap (shown) to access the toner fill cap. Using a small flathead
Installation Manual TWM Performance Short Shifter 2008 Mitsubishi Lancer
 Page 1 Installation Manual TWM Performance Short Shifter 2008 Mitsubishi Lancer Please Note: It is preferable to park on a flat surface, as you will have to engage and disengage the hand brake and shift
Installation Manual TWM Performance Short Shifter Subaru STi 2008+
 - 1 - Installation Manual TWM Performance Short Shifter Subaru STi 2008+ Please Note: It is preferable to park on a flat surface, as you will have to engage and disengage the hand brake and shift from
SAFETY THIS PRODUCT IS FOR OFFROAD USE ONLY. ALL LIABILITY FOR INSTALLATION AND USE RESTS WITH THE OWNER.
 SAFETY Your safety and the safety of others is very important. In order to help you make informed decisions about safety, we have provided installation instructions and other information. These instructions
2003 CR-V - A/T Shift Cable Replacement-Print Preview
 Page 1 of 7 2003 CR-V - A/T Shift Cable Replacement 1. Raise the front of the vehicle, or lift the vehicle up, and make sure it is securely supported. 2. Remove the driver's dashboard lower cover, and
Installation instructions for Alpha Racing Quickshifter/Blipper for a pre-2014 S1000RR
 Skill Level: Intermediate Installation instructions for Alpha Racing Quickshifter/Blipper for a pre-2014 S1000RR Tools Required: Alen keys/socket/drivers Torx keys/sockets/drivers Metric box wrenches and
3.2 DRIVE TORQUE HUB. Roll, Leak and Brake Testing SECTION 3 - CHASSIS & TURNTABLE. 3-2 JLG Lift
 3.2 DRIVE TORQUE HUB Roll, Leak and Brake Testing 10 LUG PATTERN Torque-Hub units should always be roll and leak tested before disassembly and after assembly to make sure that the unit's gears, bearings
5 Removal and replacement
 5 Removal and replacement This chapter describes the removal and replacement of field-replaceable units (FRUs) only. Removal and replacement strategy User-replaceable parts Covers Internal assemblies ENWW
Oreck Magnesium Series Service Manual. The Oreck Manufacturing Company
 Oreck Magnesium Series Service Manual The Oreck Manufacturing Company 08/2012 10/2011 The Oreck Manufacturing Company Contents Covering all Magnesium Upright Models Including: LW100, LW125, LW1000, AND
Maintenance Information
 80234313 Edition 1 June 2006 Air Grinder, Die Grinder, Sander and Belt Sander Series G1 (Angle) Maintenance Information Save These Instructions WARNING Always wear eye protection when operating or performing
Southwest Windpower Instruction Sheet AIR-X Circuit Replacement Kit
 Southwest Windpower Instruction Sheet AIR-X Circuit Replacement Kit Tools Required 5 / 32 Hex key 5 / 16 Hex key 7 / 64 Hex key Standard screwdriver Pair of external snap ring pliers Rubber mallet Hammer
Installation Manual TWM Performance Short Shifter Subaru Forester up to 2005
 - 1 - Installation Manual TWM Performance Short Shifter Subaru Forester up to 2005 Please Note: It is preferable to park on a flat surface, as you will have to engage and disengage the hand brake and shift
Maintenance Information
 80234313 Edition 2 May 2014 Air Grinder, Die Grinder, Sander and Belt Sander Series G1 (Angle) Maintenance Information Save These Instructions Product Safety Information WARNING Failure to observe the
Short-throw Shifter Installation Guide
 Short-throw Shifter Installation Guide Removal Procedure 1) Remove the shift control knob. A. Lift up on the rear portion of the shift control closeout boot retaining ring and detach the retaining ring
Model EL8500 Series. Bagless Upright. Assembly/Disassembly Guide 1
 Model EL8500 Series Bagless Upright Assembly/Disassembly Guide 1 Table Of Contents Parts Removal / Installation Guide Belt & Brushroll Section A Page 3 Hood Assembly Section B Page 3 Main PCB Board Section
Maintenance Information
 Form 16575334 Edition 1 April 2005 Electric Screwdrivers EL, EP and ET 34V DC Series Maintenance Information Save These Instructions WARNING Maintenance procedures have the potential for severe shock hazard
Maintenance Information
 04581245 Edition 2 May 2014 Air Grinder, Die Grinder and Sander Series G2 (Angle) Maintenance Information Save These Instructions Product Safety Information WARNING Failure to observe the following warnings,
Product Description. Product Numbers. Warning/Caution Notations. Required Tools. Wiring. Prerequisites
 Document No. 155-302N VE 598 Electronic Flowrite Valve Field Assembly Product Description The VE 598 Electronic Valve Assemblies consist of an electronic actuator, linkage kit, and a valve body assembly.
Primus Wind Power. AIR Circuit Replacement Instructions
 Primus Wind Power AIR Circuit Replacement Instructions Items included with this kit: (see Exploded View p. 3) ITEM ITEM NAME QUANTITY 1 SCREW - SOCKET HEAD - 10-24 X 1-1/2" 4 includes 1 spare 2 O-RING
SAFETY THIS PRODUCT IS FOR OFFROAD USE ONLY. ALL LIABILITY FOR INSTALLATION AND USE RESTS WITH THE OWNER.
 SAFETY Your safety and the safety of others is very important. In order to help you make informed decisions about safety, we have provided installation instructions and other information. These instructions
Blue Jay Rodless Cylinder BC MS. Track Repair Manual 1996 & 2012 THE EASTMAN EASTMAN. All End Caps Black for Models
 EASTMAN 1996 & 2012 THE EASTMAN Blue Jay Rodless Cylinder BC-40224-MS Track Repair Manual All End Caps Black for 1996-2012 Models IMPORTANT Disconnect this equipment from pneumatic pressure lines before
Installation Manual TWM Performance Short Shifter Cobalt SS/SC, SS/TC, HHR SS, Ion Redline and Saab 9-3
 Page 1 Installation Manual TWM Performance Short Shifter Cobalt SS/SC, SS/TC, HHR SS, Ion Redline and Saab 9-3 Please Note: It is preferable to park on a flat surface, as you will have to engage and disengage
KJ09168BK Renegade 1.5 Lift Kit
 KJ09168BK Renegade 1.5 Lift Kit www.daystarweb.com Tech Support Contact Info Tech@DaystarWeb.com Phone: 623.907.0081 Fax: 623.907.0088 841 South 71 st Avenue Phoenix, AZ 85043 Instruction Sheet: P21677
THIS GUIDE IS INTENDED FOR DEALERS AND SOLAR COMFORT TECHNICIANS ONLY AND IS NOT MEANT OR INTENDED TO BE REPRODUCED OR DISTRIBUTED TO THE CONSUMER
 THIS GUIDE IS INTENDED FOR DEALERS AND SOLAR COMFORT TECHNICIANS ONLY AND IS NOT MEANT OR INTENDED TO BE REPRODUCED OR DISTRIBUTED TO THE CONSUMER Table of Contents Page Tools Needed (A) 3 Replacement
Laser BILLET Main Grille
 Laser BILLET Main Grille Main grille - #6219420 / #6219421 2016 TOYOTA TACOMA Parts included (1) Billet Grille - Main Polished - Part #6219420 OR Black - Part #6219421 Hardware included (6) #8 0.7 Screws
Installation Manual TWM Performance Short Shift Kit Stage 1 and Stage 2 MazdaSpeed 6
 Page 1 Installation Manual TWM Performance Short Shift Kit Stage 1 and Stage 2 MazdaSpeed 6 Please Note: It is preferable to park on a flat surface, as you will have to engage and disengage the hand brake
Upper Class Grille Main grille INSERT - #54127 / #54131 / #54133 / #51127 / #51131 / 51133
 Parts included (1) - Main Full Opening - Polished - Part #54127 OR 1 Bar - Polished - Part #54131 OR 2 Bar - Polished - Part #54133 OR Full Opening - Black - Part #51127 OR 1 Bar - Black - Part #51131
Maintenance Adjustments
 4 Maintenance and Adjustments Chapter Contents Cleaning the Printer and Paper Handling Accessories..... 158 Cleaning the HP Digital Copier....................... 161 Cleaning ADF and Glass............................
Service Handbook High-Pressure Washer Pump
 Service Handbook High-Pressure Washer Pump 9.120-014.0 2 A. Water Inlet Filter C. Nozzle Insert 1. Remove filter with a screwdriver. 2. Clean filter with warm water and mild soap. 3. Reinstall filter.
TORCH Main Grille Main grille INSERT - # / # Chevrolet Silverado
 Parts included (1) TORCH Grille - Main (1) 40 LED - Part #6311271 OR Stealth - Part #6311271-BR OR (1) 30 LED - Part #6311281 OR Stealth - Part #6311281-BR Hardware included (1) - Large Bottom Mounting
Polaris 9300 Series Robotic Cleaner
 Polaris 9300 Series Robotic Cleaner 9300 Sport 9300xi Sport Zodiac Pool Systems, Inc. 1-800-822-7933 www.zodiacpoolsystems.com Regional Extension Instructor ext. Sales Representatives ext. ext. Service
EDGE The Laser Printer Tech Quarterly from Liberty Parts Team Summer 2014
 SERVICE EDGE The Laser Printer Tech Quarterly from Liberty Parts Team Summer 2014 THIS ISSUE: P4015 Transfer Block Replacement Replacing the M600 Fuser Drive P3005 Formatter and Ribbon Cables Three new
Power Steering Rack Leak from Right Side: Overhaul Procedure
 T-SB-0030-14 April 17, 2014 Power Steering Rack Leak from Right Side: Overhaul Procedure Service Category Steering Section Steering Gear/Linkage Market USA Applicability YEAR(S) MODEL(S) ADDITIONAL INFORMATION
Installation Instructions
 CADET Centerset Lavatory Faucet with Speed Connect Drain Installation Instructions Congratulations on purchasing your American Standard faucet with the Speed Connect Drain, a feature found only on American
Detroit Speed, Inc. Electric Headlight Door Kit Corvette P/N: &
 Detroit Speed, Inc. Electric Headlight Door Kit 1968-82 Corvette P/N: 122006 & 122007 The Detroit Speed Inc. Electric Headlight Door Kit replaces the stock vacuum actuated system on all 1968-82 Corvettes.
Dispenser Parts Part Description Replacement SKU
 Tork Elevation H1 Matic Towel Dispenser: H1 Matic System 5510202 White; 5510282 Black Dispenser Dimensions HxWxD Inches (cm): 14.65 x 13.26 x 7.99 (37.2 x 33.7 x 20.3) H1 Roll Towel Product Options: Roll
Rollstar Shade Installation Instructions
 Rollstar Shade Installation Instructions All Lifting Systems Inside or Outside Mount Thank you for purchasing your new Rollstar shade. It has been custom-made from the highest quality materials to the
Detroit Speed, Inc. Electric Headlight Door Kit Corvette P/N: &
 Detroit Speed, Inc. Electric Headlight Door Kit 1968-82 Corvette P/N: 122006 & 122007 The Detroit Speed Inc. Electric Headlight Door Kit replaces the stock vacuum actuated system on all 1968-82 Corvettes.
Maintenance Instructions. World Leader in Modular Torque Limiters. JSE AEA Extruder Clutch
 World Leader in Modular Torque Limiters PROTECTING EQUIPMENT& MACHINERYYEARSInstallation and Maintenance Instructions JSE.5-0234AEA Extruder Clutch 1304 Twin Oaks Street Wichita Falls, Texas 76302 (940)
DRIVE AXLE Volvo 960 DESCRIPTION & OPERATION AXLE IDENTIFICATION DRIVE AXLES Volvo Differentials & Axle Shafts
 DRIVE AXLE 1994 Volvo 960 1994 DRIVE AXLES Volvo Differentials & Axle Shafts 960 DESCRIPTION & OPERATION All 960 station wagon models use type 1041 rear axle assembly. All 960 4-door models use type 1045
Tooling Assistance Center
 Safeguards are designed into this application equipment to protect operators and maintenance personnel from most hazards during equipment operation. However, certain safety precautions must be taken by
Top Down Rollstar Shade Installation Instructions
 Top Down Rollstar Shade Installation Instructions Thank you for purchasing your new Rollstar shade. It has been custom-made from the highest quality materials to the dimensions you specified. With proper
Merkur Scorpio Odometer Repair Instructions
 www.odometergears.com Merkur Scorpio Odometer Repair Instructions http://www.bitsprings.com/gearinst.pdf Please read through these instructions completely once before proceeding. It is important to understand
Electric motor testing
 Electric motor testing MOTOR (MODELS EJ4-4001 AND EJ8-4001A) 23 GENERAL INFORMATION The vehicle is equipped with a 48-volt DC, shunt-wound, reversible traction motor. The shunt-wound motor is designed
SUT-250-S (These instructions are used for SUT-250-SCLC also)
") SUT-250-S (These instructions are used for SUT-250-SCLC also) Torque wrench, carpenters square, wire cutters, Phillips screwdriver, 7/16, 9/16, and 3/4 combination wrenches, ratchet, 9/16, 3/4, 13/16,
SUT-250-S (These instructions are used for SUT-250-SCLC also) Torque wrench, carpenters square, wire cutters, Phillips screwdriver, 7/16, 9/16, and 3/4 combination wrenches, ratchet, 9/16, 3/4, 13/16,
Please try our way first.
 1958-1962 Corvette Raingear installation instructions Designer s Note: The 1958-1962 Corvette RainGear wiper system that you have purchased is complex and will require patient fitting. Complete Instructions
LIMITED SLIP DIFFERENTIAL INSTALLATION
 Installation of the limited slip gear can be done with axle out of car or with car lifted to gain access from underneath. Refer to repair manual for proper lifting instructions if car is to be lifted.
Push Start Ignition (05-10 All) Installation
 Installation") Tools Required: Phillips head screwdriver Flat head screwdriver Ratchet 7mm Socket Torx T20 bit Wire strippers/cutters Hand file Needle nose pliers Installation Instructions: Push Start Ignition (05-10
Tools Required: Phillips head screwdriver Flat head screwdriver Ratchet 7mm Socket Torx T20 bit Wire strippers/cutters Hand file Needle nose pliers Installation Instructions: Push Start Ignition (05-10
SECTION 4 - FUEL SYSTEMS AND CARBURETION
 SECTION - FUEL SYSTEMS AND CARBURETION FUEL SYSTEMS - - - - - - - - - - - - - - - - - - - - - - - - - - - - - - - - - - - - - - - - - - - - - - - - - - - - - - - - - - - - - -62 FUEL PUMP - - - - - - -
TESLA MODEL S REAR UNDER SPOILER & DIFFUSER SYSTEM
 TESLA MODEL S Thank you for purchasing your Unplugged Performance Rear Under Spoiler & Diffuser System for the Tesla Model S! Please read this manual carefully prior to installation. REAR UNDER SPOILER
Operation and care of the Visual Optics Fiber Scopes
 Operation and care of the Visual Optics Fiber Scopes Congratulations on buying a high quality product from Visual Optics, Inc. We take pride in not only selling our products but serving and reacting to
SERVICE INSTRUCTIONS,HOOVER - BAGLESS CLEANERS
 SERVICE INSTRUCTIONS,HOOVER - BAGLESS CLEANERS o41oo 149 E -1 Upper Handle Handle Cap Handle Cover Rear Di_ Cup_ HEPA Front Cover pport Latch Shaft Spring Pre-Filter Rear Filter Grille Dirt Cup _,_ Front
AmTryke Adult Recumbent Model JT2000 #50-FC-2000
 AmTryke Adult Recumbent Model JT2000 #50-FC-2000 TOOLS Needed for Assembly 5 mm Allen Wrench 8 mm Socket or Wrench 10 mm Socket or Wrench 14 mm Socket or Wrench 15 mm Socket or Wrench 22 mm Socket or Adjustable
Installation Instructions 7024
 HAMILTON Centerset Lavatory Faucet with EverClean Finish & Speed Connect Drain Installation Instructions 70 Congratulations on purchasing your American Standard faucet with the EverClean finish and Speed
Installation Manual TWM Performance Short Shifter Nissan 350Z, 370Z Infiniti G35, G37
 Installation Manual TWM Performance Short Shifter Nissan 350Z, 370Z Infiniti G35, G37 It is preferable to park on a flat surface, as you will have to engage and disengage the hand brake and shift from
Installation Manual TWM Performance Short throw shifter 2001 and up Hyundai Accent
 Installation Manual TWM Performance Short throw shifter 2001 and up Hyundai Accent 1. Place the vehicle on a flat surface with blocks in front and behind the wheels preventing unwanted movement. The car
Moddit. How to Install an OS Giken Differential into a
 Moddit How to Install an OS Giken Differential into a Subaru BRZ This guide goes over the steps necessary to remove and install the OS Giken Limited Slip Differential into a Subaru BRZ. This guide may
In an effort to do a comprehensive 67,500 mile service article, this is what we found:
 UNDERHOOD Perform Service at 67,500 miles Let s break the service down into its three components: Part 1: Change the crankcase vent (CCV) filter Part 2: Remove and clean the exhaust gas recirculation (EGR)
Supply Valve Replacement
 This procedure is to help facilitate the replacement of the25.1-25.4 supply valves. Solenoid Supply Valves Note: You will need the following tools: Socket Wrench with extension and a 3/8 Socket Size 1
Current Range Rover Sport STRUT Collection Installation Manual
 2014 - Current Range Rover Sport STRUT Collection Installation Manual 1 1. Removing Main Grille and Lower Fascia 1.1 Run a line of low tack masking tape across the front of the bumper below the grille
GruvenParts.com BRASS GM Power Folding Mirror Gear Replacement Instructions. Updated 8/25/2017 Additional Pictures / Tips Posted!
 Page 1 GruvenParts.com BRASS GM Power Folding Mirror Gear Replacement Instructions Updated 8/25/2017 Additional Pictures / Tips Posted! ** Latest Design is uses an ALL BRASS SPUR GEAR!!! ** ** If you don
CorkSport ort Mazda 3 Adjustable Shifter Mazdaspeed 3, Mazda 3 6-speed and Mazda3 SkyActiv 6-speed
 Part # Axl-6-963 CorkSport ort Mazda 3 Adjustable Shifter 2010-2013 Mazdaspeed 3, 2010-2013 Mazda 3 6-speed and 2012-2013 Mazda3 SkyActiv 6-speed Pre-Installation Notes: The CorkSport Adjustable Short
Creation Date Last Mod Date Model Year Drawings Estimated Time. 5/22/2009 6/15/2009 S120/S90/E min.
 You are here: Service > Forks > 2008 > E100 > S120/S90/E100 50-hour Service Open the Specialized Business Online site in a new window... S120/S90/E100 50-hour Service Creation Date Last Mod Date Model
Fuser Replacement LJ 1160/1320/P2015
 Service Edge Page 6 COMPANY A L-side: Two tabs C R-side: Tabs E Back cover: tab, pin G Back cover B R-side: Tab D R-side: Tabs F Duplexer: tab Fuser Replacement LJ 1160/1320/P2015 As a regular maintenance
Tru-Billet Climate Control Knob Installation Instructions
 P/N S197-525-07 2007-08 Tru-Billet Climate Control Knob Installation Instructions Thank you for your purchase of SilverHorse Racing products. Please read all directions before beginning the installation.
Electrically Held to Mechanically Latched Contactor
 Electrically Held to Mechanically Latched Contactor Bulletin 1502 Series E or later Retrofit Instructions Important User Information Read this document and the documents listed in the Additional Resources
PIKE DUAL AIR PICTORIAL INSTRUCTIONS. INSTRUCTIONS FOR INSTALLING ENDURO FORK SEALS AND CHANGING SEMI-BATH OIL in RockShox PIKE Dual Air Forks
 INSTRUCTIONS FOR INSTALLING ENDURO FORK SEALS AND CHANGING SEMI-BATH OIL in RockShox PIKE Dual Air Forks RECOMMENDED PARTS AND TOOLS -Bicycle work stand -Plastic bucket/drain pan -5mm Allen wrench -DH
REVi RX-8 Intake. RX-8 REVi Intake System I PN Installation Instructions. Tools Required:
 RX-8 REVi Intake System PN 18299 Installation Instructions I-18299 Tools Required: Small/Stubby Phillips head screwdriver Small flat head screwdriver Medium Phillips head screwdriver 10mm socket and ratchet
CorkSport Mazdaspeed 3 ECU Relocation Box Mazdaspeed 3
 CorkSport Mazdaspeed 3 ECU Relocation Box 2007-2013 Mazdaspeed 3 Thank you for purchasing the CorkSport ECU Relocation Battery Box for the Mazdaspeed 3. With the install of this battery box, you now have
Trackstar Motorized Folding Shade Installation Instructions
 Trackstar Motorized Folding Shade Installation Instructions Thank you for purchasing your new Trackstar folding shade. It has been custom-made from the highest quality materials to the dimensions you specified.
EDGEMERE DUAL CONTROL WIDESPREAD LAVATORY FAUCET INSTALLATION INSTRUCTIONS
 EDGEMERE DUAL CONTROL WIDESPREAD LAVATORY FAUCET INSTALLATION INSTRUCTIONS 708.80 Thank you for selecting American Standard... the benchmark of fine quality for over 00 years. To ensure that your installation
LIFT TRUCK SERIES: G35S-2 G40S-2 G45S-2 G40SC-2 G45SC-2 G50SC-2. November 15, 2000 CODE 3150 LT3150-L0 SUBJECT: NEW DRIVE AXLE
 LIFT TRUCK SERIES: G35S-2 G40S-2 G45S-2 G40SC-2 G45SC-2 G50SC-2 November 15, 2000 CODE 3150 LT3150-L0 SUBJECT: NEW DRIVE AXLE A new drive axle has been introduced in the above model lift trucks. The purpose
AmTryke Adult Recumbent Model HP1000 #50-HC-1000
 AmTryke Adult Recumbent Model HP1000 #50-HC-1000 TOOLS Needed for Assembly 5 mm Allen Wrench 8 mm Socket or Wrench 10 mm Socket or Wrench 14 mm Socket or Wrench 15 mm Socket or Wrench 22 mm Socket or Adjustable
Periodic Maintenance 7-1
 Periodic Maintenance This section provides periodic maintenance guidelines for keeping the InkCenter Refill System in optimal operational condition and detailed descriptions of maintenance procedures.
TOYOTA RAV4/HV INTERIOR LIGHT KIT Preparation
 Preparation Part Number: PT413-42130 Kit Contents Item # Quantity Reqd. Description 1 1 Wire Harness 2 3 Hardware Bag Contents Item # Quantity Reqd. Description 1 20 Cable Tie 2 2 Scotchlok 3 2 Foam Pad
MANUFACTURING CO. THE FIRST NAME IN QUALITY COUPLINGS. Installation, Inspection, Operation & Maintenance Guide. Model 880 Coupling IMPORTANT
 MANUFACTURING CO. THE FIRST NAME IN QUALITY COUPLINGS Installation, Inspection, Operation & Maintenance Guide Model 880 Coupling IMPORTANT Read these instructions completely before installing, using or
Remove Air Cleaner Cover and. Filter
 Remove Air Cleaner Cover and Inspect paper filter for tears Foam pre-cleaner is washable if equipped Replace if necessary Filter Remove Trim Panel Pull throttle lever knob off Remove 3, 8mm screws Remove
Integrated Engineering MK7/MQB Cold Air Intake Install Guide IEINCI2 & IEINCI8
 Integrated Engineering MK7/MQB Cold Air Intake Install Guide IEINCI2 & IEINCI8 Thank you for purchasing another high quality Integrated Engineering product! This instruction guide is used for installation
INSTALLATION INSTRUCTIONS PATIENCE
 INSTALLATION INSTRUCTIONS PATIENCE 706.8X DUAL CONTROL WIDESPREAD LAVATORY FAUCET WITH SPEED CONNECT Thank you for selecting American Standard... the benchmark of fine quality for over 00 years. To ensure
Motion System Components Diagram. Note: #2 Mirror Cover and X-Axis Motor Cover have been removed for visibility. Maintenance.
 Professional Laser System PLS3.75, PLS4.75, PLS6.75 and PLS6.150D Keeping the laser system clean will ensure the highest quality engraving. A clean laser system is the best performing laser system. The