IMPORTANT WARRANTY & INSTALLATION INSTRUCTIONS ATTACHED
|
|
|
- Aileen Flynn
- 5 years ago
- Views:
Transcription

1 IMPORTANT WARRANTY & INSTALLATION INSTRUCTIONS ATTACHED Please Forward All Attached Information to Consumer Warranty Not Valid Unless Returned to CORSA Exhaust STOP
2 Please take time to read and understand these installation instructions. CORSA recommends that the installation of this system be performed by a qualified service center or professional muffler installer who has the necessary equipment, tools and experienced personnel. However, if you decide to perform this install, the use of a hoist and an additional person will be required. CAUTION: Never work on a hot exhaust system. Allow time for the vehicle to cool. Always wear eye protection when working under a vehicle. Recommended Tools: 3/8 drive ratchet 3/8 drive long extension 3/8 drive 13mm socket 3/8 drive 15mm deep socket Grommet pullers Soap and water solution Torque Wrench Penetrating lubricant spray Safety glasses Please confirm that all parts are present before beginning the factory exhaust system removal and CORSA exhaust system installation. Bill of Materials 1. 17CH4052 XO Pipe Assembly 2. 17CH7009 Hardware Kit 3. 18LC2000 Xtreme Tunnel Muffler (2) (PNs: 14975, 14985) 4. 18LC2011 Driver Rear Muffler Assembly (PNs: 14974, 14975) 5. 18LC2012 Passenger Rear Muffler Assembly (PNs: 14974, 14975) 6. 18LC4001 Driver Axle Pipe Assembly 7. 18LC4000 Passenger Axle Pipe Assembly 8. 18LC2045 Driver Rear Muffler Assembly (PNs: 14985, 14986) 9. 18LC2046 Passenger Rear Muffler Assembly (PNs: 14985, 14986) FL2000 Sport Tunnel Muffler (2) (PNs: 14974, 14986) 2
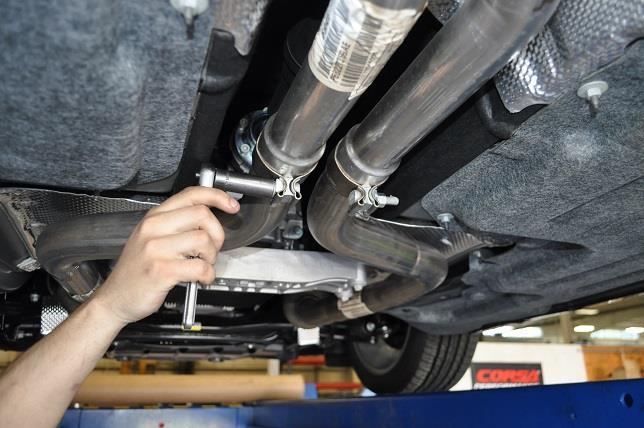
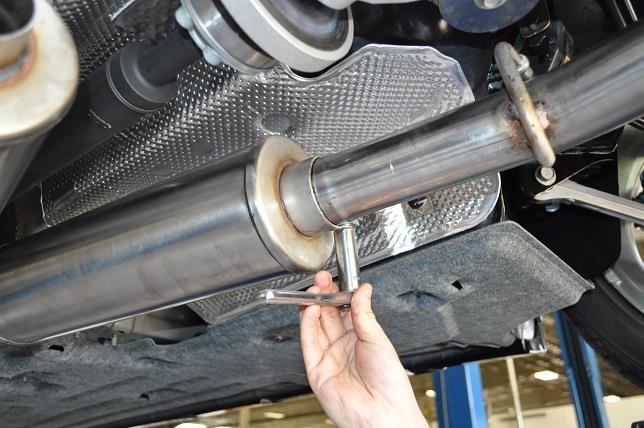
3 Factory Exhaust System Removal: 1. Using grommet pullers or a similar device, remove the driver and passenger side stock axle pipe hangers from their corresponding hanger grommets. (Fig. A) NOTE: The use of a soap and water solution may aid in the removal of hanger grommets. 2. Using a 3/8 ratchet and 13mm deep socket, remove the spring bolts at the driver side rear muffler flange connection. (Fig. B) Next, using the ratchet, long extension, and 13mm socket, unbolt both the front and rear driver side hanger grommet assemblies from the vehicle chassis. (Fig. C & D) The driver side muffler will no longer be supported and can be removed by sliding it rearward until the flange clears the studs, then lowering the muffler. (Fig E) 3. Using a 3/8 drive ratchet and 15mm deep socket, loosen the driver and passenger side clamps at the cat-back connection point. (Fig. F) 4. Remove the grounding wire clamp from the passenger rear muffler hanger. (Fig. G) Then, using a 3/8 ratchet and 13mm socket, long extension, unbolt the front and rear hanger grommet assemblies form the vehicle chassis. (Fig. H) The remaining portion of the stock exhaust can now be removed by sliding the system rearward to clear the overlapping pipe connection and the cat-back connection point; then lower the remaining portion of the stock exhaust system. (Fig. I) 5. Using grommet pullers or a similar device, remove the front and rear hanger grommet assemblies from the rear driver and passenger side mufflers. Make note of the hanger grommet assemblies orientation as they will be installed in the same position on the Corsa Performance exhaust system. (Fig. J) NOTE: The use of a soap and water solution may aid in the removal of hanger grommets. REMOVAL PICTURES ON NEXT PAGE 3


4 Factory Exhaust System Removal Pictures: Fig. A Fig. B Fig. C Fig. D Fig. E Fig. F 4


5 Factory Exhaust System Removal Pictures: Fig. G Fig. H Fig. I Fig. J 5

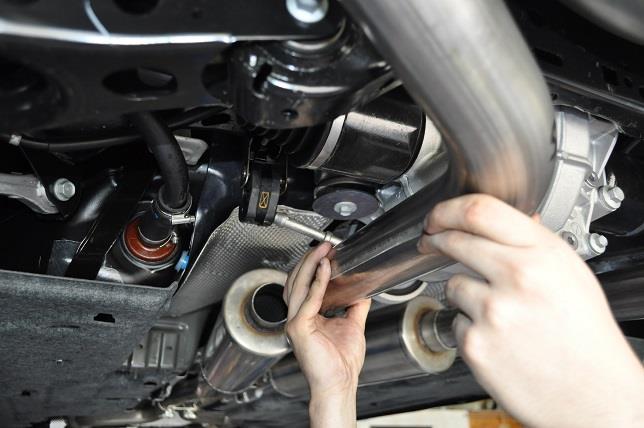
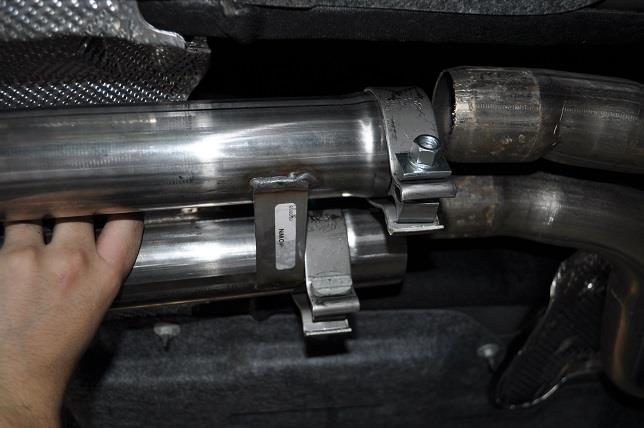
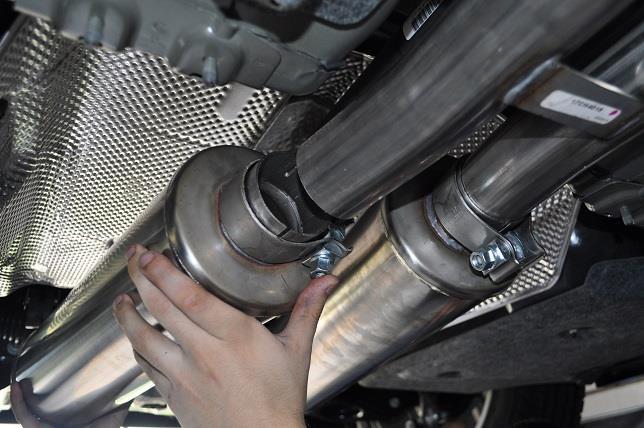
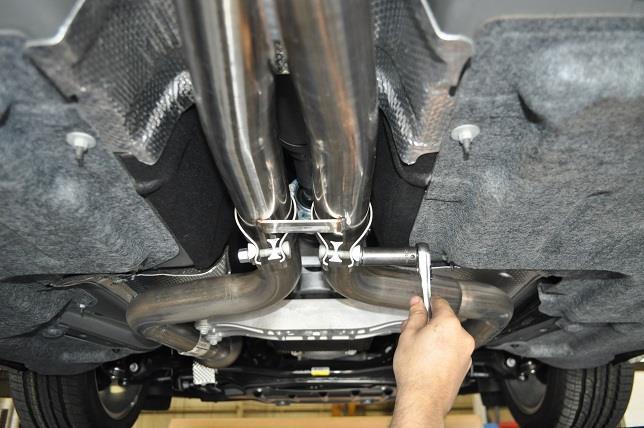
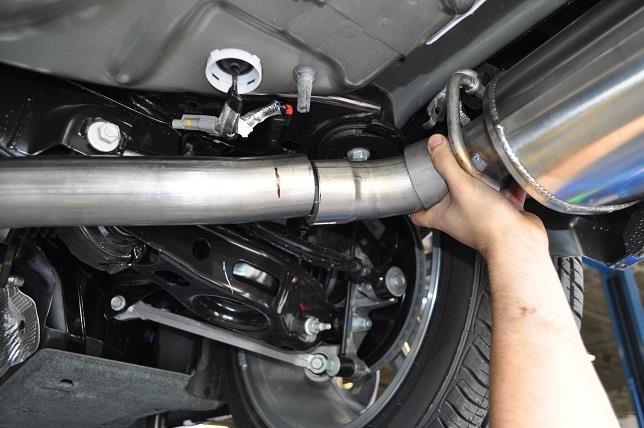
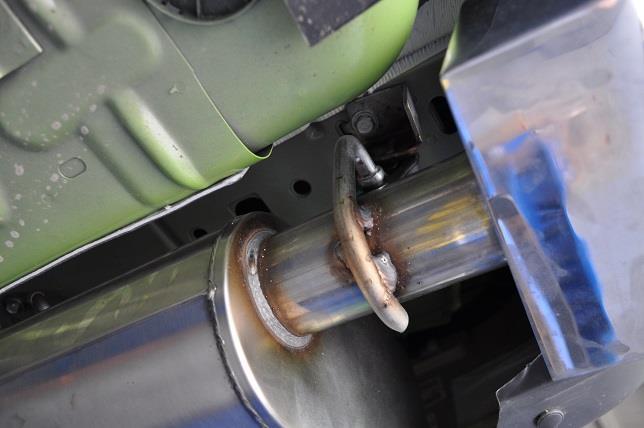
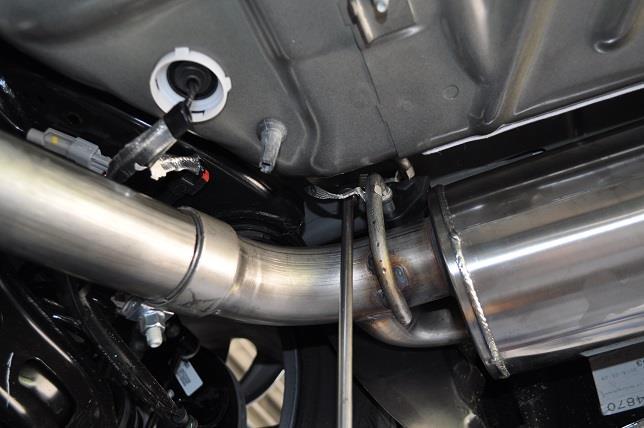
6 Installation of CORSA Exhaust System: NOTE: Apply the anti-seize lubricant (supplied) to the threads ONLY of all the clamps and flange bolts. Failure to follow this procedure can cause nuts to seize on clamps and potentially destroy threads. After applying anti-seize lubricant, be sure to thoroughly clean your hands, as lubricant will tarnish stainless steel. All clamps should be tightened using a properly calibrated Torque Wrench. Using an air impact gun will damage the clamp and reduce its ability to effectively seal the joint. It may also cause the joint to separate, thereby causing damage to your exhaust system and to your vehicle. NOTE: Align all clamps so that the center of the clamp bolt is 90 degrees from the notch in the pipe. (See Fig. CLAMP) 1. Remove all exhaust system components from the shipping boxes, including clamps and hardware. 2. Locate the XO pipe assembly and two 2.5 clamps. Install the clamps on the expanded inlet side of the XO assembly so that the bolts are horizontal with the nuts towards the outside of the vehicle. With the XO cross braces towards the bottom, slide the assembly over the stock exhaust pipes at the cat-back connection point. (Fig. K) Position the XO assembly so that it is parallel with the ground and snug the clamps using a 15mm deep socket and ratchet. (Fig. L) 3. Locate the two tunnel muffler assemblies along with two 2.5 clamps. Install the clamps on the expanded inlets of the tunnel mufflers. Position the driver side clamp so that the bolt is vertical with the nut towards the ground and the bolt towards the outside of the vehicle. Position the passenger side clamp so that the bolt is vertical with the nut towards the ground and the bolt towards the center of the vehicle. Slide the expanded inlet end of the tunnel muffler over the XO assembly outlet. (Fig. M) Using a 15mm deep socket and ratchet, snug both the driver and passenger side clamps. (Fig. N) Place a jack stand under each tunnel muffler for additional support during the rest of the install process. 4. Locate the driver and passenger side axle pipes along with two 2.5 clamps. Insert the axle pipe hangers into their corresponding grommets located just before the rear differential. (Fig. O) Install the clamps on the expanded inlet side of the axle pipe assemblies so that the bolts are vertical with the nuts towards the ground and the bolts towards the outside of the vehicle. Side the expand inlet end of the axle pipe assembly over the tunnel muffler outlet. Position the axle pipe assemblies so that the hangers are parallel with the ground and the hanger is swung forward. Snug both clamps using a 15mm deep socket and ratchet. (Fig. P) NOTE: The use of a soap and water solution may make it easier to install the hangers. INSTALLATION INSTRUCTIONS CONTINUED ON NEXT PAGE 6
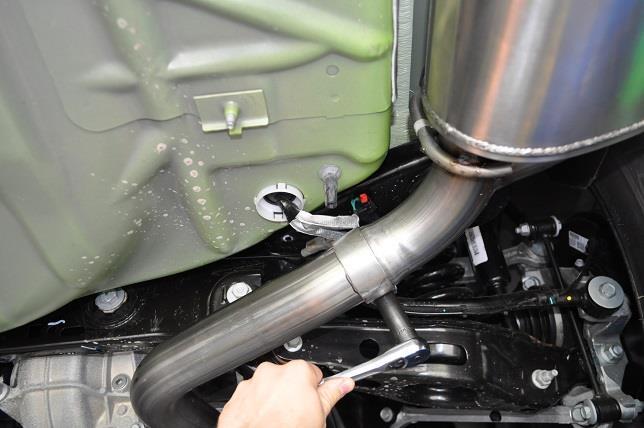
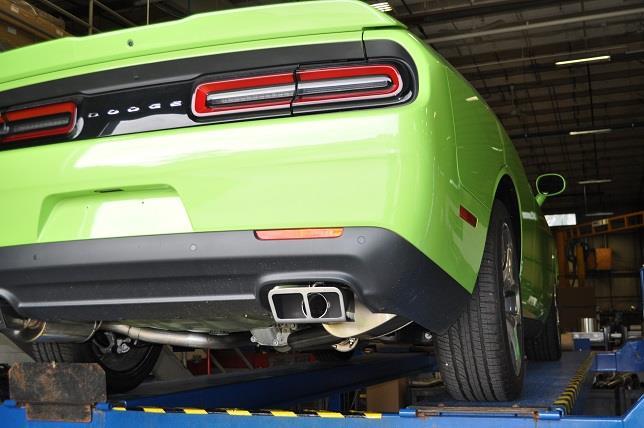
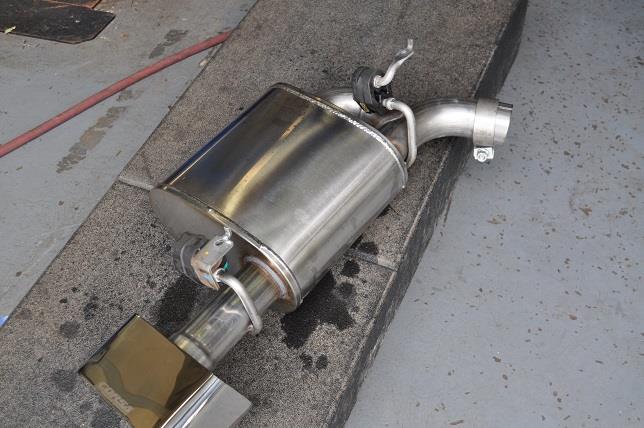
7 5. Locate the passenger side rear muffler, a 2.5 clamp, and the passenger side hanger grommet assemblies removed during step 5 of the stock exhaust removal process. Install the hanger grommet assemblies on their corresponding hangers in the same orientation as removed from the stock exhaust. (Fig. Q) Next, install the clamp on the expanded inlet end of the muffler assembly so that the bolt is vertical, with the nut towards the ground and the bolt towards the front of the vehicle. Slide the muffler inlet over the axle pipe outlet. (Fig. R) Using a 13mm socket, long extension, and ratchet, install the front hanger grommet assembly, reusing the stock bolt. (Fig. S) Swing the muffler assembly forward and install the rear hanger grommet assembly; again reusing the stock bolt. (Fig. T) Once the muffler is in place, snug the clap using the ratchet and 15mm socket. (Fig. U) Install the ground wire by clipping it to the stock hanger assembly and the hanger on the Corsa Performance rear muffler. 6. Repeat step #5 on the driver side of the vehicle. 7. Check that the clearance to the suspension mounts are the same on both sides. Adjust the position of the x-pipe and tunnel mufflers as needed to create equal and adequate clearance of the axle pipes and the rear suspension sub-frame. Make sure that the x-pipe is level and not rotated to one side, this will ease tip adjustment. Check clearance between the passenger side axle pipe and the spare tire well. 8. Adjust the system accordingly, including the rear muffler depth and rotation, so that the exhaust tip outlets are centered in the bumper exhaust cutouts. (Fig. V) Check clearance between the system components and chassis. At this time, tighten all clamps to 45ft-lbs using the torque wrench and 15mm socket. NOTE: During cold weather start-ups, you may experience an exhaust sound that is deeper and louder in tone than usual. This is temporary and will diminish to normal levels once your engine has reached its normal operating temperature. NOTE: Immediately following the installation of your exhaust system, you may experience a trace of smoke after initial start-up. DO NOT be alarmed. The smoke is caused by the burning of a small amount of forming oil residue used in the manufacturing process. INSTALLATION PICTURES ON NEXT PAGE 7

8 CORSA Installation Pictures Fig. K Fig. L Fig. M Fig. N Fig. O Fig. P 8
9 CORSA Installation Pictures Fig. Q Fig. R Fig. S Fig. T Fig. U Fig. V 9
IMPORTANT WARRANTY & INSTALLATION INSTRUCTIONS ATTACHED
 IMPORTANT WARRANTY & INSTALLATION INSTRUCTIONS ATTACHED Please Forward All Attached Information to Consumer Warranty Not Valid Unless Returned to CORSA Exhaust We ask that you take a few moments to complete
IMPORTANT WARRANTY & INSTALLATION INSTRUCTIONS ATTACHED
 IMPORTANT WARRANTY & INSTALLATION INSTRUCTIONS ATTACHED Please Forward All Attached Information to Consumer Warranty Not Valid Unless Returned to CORSA Exhaust STOP Please take time to read and understand
IMPORTANT WARRANTY & INSTALLATION INSTRUCTIONS ATTACHED
 IMPORTANT WARRANTY & INSTALLATION INSTRUCTIONS ATTACHED Please Forward All Attached Information to Consumer Warranty Not Valid Unless Returned to CORSA Performance STOP Please take time to read and understand
Recommended Tools: 3/8 drive ratchet 3/8 drive 13mm deep socket 3/8 drive 15mm deep socket 3/8 drive 15mm shallow socket 13mm wrench
 Please take time to read and understand these installation instructions. CORSA recommends that the installation of this system be performed by a qualified service center or professional muffler installer
IMPORTANT WARRANTY & INSTALLATION INSTRUCTIONS ATTACHED
 IMPORTANT WARRANTY & INSTALLATION INSTRUCTIONS ATTACHED Please Forward All Attached Information to Consumer Warranty Not Valid Unless Returned to CORSA Exhaust We ask that you take a few moments to complete
IMPORTANT WARRANTY & INSTALLATION INSTRUCTIONS ATTACHED
 IMPORTANT WARRANTY & INSTALLATION INSTRUCTIONS ATTACHED Please Forward All Attached Information to Consumer Warranty Not Valid Unless Returned to CORSA Exhaust We ask that you take a few moments to complete
IMPORTANT WARRANTY & INSTALLATION INSTRUCTIONS ATTACHED
 IMPORTANT WARRANTY & INSTALLATION INSTRUCTIONS ATTACHED Please Forward All Attached Information to Consumer Warranty Not Valid Unless Returned to CORSA Exhaust We ask that you take a few moments to complete
IMPORTANT WARRANTY & INSTALLATION INSTRUCTIONS ATTACHED
 IMPORTANT WARRANTY & INSTALLATION INSTRUCTIONS ATTACHED Please Forward All Attached Information to Consumer Warranty Not Valid Unless Returned to CORSA Exhaust We ask that you take a few moments to complete
Please take time to read and understand these installation instructions.
 2014- Current C7 Corvette Please take time to read and understand these installation instructions. CORSA recommends that the installation of this system be performed by a qualified service center or professional
IMPORTANT WARRANTY & INSTALLATION INSTRUCTIONS ATTACHED TO ACTIVATE YOUR WARRANTY GO TO: CORSAPERFORMANCE.COM/WARRANTY STOP
 IMPORTANT WARRANTY & INSTALLATION INSTRUCTIONS ATTACHED Please Forward All Attached Information to Consumer Warranty Not Valid Unless Returned to CORSA Performance We ask that you take a few moments to
IMPORTANT WARRANTY & INSTALLATION INSTRUCTIONS ATTACHED
 IMPORTANT WARRANTY & INSTALLATION INSTRUCTIONS ATTACHED Please Forward All Attached Information to Consumer Warranty Not Valid Unless Returned to CORSA Exhaust Please be sure to review the enclosed instructions
IMPORTANT WARRANTY & INSTALLATION INSTRUCTIONS ATTACHED
 IMPORTANT WARRANTY & INSTALLATION INSTRUCTIONS ATTACHED Please Forward All Attached Information to Consumer Warranty Not Valid Unless Returned to CORSA Performance We ask that you take a few moments to
IMPORTANT WARRANTY & INSTALLATION INSTRUCTIONS ATTACHED
 IMPORTANT WARRANTY & INSTALLATION INSTRUCTIONS ATTACHED Please Forward All Attached Information to Consumer Warranty Not Valid Unless Returned to CORSA Performance We ask that you take a few moments to
IMPORTANT WARRANTY & INSTALLATION INSTRUCTIONS ATTACHED
 IMPORTANT WARRANTY & INSTALLATION INSTRUCTIONS ATTACHED Please Forward All Attached Information to Consumer Warranty Not Valid Unless Returned to CORSA Exhaust We ask that you take a few moments to compete
Recommended Tools: 1/4 drive ratchet 1/4 drive 7mm socket 3/8 drive ratchet 3/8 drive 15mm deep socket File or rasp
 Please take time to read and understand these installation instructions. CORSA recommends that the installation of this system be performed by a qualified service center or professional muffler installer
STOP IMPORTANT WARRANTY & INSTALLATION INSTRUCTIONS ATTACHED TO ACTIVATE YOUR LIMITED LIFETIME WARRANTY GO TO: CORSAPERFORMANCE.
 IMPORTANT WARRANTY & INSTALLATION INSTRUCTIONS ATTACHED Please Forward All Attached Information to Consumer Warranty Not Valid Unless Returned to CORSA Exhaust We ask that you take a few moments to complete
Bill of Materials: Please take time to read and understand these installation instructions.
 Please take time to read and understand these installation instructions. CORSA recommends that installation of this system be performed by a qualified service center or professional muffler installer who
Please take time to read and understand these installation instructions.
 Cat Back Exhaust System 2013+ SRT/ GTS Viper Please take time to read and understand these installation instructions. CORSA recommends that the installation of this system be performed by a qualified service
STOP IMPORTANT WARRANTY & INSTALLATION INSTRUCTIONS ATTACHED TO ACTIVATE YOUR LIMITED LIFETIME WARRANTY GO TO: CORSAPERFORMANCE.
 IMPORTANT WARRANTY & INSTALLATION INSTRUCTIONS ATTACHED Please Forward All Attached Information to Consumer Warranty Not Valid Unless Returned to CORSA Exhaust We ask that you take a few moments to complete
15-18 FORD MUSTANG GT
 15-18 FORD MUSTANG GT IMPORTANT! WARRANTY AND Please Forward All Information to Consumer Be sure to review the enclosed instructions prior to beginning the installation process. If you have any questions
IMPORTANT WARRANTY & INSTALLATION INSTRUCTIONS ATTACHED
 IMPORTANT WARRANTY & INSTALLATION INSTRUCTIONS ATTACHED Please Forward All Attached Information to Consumer Warranty Not Valid Unless Returned to CORSA Performance We ask that you take a few moments to
STOP IMPORTANT WARRANTY & INSTALLATION INSTRUCTIONS ATTACHED TO ACTIVATE YOUR LIMITED LIFETIME WARRANTY GO TO: CORSAPERFORMANCE.
 IMPORTANT WARRANTY & INSTALLATION INSTRUCTIONS ATTACHED Please Forward All Attached Information to Consumer Warranty Not Valid Unless Returned to CORSA Exhaust We ask that you take a few moments to complete
IMPORTANT WARRANTY & INSTALLATION INSTRUCTIONS ATTACHED
 IMPORTANT WARRANTY & INSTALLATION INSTRUCTIONS ATTACHED Please Forward All Attached Information to Consumer Warranty Not Valid Unless Returned to CORSA Exhaust STOP Please take time to read and understand
15-17 FORD MUSTANG GT
 15-17 FORD MUSTANG GT IMPORTANT! WARRANTY AND Please Forward All Information to Consumer Be sure to review the enclosed instructions prior to beginning the installation process. If you have any questions
Please confirm that all parts are present before beginning the factory exhaust system removal and CORSA exhaust system installation.
 Please take time to read and understand these installation instructions. CORSA recommends that installation of this system be performed by a qualified service center or professional muffler installer who
IMPORTANT WARRANTY & INSTALLATION INSTRUCTIONS ATTACHED
 IMPORTANT WARRANTY & INSTALLATION INSTRUCTIONS ATTACHED Please Forward All Attached Information to Consumer Warranty Not Valid Unless Returned to CORSA Exhaust We ask that you take a few moments to complete
STOP IMPORTANT WARRANTY & INSTALLATION INSTRUCTIONS ATTACHED TO ACTIVATE YOUR LIMITED LIFETIME WARRANTY GO TO: CORSAPERFORMANCE.
 IMPORTANT WARRANTY & INSTALLATION INSTRUCTIONS ATTACHED Please Forward All Attached Information to Consumer Warranty Not Valid Unless Returned to CORSA Exhaust We ask that you take a few moments to complete
15-17 FORD MUSTANG GT
 15-17 FORD MUSTANG GT IMPORTANT! WARRANTY AND Please Forward All Information to Consumer Be sure to review the enclosed instructions prior to beginning the installation process. If you have any questions
15-17 FORD MUSTANG GT
 15-17 FORD MUSTANG GT IMPORTANT! WARRANTY AND Please Forward All Information to Consumer Be sure to review the enclosed instructions prior to beginning the installation process. If you have any questions
Recommended Tools: 3/8 drive ratchet 3/8 drive 13mm socket 3/8 drive 15mm deep socket 10 3/8 ratchet extension Grommet pullers
 Please take time to read and understand these installation instructions. CORSA recommends that the installation of this system be performed by a qualified service center or professional muffler installer
15-17 FORD MUSTANG GT
 15-17 FORD MUSTANG GT IMPORTANT! WARRANTY AND Please Forward All Information to Consumer Be sure to review the enclosed instructions prior to beginning the installation process. If you have any questions
STOP IMPORTANT WARRANTY & INSTALLATION INSTRUCTIONS ATTACHED TO ACTIVATE YOUR LIMITED LIFETIME WARRANTY GO TO: CORSAPERFORMANCE.
 IMPORTANT WARRANTY & INSTALLATION INSTRUCTIONS ATTACHED Please Forward All Attached Information to Consumer Warranty Not Valid Unless Returned to CORSA Exhaust We ask that you take a few moments to complete
Exhaust System Installation Corvette C6
 CORVETTE C6 Exhaust System Installation 2009+ Corvette C6 Recommended Tools: 13 mm Socket 15 mm Socket 18 mm Socket 15 mm Open End Wrench Torque Wrench (20-100 ft.-lb.) Drive extensions for Ratchet (MINIMUM
Please take time to read and understand these installation instructions.
 Please take time to read and understand these installation instructions. CORSA recommends that installation of this system be performed by a qualified service center or professional muffler installer who
STOP IMPORTANT WARRANTY & INSTALLATION INSTRUCTIONS ATTACHED TO ACTIVATE YOUR LIMITED LIFETIME WARRANTY GO TO: CORSAPERFORMANCE.
 IMPORTANT WARRANTY & INSTALLATION INSTRUCTIONS ATTACHED Please Forward All Attached Information to Consumer Warranty Not Valid Unless Returned to CORSA Exhaust We ask that you take a few moments to complete
IMPORTANT WARRANTY & INSTALLATION INSTRUCTIONS ATTACHED
 IMPORTANT WARRANTY & INSTALLATION INSTRUCTIONS ATTACHED Please Forward All Attached Information to Consumer Warranty Not Valid Unless Returned to CORSA Performance We ask that you take a few moments to
STOP IMPORTANT WARRANTY & INSTALLATION INSTRUCTIONS ATTACHED TO ACTIVATE YOUR LIMITED LIFETIME WARRANTY GO TO: CORSAPERFORMANCE.
 IMPORTANT WARRANTY & INSTALLATION INSTRUCTIONS ATTACHED Please Forward All Attached Information to Consumer Warranty Not Valid Unless Returned to CORSA Exhaust We ask that you take a few moments to complete
Grommet pullers Soapy water Safety glasses Torque Wrench
 Please take time to read and understand these installation instructions. We recommend that the installation of this system be performed by a qualified service center or professional muffler installer who
3 Turbo Downpipe Installation Audi A3 / Volkswagen GTI / Volkswagen Jetta 2.0L FSI/TSI Turbo CD100013
 Please take time to read and understand these installation instructions. APR recommends that installation of this system be performed by a qualified service center or professional muffler installer who
IMPORTANT WARRANTY & INSTALLATION INSTRUCTIONS ATTACHED
 IMPORTANT WARRANTY & INSTALLATION INSTRUCTIONS ATTACHED Please Forward All Attached Information to Consumer Warranty Not Valid Unless Returned to CORSA Exhaust We ask that you take a few moments to compete
Suggested Installation Instructions for: , , Corvette C6 - Corsa Performance Exhaust System
 Page 1 Suggested Installation Instructions for: 648-176, 648-178, 648-180 2009 Corvette C6 - Corsa Performance Exhaust System Count on Mid America Motorworks for all your Corvette Parts and Corvette Accessories
STOP IMPORTANT WARRANTY & INSTALLATION INSTRUCTIONS ATTACHED TO ACTIVATE YOUR LIMITED LIFETIME WARRANTY GO TO: CORSAPERFORMANCE.
 IMPORTANT WARRANTY & INSTALLATION INSTRUCTIONS ATTACHED Please Forward All Attached Information to Consumer Warranty Not Valid Unless Returned to CORSA Exhaust We ask that you take a few moments to complete
IMPORTANT WARRANTY & INSTALLATION INSTRUCTIONS ATTACHED
 IMPORTANT WARRANTY & INSTALLATION INSTRUCTIONS ATTACHED Please Forward All Attached Information to Consumer. Warranty Not Valid Unless Returned to db Performance Exhaust We ask that you take a few moments
IMPORTANT WARRANTY & INSTALLATION INSTRUCTIONS ATTACHED
 IMPORTANT WARRANTY & INSTALLATION INSTRUCTIONS ATTACHED Please Forward All Attached Information to Consumer. Warranty Not Valid Unless Returned to CORSA Exhaust We ask that you take a few moments to Complete
Exhaust System Installation Turbo Downpipe Audi MKII TT-RS 2.5T CD100028
 Please take the time to read and understand installation instructions. APR recommends that installation of this system be performed by a qualified service center or professional muffler installer who has
Please take time to read and understand these installation instructions.
 Please take time to read and understand these installation instructions. We recommend that the installation of this system be performed by a qualified service center or professional muffler installer who
CAUTION: Never work on a hot exhaust system. Allow time for the vehicle to cool. Always wear eye protection when working under a vehicle.
 Please take time to read and understand these installation instructions. CORSA Exhaust System Installation We recommend that the installation of this system be performed by a qualified service center or
TENF8046MCD F8X M3/M4 TEST PIPES (REMOVES SECONDARY CATS) **NOT FOR USE ON ROAD VEHICLES / FOR OFF-ROAD AND RACING USE ONLY**
 **NOT FOR USE ON ROAD VEHICLES / FOR OFF-ROAD AND RACING USE ONLY**") Turner Motorsport LLC / 1-800-280-6966 / www.turnermotorsport.com DI/DBM 3/21/16 TENF8046MCD F8X M3/M4 TEST PIPES (REMOVES SECONDARY CATS) **NOT FOR USE ON ROAD VEHICLES / FOR OFF-ROAD AND RACING USE ONLY**
Turner Motorsport LLC / 1-800-280-6966 / www.turnermotorsport.com DI/DBM 3/21/16 TENF8046MCD F8X M3/M4 TEST PIPES (REMOVES SECONDARY CATS) **NOT FOR USE ON ROAD VEHICLES / FOR OFF-ROAD AND RACING USE ONLY**
STOP IMPORTANT WARRANTY & INSTALLATION INSTRUCTIONS ATTACHED TO ACTIVATE YOUR LIMITED LIFETIME WARRANTY GO TO: CORSAPERFORMANCE.
 IMPORTANT WARRANTY & INSTALLATION INSTRUCTIONS ATTACHED Please Forward All Attached Information to Consumer Warranty Not Valid Unless Returned to CORSA Exhaust We ask that you take a few moments to complete
Please confirm that all parts are present before beginning the factory exhaust system removal and db Performance Exhaust system installation.
 Please take time to read and understand these installation instructions. We recommend that the installation of this system be performed by a qualified service center or professional muffler installer who
Chevy Monte Carlo / Chevy Impala / Pontiac Grand Prix 2000 & newer - All models Dual Rear Exit Exhaust System Installation Instructions
 Chevy Monte Carlo / Chevy Impala / Pontiac Grand Prix 2000 & newer - All models Dual Rear Exit Exhaust System Installation Instructions TOOLS/SUPPLIES NEEDED: Safety glasses, 15mm deep socket, 15mm wrench,
Please take time to read and understand these installation instructions.
 Please take time to read and understand these installation instructions. We recommend that the installation of this system be performed by a qualified service center or professional muffler installer who
STOP IMPORTANT WARRANTY & INSTALLATION INSTRUCTIONS ATTACHED TO ACTIVATE YOUR LIMITED LIFETIME WARRANTY GO TO: CORSAPERFORMANCE.
 IMPORTANT WARRANTY & INSTALLATION INSTRUCTIONS ATTACHED Please Forward All Attached Information to Consumer Warranty Not Valid Unless Returned to CORSA Exhaust We ask that you take a few moments to complete
GM Duramax Diesel
 Please confirm that all parts are present before beginning the factory exhaust system removal and CORSA exhaust system installation. 2001-05 BILL OF MATERIALS: PN 15201, 15203, 15204 & 15210: (1) Muffler,
IMPORTANT WARRANTY & INSTALLATION INSTRUCTIONS ATTACHED TO ACTIVATE YOUR WARRANTY GO TO: CORSAPERFORMANCE.COM/WARRANTY STOP
 IMPORTANT WARRANTY & INSTALLATION INSTRUCTIONS ATTACHED Please Forward All Attached Information to Consumer Warranty Not Valid Unless Returned to CORSA Performance We ask that you take a few moments to
IMPORTANT WARRANTY & INSTALLATION INSTRUCTIONS ATTACHED
 IMPORTANT WARRANTY & INSTALLATION INSTRUCTIONS ATTACHED Please Forward All Attached Information to Consumer. Warranty Not Valid Unless Returned to CORSA Exhaust We ask that you take a few moments to Complete
Exhaust System Installation for Corvette, C6 or Z06 PN s , 11811, 11812, 11814, 11815, 11816, 11917
 Exhaust System Installation for Corvette, C6 or Z06 PN s - 11810, 11811, 11812, 11814, 11815, 11816, 11917 ***** Please compare the parts in the box with the bill of materials provided ***** to assure
05-18 DODGE CHRYSLER CHALLENGER CHARGER 300 MAGNUM
 05-18 DODGE CHRYSLER CHALLENGER CHARGER 300 MAGNUM IMPORTANT! WARRANTY AND INSTALLATION INSTRUCTIONS Please Forward All Information to Consumer Be sure to review the enclosed instructions prior to beginning
Installation for Jeep Grand Cherokee SRT8 PN s , and 60634, 60635
 Installation for Jeep Grand Cherokee SRT8 PN s-140632, 140633 and 60634, 60635 BORLA PERFORMANCE INDUSTRIES ***** Please compare the parts in the box with the bill of materials provided ***** to assure
Installation for Honda Accord PN s 11840, 11853, 11949
 Installation for Honda Accord PN s 11840, 11853, 11949 BORLA PERFORMANCE INDUSTRIES ***** Please compare the parts in the box with the bill of materials provided ***** to assure that you have all the parts
Installation for Chevrolet Malibu 2.0L Turbo PN-11936
 Installation for Chevrolet Malibu 2.0L Turbo PN-11936 BORLA PERFORMANCE INDUSTRIES ***** Please compare the parts in the box with the bill of materials provided ***** to assure that you have all the parts
Exhaust System Installation for Chevrolet Corvette C6 PN and
 Exhaust System Installation for Chevrolet Corvette C6 PN-140128 and 140131 These instructions have been written to help you with the installation of your Borla Performance Exhaust System. Please read this
Installation for Chevrolet Silverado & GMC Sierra PN s , , ,
 Installation for Chevrolet Silverado & GMC Sierra PN s-140717, 140718, 140719, 140720 BORLA PERFORMANCE INDUSTRIES ***** Please compare the parts in the box with the bill of materials provided ***** to
Installation for Chevrolet Silverado/GMC Sierra PN s ,
 Installation for Chevrolet Silverado/GMC Sierra PN s-140550, 140551 ***** Please compare the parts in the box with the bill of materials provided ***** to assure that you have all the parts necessary for
Exhaust System Installation for Dodge Challenger PN s , , , &
 Exhaust System Installation for Dodge Challenger PN s 140297, 140306, 140384, & 140482 ***** Please compare the parts in the box with the bill of materials provided ***** to assure that you have all the
15-18 FORD MUSTANG GT
 15-18 FORD MUSTANG GT IMPORTANT! WARRANTY AND INSTALLATION INSTRUCTIONS Please Forward All Information to Consumer Be sure to review the enclosed instructions prior to beginning the installation process.
Exhaust System Installation for the Ford F-150 PNs , , , , , ,
 Exhaust System Installation for the Ford F-150 PNs 140693, 140694, 140695, 140696 140697, 140698, 140699, 140700 BORLA PERFORMANCE INDUSTRIES ***** Please compare the parts in the box with the bill of
Installation for Honda Civic Type R PN
 Installation for PN-140738 BORLA PERFORMANCE INDUSTRIES ***** Please compare the parts in the box with the bill of materials provided ***** to assure that you have all the parts necessary for this installation.
Exhaust System Installation for Audi S4, S5 & S5 Sportback PNs ,
 Exhaust System Installation for Audi S4, S5 & S5 Sportback PNs 140740, 140749 ***** Please compare the parts in the box with the bill of materials provided ***** to assure that you have all the parts necessary
Exhaust System Installation for Chevrolet Silverado and GMC Sierra PN , , , , ,
 Exhaust System Installation for Chevrolet Silverado and GMC Sierra PN-140535, 140536, 140537, 140538, 140539, 140540 ***** Please compare the parts in the box with the bill of materials provided *****
Installation for Dodge Challenger R/T PN s ,
 Installation for PN s-140707, 140708 ***** Please compare the parts in the box with the bill of materials provided ***** (view the following pages) to assure that you have all the parts necessary for this
Exhaust System Installation PN s , , , , ,
 Exhaust System Installation PN s - 140557, 140558, 140559, 140560, 140652, 140653 ***** Please compare the parts in the box with the bill of materials provided ***** to assure that you have all the parts
97-04 CHEVROLET CORVETTE C5
 97-04 CHEVROLET CORVETTE C5 IMPORTANT! WARRANTY AND INSTALLATION INSTRUCTIONS Please Forward All Information to Consumer Be sure to review the enclosed instructions prior to beginning the installation
TOYOTA. Tundra Split Rear Dual Exhaust. Part Number: ; Base Kit Fit Kit: ; 4.6 & 5.7L D-Cab Standard Bed & Crew Max
 TOYOTA Tundra 010 - Split Rear Dual Exhaust Part Number: 00016-34731; Base Kit Fit Kit: 00016-34734-03; 4.6 &.7L D-Cab Standard Bed & Crew Max Acc. Code: DE1 Section I Installation Preparation Kit Contents
Please compare the parts in the box with the bill of materials provided to assure that you have all the parts necessary for this installation.
 Installation for Chevrolet Corvette C7 Stingray & ZO6 (Standard exhaust) PN s - 11862, 11863, 11868, 11869, 11877, 11878, 11880, 11881 (Optional NPP) PN s - 11874, 11855, 11875, 11856 ZO6 PN s - 11902,
Chevrolet Camaro Exhaust System Installation PN s , , , , , , , , , , ,
 Chevrolet Camaro Exhaust System Installation PN s -140280, 140281, 140282, 140348, 140356, 140493, 140494, 140495, 140526, 140530, 140528, 140532 Thank you for purchasing a Borla Performance Cat-Back Exhaust
Exhaust System Installation for Audi S5, S4, and S6 PNs , ,
 Exhaust System Installation for Audi S5, S4, and S6 PNs-140391, 140403, 140704 ***** Please compare the parts in the box with the bill of materials provided ***** to assure that you have all the parts
Exhaust System Installation for Subaru Impreza WRX + STI PNs ,140381,140418, &
 Exhaust System Installation for Subaru Impreza WRX + STI PNs-140264,140381,140418, & 140595 ***** Please compare the parts in the box with the bill of materials provided ***** (view the following pages)
Exhaust System Installation for the Ford Mustang PN s , , , , , , , ,
 Exhaust System Installation for the Ford Mustang PN s-140583, 140584,1 40585, 140586, 140587, 140588, 140589, 140590, 140591 Precision manufactured using aircraft quality T-304 stainless steel; this system
Installation for Ford F-150 Raptor (V6 Ecoboost) PN s , 60638, 60650*
 PN s , 60638, 60650*") Installation for (V6 Ecoboost) PN s- 60637, 60638, 60650* ***** Please compare the parts in the box with the bill of materials provided ***** to assure that you have all the parts necessary for this installation.
Installation for (V6 Ecoboost) PN s- 60637, 60638, 60650* ***** Please compare the parts in the box with the bill of materials provided ***** to assure that you have all the parts necessary for this installation.
Exhaust System Installation For Dodge Ram 1500 PN ,140552,140553
 Exhaust System Installation For Dodge Ram 1500 PN-140308,140552,140553 BORLA PERFORMANCE INDUSTRIES Precision manufactured using high quality austenitic stainless steel; this system is designed to endure
By installing your Borla Performance Exhaust System, you indicate that you have read this document and you agree with the terms stated below.
 Thank you for purchasing a Borla Performance Cat-back Exhaust System. Precision manufactured using aircraft quality T-304 stainless steel; this system is designed to endure years of heavy use. Installing
Ford Mustang GT Long Tube Header Installation
 2005-2006 Ford Mustang GT Long Tube Header Installation Precision manufactured using aircraft quality T-304 stainless steel; this system is designed to endure years of heavy use. Installing a Borla Performance
Installation for Ford Explorer PN s , ,
 Installation for Ford Explorer PN s- 140656, 140659, 140658 These instructions have been written to help you with the installation of your Borla Performance Exhaust System. Please read this document completely
Installation Guide for Chevrolet Camaro ZL1 PNs ,
 Installation Guide for Chevrolet Camaro ZL1 PNs -140726, 140727 ***** Please compare the parts in the box with the bill of materials provided ***** (view the following pages) to assure that you have all
Exhaust System Installation for the Ford Mustang PN s ,140584,140585,140589,140590,140591
 Exhaust System Installation for the Ford Mustang PN s-140583,140584,140585,140589,140590,140591 Precision manufactured using aircraft quality T-304 stainless steel; this system is designed to endure years
M-5230-MGTCA Mustang GT, Mustang GT500 INSTALLATION INSTRUCTIONS
 Please visit www.fordracingparts.com for the most current instruction information!!! PLEASE READ ALL OF THE FOLLOWING INSTRUCTIONS CAREFULLY PRIOR TO INSTALLATION. AT ANY TIME YOU DO NOT UNDERSTAND THE
Installation for Dodge Challenger & Charger HellCat PN s , , , , , , ,
 Installation for PN s-140642, 140646, 140647, 140648, 140666, 140667, 140668, 140669 ***** Please compare the parts in the box with the bill of materials provided ***** to assure that you have all the
Installation Instructions for Challenger R/T: , , , Charger R/T: , , ,
 Installation Instructions for Challenger R/T: 140713, 140714, 140715, 140716 Charger R/T: 140722, 140723, 140724, 140725 ***** Please compare the parts in the box with the bill of materials provided *****
Exhaust System Installation for the Ford Mustang PN s , , , , , , , ,
 Exhaust System Installation for the PN s-140583, 140584,1 40585, 140586, 140587, 140588, 140589, 140590, 140591 ***** Please compare the parts in the box with the bill of materials provided ***** to assure
Thank you for purchasing a Borla Performance Cat-Back Exhaust System.
 Thank you for purchasing a Borla Performance Cat-Back Exhaust System. Precision manufactured using aircraft quality T-304 stainless steel; this system is designed to endure years of heavy use. Installing
Installation for Dodge Charger R/T PN s , ,
 Installation for Dodge Charger R/T PN s 140635, 140636, 140637 These instructions have been written to help you with the installation of your Borla Performance Exhaust System. Please read this document
Exhaust System Installation PN , , , , &
 Exhaust System Installation PN-140415, 140416, 140417, 140438, & 140466 BORLA PERFORMANCE INDUSTRIES These instructions have been written to help you with the installation of your Borla Performance Exhaust
Chevrolet Camaro (Gen6) Installation Guide PN 11920, 11921, 11924, 11925, 11926, 11927, 11930, 11931
 Installation Guide PN 11920, 11921, 11924, 11925, 11926, 11927, 11930, 11931") Installation Guide PN 11920, 11921, 11924, 11925, 11926, 11927, 11930, 11931 ***** Please compare the parts in the box with the bill of materials provided ***** (view the following pages) to assure that
Installation Guide PN 11920, 11921, 11924, 11925, 11926, 11927, 11930, 11931 ***** Please compare the parts in the box with the bill of materials provided ***** (view the following pages) to assure that
Installation for the Ford Mustang V-6 PN s , ,
 Installation for the Ford Mustang V-6 PN s-140586, 140587, 140588 These instructions have been written to help you with the installation of your Borla Performance Exhaust System. Please read this document
Exhaust System Installation For Dodge Challenger 3.5L
 Exhaust System Installation For Dodge Challenger 3.5L BORLA PERFORMANCE INDUSTRIES These instructions have been written to help you with the installation of your Borla Performance Exhaust System. Please
Exhaust System Installation for Chevrolet Corvette C7 Stingray PN 11855, 11856
 Exhaust System Installation for Chevrolet Corvette C7 Stingray PN 11855, 11856 These instructions have been written to help you with the installation of your Borla Performance Exhaust System. Please read
Header Installation For Jeep Wrangler
 Header Installation For 2007-2008 Jeep Wrangler Precision manufactured using high quality austenitic stainless steel; this system is designed to endure years of heavy use. Installing a Borla Performance