THE LIFTER OPERATION AND MAINTENANCE MANUAL Valley Drive, Rock Valley IA Ph: Fax:
|
|
|
- Griffin Chambers
- 5 years ago
- Views:
Transcription

1 THE LIFTER OPERATION AND MAINTENANCE MANUAL 1334 Valley Drive, Rock Valley IA Ph: Fax:
2 INTRODUCTION READ CAREFULLY This manual is provided to familiarize you with the operation of The Lifter, and to supply you with the information necessary for proper equipment maintenance. It is the user s responsibility to maintain and operate The Lifter in a manner that will result in the safest working conditions possible. In addition, it is also the use s responsibility to be aware of existing Federal, State and Local codes and regulation governing the safe use and maintenance of this product. Warranty will be void on any part of The Lifter when subject to misuse due to overloading, abuse, lack of maintenance or unauthorized modifications. No warranty verbal, written or implied other than the official published Rock Mills Enterprises new machinery and equipment warranty will be valid with this unit. Treat the equipment with respect and service it regularly. This will result in a safer working environment and longer equipment life. 2


3 TAKE NOTE! THIS SAFETY ALERT SYMBOL FOUND THROUGHOUT THIS MANUAL IS USED TO CALL YOUR ATTENTION TO INSTRUCTIONS INVOLVING YOUR PERSONAL SAFETY AND THE SAFETY OF OTHERS. FAILURE TO FOLLOW THESE INSTRUCTIONS CAN RESULT IN INJURY OR DEATH. SIGNAL WORDS: THIS SYMBOL MEANS - ATTENTION! - BECOME ALERT! - YOUR SAFETY IS INVOLVED! Note the use of signal words DANGER, WARNING and CAUTION with the safety messages. The appropriate signal word for each has been selected using the following guidelines: DANGER: Indicates an imminently hazardous situation that, if not avoided, will result in death or serious injury. This signal word is limited to the most extreme situations typically for machine components that cannot be guarded for functional purposes. WARNING: Indicates a potentially hazardous situation that, if not avoided, could result in death or serious injury, and includes hazards that are exposed when guards are removed. It may also be used to alert against unsafe practices. CAUTION: Indicates a potentially hazardous situation that, if not avoided, may result in minor or moderate injury. It may also be used to alert against unsafe practices. If you have questions not answered in this manual or require additional copies or the manual is damaged, please contact your dealer or Rock Mills Ent., 1334 Valley Drive, Rock Valley IA (Telephone)
4
5 TECHNICAL BULLETIN THE LIFTER PLUS This Technical Bulletin is being issued to provide Lifter PLUS users with proper operating procedures to ensure effective, reliable field performance. The Lifter PLUS operates off the vehicles 12 Volt DC electrical system. - Continuous or extended daily periods of using The Lifter PLUS will draw down the battery output to below 12 Volts. - Low voltage causes improper function of the unit s solenoids which may result in failure to operate. - The vehicle must idle at sufficient engine RPM s to maintain proper voltage for the battery to recharge and support The Lifter PLUS power demands. - When using the Manual Lifter Operation Switch, it MUST be released and returned to the neutral center position once The Lifter is fully extended or retracted. Continuing operation beyond this will cause electrical damage. 5
6 Solutions: To reduce the risk of damage to your Lifter PLUS, follow these operating instructions: Make sure your vehicle s battery and alternator are in good operating condition to support operation of The Lifter PLUS. - Once the manhole cover is lifted and moved away from the hole, lower it to the ground and release the magnet. If energized, the magnet will continue to draw battery power. - Allow the vehicle to run at sufficient engine RPM s to deliver power for the lift and battery recharge. In most situations, you will increase engines alternator output enough to regain the lost voltage as you move from location to location. 6
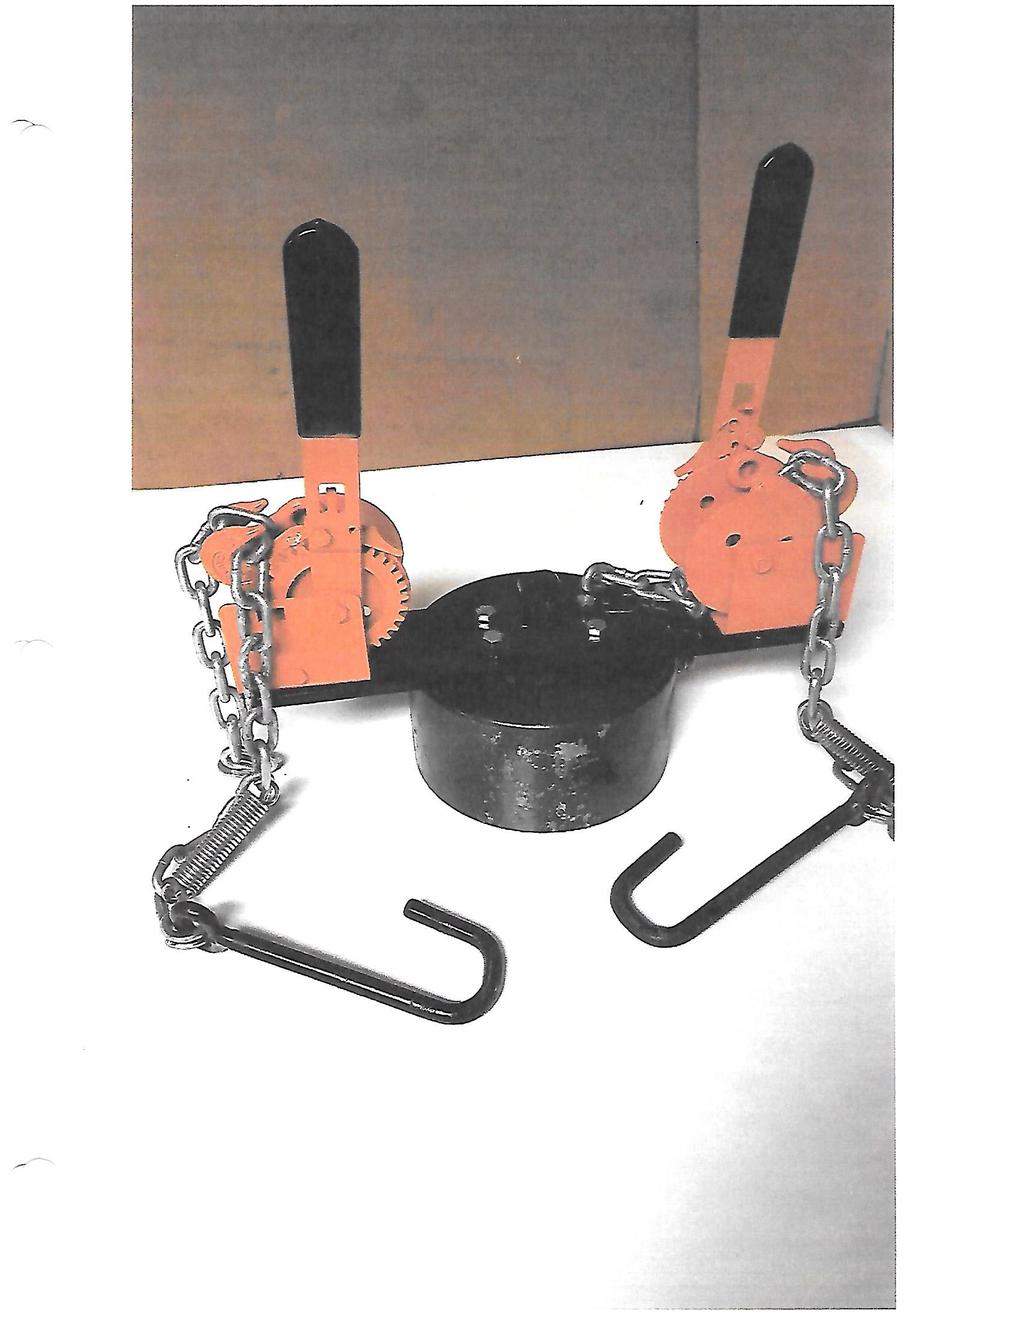
7 Plus Weight 62 Lbs 62 Lbs Length (With Camera & Magn 38 inches 38 inches THE LIFTER S p e c i f i c a t i o n s Standard 2" Bore X 18" Stroke Adhesion (metal to metal) Pressure Square Inch Pull Capacity Push Capacity 2,700 PSI 2,700 PSI 6,350,lbs 6,350 lbs 8,475 lbs 8,475 lbs Weight 47 lbs 49 lbs Diameter with connector 8 Inches 8 Inches Amps 8 Amps 17 Amps Voltage 12 Volts 12 Volts Working Capacity 2,500 lbs 3,500 lbs Color Camera - High Density Infra red LEDS Heated with Audio Feed Accepts up to 2 Cameras 7" Inch Digital Screen Voltage 12 Volts 12 Volts Frame - Adjustable Height Cylinder Stroke 2" Hitch 2" Hitch 18 Inches 18 Inches 62 lbs 62 lbs Minimum Vehcile Capacity 650 Amps 800 Amps Remote - Waterproof Swing Arm 40 lbs 43 lbs 24 lbs 24 lbs 7

8 ROCK MILLS ENTERPRISES 1334 Valley Drive. Rock Valley, Iowa Vehicle Compatibility Requirements CAUTION The Lifter operates with up to 3,000 lbs of lifting force. The Lifter must be attached to vehicles capable of supporting the expected forces applied during the process of removing and replacing manhole covers and grates. The Lifter should be attached to a minimum of a Class 3 trailer hitch. Any vehicle used to operate The Lifter must have frame, suspension systems and attachment points capable of supporting the lifting force and pulling capacity of the unit. Rock Mills Enterprises assumes no liability for damage to any vehicle that is used with The Lifter that does not meet these minimum vehicle design specifications. 8

9

10
11
12 TABLE OF CONTENTS Section 1 Installation. Section 2 Operation.. 1 Section 3 Maintenance.. Section 4 Electrical... Section 5 Assembly Drawings.. -2 Options Note: read the entire manual before installing or operating Lifter 12
13
14 13 REMOTE TRANSMITTER INSTALLATION PL3000 CONNECT TO POSITIVE SIDE OF BATTERY CONNECT TO NEGATIVE SIDE OF BATTERY INCH RECEIVER (FRONT OR REAR OF VEHICLE) ITEM NO. QTY. PART NO. DESCRIPTION 1 1 P-42A FRAME RISER 2 1 P-42 FRAME ASSEMBLY HEX HEAD BOLT X LOCK WASHER HEX NUT 6 1 CHASSIS POWER CABLE ASSY CHASSIS POWER CABLE EYELET 1/4 EYELET EYELET 5/16 EYELET AMP BREAKER 10 1 BATTERY POWER CABLE ASSY BATTERY POWER CABLE RED 11 1 TERMINAL COVER RED TERMINAL COVER RED 12 1 BREATHER VALVE BREATHER VALVE 13 1 P-13 MAGNET LOCK WASHER HEX BOLT X CC77 CAMERA ASSEMBLY MOTOR COVER 18 1 MAGNET WIRE 5 ANDERSON CONNECTORS 4 14


15 SECTION 1 INSTALLATION These instructions are intended as a guide to assist you with The Lifter installation. We cannot cover every make, model and year of truck manufactured worldwide, so these instructions will provide only general information. 1. Attach the frame riser (P-42A) to the frame (P-42), using the 2-½ bolts. Slide the lifter frame into the 2 inch receiver, pin or bolt into place. The lifter can be installed on the front or the rear of a vehicle. a. Frame Riser can be installed with long leg facing up or down depending on height requirements per vehicle s receiver. b. Approximate height from underside of battery mount to ground is 13 to 15 inches. Final height must be check after battery is installed, 2. Cut the wires (P-62A/B) to length needed to reach the battery and solder on supplied copper eyelets. Solder the 5/16 eyelet to the black wire and the ¼ eyelet to the red wire. Run the 6 ga red wire to one side of the 50 amp breaker; connect the battery lead to the positive side of the battery. Run the black wire to the negative side. Plug the Anderson connectors together from the vehicle to the lifter. 3. Remove plug from elbow fitting on manifold and insert breather valve (attached to The Lifter motor) before operating. 4. Place the magnet (P-10) below the cylinder and lower the rod down until the magnet attachment plate touches the magnet by using the remote transmitter (the transmitter must be turned on). Line up the four bolt holes and insert the bolts that attach the plate to the magnet. Connect the yellow cord (P-13) to the magnet. 5. When the magnet is in the raised position, make sure there is a minimum of 9 inches of clearance from the bottom of the magnet to the ground. 6. Mount the camera to the mounting bracket on the top of The Lifter frame. The camera should be aligned to view the magnet. Wire the camera cable and power harness per enclosed manufacturer s directions. Mount the monitor inside the cab where desired. 15
16 7. To attach motor cover, slide cover from top over motor (opening to frame). Remove the bolt on the right side of the frame and be sure to support the hydraulic motor. Place the motor cover in front of the motor mount, line up the holes, and re-bolt the cover to the frame. Move to the left side of the frame and remove the top bolt. Place the cover over motor mount, line up the holes and re-bolt. The cover is fairly flexible which will allow you to bolt one side at a time. 8. TEST ALL FUNCTIONS. The Lifter is attached directly to the vehicle s 12V electrical system. Twenty (20) feet of power cable is included with The Lifter. The performance of The Lifter depends on the truck s electrical system. The use of low maintenance battery is not recommended. The recommended alternator and battery that will give the longest life with the most useful duty cycle is a 90 Amp alternator with a 200 minimum reserve, 700 cold cranking Amp battery. These specifications should be considered minimum. A typical power cable mounting and hookup is included in section 5. CAUTION: Your electric/hydraulic Lifter is equipped with an electric motor rated for intermittent duty only! Caution must be taken not to overheat the motor, which could cause permanent damage to internal windings. Duty cycle will vary with the change of the load requirements and Amperage draw. Heavier loads causing higher amperage draw will cause faster motor heat-up and will require longer cool off periods. Approximate duty cycle at no load would be 1 MINUTE ON and 2 MINUTES OFF. Full load conditions would be approximately 1 MINUTE ON and 5 MINUTES OFF. Climate conditions will affect duty cycle intervals 16


17 OPERATE THE LIFTER SAFELY Manhole Covers and Grates are heavy and can cause serious injury if accidentally dropped. All personnel should stand at least three feet away from the outside of the manhole cover, grate or any other object being lifted. DO NOT at any time, have hands or feet under the manhole cover, grate or any other object being lifted. 17


18 SECTION 2 - OPERATION 1. Drive toward the manhole cover until it disappears from view. Turn on the monitor and watch for the cover as it appears on the screen. Position the magnet directly in the middle of the cover if possible or if the cover has tar on it, place the magnet where there is bare metal. 2. With the Remote Transmitter, lower the magnet onto the cover, using the Cylinder DOWN arrow button. Energize the Magnet using the Magnet ON button. 3. With the Remote Transmitter, raise the magnet with the cover all the way up, using the Cylinder UP arrow button and drive forward or backwards two or three feet. Make sure the cover is clear of the casting before moving. 4. With the Remote Transmitter, lower the magnet with the cover to the ground, using the Cylinder DOWN arrow button and using the magnet OFF button, release the cover. Always return the Magnet to the up position to avoid the possibility of damage by moving the vehicle with the Magnet at ground level. The manufacture recommends that the magnet not be on longer than 3 minutes at a time. The transmitter will shut off the magnet after 5 minutes of activity and is set to shut down completely after 15 minutes of inactivity to save the transmitter battery. KEEP HANDS AND FEET CLEAR WHILE OPERATING THE LIFTER! 18
19 SPECIAL CONDITIONS The Lifter motor has 3000 lbs of lift force with direct metal to metal contact. For best performance, The Lifter must have a clean metal contact surface on the manhole cover or drainage grate. The operator may at times encounter field conditions that will require attention for best results. - DEBRIS ON MANHOLE COVER: If the cover is completely tarred over, the magnet cannot adhere to the cover. Clean off the cover as thoroughly as possible over the entire cover. Place the magnet over the cleanest area and engage The Lifter. - ICE AND SNOW: Clean ice and snow off manhole cover and grates to allow solid metal to metal contact between the cover and the magnet. If the cover is resistant to removal, with light to moderate tension on the cover by The Lifter, strike the top of the cover or perimeter of the grate with moderate blows with a heavy mallet or sledge hammer. This will break the ice bond and the cover or grate should pop off. Caution: DO NOT strike grates in the grate area. It may damage the grate. Always strike along the perimeter of the grate frame with moderate blows. - STUCK COVERS: At times, manhole covers and grates that have not been removed for long periods of time can be stuck in place. They can be bonded to the frame due to a variety of adhesive conditions. When this situation occurs, with light to moderate tension on the cover by The Lifter, strike the top of the cover or perimeter of the grate with a heavy mallet or sledge hammer as outlined under Ice and Snow. This will typically break the bond and the cover or grate should pop off. 19
20 SECTION 3 MAINTENANCE 1. Keep bottom of magnet clean, you may need to sand rust from bottom occasionally. 2. Keep camera lens clean, using soft cloth and glass cleaner 3. Watch hydraulic fluid level. With cylinder retracted, fill with hydraulic fluid until it comes out of the fill hole (use Automatic Transmision oil) 4. Wireless transmitter: a. Press and hold the power button on the transmitter until both LEDs turn on, then release. The green LED will flash rapidly when communication has been established with the receiver. b. The transmitter is designed with power savings feature which turns the transmitter off after 15 minutes if none of the switches are pressed. c. Plug the charging connector into the port at the top of the transmitter. Observe orientation and do not use force. A solid red LED indicates battery is charging. Once the internal battery is fully charged, the red LED will turn off and the green LED will turn on. A fully discharged unit will take up to 3 hours to recharge. Use only approved chargers. Transmitter will require charging every days with constant use. d. The transmitter and receiver should have been matched at the factory. If matching is required, see instructions with the transmitter. 20
21 YELLOW NOT USED PURPLE NOT USED ELECTRICAL REMOTE TRANSMITTER GREEN GREY NOT USED RED BLUE BROWN BLACK BROWN GREEN/YELLOW NOT USED BLUE GROUND ELECTRIC / HYDRAULIC POWER UNIT MAGNET - + BATTERY 21
22 22
23 MANUAL LIFTER OPERATION SWITCH (Toggle Switch) Purpose: The Manual Lifter Operation Switch is installed to operate the power unit without the use of the external remote. The Toggle Switch to be installed is a Momentary Switch. There are three positions, On Off On. When pressed and released, the Toggle Switch is designed to return to the central off position. Installation: The Toggle Switch is mounted on the existing camera bracket toward the upper end of the Lifter. Please refer to drawings included for further assistance. 1. Unplug Anderson Electrical Connector from power source. 2. Drill and 1/2 hole in camera bracket. The hole must be a minimum of 7/8 from bracket top and approximately 5/8 from edge (edge closest to motor/pump assembly). 3. Remove Switch boot and nuts from the switch assembly. The boot is threaded onto the Toggle Switch. 4. Insert Toggle Switch into previously drilled hole with the unused pole on the bottom. This will orient the switch to the direction of travel. 5. Fasten the Toggle Switch to bracket with nuts provided and cover with boot previously removed. 6. Attach the following wires: (Refer to wiring schematic for further assistance) Red: Remove nuts from lower stud on motor solenoid. Attach red wire with 5/16 ring and tighten nuts snugly (Do not over tighten). White: Remove nuts from upper stud on motor solenoid. Attach both white wires with 5/16 rings and tighten nuts snugly (Do not over tighten). Green: Locate existing green wire running from the Remote Transmitter to the Pump Solenoid. Cut off and discard existing connector. Be sure to maintain as much wire length as possible. Strip off approximately 3/8 from existing green wire. Twist both wire ends together securely. Slide both wires through the provided shrink wrap covering. Fully insert wire ends into the provided Female Disconnect and crimp snugly. Be sure wires do not pull out. Return the new Female Disconnect onto the same pole on the Pump Solenoid. Slide the shrink wrap covering over the Disconnect and pole. Using a heat gun or hairdryer, warm the covering to form a tight protective layer as was previously in place. 23

24 24

25 ITEM NO. QTY. PART NO. DESCRIPTION 1 1 AE X 18 CYLINDER 3 1 AE SIGHT ROD 4 1 AE1006 CAMERA MOUNT 5 1 AE1010 CYLINDER BRACKET 6 1 AE1011 CYLINDER SWIVEL BRKT MNT 7 1 HJNUT B-N 8 1 MC98330A325 CLEVIS PIN 9 1 DC MC98335A069 HAIR PIN 11 2 #10-24 HEX NUT 12 1 PIN CYLINDER PIN 13 2 MC98335A067 HAIR PIN K RETRACT HYD TUBE RETRACT HYD TUBE 16 1 EXTEND HYD TUBE EXTEND HYD TUBE 17 1 AE MAGNET MOUNT 18 1 REMOTE CONTROL RECIEVER REMOTE CONTROL RECIEVER 19 1 REMOTE CONTROL FAUB REMOTE CONTROL FAUB 20 1 POWER CABLE ASSY 21 3 Internal Tooth LW Type A HFBOLT x0.75x0.75-N 23 2 Internal Tooth LW Type A HFBOLT x0.5x0.5-N 25 2 IN-HHMS x0.5x0.5-N 26 2 #10 LOCK WASHER #10 SPRING LOCK WASHER 27 2 MSHXNUT S-N 25

26 P
27 27
28
29
30 Rock Mills Enterprises Camera / Monitor Installation and Operations Instructions Models included: Camera: Monitor: ecamrvc-16 ecam7001 Mount camera on bracket located above the Lifter s cylinder screws enclosed Monitor may be mounted on vehicles dash or console Wiring Connection Diagram is enclosed. This application will require only two wires. RED is power and BLACK is ground. Disregard other wires. 2 5/16 eyelets are enclosed and will be soldered to wires after determining appropriate length while connecting to appropriate source Monitor cable will pass through vehicle s fire wall Zip tie loose cables when installation is completed Need support call Rearview ( ) kkrearviewsystems@tds.net W A R N I N G Monitor must be powered off at the end of each day. Failure to do so will draw down battery charge. 30

31

32
33
34

35

36
37
38
39

40
MODEL 2060 INSPECTION, OPERATION AND MAINTENANCE MANUAL
 12/7/07 STI610856 MODEL 2060 INSPECTION, OPERATION AND MAINTENANCE MANUAL TIGER CRANES 877 1ST AVE NW SIOUX CENTER, IA 51250 PH: 712-722-3711 TOLL FREE: 800-225-8789 WWW.TIGERCRANES.COM TAKE NOTE! THIS
Premium Supply. Direct Push. Models PCK-3530-DP PCK DP PCK-530-DP. Operator s Manual and Installation Instructions
 Direct Push Models PCK-3530-DP PCK-3530-2DP PCK-530-DP Operator s Manual and Installation Instructions Premium Supply 2038 West Interstate 30 866-934-0777 Proud members of: and June 20, 2018 Table of Contents
Premium Supply. Tilt Deck. Models PCK-TD PCK-PTD CTD-310-K. Operator s Manual and Installation Instructions
 Tilt Deck Models PCK-TD PCK-PTD CTD-310-K Operator s Manual and Installation Instructions Premium Supply 2038 West Interstate 30 866-934-0777 Proud members of: and April 20, 2018 Table of Contents Introduction...
Premium Supply. Tilt Deck. Models PCK-TD PCK-PTD. Operator s Manual and Installation Instructions
 Tilt Deck Models PCK-TD PCK-PTD Operator s Manual and Installation Instructions Premium Supply 2038 West Interstate 30 866-934-0777 Proud members of: and June 1, 2015 Table of Contents Introduction...
INTRODUCTION Thank you for purchasing a Maurer Revolver. Proper care and use will result in many years of service. WARNING: TO AVOID PERSONAL INJURY O
 /04/0 8A000049, Rev. AC REVOLVER JD-7: JOHN DEERE STS OPERATOR S MANUAL FITS: 60 & 70 SERIES STS COMBINE WITH HIGH UNLOAD RATE AUGER (7 DIA.) READ complete manual CAREFULLY BEFORE attempting operation.
A1062 & A1072 AUGER ASSEMBLY MANUAL. Read & understand all instructions pertaining to this auger prior to use!
 A1062 & A1072 AUGER ASSEMBLY MANUAL Read & understand all instructions pertaining to this auger prior to use! Safety Alert Watch for this ALERT Symbol. It identifies potential hazards to Personal SAFETY
Stealth Power i-tilt
 Power Tilts OWNERS MANUAL Stealth Power i-tilt User Manual and Maintenance Guide for Stealth s i-tilt Customer Satisfaction 1.0 Stealth Products strives for 100% customer satisfaction. Your complete satisfaction
WARNING WARNING CAUTION. Warnings and Cautions MOVING PARTS ENTANGLEMENT HAZARD MOVING PARTS ENTANGLEMENT HAZARD CHEMICAL AND FIRE HAZARD
 Warnings and Cautions As you read these instructions, you will see S, S, NOTICES and NOTES. Each message has a specific purpose. S are safety messages that indicate a potentially hazardous situation, which,
before serial number 2214
 before serial number 2214 Contents Page Safety Rules... 3 Pre-operational & Safety Inspection... 4 Operating Instructions... 6 Transport... 12 Maintenance & Routine Service... 12 Specifications... 14 SAFETY
Smart Switch Basic Kit - 24 volt ( ) Wiring Instructions
 Wiring Instructions") Smart Switch Basic Kit - 4 volt (54-08) Wiring Instructions NB 8/0/ 6 ga. wire 6 ga. wire 6 ga. wire OUT IN 6 ga. wire Yellow Black Blue 50 AMP BREAKER MOTOR 6 ga. wire 6 ga. wire 6 ga. wire ROCKER SWITCH
Smart Switch Basic Kit - 4 volt (54-08) Wiring Instructions NB 8/0/ 6 ga. wire 6 ga. wire 6 ga. wire OUT IN 6 ga. wire Yellow Black Blue 50 AMP BREAKER MOTOR 6 ga. wire 6 ga. wire 6 ga. wire ROCKER SWITCH
Plow Partner Mounting Kit M
 Plow Partner Mounting Kit 59-M Page Warning Plow Partner Mounting Kit Do not exceed GVWR or GAWR, including blade and ballast. The rating label is found on the driver side vehicle door corners. Lower
AUXILIARY BATTERY BOX INSTALLATION INSTRUCTIONS
 AUXILIARY BATTERY BOX INSTALLATION INSTRUCTIONS The original TOMMY GATE hydraulic lift Assembling the Auxiliary Battery Box 1. Remove the cover from the auxiliary battery box by removing the two nuts and
TRAILER WINCH MODELS ST315 AND ST712. General Safety (Continued) Description. Unpacking. General Safety Information.
 Description. Unpacking. General Safety Information.") OPERATION AND MAINTENANCE MANUAL TRAILER WINCH READ CAREFULLY BEFORE ATTEMPTING TO ASSEMBLE, INSTALL, OPERATE OR MAINTAIN THE PRODUCT DESCRIBED. PROTECT YOURSELF AND OTHERS BY OBSERVING ALL SAFETY INFORMATION.
OPERATION AND MAINTENANCE MANUAL TRAILER WINCH READ CAREFULLY BEFORE ATTEMPTING TO ASSEMBLE, INSTALL, OPERATE OR MAINTAIN THE PRODUCT DESCRIBED. PROTECT YOURSELF AND OTHERS BY OBSERVING ALL SAFETY INFORMATION.
FOR New Electric Kit and Remote Control Installation
 Installation Manual COMMAND-10 REMOTE AND COMMAND STATION FOR New Electric Kit and Remote Control Installation Use these in place of the rocker switch and solenoid section of instructions in your roll
W & A 12 ROW TOP LEVELING STACKER LEVEL BANDER
 W & A 12 ROW TOP LEVELING STACKER LEVEL BANDER NO. 3640 OPERATOR S MANUAL TO THE OWNER: Congratulations on your purchase of a new W & A Top Leveling Stacker Level Bander. Your selection is an indication
Combine Grain Tank Extension Tip-Up Kit CIH MZ315P Fits Case IH 7120, 7230, 7240 w/ 24 POWER FOLDING EXTENSION PANELS
 10/6/2016 8E00006,Rev AB Combine Grain Tank Extension Tip-Up Kit CIH MZ315P Fits Case IH 70, 7230, 720 w/ 2 POWER FOLDING EXTENSION PANELS OPERATOR / assembly MANUAL PLACE IN COMBINE CAB AFTER ASSEMBLY
ProPass-200 Top Dresser
 Setup Manual Form No. 3365-184 Rev A ProPass-200 Top Dresser Model No. 44700-Serial No. 310000001 and Up Model No. 44701-Serial No. 310000001 and Up Model No. 44704 Model No. 44705 Model No. 44706 Model
ITEM # V CORDLESS SNOW SHOVEL MODEL #KSS 1280B-06 Español p. 19. ATTACH YOUR RECEIPT HERE Serial Number. Purchase Date
 ITEM #0533632 80 V CORDLESS SNOW SHOVEL MODEL #KSS 1280B-06 Español p. 19 ATTACH YOUR RECEIPT HERE Serial Number Purchase Date Questions, problems, missing parts? Before returning to your retailer, call
Lift N Go [Model 210] Electric Carrier For use with power chairs & scooters Installation Guide & Owners Manual
![Lift N Go [Model 210] Electric Carrier For use with power chairs & scooters Installation Guide & Owners Manual](/thumbs/74/70316262.jpg "Lift N Go [Model 210] Electric Carrier For use with power chairs & scooters Installation Guide & Owners Manual") 203 Matzinger Road Toledo, OH 43612 Phone: 1-800-541-3213 Fax: (419) 478-4425 www.wheelchaircarrier.com E-mail: admin@wheelchaircarrier.com Lift N Go [Model 210] Electric Carrier For use with power chairs
203 Matzinger Road Toledo, OH 43612 Phone: 1-800-541-3213 Fax: (419) 478-4425 www.wheelchaircarrier.com E-mail: admin@wheelchaircarrier.com Lift N Go [Model 210] Electric Carrier For use with power chairs
ESE Series Cast Iron Sewage Pumps
 Owner s Manual ESE Series Cast Iron Sewage Pumps TABLE OF CONTENTS General Safety.................... 2 Specifications..................... 3 Installation.................... 4 & 5 Troubleshooting...................
PowerLogic High Density Metering System 4-Meter Enclosure Installation Guide
 PowerLogic High Density Metering System 4-Meter Enclosure Installation Guide 7002-0289-00 Instruction Bulletin HAZARD CATEGORIES AND SPECIAL SYMBOLS Read these instructions carefully and look at the equipment
OPERATOR S MANUAL SINGLE PORT UNIVERSAL CAR CHARGER
 OPERATOR S MANUAL SINGLE PORT UNIVERSAL CAR CHARGER P130 Fits Ryobi 7.2 volt-18 volt battery packs BATTERIES SOLD SEPARATELY Your battery charger has been engineered and manufactured to Ryobi s high standard
Operation Guide. Operation Guide. Winnebago Hydraulic Leveling Systems by Kwikee. Introduction. Table of Content WARNINGS
 Operation Guide 05/07 Kwikee #1422192 Rev. 0F Table of Content Page Introduction 1 Safety Information 1 Operation 2 Control Panel 3 Manual Leveling 3 Automatic Leveling 3 Remote Operation 4 Stabilizing
Brakes. FREE BACKING # Right # Left. UNI-SERVO # Right # Left. Page 1. 1/15 BC20011, Rev 6
 1/15 BC20011, Rev 6 Brakes FREE BACKING #01971 - Right #01970 - Left UNI-SERVO #07911 - Right #07910 - Left ASSEMBLY CALIBRATION OPERATION REPLACEMENT PARTS Page 1 WARNING: To Prevent Serious Injury or
Operator s Manual and Assembly
 Operator s Manual and Assembly Published: Mar 24, 2017 Manual Part No. AH02-00-MAN Gatco Manufacturing Inc. www.gatcomfg.com Location: 2524 South Service Road West, Swift Current, SK, Canada Mail: Box
HIGH RISE POWER ANGLE KIT
 HIGH RISE POWER ANGLE KIT P/N 33-0100 OWNER S MANUAL Application HIGH RISE PUSH TUBE 33-0000 & 34-0000 ATTENTION DEALER: CUSTOMER MUST RECEIVE A COPY OF THIS MANUAL AT THE TIME OF SALE. Before you begin,
Installation of Hydraulic Kit STD Controls w/ standard pump/manifold location
 BULLETIN MIO-H29RRG048B00 REV A Installation of Hydraulic Kit STD Controls w/ standard pump/manifold location SAFETY PRECAUTIONS If any installation problems are encountered, please call G&B Specialties
INSTALLATION GUIDE. Universal System for Zero Turn Mowers
 INSTALLATION GUIDE Universal System for Zero Turn Mowers Table of Contents General Information 1 Important Notice to Purchaser 2 Specifications 2 Intended Usage 2 Important Information 3 General Safety
Combine Grain Tank Extension Tip-Up Kit CIH MZ315C Fits Case IH 7120, 7230, 7240 w/ POWER FOLD COVER & 24 PANELS
 9/22/2016 8E000048,Rev AB Combine Grain Tank Extension Tip-Up Kit CIH MZ315C Fits Case IH 7120, 7230, 7240 w/ POWER FOLD COVER & 24 PANELS OPERATOR / assembly MANUAL PLACE IN COMBINE CAB AFTER ASSEMBLY
IMT Bead Breaker 1000
 Manual Part Number 99903638 IMT Bead Breaker 000 Revised 2050423 Copyright 204 Iowa Mold Tooling Co., Inc. All rights reserved IOWA MOLD TOOLING CO., INC. PO Box 89 Garner, IA 50438 Tel: 64-923-37 FAX:
W & A 12 ROW TOP LEVELING STACKER LEVEL BANDER
 W & A 12 ROW TOP LEVELING STACKER LEVEL BANDER NO. 3640 OPERATOR S MANUAL TO THE OWNER: Congratulations on your purchase of a new W & A Top Leveling Stacker Level Bander. Your selection is an indication
MODEL ELC-12/60-D BATTERY CHARGER
 *32198* NATIONAL RAILWAY SUPPLY Installing, Operating and Service Instructions for the 12/60 Solid State Charger MODEL ELC-12/60-D BATTERY CHARGER PLEASE SAVE THESE IMPORTANT SAFETY AND OPERATING INSTRUCTIONS
Two-Stage Snow Blower For 4WD Pick Up Trucks. Operator s Manual
 Two-Stage Snow Blower For 4WD Pick Up Trucks Operator s Manual Distrubuted by: Metal Fabricating LLC P.O. Box 831 Brodheadsville, PA 18322 Phone: 570-992-9989 SnowVac.com WARRANTY POLICY Metal Fabricating
25 BUSHEL MANURE SPREADER
 25 BUSHEL MANURE SPREADER RODA MANUFACTURING 338 MAIN ST. HULL, IA. 51239 Art s-way Manufacturing 712-439-2366 Co., Inc. Hwy 9 West - PO Box 288 WWW.RODAMFG.COM Armstrong, IA. 50514 U.S.A 2 INTRODUCTION
INSTALLATION INSTRUCTIONS PARTS LIST INSTALLATION INSTRUCTIONS AIR CONTROL KIT (800A0168 OR 800A0169)
") INSTALLATION INSTRUCTIONS INSTALLATION INSTRUCTIONS PARTS LIST AIR CONTROL KIT (800A0168 OR 800A0169) Link mfg. Ltd. 223 15th St. N.E. Sioux Center, IA USA 51250-2120 (712) 722-4874 Fax (712) 722-4876
INSTALLATION INSTRUCTIONS INSTALLATION INSTRUCTIONS PARTS LIST AIR CONTROL KIT (800A0168 OR 800A0169) Link mfg. Ltd. 223 15th St. N.E. Sioux Center, IA USA 51250-2120 (712) 722-4874 Fax (712) 722-4876
Technical Support (707)
") Installation Instructions CONSOLE MEGASHIFTER Fits: 1982-1992 Camaro & Firebird w/automatic Transmission *except 1988-1992 Firebird Formula Model Catalog # 80692 WORK SAFELY! For maximum safety, perform
Installation Instructions CONSOLE MEGASHIFTER Fits: 1982-1992 Camaro & Firebird w/automatic Transmission *except 1988-1992 Firebird Formula Model Catalog # 80692 WORK SAFELY! For maximum safety, perform
MOTORIZED FOLDING CAMPER WINCH
 OWNER'S MANUAL MOTORIZED FOLDING CAMPER WINCH With 1200lb Lift Capacity The 12 Volt Motorized Folding Camper Winch is used to raise and lower folding campers with the touch of the switch, eliminating hand
OWNER'S MANUAL BOAT TRAILER WINCH. 12 Volt Powered Winch Power-In / Power-Out Operation PW2. pw325101
 OWNER'S MANUAL PW2 BOAT TRAILER WINCH pw325101 12 Volt Powered Winch Power-In / Power-Out Operation 056015-001r1 Printed in USA January, 2013 PROPRIETARY STATEMENT The Powerwinch Trailer Winch is a product
Combine Grain Tank Extension Tip-Up Kit CIH MZ315C FITS CASE IH 7120, 7230, 7240 w/ POWER FOLD COVER & 24 PANELS OPERATOR / ASSEMBLY MANUAL
 5/6/2016 8E000048,Rev AA Combine Grain Tank Extension Tip-Up Kit CIH MZ315C FITS CASE IH 7120, 7230, 7240 w/ POWER FOLD COVER & 24 PANELS OPERATOR / ASSEMBLY MANUAL PLACE IN COMBINE CAB AFTER ASSEMBLY
INSTALLATION INSTRUCTIONS
 Equipped with AEM Dryflow Filter No Oil Required! INSTALLATION INSTRUCTIONS PART NUMBER: 24-6105 2002-2006 ACURA RSX - Excludes Type S L4-2.0L C.A.R.B. E.O. # D-670 * NOTE: Legal in California only for
PowerLevel s e r i e s
 Owner s Manual Hydraulic Leveling CONTENTS Introduction Operation Control Panel Automatic Leveling Manual Leveling Retracting Jacks Remote Operation Care & Maintenance Troubleshooting Error Codes 1 2 2
Quick Install Lift AL065 Installation Guide & Owners Manual
 Quick Install Lift AL065 Installation Guide & Owners Manual Congratulations on your new lift purchase. The Quick Install Lift line is one of the easiest and most trouble free ways to transport your scooter
INDUSTRY WIDE LABOR-MANAGEMENT SAFETY COMMITTEE
 INDUSTRY WIDE LABOR-MANAGEMENT SAFETY COMMITTEE SAFETY BULLETIN #23 GUIDELINES FOR WORKING WITH LIGHTING SYSTEMS AND OTHER ELECTRICAL EQUIPMENT All electrical systems and electrically energized equipment
HYDRAULIC LEVELING SYSTEMS OPERATIONS MANUAL (For systems with touch pad part number , , , , or no number at all)
") HYDRAULIC LEVELING SYSTEMS OPERATIONS MANUAL (For systems with touch pad part number 500089, 500105, 500210, 500456, 500535 or no number at all) Visit us on the web at www.powergearus.com 82-L0040-01 Rev.
HYDRAULIC LEVELING SYSTEMS OPERATIONS MANUAL (For systems with touch pad part number 500089, 500105, 500210, 500456, 500535 or no number at all) Visit us on the web at www.powergearus.com 82-L0040-01 Rev.
INSTALLATION CONSTELLATION DRIVING LIGHTS 5009
 INSTALLATION CONSTELLATION DRIVING LIGHTS 5009 PARTS INCLUDED 1 Right Driving Light with Turn Signals 1 Left Driving Light with Turn Signals 1 Installation Component Kit Including: 8 Insulated Male Spades
INSTALLATION AND OPERATING INSTRUCTIONS
 INSTALLATION AND OPERATING INSTRUCTIONS MANUAL TRANSFER SWITCHES FROM 0 Residential Wattage Requirements Appliance Running Watts Add watts for starting Furnace blower, gas or fuel 1/8 hp 300 500 1/8 hp
ITEM # V SNOW SHOVEL. MODEL #KSS 2540A-06 Español p. 18. ATTACH YOUR RECEIPT HERE Serial Number. Purchase Date
 ITEM #0727249 40 V SNOW SHOVEL MODEL #KSS 2540A-06 Español p. 18 ATTACH YOUR RECEIPT HERE Serial Number Purchase Date Questions, problems, missing parts? Before returning to your retailer, call our customer
Hose Reel Kit for Multi-Pro 1200 and 1250 Sprayers. Installation Instructions. Form No Model No Serial No.
 Hose Reel Kit for Multi-Pro 00 and 50 Sprayers Model No. Serial No. 000000 and Up Form No. 9-8 Installation Instructions Installation Important You will need to purchase Teflon tape before installing this
SAC Liquid Manure Flow Meter
 LM300000 REV A 11/11/2009 QUALITY PEOPLE, QUALITY PRODUCTS SAC Liquid Manure Flow Meter Operation and Service Manual ASSEMBLY CALIBRATION OPERATION REPLACEMENT PARTS READ complete manual CAREFULLY BEFORE
READ AND UNDERSTAND THIS MANUAL BEFORE INSTALLATION AND OPERATION OF THIS PRODUCT.
 Assembly & Operating Instructions KW7.5RM 7500 lbs 12V DC Electric Winch CAUTION READ AND UNDERSTAND THIS MANUAL BEFORE INSTALLATION AND OPERATION OF THIS PRODUCT. OWNER S MANUAL KW7.5RM 7500 lb 12V DC
OWNER'S MANUAL MOBILE LIFT:
 : 18"MODELS-(19675 & 24565) OR 24" MODELS-(20565, 24570, & 24770) INSTALLATION AND OPERATION INSTRUCTIONS -SERVICE AND PARTS INFORMATION IMPORTANT A class III frame receiver hitch must be installed by
82V LITHIUM-ION BATTERY CHARGER GC 400
 82V LITHIUM-ION BATTERY CHARGER GC 400 (2907302) Owner s Manual TOLL-FREE HELPLINE: 1-855-470-4267 www.greenworkstools.com/82v-commercial/ Read all safety rules and instructions carefully before operating
PARTS AND SERVICE MANUAL FOR LEVELING SYSTEMS WITH TOUCH PAD PART NUMBERS , , , , or no number at all
 PARTS AND SERVICE MANUAL FOR LEVELING SYSTEMS WITH TOUCH PAD PART NUMBERS 500089, 500105, 500210, 500456, 500535 or no number at all Visit us on the web at www.powergearus.com! 82 L0051 00 Rev. 3 1 WARNING
User Manual Stealth s Power Tilt
 User Manual Stealth s Power Tilt Copyright 2014 Stealth Products, Inc. Copyright 2014 Stealth Products, Inc. All rights reserved. Published by Stealth Products, Inc. November 7, 2014 P45D61R1 Customer
4/3/2012 8E000024,Rev C Combine Grain Tank Extension Tip-Up Kit CIH250MX FITS CASE IH 5088 W/ 24 MANUAL FOLDING EXTENSION PANELS OPERATOR / ASSEMBLY M
 4/3/2012 8E000024,Rev C Combine Grain Tank Extension Tip-Up Kit CIH250MX FITS CASE IH 5088 W/ 24 MANUAL FOLDING EXTENSION PANELS OPERATOR / ASSEMBLY MANUAL PLACE IN COMBINE CAB AFTER ASSEMBLY FOR FUTURE
If you have any questions or difficulty installing this product, TRAC is here to help! If you still need help, call us from 8 am to 4 pm
 For Trailer Winch Models: T10124-C Day Runner T10128-C Lite Cruiser (cable) T10129-S Lite Cruiser (strap) If you have any questions or difficulty installing this product, TRAC is here to help! First READ
TRUSS KITS FOR SPOUTING Installation Manual
 TRUSS KITS FOR SPOUTING Installation Manual LAMBTON CONVEYOR LIMITED 102 Arnold Street Wallaceburg, ON N8A 3P4 Canada Telephone: (519) 695-2316 Telephone: (519) 627-8228 ONE SOURCE ONE SOLUTION Toll free:
! DANGER Lb. Winch Mounting Instructions. Tools required: Before You Start. Assembly Instructions. General Information. Manual No.
 500 Lb. Winch Mounting Instructions For 400/4400 NT/ST, 40/440 ST And 40/440 ST Manual No. 70-86M Before You Start! When you see this symbol, the subsequent instructions and warnings are serious - follow
RAPID ROLLER OPERATOR S MANUAL. L&C ENTERPRISES - U.S.A, Inc N.75 Drive, Escanaba, MI OWNER S NAME MODEL
 RAPID ROLLER OPERATOR S MANUAL OWNER S NAME MODEL SERIAL NUMBER DATE OF PURCHASE L&C ENTERPRISES - U.S.A, Inc. 6652 N.75 Drive, Escanaba, MI 49829 906-786-1008 1-866-786-1009 LIMITED WARRANTY L&C Enterprises-USA,
Model 315. Always stand clear of the area behind and between the load or anchor point and the winch. Serious injury could occur, if the cable breaks.
 315, 712A and 912 Please read and save these instructions. Read carefully before attempting to assemble, install, operate or maintain the product described. Protect yourself and others by observing all
Single Leg AM / CM 20, 24 and 30. Installation
 1-800-846-9659 www.equalizersystems.com Installation and Operation Guide January 2011 Single Leg AM / CM 20, 24 and 30 Installation Tools Required for Installation Ratchet, Sockets and Wrench Set Wire
INSTALLATION and MAINTENANCE INSTRUCTIONS SHO SERIES ELECTRIC CABLE REELS
 INSTALLATION and MAINTENANCE INSTRUCTIONS SHO SERIES ELECTRIC CABLE REELS All units are provided with right hand rotation unless otherwise specified. This means that cable is pulled off spool top left
Rugby Manufacturing Direct Mount Unit Manual
 Preface INSTALLATION & OPERATION MANUAL INTRODUCTION IMPORTANT!! Read this manual thoroughly prior to installation and operation. This manual outlines the installation and operation of a Direct Mount unit
Superwinch 12 Volt Smart Switch w/ Wireless Remote Kit Installation Instructions
 1404 N. Marshall Ave. El Cajon CA. 92020 WLH 08/09/18 514-0141 607-0143 TABLE OF CONTENTS ***Assembly*** ***Parts & Tools*** Wiring the Motor... 1 Smart Switch Basic Kit - Wiring Diagram #514-0141... 5
SlimRack Bed Lift System OEM INSTALLATION MANUAL
 SlimRack Bed Lift System OEM INSTALLATION MANUAL Rev: 07.11.2018 TABLE OF CONTENTS System Information 2 Safety Information 3 Resources Required 3 General Requirements 3 Installation 4 SlimRack Bed Lift
INSTALLATION INSTRUCTIONS
 EMB Manufacturing Inc. 4144 Boomer Line St. Clements, Ontario N0B 2M0 Canada www.wallensteinequipment.com INSTALLATION INSTRUCTIONS Contents 1. Safety...2 2. Warranty...3 3. Parts Breakdown...4 4. Procedure...5
AGRI-COVERTM SWITCH CONTROL INSTRUCTIONS
 AGRI-COVERTM SWITCH CONTROL INSTRUCTIONS Use these instructions in place of the rocker switch and solenoid sections in your roll tarp or ROLTECTM Electric Hopper Conversion instructions. Some installs
Single Leg AM/CM 20, 24 and 30
 800/846-9659 www.equalizersystems.com Installation and Operation Guide April 2007 Single Leg AM/CM 20, 24 and 30 Installation Tools Required for Installation Ratchet, sockets and wrench set Wire cutters/crimpers
# & Automatic Touchpad. # & Semi-Auto Touchpad. # Manual Touchpad
 # 500629 & 140-1226 Automatic Touchpad # 500675 & 140-1231 Semi-Auto Touchpad # 500731 Manual Touchpad Parts and Service Manual for Hydraulic Leveling Systems with Touch Pad Part Numbers 500675, 140-1231,
Operation Guide. Hydraulic Leveling Systems #2000, #2010, #3000, and # Table of Content. Introduction
 Operation Guide Operation Guide Hydraulic Leveling Systems #2000, #2010, #3000, and #30130 Table of Content Page Introduction 1 Safety Information 1 Operation 2 Control Panel 3 Manual Mode 3 Auto Mode
HM860 FLOWMETER OPERATOR S MANUAL DO NOT USE OR OPERATE THIS EQUIPMENT UNTIL THIS MANUAL HAS BEEN READ AND THOROUGHLY UNDERSTOOD
 HM860 FLOWMETER OPERATOR S MANUAL DO NOT USE OR OPERATE THIS EQUIPMENT UNTIL THIS MANUAL HAS BEEN READ AND THOROUGHLY UNDERSTOOD PART NUMBER 393-008-020 Rev. C Table of Contents TABLE OF CONTENTS 393-008-020
Installation and Operation Guide October 2010
 1-800-846-9659 www.equalizersystems.com Hydraulic Trailer Jack Installation and Operation Guide October 2010 Hydraulic Trailer Jack AJ Dual Leg General Description Dual leg trailer jack Lifting capacity:
Deluxe High Amp Switch Kit - 12 Volt Wiring Instructions
 1404 N. Marshall Ave. El Cajon C 92020 WLH 09/01/16 514-0139 OUT IN 16 ga. Black wire 16 ga. Green wire Yellow Black Blue 50 AMP BREAKER MOTOR 16 ga. White wire ROCKER SWITCH (IN CAB) BATTERY 607-0139
Smart Switch with External Switch - 12 volt - ( )
") Smart Switch with External Switch - 12 volt - (501-9953) Wiring Instructions MOTOR (-) / 6 ga. wire MOTOR (+) / 6 ga. wire CONTROL BOX BAT (-) / 6 ga. wire BAT (+) / 6 ga. wire MOTOR BAB 1/23/09 KJH 04/23/08
Smart Switch with External Switch - 12 volt - (501-9953) Wiring Instructions MOTOR (-) / 6 ga. wire MOTOR (+) / 6 ga. wire CONTROL BOX BAT (-) / 6 ga. wire BAT (+) / 6 ga. wire MOTOR BAB 1/23/09 KJH 04/23/08
Motor Lead Pigtail or V-Stub Splice 5380 Series For 5/8 kv Non-Shielded and Shielded Feeder Cables (Tape, Wire or UniShield Cables)
") Motor Lead Pigtail or V-Stub Splice 5380 Series For 5/8 kv Non-Shielded and Shielded Feeder Cables (Tape, Wire or UniShield Cables) Instructions Kit Contents 3 Lug Covers 3 Cold Shrink Terminations 12
Motor Lead Pigtail or V-Stub Splice 5380 Series For 5/8 kv Non-Shielded and Shielded Feeder Cables (Tape, Wire or UniShield Cables) Instructions Kit Contents 3 Lug Covers 3 Cold Shrink Terminations 12
US208S Scooter / Power Chair Carrier Lift N Go 117 Mini Electric Lift Electric Tote & 130 Swing Away Installation Guide & Owners Manual
 7325 Douglas Rd. Lambertville, MI 48144 Phone: 1-800-541-3213 Fax: (734) 568-6705 www.wheelchaircarrier.com E-mail: admin@wheelchaircarrier.com US208S Scooter / Power Chair Carrier - 210 Lift N Go 117
Speed For Sale LLC Website: Telephone: Location: 3100 Engineering
 Speed For Sale LLC Website: www.speedforsale.com/nissangtrparts Email: Sales@SpeedForSale.com Telephone: 770-777-4774 Location: 3100 Engineering Parkway Alpharetta, GA 30004 SpeedForSale.com s Installation
Part Number Mini Linear Lift Assembly Installation & Operator s Instruction Manual
 Part Number 39644 Mini Linear Lift Assembly Installation & Operator s Instruction Manual April 1999 MV1505C Chore-Time Warranty Mini Linear Lift Assembly Manual Chore-Time Warranty Chore-Time Equipment
INSTRUCTIONS FOR THE RELIANCE Fast/Tran TM ARL0909 & ARL0909R
 INSTRUCTIONS FOR THE RELIANCE Fast/Tran TM ARL0909 & ARL0909R THE RELIANCE Fast/Tran IS NOT FOR "DO-IT-YOURSELF" INSTALLATION. It must be installed by a qualified electrician thoroughly familiar with all
P Original Series Cargo Van Lift Mounting Instructions Fullsize Ford Van present. Preparing the Gate
 Fullsize Ford Van- 1992-present Preparing the Gate 1. Remove the mounting hardware which is banded to the liftgate. 2. Verify mounting kit (Figure 1 and Table 1). S-400-40 STRAP VAN MOUNTING EAR BENT BRACKET
INSTRUCTIONS. w w w. h d o n l i n e s h o p. d e ENGINE GUARD-MOUNTED FOG LAMP KIT 1WARNING -J02798 REV Installation.
 INSTRUCTIONS -J0798 REV. 9-4-00 Kit Number 689-98B General ENGINE GUARD-MOUNTED FOG LAMP KIT Installation This kit fits all models equipped with Harley-Davidson -/4 in. ( mm) diameter front engine guards,
Combine Grain Tank Extension Tip-Up Kit CIH MX410P Fits Case IH 8240, 9240 w/ 410 bu. POWER FOLD Extension
 10/25/2017 8E000050,Rev AB Combine Grain Tank Extension Tip-Up Kit CIH MX410P Fits Case IH 8240, 9240 w/ 410 bu. POWER FOLD Extension OPERATOR / assembly MANUAL PLACE IN COMBINE CAB AFTER ASSEMBLY FOR
DISCONTINUED. OPERATORS MANUAL for SEMI AUTOMATIC RV SYSTEM. 82 L Rev. 0. Comment [KO1]:
![DISCONTINUED. OPERATORS MANUAL for SEMI AUTOMATIC RV SYSTEM. 82 L Rev. 0. Comment [KO1]:](/thumbs/89/97984779.jpg "DISCONTINUED. OPERATORS MANUAL for SEMI AUTOMATIC RV SYSTEM. 82 L Rev. 0. Comment [KO1]:") OPERATORS MANUAL for SEMI AUTOMATIC RV SYSTEM 82 L0020 00 Rev. 0 Comment [KO1]: TABLE OF CONTENTS OPERATION AND MAINTENANCE...1 OPERATION CAUTION NOTES...1 BEFORE YOU OPERATE THE SYSTEM...2 EXCESS SLOPE...2
OPERATORS MANUAL for SEMI AUTOMATIC RV SYSTEM 82 L0020 00 Rev. 0 Comment [KO1]: TABLE OF CONTENTS OPERATION AND MAINTENANCE...1 OPERATION CAUTION NOTES...1 BEFORE YOU OPERATE THE SYSTEM...2 EXCESS SLOPE...2
AOM452 In-Car LCD Display System Package Installation Manual
 AOM452 In-Car LCD Display System Package Installation Manual Features: 4.5 TFT Color LCD Display Camera 1 input for Rearview camera Camera 2 input for Side view camera Navigation Input Cautions! The product
It don t mean a thing If it ain t got the swing
 SWING CHUTE SAND/SALT SPREADER INSTALLATION AND OPERATING INSTRUCTIONS SWING CHUTE SPREADER MODELS: 7, 8, 9, 9.5 & 10 MANUAL FOR SPREADER SERIAL NUMBERS AFTER # 20000 It don t mean a thing If it ain t
Wheel Horse. 44 Snowthrower. for 5xi Lawn and Garden Tractors. Model No & Up. Operator s Manual
 FORM NO. 8 Rev A Wheel Horse Snowthrower for 5xi Lawn and Garden Tractors Model No. 7966 890050 & Up Operator s Manual IMPORTANT: Read this manual, and your tractor manual, carefully. They contain information
Installation Instructions
 Instructions Created by an: DIY Underhood LED Lighting Kit (SKU# DIY-E-UHLK) Installation Instructions NOTICE: This Under Hood Light Kit was installed on a 2002 Toyota Tacoma. However, these instructions
INSTALLATION CONSTELLATION DRIVING LIGHTS 5009
 INSTALLATION CONSTELLATION DRIVING LIGHTS 5009 PARTS INCLUDED 1 Right Driving Light with Turn Signals 1 Left Driving Light with Turn Signals 1 Installation Component Kit Including: 8 Insulated Male Spades
IMGL and 9510 Control Replacement Kit #214 INSTALLATION MANUAL
 IMGL and 9510 Control Replacement Kit #214 INSTALLATION MANUAL TABLE OF CONTENTS Safety Information 2 Product Information 2 Removal and Replacement of IMGL Assembly 4 Removal and Replacement of The Control
EJ212 Electric Jack 1 Ton (2,000 lbs) Assembly & Operating Instructions
 Assembly & Operating Instructions") EJ212 Electric Jack 1 Ton (2,000 lbs) Assembly & Operating Instructions READ ALL INSTRUCTIONS AND WARNINGS BEFORE USING THIS PRODUCT. This manual provides important information on proper operation & maintenance.
EJ212 Electric Jack 1 Ton (2,000 lbs) Assembly & Operating Instructions READ ALL INSTRUCTIONS AND WARNINGS BEFORE USING THIS PRODUCT. This manual provides important information on proper operation & maintenance.
Kwikee Platinum Series OWNER'S MANUAL
 Kwikee Platinum Series OWNER'S MANUAL TABLE OF CONTENTS Safety Information 2 Product Information 2 General Service Notes 3 Prior To Operation 3 Operation 4 Step with Control Unit 4 Troubleshooting 5 Step
Equipped with AEM Dryflow Filter No Oil Required!
 Equipped with AEM Dryflow Filter No Oil Required! INSTALLATION INSTRUCTIONS PART NUMBER: 21-491B (Blue Finish) 21-491C (Gun Metal Grey Finish) 21-491P (Vacuum Metalized Chrome-VMC) 21-491R (Red Finish)
VALVE AND PLUMBING KIT INSTRUCTIONS SMC 84Q & 2408 LOADERS NEW HOLLAND TRACTORS MODEL 2WD 4WD LESS CAB WITH CAB 1720 X X X 1920 X X X
 ASSEMBLY MANUAL Keep With Operator s Manual VALVE AND PLUMBING KIT INSTRUCTIONS SMC 84Q & 2408 LOADERS NEW HOLLAND TRACTORS MODEL 2WD 4WD LESS CAB WITH CAB 1720 X X X 1920 X X X TRACTOR AND VALVE KIT GENERAL
Maxx-Mini Lift MMLE-50D Service Manual
 Maxx-Mini Lift MMLE-50D Service Manual LIFT PRODUCTS INC PO BOX 349 ELM GROVE WI 53122 262-521-5720 FAX 262-521-5725 Toll Free 877-543-8776 Model: MMLE-50D S/N Customer REGISTRATION INFORMATION (To validate
ATV/UTV WINCH INSTRUCTION BOOK 3000 LBS
 ATV/UTV WINCH INSTRUCTION BOOK 3000 LBS As you read these instructions, you will see WARNINGS and CAUTIONS. Each message has a specific purpose. WARNINGS and CAUTIONS identify the hazard, indicate how
Installation Instructions. QuickSilver Shifter. Fits: GM, Ford, Chrysler Transmissions See Application Guide for Specific Applications Part # 80683
 Installation Instructions QuickSilver Shifter Fits: GM, Ford, Chrysler Transmissions See Application Guide for Specific Applications Part # 80683 WORK SAFELY! For maximum safety, perform this installation
US208S Scooter Carrier - US208P Power Chair Carrier 210 Lift N Go 130 Swing Away Installation Guide & Owners Manual
 7325 Douglas Rd. Lambertville, MI 48144 Phone: 1-800-541-3213 Fax: (734) 568-6705 www.wheelchaircarrier.com E-mail: admin@wheelchaircarrier.com US208S Scooter Carrier - US208P Power Chair Carrier 210 Lift
Kwikee Revolution Step Series
 Kwikee Revolution Step Series OWNER'S MANUAL (3010002262) Rev: 07.26.2018 Kwikee Revolution Step Series Owner's Manual 3010002262 TABLE OF CONTENTS Safety Information 2 Product Information 2 General Service
REMOTE CONTROL CONVERSION KIT, P/N INSTALLATION INSTRUCTIONS
 REMOTE CONTROL CONVERSION KIT, P/N 5036662 INSTALLATION INSTRUCTIONS APPLICATION This kit is designed for use on 2005 (SO) and newer Johnson 9.9 and 5 HP (302 cc) 4-Stroke outboards. DO NOT install on
BALE KING GT40 Grain Feeder Operator's & Parts Manual Last Update: November 20, 2014 Bridgeview Manufacturing Inc - 1 -
 BALE KING GT40 Grain Feeder Operator's & Parts Manual Last Update: November 20, 2014 Bridgeview Manufacturing Inc - 1 - Your Authorized Dealer: Your Serial Number: The Serial Number is located on the tank.