FORD RAPTOR SUPERCREW 6.2L, 4WD
|
|
|
- Beverly Warner
- 5 years ago
- Views:
Transcription


1 THY-223Y-1-C LEGALITY NOTES These exhaust headers DO NOT comply with California Air Resource Board regulations and are NOT LEGAL for sale or use on pollution controlled vehicles in the state of California. These headers are intended for use on vehicles that are involved in closed course racing applications only. They will be referred to as RACE USE ONLY in any other location in this instruction sheet, or any marketing information. The installation of exhaust headers onto any vehicle must be performed in accordance with all governmental regulations that pertain to the particular vehicle receiving the headers.
2 PARTS INCLUDED Ref. Part Number Description Qty 1) Driver Side Header Assembly 1 2) Passenger Side Header Assembly 1 3) Main Y-pipe Assembly 1 4) Driver Side Connector Pipe Assembly 1 5) Passenger Side Connector Pipe Assembly 1 6) Band Clamp 3 7) M x30mm Hex Flange Head Bolt 2 8) /8-16x2.25 Hex Head Bolt 4 9) /8-16 Hex Nut 4 10) /8-16 Toplock Hex Nut 4 9) /8 Flat Washer 8 TOOLS REQUIRED Ref. Description 1) 3/8 Drive Ratchet and Extensions 2) 7/8 Box wrench or O2 Sensor Socket 3) 9/16 Box Wrench and Socket 4) 8mm, 10mm, 12mm, 14mm Sockets 5) 8mm, 10mm, 12mm, 14mm Wrenches Ref. Description 6) Metric Allen Wrench Set 7) WD40 or equivalent 8) Sawzall, hack saw, or equivalent 9) High strength thread locker 10) High temperature silicone sealant WARRANTY NOTES 1) The utmost care is taken at Doug Thorley Headers ( DTH ) to maintain the highest standards of quality. However, DTH cannot control the installation of the product. For this reason the warranty covers only the replacement of the components, it does not cover labor for the installation. 2) The use of any type of header wrapping immediately voids the warranty. Using any sort of wrapping material on the headers destroys the tubing s ability to dissipate heat, causing very rapid deterioration of the composition of the metal and the subsequent failure of the headers. 3) Any chrome plating applied to DTH header components is a high-nickel chrome finish applied to retard corrosion. This is a commercial quality heat chrome designed to protect the metal from the environment only. This finish is not show chrome and is not intended for the sake of appearance. This high-nickel chrome will turn colors and approach black as it cooks into the metal. The initial brilliance of the chrome finish is not covered under the warranty. Contamination of the surface by foreign substances may produce other color patterns. This can be prevented by routine cleaning. 4) Retain all paperwork pertaining to the purchase of your DTH product. Save your receipt! Your limited lifetime warranty is not valid without a receipt of your purchase.
3 INSTALLATION NOTES 1) It is important that you read the entire instruction sheet before beginning any installation. 2) Due to restricted room in the engine compartment your headers may come close to certain body and chassis components, this is normal for an installation of this type. However, a careful inspection must be completed to ensure that the distances and placement are reasonable and logical, especially with regard to electrical, fuel, and brake components. 3) Because of car-to-car variations, DTH strongly recommends that these headers be installed by an experienced installation shop that has a vehicle lift, fabrication and/or welding experience. NOTE: Installation of these headers is quite difficult, and will take a good amount of time. Please be sure that you are capable of performing all tasks required to complete the installation before beginning. 1) Disconnect both battery terminals. 2) Cut the factory y-pipe assembly between the passenger side catalytic convertor and the y-pipe collector. Doing this will ease removal of the factory y-pipe. (Fig. 1) 3) Disconnect and remove all four O2 sensors from the factory exhaust system. 4) Remove the four bolts securing the stock exhaust manifolds to the y-pipe inlets. 5) Loosen the band clamp nut on the driver side. 6) Remove the two bolts securing the y-pipe to the exhaust system inlet. 7) Remove the factory y-pipe sections from the truck. 8) Remove the bolts securing the driver side manifold heat shield, and remove the heat shield. 9) Remove the two bolts securing the passenger side heat shield. 10)On the passenger side, disconnect the wiring and remove the three starter mounting bolts. Remove the starter from the truck. 11) Find a suitable place on the passenger side to jack the engine up and lift just enough to support the engine.
4 12)Remove the three engine mount bolts (engine mount to engine block). 13)Loosen both large engine mount nuts (engine mount to frame). Remove the nut closest to the driver side, and leave the nut closest to the passenger side on with a few threads showing. (Fig. 2) 14)Lift the engine just enough to finish removing the passenger side manifold heat shield form the truck. 15)With the engine still lifted, remove all passenger side manifold nuts and remove the manifold from the truck. Retain all hardware and factory gasket. 16)Remove the engine oil dipstick. 17)Remove all driver side manifold nuts and remove the manifold from the truck. Retain all hardware and factory gasket. 18)Inspect both the factory gaskets and the cylinder heads. Clean all excess carbon deposits and/or dirt from the gaskets and cylinder heads. 19)Mark the orientation of the steering shaft to rack, and remove the pinch bolt. Move the steering shaft out of the way. 20)Carefully remove all of the top manifold studs from the driver side cylinder head. 21)Place the factory gasket onto the lower studs on the driver side cylinder head. Install the new Driver Side Header onto the lower studs. 22)Loosely secure the header to the cylinder head using one supplied M x30mm Hex Flange Head Bolt. This bolt will be installed on the top in the second position from the front. 23)Loosely secure all other header flange mounting points using the original studs and nuts. It is very important that you start all hardware prior to tightening anything. Do not fully tighten at this time. 24)Starting with the centermost hardware, tighten all driver side header flange hardware to factory specification.
5 25)Reattach the steering shaft to the rack. 26)Remove the third manifold mounting stud from the front (top) on the passenger side cylinder head. 27)Remove all three floorboard heat shield (large heat shield on passenger side) bolts and slide the heat shield back & out of the way. 28)Place the factory gasket onto the studs on the passenger side cylinder head. Install the new Passenger Side Header onto the studs. NOTE: It may take a few different engine positions to work the passenger side header up to the cylinder head, be patient. 29)Loosely secure the header to the cylinder head using the supplied M x30mm Hex Flange Head Bolt. This bolt will be installed on the top in the third position from the front. 30)Loosely secure all other header flange mounting points using the original studs and nuts. It is very important that you start all hardware prior to tightening anything. Do not fully tighten at this time. 31)Starting with the centermost hardware, tighten all passenger side header flange hardware to factory specification. 32)While the engine is still lifted, reinstall the engine oil dip stick. NOTE: Remember that it is routed behind the motor mount. 33)Reinstall the starter and all wiring connections to it. 34)Install the original front O2 sensors into the bungs provided on the headers. Reconnect the O2 sensors to the wiring harness. 35)Slide the floorboard heat shield back into position. If it comes into contact with the header you may need to bend the heat shield, or trim it slightly. 36)Secure the floorboard heat shield using the original bolts. 37)Lower the engine down into the original position and fully tighten all engine mounting hardware to factory specification.
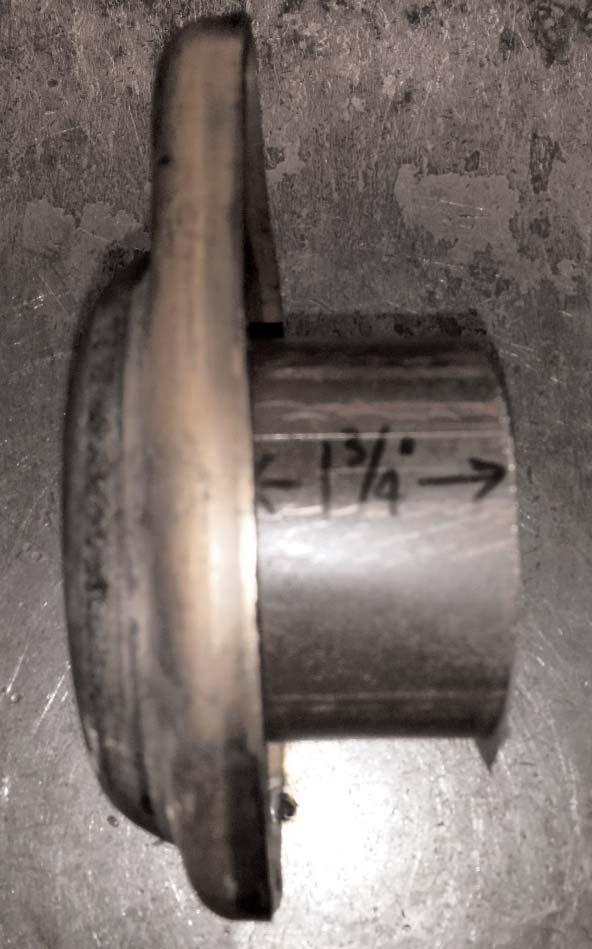
6 38)The new Y-pipe Assembly requires you to cut the factory flange from the exhaust system inlet in order to accommodate the new y-pipe. Cut the exhaust system 1.75 from the weld on the back side of the flange. (Fig. 3) 39)Deburr and clean the cut end of the exhaust system. 40)Place one supplied Band Clamp over the notched portion of the Y-pipe Assembly. Apply some high temperature silicone sealant to the exhaust system inlet and slide the y-pipe assembly into position over the exhaust system inlet. Do not tighten clamp at this time. NOTE: In order to accommodate installation of the new y-pipe components, you may need to take the exhaust system completely out of the hangers. 41)Place one supplied Band Clamp over the notched passenger side inlet of the y-pipe assembly. Apply some high temperature silicone sealant to the outlet of the Passenger Side Connector Pipe and slide it into the passenger side y-pipe inlet. 42)Position the passenger side connector pipe over the passenger side header outlet. Using the supplied 3/8-16x2.25 Hex Head Bolts (2), 3/8-16 Hex Nuts (2), and 3/8 Flat Washers (4), loosely secure the connector pipe to the header outlet. Do not fully tighten at this time. 43)Place one supplied Band Clamp over the notched outlet of the Driver Side Connector Pipe. Apply some high temperature silicone sealant to the driver side inlet of the y-pipe assembly and slide the driver side connector pipe into place. 44)Position the driver side connector pipe over the driver side header outlet. Using the supplied 3/8-16x2.25 Hex Head Bolts (2), 3/8-16 Hex Nuts (2), and 3/8 Flat Washers (4), loosely secure the connector pipe to the header outlet. Do not fully tighten at this time. 45)Once you are satisfied with the positioning of all y-pipe components and the exhaust system, you may fully tighten all band clamps and header outlet hardware. 46)Thread one 3/8-16 Toplock Hex Nut onto the exposed threads of each 3/8-16x2.25 hex head bolt installed in Step #42 & 44. Using a wrench to hold the hex nuts in place while securing the toplock nuts to the hex nuts with a second wrench. 47)Install the original rear O2 sensors into the bungs provided on the y-pipe assembly. Reconnect the O2 sensors to the wiring harness. NOTE: You may need to use some wire ties to secure any O2 wiring away from exhaust components.
Inspect the entire header installation for any loose hardware that may have been missed. 50)Reconnect the battery. 51)Start the engine and check for any exhaust leaks.")
7 48)Inspect engine compartment and components around the headers for clearance issues. Wipe excess oil, grease and finger prints off of the headers with acetone or equivalent. 49)Inspect the entire header installation for any loose hardware that may have been missed. 50)Reconnect the battery. 51)Start the engine and check for any exhaust leaks. 52)It will be necessary to re-torque nuts and bolts once the engine has reached operating temperature, and has cooled back down. CATALYTIC BREAK-IN PROCEDURE New catalytic convertors require a break-in period in order to work properly 1) Start the engine and allow it to idle for 5 minutes without touching the accelerator. 2) After 5 minutes, raise the RPM to 2500 for another 2 minutes. 3) Allow the engine to cool. Fig. 1

8 Fig. 2 Fig. 3
DODGE CHARGER, CHALLENGER, MAGNUM (05-08), CHRYSLER L HEMI (FOR OFF-ROAD RACING USE ONLY)
, CHRYSLER L HEMI (FOR OFF-ROAD RACING USE ONLY)") LEGALITY NOTES These exhaust headers DO NOT comply with California Air Resource Board regulations and are NOT LEGAL for sale or use on pollution controlled vehicles in the state of California. These headers
LEGALITY NOTES These exhaust headers DO NOT comply with California Air Resource Board regulations and are NOT LEGAL for sale or use on pollution controlled vehicles in the state of California. These headers
CHEVELLE / EL CAMINO BIG BLOCK (2 PRIMARY TUBES)
") (2 PRIMARY TUBES) THY-351-C LEGALITY NOTES If your vehicle was manufactured on, or after, 1976 these exhaust headers DO NOT comply with California Air Resource Board regulations and are NOT LEGAL for sale
(2 PRIMARY TUBES) THY-351-C LEGALITY NOTES If your vehicle was manufactured on, or after, 1976 these exhaust headers DO NOT comply with California Air Resource Board regulations and are NOT LEGAL for sale
THY-124Y PARTS INCLUDED TOOLS REQUIRED HARDWARE INCLUDED WARRANTY NOTES
 B Y S U M M I T I N D U S T R I E S PARTS INCLUDED 1 - Right side header 1 - Left side header 2 - Reducers 1 - Hot air pickup 8 - Heat sleeves 2 - Header gaskets 2 - Collector gaskets HARDWARE INCLUDED
PARTS INCLUDED HARDWARE INCLUDED TOOLS REQUIRED
 B Y S U M M I T I N D U S T R I E S PARTS INCLUDED HARDWARE INCLUDED TOOLS REQUIRED 1 - Right side header 1 - Left side header 1 - Hot air pickup 2 - Reducers 2 - Header gaskets 2 - Collector gaskets 12-3/8-16
THY-355Y OLDSMOBILE GMC CLASS A MOTORHOME, FRONT WHEEL DRIVE (NO REVCON) PARTS INCLUDED TOOLS REQUIRED HARDWARE INCLUDED WARRANTY NOTES
 PARTS INCLUDED TOOLS REQUIRED HARDWARE INCLUDED WARRANTY NOTES") B Y S U M M I T I N D U S T R I E S THY-355Y PARTS INCLUDED 1 - Right side header 1 - Left side header 1 - Hot air pickup 2 - Reducers 2 - Header gaskets 2 - Conical gaskets 9 - Heat sleeves HARDWARE INCLUDED
B Y S U M M I T I N D U S T R I E S THY-355Y PARTS INCLUDED 1 - Right side header 1 - Left side header 1 - Hot air pickup 2 - Reducers 2 - Header gaskets 2 - Conical gaskets 9 - Heat sleeves HARDWARE INCLUDED
THY-616Y-C / THY-616Y-S-C JEEP J-SERIES PICKUP, WAGONEER, CHEROKEE PARTS INCLUDED HARDWARE INCLUDED TOOLS REQUIRED WARRANTY NOTES
 B Y S U M M I T I N D U S T R I E S THY-616Y-C / THY-616Y-S-C PARTS INCLUDED HARDWARE INCLUDED TOOLS REQUIRED 1 - Right side header 1 - Left side header 1 - Connector pipe assembly 1 - Catalytic converter
GM TRUCK / SUBURBAN 5.3L-6.2L LS MOTOR SWAP
 THY-322Y-C LEGALITY NOTES If your vehicle was manufactured on, or after, 1976 these exhaust headers DO NOT comply with California Air Resource Board regulations and are NOT LEGAL for sale or use on pollution
THY-211Y / THY-211Y-S PARTS INCLUDED TOOLS REQUIRED HARDWARE INCLUDED WARRANTY NOTES
 B Y S U M M I T I N D U S T R I E S THY-211Y / THY-211Y-S PARTS INCLUDED 1 - Right side header 1 - Left side header 1 - Hot air pickup 2 - Reducers 2 - Header gaskets 2 - Collector gaskets HARDWARE INCLUDED
THY-109Y DODGE VAN, MINI-MOTORHOME PARTS INCLUDED TOOLS REQUIRED HARDWARE INCLUDED WARRANTY NOTES
 B Y S U M M I T I N D U S T R I E S PARTS INCLUDED 1 - Right side header 1 - Left side header 2 - Reducers 1 - Hot air pickup 8 - Heat sleeves 2 - Header gaskets 2 - Collector gaskets HARDWARE INCLUDED
THY-114Y / THY-114Y-S DODGE PICKUP, RAMCHARGER PARTS INCLUDED TOOLS REQUIRED HARDWARE INCLUDED WARRANTY NOTES
 B Y S U M M I T I N D U S T R I E S PARTS INCLUDED 1 - Right side header 1 - Left side header 1 - Hot air pickup 2 - Reducers 2 - Header gaskets 2 - Collector gaskets HARDWARE INCLUDED 12-5/16-18 x 1 Header
THY-303Y / THY-303Y-DA / THY-303Y-S PARTS INCLUDED TOOLS REQUIRED HARDWARE INCLUDED WARRANTY NOTES
 B Y S U M M I T I N D U S T R I E S THY-303Y / THY-303Y-DA / THY-303Y-S PARTS INCLUDED 1 - Right side header 1 - Left side header 2 - Reducers 2 - Header gaskets 2 - Conical gaskets HARDWARE INCLUDED 16-3/8-16
THY-376Y1 / THY-376Y1-S CHEVROLET CAMARO / Z-28 PARTS INCLUDED HARDWARE INCLUDED TOOLS REQUIRED WARRANTY NOTES
 B Y S U M M I T I N D U S T R I E S PARTS INCLUDED HARDWARE INCLUDED TOOLS REQUIRED 1 - Right side header 1 - Left side header 1 - Hot air pickup 2 - Reducers 2 - Header gaskets 2 - Conical gaskets 12-3/8-16
THY-388Y / THY-388Y-S CHEVY PICKUP, 92½-95 PICKUP, SUBURBAN PARTS INCLUDED TOOLS REQUIRED HARDWARE INCLUDED WARRANTY NOTES
 B Y S U M M I T I N D U S T R I E S THY-388Y / THY-388Y-S PARTS INCLUDED 1 - Right side header 1 - Left side header 1 - Y-pipe assembly 1 - Catalytic converter adapter 2 - Header gaskets 2 - Conical gaskets
THY-306Y1 / THY-306Y1-S CHEVROLET CLASS A MOTORHOME WITH TURBO 400 AUTO TRANS PARTS INCLUDED TOOLS REQUIRED HARDWARE INCLUDED
 B Y S U M M I T I N D U S T R I E S PARTS INCLUDED 1 - Right side header 1 - Left side header 1 - Y-pipe assembly 1 - Catalytic converter adapter 2 - Header gaskets 2 - Conical gaskets 1 - Collector gasket
PARTS INCLUDED HARDWARE INCLUDED TOOLS REQUIRED
 B Y S U M M I T I N D U S T R I E S PARTS INCLUDED HARDWARE INCLUDED TOOLS REQUIRED 1 - Right side header 1 - Left side header 2 - Catalytic converter adapter (short) 2 - Header gaskets (9310) 1 - EGR
15-18 FORD MUSTANG GT
 15-18 FORD MUSTANG GT IMPORTANT! WARRANTY AND INSTALLATION INSTRUCTIONS Please Forward All Information to Consumer Be sure to review the enclosed instructions prior to beginning the installation process.
1501 Industrial Way N., Toms River, NJ Fax: PACKING LIST MUSTANG GT LONG TUBE HEADERS (M30000)
") ADVANCED - Installation requires professional-type tools and advanced automotive-service skills. If you lack experience with internal engine modifications, an Advanced installation is probably beyond your
ADVANCED - Installation requires professional-type tools and advanced automotive-service skills. If you lack experience with internal engine modifications, an Advanced installation is probably beyond your
05-18 DODGE CHRYSLER CHALLENGER CHARGER 300 MAGNUM
 05-18 DODGE CHRYSLER CHALLENGER CHARGER 300 MAGNUM IMPORTANT! WARRANTY AND INSTALLATION INSTRUCTIONS Please Forward All Information to Consumer Be sure to review the enclosed instructions prior to beginning
GP1-R FULL EXHAUST SUZUKI GSX-R600 / GSX-R
 THIS EXHAUST SYSTEM IS DESIGNED FOR USE IN CLOSED COURSE RACING ONLY, AND IS NOT INTENDED FOR PUBLIC HIGHWAY USE. IN THE STATE OF CALIFORNIA, IT IS ILLEGAL TO MODIFY THE EMISSION CONTROL SYSTEM ON ANY
GP1-R FULL EXHAUST SUZUKI GSX-R600 / GSX-R
 THIS EXHAUST SYSTEM IS DESIGNED FOR USE IN CLOSED COURSE RACING ONLY, AND IS NOT INTENDED FOR PUBLIC HIGHWAY USE. IN THE STATE OF CALIFORNIA, IT IS ILLEGAL TO MODIFY THE EMISSION CONTROL SYSTEM ON ANY
GP125S STAINLESS HEADER
 GP125S STAINLESS HEADER WITH EGR FITTING FORD EXCURSION 6.8L-V-10 2/4WD FORD SUPERDUTY TRUCK F250HD/F350 6.8L-V10 2/4WD GIBSON HEADERS ARE 50 STATE SMOG LEGAL 2/2 WARNING! Do not rely on bumper jacks or
IMPORTANT WARRANTY & INSTALLATION INSTRUCTIONS ATTACHED TO ACTIVATE YOUR WARRANTY GO TO: CORSAPERFORMANCE.COM/WARRANTY STOP
 IMPORTANT WARRANTY & INSTALLATION INSTRUCTIONS ATTACHED Please Forward All Attached Information to Consumer Warranty Not Valid Unless Returned to CORSA Performance We ask that you take a few moments to
GP114S-C CERAMIC COATED HEADER
 GP114S-C CERAMIC COATED HEADER HAS AIR INJECTION, OLD BODY STYLE FOR CHEVROLET/GMC 98-99 PICKUP 5.0L-5.7L 98-99 YUKON/DENALI/TAHOE 5.7L 98-99 SUBURBAN 5.7L 98-99 CADILLAC ESCALADE 5.7L 2/4 WD D GIBSON
FULL LENGTH HEADERS/ CATTED HEAD PIPES
 INSTALLATION INSTRUCTIONS INS232 2016-2018 CAMARO 6.2L V8 FULL LENGTH HEADERS/ CATTED HEAD PIPES Part #4044 and 40440 Special Tools required: 10mm, 12mm, 13mm, 15mm Socket and Wrenches, Pliers, Saw, Welder
952004S STAINLESS POWER EXHAUST SYSTEM CHEVY 454 CLASS A MOTORHOME SINGLE AIR PUMP
 952004S STAINLESS POWER EXHAUST SYSTEM 75-86 CHEVY 454 CLASS A MOTORHOME SINGLE AIR PUMP Thank you very much for purchasing our Gibson Exhaust System for your vehicle. If you need further assistance, please
97-04 CHEVROLET CORVETTE C5
 97-04 CHEVROLET CORVETTE C5 IMPORTANT! WARRANTY AND INSTALLATION INSTRUCTIONS Please Forward All Information to Consumer Be sure to review the enclosed instructions prior to beginning the installation
1501 Industrial Way N., Toms River, NJ Fax: PACKING LIST MUSTANG LONG TUBE HEADERS (M30000)
") 2/18/04 1501 Industrial Way N., Toms River, NJ 08755 732-349-2109 Fax:732-244-0867 ADVANCED - Installation requires professional-type tools and advanced automotive-service skills. If you lack experience
2/18/04 1501 Industrial Way N., Toms River, NJ 08755 732-349-2109 Fax:732-244-0867 ADVANCED - Installation requires professional-type tools and advanced automotive-service skills. If you lack experience
GP603 CHROME HEADER TOYOTA TUNDRA 4.7L 2WD TOYOTA SEQUOIA 4.7L 2WD GIBSON HEADERS ARE 50 STATE SMOG LEGAL
 GP603 CHROME HEADER 00-04 TOYOTA TUNDRA 4.7L 2WD 01-04 TOYOTA SEQUOIA 4.7L 2WD GIBSON HEADERS ARE 50 STATE SMOG LEGAL Thank you very much for purchasing our Gibson header for your vehicle. If you need
Installation Instructions
 05 CHEVROLET C-6 CORVETTE LS-2 STAINLESS STEEL EXHAUST SYSTEM PART # (115-635300S) (LIT 885) Installation Instructions Congratulations on your purchase of the Dynatech / SuperMaXX exhaust system for the
What s in your new header system kit?
 !"#$% "#$%& ' "())' **+ Congratulations on your purchase of the Dynatech / SuperMaXX system for the Dodge Magnum / Chrysler 300C. We believe, and think you will agree that this system is second to none
GP113S STAINLESS HEADER WITH STAINLESS Y-PIPE
 GP113S STAINLESS HEADER WITH STAINLESS Y-PIPE HAS NO AIR FITTING AT THE FRONT OF EACH MANIFOLD FOR CHEVROLET/GMC 96-00 PICKUP 7.4L 2/4WD 96-00 SUBURBAN 7.4L 2/4WD GIBSON HEADERS ARE 50 STATE SMOG LEGAL
Installation Instructions
 2007/2010 Chevy/GMC 1500 TRUCK (4.8, 5.3, 6.0 & 6.2 liter) 2WD and 4WD 07-08 Part # 715-14110, 715-14120 & 715-14130 09-Up Part # 715-14110, 715-14420 & 715-14430 11-12 6.2L Part # 715-14110, 715-14620
GP314S-C CERAMIC HEADER
 GP314S-C CERAMIC HEADER 04-06 DODGE MAGNUM RT 5.7L HEMI 2WD 04-06 CHRYSLER 300 C STYLE 5.7L HEMI AWD 2006 DODGE CHARGER 5.7L HEMI 2WD GIBSON HEADERS ARE 50 STATE SMOG LEGAL AUTOMATIC ONLY Thank you very
Part Numbers: Complete Kits: C5 Base/Z06 Complete Header Package with Cats C5 Base/Z06 Complete Header Package without Cats
 Product: Corvette Tri-Y Headers & Mid-Pipe Part Numbers: Complete Kits: 1150042 C5 Base/Z06 Complete Header Package with Cats 1150043 C5 Base/Z06 Complete Header Package without Cats Applications: Chevrolet
GP137S STAINLESS STEEL HEADER
 GP137S STAINLESS STEEL HEADER NO AIR INJECTION, NO EGR 2014 SILVERADO / SIERRA TRUCK 1500 5.3L & 6.2L 2/4WD GIBSON HEADERS ARE 50 STATE SMOG LEGAL Thank you very much for purchasing our Gibson header for
Banks PowerPack System
 Owner smanual with Installation Instructions Banks PowerPack System Including: Banks Stinger System 1999-2004 Ford 6.8L V-10 F250/F350 Pickups and Excursions This manual is for use with systems 49130-49139
2016 Camaro Header Installation
 TEXAS-SPEED.COM 2016 Camaro Header Installation Tools 8mm Socket 11mm Socket 5/8 Spark Plug Socket T15, T35 Torx Bit 5mm Allen Bit 10mm Socket and Wrench 11mm Socket and Wrench 3/8 Drive Ratchet, Torque
RT1 SLIP-ON EXHAUST HONDA CBR600RR REV. A
 08-50-43733 REV. A PARTS INCLUDED Ref. Part Number Description Qty 1) 00-200-00064 Slip-on S-bend Assembly 1 2) 00-200-00088 RT1 Aluminum Muffler Assembly 1 3) 03-46-43058 Muffler Mounting Strap 1 4) 07-27-42566
Pontiac GTO LS-2 Header System (6.0 liter) Part # , &
 Part # , &") 2005-06 Pontiac GTO LS-2 Header System (6.0 liter) Part # 715-73410, 715-73520 & 715-73530 LIT 891 Dynatech highly recommends hiring a professional installer, one that is familiar with the installation
2005-06 Pontiac GTO LS-2 Header System (6.0 liter) Part # 715-73410, 715-73520 & 715-73530 LIT 891 Dynatech highly recommends hiring a professional installer, one that is familiar with the installation
GP129S-C CERAMIC HEADER
 GP129S-C CERAMIC HEADER NO AIR INJECTION, NO EGR CADILLAC ESCALADE 6.2L AWD CADILLAC ESCALADE 5.3L AWD CHEVY AVALANCHE 5.3L 2/4WD SILVERADO / SIERRA TRUCK 1500 4.8L-5.3L 2/4WD SILVERADO TRUCK 1500 6.0L
SLP Camaro ZL1 STAGE 2 (625 HP)
") SLP - 2012 Camaro ZL1 STAGE 2 (625 HP) PART #26001 PACKING LIST Before installation, use this check list to make sure all necessary parts have been included. ITEM QTY CHECK PART NUMBER DESCRIPTION 1. 1
SLP - 2012 Camaro ZL1 STAGE 2 (625 HP) PART #26001 PACKING LIST Before installation, use this check list to make sure all necessary parts have been included. ITEM QTY CHECK PART NUMBER DESCRIPTION 1. 1
Tuned Length Headers. Special Tools Required: Install Time: Difficulty: Follow these instructions carefully to ensure correct fitment and operation.
 Special Tools Required: welder / saws all Install Time: Approximately 4 Hours Difficulty: 4 out of 5 Follow these instructions carefully to ensure correct fitment and operation. STEP 1 Disconnect the negative
POWER EXHAUST SYSTEM DODGE 440 CLASS A MOTORHOME PASSENGER SIDE EXIT
 954002 POWER EXHAUST SYSTEM 74-81 DODGE 440 CLASS A MOTORHOME PASSENGER SIDE EXIT Thank you very much for purchasing our Gibson Exhaust System For your vehicle. If you need further assistance, please do
RT1 DUAL OUTLET SLIP-ON EXHAUST HONDA CBR600RR Rev B
 18-1022-723-02 08 50 44541 Rev B PARTS INCLUDED Ref. Part Number Description Qty 1) 00-200-00042 Slip-on S-bend Assembly 1 2) 00-200-01197 Stainless Steel Dual Outlet Muffler 1 3) 03-46-42766 Muffler Mounting
Part # 6695S. Read all instructions carefully before attempting installation.
 Corporate Office: PerTronix Inc. 440 E. Arrow Highway, San Dimas, California 91773 * Phone 909.599.5955 FAX 909.599.6424 Installation Instructions and Warranty Information 2007-10 5.4 Ford Mustang Shelby
RT1 DUAL OUTLET SLIP-ON EXHAUST TRIUMPH DAYTONA E: TECH: (216) REV.
 REV.") 08-50-43009 REV. C PARTS INCLUDED Ref. Part Number Description Qty 1) 00-200-00060 Slip-on S-bend Assembly 1 2) 00-200-00056 Carbon Fiber Dual Outlet Muffler 1 3) 04-24-42866 Supersport Fender Bracket
08-50-43009 REV. C PARTS INCLUDED Ref. Part Number Description Qty 1) 00-200-00060 Slip-on S-bend Assembly 1 2) 00-200-00056 Carbon Fiber Dual Outlet Muffler 1 3) 04-24-42866 Supersport Fender Bracket
Long Tube Header Installation For Ford Mustang GT
 Long Tube Header Installation For 2005-2008 Ford Mustang GT Precision manufactured using aircraft quality T-304 stainless steel; this system is designed to endure years of heavy use. Installing a Borla
POWER EXHAUST SYSTEM CHEVY 454 CLASS A MOTORHOME DUAL AIR PUMP
 952003 POWER EXHAUST SYSTEM 87-89 CHEVY 454 CLASS A MOTORHOME DUAL AIR PUMP Thank you very much for purchasing our Gibson Exhaust System for your vehicle. If you need further assistance, please do not
2010 Camaro Long Tube Headers, Coated w/high Flow Cats/ Powerflo-X Crossover Assembly
 PART #30213/30214 2010 Camaro Long Tube Headers, Coated w/high Flow Cats/ Powerflo-X Crossover Assembly PACKING LIST Before installation, use this checklist to make sure all necessary parts have been included.
POWER EXHAUST SYSTEM DODGE 440 CLASS A MOTORHOME DRIVER SIDE EXIT
 954000 POWER EXHAUST SYSTEM 74-81 DODGE 440 CLASS A MOTORHOME DRIVER SIDE EXIT Thank you very much for purchasing our Gibson Exhaust System For your vehicle. If you need further assistance, please do not
Exhaust System Installation Turbo Downpipe Audi MKII TT-RS 2.5T CD100028
 Please take the time to read and understand installation instructions. APR recommends that installation of this system be performed by a qualified service center or professional muffler installer who has
Installation Instructions
 Camaro / Firebird LS-1 F-Body Header System 715-73210, 715-73220 and 715-73230 Model Years 1998 and 1999 715-73310, Model Years 2000 and Later Dynatech highly recommends hiring a professional installer,
Part # , and All Ford F-150 Series Trucks 2wd & 4wd with a Triton V-8 5.4L LIT
 Part #722-84210, 722-84220 and 722-84230 All Ford 99-03 F-150 Series Trucks 2wd & 4wd with a Triton V-8 5.4L LIT 1014 1 Note: We do our best to make sure the instructions in the box are the latest version.
2010 Camaro Long Tube Headers, Coated w/high Flow Cats Use w/#30220
 PART #30212 2010 Camaro Long Tube Headers, Coated w/high Flow Cats Use w/#30220 PACKING LIST Before installation, use this checklist to make sure all necessary parts have been included. ITEM CHECK PART
Read all instructions carefully before attempting installation. 1633S-1JS Shown. Rev DSL
 Corporate Office: PerTronix Inc. 440 E. Arrow Highway, San Dimas, California 91773 * Phone 909.599.5955 FAX 909.599.6424 Installation Instructions and Warranty Information 1630S 86-87 Ranger/Bronco II
InstalLation Instructions. rock ripper tacoma 2.7l header tacoma/4runner header, 2.7l ( KIT) kit contents
 kit contents") InstalLation Instructions rock ripper tacoma 2.7l header tm 95-98 tacoma/4runner header, 2.7l (180308-1-KIT) kit contents 5356 EAST PINE AVE FRESNO, CA 93727 USA TOLL FREE: 877.4X4.TOYS WORLDWIDE: 559.252.4950
InstalLation Instructions rock ripper tacoma 2.7l header tm 95-98 tacoma/4runner header, 2.7l (180308-1-KIT) kit contents 5356 EAST PINE AVE FRESNO, CA 93727 USA TOLL FREE: 877.4X4.TOYS WORLDWIDE: 559.252.4950
Ford Mustang GT Long Tube Header Installation
 2005-2006 Ford Mustang GT Long Tube Header Installation Precision manufactured using aircraft quality T-304 stainless steel; this system is designed to endure years of heavy use. Installing a Borla Performance
GP400S-C CERAMIC HEADER
 GP400S-C CERAMIC HEADER 91-95 JEEP WRANGLER YJ 4.0L 4WD 96-99 JEEP WRANGLER TJ 4.0L 4WD 91-99 JEEP CHEROKEE 4.0L 2/4WD 93-99 JEEP GRAND CHEROKEE 4.0L 2/4WD GIBSON HEADERS ARE 50 STATE SMOG LEGAL 2/2 Thank
Owner smanual. Banks Monster Exhaust System Ford Power Stroke 6.0L Turbo-Diesel F250/F350 Trucks & Excursions
 with Installation Instructions Owner smanual Banks Monster Exhaust System 2003-2007 Ford Power Stroke 6.0L Turbo-Diesel F250/F350 Trucks & Excursions THIS MANUAL IS FOR USE WITH SYSTEMS 48749, 48760, 48781,
Owner smanual. Banks PowerPack System. Including: Banks Stinger System & Optional Ottomind. Ford 6.8L V-10 Class-C Motorhome
 with Installation Instructions Owner smanual Banks PowerPack System Including: Banks Stinger System & Optional Ottomind Ford 6.8L V-10 Class-C Motorhome THIS MANUAL IS FOR USE WITH SYSTEM 49144, 49145,
4 December 2017 PN# , , Dodge 6.7L Rumble B SXE (I-00400) 1. BD Rumble B SXE. D o d g e 6. 7 L H P C R Installation Instructions
 1. BD Rumble B SXE. D o d g e 6. 7 L H P C R Installation Instructions") 4 December 2017 PN#1045705, 1045706, 1045708 Dodge 6.7L Rumble B SXE (I-00400) 1 DOWNLOAD ENHANCED INSTALL MANUALS AT dieselperformance.com BD Rumble B SXE D o d g e 6. 7 L H P C R Installation Instructions
4 December 2017 PN#1045705, 1045706, 1045708 Dodge 6.7L Rumble B SXE (I-00400) 1 DOWNLOAD ENHANCED INSTALL MANUALS AT dieselperformance.com BD Rumble B SXE D o d g e 6. 7 L H P C R Installation Instructions
Owner smanual. Banks Split-Dual Monster Exhaust System Chevy/GMC 6.6L LMM Duramax Turbo-Diesel Pickups. with Installation Instructions
 with Installation Instructions Owner smanual Banks Split-Dual Monster Exhaust System 2007-2010 Chevy/GMC 6.6L LMM Duramax Turbo-Diesel Pickups THIS MANUAL IS FOR USE WITH SYSTEM 47785 General Installation
Installation Instructions
 04 and up FORD F150 w/5.4 liter V-8 Stainless Steel Header Exhaust System Part # 722-62210, 722-62220, 722-62230 (4WD) Part # 722-62210, 722-62320, 722-62330 (2WD) (Lit 882) Dynatech highly recommends
Banks Monster Exhaust Rear Quads System
 Banks Monster Exhaust Rear Quads System 2007-2008 Chevy/GMC 1500 Silverado, 6.0L V-8 Gas, Vortex Max THIS MANUAL IS FOR USE WITH MONSTER EXHAUST SYSTEMS 48347 Gale Banks Engineering 546 Duggan Avenue Azusa,
2007 Shelby GT500 Long Tube Headers Installation
 2007 Shelby GT500 Long Tube Headers Installation Precision manufactured using aircraft quality T-304 stainless steel; this system is designed to endure years of heavy use. Installing a Borla Performance
Installation Instructions and Warranty Information
 Corporate Office: PerTronix Inc. 440 E. Arrow Highway, San Dimas, California 91773 * Phone 909.599.5955 FAX 909.599.6424 Installation Instructions and Warranty Information 6695S 2007-14 5.4/5.8 Ford Mustang
Application List L Cummins
 1 Discharging & Recharging of the A/C System is required for this install. INTERCOOLER INSTALLATION FOR 2010+ DODGE 6.7L CUMMINS Application List 2010+ 6.7L Cummins 1042530 PLEASE READ ALL INSTRUCTIONS
Z-Gate Universal Shifter
 Installation Instructions Z-Gate Universal Shifter Fits: GM, Ford, Lincoln and Chrysler Transmissions See Application Guide for Specific Applications Part #80681 Rev 06/01/2018 WORK SAFELY! For maximum
Ford 6.8L V-10 Class-A Motorhome
 with Installation Instructions Owner smanual Banks PowerPack System Including: Banks Stinger System Banks Git-Kit 1997-2005 Ford 6.8L V-10 Class-A Motorhome THIS MANUAL IS FOR USE WITH SYSTEMS 49140, 49141,
Owner smanual. Banks TorqueTube System With Optional Headpipe Assembly
 Owner smanual with Installation Instructions Banks TorqueTube System With Optional Headpipe Assembly Jeep 4.0L I-6 models including: 91-99 Wrangler 91-99 Cherokee 93-98 Grand Cherokee 91-92 Comanche THIS
81-87, 22r/re 4wd, 50 state smog legal header ( k) r 4wd ca only 50 state smog legal header ( k) 1 ct.
 r 4wd ca only 50 state smog legal header ( k) 1 ct.") InstalLation Instructions rock ripper toy header tm 81-87, 22r/re 4wd, 50 state smog legal header (180302-1-k) 81-84 22r 4wd ca only 50 state smog legal header (180303-1-k) kit contents Header Tube Intermediate
InstalLation Instructions rock ripper toy header tm 81-87, 22r/re 4wd, 50 state smog legal header (180302-1-k) 81-84 22r 4wd ca only 50 state smog legal header (180303-1-k) kit contents Header Tube Intermediate
Owner smanual. Banks TorqueTube System Ford 5.4L F-150 (Late Body Style) with Installation Instructions
 with Installation Instructions") Owner smanual with Installation Instructions Banks TorqueTube System 2004-2008 Ford 5.4L F-150 (Late Body Style) THIS MANUAL IS FOR USE WITH SYSTEMS 48715 Gale Banks Engineering 546 Duggan Avenue Azusa,
Owner smanual with Installation Instructions Banks TorqueTube System 2004-2008 Ford 5.4L F-150 (Late Body Style) THIS MANUAL IS FOR USE WITH SYSTEMS 48715 Gale Banks Engineering 546 Duggan Avenue Azusa,
For Toyota Tundra 4.7L V-8 Two and Four Wheel Drive
 Corporate Office: PerTronix Inc. 440 E. Arrow Highway, San Dimas, California 91773 * Phone 909.599.5955 FAX 909.599.6424 Installation Instructions and Warranty Information For 2000-2004 Toyota Tundra 4.7L
3 Turbo Downpipe Installation Audi A3 / Volkswagen GTI / Volkswagen Jetta 2.0L FSI/TSI Turbo CD100013
 Please take time to read and understand these installation instructions. APR recommends that installation of this system be performed by a qualified service center or professional muffler installer who
BD SUPER B SINGLE TURBO KIT Dodge 5.9L Cummins v ISBe (Non 600 motors)
") 1 DOWNLOAD ENHANCED INSTALL MANUALS AT dieselperformance.com BD SUPER B SINGLE TURBO KIT Dodge 5.9L Cummins 2003-2004 24v ISBe (Non 600 motors) Part # 1045230 PLEASE READ ALL INSTRUCTIONS BEFORE INSTALLATION
1 DOWNLOAD ENHANCED INSTALL MANUALS AT dieselperformance.com BD SUPER B SINGLE TURBO KIT Dodge 5.9L Cummins 2003-2004 24v ISBe (Non 600 motors) Part # 1045230 PLEASE READ ALL INSTRUCTIONS BEFORE INSTALLATION
Installation Instructions Z-Gate Shifter
 Installation Instructions Z-Gate Shifter Part Number 80681 1998, 2001 by B&M Racing and Performance Products The B&M Z-Gate shifter can be used in vehicles equipped with most popular three speed automatic
1 ct. 1 ct. 2 ct. 2 ct. 1 ct. 2 ct. 1 ct. 2 ct. 2 ct. 2 ct. Air Injection Tube Gaskets. 1 ct. 4 ct. 4 ct. 1 ct. 2 ct. 2 ct.
 rock ripper tm toy header 88-95 4cyl, 4wd, 50 state smog legal header - 180304-1-k kit contents Header Tube Intermediate Tube Flanges Header Flange Gaskets Exhaust Clamps Header Gasket CARB Decal Air Injection
IMPORTANT WARRANTY & INSTALLATION INSTRUCTIONS ATTACHED
 IMPORTANT WARRANTY & INSTALLATION INSTRUCTIONS ATTACHED Please Forward All Attached Information to Consumer Warranty Not Valid Unless Returned to CORSA Performance We ask that you take a few moments to
INSTALLATION & OWNER S MANUAL
 1 of 18 INSTALLATION & OWNER S MANUAL (*Not including cab & other accessories) A/C Alternator Kit: Yamaha Drive & Drive2 P/N: 1ACYDR2DRK Recommended it be installed with Curtis Cab: Sandstone (p/n 1GCYD1-A,
Long Tube Header Installation For Dodge Challenger SRT-8 & R/T, Charger SRT-8 & R/T, Magnum SRT-8 & R/T & Chrysler 300 SRT-8 & 300C
 Long Tube Header Installation For 2005-2008 Dodge Challenger SRT-8 & R/T, Charger SRT-8 & R/T, Magnum SRT-8 & R/T & Chrysler 300 SRT-8 & 300C Precision manufactured using high quality austenitic stainless
RT1 DUAL OUTLET SLIP-ON EXHAUST TRIUMPH DAYTONA E: TECH: (216) REV.
 REV.") 08-50-46629 REV. C PARTS INCLUDED Ref. Part Number Description Qty 1) 00-200-02194 Slip-on Midpipe Assembly 1 2) 00-200-01201 Polished Dual Outlet Muffler 1 3) 04-24-42866 Supersport Fender Bracket 1 4)
08-50-46629 REV. C PARTS INCLUDED Ref. Part Number Description Qty 1) 00-200-02194 Slip-on Midpipe Assembly 1 2) 00-200-01201 Polished Dual Outlet Muffler 1 3) 04-24-42866 Supersport Fender Bracket 1 4)
Installation Instructions and Warranty Information
 Installation Instructions and Warranty Information 1625S 96-98 Mustang 4.6L 2v 1-1/2 1625S-8 96-98 Mustang 4.6L 2v 1-5/8 1625S-1 99-04 Mustang 4.6L 2v 1-1/2 1625S-9 99-04 Mustang 4.6L 2v 1-5/8 1625S-5JT
**DO NOT EXCEED RECOMMENDED VEHICLE TOWING WEIGHT!**
 60660 SUBKIT 7/8/0 **DO NOT EXCEED RECOMMENDED VEHICLE TOWING WEIGHT!** DODGE 500 / 3500 SHORT AND LONG BED PAGE OF 5 WARNING!! BRAKE, FUEL, AND ELECTRICAL LINES MAY NEED TO BE LOOSENED OR REPOSITIONED
Bill of Materials: Please take time to read and understand these installation instructions.
 Please take time to read and understand these installation instructions. CORSA recommends that installation of this system be performed by a qualified service center or professional muffler installer who
Installation Instructions and Warranty Information 1688S Ford F V8
 Corporate Office: PerTronix Inc. 440 E. Arrow Highway, San Dimas, California 91773 * Phone 909.599.5955 FAX 909.599.6424 Installation Instructions and Warranty Information 1688S 2011-14 Ford F-150 5.0
Owner smanual. Banks Monster Exhaust Cherokee (XJ) with Installation Instructions THIS MANUAL IS FOR USE WITH SYSTEMS 51360
 with Installation Instructions THIS MANUAL IS FOR USE WITH SYSTEMS 51360") with Installation Instructions Owner smanual Banks Monster Exhaust 1987-2001 Cherokee (XJ) THIS MANUAL IS FOR USE WITH SYSTEMS 51360 Gale Banks Engineering 546 Duggan Avenue Azusa, CA 91702 (626) 969-9600
with Installation Instructions Owner smanual Banks Monster Exhaust 1987-2001 Cherokee (XJ) THIS MANUAL IS FOR USE WITH SYSTEMS 51360 Gale Banks Engineering 546 Duggan Avenue Azusa, CA 91702 (626) 969-9600
Owner smanual. Banks Monster Split-Dual Exhaust System Ford Power Stroke 6.0L Turbo-Diesel F250/F350 Trucks. with Installation Instructions
 Owner smanual with Installation Instructions Banks Monster Split-Dual Exhaust System 2003-2007 Ford Power Stroke 6.0L Turbo-Diesel F250/F350 Trucks THIS MANUAL IS FOR USE WITH Systems 47600-47614, 48761,
INSTALLATION & OWNER S MANUAL
 Rev. E p. of 3 INSTALLATION & OWNER S MANUAL V446 Front Cab Kit and V446 Rear Cab Kit for RTV 40 INSTALLATION & OWNER S MANUAL The contents of this envelope are the property of the owner. Be sure to leave
Owner smanual. Banks TorqueTube System. Jeep 2.5L 4-Cylinder '91-02 Wrangler. with Installation Instructions THIS MANUAL IS FOR USE WITH SYSTEM 51316
 with Installation Instructions Owner smanual Banks TorqueTube System Jeep 2.5L 4-Cylinder '91-02 Wrangler THIS MANUAL IS FOR USE WITH SYSTEM 51316 Gale Banks Engineering 546 Duggan Avenue Azusa, CA 91702
Please take time to read and understand these installation instructions.
 2014- Current C7 Corvette Please take time to read and understand these installation instructions. CORSA recommends that the installation of this system be performed by a qualified service center or professional
Long Tube Header Installation For Charger R/T, Magnum R/T, Chrysler 300C, Challenger R/T & Charger R/T PN , 17275,17256, 17275
 Long Tube Header Installation For Charger R/T, Magnum R/T, Chrysler 300C, Challenger R/T & Charger R/T PN - 17252, 17275,17256, 17275 These instructions have been written to help you with the installation
BBK LONG TUBE HEADERS (99-04 GT, Mach 1, Bullitt)
") BBK LONG TUBE HEADERS (99-04 GT, Mach 1, Bullitt) Install Time: Approx. 8-10 hrs Parts Needed: BBK Long Tube Headers Shorty mid pipe X/H O2 wiring harness extensions Hi-temp thread locker Tools Required:
BBK LONG TUBE HEADERS (99-04 GT, Mach 1, Bullitt) Install Time: Approx. 8-10 hrs Parts Needed: BBK Long Tube Headers Shorty mid pipe X/H O2 wiring harness extensions Hi-temp thread locker Tools Required:
Header Installation For Jeep Wrangler
 Header Installation For 2007-2008 Jeep Wrangler Precision manufactured using high quality austenitic stainless steel; this system is designed to endure years of heavy use. Installing a Borla Performance
Installation Instructions And Warranty Information
 Corporate Office: PerTronix Inc. 440 E. Arrow Highway, San Dimas, California 91773 * Phone 909.599.5955 FAX 909.599.6424 Installation Instructions And Warranty Information 1999-2006 Chevrolet/GMC 2WD 1500,
P/N 2032S Tacoma 3.4L P/N 2032S Tacoma 3.4L P/N 2032S T L
 Corporate Office: PerTronix Inc. 440 E. Arrow Highway, San Dimas, California 91773 * Phone 909.599.5955 FAX 909.599.6424 Installation Instructions and Warranty Information For JBA Headers for 1995-2004
Installation Instructions and Warranty Information
 Corporate Office: PerTronix Inc. 440 E. Arrow Highway, San Dimas, California 91773 * Phone 909.599.5955 FAX 909.599.6424 Installation Instructions and Warranty Information Part #1627S 1987-95 F-150/Bronco
Long Tube Header Installation for Charger R/T, Magnum R/T, Chrysler 300C, Challenger R/T & Charger R/T PN *,17256*, 17275*
 Long Tube Header Installation for Charger R/T, Magnum R/T, Chrysler 300C, Challenger R/T & Charger R/T PN - 17252*,17256*, 17275* ***** Please compare the parts in the box with the bill of materials provided
BD TrackMaster S D o d g e H P C R Installation Instructions
 7 July 2016 PN#1045701, 1045702, 1045704 Dodge 6.7L TMS400 (I-00361) 1 BD TrackMaster S400 2008-2012 D o d g e H P C R Installation Instructions 1045701 2008-2009 Dodge 6.7L TMS400 1045702 2010-2012 Dodge
99-04 GT. Hellion Power Systems Mustang GT Kit Instructions
 Hellion Power Systems 99-04 Mustang GT Kit Instructions Part 1 Hellion recommends that the front suspension system be installed either by trained professionals or by 5.Remove rack bolts K-Member Installation
Long Tube Header Installation PNs , 17276
 Long Tube Header Installation PNs - 17260, 17276 ***** Please compare the parts in the box with the bill of materials provided ***** to assure that you have all the parts necessary for this installation.