Pypes 409 Stainless Steel Violator Cat-back with Polished 304 Tips Installation Guide (98-04 GT/Mach 1)
|
|
|
- Charlotte Mathews
- 5 years ago
- Views:
Transcription
 Please read through the instructions carefully before starting this project.")
 Jack Stands Safety Goggles and Gloves (For Use When Cutting) Allen Wrenches Optional Parts Impact")
1 Pypes 409 Stainless Steel Violator Cat-back with Polished 304 Tips Installation Guide (98-04 GT/Mach 1) The below installation instructions work for the following products: Pypes 409 Stainless Steel Violator Catback with Polished 304 Tips (98-04 GT/Mach 1) Please read through the instructions carefully before starting this project. Take the time to get all the materials together as well as all the safety equipment. Tools needed: 14mm Deep Socket Ratchet Hacksaw or Reciprocating Saw 1 Can of WD-40 Jack and (2) Jack Stands Safety Goggles and Gloves (For Use When Cutting) Allen Wrenches Optional Parts Impact Wrench "PB-Blaster"-brand Lubricant Metal File Pre-Work 24 to 48 hours before you attempt removal, spray the 4 bolts down with PB-Blaster. Be sure to place rags or scrap wood under the car to catch any drips. Doing so will eliminate the need for an impact wrench to remove the hardware.


2 Installation: 1. Remove all parts from box and identify the parts in your kit before beginning the installation. The instructions that come with the Pypes exhaust definitely could use some work. 2. Two additional pages of instructions are included with the kit. The page below identifies which hanger to use on the stainless tips.


3 3. The last page introduces a bit of concern, as it hints towards the possibility of having to trim the flow tubes in order to make them fit properly. NOTE: No cutting was required on the Pypes kit during installation on my 2002 GT. 4. REMINDER: Identify and lay out the parts BEFORE attempting to mount anything. The kit comes with 4 sets of clamps and 2 sets of mounting hardware (not required if you are bolting up to the factory H-Pipe).

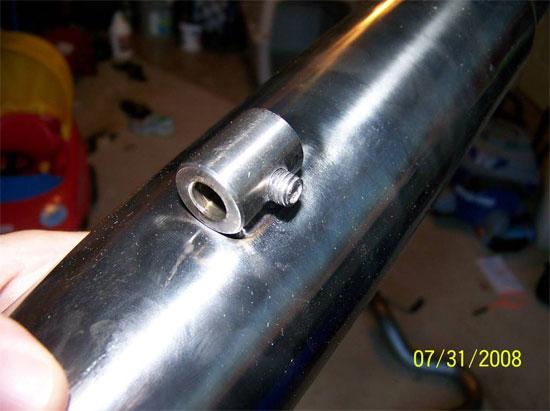
4 5. When laying out the new exhaust be sure to adhere to the following: a. Short flow tube (items with flanges) goes on the driver side. b. Each muffler has an INLET and OUTLET side. The INLET of each muffler is labeled on one side. c. The INLET side faces the stock H-pipe/front of the car. d. The main exhaust pipes have one hanger on each. The hanger side faces the mufflers while the LONG section of pipe faces the rear of the car. If you lay the hardware on the floor with the hangers facing UP and the humps facing OUT, then you have them in the correct orientation. e. Finally the tips can be placed into the equation.
. The machined Allen-Key clamps that hold these hangers do not allow for any deformities.")
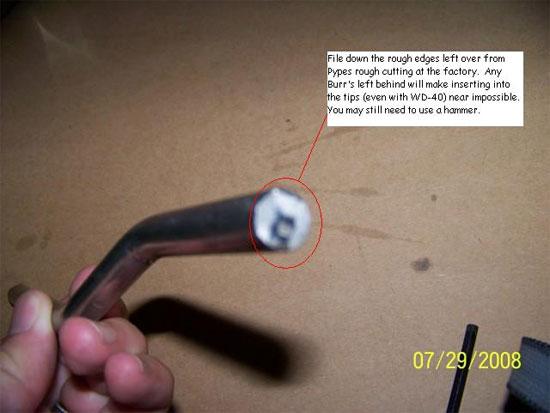
5 6. It may be necessary to file any rough edges off the tip of the hangers to ensure they fit properly (it was required during my installation). The machined Allen-Key clamps that hold these hangers do not allow for any deformities. The LONG side of the hanger slides into the mount.
6

7 7. The factory exhaust is a single piece and requires cutting to remove it from the car. Before proceeding with cutting, perform the following: a. Chock the front wheels. b. Jack up the rear of the car, placing it on jack stands. The higher the better. c. Remove BOTH rear wheels. You will NOT be able to get the Pypes over axle exhaust pipes installed without doing so. 8. Lubricate all hangers with the WD-40. Spray the rod that protrudes through the hanger. The hanger grommets STAY ON THE CAR. You will be removing the rod closest to the ground. Do not attempt to remove the hangers until after you cut the exhaust, which you will do later in the procedure. Doing so will only frustrate you, as there is little play in the exhaust until this is done.
8


9 9. Break the 14mm nuts free, which hold the factory exhaust on. Since we used the "PB-Blaster" beforehand, we were able to easily break free the nuts with hand tools. The studs are firmly attached to the H-pipe flange and do not require a second ratchet or wrench to hold.


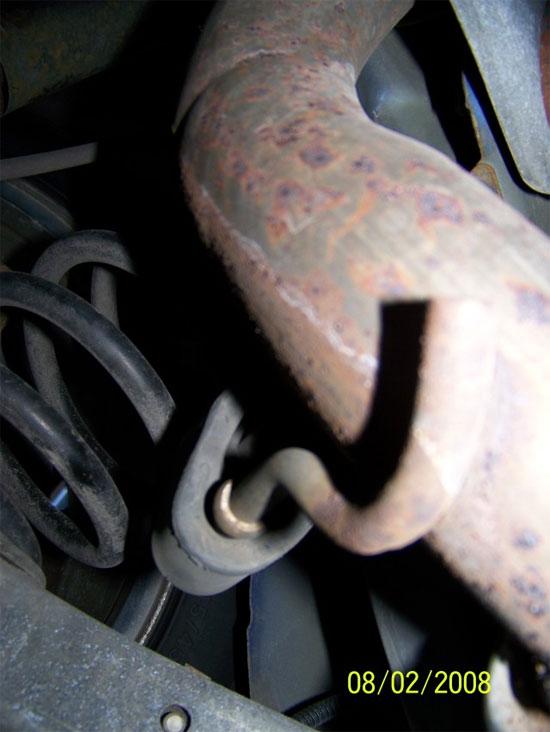
10 10. Put on your safety goggles and gloves if you have not already done so. Cut the factory exhaust as close to the center of the hoop that goes over the axle as you can. STEER CLEAR OF BRAKE LINES, FUEL LINES, etc. In some cases, it may be easier to cut the exhaust in 2 or more places. The reciprocating saw will cut through the pipe in less then 30 seconds. Slide the exhaust from the hangers. 11. With the factory exhaust removed now you can work the new, over-axle portions into place. This part can be a bit tricky. Be patient and do not attempt to do this without first taking BOTH rear wheels off. The long section faces the rear while the hanger faces the cats. Remove the black packing material from the Pypes hangers and slide them into the factory grommets (additional WD-40 may help). 12. Slide a clamp on the rear section, then the stainless tip with the hanger loosely holding it up.


11 13. Slide another clamp onto the flow tube and slide it into the muffler. The flanges are floating and allow for proper fitting to the H-pipe. If you go in any other order you will be frustrated by parts not having clearance to fit. 14. Do NOT tighten anything until you have it all in place. Tighten the nuts with your fingers, but not with any tools, as this will hold everything firmly in place until you're sure you've gotten everything right. 15. When mounting the mufflers, be sure the outlets are closest to the sides of the car.


12 16. The new exhaust only has a single hanger, on the over-axle portion that uses the mount closest to the front of the vehicle/closer to floor boards. 17. When tightening the supplied clamps, try to keep the nuts pointing to the sides for clearance.

13 18. Once everything is loosely in place go ahead and tighten all connections. Have a friend hold the exhaust system up while you tighten it down. Make it TIGHT. Work on each nut a few turns at a time then switch to the other. Attempt to leave equal threads visible on each side of the U-Clamp. 19. Do not forget to tighten the hangers on the tips with an Allen Wrench. 20. The installed system should hang no lower than the factory system did. If it does hang lower, then try rotating the flow tubes, mufflers or over-axle portions to make sure they all fit properly No part of the new exhaust system should touch any other surface on the car. The system gets EXTREMELY hot and will cause serious damage if it makes contact with any of these surfaces. You should be able to slide a finger between the exhaust and all surfaces of the car. 22. Put the wheels back on the car and lower it from the jack stands. 23. Clear all tools from around the car and start it up. *Drool*. It is normal for a nasty burning smell to emit from the system for minutes or more. These are the oils used during the manufacturing process burning off. 24. Check for leaks using a spray bottle that contains water and liquid soap. Spray the joints and look for bubbles. I typically wait to do this after driving the car for about 20 minutes or so to allow the metal to expand and contract. Installation instructions provided by AmericanMuscle customer Mike Ames Find more how-tos, instructions and videos at
Pypes 409 Stainless Steel Violator Catback with Polished 304 Tips (86-93 LX & GT) - Installation Instructions
 - Installation Instructions") Pypes 409 Stainless Steel Violator Catback with Polished 304 Tips (86-93 LX & 94-97 GT) - Installation Instructions The below installation instructions work for the following products: Pypes 409 Stainless
Pypes 409 Stainless Steel Violator Catback with Polished 304 Tips (86-93 LX & 94-97 GT) - Installation Instructions The below installation instructions work for the following products: Pypes 409 Stainless
SLP High Flow Catalytic Converter Kit (96-10) - Installation Instructions
 - Installation Instructions") SLP High Flow Catalytic Converter Kit (96-10) - Installation Instructions The below installation instructions work for the following products: SLP High Flow Catalytic Converter Kit (96-10) Please read
SLP High Flow Catalytic Converter Kit (96-10) - Installation Instructions The below installation instructions work for the following products: SLP High Flow Catalytic Converter Kit (96-10) Please read
MAC Catback Exhaust (86-93 LX; GT)
") MAC Catback Exhaust (86-93 LX; 94-95 GT) Installation Time: 3-4 hours for a novice, including time for adjustments. Tools recommended: Sawz-all or hacksaw, or exhaust cutoff tool 7/16 deep socket and/or
MAC Catback Exhaust (86-93 LX; 94-95 GT) Installation Time: 3-4 hours for a novice, including time for adjustments. Tools recommended: Sawz-all or hacksaw, or exhaust cutoff tool 7/16 deep socket and/or
Installation Instructions Borla Stinger S-Type Cat-Back Exhaust (05-09 GT)
") Installation Instructions Borla Stinger S-Type Cat-Back Exhaust (05-09 GT) Overview: This installation guide will cover installation of the Borla Stinger S-Type Catback Exhaust for all Mustang GTs from
Installation Instructions Borla Stinger S-Type Cat-Back Exhaust (05-09 GT) Overview: This installation guide will cover installation of the Borla Stinger S-Type Catback Exhaust for all Mustang GTs from
SLP Modular Muffler Installation Guide
 SLP Modular Muffler Installation Guide The below installation instructions work for the following products: Ford Mustang Bullet Style SLP Loudmouth II Mufflers Ford Mustang Shotgun-Style SLP Loudmouth
By AM Customer: Dean Smith, Aug. 8, 2014.
 Ford Racing Bullitt Axle-Back Exhaust (05-09 GT, GT500) By AM Customer: Dean Smith, Aug. 8, 2014. Tools for the Job: 13mm Wrench 13mm Socket 15mm Socket 15mm Deep Socket Ratchet(s) [I used a bigger one
Recommended Tools: 3/8 drive ratchet 3/8 drive 13mm socket 3/8 drive 15mm deep socket 10 3/8 ratchet extension Grommet pullers
 Please take time to read and understand these installation instructions. CORSA recommends that the installation of this system be performed by a qualified service center or professional muffler installer
BBK Ceramic Long Tube Headers (99-04 Cobra and Mach 1) - Installation Instructions
 - Installation Instructions") BBK Ceramic Long Tube Headers (99-04 Cobra and 03-04 Mach 1) - Installation Instructions The below installation instructions work for the following products: BBK Ceramic Long Tube Headers (99-04 Cobra
BBK Ceramic Long Tube Headers (99-04 Cobra and 03-04 Mach 1) - Installation Instructions The below installation instructions work for the following products: BBK Ceramic Long Tube Headers (99-04 Cobra
Focus RS Catback
 593100 - Focus RS Catback 593100 Focus RS Catback Ford Focus RS 2016-18 Congratulations on your purchase of the COBB Tuning Focus RS Catback Exhaust! The following instructions will assist you through
Please take time to read and understand these installation instructions.
 Please take time to read and understand these installation instructions. CORSA recommends that installation of this system be performed by a qualified service center or professional muffler installer who
IMPORTANT WARRANTY & INSTALLATION INSTRUCTIONS ATTACHED
 IMPORTANT WARRANTY & INSTALLATION INSTRUCTIONS ATTACHED Please Forward All Attached Information to Consumer Warranty Not Valid Unless Returned to CORSA Exhaust STOP Please take time to read and understand
IMPORTANT WARRANTY & INSTALLATION INSTRUCTIONS ATTACHED
 IMPORTANT WARRANTY & INSTALLATION INSTRUCTIONS ATTACHED Please Forward All Attached Information to Consumer Warranty Not Valid Unless Returned to CORSA Performance We ask that you take a few moments to
CORKSPORT Power Series Cat Back Exhaust I N S T A L L A T I O N I N S T R U C T I O N S Mazda 6 2.5T PART #: ATK
 I N S T A L L A T I O N I N S T R U C T I O N S CORKSPORT Power Series Cat Back Exhaust 2018+ Mazda 6 2.5T PART #: ATK-6-101-12 Need Help With Your Installation? Call (360) 260-CORK PAGE 1 CORKSPORT Power
Pypes Polished Shorty Headers (05-10 V6):
:") Pypes Polished Shorty Headers (05-10 V6): Introduction: The kit comes complete with replacement hardware and gaskets and can be easily done in your driveway. The hardware supplied for install includes
Pypes Polished Shorty Headers (05-10 V6): Introduction: The kit comes complete with replacement hardware and gaskets and can be easily done in your driveway. The hardware supplied for install includes
OIL COOLER KIT INSTALLATION INSTRUCTIONS D Application: , E89 Z4 sdrive 35i without stock oil cooler* PARTS LIST
 OIL COOLER KIT INSTALLATION INSTRUCTIONS D570-0891 Application: 2009-11, E89 Z4 sdrive 35i without stock oil cooler* PARTS LIST Qty Part No. Description 1 D573-0050 Oil Cooler + Frame Assy 1 D573-0044
BBK Electric Mustang Fuel Pump Kit - (86-97 V8) - Installation Instructions
 - Installation Instructions") BBK Electric Mustang Fuel Pump Kit - (86-97 V8) - Installation Instructions The below installation instructions work for the following products: BBK Electric Mustang Fuel Pump Kit - 190 LPH (86-97 V8)
BBK Electric Mustang Fuel Pump Kit - (86-97 V8) - Installation Instructions The below installation instructions work for the following products: BBK Electric Mustang Fuel Pump Kit - 190 LPH (86-97 V8)
Mustang Steeda Tri-Ax Shifter Installation Guide
 Mustang Steeda Tri-Ax Shifter Installation Guide The below installation instructions work for the following products: Mustang Short-Throw Shifters and Mustang Handles This "all questions answered" guide
Steeda Billet Charge Motion Control Plates (05-08 GT) - Installation Instructions
 - Installation Instructions") Steeda Billet Charge Motion Control Plates (05-08 GT) - Installation Instructions The below installation instructions work for the following products: Steeda Billet Charge Motion Control Plates (05-08
Steeda Billet Charge Motion Control Plates (05-08 GT) - Installation Instructions The below installation instructions work for the following products: Steeda Billet Charge Motion Control Plates (05-08
Saab 9-3 Krona Downpipe Installation Instructions. What's Included:
 www.kronaperformance.com 2003-2010 Saab 9-3 Krona Downpipe Installation Instructions What's Included: (1) 3 stainless downpipe (with or without catalyst) (1) 3-2.5 stainless downpipe adapter pipe (1) Turbo
Owner smanual. Banks Monster Exhaust System Volkswagen Golf 4 Door TDI 2.0L Clean Diesel. with Installation Instructions
 with Installation Instructions Owner smanual Banks Monster Exhaust System 2010-2012 Volkswagen Golf 4 Door TDI 2.0L Clean Diesel THIS MANUAL IS FOR USE WITH SYSTEMs 46170 Gale Banks Engineering 546 Duggan
Magnaflow MF Series Cat-Back Exhaust Dual Side Exit - Before Rear Tire p/n: F150 Extended Cab
 Magnaflow MF Series Cat-Back Exhaust Dual Side Exit - Before Rear Tire p/n: 19054 2015-2017 F150 Extended Cab Time Necessary: Approximately 1 hour Please Note: I ran into an issue with my install. This
Bill of Materials: Please take time to read and understand these installation instructions.
 Please take time to read and understand these installation instructions. CORSA recommends that installation of this system be performed by a qualified service center or professional muffler installer who
Ford Racing BOSS 302 Engine Oil Cooler (11-14 GT)
") Tools needed: 14mm hex socket 7mm socket/wrench 8mm socket/wrench Ford Racing BOSS 302 Engine Oil Cooler (11-14 GT) 10mm socket (for airbox removal) ¾ inch or 19mm wrench Torque wrench Appropriate ratchets
Tools needed: 14mm hex socket 7mm socket/wrench 8mm socket/wrench Ford Racing BOSS 302 Engine Oil Cooler (11-14 GT) 10mm socket (for airbox removal) ¾ inch or 19mm wrench Torque wrench Appropriate ratchets
Ford Racing Mustang K-Springs (05-09 GT) - Installation Instructions
 - Installation Instructions") Ford Racing Mustang K-Springs (05-09 GT) - Installation Instructions The below installation instructions work for the following products: Ford Racing Mustang K-Springs (05-09) Please read through the instructions
Ford Racing Mustang K-Springs (05-09 GT) - Installation Instructions The below installation instructions work for the following products: Ford Racing Mustang K-Springs (05-09) Please read through the instructions
3 Turbo Downpipe Installation Audi A3 / Volkswagen GTI / Volkswagen Jetta 2.0L FSI/TSI Turbo CD100013
 Please take time to read and understand these installation instructions. APR recommends that installation of this system be performed by a qualified service center or professional muffler installer who
IMPORTANT WARRANTY & INSTALLATION INSTRUCTIONS ATTACHED
 IMPORTANT WARRANTY & INSTALLATION INSTRUCTIONS ATTACHED Please Forward All Attached Information to Consumer Warranty Not Valid Unless Returned to CORSA Exhaust We ask that you take a few moments to complete
Procharger Stage II Intercooled Supercharger System (11-14 GT)
") Procharger Stage II Intercooled Supercharger System (11-14 GT) Installation Time: Approximately one day. Installed on 2012 Mustang GT 5.0/Manual Required Tools 3/8 Socket Set (Standard and Metric) 1/2
Procharger Stage II Intercooled Supercharger System (11-14 GT) Installation Time: Approximately one day. Installed on 2012 Mustang GT 5.0/Manual Required Tools 3/8 Socket Set (Standard and Metric) 1/2
Please take time to read and understand these installation instructions.
 2014- Current C7 Corvette Please take time to read and understand these installation instructions. CORSA recommends that the installation of this system be performed by a qualified service center or professional
Banks Monster Exhaust System
 Banks Monster Exhaust System 2007-2008 Chevy/GMC 1500 Silverado 4.8L, 5.3L, 6.0L V-8 Gas, New Body Style THIS MANUAL IS FOR USE WITH MONSTER EXHAUST SYSTEMS 48344, 48345 Gale Banks Engineering 546 Duggan
COBB Catback Exhaust
 591100 COBB Catback Exhaust 2013 Ford Focus ST Congratulations on your purchase of the COBB Catback Exhaust for your 2013 Ford Focus ST. The following instructions will assist you through your installation
Steeda Bumpsteer Kit (94-04) - Installation Instructions
 - Installation Instructions") Steeda Bumpsteer Kit (94-04) - Installation Instructions The below installation instructions work for the following products: Steeda Bumpsteer Kit (94-04) Please read through the instructions carefully
Steeda Bumpsteer Kit (94-04) - Installation Instructions The below installation instructions work for the following products: Steeda Bumpsteer Kit (94-04) Please read through the instructions carefully
UNDERDOG RACING DEVELOPMENT URD Traction Bar Installation
 URD Traction Bar Installation Introduction: UNDERDOG RACING DEVELOPMENT Thank you for choosing the URD Traction Bar for two wheel drive street trucks. More models coming soon! This bar is a true bolt on
Banks Monster Exhaust System Ford Power Stroke 6.7L Turbo-Diesel F-250/F-350/F-450 Trucks Crew Cab 6.75ft & 8ft bed
 with Installation Instructions Owner smanual Banks Monster Exhaust System 2011-2015 Ford Power Stroke 6.7L Turbo-Diesel F-250/F-350/F-450 Trucks Crew Cab 6.75ft & 8ft bed THIS MANUAL IS FOR USE WITH SYSTEM
IMPORTANT WARRANTY & INSTALLATION INSTRUCTIONS ATTACHED
 IMPORTANT WARRANTY & INSTALLATION INSTRUCTIONS ATTACHED Please Forward All Attached Information to Consumer Warranty Not Valid Unless Returned to CORSA Exhaust We ask that you take a few moments to compete
COBB Tuning Catback Exhaust System MAZDASPEED3
 572101 COBB Tuning Catback Exhaust System 2010+ MAZDASPEED3 Congratulations on your purchase of the COBB Tuning SS Catback Exhaust System for your 2010+ MAZDASPEED3. The following instructions will assist
Banks Monster Exhaust 5 System Chevy/GMC 6.6L L5P Duramax
 with Installation Instructions Owner smanual Banks Monster Exhaust 5 System 2017-2019 Chevy/GMC 6.6L L5P Duramax THIS MANUAL IS FOR USE WITH SYSTEM 48996, 48996-B DCLB, CCSB, CCLB, INCLUDING DUALLY MODELS
Owner smanual. Banks Split-Dual Monster Exhaust System Chevy/GMC 6.6L LMM Duramax Turbo-Diesel Pickups. with Installation Instructions
 with Installation Instructions Owner smanual Banks Split-Dual Monster Exhaust System 2007-2010 Chevy/GMC 6.6L LMM Duramax Turbo-Diesel Pickups THIS MANUAL IS FOR USE WITH SYSTEM 47785 General Installation
Lowering Spring Installation on a Mustang GT
 Lowering Spring Installation on a 99-04 Mustang GT This installation is very the same installation that many of the 79-04 Mustangs excluding Cobra require. Time to install: 2-3 hours to do alone with a
BBK Long Tube Header and Shorty Mid-pipe (05-10 GT):
:") Time Required: Approximately 6-8 Hours BBK Long Tube Header and Shorty Mid-pipe (05-10 GT): Tools Required: Floor Jack or Ramps Jack Stands (unless you used a ramp) 5mm, 8mm, 10mm, 12mm, 22mm sockets/open
Time Required: Approximately 6-8 Hours BBK Long Tube Header and Shorty Mid-pipe (05-10 GT): Tools Required: Floor Jack or Ramps Jack Stands (unless you used a ramp) 5mm, 8mm, 10mm, 12mm, 22mm sockets/open
CAUTION: Never work on a hot exhaust system. Allow time for the vehicle to cool. Always wear eye protection when working under a vehicle.
 Please take time to read and understand these installation instructions. CORSA Exhaust System Installation We recommend that the installation of this system be performed by a qualified service center or
Owner smanual. Banks Monster Exhaust System Toyota FJ Cruiser. with Installation Instructions
 with Installation Instructions Owner smanual Banks Monster Exhaust System 2007-2009 Toyota FJ Cruiser THIS MANUAL IS FOR USE WITH MONSTER EXHAUST SYSTEMS 48141, 48142 Gale Banks Engineering 546 Duggan
Thank you for purchasing a Borla Performance Cat-Back Exhaust System.
 Thank you for purchasing a Borla Performance Cat-Back Exhaust System. Precision manufactured using aircraft quality T-304 stainless steel; this system is designed to endure years of heavy use. Installing
Banks Monster Exhaust Rear Quads System
 Banks Monster Exhaust Rear Quads System 2007-2008 Chevy/GMC 1500 Silverado, 6.0L V-8 Gas, Vortex Max THIS MANUAL IS FOR USE WITH MONSTER EXHAUST SYSTEMS 48347 Gale Banks Engineering 546 Duggan Avenue Azusa,
RTR Tactical Performance Adjustable Rear Sway Bar with Heavy Duty Axle Brackets (05-14 All) Item # MPN#T5-FR65Z-RTR
 Item # MPN#T5-FR65Z-RTR") Installation Tools: RTR Tactical Performance Adjustable Rear Sway Bar with Heavy Duty Axle Brackets (05-14 All) Item #383782 MPN#T5-FR65Z-RTR 1 Jack 2 Jack Stands (1/2 Drive) Ratchet (1/2 Drive) Breaker
Installation Tools: RTR Tactical Performance Adjustable Rear Sway Bar with Heavy Duty Axle Brackets (05-14 All) Item #383782 MPN#T5-FR65Z-RTR 1 Jack 2 Jack Stands (1/2 Drive) Ratchet (1/2 Drive) Breaker
TENF8046MCD F8X M3/M4 TEST PIPES (REMOVES SECONDARY CATS) **NOT FOR USE ON ROAD VEHICLES / FOR OFF-ROAD AND RACING USE ONLY**
 **NOT FOR USE ON ROAD VEHICLES / FOR OFF-ROAD AND RACING USE ONLY**") Turner Motorsport LLC / 1-800-280-6966 / www.turnermotorsport.com DI/DBM 3/21/16 TENF8046MCD F8X M3/M4 TEST PIPES (REMOVES SECONDARY CATS) **NOT FOR USE ON ROAD VEHICLES / FOR OFF-ROAD AND RACING USE ONLY**
Turner Motorsport LLC / 1-800-280-6966 / www.turnermotorsport.com DI/DBM 3/21/16 TENF8046MCD F8X M3/M4 TEST PIPES (REMOVES SECONDARY CATS) **NOT FOR USE ON ROAD VEHICLES / FOR OFF-ROAD AND RACING USE ONLY**
Installation for Chevrolet Silverado/GMC Sierra PN s ,
 Installation for Chevrolet Silverado/GMC Sierra PN s-140550, 140551 ***** Please compare the parts in the box with the bill of materials provided ***** to assure that you have all the parts necessary for
Installation for Chevrolet Silverado & GMC Sierra PN s , , ,
 Installation for Chevrolet Silverado & GMC Sierra PN s-140717, 140718, 140719, 140720 BORLA PERFORMANCE INDUSTRIES ***** Please compare the parts in the box with the bill of materials provided ***** to
INSTALLATION INSTRUCTIONS
 AUTOMOTIVE PRODUCTS, INSTALLATION INSTRUCTIONS ULTIMATE BULL BAR APPLICATION: 200-2014 Ford Expedition / 2007-2014 Ford Expedition EL 200-2014 Lincoln Navigator L 2/4WD 2009-2014 Ford F-150 2015 + Ford
Banks Monster Exhaust System Chevy/GMC 1500 Silverado 4.8L, 5.3L, 6.0L V-8 Gas, New Body Style
 with Installation Instructions Owner smanual Banks Monster Exhaust System 2007-2008 Chevy/GMC 1500 Silverado 4.8L, 5.3L, 6.0L V-8 Gas, New Body Style THIS MANUAL IS FOR USE WITH MONSTER EXHAUST SYSTEMS
Exhaust System Installation for Chevrolet Silverado and GMC Sierra PN , , , , ,
 Exhaust System Installation for Chevrolet Silverado and GMC Sierra PN-140535, 140536, 140537, 140538, 140539, 140540 ***** Please compare the parts in the box with the bill of materials provided *****
Banks Monster Exhaust System. Chevy/GMC 1500 Silverado 5.3L, Gas/FFV, 2012 Extend Cab Standard 6.5 Bed
 Owner smanual with Installation Instructions Banks Monster Exhaust System Chevy/GMC 1500 Silverado 5.3L, Gas/FFV, 2012 Extend Cab Standard 6.5 Bed THIS MANUAL IS FOR USE WITH MONSTER EXHAUST SYSTEM 48354
Tools Required. Metric Wrench Set Screwdriver Set Metric Socket Set Pliers Heavy duty hydraulic Jack and Car Stands Box knife or similar Hacksaw WD40
 Subaru 2004+ Legacy GT & Outback XT For JDM 2.0 twinscroll turbo and USDM 2.5 turbo models Front Mount Intercooler Fitting Instructions PN# LEG-1348-000 You are now the proud owner of a highly tested and
Cat-Back Exhaust Installation , , ,
 Cat-Back Exhaust Installation 140261, 140262, 140517, 140518 BORLA PERFORMANCE INDUSTRIES These instructions have been written to help you with the installation of your Borla Performance Exhaust System.
Saab 900 and 9-3 Krona 3 Downpipe Installation Instructions
 1994-2002 Saab 900 and 9-3 Krona 3 Downpipe Installation Instructions 1 What s in the box? X1 Krona 3 downpipe (with or without catalyst) X1 Krona 3 mid pipe assembly X1 02 Bung plug X1 2 bolt flange gasket
Exhaust System Installation for Audi S4, S5 & S5 Sportback PNs ,
 Exhaust System Installation for Audi S4, S5 & S5 Sportback PNs 140740, 140749 ***** Please compare the parts in the box with the bill of materials provided ***** to assure that you have all the parts necessary
FULL LENGTH HEADERS/ CATTED HEAD PIPES
 INSTALLATION INSTRUCTIONS INS232 2016-2018 CAMARO 6.2L V8 FULL LENGTH HEADERS/ CATTED HEAD PIPES Part #4044 and 40440 Special Tools required: 10mm, 12mm, 13mm, 15mm Socket and Wrenches, Pliers, Saw, Welder
V6 Spring Belt Tensioner
 Dodgerunner s V6 Spring Belt Tensioner Installation Guide Dodgerunner 2007 The bracket consists of two pieces of 1/8" steel bolted together. The main piece is flat plate with welded-on alternator mounting
Owner smanual. Banks Monster Split-Dual Exhaust System Ford Power Stroke 6.0L Turbo-Diesel F250/F350 Trucks. with Installation Instructions
 Owner smanual with Installation Instructions Banks Monster Split-Dual Exhaust System 2003-2007 Ford Power Stroke 6.0L Turbo-Diesel F250/F350 Trucks THIS MANUAL IS FOR USE WITH Systems 47600-47614, 48761,
BBK LONG TUBE HEADERS (99-04 GT, Mach 1, Bullitt)
") BBK LONG TUBE HEADERS (99-04 GT, Mach 1, Bullitt) Install Time: Approx. 8-10 hrs Parts Needed: BBK Long Tube Headers Shorty mid pipe X/H O2 wiring harness extensions Hi-temp thread locker Tools Required:
BBK LONG TUBE HEADERS (99-04 GT, Mach 1, Bullitt) Install Time: Approx. 8-10 hrs Parts Needed: BBK Long Tube Headers Shorty mid pipe X/H O2 wiring harness extensions Hi-temp thread locker Tools Required:
Thank you for purchasing a Borla Performance Cat-Back Exhaust System.
 Thank you for purchasing a Borla Performance Cat-Back Exhaust System. Precision manufactured using aircraft quality T-304 stainless steel; this system is designed to endure years of heavy use. Installing
IMPORTANT WARRANTY & INSTALLATION INSTRUCTIONS ATTACHED
 IMPORTANT WARRANTY & INSTALLATION INSTRUCTIONS ATTACHED Please Forward All Attached Information to Consumer Warranty Not Valid Unless Returned to CORSA Exhaust We ask that you take a few moments to complete
Please confirm that all parts are present before beginning the factory exhaust system removal and db Performance Exhaust system installation.
 Please take time to read and understand these installation instructions. We recommend that the installation of this system be performed by a qualified service center or professional muffler installer who
ALLOY USA AXLE INSTALLATION (99-04 GT, Mach 1)
") ALLOY USA AXLE INSTALLATION (99-04 GT, Mach 1) Time Necessary: Approximately 4 hours Tools Required: Wrenches: 8mm, 13mm, 15mm, 5.5 mm allen, 6mm allen Sockets: 5/8, 3/4 Ratchet Floor Jack Jack Stands
ALLOY USA AXLE INSTALLATION (99-04 GT, Mach 1) Time Necessary: Approximately 4 hours Tools Required: Wrenches: 8mm, 13mm, 15mm, 5.5 mm allen, 6mm allen Sockets: 5/8, 3/4 Ratchet Floor Jack Jack Stands
How to Install a Tanabe Medalion Concept G Exahust on a Subaru BRZ
 Moddit How to Install a Tanabe Medalion Concept G Exahust on a Subaru BRZ Written By: Terence Chang 2019 www.moddit.com/ Page 1 of 11 TOOLS: Metric Socket Set- 10mm,12mm,14mm,17mm (1) Metric Combination
97-06 JEEP TJ/LJ LONG ARM UPGRADE KIT
 921663U00 97-06 JEEP TJ/LJ LONG ARM UPGRADE KIT Thank you for choosing Rough Country for your suspension needs. This kit is an upgrade kit only. This kit includes frame mounting points and adjustable long
INSTALLATION INSTRUCTIONS Air Spring Kit Dodge WD IMPORTANT NOTES
 INSTALLATION INSTRUCTIONS 6211 Air Spring Kit 2003+ Dodge 1500 4WD Thank you for purchasing a quality Hellwig Product. PLEASE READ THIS INSTRUCTION SHEET COMPLETELY BEFORE STARTING YOUR INSTALLATION IMPORTANT
2010 Camaro Long Tube Headers, Coated w/high Flow Cats Use w/#30220
 PART #30212 2010 Camaro Long Tube Headers, Coated w/high Flow Cats Use w/#30220 PACKING LIST Before installation, use this checklist to make sure all necessary parts have been included. ITEM CHECK PART
FR500 Mustang Steering Wheel Installation Guide
 FR500 Mustang Steering Wheel Installation Guide The below installation instructions work for the following products: Ford Mustang FR500 Style Steering Wheel Replacement This install guide is for the FR500
Exhaust System Installation for the Ford F-150 PNs , , , , , ,
 Exhaust System Installation for the Ford F-150 PNs 140693, 140694, 140695, 140696 140697, 140698, 140699, 140700 BORLA PERFORMANCE INDUSTRIES ***** Please compare the parts in the box with the bill of
IMPORTANT WARRANTY & INSTALLATION INSTRUCTIONS ATTACHED
 IMPORTANT WARRANTY & INSTALLATION INSTRUCTIONS ATTACHED Please Forward All Attached Information to Consumer Warranty Not Valid Unless Returned to CORSA Exhaust STOP Please take time to read and understand
Recommended Tools: 1/4 drive ratchet 1/4 drive 7mm socket 3/8 drive ratchet 3/8 drive 15mm deep socket File or rasp
 Please take time to read and understand these installation instructions. CORSA recommends that the installation of this system be performed by a qualified service center or professional muffler installer
FORD RAPTOR SUPERCREW 6.2L, 4WD
 THY-223Y-1-C LEGALITY NOTES These exhaust headers DO NOT comply with California Air Resource Board regulations and are NOT LEGAL for sale or use on pollution controlled vehicles in the state of California.
Please take time to read and understand these installation instructions.
 Please take time to read and understand these installation instructions. We recommend that the installation of this system be performed by a qualified service center or professional muffler installer who
Changing the Struts on a WK Jeep CRD
 Changing the Struts on a WK Jeep CRD Step by Step By Chirpz Disclaimer: I do not claim that this procedure is the right way or even the best way to change your struts. This is what I did after reading
Ford Racing Performance Improvement Intake Manifold (96-04 GT) Time Necessary: Approximately 4 hours
 Time Necessary: Approximately 4 hours") Ford Racing Performance Improvement Intake Manifold (96-04 GT) Time Necessary: Approximately 4 hours Tools Required: Ratchet and socket set Torque wrench Large adjustable wrench Needle nose pliers A dozen
Ford Racing Performance Improvement Intake Manifold (96-04 GT) Time Necessary: Approximately 4 hours Tools Required: Ratchet and socket set Torque wrench Large adjustable wrench Needle nose pliers A dozen
2007 Chevy Silverado 1500 & GMC Sierra 1500 Exhaust System Installation
 2007 Chevy Silverado 1500 & GMC Sierra 1500 Exhaust System Installation Precision manufactured using aircraft quality T-304 stainless steel; this system is designed to endure years of heavy use. Installing
GP1-R FULL EXHAUST SUZUKI GSX-R600 / GSX-R
 THIS EXHAUST SYSTEM IS DESIGNED FOR USE IN CLOSED COURSE RACING ONLY, AND IS NOT INTENDED FOR PUBLIC HIGHWAY USE. IN THE STATE OF CALIFORNIA, IT IS ILLEGAL TO MODIFY THE EMISSION CONTROL SYSTEM ON ANY
C&L Cold Air Intake (03-04 Mach 1) - Installation Instructions
 - Installation Instructions") C&L Cold Air Intake (03-04 Mach 1) - Installation Instructions The below installation instructions work for the following products: C&L Cold Air Intake (03-04 Mach 1) Please read through the instructions
C&L Cold Air Intake (03-04 Mach 1) - Installation Instructions The below installation instructions work for the following products: C&L Cold Air Intake (03-04 Mach 1) Please read through the instructions
Owner smanual. Banks Monster Exhaust System Jeep 3.6L Wrangler 2 Door. with Installation Instructions
 with Installation Instructions Owner smanual Banks Monster Exhaust System 2012-2016 Jeep 3.6L Wrangler 2 Door THIS MANUAL IS FOR USE WITH MONSTER EXHAUST SYSTEM 51342 Gale Banks Engineering 546 Duggan
OIL COOLER KIT INSTALLATION INSTRUCTIONS PART NUMBER D E92 335i/xi (N55 engine) with BMW Standard bumper and with stock oil cooler
 with BMW Standard bumper and with stock oil cooler") OIL COOLER KIT INSTALLATION INSTRUCTIONS PART NUMBER D570-0924 APPLICATION: 2011-12 E92 335i/xi (N55 engine) with BMW Standard bumper and with stock oil cooler Congratulations for being selective enough
OIL COOLER KIT INSTALLATION INSTRUCTIONS PART NUMBER D570-0924 APPLICATION: 2011-12 E92 335i/xi (N55 engine) with BMW Standard bumper and with stock oil cooler Congratulations for being selective enough
GP113S STAINLESS HEADER WITH STAINLESS Y-PIPE
 GP113S STAINLESS HEADER WITH STAINLESS Y-PIPE HAS NO AIR FITTING AT THE FRONT OF EACH MANIFOLD FOR CHEVROLET/GMC 96-00 PICKUP 7.4L 2/4WD 96-00 SUBURBAN 7.4L 2/4WD GIBSON HEADERS ARE 50 STATE SMOG LEGAL
Powerslot Mustang Rotors (Rear Pair GT/V6) - Installation Instructions
 - Installation Instructions") Powerslot Mustang Rotors (Rear Pair 94-04 GT/V6) - Installation Instructions The below installation instructions work for the following products: Powerslot Mustang Rotors (Rear Pair 94-04 GT/V6) Please
Powerslot Mustang Rotors (Rear Pair 94-04 GT/V6) - Installation Instructions The below installation instructions work for the following products: Powerslot Mustang Rotors (Rear Pair 94-04 GT/V6) Please
Installation for Chevrolet Malibu 2.0L Turbo PN-11936
 Installation for Chevrolet Malibu 2.0L Turbo PN-11936 BORLA PERFORMANCE INDUSTRIES ***** Please compare the parts in the box with the bill of materials provided ***** to assure that you have all the parts
Installation for Jeep Grand Cherokee SRT8 PN s , and 60634, 60635
 Installation for Jeep Grand Cherokee SRT8 PN s-140632, 140633 and 60634, 60635 BORLA PERFORMANCE INDUSTRIES ***** Please compare the parts in the box with the bill of materials provided ***** to assure
OIL COOLER KIT INSTALLATION INSTRUCTIONS PART NUMBER D
 OIL COOLER KIT INSTALLATION INSTRUCTIONS PART NUMBER D570-0904 APPLICATION: 2011-2012 E90 335i/xi (N55 engine) with BMW standard bumper and with stock oil cooler Congratulations for being selective enough
STOP IMPORTANT WARRANTY & INSTALLATION INSTRUCTIONS ATTACHED TO ACTIVATE YOUR LIMITED LIFETIME WARRANTY GO TO: CORSAPERFORMANCE.
 IMPORTANT WARRANTY & INSTALLATION INSTRUCTIONS ATTACHED Please Forward All Attached Information to Consumer Warranty Not Valid Unless Returned to CORSA Exhaust We ask that you take a few moments to complete
IMPORTANT WARRANTY & INSTALLATION INSTRUCTIONS ATTACHED
 IMPORTANT WARRANTY & INSTALLATION INSTRUCTIONS ATTACHED Please Forward All Attached Information to Consumer Warranty Not Valid Unless Returned to CORSA Exhaust STOP Please take time to read and understand
Banks Monster Exhaust System Chevy/GMC 1500 Silverado 4.8L, 5.3L, 6.0L V-8 Gas, New Body Style
 with Installation Instructions Owner smanual Banks Monster Exhaust System 2007-2008 Chevy/GMC 1500 Silverado 4.8L, 5.3L, 6.0L V-8 Gas, New Body Style THIS MANUAL IS FOR USE WITH MONSTER EXHAUST SYSTEMS
PRODUCT USE INFORMATION
 9RC61000 Jeep YJ Body Lift Thank you for choosing Rough Country for all your suspension needs. This body lift fits both manual and Automatic equipped vehicles!!! Refer to last page of this Instruction
15-17 FORD MUSTANG GT
 15-17 FORD MUSTANG GT IMPORTANT! WARRANTY AND Please Forward All Information to Consumer Be sure to review the enclosed instructions prior to beginning the installation process. If you have any questions
INSTALLATION INSTRUCTIONS
 INSTALLATION INSTRUCTIONS Part# 22-2719 Complete Mounting System for Dual Viair Compressors For the most up-to-date instructions please visit www.updownair.com www.updownair.com 833-226-4863 I M P O R
Owner smanual. Banks Monster Exhaust System Ford Power Stroke 6.0L Turbo-Diesel F250/F350 Trucks & Excursions
 with Installation Instructions Owner smanual Banks Monster Exhaust System 2003-2007 Ford Power Stroke 6.0L Turbo-Diesel F250/F350 Trucks & Excursions THIS MANUAL IS FOR USE WITH SYSTEMS 48749, 48760, 48781,
Sport Coil Springs Chysler 300C SRT-8 05 Dodge Charger SRT-8
 Sport Coil Springs 19105 05 Chysler 300C SRT-8 05 Dodge Charger SRT-8 Warning: This installation should be performed by a trained professional. The installation requires lowering of the rear cradle from
STOP IMPORTANT WARRANTY & INSTALLATION INSTRUCTIONS ATTACHED TO ACTIVATE YOUR LIMITED LIFETIME WARRANTY GO TO: CORSAPERFORMANCE.
 IMPORTANT WARRANTY & INSTALLATION INSTRUCTIONS ATTACHED Please Forward All Attached Information to Consumer Warranty Not Valid Unless Returned to CORSA Exhaust We ask that you take a few moments to complete
BMW F8x M3 & M4 Valvetronic Exhaust System
 BMW F8x M3 & M4 Valvetronic Exhaust System SKU: FS.BMW.F8X.VLVP Required Tools Hydraulic Lift or Floor Jack & Stands Metric Socket Set w/ Ratchet & Extensions Metric Open-End Wrench Set Inverted Torx Bits
IMPORTANT WARRANTY & INSTALLATION INSTRUCTIONS ATTACHED
 IMPORTANT WARRANTY & INSTALLATION INSTRUCTIONS ATTACHED Please Forward All Attached Information to Consumer Warranty Not Valid Unless Returned to CORSA Performance STOP Please take time to read and understand
IMPORTANT WARRANTY & INSTALLATION INSTRUCTIONS ATTACHED
 IMPORTANT WARRANTY & INSTALLATION INSTRUCTIONS ATTACHED Please Forward All Attached Information to Consumer Warranty Not Valid Unless Returned to CORSA Exhaust Please be sure to review the enclosed instructions
HP10220 KIT. See application guide for proper fitment.
 HP10220 KIT Dodge Dakota* (2WD/4WD) * 2005 All Dodge Dakotas 2006 - All Dodge Dakotas except Night Runner and R/T sub models 2007 - All Dodge Dakotas except SXT and TRX4 sub models 2008 - All Dodge Dakotas
Grommet pullers Soapy water Safety glasses Torque Wrench
 Please take time to read and understand these installation instructions. We recommend that the installation of this system be performed by a qualified service center or professional muffler installer who
Exhaust System Installation for Chevrolet Corvette C6 PN and
 Exhaust System Installation for Chevrolet Corvette C6 PN-140128 and 140131 These instructions have been written to help you with the installation of your Borla Performance Exhaust System. Please read this